More Related Content
Similar to How to Read a Truss Plan
Similar to How to Read a Truss Plan (20)
More from Western-Building-Center
More from Western-Building-Center (20)
How to Read a Truss Plan
- 1. How to Read a Truss Design Drawing
Copyright © 2001-02 Wood Truss Council of America, Inc. TTBTD-020614
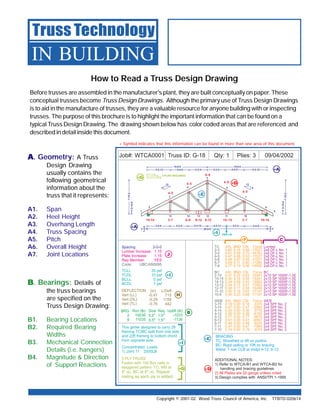
Before trusses are assembled in the manufacturer's plant, they are built conceptually on paper. These
conceptual trusses become Truss Design Drawings. Although the primary use of Truss Design Drawings
is to aid in the manufacture of trusses, they are a valuable resource for anyone building with or inspecting
trusses. The purpose of this brochure is to highlight the important information that can be found on a
typical Truss Design Drawing. The drawing shown below has color coded areas that are referenced and
described in detail inside this document.
Truss Technology
IN BUILDING
AAAAA. Geometry: A Truss
Design Drawing
usually contains the
following geometrical
information about the
truss that it represents:
A1. Span
A2. Heel Height
A3. Overhang Length
A4. Truss Spacing
A5. Pitch
A6. Overall Height
A7. Joint Locations
BBBBB. Bearings: Details of
the truss bearings
are specified on the
Truss Design Drawing:
B1. Bearing Locations
B2. Required Bearing
Widths
B3. Mechanical Connection
Details (i.e. hangers)
B4. Magnitude & Direction
of Support Reactions
Wood Truss Council of America
One WTCA Center
6300 Enterprise Lane • Madison, WI 53719
608/274-4849 • 608/274-3329 (fax)
www.woodtruss.com • wtca@woodtruss.com
Copyright © 2001-02 Wood Truss Council of America, Inc.
Reproduction of this document, in any form, is prohibited without written permission from WTCA. This document should appear in more than one color.
Truss Technology IN BUILDING
An informational series designed to
address the issues and questions
faced by professionals in the
building construction process.
JJJJJ. Conditions of Use: The design values used for lumber and
plates are dependent upon the conditions under which trusses
will be used. For example, if the trusses are expected to
function in wet or corrosive conditions, design values will
have to be changed accordingly. Any factors that are applied
to the design values for lumber and plates are usually stated on the Truss Design Drawings.
Truss Installation Tip: Trusses may have symmetrical profiles but the loads they carry may
not be symmetrical. Trusses that are mistakenly installed backwards or upside down cannot
support the same amount of load as a correctly installed truss.
Avoid errors by taking the time to review your Truss Design Drawings.
Watch for the following:
Is the web configuration symmetrical? If not, check your Truss Design Drawing to see
that you have oriented the truss correctly.
If the web configuration is symmetrical, are the plates and lumber symmetrical as well?
Is the truss carrying any substantial point loads (beams, girders, etc.)? A major point
load will usually coincide with the location of a truss joint.
Is there a cantilever or interior bearing? If there is, the truss will usually be designed
such that the bearing points line up with truss joints.
+ Symbol indicates that this information can be found in more than one area of this document.
BACKWARDS
If the truss is
designed to be
installed this way...
DO NOT install this way!
UPSIDE DOWN
If the truss is designed to be
installed this way...
DO NOT install this way!
+A
+EEEEE
HHHHH
+IIIII
JJJJJ
+A
+GGGGG
+DDDDD
BBBBB
+IIIII
+DDDDD
+EEEEE
+FFFFF CCCCC
+IIIII
+GGGGG
- 2. F2. Combined Stress Index (CSI): The combined stress index is a ratio of
the maximum axial and bending forces expected in a member to the
forces that the member should be capable of resisting. It has a maxi-
mum value of 1.00 and can be thought of as a measure of structural
efficiency. A member with a CSI close to 1.00 is subject to forces
approaching its maximum design capacity.
GGGGG. Multi-Ply Girder Connection: A girder is a truss that supports loads
from other structural members framing into it. The girder may be a
single truss or made up of identical trusses attached together to act as
one. Multi-ply girder connections ensure that the load is transmitted
equally between all plies.
Two and three-ply trusses are usually connected using nails. For
trusses that are four plies or more, bolts must be used
to fasten the plies together. The type of fasteners
used, as well as the appropriate pattern and spacing
of those fasteners, will be specified on the Truss
Design Drawing.
HHHHH. Deflection: The maximum deflection of a truss under design
load is specified on the design drawing. It is usually shown
using two formats.
H1. Magnitude & Direction: This is the actual, numerical value of the truss deflection (usually in
inches). It assumes positive values for upward deflection
and negative values for downward deflection.
H2. Deflection Ratio: The deflection ratio is the ratio of the truss
span to the maximum expected deflection. For example if a
60' truss deflects 2", the deflection ratio would be L/360
(720" / 2" = 360).
Note: Truss deflections are calculated assuming that all truss supports do not contribute to truss deflection.
In situations where this is not the case, such as when support is provided by a beam or girder truss, additional
deflection should be expected.
IIIII. Design Loads: Every Truss Design Drawing must specify the loads that
have been accounted for in the design. This includes:
I 1. Top chord live loads (may include snow or construction loads)
I 2. Top chord dead loads
I 3. Bottom chord live loads
I 4. Bottom chord dead loads
I 5. Controlling wind and earthquake loads
The Truss Design Drawing will show specific locations and
magnitudes of concentrated or uniform loads applied to girder
trusses.
Copyright © 2001-02 Wood Truss Council of America, Inc.
CCCCC. Lumber: Each drawing specifies the properties of every wood member
of the truss. The following information will be shown:
C1. Nominal Cross Section Dimensions
C2. Lumber Species
C3. Lumber Grade
DDDDD. Plating Information: Metal plate connected wood trusses are
generally designed using proprietary software provided by the
manufacturer of the connector plates. As a result, the plate
design specified on truss design drawings is only valid for plates
supplied by a particular plate manufacturer.
For example, it is not acceptable to substitute one brand of plate
for another brand of plate unless the substitution is
approved by the engineer responsible for the
truss design.
Most Truss Design Drawings will specify:
D1. Plate Manufacturer
D2. Size of plate for each joint
D3. Gauge of plates (corresponds to thickness)
D4. Dimensioned locations of plates
EEEEE. Permanent Truss Member Bracing:
Individual truss members are often
subjected to compression forces. To prevent
these members from buckling, permanent truss
member bracing is sometimes required.
Continuous lateral bracing and T-bracing are
common bracing techniques.
Required permanent truss member bracing
location(s) and/or spacing, will be specified
on the design drawing.
FFFFF. Truss Member Forces: Truss Design Drawings will specify the maximum axial force
expected in each truss member. This information is required for the building designer to
specify the details of the permanent continuous lateral bracing. The maximum axial force
is usually expressed in two formats:
F1. Magnitude & Direction: This is the actual, numerical value of the truss member axial force
(usually in pounds). It assumes positive values for members in tension and negative
values for members in compression.
Note: Dimensioned
plate locations are
sometimes omitted
when a plate is
to be positioned
symmetrically about
a joint interface.
Copyright © 2001-02 Wood Truss Council of America, Inc.
See WTCA’s TTB Web Member Permanent Bracing
and TTB T-Bracing, for more detailed information.
- 3. F2. Combined Stress Index (CSI): The combined stress index is a ratio of
the maximum axial and bending forces expected in a member to the
forces that the member should be capable of resisting. It has a maxi-
mum value of 1.00 and can be thought of as a measure of structural
efficiency. A member with a CSI close to 1.00 is subject to forces
approaching its maximum design capacity.
GGGGG. Multi-Ply Girder Connection: A girder is a truss that supports loads
from other structural members framing into it. The girder may be a
single truss or made up of identical trusses attached together to act as
one. Multi-ply girder connections ensure that the load is transmitted
equally between all plies.
Two and three-ply trusses are usually connected using nails. For
trusses that are four plies or more, bolts must be used
to fasten the plies together. The type of fasteners
used, as well as the appropriate pattern and spacing
of those fasteners, will be specified on the Truss
Design Drawing.
HHHHH. Deflection: The maximum deflection of a truss under design
load is specified on the design drawing. It is usually shown
using two formats.
H1. Magnitude & Direction: This is the actual, numerical value of the truss deflection (usually in
inches). It assumes positive values for upward deflection
and negative values for downward deflection.
H2. Deflection Ratio: The deflection ratio is the ratio of the truss
span to the maximum expected deflection. For example if a
60' truss deflects 2", the deflection ratio would be L/360
(720" / 2" = 360).
Note: Truss deflections are calculated assuming that all truss supports do not contribute to truss deflection.
In situations where this is not the case, such as when support is provided by a beam or girder truss, additional
deflection should be expected.
IIIII. Design Loads: Every Truss Design Drawing must specify the loads that
have been accounted for in the design. This includes:
I 1. Top chord live loads (may include snow or construction loads)
I 2. Top chord dead loads
I 3. Bottom chord live loads
I 4. Bottom chord dead loads
I 5. Controlling wind and earthquake loads
The Truss Design Drawing will show specific locations and
magnitudes of concentrated or uniform loads applied to girder
trusses.
Copyright © 2001-02 Wood Truss Council of America, Inc.
CCCCC. Lumber: Each drawing specifies the properties of every wood member
of the truss. The following information will be shown:
C1. Nominal Cross Section Dimensions
C2. Lumber Species
C3. Lumber Grade
DDDDD. Plating Information: Metal plate connected wood trusses are
generally designed using proprietary software provided by the
manufacturer of the connector plates. As a result, the plate
design specified on truss design drawings is only valid for plates
supplied by a particular plate manufacturer.
For example, it is not acceptable to substitute one brand of plate
for another brand of plate unless the substitution is
approved by the engineer responsible for the
truss design.
Most Truss Design Drawings will specify:
D1. Plate Manufacturer
D2. Size of plate for each joint
D3. Gauge of plates (corresponds to thickness)
D4. Dimensioned locations of plates
EEEEE. Permanent Truss Member Bracing:
Individual truss members are often
subjected to compression forces. To prevent
these members from buckling, permanent truss
member bracing is sometimes required.
Continuous lateral bracing and T-bracing are
common bracing techniques.
Required permanent truss member bracing
location(s) and/or spacing, will be specified
on the design drawing.
FFFFF. Truss Member Forces: Truss Design Drawings will specify the maximum axial force
expected in each truss member. This information is required for the building designer to
specify the details of the permanent continuous lateral bracing. The maximum axial force
is usually expressed in two formats:
F1. Magnitude & Direction: This is the actual, numerical value of the truss member axial force
(usually in pounds). It assumes positive values for members in tension and negative
values for members in compression.
Note: Dimensioned
plate locations are
sometimes omitted
when a plate is
to be positioned
symmetrically about
a joint interface.
Copyright © 2001-02 Wood Truss Council of America, Inc.
See WTCA’s TTB Web Member Permanent Bracing
and TTB T-Bracing, for more detailed information.
- 4. How to Read a Truss Design Drawing
Copyright © 2001-02 Wood Truss Council of America, Inc. TTBTD-020614
Before trusses are assembled in the manufacturer's plant, they are built conceptually on paper. These
conceptual trusses become Truss Design Drawings. Although the primary use of Truss Design Drawings
is to aid in the manufacture of trusses, they are a valuable resource for anyone building with or inspecting
trusses. The purpose of this brochure is to highlight the important information that can be found on a
typical Truss Design Drawing. The drawing shown below has color coded areas that are referenced and
described in detail inside this document.
Truss Technology
IN BUILDING
AAAAA. Geometry: A Truss
Design Drawing
usually contains the
following geometrical
information about the
truss that it represents:
A1. Span
A2. Heel Height
A3. Overhang Length
A4. Truss Spacing
A5. Pitch
A6. Overall Height
A7. Joint Locations
BBBBB. Bearings: Details of
the truss bearings
are specified on the
Truss Design Drawing:
B1. Bearing Locations
B2. Required Bearing
Widths
B3. Mechanical Connection
Details (i.e. hangers)
B4. Magnitude & Direction
of Support Reactions
Wood Truss Council of America
One WTCA Center
6300 Enterprise Lane • Madison, WI 53719
608/274-4849 • 608/274-3329 (fax)
www.woodtruss.com • wtca@woodtruss.com
Copyright © 2001-02 Wood Truss Council of America, Inc.
Reproduction of this document, in any form, is prohibited without written permission from WTCA. This document should appear in more than one color.
Truss Technology IN BUILDING
An informational series designed to
address the issues and questions
faced by professionals in the
building construction process.
JJJJJ. Conditions of Use: The design values used for lumber and
plates are dependent upon the conditions under which trusses
will be used. For example, if the trusses are expected to
function in wet or corrosive conditions, design values will
have to be changed accordingly. Any factors that are applied
to the design values for lumber and plates are usually stated on the Truss Design Drawings.
Truss Installation Tip: Trusses may have symmetrical profiles but the loads they carry may
not be symmetrical. Trusses that are mistakenly installed backwards or upside down cannot
support the same amount of load as a correctly installed truss.
Avoid errors by taking the time to review your Truss Design Drawings.
Watch for the following:
Is the web configuration symmetrical? If not, check your Truss Design Drawing to see
that you have oriented the truss correctly.
If the web configuration is symmetrical, are the plates and lumber symmetrical as well?
Is the truss carrying any substantial point loads (beams, girders, etc.)? A major point
load will usually coincide with the location of a truss joint.
Is there a cantilever or interior bearing? If there is, the truss will usually be designed
such that the bearing points line up with truss joints.
+ Symbol indicates that this information can be found in more than one area of this document.
BACKWARDS
If the truss is
designed to be
installed this way...
DO NOT install this way!
UPSIDE DOWN
If the truss is designed to be
installed this way...
DO NOT install this way!
+A
+EEEEE
HHHHH
+IIIII
JJJJJ
+A
+GGGGG
+DDDDD
BBBBB
+IIIII
+DDDDD
+EEEEE
+FFFFF CCCCC
+IIIII
+GGGGG