Up2university workshop SeLCont manual
•
0 likes•30 views

eTwinning Thematic Conference: "Learning to think in a digital society"

Recommended
More Related Content
What's hot
What's hot (19)
Similar to Up2university workshop SeLCont manual
Similar to Up2university workshop SeLCont manual (20)
More from Up2Universe
More from Up2Universe (20)
Recently uploaded
Recently uploaded (20)
Up2university workshop SeLCont manual
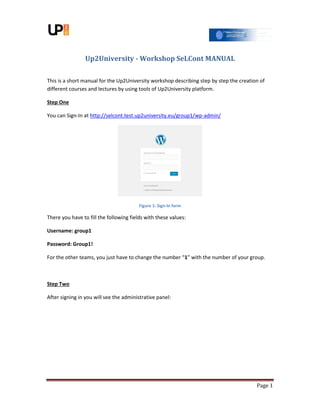
- 1. Page 1 Up2University - Workshop SeLCont MANUAL This is a short manual for the Up2University workshop describing step by step the creation of different courses and lectures by using tools of Up2University platform. Step One You can Sign-In at http://selcont.test.up2university.eu/group1/wp-admin/ Figure 1: Sign-In form There you have to fill the following fields with these values: Username: group1 Password: Group1! For the other teams, you just have to change the number “1” with the number of your group. Step Two After signing in you will see the administrative panel:
- 2. Page 2 Figure 2: Admin Panel On this step you have just to minimize the browser’s window. Next you will open the demo presentation file (it is provided by us). Step Three In this step you run the screen capturing executable. You will see a window like this: Figure 3: Screen Capturing Tool initial window Don’t press any button. Minimize screen capturing tool, and select the window with the demo presentation and enter on Slide Show mode.
- 3. Page 3 Step Four Demo video will be presented. You have to press the Ptr button when video starts. When you hear “Please change Slide” you have to push navigation arrows in order to go to the next slide on your Laptop. Screen capturing tool will capture this screenshot and will save it with its timestamp on the images folder of your OS (Windows). After demo video ends, screen capturing tool will be like this: Figure 4: Screen Capturing tool after screen capturing After screen capturing you have to close the screen capturing tool. Step Five On this step you have first to maximize the browser’s window and the admin panel appears. On this panel you have to select the “Lectures” section as seen below:
- 4. Page 4 Figure 5: Lectures Section When you select “Lectures” section you first have to enter your Institution (for example: 1st junior high class), by selecting “Institutions”. There you can add your institution name and you can save it by pressing the “Add New Institution” button.
- 5. Page 5 Figure 6: Insert New Institution With the same way you can add a course (for example mathematics) by selecting “Courses”. Next you can add a new lecture by selecting the “Add New” section under “Lectures”. After selecting “Add New” you will see the form that you have to fill in.
- 6. Page 6 Figure 7: Lecture Form filled Some fields of the form are: Title: You have to fill lecture’s title: Description: You have to enter a short description (not necessary) Instructor: You fill the instructors name Video URL: You have to fill the video URL.( Video URL will be provided by us) School: Name of the school Presentation File: There you will upload the demo presentation file. You have to press “Choose File” button. Then you will select the demo presentation file on the pop-up window and you will press “open”. Slides with timestamps: There you can upload your slides. About slides uploading: First you will press the “Add Slides” button and you will select “Upload Files”.
- 7. Page 7 Figure 8: Upload Files Section Then you will press “Select Files” and you will navigate to the folder that SeLCont’s Timestamps are being saved and select all the timestamps and press “open”. Figure 9: Timestamps Selection
- 8. Page 8 Notice: if you upload any other picture (with other name than a timestamp value) or multimedia element, synchronization will not work. After uploading images, you have just to press the “Add to lecture” button, as below: Figure 10: Add slides to lecture After that you have to select your Institution and your course on the same form as it can be seen below: Figure 11: Institution and Course Selection All you have to do, is to press the “Publish” button. Lecture is now published and you can see it by pressing the URL link:
- 9. Page 9 Figure 12: Lecture URL Now the lecture is published! The final lecture page includes the video on the left and the (synchronized) slides on the right: Figure 13: Lecture final page