tools in IDTelated to first year vtu students is useful where they can refer ...
Task 5 screenshots of character Work
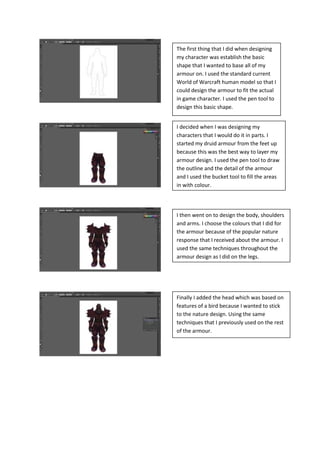
1. The first thing that I did when designing
my character was establish the basic
shape that I wanted to base all of my
armour on. I used the standard current
World of Warcraft human model so that I
could design the armour to fit the actual
in game character. I used the pen tool to
design this basic shape.
I decided when I was designing my
characters that I would do it in parts. I
started my druid armour from the feet up
because this was the best way to layer my
armour design. I used the pen tool to draw
the outline and the detail of the armour
and I used the bucket tool to fill the areas
in with colour.
I then went on to design the body, shoulders
and arms. I choose the colours that I did for
the armour because of the popular nature
response that I received about the armour. I
used the same techniques throughout the
armour design as I did on the legs.
Finally I added the head which was based on
features of a bird because I wanted to stick
to the nature design. Using the same
techniques that I previously used on the rest
of the armour.
2. I decided when I was designing my
characters that I would do it in parts. I
started my Death Knight armour from the
feet up because this was the best way to
layer my armour design. I used the pen tool
to draw the outline and the detail of the
armour and I used the bucket tool to fill the
areas in with colour.
I then went on to design the body,
shoulders and arms. I choose the colours
that I did for the armour because of the
popular dark feel response that I received
about the armour. I used the same
techniques throughout the armour design
as I did on the legs.
Finally I added the head which I designed
by looking at skulls and decided to make
a fading mask based around a skull to
stick to the death style. I used the same
techniques on this as I used on the other
parts of the armour.
3. I decided when I was designing my characters
that I would do it in parts. I started my warrior
armour from the feet up because this was the
best way to layer my armour design. I used the
pen tool to draw the outline and the detail of
the armour and I used the bucket tool to fill the
areas in with colour.
I then went on to design the body, shoulders
and arms. I choose the colours that I did for
the armour because of the popular
templar/rusted design response that I
received about the armour. I used the same
techniques throughout the armour design as I
did on the legs.
Finally I added the head which I designed
by looking at Viking helmets and knight
helms which inspired me to create the helm
how I did. I used the same techniques on
this as I used on the other parts of the
armour.
4. I decided when I was designing my
characters that I would do it in parts. I
started my mage armour from the feet up
because this was the best way to layer my
armour design. I used the pen tool to draw
the outline and the detail of the armour
and I used the bucket tool to fill the areas
in with colour.
I then went on to design the body, shoulders
and arms. I choose the colours that I did for
the armour because of the popular
arcane/magical response that I received
about the armour. I used the same
techniques throughout the armour design as
I did on the legs.
Finally I designed the head of the mage. I chose
not to add an actual helm to this character
because it suited the armour more without one.
I did this because it fit in best with the look that I
was aiming for. I used the same techniques on
this as I used on the other parts of the armour.