SlideShare a Scribd company logo
1 of 11
Salford City College
Eccles Sixth Form Centre
BTec Level 3
Extended Diploma in Creative Media Production
Games Design
Unit 66 – 3D Modelling
HA5 – Sidekick Task 6 – Production
Name Ben White
Date: 10th March
Today, I began with the design pack. I started with our homework by researching various robots and gathering images. I am quite interested in the wild west
theme at the moment, so have ideas as to a cowboy styled robot. I gathered many interesting robots and also gathered a few wild west styled characters such as
the robot from Steam World Dig. Then I went on to create a piece describing what my robot will do, his abilities, looks and roles he will take, such as protecting
the people or flying. After this, I then went on to produce a few designs. My first was a western themed robot which was greatly inspired by Steam World Dig
and Red Dead Redemption as I have played those games recently and have enjoyed them. He is a tall cowboy who wears a suit and poncho as well as a hat and
looks to be the sheriff of a town out in the country. His job is to protect the people. My second design I produced today was a more futuristic themed robot. This
robot was inspired by a mix of the robots from titan fall, as well as the pilots within the game and the spectre robots. It is taller than the average human, roughly
7ft, has a jetpack, top combat skills and park our abilities and is tasked to serve in the military to protect the country. Looking at these robots, the cowboy is my
preferred choice, but I plan to make another tomorrow. I feel very confident about using modeller and I believe I will be able to make these robots with not
much difficulty, so I will try to add as much detail as possible.
Inspiration for design 1:
Inspiration for design 2:
Designs 1: Design 2:
Date: 13th March
Today, I began to make my robot. I firstly started with the head by creating a capsule object. After this, I began to manipulate the object using the multi-shift
tool to give space for eyes, and pull out a mouth similar to the iron giants. After the basic shape was created, I then began to create a hat. I used two disc
objects. With the first disc, I manipulated it to look like a cylinder, and then used the bend to curve it. This would form the top of the hat. Then with the second
disc, I extruded it slightly and used the bend tool to curve this as well. This would form the base of the hat. Once completed, I move the hat over the top of the
head. Once on, I then used the ‘triple’ tool and the mouth piece of the robot as sub dividing would not work. I also thought that the spike tool work quite well
with the triple tool as I wanted to create a beard. The spike tool seemed to pull each polygon out from the centre point to create a spiked effect. This worked
really well to simulate a beard. I then moved to the centre of the face to add and edit a mouth and nose. To create the nose, I subdivided various points
between the eyes to create small polygons, and then I used the select tool to select a nose shape which I could then pull out. However, I wasn’t quite sure about
whether I like the look of it or not, so I might change it at a later date. On the eyes, I subdivided the white areas seen on the picture below. With not much time
left, I then began to use the surface editor to add colours to the head parts. On the eyes, I used the small polygons I had just created and the surface editor to
colour certain areas in to draw on eye shapes. I wanted the eyes to be screens and this method came to me by looking at pixel art. The way I coloured in the
polygons was very similar to pixel art as all the polygons were the same size; I just had to use my imagination to paint some polygons to create aggressive-
looking eyes.
Date: March 17th
Today, I began work on the body. To begin, I created another capsule object, and then I used the stretch tool to stretch out the X axis of the object to widen it
out to get a kind of broad body shape. Once The main body capsule was in place, I could then work on the shoulders and the arms. To create these shoulder
pieces, I used the multi-shift tool as well as the symmetry tool to ensure both sides were the same, so I selected some polygons on the left side of the capsule
and used multi-shift the drag them out altogether. Symmetry ensured the right side would be pulled out
too. Having the shoulders ready meant I could now begin to create basic arms. Using multi-shift again, I
was able to establish a back arm, elbow and forearm in one use. Symmetry however would not work for
the arm for unknown reasons, so I thought the best thing to do would be to select the arm and transport
it to its own layer to make it into its own object. I could then use the mirror tool to duplicate and mirror
the image onto the other side. I am unsure about the look of the arms however, so may change them at
a later date. My robot wears a poncho in my design, so I began work to model him one. I figured the best
thing to do would be to duplicate the current capsule, which I had already done before the work on the
shoulders as luckily I thought ahead, and then edit the object by deleting areas to create a poncho shape
which fits over the main body capsule. I deleted a lot of polygons here and used the drag tool to drag
points in certain areas to make it look more rugged. However, a problem arose that the polygons on the
inside of the poncho were invisible. This is because the capsule object is not hollow and was not
intended to have any polygons removed, so nothing can be seen if you were inside the capsule. To fix
this however, I remembered a tool used on a previous piece of work, the reference modelling, where in
the tutorial, the teacher used the ‘extrusion’ tool to give a polygon a 3D look as well as a back and sides,
so I was able to use this method on the poncho. I had to split the poncho into 2 halves, front and back,
because the extrusion tool went through one of the other halves if you tried to extrude it all together. I
extruded both sides individually. After the poncho was created, I began to add detail such as colour and
the maracas. I attempted to create a wavy
pattern on the maracas by using the drag tool
to drag points and create waves; however,
this area needs more work as the waves
would work much better if they were larger.
I also create another hat for him, a sombrero
as I had an unusual idea of making him
Mexican. This sprung from the idea of the
poncho and I believed the sombrero worked
quite well, however, it does not look very nice and I much preferred the look of the original cowboy
hat. This was a trial and error process as I wanted to see just how my robot would look in case I
found out that it would look even better with the sombrero
Date: 24th March
Today, I worked mainly on the hands and the detail on the
body. I began with the hands. To create these, I used the multi-
shift tool to drag out the main part of the hand. There was
some difficulty with this as polygons would disappear as they could not fit where I wanted them to go.
To solve this, I used more primitive shapes to replace the broken areas and create a more hand like
shape. Once the main plam and back hand was complete, I could move onto the fingers. I have to
subdivide the polygons at the bottom of the hand so that I have 3 similar sized polygons all aligned so
that I could use the multi-shift tool to drag them out. As I was dragging the fingers out, I created a point
where the finger bends, so that it looks like the robot can move his fingers and use things such as grip.
Once the fingers were complete, I took the end finger and tried to make it look like the little finger on a
human hand by shrinking it slighly. After this, I enarged the index finger slightly. I could then move onto
the thumb. I used another primitive cube and put it in place, hen extended and manipulated the thumb
using the multi shift tool. Once, complete, I used the size tool to thicken up the thumb to make it more
realistic as comparred to a human thumbs thickness.
After this, I could move onto adding more detail to the body. The first thing I worked on was the
bandolier. I started by using a basic box primitive and breating a flat surface. There were not polygons
on the back as I planned to extrude this object once set in place so I could establish a correct and
realistic thickness to the bandolier. I then moved this primitive diagonally across the body of my robot,
the subdived it a bunch of times. I could then grab the points on oposite sides of the newly created
edges and move them to wrap around the body. I only wrapped the bandolier around the front half of
the body as I duplicated the finished half and placed it around the back. As expected, the points on the
back bandolier did not connect to the front bandolier, so it went through parts of the poncho and looked
like it was floating. I then had to drag and rotate certain points to move them
into the correct position so the two halves looked like one whole bandolier.
Once complete, I could extrude the polygons to create a 3D bandolier with
polygons on all sides.
I then took a reference image of a bullet and used box modelling techniques to establish the bullets seen to the left. I duplicated the
objects and added them into position so they looked attatched to the bandolier. Next, I created the maracas by using a capsule
primitive and using the size tool to shink and contract some areas to make it look more like an oval. To create the handle, I also used a
capsule primitive, but vastly increased the hight whilst keeping the length and width short. Then I used the size tool to shrink the
centre part to give it a kind of grip area. Using box modelling techniques again, I created the badge and did the same with the star. I also used a reference image
for the star to make is look like an actual sheriffs badge, after which, I added small sphere primitices to the points of the star. I created the belt similar to how I
created the bandolier, using the box primitive and extrusion techniques and to create the belt, I create a flat sphere on the Z axis, rotated it, extruded it out and
fit it in place. Finally for today, I could texturize the model.
Date: 27th March
Today, I started the next major part of my robot. The legs. I began by looking at my reference image and noting I have began
with using spherical primitives. I created these in modeller and added them to the pelvic area.Using capsule shapes, I
constructed the theigh. I then wanted to add some form of leg armour, but also make it look like he is wearing pants. To do
this, I established a shape by selecting the right amount of polygons and using the multi
sift tool to drag them ou. This was quite hard to do as I had to ensure the armour was
symetrical and that I had selected the correct
number of polygons. Once muli shifted, I got
the shape you can see on the right, so I then
just had to use the surface editor to colour it. I
then moved on to the knee and I wanted the
knee areas to be able to rotate and twist in
any direction, s I thought the bes thing to do
would to be to use a sphere object. Then I
moved onto the boots and calf area. I used a
capsule primitive and multishifted certain
areas t create the top part of the boot. After
this, I used various primitives to construct the
basic shoe. I believe this to be the worst part
of my robot and this could need further work.
After manipulating these primitives, I was able
to create the spurs of the boots. I used
primitives again and bevelled the golden area
you can see to the right to create this spike
styled spur. One thing I wanted to improve
was the length of the legs as I thought they
were two short and I wanted him to be an
imposing character.
Date: 3rd April
Today, I came in early to work on a number of
things. My robot needs the ability to fly, so I
wanted to give him a jetpack. To begin, I
created a large cube object and placed it on
his back, positioning it with the rotate and
move tools. I then used box modelling
techniques to construct a jetpack, as well as
adding more primitive shapes to help with the
sides of the pack.
Once complete, I went on to creating holsters
and revolvers, yet again using box modelling
techniques, however, I used reference
modelling as well to construct the revolver. I
also used the spline draw tool to construct the basic shape of the revolver from the
reference image and the handle.
After the revolver, I went back to the legs to add a bit more detail. To begin, I
extended the calf of the leg a bit, and then created two capsule primitives. I created
tall capsules with thin widths to get a pole shape, textured them, and then added
them into place between the knee and boots. I also went back to the boots and
added polygons by selecting points at the top of the boots so they weren’t cubed
and have a more realistic and smooth look.
Date: 7th April – 1st May
My robot was then sent to NewTek Layout, as the 3D model was now complete, where it would undergo drastic texture
changes. Using the large selection of pre-set textures and the surface editor, I was able to give textures certain qualities.
For example, I could give the steel body a shinier, metal look. I also gave the calf legs, guns, gears, buckle, badge and
bullets a golden, metal coating. The poncho was edited to look like it was made out of rough fabric and the bandolier had a
kind of rough leather look to it. His eyes were intended to be colour changing screens depending on the situation. If
nothing was happening and all was good, they would be green, but if something bad was happening, they would turn red
and the robot would take action to try to stop the bad thing from happening. Since they were screens, I added a neon
effect and made them shinier. I added a few more texture changes such as the jetpack and then my robot was complete.
I then had to take pictures of the robot using the render feature. Since my robot had a humanoid shape, I tried to take a
number of long portrait images. There were 12 images in total, all from different angles, conveying different things.
Add as required
Unit66 production log

More Related Content

Similar to Unit66 production log

Unit66 production log_060314 (1)
Unit66 production log_060314 (1)Unit66 production log_060314 (1)
Unit66 production log_060314 (1)Luke Summers
 
Unit66 production log_steph_hawkins_final 3
Unit66 production log_steph_hawkins_final 3Unit66 production log_steph_hawkins_final 3
Unit66 production log_steph_hawkins_final 3stephlizahawkins123
 
Overall progress - barry
Overall progress - barryOverall progress - barry
Overall progress - barrycrimzon36
 
Production reflection fmp y1
Production reflection fmp y1Production reflection fmp y1
Production reflection fmp y1GemmaNicholls1
 
Fmp production reflection
Fmp production reflectionFmp production reflection
Fmp production reflectionBen Harris
 
Final reflective task
Final reflective taskFinal reflective task
Final reflective taskDeclan Brophy
 
Final reflective task
Final reflective taskFinal reflective task
Final reflective taskDeclan Brophy
 
Unit 7 evaluation
Unit 7 evaluationUnit 7 evaluation
Unit 7 evaluationmw4684
 
Ha2 production log
Ha2 production logHa2 production log
Ha2 production logsoulsama
 
Digital graphics evaluation pro forma
Digital graphics evaluation pro formaDigital graphics evaluation pro forma
Digital graphics evaluation pro formaElliot Miller
 
Evaluation
EvaluationEvaluation
Evaluationmw4684
 

Similar to Unit66 production log (20)

Unit66 production log_060314 (1)
Unit66 production log_060314 (1)Unit66 production log_060314 (1)
Unit66 production log_060314 (1)
 
Task 6
Task 6Task 6
Task 6
 
Task 6
Task 6Task 6
Task 6
 
Unit66 production log
Unit66 production logUnit66 production log
Unit66 production log
 
Production Log
Production LogProduction Log
Production Log
 
CB_Production Log
CB_Production Log CB_Production Log
CB_Production Log
 
Production Log
Production LogProduction Log
Production Log
 
Unit66 production log_steph_hawkins_final 3
Unit66 production log_steph_hawkins_final 3Unit66 production log_steph_hawkins_final 3
Unit66 production log_steph_hawkins_final 3
 
HA3 - Production Log
HA3 - Production LogHA3 - Production Log
HA3 - Production Log
 
Overall progress - barry
Overall progress - barryOverall progress - barry
Overall progress - barry
 
Production reflection fmp y1
Production reflection fmp y1Production reflection fmp y1
Production reflection fmp y1
 
Fmp production reflection
Fmp production reflectionFmp production reflection
Fmp production reflection
 
Final reflective task
Final reflective taskFinal reflective task
Final reflective task
 
Final reflective task
Final reflective taskFinal reflective task
Final reflective task
 
Unit 7 evaluation
Unit 7 evaluationUnit 7 evaluation
Unit 7 evaluation
 
Ha2 production log
Ha2 production logHa2 production log
Ha2 production log
 
Task 1
Task 1Task 1
Task 1
 
Overallevaluation
OverallevaluationOverallevaluation
Overallevaluation
 
Digital graphics evaluation pro forma
Digital graphics evaluation pro formaDigital graphics evaluation pro forma
Digital graphics evaluation pro forma
 
Evaluation
EvaluationEvaluation
Evaluation
 

More from BenWhite101

Ben white final major project production diary template 2014_2015 2
Ben white final major project production diary template 2014_2015 2Ben white final major project production diary template 2014_2015 2
Ben white final major project production diary template 2014_2015 2BenWhite101
 
Ben white final major project production diary template 2014_2015 2
Ben white final major project production diary template 2014_2015 2Ben white final major project production diary template 2014_2015 2
Ben white final major project production diary template 2014_2015 2BenWhite101
 
Fmp presentatatat
Fmp presentatatatFmp presentatatat
Fmp presentatatatBenWhite101
 
Story boards and level recognisance
Story boards and level recognisanceStory boards and level recognisance
Story boards and level recognisanceBenWhite101
 
Story boards and level recognisance
Story boards and level recognisanceStory boards and level recognisance
Story boards and level recognisanceBenWhite101
 
Story boards and level recognisance
Story boards and level recognisanceStory boards and level recognisance
Story boards and level recognisanceBenWhite101
 
Enviromental art research
Enviromental art researchEnviromental art research
Enviromental art researchBenWhite101
 
Production diary
Production diaryProduction diary
Production diaryBenWhite101
 
Enviromental art research
Enviromental art researchEnviromental art research
Enviromental art researchBenWhite101
 
Enviromental art research
Enviromental art researchEnviromental art research
Enviromental art researchBenWhite101
 
Fmp pitch script2
Fmp pitch script2Fmp pitch script2
Fmp pitch script2BenWhite101
 

More from BenWhite101 (20)

Evaluation fmp
Evaluation   fmpEvaluation   fmp
Evaluation fmp
 
Ben white final major project production diary template 2014_2015 2
Ben white final major project production diary template 2014_2015 2Ben white final major project production diary template 2014_2015 2
Ben white final major project production diary template 2014_2015 2
 
Ben white final major project production diary template 2014_2015 2
Ben white final major project production diary template 2014_2015 2Ben white final major project production diary template 2014_2015 2
Ben white final major project production diary template 2014_2015 2
 
Fmp presentatatat
Fmp presentatatatFmp presentatatat
Fmp presentatatat
 
Q cards
Q cardsQ cards
Q cards
 
Story boards and level recognisance
Story boards and level recognisanceStory boards and level recognisance
Story boards and level recognisance
 
Story boards and level recognisance
Story boards and level recognisanceStory boards and level recognisance
Story boards and level recognisance
 
Story boards and level recognisance
Story boards and level recognisanceStory boards and level recognisance
Story boards and level recognisance
 
Risk assessment
Risk assessmentRisk assessment
Risk assessment
 
Enviromental art research
Enviromental art researchEnviromental art research
Enviromental art research
 
Production diary
Production diaryProduction diary
Production diary
 
Evaluation art
Evaluation artEvaluation art
Evaluation art
 
Enviromental art research
Enviromental art researchEnviromental art research
Enviromental art research
 
Fmp pitch
Fmp pitchFmp pitch
Fmp pitch
 
Enviromental art research
Enviromental art researchEnviromental art research
Enviromental art research
 
Fmp pitch script2
Fmp pitch script2Fmp pitch script2
Fmp pitch script2
 
Work flow 4
Work flow 4Work flow 4
Work flow 4
 
Work flow 4
Work flow 4Work flow 4
Work flow 4
 
Engine flow
Engine flowEngine flow
Engine flow
 
Uv flow
Uv flowUv flow
Uv flow
 

Recently uploaded

black magic specialist amil baba pakistan no 1 Black magic contact number rea...
black magic specialist amil baba pakistan no 1 Black magic contact number rea...black magic specialist amil baba pakistan no 1 Black magic contact number rea...
black magic specialist amil baba pakistan no 1 Black magic contact number rea...Black Magic Specialist
 
CALL ON ➥8923113531 🔝Call Girls Indira Nagar Lucknow Lucknow best Night Fun s...
CALL ON ➥8923113531 🔝Call Girls Indira Nagar Lucknow Lucknow best Night Fun s...CALL ON ➥8923113531 🔝Call Girls Indira Nagar Lucknow Lucknow best Night Fun s...
CALL ON ➥8923113531 🔝Call Girls Indira Nagar Lucknow Lucknow best Night Fun s...anilsa9823
 
The King Great Goodness Part 2 ~ Mahasilava Jataka (Eng. & Chi.).pptx
The King Great Goodness Part 2 ~ Mahasilava Jataka (Eng. & Chi.).pptxThe King Great Goodness Part 2 ~ Mahasilava Jataka (Eng. & Chi.).pptx
The King Great Goodness Part 2 ~ Mahasilava Jataka (Eng. & Chi.).pptxOH TEIK BIN
 
CALL ON ➥8923113531 🔝Call Girls Nishatganj Lucknow best Female service 🕶
CALL ON ➥8923113531 🔝Call Girls Nishatganj Lucknow best Female service  🕶CALL ON ➥8923113531 🔝Call Girls Nishatganj Lucknow best Female service  🕶
CALL ON ➥8923113531 🔝Call Girls Nishatganj Lucknow best Female service 🕶anilsa9823
 
Elite Class ➥8448380779▻ Call Girls In Naraina Delhi NCR
Elite Class ➥8448380779▻ Call Girls In Naraina Delhi NCRElite Class ➥8448380779▻ Call Girls In Naraina Delhi NCR
Elite Class ➥8448380779▻ Call Girls In Naraina Delhi NCRDelhi Call girls
 
Part 1 of the Holy Quran- Alif Laam Meem
Part 1 of the Holy Quran- Alif Laam MeemPart 1 of the Holy Quran- Alif Laam Meem
Part 1 of the Holy Quran- Alif Laam MeemAbdullahMohammed282920
 
Pradeep Bhanot - Friend, Philosopher Guide And The Brand By Arjun Jani
Pradeep Bhanot - Friend, Philosopher Guide And The Brand By Arjun JaniPradeep Bhanot - Friend, Philosopher Guide And The Brand By Arjun Jani
Pradeep Bhanot - Friend, Philosopher Guide And The Brand By Arjun JaniPradeep Bhanot
 
Call Girls in Greater Kailash Delhi 💯Call Us 🔝8264348440🔝
Call Girls in Greater Kailash Delhi 💯Call Us 🔝8264348440🔝Call Girls in Greater Kailash Delhi 💯Call Us 🔝8264348440🔝
Call Girls in Greater Kailash Delhi 💯Call Us 🔝8264348440🔝soniya singh
 
Call Girls in sarojini nagar Delhi 8264348440 ✅ call girls ❤️
Call Girls in sarojini nagar Delhi 8264348440 ✅ call girls ❤️Call Girls in sarojini nagar Delhi 8264348440 ✅ call girls ❤️
Call Girls in sarojini nagar Delhi 8264348440 ✅ call girls ❤️soniya singh
 
Call Girls In East Of Kailash 9654467111 Short 1500 Night 6000
Call Girls In East Of Kailash 9654467111 Short 1500 Night 6000Call Girls In East Of Kailash 9654467111 Short 1500 Night 6000
Call Girls In East Of Kailash 9654467111 Short 1500 Night 6000Sapana Sha
 
CALL ON ➥8923113531 🔝Call Girls Singar Nagar Lucknow best Night Fun service 👔
CALL ON ➥8923113531 🔝Call Girls Singar Nagar Lucknow best Night Fun service  👔CALL ON ➥8923113531 🔝Call Girls Singar Nagar Lucknow best Night Fun service  👔
CALL ON ➥8923113531 🔝Call Girls Singar Nagar Lucknow best Night Fun service 👔anilsa9823
 
Codex Singularity: Search for the Prisca Sapientia
Codex Singularity: Search for the Prisca SapientiaCodex Singularity: Search for the Prisca Sapientia
Codex Singularity: Search for the Prisca Sapientiajfrenchau
 
Top Astrologer in UK Best Vashikaran Specialist in England Amil baba Contact ...
Top Astrologer in UK Best Vashikaran Specialist in England Amil baba Contact ...Top Astrologer in UK Best Vashikaran Specialist in England Amil baba Contact ...
Top Astrologer in UK Best Vashikaran Specialist in England Amil baba Contact ...Amil Baba Naveed Bangali
 
Lesson 3 - Heaven - the Christian's Destiny.pptx
Lesson 3 - Heaven - the Christian's Destiny.pptxLesson 3 - Heaven - the Christian's Destiny.pptx
Lesson 3 - Heaven - the Christian's Destiny.pptxCelso Napoleon
 
madina book to learn arabic part1
madina   book   to  learn  arabic  part1madina   book   to  learn  arabic  part1
madina book to learn arabic part1JoEssam
 
The_Chronological_Life_of_Christ_Part_98_Jesus_Frees_Us
The_Chronological_Life_of_Christ_Part_98_Jesus_Frees_UsThe_Chronological_Life_of_Christ_Part_98_Jesus_Frees_Us
The_Chronological_Life_of_Christ_Part_98_Jesus_Frees_UsNetwork Bible Fellowship
 
Vashikaran Specialist in London Black Magic Removal No 1 Astrologer in UK
Vashikaran Specialist in London Black Magic Removal No 1 Astrologer in UKVashikaran Specialist in London Black Magic Removal No 1 Astrologer in UK
Vashikaran Specialist in London Black Magic Removal No 1 Astrologer in UKAmil Baba Naveed Bangali
 

Recently uploaded (20)

black magic specialist amil baba pakistan no 1 Black magic contact number rea...
black magic specialist amil baba pakistan no 1 Black magic contact number rea...black magic specialist amil baba pakistan no 1 Black magic contact number rea...
black magic specialist amil baba pakistan no 1 Black magic contact number rea...
 
CALL ON ➥8923113531 🔝Call Girls Indira Nagar Lucknow Lucknow best Night Fun s...
CALL ON ➥8923113531 🔝Call Girls Indira Nagar Lucknow Lucknow best Night Fun s...CALL ON ➥8923113531 🔝Call Girls Indira Nagar Lucknow Lucknow best Night Fun s...
CALL ON ➥8923113531 🔝Call Girls Indira Nagar Lucknow Lucknow best Night Fun s...
 
The King Great Goodness Part 2 ~ Mahasilava Jataka (Eng. & Chi.).pptx
The King Great Goodness Part 2 ~ Mahasilava Jataka (Eng. & Chi.).pptxThe King Great Goodness Part 2 ~ Mahasilava Jataka (Eng. & Chi.).pptx
The King Great Goodness Part 2 ~ Mahasilava Jataka (Eng. & Chi.).pptx
 
CALL ON ➥8923113531 🔝Call Girls Nishatganj Lucknow best Female service 🕶
CALL ON ➥8923113531 🔝Call Girls Nishatganj Lucknow best Female service  🕶CALL ON ➥8923113531 🔝Call Girls Nishatganj Lucknow best Female service  🕶
CALL ON ➥8923113531 🔝Call Girls Nishatganj Lucknow best Female service 🕶
 
Elite Class ➥8448380779▻ Call Girls In Naraina Delhi NCR
Elite Class ➥8448380779▻ Call Girls In Naraina Delhi NCRElite Class ➥8448380779▻ Call Girls In Naraina Delhi NCR
Elite Class ➥8448380779▻ Call Girls In Naraina Delhi NCR
 
Part 1 of the Holy Quran- Alif Laam Meem
Part 1 of the Holy Quran- Alif Laam MeemPart 1 of the Holy Quran- Alif Laam Meem
Part 1 of the Holy Quran- Alif Laam Meem
 
Pradeep Bhanot - Friend, Philosopher Guide And The Brand By Arjun Jani
Pradeep Bhanot - Friend, Philosopher Guide And The Brand By Arjun JaniPradeep Bhanot - Friend, Philosopher Guide And The Brand By Arjun Jani
Pradeep Bhanot - Friend, Philosopher Guide And The Brand By Arjun Jani
 
Call Girls in Greater Kailash Delhi 💯Call Us 🔝8264348440🔝
Call Girls in Greater Kailash Delhi 💯Call Us 🔝8264348440🔝Call Girls in Greater Kailash Delhi 💯Call Us 🔝8264348440🔝
Call Girls in Greater Kailash Delhi 💯Call Us 🔝8264348440🔝
 
Call Girls in sarojini nagar Delhi 8264348440 ✅ call girls ❤️
Call Girls in sarojini nagar Delhi 8264348440 ✅ call girls ❤️Call Girls in sarojini nagar Delhi 8264348440 ✅ call girls ❤️
Call Girls in sarojini nagar Delhi 8264348440 ✅ call girls ❤️
 
English - The Forgotten Books of Eden.pdf
English - The Forgotten Books of Eden.pdfEnglish - The Forgotten Books of Eden.pdf
English - The Forgotten Books of Eden.pdf
 
Call Girls In East Of Kailash 9654467111 Short 1500 Night 6000
Call Girls In East Of Kailash 9654467111 Short 1500 Night 6000Call Girls In East Of Kailash 9654467111 Short 1500 Night 6000
Call Girls In East Of Kailash 9654467111 Short 1500 Night 6000
 
CALL ON ➥8923113531 🔝Call Girls Singar Nagar Lucknow best Night Fun service 👔
CALL ON ➥8923113531 🔝Call Girls Singar Nagar Lucknow best Night Fun service  👔CALL ON ➥8923113531 🔝Call Girls Singar Nagar Lucknow best Night Fun service  👔
CALL ON ➥8923113531 🔝Call Girls Singar Nagar Lucknow best Night Fun service 👔
 
Codex Singularity: Search for the Prisca Sapientia
Codex Singularity: Search for the Prisca SapientiaCodex Singularity: Search for the Prisca Sapientia
Codex Singularity: Search for the Prisca Sapientia
 
Top Astrologer in UK Best Vashikaran Specialist in England Amil baba Contact ...
Top Astrologer in UK Best Vashikaran Specialist in England Amil baba Contact ...Top Astrologer in UK Best Vashikaran Specialist in England Amil baba Contact ...
Top Astrologer in UK Best Vashikaran Specialist in England Amil baba Contact ...
 
Lesson 3 - Heaven - the Christian's Destiny.pptx
Lesson 3 - Heaven - the Christian's Destiny.pptxLesson 3 - Heaven - the Christian's Destiny.pptx
Lesson 3 - Heaven - the Christian's Destiny.pptx
 
Call Girls In Nehru Place 📱 9999965857 🤩 Delhi 🫦 HOT AND SEXY VVIP 🍎 SERVICE
Call Girls In Nehru Place 📱  9999965857  🤩 Delhi 🫦 HOT AND SEXY VVIP 🍎 SERVICECall Girls In Nehru Place 📱  9999965857  🤩 Delhi 🫦 HOT AND SEXY VVIP 🍎 SERVICE
Call Girls In Nehru Place 📱 9999965857 🤩 Delhi 🫦 HOT AND SEXY VVIP 🍎 SERVICE
 
English - The Story of Ahikar, Grand Vizier of Assyria.pdf
English - The Story of Ahikar, Grand Vizier of Assyria.pdfEnglish - The Story of Ahikar, Grand Vizier of Assyria.pdf
English - The Story of Ahikar, Grand Vizier of Assyria.pdf
 
madina book to learn arabic part1
madina   book   to  learn  arabic  part1madina   book   to  learn  arabic  part1
madina book to learn arabic part1
 
The_Chronological_Life_of_Christ_Part_98_Jesus_Frees_Us
The_Chronological_Life_of_Christ_Part_98_Jesus_Frees_UsThe_Chronological_Life_of_Christ_Part_98_Jesus_Frees_Us
The_Chronological_Life_of_Christ_Part_98_Jesus_Frees_Us
 
Vashikaran Specialist in London Black Magic Removal No 1 Astrologer in UK
Vashikaran Specialist in London Black Magic Removal No 1 Astrologer in UKVashikaran Specialist in London Black Magic Removal No 1 Astrologer in UK
Vashikaran Specialist in London Black Magic Removal No 1 Astrologer in UK
 

Unit66 production log

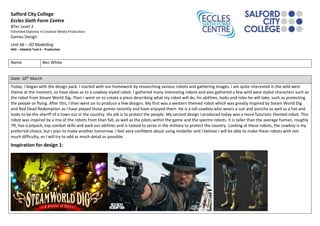
  • 1. Salford City College Eccles Sixth Form Centre BTec Level 3 Extended Diploma in Creative Media Production Games Design Unit 66 – 3D Modelling HA5 – Sidekick Task 6 – Production Name Ben White Date: 10th March Today, I began with the design pack. I started with our homework by researching various robots and gathering images. I am quite interested in the wild west theme at the moment, so have ideas as to a cowboy styled robot. I gathered many interesting robots and also gathered a few wild west styled characters such as the robot from Steam World Dig. Then I went on to create a piece describing what my robot will do, his abilities, looks and roles he will take, such as protecting the people or flying. After this, I then went on to produce a few designs. My first was a western themed robot which was greatly inspired by Steam World Dig and Red Dead Redemption as I have played those games recently and have enjoyed them. He is a tall cowboy who wears a suit and poncho as well as a hat and looks to be the sheriff of a town out in the country. His job is to protect the people. My second design I produced today was a more futuristic themed robot. This robot was inspired by a mix of the robots from titan fall, as well as the pilots within the game and the spectre robots. It is taller than the average human, roughly 7ft, has a jetpack, top combat skills and park our abilities and is tasked to serve in the military to protect the country. Looking at these robots, the cowboy is my preferred choice, but I plan to make another tomorrow. I feel very confident about using modeller and I believe I will be able to make these robots with not much difficulty, so I will try to add as much detail as possible. Inspiration for design 1:
  • 4. Date: 13th March Today, I began to make my robot. I firstly started with the head by creating a capsule object. After this, I began to manipulate the object using the multi-shift tool to give space for eyes, and pull out a mouth similar to the iron giants. After the basic shape was created, I then began to create a hat. I used two disc objects. With the first disc, I manipulated it to look like a cylinder, and then used the bend to curve it. This would form the top of the hat. Then with the second disc, I extruded it slightly and used the bend tool to curve this as well. This would form the base of the hat. Once completed, I move the hat over the top of the head. Once on, I then used the ‘triple’ tool and the mouth piece of the robot as sub dividing would not work. I also thought that the spike tool work quite well with the triple tool as I wanted to create a beard. The spike tool seemed to pull each polygon out from the centre point to create a spiked effect. This worked really well to simulate a beard. I then moved to the centre of the face to add and edit a mouth and nose. To create the nose, I subdivided various points between the eyes to create small polygons, and then I used the select tool to select a nose shape which I could then pull out. However, I wasn’t quite sure about whether I like the look of it or not, so I might change it at a later date. On the eyes, I subdivided the white areas seen on the picture below. With not much time left, I then began to use the surface editor to add colours to the head parts. On the eyes, I used the small polygons I had just created and the surface editor to colour certain areas in to draw on eye shapes. I wanted the eyes to be screens and this method came to me by looking at pixel art. The way I coloured in the polygons was very similar to pixel art as all the polygons were the same size; I just had to use my imagination to paint some polygons to create aggressive- looking eyes.
  • 5. Date: March 17th Today, I began work on the body. To begin, I created another capsule object, and then I used the stretch tool to stretch out the X axis of the object to widen it out to get a kind of broad body shape. Once The main body capsule was in place, I could then work on the shoulders and the arms. To create these shoulder pieces, I used the multi-shift tool as well as the symmetry tool to ensure both sides were the same, so I selected some polygons on the left side of the capsule and used multi-shift the drag them out altogether. Symmetry ensured the right side would be pulled out too. Having the shoulders ready meant I could now begin to create basic arms. Using multi-shift again, I was able to establish a back arm, elbow and forearm in one use. Symmetry however would not work for the arm for unknown reasons, so I thought the best thing to do would be to select the arm and transport it to its own layer to make it into its own object. I could then use the mirror tool to duplicate and mirror the image onto the other side. I am unsure about the look of the arms however, so may change them at a later date. My robot wears a poncho in my design, so I began work to model him one. I figured the best thing to do would be to duplicate the current capsule, which I had already done before the work on the shoulders as luckily I thought ahead, and then edit the object by deleting areas to create a poncho shape which fits over the main body capsule. I deleted a lot of polygons here and used the drag tool to drag points in certain areas to make it look more rugged. However, a problem arose that the polygons on the inside of the poncho were invisible. This is because the capsule object is not hollow and was not intended to have any polygons removed, so nothing can be seen if you were inside the capsule. To fix this however, I remembered a tool used on a previous piece of work, the reference modelling, where in the tutorial, the teacher used the ‘extrusion’ tool to give a polygon a 3D look as well as a back and sides, so I was able to use this method on the poncho. I had to split the poncho into 2 halves, front and back, because the extrusion tool went through one of the other halves if you tried to extrude it all together. I extruded both sides individually. After the poncho was created, I began to add detail such as colour and the maracas. I attempted to create a wavy pattern on the maracas by using the drag tool to drag points and create waves; however, this area needs more work as the waves would work much better if they were larger. I also create another hat for him, a sombrero as I had an unusual idea of making him Mexican. This sprung from the idea of the poncho and I believed the sombrero worked quite well, however, it does not look very nice and I much preferred the look of the original cowboy hat. This was a trial and error process as I wanted to see just how my robot would look in case I found out that it would look even better with the sombrero
  • 6.
  • 7. Date: 24th March Today, I worked mainly on the hands and the detail on the body. I began with the hands. To create these, I used the multi- shift tool to drag out the main part of the hand. There was some difficulty with this as polygons would disappear as they could not fit where I wanted them to go. To solve this, I used more primitive shapes to replace the broken areas and create a more hand like shape. Once the main plam and back hand was complete, I could move onto the fingers. I have to subdivide the polygons at the bottom of the hand so that I have 3 similar sized polygons all aligned so that I could use the multi-shift tool to drag them out. As I was dragging the fingers out, I created a point where the finger bends, so that it looks like the robot can move his fingers and use things such as grip. Once the fingers were complete, I took the end finger and tried to make it look like the little finger on a human hand by shrinking it slighly. After this, I enarged the index finger slightly. I could then move onto the thumb. I used another primitive cube and put it in place, hen extended and manipulated the thumb using the multi shift tool. Once, complete, I used the size tool to thicken up the thumb to make it more realistic as comparred to a human thumbs thickness. After this, I could move onto adding more detail to the body. The first thing I worked on was the bandolier. I started by using a basic box primitive and breating a flat surface. There were not polygons on the back as I planned to extrude this object once set in place so I could establish a correct and realistic thickness to the bandolier. I then moved this primitive diagonally across the body of my robot, the subdived it a bunch of times. I could then grab the points on oposite sides of the newly created edges and move them to wrap around the body. I only wrapped the bandolier around the front half of the body as I duplicated the finished half and placed it around the back. As expected, the points on the back bandolier did not connect to the front bandolier, so it went through parts of the poncho and looked like it was floating. I then had to drag and rotate certain points to move them into the correct position so the two halves looked like one whole bandolier. Once complete, I could extrude the polygons to create a 3D bandolier with polygons on all sides. I then took a reference image of a bullet and used box modelling techniques to establish the bullets seen to the left. I duplicated the objects and added them into position so they looked attatched to the bandolier. Next, I created the maracas by using a capsule primitive and using the size tool to shink and contract some areas to make it look more like an oval. To create the handle, I also used a capsule primitive, but vastly increased the hight whilst keeping the length and width short. Then I used the size tool to shrink the centre part to give it a kind of grip area. Using box modelling techniques again, I created the badge and did the same with the star. I also used a reference image
  • 8. for the star to make is look like an actual sheriffs badge, after which, I added small sphere primitices to the points of the star. I created the belt similar to how I created the bandolier, using the box primitive and extrusion techniques and to create the belt, I create a flat sphere on the Z axis, rotated it, extruded it out and fit it in place. Finally for today, I could texturize the model. Date: 27th March Today, I started the next major part of my robot. The legs. I began by looking at my reference image and noting I have began with using spherical primitives. I created these in modeller and added them to the pelvic area.Using capsule shapes, I constructed the theigh. I then wanted to add some form of leg armour, but also make it look like he is wearing pants. To do this, I established a shape by selecting the right amount of polygons and using the multi sift tool to drag them ou. This was quite hard to do as I had to ensure the armour was symetrical and that I had selected the correct number of polygons. Once muli shifted, I got the shape you can see on the right, so I then just had to use the surface editor to colour it. I then moved on to the knee and I wanted the knee areas to be able to rotate and twist in any direction, s I thought the bes thing to do would to be to use a sphere object. Then I moved onto the boots and calf area. I used a capsule primitive and multishifted certain areas t create the top part of the boot. After this, I used various primitives to construct the basic shoe. I believe this to be the worst part of my robot and this could need further work. After manipulating these primitives, I was able to create the spurs of the boots. I used primitives again and bevelled the golden area you can see to the right to create this spike styled spur. One thing I wanted to improve was the length of the legs as I thought they were two short and I wanted him to be an imposing character.
  • 9. Date: 3rd April Today, I came in early to work on a number of things. My robot needs the ability to fly, so I wanted to give him a jetpack. To begin, I created a large cube object and placed it on his back, positioning it with the rotate and move tools. I then used box modelling techniques to construct a jetpack, as well as adding more primitive shapes to help with the sides of the pack. Once complete, I went on to creating holsters and revolvers, yet again using box modelling techniques, however, I used reference modelling as well to construct the revolver. I also used the spline draw tool to construct the basic shape of the revolver from the reference image and the handle. After the revolver, I went back to the legs to add a bit more detail. To begin, I extended the calf of the leg a bit, and then created two capsule primitives. I created tall capsules with thin widths to get a pole shape, textured them, and then added them into place between the knee and boots. I also went back to the boots and added polygons by selecting points at the top of the boots so they weren’t cubed and have a more realistic and smooth look.
  • 10. Date: 7th April – 1st May My robot was then sent to NewTek Layout, as the 3D model was now complete, where it would undergo drastic texture changes. Using the large selection of pre-set textures and the surface editor, I was able to give textures certain qualities. For example, I could give the steel body a shinier, metal look. I also gave the calf legs, guns, gears, buckle, badge and bullets a golden, metal coating. The poncho was edited to look like it was made out of rough fabric and the bandolier had a kind of rough leather look to it. His eyes were intended to be colour changing screens depending on the situation. If nothing was happening and all was good, they would be green, but if something bad was happening, they would turn red and the robot would take action to try to stop the bad thing from happening. Since they were screens, I added a neon effect and made them shinier. I added a few more texture changes such as the jetpack and then my robot was complete. I then had to take pictures of the robot using the render feature. Since my robot had a humanoid shape, I tried to take a number of long portrait images. There were 12 images in total, all from different angles, conveying different things. Add as required