DELTA HMI PROGRAMMING IN BANGLA
•
1 like•419 views

DELTA HMI PROGRAMMING IN BANGLA

Recommended
More Related Content
What's hot
What's hot (20)
Similar to DELTA HMI PROGRAMMING IN BANGLA
Similar to DELTA HMI PROGRAMMING IN BANGLA (20)
Recently uploaded
Recently uploaded (20)
DELTA HMI PROGRAMMING IN BANGLA
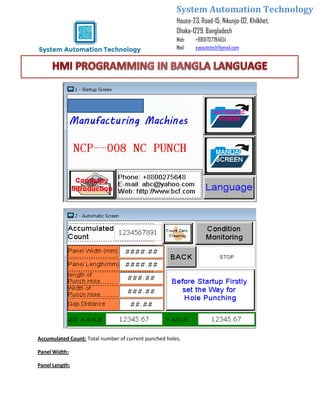
- 1. System Automation Technology House-23, Road-15, Nikunjo-02, Khilkhet, Dhaka-1229, Bangladesh Mob: +8801737784651 Mail: sysautotech@gmail.com Accumulated Count: Total number of current punched holes. Panel Width: Panel Length:
- 2. System Automation Technology House-23, Road-15, Nikunjo-02, Khilkhet, Dhaka-1229, Bangladesh Mob: +8801737784651 Mail: sysautotech@gmail.com Length of Punched Hole (Diameter): set the length of length/ round stamping in mm Width of Punched Hole: Set the width of the circular stamping. Stamping without setting unit mm Gap distance: Gap distance between punched work pieces X & Y-axis: Display the current coordinates of X & Y axis Number of Punched Holes: Displays the current number of punched holes on a panel Number of current Rows: Displays the current number of punched rows Number of current Row Holes: Displays the punched holes of each rows Horizontal Punched holes: Display the punched holes of each rows Vertical Punched holes: Display the punched holes of each panel/Coolum Speed of punch: set the speed (Hz) of punch press display value (for VFD) max 50hz Operating Instruction: Auxilary Setting: Clutch Inching: Inching of Pneumatic clutch Oil Inching: Manual control of lubrication pump Return to Base Point: Return Horizontal & vertical axes to the base points
- 3. System Automation Technology House-23, Road-15, Nikunjo-02, Khilkhet, Dhaka-1229, Bangladesh Mob: +8801737784651 Mail: sysautotech@gmail.com Axle Zero Cleaning: Press this key to conduct zero cleaning for current coordinates Processing Points: (x,y) axis run to the starting points Horizontal Moving speed: SET the speed of X-axis servo, for equipment debugging, don’t change after debugging Vertical Moving speed: SET the speed of Y-axis servo, for equipment debugging, don’t change after debugging Manual Moving speed: set the manual speed Moving Time-delay: set the interval time for servo motor during debugging, it’s not required to be change Speed Inc/Dec time: For equipment debugging Auto Return to Zero speed: Set the speed of servo motor returning into the base points under the automatic operation mode Unloading Distance: set the distance of X-axis from the processing point to the unloading point System Debugging:
- 4. System Automation Technology House-23, Road-15, Nikunjo-02, Khilkhet, Dhaka-1229, Bangladesh Mob: +8801737784651 Mail: sysautotech@gmail.com Horizontal Axis Working Point: Set the position from the base point to the first hole of x-axis Vertical Axis Working Point: Set the position from the base point to the first hole of y-axis Horizontal Length (mm): Set the operating Distance of X-axis Servo motor (mm) Vertical Length (mm): Set the operating Distance of Y-axis Servo motor (mm) Gripping time Delay: Set the gripping Time delay Time for Lubricating Operation: Set the Oil pump RUN time (Sec) under automatic operation
- 5. System Automation Technology House-23, Road-15, Nikunjo-02, Khilkhet, Dhaka-1229, Bangladesh Mob: +8801737784651 Mail: sysautotech@gmail.com Time for Lubricating Suspension: Set the suspension time of lub pump (sec) under automatic operation Close –to-the-switch-reaction Time: for equipment debugging Punching Completion time Delay: Suspension time between punching completion to return to base point under automatic operation Close-to-the-switch fine time: for equipment debugging Blowing Time Delay: Working hour of blowing under automatic operation MASTER PANEL 1.Power supply Indicator 2.Electromagnet Switching off of pneumatic clutch, pneumatic clutch is controlled by PLC when it is turned off, the pneumatic clutch is turned on when it is turned on. It is used for mold adjustment 3.Debugging After setting system parameters, select automatic operation mode, Press this key. The servo runs according to the designed program, the punch press doesn’t work.
- 6. System Automation Technology House-23, Road-15, Nikunjo-02, Khilkhet, Dhaka-1229, Bangladesh Mob: +8801737784651 Mail: sysautotech@gmail.com 4.Emergency Stop OPERATION METHOD 1.Return to Base point Set the desktop to manual operation mode, manually move X & Y axis to slide to the middle position, Press “ ” then X & Y axis return to the base point. 2.Set Processing point Place the punched materials on to the slide & Clamp them, manually move X & Y axis to move the punched materials to the mold punching position & cover the mold trim line, record the coordinates of X & Y axis. Record the position distance divided by 2 into “ ”as processing points of X & y axis. 3.Parameter setting Record the length & width of punched materials, sizes & distance of punched holes into corresponding parameter forms, then the system will automatically calculate. Notes: The Power Supply should be turned off & returned on after parameter change, thus to facilitates the system update. 4.Operation (1) After parameter setting put the operation mode selector switch to manual, move X & Y axis to middle position of the slide, Press “ ” then X & Y axis return to the base point. (2) Press “Processing points” X & Y axis move automatically from base point to processing point. (3) Press “ ” (Axis/ coordinate zero cleaning) Coordinate position will automatically change into zero. (4) Press “Punch Press Startup” to run punch press motor.
- 7. System Automation Technology House-23, Road-15, Nikunjo-02, Khilkhet, Dhaka-1229, Bangladesh Mob: +8801737784651 Mail: sysautotech@gmail.com (5) Press “Single Punching” the clutch of punch press pulls in, the puncher moves downward, one punching is stopped, the slide & puncher operate synchronously & move by one working position. When the manual operation is conducted to the last row, pls inspect the position of clamps in the punch press mold, it should not enter the mold. (6) After manual operation has no problem, put the operation mode selector switch to automatic, press “Continuous Punching “to automatically operate to one piece of punched materials has been fully punched according to the parameters set by the operator & Automatically collect the scarp. MOLD REPLACEMENT & OPERATION 1. Press “STOP” 2. 3.
- 8. System Automation Technology House-23, Road-15, Nikunjo-02, Khilkhet, Dhaka-1229, Bangladesh Mob: +8801737784651 Mail: sysautotech@gmail.com