SlideShare a Scribd company logo
1 of 29
Download to read offline
#SCR7
Please Notice: We had to make our Screen printing booklet into a plan 8 ½”x 11”
format so our customers would not need to stable a booklet together. We hope you
enjoy this information. All this information can be applied to screen printing Solar
Cells on glass, plastic or metal. If you are needing more information as in large
booklet forms as well as Screen Printing supplies, then check out these companies
online at: www.silkscreenbiz.com another great supplier to check out is at:
www.ryanrss.com
The following photo’s are just examples of what is used to Screen Print.
Screen PrintingScreen Printing
BookletBooklet
Free News
Copyright 2003
Free News
Free News
2 wood frame printing screens Example: of 3 aluminum frames
1 color t-shirt printer,
which can be used to
print Solar Cells
6- Color T-shirt Printer 4-Color T-shirt Printer
Creative Science & Screen Printing PO BOX 557 New Albany, IN. 47151
Wood Frame
Screen Printing
Image!Image!Image!Image!
Screen cloth & Photo Emulsion
Learn how to Screen Print. Screen printing is done all over the world by very large
printing companies right down to the guy who does it at home in his basement.
Screen printing was first discovered by the Chinese hundreds of years ago. It is a
very simple process that anyone can do. The Chinese first used silk to use in there
wood frames to print with, then as time went on better material was made to
print with.
We hope you enjoy this small booklet, it was thrown together very quickly for
Creative Science and Research as a help for there customers. If you would like to
learn more. your local library will have more information or any local art store.
many books have been written on this subject or see www.Silkscreenbiz.com
www.ryanrss.com or signindustry.com
Screen Printing #SCR7
Page 1
Copyright 2003 Creative Science
Screen Printing #SCR7
Copyright 2003 Creative Science
SO HOW DO WE SCREEN PRINT?
Screen printing is done by using a wooden frame with screen printing cloth stretched
over it, Then there is a photo emulsion applied to the screen, dried and then exposed to a
bright light source, ( You can use the sun or a photo bulb )
but before exposing it to the light source, you must first apply your film positive to the
back of screen. A film positive is simply a clear piece of plastic with a silhouette or a
profile or art work design filled in with a dark color, in this case you can use dark red or
black. Art stores and screen supply companies sell a red film you can cut with an exacto
knife called amerlith. You simply cut out your design and peel away the background that
you do not want. I suggest you go to a local screen printing shop and ask them if you can
buy a small 24” x 24” piece, it would be cheaper than buying a whole roll. Once you are
done cutting out your design on the amberlith plastic film, you then spray the front of it (
the side with the film cut on it, ) with all purpose spray adhesive, let it dry for 3 minutes or
so and then apply to back of Photo emulsioned screen and then expose to light source.
Now after exposing it to the sun, the screen is then washed out with water using a
water hose. The black or red image on the film positive did not let any sun get to the
photo emulsion, therefor the unexposed photo emulsion can then be washed out, the
other has been hardened by the sun light and can not be washed out. now after the
screen has dried. you can use it to print your image with over and over as many times as
you like.
Ink is then applied to the inside of the screen, and by using a soft rubber squeegee, you
pull the ink over top of the image area. ink then only passes through that area which was
not exposed to the sun. ( See our video ) This process is known as screen printing.
Let me give an example: The screen is like an open water valve, when certain areas of
the screen are stopped off, then the water can not go through it, only where you want it to
go.
The photo emulsion can be like this example: take a 8 1/2" x 11" piece of paper. now cut
a hole in it. now lay it flat down onto a table. Now get a can of spray paint and begin
spraying the paper. Now lift the paper up and what do you have? you have a painted
circle. This is the same way screen printing works. The nice thing about screen printing is
you can pass just about any type of liquid you want through the screen print area. If you
are printing on paper you can screen print with any type of paint or screen printing ink,
just as long as it is thick enough. If it is to thin your printed image will have run spots.
Page 2
Of course there is a much easier way to make your own screen and that is to
buy one. they are not that expensive. In your Yellow page phone book look
under art supply stores and then look under Screen printing companies. Tell them
what you are doing and ask them how much they will charge for a screen the
size of a T-shirt screen, (Fine mesh-yellow or white ) and also ask how much they
would charge to coat out and expose for you. should be only about $25 for the
screen and $19 to coat out with photo emulsion and expose it for you. They are
pro's most know what they are doing.
Materials you will need
Wood Frame
Image for Solar Cells
Photo Emulsion
Screen
Screen Printing Ink
Squeegee
Used to move the printing ink from the top of the inside of the
screen to the bottom. To press the ink through the image and
screen onto the glass or paper.
INK
Ink can be thick paint(oil base), or special Screen
printing ink, or in your case an Ink that you will
create to print Solar Cells with.
Printing Ink can not be to thin or it will run on the
printed image. and it can not be to thick where it
will not go through the screen. By adding your
thinner or not adding thinner you can control this.
it is like thinning paint to paint a house.
1. SPRAY ADHESIVE
2. RAGS-Viva PAPER TOWELS
for clean up.
3. MINERAL SPIRITS
4. LACQUER THINNER
5. SMALL DOOR HINGES
6. A TABLE TO PRINT ON
7. PHOTO EMULSION or
LACQUER FILM
8. RUBYLITHE or AMBERLITH
FILM
9. EXACTO KNIFE
10. Screen Coater 13 1/2"
IT IS BEST IF YOU MAKE OR BUY 2 SCREENS
1- used for negative contact, nickel mesh print
2nd used for layers n-type and p-type.
Screen Printing #SCR7
Copyright 2003 Creative Science
Page 3
Screen Printing #SCR7
Copyright 2003 Creative Science
Now lets assume that the screen is all
prepared and ready. 1st- You attach the
2 x 4 to the table using nails or wood
screws. Then you take the wood screen
and lay it flat on the table, push the
back up against the 2x4, now attach the
door hinge to the 2x4 and the wood
screen using wood screws. you will
need 2 hinges one for the top left side
and one for the right top side. Now the
screen can move up and down. Now to
keep the screen up while you are
registering the glass or what ever you
will be printing on, you will need to add
a kickleg (see drawing). now lay down
the screen on top of the glass, and
move the glass around until the print
image is right over top of it or is in the
desired position. Now take some
masking tape and tape 3 pieces onto
the table right up to the glass, this will
be your registration marks which you
can then after printing your first piece of
glass or paper can place another in the
same place and print it in the exact
same spot. You can Screen Print the
Solar Cells either- or
top view
tape
without screen
+ +
+
+ +
+
Registration
To simplify registration we are showing the
top view without the screen. (of course the
screen should be there when registering
your item that you are going to print.) Once
you have completed registration pencil
around the glass onto the table, then
remove glass then place paper all around
pencil area on the outside so you will not
overspray the hold down adhesive. Now
spray the adhesive onto the table and let dry
5-10 minutes. This process will help hold
down the glass to the table while you are
printing so the glass will not move and you
will get a good print.
Glass or
other
wood table
Glass
Kickleg
nail
sml door hinge
2" x 4" wood
Squeegee
wood screen
side view
How to Screen Print
Page 4
Screen Printing #SCR7
Copyright 2003 Creative Science
apply ink here
wood screen
step 1
step 4
Start to print
Printing
Finished print
Holding squeegee with 2 hands
press down w/angle and come
toward you.
step 3
step 2
with your ink
flood screen 1st
Page 5
Screen Printing #SCR7
Copyright 2003 Creative Science
step 5
flood screen again
for next print. or STOP.
step 6
Remove object ( Glass )
that you have printed and
let it air dry.
Once you have finished printing. you must clean up your screen. It is very important not to let ink dry in screen. The longer you
wait the more chance you will have of your screen getting glogged up and you could mess up your screen forever.
Use paper towels and mineral spirits to clean up. depending on what kind of ink you use will determine what type of clean up
solvent.
Printing cont...
Page 6
Screen Printing #SCR7
Copyright 2003 Creative Science
Stretch Screen and staple down to wood frame.
Then trim up screen mesh all the way to the outside frame.
Screen should be tight enough to bounce a penny on it.
Making your Screen
It is very easy to build your own screen. Use 2" x 2" pieces of wood for
your frame. You can angle them together or square them together. Use
wood glue and steel angle from a hardware store, this will help keep the
frame strong. Frame size is 19 1/2" x 23 1/2".
Now you must purchase screen material from a art supply store or from
a screen printing supply company or buy some from a screen printing
shop. Most shops are very helpful. ( Some sign painting companies also
screen print, Check your yellow page phone book. )
tell them you want to buy a fine screen mesh yellow or white. But not to
fine a mesh, but not to course either. Now place your frame down flat on
a table and place your screen mesh over top of it. cut your screen mesh
leaving about 4" hanging from all around the frame. Now using a staple
gun, start stapling one end only, now go to the opposite end and staple
that while griping the screen mesh in your right hand and stapling with the
other hand. YOU MUST STRETCH THE MATERIAL TIGHT STARTING FROM THE
CENTER and working your way outward.
1st
1st
2nd
2nd
Page 7
Screen Printing #SCR7
Copyright 2003 Creative Science
Prep. your Screen
Now you must prepare your screen for the photo emulsion. If the
screen is not cleaned right, the photo emulsion will have a hard time
sticking to it.
Use Ajax scrubbing bleach cleaner ( Bleach powder You can buy it
at any store.)
Now take the screen and spray it on both sides with water, now while it is still wet apply the
Ajax bleach on both sides, ( it does not take much, Don't over kill it.) Now using a wet cotton rag
or cloth scrub the screen on both sides, clean it very well. Now take a water hose and spray out
all the ajax, THIS IS VERY IMPORTANT! Spray both sides of the screen. Each side should take you
about 2 - 3 minutes per side to spray out. if all of the bleach is not sprayed it it will cause
problems with the photo emulsion, it will not stick good in spots. Bleach will take out exposed
photo emulsion, this is what the old timers used to clean out the photo emulsion after they
where done screen printing with the screen. But in your case you will just keep the image in the
screen for later use.
Ajax
BLEACH
Now set the screen aside and let air dry or use a fan to dry it with. ( put your screen in
a place where not alot of dust is located. ) Once your screen is dry you are ready for
the photo emulsion. you will need a very low light area, 1- small bottle of photo
emulsion ( Follow the instructions on the bottle. ) and 1- plastic or metal screen coater.
make sure the photo emulsion is very well mixed before each use. Now take the photo
emulsion and pour it into the screen coating spreader. ( you can make one your self out
of card board or buy one at a supply store. The plastic ones are very cheap. ) Now take
the screen coater with hand while holding the small screen with the other. Starting from
the bottom, place the screen coater onto the screen, Now angle it so the emulsion will
start to slowly run out. Now slowly move up and over the screen coating the back side
with one coat. Now flip screen over to the other side and coat it the same way. you
should now have a nice smooth thin coat of photo emulsion on both sides of screen,
wait 70 seconds, now coat just the back side of screen one more time. now you are
done. place the coater on a flat table and take a small square piece of card board
and smooth out the build ups that where made by the edge of the coater. Now take
the screen and lay it flat away from the floor and apply a fan. YOU MUST USE A FAN!
Photo emulsion will come with complete instructions.
Page 8
Screen Printing #SCR7
Copyright 2003 Creative Science
Exposing. your Screen
Side view of screen
being dried with fan.
Coating out screen
Let dry for about 2 hrs
screen
Photo emulsion
What you are seeing here is
the back of the screen being
coated out with a screen
coater with photo emulsion in
it. Coat backside, then front
side, then back side again,
then let dry with a fan. ( See
Video )
Now once your screen has dried, you take your film positive which you can cut from amberlith
or rubylithe using an exacto knife. It is a red easy to cut film that is attached to a clear piece of
mylar plastic. You cut away what you do not want to print. It is very simple. In your case you
simply cut a square or a circle and remove all the red film around it. While leaving the circle or
square. ( You can also buy this at any supply store.) Or you can do it all on a computer using a
laser printer, printing your image in black on clear plastic. or you can copy your image using a
copier at a copier office supply place. ( They sell clear plastic for this. many people use it for
overhead projectors.)
Now you can spray the back of your film positive with spray adhesive, (If you spray the wrong
side just use mineral sprits to wipe it off. ) Now let the spray dry for 5 minutes. Now stick it to the
back side of the photo screen. now lay it flat on the dry ground out in the full sun light for about
5-10 minutes. It has been a long time since I have done it this way, But I am sure it is 10 minutes.
After that time take off the film and take your screen into a semi- dark area ( Best if inside of a
garage.) and take a water hose with a sprayer attached and start spraying it lightly with a spray
of water not a strong stream. spray out the unexposed photo emulsion, you will see it start to
come out in about 1 or 2 minutes, now spray the other side of screen lightly. now hold screen up
to a light to see if you got all of it out.
Page 9
Screen Printing #SCR7
Copyright 2003 Creative Science
Exposing. your Screen cont...
Now while screen is still wet, feel both sides of the emulsion
with one finger if either side feels snotty or very soft and green
and it is coming off onto your finger, then you have not
exposed screen long enough in the sunlight. If it is fine then
take a piece of news paper and place it on the back side of
screen first, now take your hand and smooth the news paper
out on the screen, the paper will begin soaking up water from
the screen.
This is called blotting the screen, you do this on both sides of the screen. if the news
paper sticks to the inside of the screen then you have under exposed the screen. ( It will
stick a little this is normal.)
Now repeat the blotting one more time.( But Quickly ). Now you must take an air hose
and with a very small amount of pressure blow out the rest of the water from the print
area. ( You can blow it out, by blowing out the water by mouth, but not to fun to do. ) or
you can use a small air brush air compressor, it is great for this. If you do not do this, you
can get what we call a clear glog up. When you go to print you will see small streaks in
your print. If you study and do everything I told you, you will have no problems.
Now set the screen back up in front of the fan and let it dry for about 1 - 2 hrs. After it
has dried you are now ready to plug up the pinholes. Pinholes are caused by dust during
exposure. Use a small modeling brush and take some of your fresh photo emulsion and
mix in a little water then stir it up real good. Then touch up all the pin holes around the
print area. ( There should not be that many if you have done it right.)
You can do your touching up in a lighted area. after you have touched up your pin
holes, let screen dry for about 1 hr. then expose to the sun for 5 - 10 more minutes this will
harden the touch up photo emulsion you used. because if you do not expose the
unexposed touch up emulsion, when you go to print if you are using a hard thinner in
your ink such as Lacquer thinner or Xylene Thinner it will harden the photo emulsion
permanently into the screen and you will never get it out, if you ever want to use the
screen for something else. They have 2 types of Photo emulsion, One is great for using
with mineral spirits the other is great for using with These harder thinners. Such as Lacquer
thinner or Xylene. Which you can buy at a paint store or hardware store.
SUPPLIERS
Internet: www.ryanrss.com, www.Silkscreenbiz.com, www.lancergroup.com, www.SignIndustry.com
National Decorators Supply Co. 443 Virginia Ave. Indianapolis, IN.
phone: 1-800-428-5022 zip 46203
or call: 1-800-382-2095 in INDIANA
Also check your Yellow Page phone book for: Screen Printing supply
Page 10
Screen Printing #SCR7
Copyright 2003 Creative Science
Now tape the inside corners on the inside of your screen where the ink is going to be. You
want to plug up every hole so the ink will not leak through onto your table or the glass or paper
you are printing on. After you have done this then go back to page 3 and 4 and go through the
steps. You are now ready to print. I hope we have giving you enough info to work with, I believe
we have. Do not let this all scare you out of screen printing. Screen printing is very simple to do
once you do it.
Masking Tape
Now Carefully mix your solar cell chemicals together and by using the thinner described
in the Patent thin as needed chemicals will be in powder form. except for thinner.
Ulano
FX-88
Photo-emulsion
Plastic Screen Coater
Card board scraper
13 1/2"
About
Page 11
Screen Printing #SCR7
Copyright 2003 Creative Science
Photo Screen Emulsion
Optional: 1- Color T-shirt printer or jacket
printer, also great for printing flat material
such as signs and Solar Cells, stickers etc..
Screen Clamps
Screen clamps can be purchased at any
screen supplier. They are used for table
top printing. This is what you should start
out with.
Page 12
Screen Printing #SCR7
Copyright 2003 Creative Science
BE YOUR OWN BOSS!
Build a T-Shirt Printing Press
With these plans it is easy and it is fun! Anyone can build!
$19.95
for plans/blue prints
Only
#JC-m1
# 402VideoVideo only $29.95
Plans are step by step construction and are professionally done.
easy to build. You can also print on paper
cardboard, steel or glass with this machine.
GUARANTEED TO WORK
OR YOUR MONEY BACK!
Start your own Screen Printing Business
Www.fuellesspower.com
Page 13
Screen Printing #SCR7
Copyright 2003 Creative Science
JCM1 5 -Color Screen Printing Machine
Constructed By: David Waggoner 1991
Replace T-shirt
with Glass or other
and print solar cells
Example: 4” diameter Solar Cell Image in photo screen
Page 14
Screen Printing #SCR7
Copyright 2003 Creative Science
Free News
Example of other screen printing devices. Although you can print without a machine it would
be nicer for you. Again if you want to go the cheap way you can get set up for less than
$100 using an old table top and 2 small screens and a kick leg to keep your screen up and
to flip it back when you want to lower your screen after you flood your screen. Below is a
photo of a spring loaded kick leg designed by David Waggoner. You may want to build your
own. Or simply use a long piece of wood with a nail.
Screen printing Kick leg, Spring loaded, Keeps screen in up position when flooding with ink and lowers
Designed and built by: David Waggoner
Page 15
Screen Printing #SCR7
Copyright 2003 Creative Science
Solar Cell Printing
_
+
If I were you, I would make the Solar Cells in
this shape. You will get more Free Energy For
your money. Hopefully soon we can have a step
by step booklet made to show you how to do it.
But there is so much research to do and so little
time to do it.
FILM POSITIVES WOULD LOOK LIKE THIS
Clear Plastic
Clear Plastic
1/16" thick grid lines
1ST PRINT:
This is what will connect to the
negative layer. Using Nickel, silver or
aluminum ink or paint.
You can buy this ink or paint at any
electronic supply house or screen
printing supply house.
Image size 10" x 10"
#2,#3,#4 & #5 LAYERS:
This one film positive can be used for all 4
of the last layers. this means you can print
one layer, clean it up then print your next
layer then clean it up etc... by using the same
screen for all 4 of the last layers, because the
image is the same.
Image size 9" x 9"
#5 layer is for picking up the + positive. Use
a solid 9"x9". Using nickel or aluminum ink
or paint.
10"
10"
9"
9"
END, Next pages are Free News
Page 16
Screen Printing #SCR7
Copyright 2003 Creative Science
Free News
6 - Color T-shirt, Jacket and cap printer
Photo Emulsions etc...
Photo Emulsions Coater
Photo Screen Exposure
You can simply use sunshine
or a bright photo bulb as well.
Different size wood screens
Infra red dryer for drying ink printed
on t-shrits or other. Signs etc...
Hand Squeegee, wood and rubber
Screen Printing #SCR7
Copyright 2003 Creative Science
Free News
GENERAL INFORMATION: Garment screen printing is a mass-production-manufacturing
method by which, most typically, a quantity of finished garments is printed with a design, in one
or more of several kinds of ink.
A permeable printing fabric is stretched tightly across a frame. To this fabric, typically by
mechanical and photographic means (similar to those used in basic black-and-white
photography), a stencil is affixed. This screen/stencil represents one color in a multi-color
design. For every color in the design, another stencil, another screen, and another position on
your printing press are required. In other words, if you're printing a design composed of four
colors, you'll require a four-color press with four screens, each of which bears its own stencil.
Each with a separate squeegee, the ink colors are, in turn, pushed through their stencils onto the
garment. This is done by hand on a manual press, or mechanically on an automatic press.
After all the colors have been printed on the garment, it is typically run through a conveyorized
dryer, or curing unit, which cures the ink, to make the design impervious to normal washing and
drying as well as normal wear and tear.
The decorated garments are then sold at retail, at wholesale, by mail order or through any
number of different outlets, and you can pocket the profit. Don't be fooled, though. You can loose
money almost as easily as you can make it if proper understanding and appropriate planning
aren't part of your formula for success.
The above, of course, is a very simplified description of the garment-screen-printing process. It
gets more complex from here. Still, if it sounds appealing, read on, always bearing in mind that
the best way to establish a successful garment-decorating operation is to learn as much as you
can about the market and the procedures involved in serving it, prior to making any significant
investment in equipment or supplies, and prior to making any long-range business plans.
Screen Printing #SCR7
Copyright 2003 Creative Science
Free News
Computer Separations Computer separations usually are rendered from art
created in a computer graphics program. Other art can be separated with the use of a
computer, but first it must be scanned or converted digitally before it can be manipulated
in a graphics program. Although there are many separation programs and drawing
programs with separation options, they all must reach a common end.
A piece of art created in a vector program is separated easily because the color usage
is controlled during the creation of the art. The program will render separations per color
and will print out exactly what the artist needs.
Fine art or photographs can be separated by computer provided the artist has access to
a large-format scanner, a drum scanner, or a digital camera. (If the art department
doesn't own any equipment, a service bureau can be paid to scan these images.) For
best results, the image should be scanned at about 300 DPI in an RGB mode and
saved as a TIFF file. Once the piece of art is converted digitally, it can then be
introduced into the design program (in this case, preferably a program that can
manipulate full-color scanned images, like PhotoShop). When a design is in this type of
program, it can render process separations, or areas of color can be selected to create
individual channels for each color, producing spot plates. The use of PhotoShop plug-
ins can decrease time spent creating spot-color channels. Many of these plug-ins use a
predetermined ink color set, which enables the finished product to closely resemble the
original design.
To calculate line counts for halftone screens, simply divide the mesh count by four. The
result will equal the highest line count that should be used. The artist must have an
understanding of mesh counts and their effect on the press. For instance, when a fade
is needed in a design, the artist may be tempted to put it in a high mesh. However, if
that same color also consists of large, open print areas, the printer will require a mesh in
a lower count. In this instance, the artist should calculate the halftone line based on the
lower mesh. To determine the best resolution for a design, multiply line count by 2.5.
Example: 55 lines = 137.5 resolution. This should prevent the program from producing
undersized dots in the lower-percentage halftone areas.
When the design is ready to be separated, it may be printed directly from the program,
or you may split the channels to create individual files to be printed later. The program
creates individual files for each color, giving the artist the option to go back and change
a color individually if the print performance is not satisfactory. It is important to label
each color and to make sure that each piece of film is complete with registration marks.
Most programs offer these options on the separation screen, but some programs
require the artist to incorporate the color names and registration marks with his or her
designs. The artist must type each color name in its own color and color the registration
marks with the "registration" color option.
Image output refers to the method in which a computer prints art or separations. One
way of printing separations is on a laser jet printer. An artist may choose to print out
directly on vellum, which exposes well, or on paper, which is then shot by a camera to
render the films. In addition to laser jet printers, an image setter may be used to output
separations. This equipment enables the artist to print out his or her art directly onto film
(and can totally replace a darkroom).
top
Artwork
Though there are many ways to create art, the artist should know some basic
information for creating art for screen printing. Some of the questions the artist should
ask include:
!What is the substrate? (color? type of garment? material content?)
!What type of print? (process? spot?)
!What size does the art need to be? (child? adult? left-chest?)
!What are the ink opacity requirements? (bright? muted? glossy? matte?)
!Is an underlay needed? (bright ink on darks? specialty inks?)
!What are the registration requirements? (butt? trap? overprint?)
!What are your production capabilities? (auto? manual? number of colors?)
Though most information can be standardized for each shop, some will be influenced by
the customer's vision of what he or she wants to achieve with the print.
Art Creation
The three most common forms of art created for screen printing are hand-drawn art,
computer-generated art, or art replicated from fine paintings or photographs.
Hand-Drawn Art
Hand-drawn art comes in many forms. An artist can create a keyline (an outline of the
design) by drawing it on paper with an opaquing pen, shooting it on a camera, or
scanning it into a computer. Art can be created from a hand-drawn keyline provided the
image is loaded into a scanning program, converted into paths, and then placed into an
art program. With the image in a format that can be manipulated, the artist can clean it
up, change its size and position, add text, and place color in selected areas. Another
option is to draw directly onto vellum or onto a coated screen. This method is not
recommended, but it is effective for simple one-color designs.
Computer-Generated Art
Computer-generated art is conceived and designed on a computer through a variety of
design programs. The most common programs in the screen-printing industry are
PhotoShop, Illustrator, Freehand, and Corel. Designs created on a computer are then
separated with the computer's separation program.
Replications
Replications of fine art or photographs are most successful when they are shot with a
digital camera or scanned into a computer. The artist can then utilize an advanced color
separator program on the computer. The artist also can separate replications by hand
through a series of hand-cut overlays.
top
top
top
top
top
Art Separations
After creation, art must be converted into final separations. The goal of art separation is
to create individual films, either acetate or vellum, in which the print areas block UV light
rays and the negative areas allow UV light to pass through. The most frequently used
methods involve separating by hand, camera, and computer.
Hand Separations
An artist can achieve hand separations in several ways.
Hand-cut positives are created by cutting photomasking film, or rubylith, into the shapes
or letters needed. Then the artist peels away the negative unwanted portion, leaving
rubylith in the areas to be printed.
Overlays are color separations created by the use of acetate or rubylith overlaid on a
keyline to create positives. By cutting, drawing, applying adhesive dot patterns, and
using acetate or burnishing letters, the artist can build each color (as well as additional
colors with dot pattern overlays).
Hand-drawn separations are created by tracing the design directly onto the acetate or
vellum. Starting with a keyline of the design, the artist overlays each color one at a time
and traces until all of the separations are
top
top
Know Your Inks
Inks can be divided into three main groups according to how they dry:
1. Evaporation
2. Thermosetting
3. UV (ultraviolet light) exposure
Ink is made up of two basic components: pigments and a carrier. The carrier is usually either
water or a solvent. Inks that dry by evaporation can be either water or solvent-based. The
principal solvents are almost all VOCs or volatile organic compounds, which means they
evaporate rather well. Water dries more slowly than the solvents, but doesn't put VOC emissions
into the atmosphere.
Environmental concerns have led to a lot of interest in water-based inks and some very rapid
developments in that area. Unfortunately, although water-based inks can now be used even on
some plastics, they are still only available for a limited number of substrates. Most sign shops
use air-dry inks exclusively, and most air-dry inks are still solvent-based. Multipurpose, vinyl,
and enamel inks all use different solvents as carriers, which mean that each type of ink will be a
little bit different to work with. For example, multipurpose and vinyl both dry faster than enamel,
but both will remain vulnerable to solvents after they dry. Enamel will not.
While not often used in sign printing, thermosetting inks are common in other industries.
Thermosetting inks cure rather than dry and will remain liquid until exposed to heat. Plastisol is
undoubtedly the best-known thermosetting ink because of its widespread use in printing T-shirts
and textiles. Epoxy inks are associated with the thermosetting group because a number of them
can be heat-cured to increase durability. Epoxy inks cure through a chemical reaction between
the base and a catalyst, which has to be added separately. Normally the catalyst is added just
before you start printing because the ink cures within a few hours. They are commonly used for
printing on glass, metal, ceramics and some types of plastic.
UV inks are definitely becoming more popular every day, but they need to be exposed to a
powerful UV light source in order to cure. With their extremely high solids content and rapid
curing ability UV inks are usually found in high-volume printing operations. As with the
plastisols there is no danger of these inks drying in a screen. However, UV drying equipment
requires a considerable investment, and beginning sign printers would be well advised to stick
with the usual air-dry inks. Because they contain no VOCs, and consequently produce no
environmentally harmful emissions, UV inks are often regarded as the wave of the future.
Match the ink to the substrate
Most adhesion problems arise when an inexperienced printer encounters an unfamiliar substrate.
The most important single step you can take is to correctly identify the material you intend to
print on. Be specific. Don't just tell your ink supplier you'll be printing on "plastic."
Polypropylene and polystyrene are both plastics, but as different from one another as night and
day when it comes to screen printing on them.
This does not just apply to plastics; the same thing goes for every type of material. You are not
printing on metal but on aluminum or brass. If the metal has a coating, remember you're not
really printing "on" the metal, you're printing on that coating. The coating is what you need to
identify.
Sometimes, though, you may unwittingly stray into unfamiliar territory. The substrate may
closely resemble something you've printed before, but is it really the same material? Even if
you've printed the same type of material a hundred times before, a slight change in the
manufacturing process can make the familiar unfamiliar. Something as subtle and invisible as a
new silicone coating can make a material impossible to print in the normal way.
Don't depend on your substrate supplier to alert you to every change in the manufacturing
process or even be aware of it. Suppliers are not usually in the business of screen- printing
themselves, and often the first time they become aware of a printing problem is when you tell
them about one. The responsibility for knowing the material you're printing on and what it takes
to put ink on it and keep it there is all yours. A basic rule to keep in mind is that any change in
the substrate changes everything.
Another thing to consider: If you print on a number of different types of substrate, you can easily
find yourself with a considerable investment in inventory. Not only do you have the different
types of ink but their corresponding array of thinners, additives and wash-ups. Since a quart of
ink is the smallest quantity you can buy, you may end up with nearly full cans of oddball colors
dating back to a small area on a few signs you printed years ago. Over time this can amount to a
considerable storage, and eventually, a disposal problem.
It's worth taking some time to organize your storage area because with a variety of different inks
on hand, the risk of grabbing the wrong type increases. Using the wrong ink accidentally is just
as bad as using the wrong one through ignorance. You should never mix different types of ink
together and be very cautious even about blending similar types of ink if they come from
different manufacturers.
Testing, testing
Fortunately, most suppliers will be able to give you some advice about which ink you need to
use. While such recommendations are certainly welcome, they don't relieve you of the
responsibility to do your own test prints. If you neglect this step, and run into problems, no ink
manufacturer or substrate supplier will take the blame for them. Ink manufacturers print
warnings in their catalogs and in every piece of literature they produce. It is your job to run test
prints to see if the ink you're using will work on that specific substrate. The very fact that
manufacturers need to post such disclaimers should alert you to the fact that problems are far
from rare. When printers get together, horror stories of "ink failures" regularly make the rounds,
but how can you call it "ink failure" when the ink has behaved exactly as it was designed to do?
Manufacturers do just about everything else to insure you get great results when you use their
products. In fact, many of them will test your substrate using a number of their inks to see which
one works best. You should be able to arrange with your supplier to send samples off to the lab
for testing. It may take anywhere from a few days to a week or more for the results to come back,
but they will definitely tell you which ink to use. Unfortunately, you may be in the position of
keeping an anxious customer at bay while you wait for the test results. But it's far better to make
a customer wait for the job than to have him unpack a bunch of signs and watch the ink flake off.
Manufacturer's labs can save you lots of money. The biggest saving obviously comes from
avoiding the costs of a botched print job. But lab testing can also spare you the more modest
expense of buying different types of ink to do your own tests. Still, once you've got that
recommended ink, pour it into a screen and pull your own tests. A lot of factors can affect ink
into the middle of a production run.
After you've printed your samples, set them aside to dry for twenty-four hours. Then
belabor your prints with fingernails, pencil points, and whatever else is handy. Do
everything you can to try to scrape the ink off the substrate. Lay a strip of tape on the ink
and smooth it down until you've got an almost perfect seal. Then rip it off. If the ink still
stays on, you've got a winner.
Your choice of ink will affect a host of other factors as well: the mesh count in your
screens, the stencil material used, and how you dry your prints. Each type of ink has its
corresponding battery of solvents, additives and wash-ups, and in some cases, special
screenprinting techniques designed to put that ink onto a substrate and keep it there. This is
why printing on a number of different materials can get expensive. As we said earlier, a
screenprinting ink has been developed for almost every type of material that can be printed.
Fortunately, sign printers only have to worry about a few of them.
Screen printing, also known as serigraphy, is a method of applying ink to a
surface through a stencil supported on a fine mesh of synthetic fibers or
metal threads stretched tightly over a frame. The stencil provides a means to
determine where the ink will be allowed to pass through the mesh to create
an image on the surface to be printed. Ink is applied to the screen and
pushed through the open mesh areas with a rubber or plastic squeegee to
produce an image.
No other printing process is as versatile as screen printing. It can print on
almost any surface, including: metal, glass, paper, plastic, cloth, wood, you
name it! Machines for screen printing use the inside of the screen frame to
act as the ink storage area. The ink is then forced through the screen by the
squeegee pushing the ink in front of it.
Manual screen printing machines are used for some work such as limited runs
or when printing very thin or very thick pieces. Most screen printing today is
performed by semi or fully automatic screen press machines at rates of up to
5,000 or more prints per hour.
How to burn an image into a silk- screen.
Most people want to know how to burn the image into the screen. It is probably the most
difficult part of silk-screening but it is very simple to do. This tutorial is a simple outline of
how to get your artwork from you transparency to the screen.
Step 1:
First, you need to prepare the screen. The screen needs to be degreased so the
emulsion will form a better bond with the screen. This can be done by spraying
degreaser onto the screen and wiping it off.
Step 2:
The emulsion will now be applied to the screen. In a low-light room, pour the emulsion
into the screen coater. Apply the emulsion to both sides of the screen. It is important
that you do not apply the emulsion too thick. It is also important that a uniform coat is
applied to the screen.
Let the emulsion dry for about an hour (or longer) in a dimly lit room. A fan should be
placed about five feet away from the screen to assist in the drying process.
Step 3:
Prepare the artwork. A tutorial on how to prepare the artwork can be found by
.
Step 4:
Place the artwork on the screen.
A piece of glass should be placed on the artwork. This will act as a vacuum so your
artwork will not move while it's being burnt into the screen.
Step 5:
An exposure light is in included with Package #1, #2, and #3. Place the exposure light
about one foot above the screen. Please take a look at the diagram below to see how
everything is situated.
A black felt or cloth is placed beneath the screen to absorb light so that no light is
reflected back up to the screen.
Step 6:
Burning times will vary, but ten minutes is a safe time. It is better to over-burn than
under-burn the screen and emulsion.
After your screen is burnt. Take a spray bottle and mist the screen with water. Take your
screen outside or to a sink or tub and rinse out your screen. If you are having trouble
getting the emulsion out, you may have to increase the water pressure of your hose or
sink.
You should be left with your image burnt into your screen. Once this step is complete,
you are well on your way to printing t-shirts.
clicking
here
Screen printing is not limited to just t-shirts. This process will work on many different
items. Our equipment can silkscreen most items that are flat. This is just a small list of
other items that can be printed with our equipment.

More Related Content

Similar to Screen Printing Guide for Solar Cells

Screen Printing Equipments
Screen Printing EquipmentsScreen Printing Equipments
Screen Printing Equipmentsrenatocarpina
 
Screen Printing Equipments
Screen Printing EquipmentsScreen Printing Equipments
Screen Printing Equipmentsrenatocarpina
 
FINAL REPORT c
FINAL REPORT cFINAL REPORT c
FINAL REPORT cKapil Rana
 
Screen printing equipments
Screen printing equipments Screen printing equipments
Screen printing equipments Jenny Liu
 
How To Simple Stamp For Fabric Printing
How To Simple Stamp For Fabric PrintingHow To Simple Stamp For Fabric Printing
How To Simple Stamp For Fabric Printingkootoyoo
 
Stencil Cut Screenprinting
Stencil Cut ScreenprintingStencil Cut Screenprinting
Stencil Cut ScreenprintingRiverwood HS
 
Photo Essay Presentation Rachel Hill
Photo Essay Presentation Rachel HillPhoto Essay Presentation Rachel Hill
Photo Essay Presentation Rachel HillRachel Hill
 
Dye Sublimation Printing Vs Screen Printing - What's the Difference
Dye Sublimation Printing Vs Screen Printing - What's the DifferenceDye Sublimation Printing Vs Screen Printing - What's the Difference
Dye Sublimation Printing Vs Screen Printing - What's the DifferenceVisigraph
 
THE BEGINNING OF ART AND PRINT GRADE 6.pptx
THE BEGINNING OF ART AND PRINT GRADE 6.pptxTHE BEGINNING OF ART AND PRINT GRADE 6.pptx
THE BEGINNING OF ART AND PRINT GRADE 6.pptxKayLaguna1
 
Screen Printing Technology (Screen Printing Frames, Screen Printing Press, Su...
Screen Printing Technology (Screen Printing Frames, Screen Printing Press, Su...Screen Printing Technology (Screen Printing Frames, Screen Printing Press, Su...
Screen Printing Technology (Screen Printing Frames, Screen Printing Press, Su...Ajjay Kumar Gupta
 
Quantity Takeoff
Quantity TakeoffQuantity Takeoff
Quantity TakeoffRajib Dey
 
Company Presentation 1 22 09
Company Presentation  1 22 09Company Presentation  1 22 09
Company Presentation 1 22 09Tony Reed
 
19252499 Paper Craft Planet Lesson 1
19252499 Paper Craft Planet Lesson 119252499 Paper Craft Planet Lesson 1
19252499 Paper Craft Planet Lesson 1GreenMellen Media
 
Week 9 and 10 photo
Week 9 and 10 photoWeek 9 and 10 photo
Week 9 and 10 photomissfcmay
 
Animation introduction and Materials use in Animation
Animation introduction and Materials use in AnimationAnimation introduction and Materials use in Animation
Animation introduction and Materials use in AnimationJohnreyRadoc
 
What is screen printing
What is screen printing What is screen printing
What is screen printing Usman Ali
 
Frequently Asked Questions3-24
Frequently Asked Questions3-24Frequently Asked Questions3-24
Frequently Asked Questions3-24Jessica Calderwood
 

Similar to Screen Printing Guide for Solar Cells (20)

Screen Printing Equipments
Screen Printing EquipmentsScreen Printing Equipments
Screen Printing Equipments
 
Screen Printing Equipments
Screen Printing EquipmentsScreen Printing Equipments
Screen Printing Equipments
 
FINAL REPORT c
FINAL REPORT cFINAL REPORT c
FINAL REPORT c
 
Screen printing equipments
Screen printing equipments Screen printing equipments
Screen printing equipments
 
How To Simple Stamp For Fabric Printing
How To Simple Stamp For Fabric PrintingHow To Simple Stamp For Fabric Printing
How To Simple Stamp For Fabric Printing
 
Stencil Cut Screenprinting
Stencil Cut ScreenprintingStencil Cut Screenprinting
Stencil Cut Screenprinting
 
Photo Essay Presentation Rachel Hill
Photo Essay Presentation Rachel HillPhoto Essay Presentation Rachel Hill
Photo Essay Presentation Rachel Hill
 
Dye Sublimation Printing Vs Screen Printing - What's the Difference
Dye Sublimation Printing Vs Screen Printing - What's the DifferenceDye Sublimation Printing Vs Screen Printing - What's the Difference
Dye Sublimation Printing Vs Screen Printing - What's the Difference
 
THE BEGINNING OF ART AND PRINT GRADE 6.pptx
THE BEGINNING OF ART AND PRINT GRADE 6.pptxTHE BEGINNING OF ART AND PRINT GRADE 6.pptx
THE BEGINNING OF ART AND PRINT GRADE 6.pptx
 
Screen Printing Technology (Screen Printing Frames, Screen Printing Press, Su...
Screen Printing Technology (Screen Printing Frames, Screen Printing Press, Su...Screen Printing Technology (Screen Printing Frames, Screen Printing Press, Su...
Screen Printing Technology (Screen Printing Frames, Screen Printing Press, Su...
 
Quantity Takeoff
Quantity TakeoffQuantity Takeoff
Quantity Takeoff
 
Screen printing
Screen printingScreen printing
Screen printing
 
Company Presentation 1 22 09
Company Presentation  1 22 09Company Presentation  1 22 09
Company Presentation 1 22 09
 
19252499 Paper Craft Planet Lesson 1
19252499 Paper Craft Planet Lesson 119252499 Paper Craft Planet Lesson 1
19252499 Paper Craft Planet Lesson 1
 
Week 9 and 10 photo
Week 9 and 10 photoWeek 9 and 10 photo
Week 9 and 10 photo
 
Animation introduction and Materials use in Animation
Animation introduction and Materials use in AnimationAnimation introduction and Materials use in Animation
Animation introduction and Materials use in Animation
 
Screen printing
Screen printingScreen printing
Screen printing
 
What is screen printing
What is screen printing What is screen printing
What is screen printing
 
Etching 15
Etching 15Etching 15
Etching 15
 
Frequently Asked Questions3-24
Frequently Asked Questions3-24Frequently Asked Questions3-24
Frequently Asked Questions3-24
 

Recently uploaded

Crayon Activity Handout For the Crayon A
Crayon Activity Handout For the Crayon ACrayon Activity Handout For the Crayon A
Crayon Activity Handout For the Crayon AUnboundStockton
 
Organic Name Reactions for the students and aspirants of Chemistry12th.pptx
Organic Name Reactions  for the students and aspirants of Chemistry12th.pptxOrganic Name Reactions  for the students and aspirants of Chemistry12th.pptx
Organic Name Reactions for the students and aspirants of Chemistry12th.pptxVS Mahajan Coaching Centre
 
Enzyme, Pharmaceutical Aids, Miscellaneous Last Part of Chapter no 5th.pdf
Enzyme, Pharmaceutical Aids, Miscellaneous Last Part of Chapter no 5th.pdfEnzyme, Pharmaceutical Aids, Miscellaneous Last Part of Chapter no 5th.pdf
Enzyme, Pharmaceutical Aids, Miscellaneous Last Part of Chapter no 5th.pdfSumit Tiwari
 
History Class XII Ch. 3 Kinship, Caste and Class (1).pptx
History Class XII Ch. 3 Kinship, Caste and Class (1).pptxHistory Class XII Ch. 3 Kinship, Caste and Class (1).pptx
History Class XII Ch. 3 Kinship, Caste and Class (1).pptxsocialsciencegdgrohi
 
Biting mechanism of poisonous snakes.pdf
Biting mechanism of poisonous snakes.pdfBiting mechanism of poisonous snakes.pdf
Biting mechanism of poisonous snakes.pdfadityarao40181
 
Meghan Sutherland In Media Res Media Component
Meghan Sutherland In Media Res Media ComponentMeghan Sutherland In Media Res Media Component
Meghan Sutherland In Media Res Media ComponentInMediaRes1
 
Full Stack Web Development Course for Beginners
Full Stack Web Development Course  for BeginnersFull Stack Web Development Course  for Beginners
Full Stack Web Development Course for BeginnersSabitha Banu
 
POINT- BIOCHEMISTRY SEM 2 ENZYMES UNIT 5.pptx
POINT- BIOCHEMISTRY SEM 2 ENZYMES UNIT 5.pptxPOINT- BIOCHEMISTRY SEM 2 ENZYMES UNIT 5.pptx
POINT- BIOCHEMISTRY SEM 2 ENZYMES UNIT 5.pptxSayali Powar
 
Pharmacognosy Flower 3. Compositae 2023.pdf
Pharmacognosy Flower 3. Compositae 2023.pdfPharmacognosy Flower 3. Compositae 2023.pdf
Pharmacognosy Flower 3. Compositae 2023.pdfMahmoud M. Sallam
 
Hierarchy of management that covers different levels of management
Hierarchy of management that covers different levels of managementHierarchy of management that covers different levels of management
Hierarchy of management that covers different levels of managementmkooblal
 
Earth Day Presentation wow hello nice great
Earth Day Presentation wow hello nice greatEarth Day Presentation wow hello nice great
Earth Day Presentation wow hello nice greatYousafMalik24
 
Solving Puzzles Benefits Everyone (English).pptx
Solving Puzzles Benefits Everyone (English).pptxSolving Puzzles Benefits Everyone (English).pptx
Solving Puzzles Benefits Everyone (English).pptxOH TEIK BIN
 
KSHARA STURA .pptx---KSHARA KARMA THERAPY (CAUSTIC THERAPY)————IMP.OF KSHARA ...
KSHARA STURA .pptx---KSHARA KARMA THERAPY (CAUSTIC THERAPY)————IMP.OF KSHARA ...KSHARA STURA .pptx---KSHARA KARMA THERAPY (CAUSTIC THERAPY)————IMP.OF KSHARA ...
KSHARA STURA .pptx---KSHARA KARMA THERAPY (CAUSTIC THERAPY)————IMP.OF KSHARA ...M56BOOKSTORE PRODUCT/SERVICE
 
Software Engineering Methodologies (overview)
Software Engineering Methodologies (overview)Software Engineering Methodologies (overview)
Software Engineering Methodologies (overview)eniolaolutunde
 
DATA STRUCTURE AND ALGORITHM for beginners
DATA STRUCTURE AND ALGORITHM for beginnersDATA STRUCTURE AND ALGORITHM for beginners
DATA STRUCTURE AND ALGORITHM for beginnersSabitha Banu
 
Introduction to AI in Higher Education_draft.pptx
Introduction to AI in Higher Education_draft.pptxIntroduction to AI in Higher Education_draft.pptx
Introduction to AI in Higher Education_draft.pptxpboyjonauth
 
Final demo Grade 9 for demo Plan dessert.pptx
Final demo Grade 9 for demo Plan dessert.pptxFinal demo Grade 9 for demo Plan dessert.pptx
Final demo Grade 9 for demo Plan dessert.pptxAvyJaneVismanos
 
Framing an Appropriate Research Question 6b9b26d93da94caf993c038d9efcdedb.pdf
Framing an Appropriate Research Question 6b9b26d93da94caf993c038d9efcdedb.pdfFraming an Appropriate Research Question 6b9b26d93da94caf993c038d9efcdedb.pdf
Framing an Appropriate Research Question 6b9b26d93da94caf993c038d9efcdedb.pdfUjwalaBharambe
 

Recently uploaded (20)

TataKelola dan KamSiber Kecerdasan Buatan v022.pdf
TataKelola dan KamSiber Kecerdasan Buatan v022.pdfTataKelola dan KamSiber Kecerdasan Buatan v022.pdf
TataKelola dan KamSiber Kecerdasan Buatan v022.pdf
 
9953330565 Low Rate Call Girls In Rohini Delhi NCR
9953330565 Low Rate Call Girls In Rohini  Delhi NCR9953330565 Low Rate Call Girls In Rohini  Delhi NCR
9953330565 Low Rate Call Girls In Rohini Delhi NCR
 
Crayon Activity Handout For the Crayon A
Crayon Activity Handout For the Crayon ACrayon Activity Handout For the Crayon A
Crayon Activity Handout For the Crayon A
 
Organic Name Reactions for the students and aspirants of Chemistry12th.pptx
Organic Name Reactions  for the students and aspirants of Chemistry12th.pptxOrganic Name Reactions  for the students and aspirants of Chemistry12th.pptx
Organic Name Reactions for the students and aspirants of Chemistry12th.pptx
 
Enzyme, Pharmaceutical Aids, Miscellaneous Last Part of Chapter no 5th.pdf
Enzyme, Pharmaceutical Aids, Miscellaneous Last Part of Chapter no 5th.pdfEnzyme, Pharmaceutical Aids, Miscellaneous Last Part of Chapter no 5th.pdf
Enzyme, Pharmaceutical Aids, Miscellaneous Last Part of Chapter no 5th.pdf
 
History Class XII Ch. 3 Kinship, Caste and Class (1).pptx
History Class XII Ch. 3 Kinship, Caste and Class (1).pptxHistory Class XII Ch. 3 Kinship, Caste and Class (1).pptx
History Class XII Ch. 3 Kinship, Caste and Class (1).pptx
 
Biting mechanism of poisonous snakes.pdf
Biting mechanism of poisonous snakes.pdfBiting mechanism of poisonous snakes.pdf
Biting mechanism of poisonous snakes.pdf
 
Meghan Sutherland In Media Res Media Component
Meghan Sutherland In Media Res Media ComponentMeghan Sutherland In Media Res Media Component
Meghan Sutherland In Media Res Media Component
 
Full Stack Web Development Course for Beginners
Full Stack Web Development Course  for BeginnersFull Stack Web Development Course  for Beginners
Full Stack Web Development Course for Beginners
 
POINT- BIOCHEMISTRY SEM 2 ENZYMES UNIT 5.pptx
POINT- BIOCHEMISTRY SEM 2 ENZYMES UNIT 5.pptxPOINT- BIOCHEMISTRY SEM 2 ENZYMES UNIT 5.pptx
POINT- BIOCHEMISTRY SEM 2 ENZYMES UNIT 5.pptx
 
Pharmacognosy Flower 3. Compositae 2023.pdf
Pharmacognosy Flower 3. Compositae 2023.pdfPharmacognosy Flower 3. Compositae 2023.pdf
Pharmacognosy Flower 3. Compositae 2023.pdf
 
Hierarchy of management that covers different levels of management
Hierarchy of management that covers different levels of managementHierarchy of management that covers different levels of management
Hierarchy of management that covers different levels of management
 
Earth Day Presentation wow hello nice great
Earth Day Presentation wow hello nice greatEarth Day Presentation wow hello nice great
Earth Day Presentation wow hello nice great
 
Solving Puzzles Benefits Everyone (English).pptx
Solving Puzzles Benefits Everyone (English).pptxSolving Puzzles Benefits Everyone (English).pptx
Solving Puzzles Benefits Everyone (English).pptx
 
KSHARA STURA .pptx---KSHARA KARMA THERAPY (CAUSTIC THERAPY)————IMP.OF KSHARA ...
KSHARA STURA .pptx---KSHARA KARMA THERAPY (CAUSTIC THERAPY)————IMP.OF KSHARA ...KSHARA STURA .pptx---KSHARA KARMA THERAPY (CAUSTIC THERAPY)————IMP.OF KSHARA ...
KSHARA STURA .pptx---KSHARA KARMA THERAPY (CAUSTIC THERAPY)————IMP.OF KSHARA ...
 
Software Engineering Methodologies (overview)
Software Engineering Methodologies (overview)Software Engineering Methodologies (overview)
Software Engineering Methodologies (overview)
 
DATA STRUCTURE AND ALGORITHM for beginners
DATA STRUCTURE AND ALGORITHM for beginnersDATA STRUCTURE AND ALGORITHM for beginners
DATA STRUCTURE AND ALGORITHM for beginners
 
Introduction to AI in Higher Education_draft.pptx
Introduction to AI in Higher Education_draft.pptxIntroduction to AI in Higher Education_draft.pptx
Introduction to AI in Higher Education_draft.pptx
 
Final demo Grade 9 for demo Plan dessert.pptx
Final demo Grade 9 for demo Plan dessert.pptxFinal demo Grade 9 for demo Plan dessert.pptx
Final demo Grade 9 for demo Plan dessert.pptx
 
Framing an Appropriate Research Question 6b9b26d93da94caf993c038d9efcdedb.pdf
Framing an Appropriate Research Question 6b9b26d93da94caf993c038d9efcdedb.pdfFraming an Appropriate Research Question 6b9b26d93da94caf993c038d9efcdedb.pdf
Framing an Appropriate Research Question 6b9b26d93da94caf993c038d9efcdedb.pdf
 

Screen Printing Guide for Solar Cells

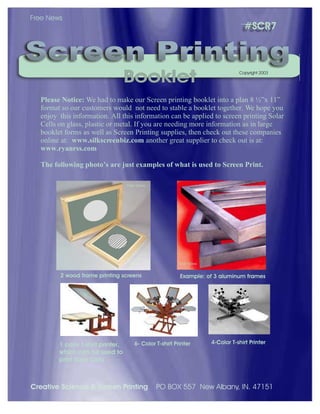
  • 1. #SCR7 Please Notice: We had to make our Screen printing booklet into a plan 8 ½”x 11” format so our customers would not need to stable a booklet together. We hope you enjoy this information. All this information can be applied to screen printing Solar Cells on glass, plastic or metal. If you are needing more information as in large booklet forms as well as Screen Printing supplies, then check out these companies online at: www.silkscreenbiz.com another great supplier to check out is at: www.ryanrss.com The following photo’s are just examples of what is used to Screen Print. Screen PrintingScreen Printing BookletBooklet Free News Copyright 2003 Free News Free News 2 wood frame printing screens Example: of 3 aluminum frames 1 color t-shirt printer, which can be used to print Solar Cells 6- Color T-shirt Printer 4-Color T-shirt Printer Creative Science & Screen Printing PO BOX 557 New Albany, IN. 47151
  • 2. Wood Frame Screen Printing Image!Image!Image!Image! Screen cloth & Photo Emulsion Learn how to Screen Print. Screen printing is done all over the world by very large printing companies right down to the guy who does it at home in his basement. Screen printing was first discovered by the Chinese hundreds of years ago. It is a very simple process that anyone can do. The Chinese first used silk to use in there wood frames to print with, then as time went on better material was made to print with. We hope you enjoy this small booklet, it was thrown together very quickly for Creative Science and Research as a help for there customers. If you would like to learn more. your local library will have more information or any local art store. many books have been written on this subject or see www.Silkscreenbiz.com www.ryanrss.com or signindustry.com Screen Printing #SCR7 Page 1 Copyright 2003 Creative Science
  • 3. Screen Printing #SCR7 Copyright 2003 Creative Science SO HOW DO WE SCREEN PRINT? Screen printing is done by using a wooden frame with screen printing cloth stretched over it, Then there is a photo emulsion applied to the screen, dried and then exposed to a bright light source, ( You can use the sun or a photo bulb ) but before exposing it to the light source, you must first apply your film positive to the back of screen. A film positive is simply a clear piece of plastic with a silhouette or a profile or art work design filled in with a dark color, in this case you can use dark red or black. Art stores and screen supply companies sell a red film you can cut with an exacto knife called amerlith. You simply cut out your design and peel away the background that you do not want. I suggest you go to a local screen printing shop and ask them if you can buy a small 24” x 24” piece, it would be cheaper than buying a whole roll. Once you are done cutting out your design on the amberlith plastic film, you then spray the front of it ( the side with the film cut on it, ) with all purpose spray adhesive, let it dry for 3 minutes or so and then apply to back of Photo emulsioned screen and then expose to light source. Now after exposing it to the sun, the screen is then washed out with water using a water hose. The black or red image on the film positive did not let any sun get to the photo emulsion, therefor the unexposed photo emulsion can then be washed out, the other has been hardened by the sun light and can not be washed out. now after the screen has dried. you can use it to print your image with over and over as many times as you like. Ink is then applied to the inside of the screen, and by using a soft rubber squeegee, you pull the ink over top of the image area. ink then only passes through that area which was not exposed to the sun. ( See our video ) This process is known as screen printing. Let me give an example: The screen is like an open water valve, when certain areas of the screen are stopped off, then the water can not go through it, only where you want it to go. The photo emulsion can be like this example: take a 8 1/2" x 11" piece of paper. now cut a hole in it. now lay it flat down onto a table. Now get a can of spray paint and begin spraying the paper. Now lift the paper up and what do you have? you have a painted circle. This is the same way screen printing works. The nice thing about screen printing is you can pass just about any type of liquid you want through the screen print area. If you are printing on paper you can screen print with any type of paint or screen printing ink, just as long as it is thick enough. If it is to thin your printed image will have run spots. Page 2
  • 4. Of course there is a much easier way to make your own screen and that is to buy one. they are not that expensive. In your Yellow page phone book look under art supply stores and then look under Screen printing companies. Tell them what you are doing and ask them how much they will charge for a screen the size of a T-shirt screen, (Fine mesh-yellow or white ) and also ask how much they would charge to coat out and expose for you. should be only about $25 for the screen and $19 to coat out with photo emulsion and expose it for you. They are pro's most know what they are doing. Materials you will need Wood Frame Image for Solar Cells Photo Emulsion Screen Screen Printing Ink Squeegee Used to move the printing ink from the top of the inside of the screen to the bottom. To press the ink through the image and screen onto the glass or paper. INK Ink can be thick paint(oil base), or special Screen printing ink, or in your case an Ink that you will create to print Solar Cells with. Printing Ink can not be to thin or it will run on the printed image. and it can not be to thick where it will not go through the screen. By adding your thinner or not adding thinner you can control this. it is like thinning paint to paint a house. 1. SPRAY ADHESIVE 2. RAGS-Viva PAPER TOWELS for clean up. 3. MINERAL SPIRITS 4. LACQUER THINNER 5. SMALL DOOR HINGES 6. A TABLE TO PRINT ON 7. PHOTO EMULSION or LACQUER FILM 8. RUBYLITHE or AMBERLITH FILM 9. EXACTO KNIFE 10. Screen Coater 13 1/2" IT IS BEST IF YOU MAKE OR BUY 2 SCREENS 1- used for negative contact, nickel mesh print 2nd used for layers n-type and p-type. Screen Printing #SCR7 Copyright 2003 Creative Science Page 3
  • 5. Screen Printing #SCR7 Copyright 2003 Creative Science Now lets assume that the screen is all prepared and ready. 1st- You attach the 2 x 4 to the table using nails or wood screws. Then you take the wood screen and lay it flat on the table, push the back up against the 2x4, now attach the door hinge to the 2x4 and the wood screen using wood screws. you will need 2 hinges one for the top left side and one for the right top side. Now the screen can move up and down. Now to keep the screen up while you are registering the glass or what ever you will be printing on, you will need to add a kickleg (see drawing). now lay down the screen on top of the glass, and move the glass around until the print image is right over top of it or is in the desired position. Now take some masking tape and tape 3 pieces onto the table right up to the glass, this will be your registration marks which you can then after printing your first piece of glass or paper can place another in the same place and print it in the exact same spot. You can Screen Print the Solar Cells either- or top view tape without screen + + + + + + Registration To simplify registration we are showing the top view without the screen. (of course the screen should be there when registering your item that you are going to print.) Once you have completed registration pencil around the glass onto the table, then remove glass then place paper all around pencil area on the outside so you will not overspray the hold down adhesive. Now spray the adhesive onto the table and let dry 5-10 minutes. This process will help hold down the glass to the table while you are printing so the glass will not move and you will get a good print. Glass or other wood table Glass Kickleg nail sml door hinge 2" x 4" wood Squeegee wood screen side view How to Screen Print Page 4
  • 6. Screen Printing #SCR7 Copyright 2003 Creative Science apply ink here wood screen step 1 step 4 Start to print Printing Finished print Holding squeegee with 2 hands press down w/angle and come toward you. step 3 step 2 with your ink flood screen 1st Page 5
  • 7. Screen Printing #SCR7 Copyright 2003 Creative Science step 5 flood screen again for next print. or STOP. step 6 Remove object ( Glass ) that you have printed and let it air dry. Once you have finished printing. you must clean up your screen. It is very important not to let ink dry in screen. The longer you wait the more chance you will have of your screen getting glogged up and you could mess up your screen forever. Use paper towels and mineral spirits to clean up. depending on what kind of ink you use will determine what type of clean up solvent. Printing cont... Page 6
  • 8. Screen Printing #SCR7 Copyright 2003 Creative Science Stretch Screen and staple down to wood frame. Then trim up screen mesh all the way to the outside frame. Screen should be tight enough to bounce a penny on it. Making your Screen It is very easy to build your own screen. Use 2" x 2" pieces of wood for your frame. You can angle them together or square them together. Use wood glue and steel angle from a hardware store, this will help keep the frame strong. Frame size is 19 1/2" x 23 1/2". Now you must purchase screen material from a art supply store or from a screen printing supply company or buy some from a screen printing shop. Most shops are very helpful. ( Some sign painting companies also screen print, Check your yellow page phone book. ) tell them you want to buy a fine screen mesh yellow or white. But not to fine a mesh, but not to course either. Now place your frame down flat on a table and place your screen mesh over top of it. cut your screen mesh leaving about 4" hanging from all around the frame. Now using a staple gun, start stapling one end only, now go to the opposite end and staple that while griping the screen mesh in your right hand and stapling with the other hand. YOU MUST STRETCH THE MATERIAL TIGHT STARTING FROM THE CENTER and working your way outward. 1st 1st 2nd 2nd Page 7
  • 9. Screen Printing #SCR7 Copyright 2003 Creative Science Prep. your Screen Now you must prepare your screen for the photo emulsion. If the screen is not cleaned right, the photo emulsion will have a hard time sticking to it. Use Ajax scrubbing bleach cleaner ( Bleach powder You can buy it at any store.) Now take the screen and spray it on both sides with water, now while it is still wet apply the Ajax bleach on both sides, ( it does not take much, Don't over kill it.) Now using a wet cotton rag or cloth scrub the screen on both sides, clean it very well. Now take a water hose and spray out all the ajax, THIS IS VERY IMPORTANT! Spray both sides of the screen. Each side should take you about 2 - 3 minutes per side to spray out. if all of the bleach is not sprayed it it will cause problems with the photo emulsion, it will not stick good in spots. Bleach will take out exposed photo emulsion, this is what the old timers used to clean out the photo emulsion after they where done screen printing with the screen. But in your case you will just keep the image in the screen for later use. Ajax BLEACH Now set the screen aside and let air dry or use a fan to dry it with. ( put your screen in a place where not alot of dust is located. ) Once your screen is dry you are ready for the photo emulsion. you will need a very low light area, 1- small bottle of photo emulsion ( Follow the instructions on the bottle. ) and 1- plastic or metal screen coater. make sure the photo emulsion is very well mixed before each use. Now take the photo emulsion and pour it into the screen coating spreader. ( you can make one your self out of card board or buy one at a supply store. The plastic ones are very cheap. ) Now take the screen coater with hand while holding the small screen with the other. Starting from the bottom, place the screen coater onto the screen, Now angle it so the emulsion will start to slowly run out. Now slowly move up and over the screen coating the back side with one coat. Now flip screen over to the other side and coat it the same way. you should now have a nice smooth thin coat of photo emulsion on both sides of screen, wait 70 seconds, now coat just the back side of screen one more time. now you are done. place the coater on a flat table and take a small square piece of card board and smooth out the build ups that where made by the edge of the coater. Now take the screen and lay it flat away from the floor and apply a fan. YOU MUST USE A FAN! Photo emulsion will come with complete instructions. Page 8
  • 10. Screen Printing #SCR7 Copyright 2003 Creative Science Exposing. your Screen Side view of screen being dried with fan. Coating out screen Let dry for about 2 hrs screen Photo emulsion What you are seeing here is the back of the screen being coated out with a screen coater with photo emulsion in it. Coat backside, then front side, then back side again, then let dry with a fan. ( See Video ) Now once your screen has dried, you take your film positive which you can cut from amberlith or rubylithe using an exacto knife. It is a red easy to cut film that is attached to a clear piece of mylar plastic. You cut away what you do not want to print. It is very simple. In your case you simply cut a square or a circle and remove all the red film around it. While leaving the circle or square. ( You can also buy this at any supply store.) Or you can do it all on a computer using a laser printer, printing your image in black on clear plastic. or you can copy your image using a copier at a copier office supply place. ( They sell clear plastic for this. many people use it for overhead projectors.) Now you can spray the back of your film positive with spray adhesive, (If you spray the wrong side just use mineral sprits to wipe it off. ) Now let the spray dry for 5 minutes. Now stick it to the back side of the photo screen. now lay it flat on the dry ground out in the full sun light for about 5-10 minutes. It has been a long time since I have done it this way, But I am sure it is 10 minutes. After that time take off the film and take your screen into a semi- dark area ( Best if inside of a garage.) and take a water hose with a sprayer attached and start spraying it lightly with a spray of water not a strong stream. spray out the unexposed photo emulsion, you will see it start to come out in about 1 or 2 minutes, now spray the other side of screen lightly. now hold screen up to a light to see if you got all of it out. Page 9
  • 11. Screen Printing #SCR7 Copyright 2003 Creative Science Exposing. your Screen cont... Now while screen is still wet, feel both sides of the emulsion with one finger if either side feels snotty or very soft and green and it is coming off onto your finger, then you have not exposed screen long enough in the sunlight. If it is fine then take a piece of news paper and place it on the back side of screen first, now take your hand and smooth the news paper out on the screen, the paper will begin soaking up water from the screen. This is called blotting the screen, you do this on both sides of the screen. if the news paper sticks to the inside of the screen then you have under exposed the screen. ( It will stick a little this is normal.) Now repeat the blotting one more time.( But Quickly ). Now you must take an air hose and with a very small amount of pressure blow out the rest of the water from the print area. ( You can blow it out, by blowing out the water by mouth, but not to fun to do. ) or you can use a small air brush air compressor, it is great for this. If you do not do this, you can get what we call a clear glog up. When you go to print you will see small streaks in your print. If you study and do everything I told you, you will have no problems. Now set the screen back up in front of the fan and let it dry for about 1 - 2 hrs. After it has dried you are now ready to plug up the pinholes. Pinholes are caused by dust during exposure. Use a small modeling brush and take some of your fresh photo emulsion and mix in a little water then stir it up real good. Then touch up all the pin holes around the print area. ( There should not be that many if you have done it right.) You can do your touching up in a lighted area. after you have touched up your pin holes, let screen dry for about 1 hr. then expose to the sun for 5 - 10 more minutes this will harden the touch up photo emulsion you used. because if you do not expose the unexposed touch up emulsion, when you go to print if you are using a hard thinner in your ink such as Lacquer thinner or Xylene Thinner it will harden the photo emulsion permanently into the screen and you will never get it out, if you ever want to use the screen for something else. They have 2 types of Photo emulsion, One is great for using with mineral spirits the other is great for using with These harder thinners. Such as Lacquer thinner or Xylene. Which you can buy at a paint store or hardware store. SUPPLIERS Internet: www.ryanrss.com, www.Silkscreenbiz.com, www.lancergroup.com, www.SignIndustry.com National Decorators Supply Co. 443 Virginia Ave. Indianapolis, IN. phone: 1-800-428-5022 zip 46203 or call: 1-800-382-2095 in INDIANA Also check your Yellow Page phone book for: Screen Printing supply Page 10
  • 12. Screen Printing #SCR7 Copyright 2003 Creative Science Now tape the inside corners on the inside of your screen where the ink is going to be. You want to plug up every hole so the ink will not leak through onto your table or the glass or paper you are printing on. After you have done this then go back to page 3 and 4 and go through the steps. You are now ready to print. I hope we have giving you enough info to work with, I believe we have. Do not let this all scare you out of screen printing. Screen printing is very simple to do once you do it. Masking Tape Now Carefully mix your solar cell chemicals together and by using the thinner described in the Patent thin as needed chemicals will be in powder form. except for thinner. Ulano FX-88 Photo-emulsion Plastic Screen Coater Card board scraper 13 1/2" About Page 11
  • 13. Screen Printing #SCR7 Copyright 2003 Creative Science Photo Screen Emulsion Optional: 1- Color T-shirt printer or jacket printer, also great for printing flat material such as signs and Solar Cells, stickers etc.. Screen Clamps Screen clamps can be purchased at any screen supplier. They are used for table top printing. This is what you should start out with. Page 12
  • 14. Screen Printing #SCR7 Copyright 2003 Creative Science BE YOUR OWN BOSS! Build a T-Shirt Printing Press With these plans it is easy and it is fun! Anyone can build! $19.95 for plans/blue prints Only #JC-m1 # 402VideoVideo only $29.95 Plans are step by step construction and are professionally done. easy to build. You can also print on paper cardboard, steel or glass with this machine. GUARANTEED TO WORK OR YOUR MONEY BACK! Start your own Screen Printing Business Www.fuellesspower.com Page 13
  • 15. Screen Printing #SCR7 Copyright 2003 Creative Science JCM1 5 -Color Screen Printing Machine Constructed By: David Waggoner 1991 Replace T-shirt with Glass or other and print solar cells Example: 4” diameter Solar Cell Image in photo screen Page 14
  • 16. Screen Printing #SCR7 Copyright 2003 Creative Science Free News Example of other screen printing devices. Although you can print without a machine it would be nicer for you. Again if you want to go the cheap way you can get set up for less than $100 using an old table top and 2 small screens and a kick leg to keep your screen up and to flip it back when you want to lower your screen after you flood your screen. Below is a photo of a spring loaded kick leg designed by David Waggoner. You may want to build your own. Or simply use a long piece of wood with a nail. Screen printing Kick leg, Spring loaded, Keeps screen in up position when flooding with ink and lowers Designed and built by: David Waggoner Page 15
  • 17. Screen Printing #SCR7 Copyright 2003 Creative Science Solar Cell Printing _ + If I were you, I would make the Solar Cells in this shape. You will get more Free Energy For your money. Hopefully soon we can have a step by step booklet made to show you how to do it. But there is so much research to do and so little time to do it. FILM POSITIVES WOULD LOOK LIKE THIS Clear Plastic Clear Plastic 1/16" thick grid lines 1ST PRINT: This is what will connect to the negative layer. Using Nickel, silver or aluminum ink or paint. You can buy this ink or paint at any electronic supply house or screen printing supply house. Image size 10" x 10" #2,#3,#4 & #5 LAYERS: This one film positive can be used for all 4 of the last layers. this means you can print one layer, clean it up then print your next layer then clean it up etc... by using the same screen for all 4 of the last layers, because the image is the same. Image size 9" x 9" #5 layer is for picking up the + positive. Use a solid 9"x9". Using nickel or aluminum ink or paint. 10" 10" 9" 9" END, Next pages are Free News Page 16
  • 18. Screen Printing #SCR7 Copyright 2003 Creative Science Free News 6 - Color T-shirt, Jacket and cap printer Photo Emulsions etc... Photo Emulsions Coater Photo Screen Exposure You can simply use sunshine or a bright photo bulb as well. Different size wood screens Infra red dryer for drying ink printed on t-shrits or other. Signs etc... Hand Squeegee, wood and rubber
  • 19. Screen Printing #SCR7 Copyright 2003 Creative Science Free News
  • 20. GENERAL INFORMATION: Garment screen printing is a mass-production-manufacturing method by which, most typically, a quantity of finished garments is printed with a design, in one or more of several kinds of ink. A permeable printing fabric is stretched tightly across a frame. To this fabric, typically by mechanical and photographic means (similar to those used in basic black-and-white photography), a stencil is affixed. This screen/stencil represents one color in a multi-color design. For every color in the design, another stencil, another screen, and another position on your printing press are required. In other words, if you're printing a design composed of four colors, you'll require a four-color press with four screens, each of which bears its own stencil. Each with a separate squeegee, the ink colors are, in turn, pushed through their stencils onto the garment. This is done by hand on a manual press, or mechanically on an automatic press. After all the colors have been printed on the garment, it is typically run through a conveyorized dryer, or curing unit, which cures the ink, to make the design impervious to normal washing and drying as well as normal wear and tear. The decorated garments are then sold at retail, at wholesale, by mail order or through any number of different outlets, and you can pocket the profit. Don't be fooled, though. You can loose money almost as easily as you can make it if proper understanding and appropriate planning aren't part of your formula for success. The above, of course, is a very simplified description of the garment-screen-printing process. It gets more complex from here. Still, if it sounds appealing, read on, always bearing in mind that the best way to establish a successful garment-decorating operation is to learn as much as you can about the market and the procedures involved in serving it, prior to making any significant investment in equipment or supplies, and prior to making any long-range business plans. Screen Printing #SCR7 Copyright 2003 Creative Science Free News
  • 21. Computer Separations Computer separations usually are rendered from art created in a computer graphics program. Other art can be separated with the use of a computer, but first it must be scanned or converted digitally before it can be manipulated in a graphics program. Although there are many separation programs and drawing programs with separation options, they all must reach a common end. A piece of art created in a vector program is separated easily because the color usage is controlled during the creation of the art. The program will render separations per color and will print out exactly what the artist needs. Fine art or photographs can be separated by computer provided the artist has access to a large-format scanner, a drum scanner, or a digital camera. (If the art department doesn't own any equipment, a service bureau can be paid to scan these images.) For best results, the image should be scanned at about 300 DPI in an RGB mode and saved as a TIFF file. Once the piece of art is converted digitally, it can then be introduced into the design program (in this case, preferably a program that can manipulate full-color scanned images, like PhotoShop). When a design is in this type of program, it can render process separations, or areas of color can be selected to create individual channels for each color, producing spot plates. The use of PhotoShop plug- ins can decrease time spent creating spot-color channels. Many of these plug-ins use a predetermined ink color set, which enables the finished product to closely resemble the original design. To calculate line counts for halftone screens, simply divide the mesh count by four. The result will equal the highest line count that should be used. The artist must have an understanding of mesh counts and their effect on the press. For instance, when a fade is needed in a design, the artist may be tempted to put it in a high mesh. However, if that same color also consists of large, open print areas, the printer will require a mesh in a lower count. In this instance, the artist should calculate the halftone line based on the lower mesh. To determine the best resolution for a design, multiply line count by 2.5. Example: 55 lines = 137.5 resolution. This should prevent the program from producing undersized dots in the lower-percentage halftone areas. When the design is ready to be separated, it may be printed directly from the program, or you may split the channels to create individual files to be printed later. The program creates individual files for each color, giving the artist the option to go back and change a color individually if the print performance is not satisfactory. It is important to label each color and to make sure that each piece of film is complete with registration marks. Most programs offer these options on the separation screen, but some programs require the artist to incorporate the color names and registration marks with his or her designs. The artist must type each color name in its own color and color the registration marks with the "registration" color option. Image output refers to the method in which a computer prints art or separations. One way of printing separations is on a laser jet printer. An artist may choose to print out directly on vellum, which exposes well, or on paper, which is then shot by a camera to render the films. In addition to laser jet printers, an image setter may be used to output separations. This equipment enables the artist to print out his or her art directly onto film (and can totally replace a darkroom). top
  • 22. Artwork Though there are many ways to create art, the artist should know some basic information for creating art for screen printing. Some of the questions the artist should ask include: !What is the substrate? (color? type of garment? material content?) !What type of print? (process? spot?) !What size does the art need to be? (child? adult? left-chest?) !What are the ink opacity requirements? (bright? muted? glossy? matte?) !Is an underlay needed? (bright ink on darks? specialty inks?) !What are the registration requirements? (butt? trap? overprint?) !What are your production capabilities? (auto? manual? number of colors?) Though most information can be standardized for each shop, some will be influenced by the customer's vision of what he or she wants to achieve with the print. Art Creation The three most common forms of art created for screen printing are hand-drawn art, computer-generated art, or art replicated from fine paintings or photographs. Hand-Drawn Art Hand-drawn art comes in many forms. An artist can create a keyline (an outline of the design) by drawing it on paper with an opaquing pen, shooting it on a camera, or scanning it into a computer. Art can be created from a hand-drawn keyline provided the image is loaded into a scanning program, converted into paths, and then placed into an art program. With the image in a format that can be manipulated, the artist can clean it up, change its size and position, add text, and place color in selected areas. Another option is to draw directly onto vellum or onto a coated screen. This method is not recommended, but it is effective for simple one-color designs. Computer-Generated Art Computer-generated art is conceived and designed on a computer through a variety of design programs. The most common programs in the screen-printing industry are PhotoShop, Illustrator, Freehand, and Corel. Designs created on a computer are then separated with the computer's separation program. Replications Replications of fine art or photographs are most successful when they are shot with a digital camera or scanned into a computer. The artist can then utilize an advanced color separator program on the computer. The artist also can separate replications by hand through a series of hand-cut overlays. top top top top top
  • 23. Art Separations After creation, art must be converted into final separations. The goal of art separation is to create individual films, either acetate or vellum, in which the print areas block UV light rays and the negative areas allow UV light to pass through. The most frequently used methods involve separating by hand, camera, and computer. Hand Separations An artist can achieve hand separations in several ways. Hand-cut positives are created by cutting photomasking film, or rubylith, into the shapes or letters needed. Then the artist peels away the negative unwanted portion, leaving rubylith in the areas to be printed. Overlays are color separations created by the use of acetate or rubylith overlaid on a keyline to create positives. By cutting, drawing, applying adhesive dot patterns, and using acetate or burnishing letters, the artist can build each color (as well as additional colors with dot pattern overlays). Hand-drawn separations are created by tracing the design directly onto the acetate or vellum. Starting with a keyline of the design, the artist overlays each color one at a time and traces until all of the separations are top top
  • 24. Know Your Inks Inks can be divided into three main groups according to how they dry: 1. Evaporation 2. Thermosetting 3. UV (ultraviolet light) exposure Ink is made up of two basic components: pigments and a carrier. The carrier is usually either water or a solvent. Inks that dry by evaporation can be either water or solvent-based. The principal solvents are almost all VOCs or volatile organic compounds, which means they evaporate rather well. Water dries more slowly than the solvents, but doesn't put VOC emissions into the atmosphere. Environmental concerns have led to a lot of interest in water-based inks and some very rapid developments in that area. Unfortunately, although water-based inks can now be used even on some plastics, they are still only available for a limited number of substrates. Most sign shops use air-dry inks exclusively, and most air-dry inks are still solvent-based. Multipurpose, vinyl, and enamel inks all use different solvents as carriers, which mean that each type of ink will be a little bit different to work with. For example, multipurpose and vinyl both dry faster than enamel, but both will remain vulnerable to solvents after they dry. Enamel will not. While not often used in sign printing, thermosetting inks are common in other industries. Thermosetting inks cure rather than dry and will remain liquid until exposed to heat. Plastisol is undoubtedly the best-known thermosetting ink because of its widespread use in printing T-shirts and textiles. Epoxy inks are associated with the thermosetting group because a number of them can be heat-cured to increase durability. Epoxy inks cure through a chemical reaction between the base and a catalyst, which has to be added separately. Normally the catalyst is added just before you start printing because the ink cures within a few hours. They are commonly used for printing on glass, metal, ceramics and some types of plastic. UV inks are definitely becoming more popular every day, but they need to be exposed to a powerful UV light source in order to cure. With their extremely high solids content and rapid curing ability UV inks are usually found in high-volume printing operations. As with the plastisols there is no danger of these inks drying in a screen. However, UV drying equipment requires a considerable investment, and beginning sign printers would be well advised to stick with the usual air-dry inks. Because they contain no VOCs, and consequently produce no environmentally harmful emissions, UV inks are often regarded as the wave of the future. Match the ink to the substrate Most adhesion problems arise when an inexperienced printer encounters an unfamiliar substrate. The most important single step you can take is to correctly identify the material you intend to print on. Be specific. Don't just tell your ink supplier you'll be printing on "plastic." Polypropylene and polystyrene are both plastics, but as different from one another as night and day when it comes to screen printing on them. This does not just apply to plastics; the same thing goes for every type of material. You are not
  • 25. printing on metal but on aluminum or brass. If the metal has a coating, remember you're not really printing "on" the metal, you're printing on that coating. The coating is what you need to identify. Sometimes, though, you may unwittingly stray into unfamiliar territory. The substrate may closely resemble something you've printed before, but is it really the same material? Even if you've printed the same type of material a hundred times before, a slight change in the manufacturing process can make the familiar unfamiliar. Something as subtle and invisible as a new silicone coating can make a material impossible to print in the normal way. Don't depend on your substrate supplier to alert you to every change in the manufacturing process or even be aware of it. Suppliers are not usually in the business of screen- printing themselves, and often the first time they become aware of a printing problem is when you tell them about one. The responsibility for knowing the material you're printing on and what it takes to put ink on it and keep it there is all yours. A basic rule to keep in mind is that any change in the substrate changes everything. Another thing to consider: If you print on a number of different types of substrate, you can easily find yourself with a considerable investment in inventory. Not only do you have the different types of ink but their corresponding array of thinners, additives and wash-ups. Since a quart of ink is the smallest quantity you can buy, you may end up with nearly full cans of oddball colors dating back to a small area on a few signs you printed years ago. Over time this can amount to a considerable storage, and eventually, a disposal problem. It's worth taking some time to organize your storage area because with a variety of different inks on hand, the risk of grabbing the wrong type increases. Using the wrong ink accidentally is just as bad as using the wrong one through ignorance. You should never mix different types of ink together and be very cautious even about blending similar types of ink if they come from different manufacturers. Testing, testing Fortunately, most suppliers will be able to give you some advice about which ink you need to use. While such recommendations are certainly welcome, they don't relieve you of the responsibility to do your own test prints. If you neglect this step, and run into problems, no ink manufacturer or substrate supplier will take the blame for them. Ink manufacturers print warnings in their catalogs and in every piece of literature they produce. It is your job to run test prints to see if the ink you're using will work on that specific substrate. The very fact that manufacturers need to post such disclaimers should alert you to the fact that problems are far from rare. When printers get together, horror stories of "ink failures" regularly make the rounds, but how can you call it "ink failure" when the ink has behaved exactly as it was designed to do? Manufacturers do just about everything else to insure you get great results when you use their products. In fact, many of them will test your substrate using a number of their inks to see which one works best. You should be able to arrange with your supplier to send samples off to the lab for testing. It may take anywhere from a few days to a week or more for the results to come back, but they will definitely tell you which ink to use. Unfortunately, you may be in the position of keeping an anxious customer at bay while you wait for the test results. But it's far better to make a customer wait for the job than to have him unpack a bunch of signs and watch the ink flake off. Manufacturer's labs can save you lots of money. The biggest saving obviously comes from avoiding the costs of a botched print job. But lab testing can also spare you the more modest expense of buying different types of ink to do your own tests. Still, once you've got that recommended ink, pour it into a screen and pull your own tests. A lot of factors can affect ink
  • 26. into the middle of a production run. After you've printed your samples, set them aside to dry for twenty-four hours. Then belabor your prints with fingernails, pencil points, and whatever else is handy. Do everything you can to try to scrape the ink off the substrate. Lay a strip of tape on the ink and smooth it down until you've got an almost perfect seal. Then rip it off. If the ink still stays on, you've got a winner. Your choice of ink will affect a host of other factors as well: the mesh count in your screens, the stencil material used, and how you dry your prints. Each type of ink has its corresponding battery of solvents, additives and wash-ups, and in some cases, special screenprinting techniques designed to put that ink onto a substrate and keep it there. This is why printing on a number of different materials can get expensive. As we said earlier, a screenprinting ink has been developed for almost every type of material that can be printed. Fortunately, sign printers only have to worry about a few of them.
  • 27. Screen printing, also known as serigraphy, is a method of applying ink to a surface through a stencil supported on a fine mesh of synthetic fibers or metal threads stretched tightly over a frame. The stencil provides a means to determine where the ink will be allowed to pass through the mesh to create an image on the surface to be printed. Ink is applied to the screen and pushed through the open mesh areas with a rubber or plastic squeegee to produce an image. No other printing process is as versatile as screen printing. It can print on almost any surface, including: metal, glass, paper, plastic, cloth, wood, you name it! Machines for screen printing use the inside of the screen frame to act as the ink storage area. The ink is then forced through the screen by the squeegee pushing the ink in front of it. Manual screen printing machines are used for some work such as limited runs or when printing very thin or very thick pieces. Most screen printing today is performed by semi or fully automatic screen press machines at rates of up to 5,000 or more prints per hour.
  • 28. How to burn an image into a silk- screen. Most people want to know how to burn the image into the screen. It is probably the most difficult part of silk-screening but it is very simple to do. This tutorial is a simple outline of how to get your artwork from you transparency to the screen. Step 1: First, you need to prepare the screen. The screen needs to be degreased so the emulsion will form a better bond with the screen. This can be done by spraying degreaser onto the screen and wiping it off. Step 2: The emulsion will now be applied to the screen. In a low-light room, pour the emulsion into the screen coater. Apply the emulsion to both sides of the screen. It is important that you do not apply the emulsion too thick. It is also important that a uniform coat is applied to the screen. Let the emulsion dry for about an hour (or longer) in a dimly lit room. A fan should be placed about five feet away from the screen to assist in the drying process. Step 3: Prepare the artwork. A tutorial on how to prepare the artwork can be found by . Step 4: Place the artwork on the screen. A piece of glass should be placed on the artwork. This will act as a vacuum so your artwork will not move while it's being burnt into the screen. Step 5: An exposure light is in included with Package #1, #2, and #3. Place the exposure light about one foot above the screen. Please take a look at the diagram below to see how everything is situated. A black felt or cloth is placed beneath the screen to absorb light so that no light is reflected back up to the screen. Step 6: Burning times will vary, but ten minutes is a safe time. It is better to over-burn than under-burn the screen and emulsion. After your screen is burnt. Take a spray bottle and mist the screen with water. Take your screen outside or to a sink or tub and rinse out your screen. If you are having trouble getting the emulsion out, you may have to increase the water pressure of your hose or sink. You should be left with your image burnt into your screen. Once this step is complete, you are well on your way to printing t-shirts. clicking here
  • 29. Screen printing is not limited to just t-shirts. This process will work on many different items. Our equipment can silkscreen most items that are flat. This is just a small list of other items that can be printed with our equipment.