Using Audacity to Record and Edit Audio Files
•
2 likes•1,850 views

Used for students in my Social Media class

Recommended
More Related Content
What's hot
What's hot (18)
Similar to Using Audacity to Record and Edit Audio Files
Similar to Using Audacity to Record and Edit Audio Files (20)
More from Matthew J. Kushin, Ph.D.
More from Matthew J. Kushin, Ph.D. (20)
Recently uploaded
Recently uploaded (20)
Using Audacity to Record and Edit Audio Files
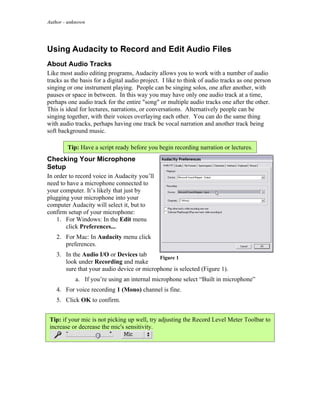
- 1. Author - unknown Using Audacity to Record and Edit Audio Files About Audio Tracks Like most audio editing programs, Audacity allows you to work with a number of audio tracks as the basis for a digital audio project. I like to think of audio tracks as one person singing or one instrument playing. People can be singing solos, one after another, with pauses or space in between. In this way you may have only one audio track at a time, perhaps one audio track for the entire "song" or multiple audio tracks one after the other. This is ideal for lectures, narrations, or conversations. Alternatively people can be singing together, with their voices overlaying each other. You can do the same thing with audio tracks, perhaps having one track be vocal narration and another track being soft background music. Tip: Have a script ready before you begin recording narration or lectures. Checking Your Microphone Setup In order to record voice in Audacity you’ll need to have a microphone connected to your computer. It’s likely that just by plugging your microphone into your computer Audacity will select it, but to confirm setup of your microphone: 1. For Windows: In the Edit menu click Preferences... 2. For Mac: In Audacity menu click preferences. 3. In the Audio I/O or Devices tab Figure 1 look under Recording and make sure that your audio device or microphone is selected (Figure 1). a. If you’re using an internal microphone select “Built in microphone” 4. For voice recording 1 (Mono) channel is fine. 5. Click OK to confirm. Tip: if your mic is not picking up well, try adjusting the Record Level Meter Toolbar to increase or decrease the mic's sensitivity.
- 2. Author - unknown Record a New Audio Track To begin recording audio: 1. Click the red Record button (Figure 3) to begin recording a new audio track, as indicated by the blue waveform display (Figure 4). Figure 2 2. To pause recording, click the blue Pause button. 3. You can restart recording where you left off by clicking the blue Pause button again. Figure 3 4. Click the yellow Stop button to finish recording this audio track. 5. You can click the red Record button to begin recording a new audio track, overlaying the first audio track. Note: If you click the yellow Stop button, and wish to begin recording where you left off, click the purple Skip to End button. Then click the red Record button to begin recording a new audio track appended to the end of the first track. Deleting Part of an Audio Track You can delete part of an audio track by dragging your cursor over a section of the audio track, then clicking the Delete or Backspace key on your keyboard. Playing Audio Tracks 1. Click the green Play button to playback the audio tracks you've recorded from the current cursor position. 2. Click the purple Skip to Start button to move your cursor to the start of the track. Adding Silence to an Audio Track You can insert silence at any point in an audio track: 1. Position your cursor where you want the silence to begin. 2. Under Generate click Silence (Figure 5). You'll be prompted to decide how Figure 4 many seconds of silence you want. Type in the number of seconds and click Generate Silence. 3. The silence will be inserted where ever your cursor is positioned, pushing the audio track up or back as necessary. Figure 5
- 3. Author - unknown You can also replace part of an audio track with silence: 1. Drag your cursor to select the portion of the audio track that you wish to replace. 2. Click the Silence Selection button (Figure 6). Saving an Audacity Project When you've finished recording and editing your audio file, be sure to save the Audacity project. An Audacity project file preserves the tracks and effects, as opposed to a WAV or MP3 file, which preserves only the audio tracks. 1. Go to the File menu and click Save Project As... 2. Select a location on your local computer to save the project. 3. Type in a file name for the project (Figure 7). 4. Click Save. Figure 6 Note: Audacity project files are not appropriate for distribution--you'll need to make a WAV or MP3 file for that. Make a MP3 File From an Audacity Project MP3 is a widely-adopted standard for encoding audio files in a format that’s shareable across computer platforms and media players. You’re probably somewhat familiar with the concept of MP3 if you’ve ever heard of iPod, Napster, or eMusic. Before you save your audio project as an MP3 you’ll want to ensure that the bitrate of the MP3 file is adequate for your purposes. Generally speaking, the higher the bitrate, the better quality the audio file. Files encoded at higher bitrate are also larger in size than those encoded smaller bitrates. To check the bitrate for MP3 encoding: 1. In the Edit menu choose Preferences... 2. Click the File Format tab Figure 7 3. Under MP3 Export Setup coose an appropriate bitrate (e.g. 96kbps) (Figure 8). Tip: Many MP3 music files are recorded at a bitrate of 128kbps. If you’re just recording voice, 64 - 96kbps will be sufficient.
- 4. Author - unknown To save your Audacity project as an MP3: 1. In the File menu choose Export as MP3. 2. Select a location on your local computer to save the MP3 file. 3. Type in a file name for the MP3 file 4. Click Save.