
Recommended
More Related Content
What's hot
What's hot (19)
Viewers also liked
Viewers also liked (20)
Similar to Unit 2 Tutorials Part B
Similar to Unit 2 Tutorials Part B (20)
More from MrLawler
More from MrLawler (20)
Recently uploaded
Recently uploaded (20)
Unit 2 Tutorials Part B
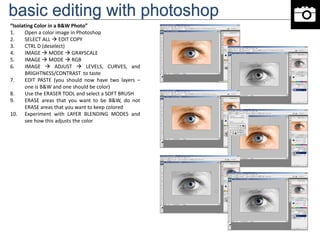
- 1. “Isolating Color in a B&WPhoto” 1. Open a color image in Photoshop 2. SELECT ALL EDIT COPY 3. CTRL D (deselect) 4. IMAGE MODE GRAYSCALE 5. IMAGE MODE RGB 6. IMAGE ADJUST LEVELS, CURVES, and BRIGHTNESS/CONTRAST to taste 7. EDIT PASTE (you should now have two layers – one is B&W and one should be color) 8. Use the ERASER TOOL and select a SOFT BRUSH 9. ERASE areas that you want to be B&W, do not ERASE areas that you want to keep colored 10. Experiment with LAYER BLENDING MODES and see how this adjusts the color
- 2. “Photochrome and Hand-Colored Prints” 1. Open a color image in Photoshop 2. Use the EYEDROPPER to select one of the colors on the image 3. IMAGE MODE GRAYSCALE 4. IMAGE MODE RGB 5. IMAGE ADJUST LEVELS, CURVES, and BRIGHTNESS/CONTRAST to taste 6. Make a NEW BLANK LAYER – set OPACITY to 65% 7. Use the BRUSH TOOL set to a SOFT BRUSH 8. Paint over some of the objects or areas of the image 9. Use the ERASER TOOL with SOFT BRUSH setting and clean up the “edges” 10. Make a NEW BLANK LAYER – set OPACITY to 65% 11. Try using a different color and paint over a different area following STEPS 7 – 9 12. Experiment with LAYER BLENDING MODES A Photochrome is a color photo lithograph, produced from a black-and-white image. Hand-coloring is a watercolor applied to a black-and-white print. Below you can see traditional hand-colored and photochrome prints.