
Recommended
More Related Content
Similar to Create New Session in eMedley
Similar to Create New Session in eMedley (20)
Recently uploaded
Recently uploaded (20)
Create New Session in eMedley
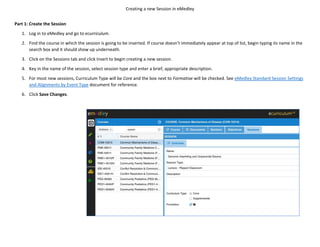
- 1. Creating a new Session in eMedley Part 1: Create the Session 1. Log in to eMedley and go to ecurriculum. 2. Find the course in which the session is going to be inserted. If course doesn’t immediately appear at top of list, begin typing its name in the search box and it should show up underneath. 3. Click on the Sessions tab and click Insert to begin creating a new session. 4. Key in the name of the session, select session type and enter a brief, appropriate description. 5. For most new sessions, Curriculum Type will be Core and the box next to Formative will be checked. See eMedley Standard Session Settings and Alignments by Event Type document for reference. 6. Click Save Changes.
- 2. Creating a new Session in eMedley Part 2: Align Session to appropriate AAMC Instructional and Assessment Methods and Assessment Resources 1. In the open Session tab panel, select the newly created session and click Update. The Alignments tab should now be visible. Click on it. 2. Using the eMedley Standard Session Settings and Alignments by Event Type document, select the appropriate assessment resources and assessment and instructional methods. In the provided example, since the session type is Lecture – Flipped Classroom, the Assessment Resource is RE002: Audience Response System; the Assessment Methods are AM004: Exam – Institutionally Developed, Written/Computer-based and AM017: Self-Assessment; and the Instructional Methods are IM001: Case-Based Instruction/Learning and IM013: Lecture. 3. Click Submit. *Note: Instructions for uploading documents to a session can be found on eMedley help page.
- 3. Creating a new Session in eMedley Part 3: Create Session Objectives - Align to Course Objectives and Topics 1. In the open Session tab panel, select the Session Objectives tab. 2. Click Insert to create the first session objective. Key in objective in the name box and click save changes. Repeat for each additional objective. 3. To align course objectives, click on an objective name in the open window of the Session Objectives tab. Click on the Alignments tab. 4. Select the appropriate box(es) next to the course objective(s) that the session objective aligns. 5. Click on the Topics tab and check the boxes next to the topics the session aligns. Click Submit. Close the session objective panel by clicking the x on the side to return to the list of session objectives. 6. Repeat steps 3 - 5 for additional session objectives. *Note: Aligning session objectives with course objectives and topics should be limited and avoid “over mapping”.
- 4. Creating a new Session in eMedley Part 4: Add an Event to the Session for it to appear on the calendar. 1. Close out all open panels associated with the newly created session and click on the Overview tab. Located at the bottom is the events section. 2. Click Add. Choose the date and input the Start and End times. 3. Select the appropriate Student Cohort from the drop-down menu. (May not show depending upon permissions.) 4. Input the faculty responsible for the session. Key in last name, first name and click the + to add. 5. Select the location from the drop-down. 6. Creating a description isn’t necessary, but if instructions specific to this specific instance are needed, this is the place to put those. Events do not carry over year-to-year. Click Save. 7. To verify the placement of the session in the calendar, navigate to the calendar and locate the event. Clicking on it should provide the details entered for the session.