Boost PC performance: How more available memory can improve productivity
Machine Language Learning Video Storyboard
1. 1
AUTOML HELP VIDEO STORYBOARD
Draft 7 – Piechocki TRT: 10:00
MAIN TITLE SLIDE
Animate on TEXT:
CPP PRODUCT MANAGEMENT
AutoML STEP-BY-STEP FOR CLASS AUTHORS
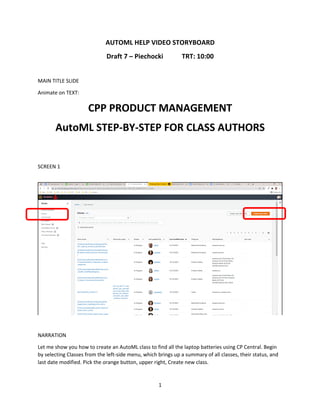
SCREEN 1
NARRATION
Let me show you how to create an AutoML class to find all the laptop batteries using CP Central. Begin
by selecting Classes from the left-side menu, which brings up a summary of all classes, their status, and
last date modified. Pick the orange button, upper right, Create new class.
2. 2
HIGHLIGHT: Class, Create new class
SCREEN 2
NARRATION:
Select ASIN as your classification technique. Then select Next.
HIGHLIGHT: ASIN
3. 3
SCREEN 3
NARRATOR:
From the three choices, pick AutoML as your classification technique, and click Next.
HIGHLIGHT: AutoML
4. 4
SCREEN 4:
NARRATOR:
Select Program as Sandbox. Then enter the demo class name… (demo_laptop_batteries_SK_ML). Under
marketplaces, we’ll choose Amazon.com, which appears checked in the box below. And enter a
description of the class. We’ll say, Demo class to identify all Laptop Batteries sold on amazon.com. And
select Next.
HIGHLIGHT: Program, Class Name, Market, Description
5. 5
SCREEN 5:
NARRATOR:
Next, under Edit program specific details edit the mandatory items. For ASIN Review Priority, select 5.
For agency, select Null. For Product Category, select All. For Notification Date select today’s date.
HIGHLIGHT: ASIN review category, Agency, Product Category, Notification Date
SCREEN 6
NARRATION:
Skip the optional fields and enter 95 into Target TP Rate. And click Save changes.
6. 6
SCREEN 7
NARRATOR:
Next, skip True Positive ASINs. We will not be entering any ASINs yet. Click Next.
SCREEN 8:
NARRATOR:
Next, also skip True negative ASINs. And click Next.
8. 8
SCREEN 10:
NARRATOR:
In the CP Central interface that appears, click Edit for input domain.
HIGHLIGHT: Input Domain and Edit button
9. 9
SCREEN 11:
NARRATOR:
Next, update the keyword classifier details by specifying the GLs for True Positive ASINs. Hit the radio
button, Only GLs listed below. Use the GLs drop-down to select wireless, wireless accessory, electronics,
and mobile electronics.
HIGHLIGHT: Only GLs listed below, 4 GLs
10. 10
SCREEN 12:
NARRATOR:
Scroll down and under Keywords, enter the code for your Inclusion category.
Click Save and close.
Attachments:
{AND
AttributesContain[item_name|product_description|bullet_point:laptop]
attributescontain[item_name|product_description|bullet_point:battery]
}
11. 11
SLIDE 13
NARRATOR:
Next to the green check, Classifier saved successfully appears.
Next, click Search ASINs using keywords.
SCREEN 14:
12. 12
NARRATOR:
AutoML now displays matched ASINs. It displays both positive ASINs that are laptop batteries, and
negative ASINs that are not laptop batteries. Our scan shows sufficient quantities of both, so it is time
for a test validation.
13. 13
SCREEN 14A
INSERT SCREEN - (INSERT SLIDE 15 FROM PPT– scroll to the top and click class name BRING TO UI)
NARRATOR:
In the breadcrumb at the top of the screen, click the class name to navigate to the class summary
screen.
HIGHLIGHT: Class name in the breadcrumb at the top, click class name to navigate to the class summary
screen.
15. 15
SCREEN 17:
NARRATOR:
Select Full catalog, and click test class.
SCREEN 18:
NARRATOR:
The Test button becomes inactive as AutoML begins the test classification.
16. 16
SCREENs 19 & 20 (combine 2 Test status emails)
NARRATOR:
You will receive an email to indicate the test classification is in progress. Another email notifies you
when it’s completed.
17. 17
SCREEN 21:
NARRATOR:
When the test is complete, the Validate button becomes active. Use the pulldown and click Validate test
accuracy.
18. 18
SCREEN 22:
NARRATOR:
Validation is a human audit that evaluates keyword predicate accuracy. For each ASIN that appears,
select Yes, No or Not Enough Information, or NEI, to help AutoML predict which products fall within the
limits. A typical validation consists of about 1,000 ASINs.
SCREEN 22AA:
19. 19
NARRATOR:
Label all ASINs as Yes, No or NEI. The summary of label counts is shown at the top (HIGHLIGHT
summary). Once you have labeled all ASINs you should see 15%-85% Yes labels ensuring good balance of
True Positives in training the Machine Learning model.
If the output of your Test generated < 1M ASINs then you will see a “Mark Batch Complete” button. Click
the button to mark batch complete and close the tab.
If the output of your Test generated >1M ASINs then you will see a warning message at the top
indicating “volume has exceeded the limit”. Close the tab and discard the batch as explained in next
step.
HIGHLIGHT: Yes/No/NEI Summary Counts, Mark Batch Complete & Warning message
SCREEN 23A:
20. 20
NARRATOR:
On the CP-Central Class Overview tab, AutoML lets you know you have successfully started Validation.
Click close.
SCREEN 24A:
NARRATOR
21. 21
This step is only required when you cannot Mark Batch Complete. Use the Validate pulldown and click
Cancel validation.
SCREEN 25:
HIGHLIGHT: Cancel validation
NARRATOR:
Once the Initialize button is enabled, click Initialize to initialize the model training session
HIGHLIGHT: ML Model & Initialize button
Screen 26:
22. 22
NARRATOR:
Set PPV = 90, NPV = 90, Coverage = 70. Check I acknowledge that I have completed a full catalog test
classification and click Initialize
Screen 27:
NARRATOR:
23. 23
Status indicates ML model initialization in progress. Click class name in the breadcrumb to go to class
overview.
HIGHLIGHT: Status and breadcrumb
Screen 28:
NARRATOR:
Once initialization is complete, the Train button is enabled. Click it to begin model training
HIGHLIGHT: Train button
25. 25
NARRATOR:
During this stage we are training the model to help AutoML learn patterns to ensure the accuracy of its
predictions. The training screen displays ASINs that AutoML determines are True Positives and False
Positives for the class you have created. They appear 10 at a time. We now confirm the True Positive
ASINs by clicking the green check, and mark the True Negatives by clicking the red “X”. If you are not
sure whether an ASIN is TP or TN do not select any option. If you want to unselect an option just click it
again e.g. Click green check to mark as TP, click green check again to unmark. click on Submit after
labeling 10 ASINs. AutoML learns from these and suggests 10 more.
SCREEN 30:
NARRATOR:
As you continue to submit more labels, The bar graph at the upper right indicates the percent of the
convergence process that is complete.
HIGHLIGHT: Convergence progress
26. 26
SCREEN 31: (FMR SCREEN 25A, unchanged, added 25B for 2nd
half of VO)
NARRATOR:
To reach 100%, it takes an average of 1000 to 5000 clicks on the validated ASINs. Once convergence
reaches 100% click on Publish to publish the ML model.
HIGHLIGHT: Convergence Progress & Publish
27. 27
SCREEN 32
NARRATOR:
Status indicates publish is pending. Click on class name in the breadcrumb to navigate to Class overview.
HIGHLIGHT: Status & class name in breadcrumb
Screen 33:
29. 29
Screen 34:
NARRATOR:
Once status updates to In Progress (Test Complete), the Test button is enabled under ML model -> Test
class. Click it to launch a new test.
HIGHLIGHT: Status and button
SCREEN 35A
30. 30
NARRATOR:
Select Full Catalog and click Test class
SCREEN 36
NARRATOR:
Back on the class overview, the Test button is disabled as a new test batch is generated. Status updates
to In Progress (Test in progress)
HIGHLIGHT: Status
SCREEN 37:
31. 31
NARRATOR:
You will receive an email to indicate the test classification is in progress. Another email notifies you
when it’s completed.
SCREEN 37: (FORMER SCREEN 26, UNCHANGED)
NARRATOR:
32. 32
When convergence is complete, the Deploy button becomes active. Click it to move the class forward in
production.
HIGHLIGHT: Deploy
33. 33
SCREEN 38 (FORMER SCREEN 27, UNCHANGED)
NARRATOR:
After a few minutes, the Launch button becomes active. Your class is almost ready to launch. Click
Launch.
HIGHLIGHT: Launch
SCREEN 39 (FORMER SCREEN 28, UNCHANGED)
NARRATOR:
You now specify production classification of the class. Select Existing ASINs and click Full catalog. Select
New ASINs/ASINs updates.
Click Launch, and your class is launched.
HIGHLIGHT: Existing ASINs, New ASINs / ASINs updates