
Recommended
Recommended
More Related Content
Similar to Job aid valve replacement
Similar to Job aid valve replacement (7)
More from Jim Piechocki
More from Jim Piechocki (20)
Recently uploaded
Recently uploaded (20)
Job aid valve replacement
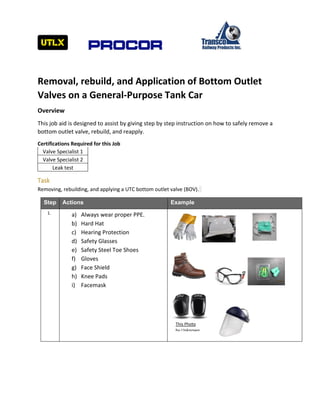
- 1. Removal, rebuild, and Application of Bottom Outlet Valves on a General-Purpose Tank Car Overview This job aid is designed to assist by giving step by step instruction on how to safely remove a bottom outlet valve, rebuild, and reapply. Certifications Required for this Job Valve Specialist 1 Valve Specialist 2 Leak test Task Removing, rebuilding, and applying a UTC bottom outlet valve (BOV). Step Actions Example 1. a) Always wear proper PPE. b) Hard Hat c) Hearing Protection d) Safety Glasses e) Safety Steel Toe Shoes f) Gloves g) Face Shield h) Knee Pads i) Facemask This Photo by Unknown
- 2. Step Actions 2. a. Confirm that the tank is clean, empty and tagged appropriately . b. Compare the car number on the car with the number on the work order/write-up. Making sure they are the same. c. Identify why the car was shopped. 3. a) Review Certificate Of Construction (COC)and fittings drawings b) Compare the valves on the COC and fittings drawing with the valves and valve fasteners on the car making sure they are the same. c) To identify the kind of valve being removed reference the valve’s information plate 4. a) Make sure the parts for the car are available by checking the parts bin area b) Compare the work order and parts boxes for accuracy c) Compare the part number on the work order with the parts in the kit d) Take the valve kit to the work bench and store C
- 3. Step Actions Example 5. a) Cycle valve to drain any residual water trapped in the valve left from the cleaning prosses. b) Remove the bottom outlet valve (BOV) by using the BOV cart and the proper tools. c) 5/8"HEX-- d) Extension----------- e) Crows Foot/Sockets----- f) Impact gun (Only Use for Removal) 6. Position the BOV cart under the BOV. Jack the Platform of the BOV cart up to the nozzle of the BOV. 7. Loosen the bolts that hold the BOV to the tank car saddle. A pneumatic impact gun can be used to loosen the bolts.
- 4. Step Actions Example 8. Use the BOV cart to safely lower the BOV. 9. Make sure the valve is in the open position for transporting and storage to help protect the ball from damage. 10. Tag the BOV with the car number written on the tag. 11. Inspect, rebuild, and test valve per valve manufactures standards. All information can be found on the iPad. Reference Documents 1. RES-205 2. RES-170 3. Mckenzievalve.com
- 5. Step Actions 12. Clean the tongue on the saddle of the car. 13. a) Place valve on the BOV cart for application. b) Verify that the sealing surface is free of any debris. c) Position cart and BOV under saddle. d) Place the proper BOV to saddle gasket in the grooved sealing surface on the BOV 14. a) Use the BOV cart to lift the BOV up to the BOV saddle. b) Make sure the tongue and groove on the BOV and saddle are properly seated. c) Apply proper anti-size to the fasteners per customer or standard requirements. 15. a) Apply the fastener to the BOV and saddle finger tight. b) Use calibrated torque wrench to apply the proper torque to the fastener per standard or gasket manufactures requirements. D B