Quick Installation Guide ENS202EXT-ezhotspot edition EN
•
0 likes•124 views

1. The document provides installation instructions for connecting an EnGenius ENS202EXT-EzHotspot extender via Ethernet cable to a PoE injector for power. 2. It describes connecting the Ethernet cable from the extender to the PoE port on the injector and connecting the power adapter to the injector to power the device. 3. After connecting the power, the document outlines connecting a mobile device to the extender's WiFi network and accessing the EzHotspot configuration page to select an available wireless network for the extender to connect to.

Recommended
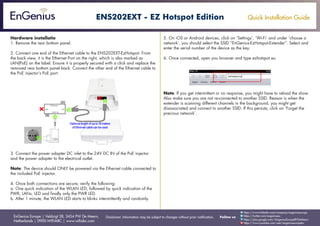
Recommended
More Related Content
What's hot
What's hot (14)
Viewers also liked
Viewers also liked (20)
Similar to Quick Installation Guide ENS202EXT-ezhotspot edition EN
Similar to Quick Installation Guide ENS202EXT-ezhotspot edition EN (20)
More from EnGenius Europe
More from EnGenius Europe (20)
Recently uploaded
Recently uploaded (20)
Quick Installation Guide ENS202EXT-ezhotspot edition EN
- 1. Quick Installation Guide EnGenius Europe | Veldzigt 28, 3454 PW De Meern, Netherlands | 0900-WIFIABC | www.wifiabc.com Disclaimer: Information may be subject to changes without prior notification. Follow us https://www.linkedin.com/company/engeniuseurope https://plus.google.com/+EngeniusEuropeBVDeMeern https://www.youtube.com/user/engeniuseuropebv https://twitter.com/engeniuseu ENS202EXT - EZ Hotspot Edition Hardware installatie 1. Remove the rear bottom panel. 2. Connect one end of the Ethernet cable to the ENS202EXT-EzHotspot. From the back view, it is the Ethernet Port on the right, which is also marked as LAN(PoE) on the label. Ensure it is properly secured with a click and replace the removed rear bottom panel back. Connect the other end of the Ethernet cable to the PoE injector’s PoE port. 3. Connect the power adapter DC inlet to the 24V DC IN of the PoE injector and the power adapter to the electrical outlet. Note: The device should ONLY be powered via the Ethernet cable connected to the included PoE injector. 4. Once both connections are secure, verify the following: a. One quick indication of the WLAN LED, followed by quick indication of the PWR, LANs, LED and finally only the PWR LED. b. After 1 minute, the WLAN LED starts to blinks intermittently and randomly. 5. On iOS or Android devices, click on ‘Settings’, ‘Wi-Fi’ and under ‘choose a network’, you should select the SSID “EnGenius-EzHotspot-Extender”. Select and enter the serial number of the device as the key. 6. Once connected, open you browser and type ezhotspot.eu. Note: If you get intermittent or no response, you might have to reload the show. Also make sure you are not re-connected to another SSID. Reason is when the extender is scanning different channels in the background, you might get disassociated and connect to another SSID. If this persists, click on ‘Forget the precious network’.
- 2. Quick Installation Guide EnGenius Europe | Veldzigt 28, 3454 PW De Meern, Netherlands | 0900-WIFIABC | www.wifiabc.com Disclaimer: Information may be subject to changes without prior notification. Follow us https://www.linkedin.com/company/engeniuseurope https://plus.google.com/+EngeniusEuropeBVDeMeern https://www.youtube.com/user/engeniuseuropebv https://twitter.com/engeniuseu ENS202EXT - EZ Hotspot Edition To start, click on the ‘Scan hotspots’-button on the left menu. Select the Hotspot’s SSID that you want to connect to. Tip 1: For example, a signal level of -50dBm is better than 80dBm. Tip 2: A Hotspot or Wi-Fi service with -80dBm or higher may not be reliable. Step 2: After selecting on the desired Hotspot, the SSID & BSSID values will be filled automatically. Click ‘Accept Values’. Next, Click on ‘Save Reload’ button on the left menu. Final step: Click save, reload & get online! ! The device will reboot in one minute after which you should be online. You can check on the status by clicking on the ‘connect status’ to check. Extra Note: - Warning! When you upgrade the firmware the EzHotspot-function is lost. - The admin-password cannot contain more than 12 characters. - When you make a connection with an encrypted access point, make sure that you choose the right encryption. This you can find under ‘Properties’ on the client device.