Quick Installation Guide EDS1130 English
•
0 likes•331 views

Quick Installation Guide EDS1130 English

Recommended
Recommended
More Related Content
Similar to Quick Installation Guide EDS1130 English
Similar to Quick Installation Guide EDS1130 English (20)
More from EnGenius Europe
More from EnGenius Europe (20)
Recently uploaded
Recently uploaded (20)
Quick Installation Guide EDS1130 English
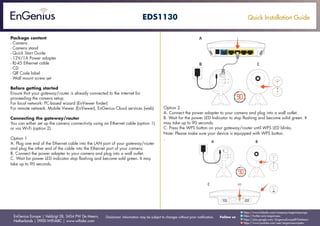
- 1. Quick Installation Guide EnGenius Europe | Veldzigt 28, 3454 PW De Meern, Netherlands | 0900-WIFIABC | www.wifiabc.com Disclaimer: Information may be subject to changes without prior notification. Follow us https://www.linkedin.com/company/engeniuseurope https://plus.google.com/+EngeniusEuropeBVDeMeern https://www.youtube.com/user/engeniuseuropebv https://twitter.com/engeniuseu EDS1130 Package content - Camera - Camera stand - Quick Start Guide - 12V/1A Power adapter - RJ-45 Ethernet cable - CD - QR Code label - Wall mount screw set Before getting started Ensure that your gateway/router is already connected to the internet for proceeding the camera setup. For local network: PC-based wizard (EnViewer finder) For remote netwerk: Mobile Viewer (EnViewer), EnGenius Cloud services (web) Connecting the gateway/router You can either set up the camera connectivity using an Ethernet cable (option 1) or via Wi-Fi (option 2). Option 1 A. Plug one end of the Ethernet cable into the LAN port of your gateway/router and plug the other end of the cable into the Ethernet port of your camera. B. Connect the power adapter to your camera and plug into a wall outlet. C. Wait for power LED indicator stop flashing and become sold green. It may take up to 90 seconds. Option 2 A. Connect the power adapter to your camera and plug into a wall outlet. B. Wait for the power LED Indicator to stop flashing and become solid green. It may take up to 90 seconds. C. Press the WPS button on your gateway/router until WPS LED blinks. Note: Please make sure your device is equipped with WPS button. .
- 2. Quick Installation Guide EnGenius Europe | Veldzigt 28, 3454 PW De Meern, Netherlands | 0900-WIFIABC | www.wifiabc.com Disclaimer: Information may be subject to changes without prior notification. Follow us https://www.linkedin.com/company/engeniuseurope https://plus.google.com/+EngeniusEuropeBVDeMeern https://www.youtube.com/user/engeniuseuropebv https://twitter.com/engeniuseu EDS1130 D. Press and hold the WPS button on the back of your camera for 1~5 seconds and the Wi-Fi LED wil start blinking frequently. When the connectivity is complete, the Wi-Fi LED will become solid green. The proccess may take up to 1 minute. Setup EnViewer Finder (PC-based Wizard for local network) The EnViewer Finder is the setup wizard assisting you to configure the camera connected to your home network (LAN). A. Select and run the EnViewer Finder from the included CD. Follow the instruction to complete the installation. The wizard will search all the camera within your home network. B. Select the target camera from the list. C. Enter the username and password of the camera on the top right corner. The default value of both username and password is admin. D. Click next to log in. E. The wizard will guide you to complete the camera settings step by step. Network: Set up IP address, select your timezone in ‘System time’-section and confirm ‘Administrator’-settings. Note: Please note the DHCP IP given by the gateway/router or you can select the manual mode to assign a fixed IP for the camera. Cloud service: You can give an alias for your personal DDNS domain that is easy to remember and to share with others in the future. Config: Set up the video resolution, compression codec and maximum. F. Once you finish all the settings in the Config page, ensure that “Check Live View now” is ticked.
- 3. Quick Installation Guide EnGenius Europe | Veldzigt 28, 3454 PW De Meern, Netherlands | 0900-WIFIABC | www.wifiabc.com Disclaimer: Information may be subject to changes without prior notification. Follow us https://www.linkedin.com/company/engeniuseurope https://plus.google.com/+EngeniusEuropeBVDeMeern https://www.youtube.com/user/engeniuseuropebv https://twitter.com/engeniuseu EDS1130 Live View Enter the username and password for proceeding to log in the Live View. The default value of both username and password is admin. Click on ‘Login’ to access the Live View. Note: You will be guided to download the WebCMS plug-in at the first time accessing the page or if there is an updated version available (for Windows O/S only). You should now see the Live View streaming succesfully. Note: You can also enter the web-based Live View page through your exclusive EnGenius DDNS domain. e.g. ooooooo.engeniusddns.com. Download EnViewer Scan the QR code or search for “EnViewer by EnGenius” to download the app on your device. 1. Find the QR code label of EnViewer inside the packaging that contains the unique QR code of your camera and other information for advanced settings. 2. Follow the EnViewer wizard, you will be directed to the step selecting the way to add a camera. Option 1 - Scan QR code 1. Click on ‘QR Code’ and follow the instruction to scan the QR code on the included QR code label. 2. Click on ‘Yes’ to add the device to the camera list.
- 4. Quick Installation Guide EnGenius Europe | Veldzigt 28, 3454 PW De Meern, Netherlands | 0900-WIFIABC | www.wifiabc.com Disclaimer: Information may be subject to changes without prior notification. Follow us https://www.linkedin.com/company/engeniuseurope https://plus.google.com/+EngeniusEuropeBVDeMeern https://www.youtube.com/user/engeniuseuropebv https://twitter.com/engeniuseu EDS1130 Option 2 - Auto search It is suggested to adopt Auto search if you are adding more than one camera within your local network at the same time. 1. Click on ‘Auto search’. 2. All cameras within the local network will be listed. Tap the device(s) you would like to add and click on ‘Save’. Simply tap the device from the camera list, and you will be viewing the live video streaming on your smart device. Setting up Smart Recording Works with EnGenius gateway/router only This function is designed to make the storage management easiler. 1. Go to the device GUI of your EnGenius gateway/ router, select the ‘EnViewer’ under the ‘Cloud Services-section’ or select ‘IP camera’ from the System-section under ‘Device management’. Note: Check Quick Start Guide of Gateway/Router to learn how to access the device GUI. 2. Find the camera from the IP-Camera Client table, click on ‘Add profile’. 3. Enter the folder name and create your own storage rules, click on ‘Apply’. Now, you all all set. Enjoy the easiness to keep what matters most with you.