
Recommended
More Related Content
What's hot
What's hot (20)
Similar to Confocal microscopy
Similar to Confocal microscopy (20)
Recently uploaded
Recently uploaded (20)
Confocal microscopy
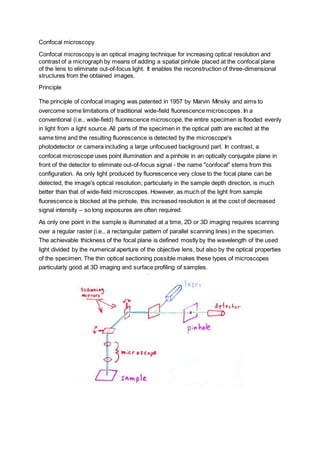
- 1. Confocal microscopy Confocal microscopy is an optical imaging technique for increasing optical resolution and contrast of a micrograph by means of adding a spatial pinhole placed at the confocal plane of the lens to eliminate out-of-focus light. It enables the reconstruction of three-dimensional structures from the obtained images. Principle The principle of confocal imaging was patented in 1957 by Marvin Minsky and aims to overcome some limitations of traditional wide-field fluorescence microscopes. In a conventional (i.e., wide-field) fluorescence microscope, the entire specimen is flooded evenly in light from a light source. All parts of the specimen in the optical path are excited at the same time and the resulting fluorescence is detected by the microscope's photodetector or camera including a large unfocused background part. In contrast, a confocal microscope uses point illumination and a pinhole in an optically conjugate plane in front of the detector to eliminate out-of-focus signal - the name "confocal" stems from this configuration. As only light produced by fluorescence very close to the focal plane can be detected, the image's optical resolution, particularly in the sample depth direction, is much better than that of wide-field microscopes. However, as much of the light from sample fluorescence is blocked at the pinhole, this increased resolution is at the cost of decreased signal intensity – so long exposures are often required. As only one point in the sample is illuminated at a time, 2D or 3D imaging requires scanning over a regular raster (i.e., a rectangular pattern of parallel scanning lines) in the specimen. The achievable thickness of the focal plane is defined mostly by the wavelength of the used light divided by the numerical aperture of the objective lens, but also by the optical properties of the specimen. The thin optical sectioning possible makes these types of microscopes particularly good at 3D imaging and surface profiling of samples.
- 2. WORKING A laser is used to provide the excitation light (in order to get very high intensities). The laser light (blue) reflects off a dichroic mirror. From there, the laser hits two mirrors which are mounted on motors; these mirrors scan the laser across the sample. Dye in the sample fluoresces, and the emitted light (green) gets descanned by the same mirrors that are used to scan the excitation light (blue) from the laser. The emitted light passes through the dichroic and is focused onto the pinhole. The light that passes through the pinhole is measured by a detector, ie., a photomultiplier tube. So, there never is a complete image of the sample -- at any given instant, only one point of the sample is observed. The detector is attached to a computer which builds up the image, one pixel at a time. In practice, this can be done perhaps 3 times a second, for a 512x512 pixel image. The limitation is in the scanning mirrors. Our confocal microscope (from Noran) uses a special Acoustic Optical Deflector in place of one of the mirrors, in order to speed up the scanning. This uses a high-frequency sound wave in a special crystal to create a diffraction grating, which deflects the laser light (actually, the first diffraction peak is used, with the zeroth-order peak being thrown away). By varying the frequency of the sound wave, the AOD changes the angle of the diffracted light, helping scan the sample quickly, allowing us to take 512x480 pixel images 30 times per second. If you want to look at a smaller field of view, our confocal microscope can go even faster (up to 480 frames per second, although I personally find that 240 frames per second is a good practical limit). ADVANTAGES By having a confocal pinhole, the microscope is really efficient at rejecting out of focus fluorescent light. The practical effect of this is that your image comes from a thin section of your sample (you have a small depth of field). By scanning many thin sections through your sample, you can build up a very clean three-dimensional image of the sample. Some examples of this are given at this page, looking at emulsions. Also, a similar effect happens with points of light in the focal plane, but not at the focal point -- emitted light from these areas is blocked by the pinhole screen. So a confocal microscope has slightly better resolution horizontally, as well as vertically. In practice, the best horizontal resolution of a confocal microscope is about 0.2 microns, and the best vertical resolution is about 0.5 microns. I wrote a brief discussion here of the difference between resolution and magnification.
- 3. Limitations of point-scanningconfocal microscopy Point-scanning microscopes, when used with high numerical aperture lenses, have an inherent speed limitation in fluorescence. This arises because of a limitation in the amount of light that can be obtained from the small volume of fluorophore contained within the focus of the scanned beam (less than a cubic micron). At moderate levels of excitation, the amount of light emitted will be proportional to the intensity of the incident excitation. However, fluorophore excited states have significant lifetimes (in the order if a few nanosecond). Therefore, as the level of excitation is increased, the situation eventually arises when most of the fluorophore molecules are pumped up to their excited state and the ground state becomes depleted. At this stage the fluorophore is saturated and no more signal may be obtained from it by increasing the flux of the excitation source. Most commercial scanning beam confocal microscopes have laser excitation sources that give around 10 mw in the major spectral lines. When the spectral line is near the excitation peak of the fluorophore being used (e.g. the 488nm argon line and fluorescein) and a high numerical aperture lens is used (>1.0 NA) this power level will cause saturation giving image degradation. Better images will be obtained by reducing the power by a factor of 10 or 100. This limits the speed which an image with a given signal-to noise ratio can be acquired. Typically, about 5 -10 seconds of integration is required with an average immunofluorescence preparation.
- 4. Bright-field microscopy Bright-field microscopy is the simplest of all the optical microscopy illumination techniques. Sample illumination is transmitted (i.e., illuminated from below and observed from above) white light and contrast in the sample is caused by absorbance of some of the transmitted light in dense areas of the sample. Bright-field microscopy is the simplest of a range of techniques used for illumination of samples in light microscopes and its simplicity makes it a popular technique. The typical appearance of a bright-field microscopy image is a dark sample on a bright background, hence the name. LIGHT PATH The light path of a bright-field microscope is extremely simple, no additional components are required beyond the normal light microscope setup. The light path therefore consists of: a transillumination light source, commonly a halogen lamp in the microscope stand; a condenser lens which focuses light from the light source onto the sample; and objective lens which collects light from the sample and magnifies the image. oculars and/or a camera to view the sample image Bright field microscopy may use critical or Köhler illumination to illuminate the sample. PERFORMANCE Bright-field microscopy typically has low contrast with most biological samples as few absorb light to a great extent. Staining is often required to increase contrast, which prevents use on live cells in many situations. Bright field illumination is useful for samples which have an intrinsic colour, for example chloroplasts in plant cells. Bright-field microscopy is a standard light microscopy technique, and therefore magnification is limited by the resolving power possible with the wavelength of visible light. WORKING In brightfield microscopy a specimen is placed on the stage of the microscope and incandescent light from the microscope’s light source is aimed at a lens beneath the specimen. This lens is called a condenser. The condenser usually contains an aperture diaphragm to control and focus light on the specimen; light passes through the specimen and then is collected by an objective lens situated in a turret above the stage. The objective magnifies the light and transmits it to an oracular lens or eyepiece and into the user’s eyes. Some of the light is absorbed by stains, pigmentation, or dense areas of the sample and this contrast allows you to see the specimen. For good results with this microscopic technique, the microscope should have a light source that can provide intense illumination necessary at high magnifications and lower light levels for lower magnifications.
- 5. Advantages Simplicity of setup with only basic equipment required. Some specimens can be viewed without staining and the optics used in the brightfield technique don’t alter the color of the specimen. It is adaptable with new technology and optional pieces of equipment can be implemented with brightfield illumination to give versatility in the tasks it can perform. Limitations Very low contrast of most biological samples. Low apparent optical resolution due to the blur of out of focus material. Samples that are naturally colorless and transparent cannot be seen well, e.g. many types of mammalian cells. These sample often have to be stained before viewing. Samples that do have their own colour can be seen without preparation, e.g. the observation of cytoplasmic streaming in Chara cells. Enhancements Reducing or increasing the amount of the light source via the iris diaphragm. Use of an oil immersion objective lens and a special immersion oil placed on a glass cover over the specimen. Immersion oil has the same refraction as glass and improves the resolution of the observed specimen. Use of sample staining methods for use in microbiology, such as simple stains (Methylene blue, Safranin, Crystal violet) and differential stains (Negative stains, flagellar stains, endospore stains). Use of a colored (usually blue) or polarizing filter on the light source to highlight features not visible under white light. The use of filters is especially useful with mineral samples.