
Recommended
More Related Content
What's hot
What's hot (20)
Similar to How To Sew: Hoodie with Owl
Similar to How To Sew: Hoodie with Owl (20)
More from CandCSewing
More from CandCSewing (9)
Recently uploaded
Recently uploaded (20)
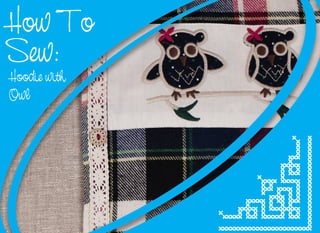
How To Sew: Hoodie with Owl
- 2. Recommended Machine: JK - SHIRLEY Water-soluble fabric marker Assorted fabric scraps Appliqué pressing sheet Fabric spray adhesive Satin Foot Pins Darning/Embroidery Foot Purchased hoodie Thread Fabric Aqua Magic™ stabilizer Fusible web Scissors Shopping List:
- 3. Sewing Directions: 1. Follow the Owl outline components onto the fusible web with a texture marker. Generally removed the shapes. 2. Pull away the defensive "waxy" some portion of the paper that does not have the outline on it. Put the sticky side of the piece onto the wrong side of the texture scrap. Ensure you can see the plan. 3. Press with an iron, yet don't utilize steam. Cut out the outline on the drawn line. Rehash for all the Owl plan design pieces. 4. At the point when all the plan pieces are removed, mastermind them on the hoodie. At the point when situation has been resolved, peel off the rest of the bit of defensive waxy paper and put on the hoodie.
- 4. 5. Cover the outline with the appliqué squeezing sheet and iron in place with the iron. NOTE: BE WATCHFUL WITH THE APPLIQUÉ SQUEEZING SHEET, AS IT WILL PROBABLY END UP PLAINLY HOT FROM SQUEEZING. 6. Put a bit of Aqua Magic™ stabilizer on the back of the outline. 7. To set up the machine for a Satin Stitch (for the appliqué), supplant the standard presser foot with a Satin Foot. Select the crisscross line on the machine's Pattern Selector Dial, at that point set the Stitch Width Dial to a medium-short setting. The line length ought to be set to a short setting– little enough that no texture appears between the lines, however not so short that the texture stalls out under the presser foot.
- 5. 8. Utilizing a piece of texture backed with stabilizer, test the crisscross stitch. On the off chance that the lines still appear to be too far separated, bring the fastens nearer together by shortening the join length setting. In the event that the join appear to be stalling out under the presser foot, make the fastens more distant separated by protracting the fasten length setting. 9. At the point when happy with the look of the Satin Stitch, sew around the edges of the Owl outline. 10. One procedure that can be utilized to make surface is free-movement sewing. To set up for freemotion sewing, cover the feed dogs with the Darning Plate from the embellishment compartment. Expel the presser foot and shank, at that point append the Darning/Embroidery Foot.
- 6. 11. Select a Straight Stitch and start making round movements on the appliqué piece until it is totally filled in. Do not stress if the lines are not uniform. Cross the string lines and simply have a fabulous time filling in the space. Keep in mind that once the feed dogs are secured (or brought down), you control where the texture goes and at what rate of speed. Have a go at rehearsing on a piece of texture to get more alright with the movement before moving to the venture. 12. Expel the overabundance stabilizer when wrapped up. The remaining stabilizer will turn out the first run through the hoodie is washed.
- 7. Inner Eyes (White) Outer Eyes (Black) Eyes on Mask (White) Cut Out Owl Belly Owl Body Owl Mask Branch Leaves