SlideShare a Scribd company logo
1 of 6
Download to read offline
This bow is so much fun!! And it is very easy to make! The possibilities with this bow are endless!


                                     SUPPLIES NEEDED
                                     ♥ Needle & Thread
                ♥ Double Prong Alligator Clip (Optional, but VERY helpful)
                                         ♥ Scissors
             ♥ Either a lighter or a wood burning tool for heat-sealing the ribbon
                                        ♥ Barrette(s)
         ♥ Something for the top of the bow to cover the stitching (buttons, resins, etc.)
                                   ♥ Ribbon (not pictured)
                            ♥ Ruler or Cutting Mat (not pictured)
First of all, there are different ways to fold your ribbon onto the needle to achieve distinct looks. You
could even mix and match within the same bow. I used dotted ribbon so that you can see the
“right” and “wrong” side to the ribbon.


                      A                          B                       C                             D


A.   This is the Figure 8 fold. I will be using this technique in the demonstration below.
B.   This is an Inside-Out fold.
C.   This is just a straight down fold.
D.   I’ll call this one the backwards fold – it only works with solid color ribbon – otherwise, your
     pattern (the dots) won’t show.

RIBBON LENGTH FORMULA
(Width of Bow x 2) + 2 inches = Length of ribbon for the first layer. For each subsequent layer,
subtract 1 inch.

               3 inch bow                          3 ½ inch bow                        4 inch bow
Layer 1        8 inches                            9 inches                            10 inches
Layer 2        7 inches                            8 inches                            9 inches
Layer 3        6 inches                            7 inches                            8 inches
Layer 4        5 inches                            6 inches                            7 inches
Layer 5            -                               5 inches                            6 inches
Layer 6            -                                   -                               5 inches

               4 ½ inch bow                        5 inch bow                          5 ½ inch bow
Layer 1        11 inches                           12 inches                           13 inches
Layer 2        10 inches                           11 inches                           12 inches
Layer 3        9 inches                            10 inches                           11 inches
Layer 4        8 inches                            9 inches                            10 inches
Layer 5        7 inches                            8 inches                            9 inches
Layer 6        6 inches                            7 inches                            8 inches
Layer 7        5 inches                            6 inches                            7 inches
Layer 8            -                               5 inches                            6 inches
Layer 9            -                                   -                               5 inches
TIPS
            ♥ You can make this bow as big or as small as you want.
   ♥ For each subsequent layer, you’ll need to decrease the ribbon length by 1
     inch – you could even decrease it by ½ inch if you want – it all depends on
                          the look you’re trying to achieve.
        ♥ You can use as many or as few pieces of ribbon for each layer.
                          Experiment to see what you like.
                 ♥ You can decide how many layers you want.
   ♥ Once your ribbon length gets to 5 inches, it may be too small – but it’s up
                                       to you.
    ♥ For each piece of ribbon you cut, you will get 2 loops. So if you cut SIX
                            pieces, you will get 12 loops.


DETAILS FOR THIS DEMONSTRATION
Layer 1: SIX 9” pieces
Layer 2: FIVE 8” pieces
Layer 3: FOUR 7” pieces
Layer 4: FOUR 6” pieces

So let’s get started. ☺

                                  1                            2                                  3


1. Once you have all your ribbon cut to size, heat-seal the ends with your preferred method.
2. Take the ribbon for LAYER 1 and place it all on top of each other. For the ribbon that only has
   the print on one side (the dots), you need to make sure that you place it PRINT DOWN. In this
   example, I placed a dotted ribbon at the bottom of the stack to illustrate how you need to fold the
   ribbon for Step 3. If you’re only using solid ribbon, it won’t matter how you fold it in Step 3.
3. Take one end of the “Stack” and bring it around to the other end, forming a loop. Notice how the
   dotted ribbon is now face-up. In fact, the two dotted ribbons will be touching each other.
4                                    5                             6


4. Now you will have both ends of the ribbon stacked together.
5. At the other end you will have formed a loop.
6. Take your needle and place it into the center of the loop, stopping when the ribbon gets about
   half way onto the needle. Hold onto the needle with your dominant hand and let go of the
   ribbon.

                             7                                   8                                9


7. Fan all the pieces of ribbon out into an even shape. You can play around with this until you get
   the ribbon exactly where you want it.
8. At this point I have found it VERY helpful to use a double prong alligator clip to hold the ribbon in
   place. Place the clip so that the needle is in between the two prongs. At any point, if the
   alligator clip becomes an annoyance, just remove it.
9. Take one end of the bottom piece of ribbon and fold it in your desired shape and place the end
   onto the needle.


Continued on next page…….
10                                   11                                      12


10. Now take the ribbon directly next to the one you just folded and do the same thing.
11. Continue all the way around the bow. You may need to re-shape some of the loops to make
    sure that everything is even.
12. Now you can pull your needle all the way through until the knot stops at the back. Then take
     the needle and put it back through the middle of the bow – making a stitch through the center.
     Repeat this 4 or 5 times – or until you feel comfortable with the bow staying together.

                              13                                   14                                 15


13. If you find it difficult to get the needle through all the layers of ribbon, then use a hard surface to
    push the needle through, rather than using your fingers.
14. When you’re finished, this is what the bow will look like.
15. If you flip the bow over, you can see that you don’t have the ends showing. You can use either
    side as the “top”.

                             16


16. At this point you can also sew on a 2 ½” piece of ribbon to the side that will be the BOTTOM of
    the bow. This piece of ribbon will be used as another measure of keeping your bow attached to
    the barrette. See Step 19.


            NOW REPEAT STEPS 2 THROUGH 16 WITH EACH ADDITIONAL LAYER.
17                                 18                                    19


17. If it’s possible for you, you can sew the layers together. However, I have a very hard time doing
    this and so I glue each layer together. Use either Hi-Temp hot glue or E-6000, which you can
    find at Wal-Mart and most craft stores.
18. Here is what this bow looks like with all the layers glued together.
19. Glue your clip to the back of the bow. Use the added piece of ribbon to glue across the barrette
    for additional stability.

                     Add your center embellishment for a completed hair bow.

More Related Content

Similar to Easy DIY Bow Tutorial

Erin's Dream Lanyards--Instructions
Erin's Dream Lanyards--InstructionsErin's Dream Lanyards--Instructions
Erin's Dream Lanyards--InstructionsVickie Buenger
 
Imaginative Spring Butterfly Pendant Tutorial
Imaginative Spring Butterfly Pendant Tutorial Imaginative Spring Butterfly Pendant Tutorial
Imaginative Spring Butterfly Pendant Tutorial HouseofGems.com
 
실뜨기 놀이 String games
실뜨기 놀이 String games실뜨기 놀이 String games
실뜨기 놀이 String gamesSeongwon Kim
 
Amigurumi Presentation
Amigurumi PresentationAmigurumi Presentation
Amigurumi PresentationSarah Cole
 
Exquisite Copper Wire Earrings With Crystal Beads
Exquisite Copper Wire Earrings With Crystal BeadsExquisite Copper Wire Earrings With Crystal Beads
Exquisite Copper Wire Earrings With Crystal BeadsHouseofGems.com
 
How To Make A Duct Tape Rose
How To Make A Duct Tape RoseHow To Make A Duct Tape Rose
How To Make A Duct Tape Rosedarebear
 
How To Make Twisted Cord
How To Make Twisted CordHow To Make Twisted Cord
How To Make Twisted Cordkootoyoo
 
Rough Draft Lanyard Instructions
Rough Draft Lanyard InstructionsRough Draft Lanyard Instructions
Rough Draft Lanyard InstructionsVickie Buenger
 
How to make_friendship_bracelets_1_[1]
How to make_friendship_bracelets_1_[1]How to make_friendship_bracelets_1_[1]
How to make_friendship_bracelets_1_[1]cubbypanda1234
 
Fabric Flowers Tutorial - Flower Headband
Fabric Flowers Tutorial - Flower HeadbandFabric Flowers Tutorial - Flower Headband
Fabric Flowers Tutorial - Flower Headbandtutorials-center
 
Fabric Flowers Tutorial - Flower Headband
Fabric Flowers Tutorial - Flower HeadbandFabric Flowers Tutorial - Flower Headband
Fabric Flowers Tutorial - Flower Headbandtutorials-center
 
Diy frame to stretch canvas
Diy frame to stretch canvasDiy frame to stretch canvas
Diy frame to stretch canvasjessica30251
 

Similar to Easy DIY Bow Tutorial (20)

Zoetrope Instructions
Zoetrope InstructionsZoetrope Instructions
Zoetrope Instructions
 
Viking Knit Tutorial
Viking Knit TutorialViking Knit Tutorial
Viking Knit Tutorial
 
Erin's Dream Lanyards--Instructions
Erin's Dream Lanyards--InstructionsErin's Dream Lanyards--Instructions
Erin's Dream Lanyards--Instructions
 
Double Wrap Wire Bangle Bracelet Tutorial
Double Wrap Wire Bangle Bracelet TutorialDouble Wrap Wire Bangle Bracelet Tutorial
Double Wrap Wire Bangle Bracelet Tutorial
 
Imaginative Spring Butterfly Pendant Tutorial
Imaginative Spring Butterfly Pendant Tutorial Imaginative Spring Butterfly Pendant Tutorial
Imaginative Spring Butterfly Pendant Tutorial
 
실뜨기 놀이 String games
실뜨기 놀이 String games실뜨기 놀이 String games
실뜨기 놀이 String games
 
Free Inkle Weaving Instructions
Free Inkle Weaving InstructionsFree Inkle Weaving Instructions
Free Inkle Weaving Instructions
 
Coiled gemdrops
Coiled gemdropsCoiled gemdrops
Coiled gemdrops
 
Bbpdf0404106
Bbpdf0404106Bbpdf0404106
Bbpdf0404106
 
How to Wire Wrap a Coin Pendant
How to Wire Wrap a Coin PendantHow to Wire Wrap a Coin Pendant
How to Wire Wrap a Coin Pendant
 
Amigurumi Presentation
Amigurumi PresentationAmigurumi Presentation
Amigurumi Presentation
 
Exquisite Copper Wire Earrings With Crystal Beads
Exquisite Copper Wire Earrings With Crystal BeadsExquisite Copper Wire Earrings With Crystal Beads
Exquisite Copper Wire Earrings With Crystal Beads
 
How To Make A Duct Tape Rose
How To Make A Duct Tape RoseHow To Make A Duct Tape Rose
How To Make A Duct Tape Rose
 
How To Make Twisted Cord
How To Make Twisted CordHow To Make Twisted Cord
How To Make Twisted Cord
 
Rough Draft Lanyard Instructions
Rough Draft Lanyard InstructionsRough Draft Lanyard Instructions
Rough Draft Lanyard Instructions
 
Tatting1
Tatting1Tatting1
Tatting1
 
How to make_friendship_bracelets_1_[1]
How to make_friendship_bracelets_1_[1]How to make_friendship_bracelets_1_[1]
How to make_friendship_bracelets_1_[1]
 
Fabric Flowers Tutorial - Flower Headband
Fabric Flowers Tutorial - Flower HeadbandFabric Flowers Tutorial - Flower Headband
Fabric Flowers Tutorial - Flower Headband
 
Fabric Flowers Tutorial - Flower Headband
Fabric Flowers Tutorial - Flower HeadbandFabric Flowers Tutorial - Flower Headband
Fabric Flowers Tutorial - Flower Headband
 
Diy frame to stretch canvas
Diy frame to stretch canvasDiy frame to stretch canvas
Diy frame to stretch canvas
 

Easy DIY Bow Tutorial

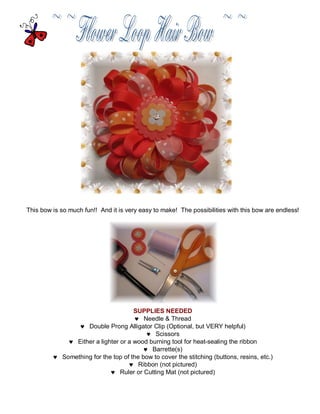
  • 1. This bow is so much fun!! And it is very easy to make! The possibilities with this bow are endless! SUPPLIES NEEDED ♥ Needle & Thread ♥ Double Prong Alligator Clip (Optional, but VERY helpful) ♥ Scissors ♥ Either a lighter or a wood burning tool for heat-sealing the ribbon ♥ Barrette(s) ♥ Something for the top of the bow to cover the stitching (buttons, resins, etc.) ♥ Ribbon (not pictured) ♥ Ruler or Cutting Mat (not pictured)
  • 2. First of all, there are different ways to fold your ribbon onto the needle to achieve distinct looks. You could even mix and match within the same bow. I used dotted ribbon so that you can see the “right” and “wrong” side to the ribbon. A B C D A. This is the Figure 8 fold. I will be using this technique in the demonstration below. B. This is an Inside-Out fold. C. This is just a straight down fold. D. I’ll call this one the backwards fold – it only works with solid color ribbon – otherwise, your pattern (the dots) won’t show. RIBBON LENGTH FORMULA (Width of Bow x 2) + 2 inches = Length of ribbon for the first layer. For each subsequent layer, subtract 1 inch. 3 inch bow 3 ½ inch bow 4 inch bow Layer 1 8 inches 9 inches 10 inches Layer 2 7 inches 8 inches 9 inches Layer 3 6 inches 7 inches 8 inches Layer 4 5 inches 6 inches 7 inches Layer 5 - 5 inches 6 inches Layer 6 - - 5 inches 4 ½ inch bow 5 inch bow 5 ½ inch bow Layer 1 11 inches 12 inches 13 inches Layer 2 10 inches 11 inches 12 inches Layer 3 9 inches 10 inches 11 inches Layer 4 8 inches 9 inches 10 inches Layer 5 7 inches 8 inches 9 inches Layer 6 6 inches 7 inches 8 inches Layer 7 5 inches 6 inches 7 inches Layer 8 - 5 inches 6 inches Layer 9 - - 5 inches
  • 3. TIPS ♥ You can make this bow as big or as small as you want. ♥ For each subsequent layer, you’ll need to decrease the ribbon length by 1 inch – you could even decrease it by ½ inch if you want – it all depends on the look you’re trying to achieve. ♥ You can use as many or as few pieces of ribbon for each layer. Experiment to see what you like. ♥ You can decide how many layers you want. ♥ Once your ribbon length gets to 5 inches, it may be too small – but it’s up to you. ♥ For each piece of ribbon you cut, you will get 2 loops. So if you cut SIX pieces, you will get 12 loops. DETAILS FOR THIS DEMONSTRATION Layer 1: SIX 9” pieces Layer 2: FIVE 8” pieces Layer 3: FOUR 7” pieces Layer 4: FOUR 6” pieces So let’s get started. ☺ 1 2 3 1. Once you have all your ribbon cut to size, heat-seal the ends with your preferred method. 2. Take the ribbon for LAYER 1 and place it all on top of each other. For the ribbon that only has the print on one side (the dots), you need to make sure that you place it PRINT DOWN. In this example, I placed a dotted ribbon at the bottom of the stack to illustrate how you need to fold the ribbon for Step 3. If you’re only using solid ribbon, it won’t matter how you fold it in Step 3. 3. Take one end of the “Stack” and bring it around to the other end, forming a loop. Notice how the dotted ribbon is now face-up. In fact, the two dotted ribbons will be touching each other.
  • 4. 4 5 6 4. Now you will have both ends of the ribbon stacked together. 5. At the other end you will have formed a loop. 6. Take your needle and place it into the center of the loop, stopping when the ribbon gets about half way onto the needle. Hold onto the needle with your dominant hand and let go of the ribbon. 7 8 9 7. Fan all the pieces of ribbon out into an even shape. You can play around with this until you get the ribbon exactly where you want it. 8. At this point I have found it VERY helpful to use a double prong alligator clip to hold the ribbon in place. Place the clip so that the needle is in between the two prongs. At any point, if the alligator clip becomes an annoyance, just remove it. 9. Take one end of the bottom piece of ribbon and fold it in your desired shape and place the end onto the needle. Continued on next page…….
  • 5. 10 11 12 10. Now take the ribbon directly next to the one you just folded and do the same thing. 11. Continue all the way around the bow. You may need to re-shape some of the loops to make sure that everything is even. 12. Now you can pull your needle all the way through until the knot stops at the back. Then take the needle and put it back through the middle of the bow – making a stitch through the center. Repeat this 4 or 5 times – or until you feel comfortable with the bow staying together. 13 14 15 13. If you find it difficult to get the needle through all the layers of ribbon, then use a hard surface to push the needle through, rather than using your fingers. 14. When you’re finished, this is what the bow will look like. 15. If you flip the bow over, you can see that you don’t have the ends showing. You can use either side as the “top”. 16 16. At this point you can also sew on a 2 ½” piece of ribbon to the side that will be the BOTTOM of the bow. This piece of ribbon will be used as another measure of keeping your bow attached to the barrette. See Step 19. NOW REPEAT STEPS 2 THROUGH 16 WITH EACH ADDITIONAL LAYER.
  • 6. 17 18 19 17. If it’s possible for you, you can sew the layers together. However, I have a very hard time doing this and so I glue each layer together. Use either Hi-Temp hot glue or E-6000, which you can find at Wal-Mart and most craft stores. 18. Here is what this bow looks like with all the layers glued together. 19. Glue your clip to the back of the bow. Use the added piece of ribbon to glue across the barrette for additional stability. Add your center embellishment for a completed hair bow.