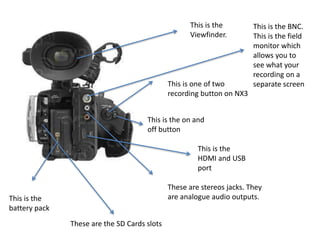
1. This is the
Viewfinder.
This is one of two
recording button on NX3
This is the on and
off button
These are the SD Cards slots
These are stereos jacks. They
are analogue audio outputs.
This is the BNC.
This is the field
monitor which
allows you to
see what your
recording on a
separate screen
This is the
HDMI and USB
port
This is the
battery pack
2. This is where you
control the white
balance using the
switch below and
in settings
This where the
Gain/ISO is.
you control the
preset settings
below as well
changing them
in the settings.
The Shutter speed
can control here
with the presets
and in settings.
This the ND Filter. The ND
filter is a setting which lowers
the the F Stops. There are 3 F
stops per filter
This is one of two menu
button
This removes HUD display on
the screen and leaves
recording on screen
This is where you change between
manual and auto focus
This button allows you to
check the status of the audio
output on LCD screen.
3. This is one of two
menu button
This removes HUD display on
the screen and leaves
recording on screen
This is one of two
recording button on
NX3
This controls the
playback of your
recordings
This button allows you to
check the status of the audio
output on LCD screen.
This is the
shuttle zoom
4. These allows you to control
the levels of the audio
output
These two switches
allow you to change
between interior
and exterior on the
two mics.
This is dial allows
you to control the
Focus
The dial
controls the
zoom
This dial controls
the exposure
This is the LCD screen
This is the status check
This is the menu button