SlideShare a Scribd company logo
1 of 105
Download to read offline
ANTENTOP 01 2010 # 012
ANTENTOP is FREE e-magazine devoted to ANTENna’s
Theory,
1-2010 Operation, and
Practice
Edited by hams for hams
In the Issue:
Antennas Theory!
Practical design of HF Antennas!
EH- Antennas!
Home brew Technique!
Regenerative Receivers!
QRP Transceivers!
And More….
Flat EH- Antenna
UA1ACO
Thanks to our authors:
Prof. Natalia K.Nikolova
Nick Kudryavchenko, UR0GT
I.Kapustin, UA0RW
Igor Lavrushov , UA6HJQ
Paul W. Ross, W3FIS
V. Polyakov, RA3AAE
And others…..
UA1AIC PA on GU43B EDITORIAL:
Well, my friends, new ANTENTOP –
01 -2009 come in! ANTENTOP is just
authors’ opinions in the world of
amateur radio. I do not correct and re-
edit yours articles, the articles are
printed “as are”. A little note, I am not
a native English, so, of course, there
are some sentence and grammatical
mistakes there… Please, be
indulgent!
ANTENTOP 01 –2010 contains
antenna articles, description of
antenna patent, QRP- Stuff. Hope it
will be interesting for you.
Our pages are opened for all
amateurs, so, you are welcome
always, both as a reader as a writer.
Copyright: Here at ANTENTOP we
just wanted to follow traditions of FREE
flow of information in our great radio
hobby around the world. A whole issue
of ANTENTOP may be photocopied,
printed, pasted onto websites. We don't
want to control this process. It comes
from all of us, and thus it belongs to all of
us. This doesn't mean that there are no
copyrights.
There is! Any work is copyrighted by the
author. All rights to a particular work are
reserved by the author.
73! Igor Grigorov, VA3ZNW
ex: RK3ZK, UA3-117-386,
UA3ZNW, UA3ZNW/UA1N,
UZ3ZK
op: UK3ZAM, UK5LAP,
EN1NWB, EN5QRP, EN100GM
Contact us: Just email me or
drop a letter.
Mailing address:
209- 5879 Bathurst Str., Toronto,
ON, M2R1Y7, CANADA
Or mail to:antentop@antentop.org
NB: Please, use only plain text
and mark email subject as:
igor_ant. I receive lots spam, so, I
delete ALL unknown me
messages without reading.
ANTENTOP is FREE e-magazine, available FREE at http://www.antentop.org/
ANTENTOP- 01- 2010, # 012 Editorial
Welcome to ANTENTOP, FREE e - magazine!
ANTENTOP is FREE e- magazine, made in
PDF, devoted to antennas and amateur radio.
Everyone may share his experience with others
hams on the pages. Your opinions and articles are
published without any changes, as I know, every
your word has the mean.
Every issue of ANTENTOP is going to have 100
pages and this one will be paste in whole on the site.
Preview's files will be removed in this case. I do not
know what a term for one issue will need, may be 8-
10 month or so. A whole issue of ANTENTOP hold
nearly 10 MB.
A little note, I am not a native English, so, of
course, there are some sentence and grammatical
mistakes there… Please, be indulgent!
Preview: Some articles from "cooking" issue will be
pasted for preview on this site, others no. Because,
as I think, it must be something mysterious in every
issue.
Publishing: If you have something for share with
your friends, and if you want to do it FREE, just send
me an email. Also, if you want to offer for publishing
any stuff from your website, you are welcome!
Your opinion is important for me, so,
contact if you want to say something!
Copyright Note:
Dear friends, please, note, I respect Copyright.
Always, when I want to use some stuff for
ANTENTOP, I ask owners about it. But… sometimes
my efforts are failed. I have some very interesting
stuff from closed websites, but I can not go to touch
with their owners… as well as I have no response on
some my emails from some owners.
I have a big collection of pictures, I have got the
pictures and stuff in others ways, from FREE
websites, from commercial CDs, intended for FREE
using, and so on... I use to the pictures (and seldom,
some stuff from closed websites) in ANTENTOP. If
the owners still are alive, please, contact with me, I
immediately remove any Copyright stuff, or, if it is
necessary, all needed references will be made there.
I do not know, why the owners do not response me. Are they still alive? Do their companies are a
bankrupt? Or do they move anywhere? Where they are in the end?
Business Advertising: ANTENTOP is not a
commercial magazine. Authors and I (Igor
Grigorov, the editor of the magazine) do not get any
profit from the issue. But off course, I do not mention
from commercial ads in ANTENTOP. It allows me to
do the magazine in most great way, allows me to pay
some money for authors to compensate their hard
work. I have lots interesting stuff in Russian, and
owners of the stuff agree to publish the stuff in
ANTENTOP… but I have no enough time to translate
the interesting stuff in English, however I may pay
money to translators,
and, they will do this work, and we will see lots
interesting articles there.
So, if you want to put a commercial advertisement in
ANTENTOP, please contact with me. A commercial
advertisement will do ANTENTOP even greater
interesting and various! I hope, readers do not
mention against such commercial ads.
Book Advertising: I do not think, that Book
Advertising is a commercial advertisement. So,
Book Advertising is FREE at ANTENTOP. Contact
with me for details.
Email: igor.grigorov@gmail.com subject:
igor_ant
NB: Please, use only plain text and mark email
subject as: igor_ant. I receive lots spam and viruses,
so, I delete ALL unknown me messages without
reading.
73! Igor Grigorov, VA3ZNW
ex: UA3-117-386, UA3ZNW, UA3ZNW/UA1N, UZ3ZK, RK3ZK
op: UK3ZAM, UK5LAP,EN1NWB, EN5QRP, EN100GM
http://www.antentop.org/ Editorial
ANTENTOP- 01- 2010, # 012 Table of Contents
Table of Contents
Antenna Theory Page
1
Aperture Antennas – Part I : by: Prof. Natalia K. Nikolova
Dear friends, I would like to give to you an interesting and reliable antenna
theory. Hours searching in the web gave me lots theoretical information about
antennas. Really, at first I did not know what information to chose for
ANTENTOP.
Now I want to present to you one more very interesting Lecture - it is a Lecture
Aperture Antennas – Part II. I believe, you cannot find such info anywhere
for free! Very interesting and very useful info for every ham, for every radio-
engineer.
(Rectangular horn antennas. Circular horns.)
5- 33
HF- Antenna Practice
2
Directional Helical Antennas: by: I..Kapustin, UA0RW
Practical Design of a small sized two Directional Helical Antennas for the 20-
meters Band.
34- 37
3
Narrow DEWD Dipole for the 80- meters: Nikolay Kudryavchenko,
UR0GT
Practical Design of a small sized two Directinoal Helical Antennas for the 20-
meters Band.
38- 39
4
Dipole Antenna for the 80- meters With Rectangular UR0GT- Match :
By: Nikolay Kudryavchenko, UR0GT
It is an alternative way (compare to DEWD) to design a broadband antenna-
use so called "UR0GT- Match." The match was offered by UR0GT at 2004 at
HZ- Forum. The match was used to feed VHF- Antennas, but it works at HF
too.
40- 41
5
Dipole Antenna for the 80- meters With Triangular UR0GT- Match: By:
Nikolay Kudryavchenko, UR0GT
It is an alternative way (compare to DEWD) to design a broadband antenna-
use so called "UR0GT- Match." The match was offered by UR0GT at 2004 at
HZ- Forum. The match was used to feed VHF- Antennas, but it works at HF
too.
42- 43
Page 1 http://www.antentop.org/
ANTENTOP- 01- 2010, # 012 Table of Contents
Table of Contents
Page
6
DEWD Dipole for the 80- meters with a Stub Matching: By: Nikolay
Kudryavchenko, UR0GT
It is just a variant of a DEWD Dipole for the 80- meters with Stub Matching.
The antenna has enough good parameters - Pass Band and Efficiency.
44- 45
7
Narrow DEWD Dipole for the 80- meters with a Stub Matching: By:
Nikolay Kudryavchenko, UR0GT
It is just a variant of a Narrow DEWD Dipole for the 80- meters with Stub
Matching.
The antenna has enough good parameters - Pass Band and Efficiency.
46- 47
8
Narrow DEWD Dipole for the 80- meters with an Inductance Matching:
By: Nikolay Kudryavchenko, UR0GT
It is just a variant of a Narrow DEWD Dipole for the 80- meters with an
Inductance Matching.
The antenna has enough good parameters - Pass Band and Efficiency.
48- 49
9
Super Narrow DEWD Dipole for the 80- meters with A Stub Matching:
By: Nikolay Kudryavchenko, UR0GT
It is just a variant of a Narrow DEWD Dipole for the 80- meters with an
Inductance Matching.
The antenna has enough good parameters - Pass Band and Efficiency.
50- 51
10
Simple Field One- Wire- Length HF Antennas : By: Igor Lavrushov ,
UA6HJQ
Below will be described simple one- length- wire HF antennas. The antennas
were designed for mountain's radio- expeditions. The main criteria were- low
weight plus simplicity. All described below HF- Antennas were tested in Northern
Caucasus Mountains with a transceiver FT- 817 and ATU MFJ- 902 and
provided good result.
52- 55
11
Flat EH- Antenna for 10- MHz: By: Vladimir Kononov, UA1ACO, St.-
Petersburg
Some days I heard 10- MHz. Good propagation conditions, lots stations but no
antenna. Only 42- meters length of wire was connected to my ICOM-7000
through ICOM AT-180. So, I decided to make EH-Antenna for the band. To
avoid too much job with cylinders (that are commonly used at EH- Antenna) I
made a Flat EH- Antenna from stuff from my scrap- box. It takes only 3- 4 hours
for making and tuning of the antenna.
56- 60
Page 2 http://www.antentop.org/
ANTENTOP- 01- 2010, # 012 Table of Contents
Table of Contents
Page
12
Flat EH- Antenna for 10- MHz in the Winter: By: Vladimir Kononov,
UA1ACO, St.-Petersburg
In three weeks the winter came in my town. I made more the 100 QSOs with 25
countries using power 30- Wtts. Antenna was covered by snow but it is worked.
I did lots QSOs with the snow- EH-Antenna. As rule I could make QSO with any
station that I heard.
61- 62
Regenerative Receivers
13
Some Thoughts on Regenerative Receivers : By: Paul W. Ross, W3FIS
After having monitored, and occasionally participating, in the discussions on the
Yahoo Regenerative Receiver Newsgroup, I thought it might be of interest to
throw in both some of my experiences, and professional thoughts. I suffer from
being an E.E. by training, having grown up at the tail end of the vacuum tube
era, as well as having held an amateur radio license for half a century.
63- 70
101- 102
14
Simple Short Wave Receiver : By: V. Egorov, UA3AB
Note from va3znw: It was the first tube regenerative receiver that I have made
by myself. At the far times I was a thirteen years old boy that fall into radio and
certainly into amateur radio. I already made a transistors' then tubes' HF
converter for my old tube receiver "Muromets." So, I could hear amateur
stations.
However, one friend of mine, old ham (he was at the times in his forties) told me
about my converters:- "Good job! But.. what I would like to say… all the stuff
(converter and receiver) you may change for one tube receiver. It would get the
same reception."
Another day he gave me an old soviet magazine "Radio" with the schematic.
When the receiver was made and tuned, I discovered that the one- tube receiver
really worked almost similar to converter with "Muromets."
71- 74
Simple QRP Transceivers
15
A Multi Band Tube 10 w QSK Transceiver: by Igor Grigorov, UZ3ZK
In the SPRAT # 67 (SPRAT is the journal of the G- QRP- Club) was published a
circuit of a tube DC receiver. I made this G0ILL receiver and enjoyed of it perfect
reception. Later I modified the receiver to transceiver.
75- 78
16
A 10- meter Band CW Transceiver : Vladimir Polyakov, RA3AAE
It is a variant of a simple DC transceiver. Transistor of PA works like a mixer in
receiving mode. So, there is no any commutation in the RF circuits. The
transceiver has output power 0.35- Wtts, shift TX/RX- 400-Hz, RX sensitivity 2
microV. Power voltage is 15-V, current at RX/TX - 30/120-mA.
79
Page 3 http://www.antentop.org/
ANTENTOP- 01- 2009, # 011 Table of Contents
Table of Contents
Page
17
An 80 m CW Valve Transceiver :.: by Igor Grigorov, RK3ZK
It is possible to build this transceiver in one evening using surplus parts. It has a
sensitivity of near 5- microV and output power on 3.5- 3.6- MHz near 1-Wtts.
80
18
PA
Practical Photos for P.A. on Tube GU-43B: By: Nikolay Kisel, UA3AIC,
Moscow
Just photos and steps how to do a simple PA on a power tube GU-43B
81- 86
19
Linear Power Amplifier on G811: By: S. Bunin, L. Yailenko
The PA is designed for ham bands 160- 10- meters. It provides 200 Wtts
CW/ 500 Wtts PEP SSB. Efficiency of the PA is 65- 70% in depend on
used rband.
87- 88
20
Patents
Ground and/or feedline independent resonant feed device for coupling
antennas and the likes.
Just a description of the patent
USB- TUBE
89- 100
Page 4 http://www.antentop.org/
ANTENTOP- 01- 2010, # 012 Aperture Antennas – Part I I
Feel Yourself a Student!
Dear friends, I would like to give to you an interesting and reliable antenna theory. Hours searching in the web
gave me lots theoretical information about antennas. Really, at first I did not know what information to chose for
ANTENTOP. Finally, I stopped on lectures “Modern Antennas in Wireless Telecommunications” written by Prof.
Natalia K. Nikolova from McMaster University, Hamilton, Canada.
You ask me: Why?
Well, I have read many textbooks on Antennas, both, as in Russian as in English. So, I have the possibility to
compare different textbook, and I think, that the lectures give knowledge in antenna field in great way. Here first
lecture “Introduction into Antenna Study” is here. Next issues of ANTENTOP will contain some other lectures.
So, feel yourself a student! Go to Antenna Studies!
I.G.
My Friends, the above placed Intro was given at ANTENTOP- 01- 2003 to Antennas Lectures.
Now I know, that the Lecture is one of popular topics of ANTENTOP. Every Antenna Lecture
was downloaded more than 1000 times!
Now I want to present to you one more very interesting Lecture - it is a Lecture Aperture
Antennas – Part II. I believe, you cannot find such info anywhere for free! Very interesting and
very useful info for every ham, for every radio- engineer.
So, feel yourself a student! Go to Antenna Studies!
I.G.
McMaster University Hall Prof. Natalia K.
Nikolova
Aperture Antennas – Part II
(Rectangular horn antennas. Circular horns.)
by Prof. Natalia K. Nikolova
www.antentop.org Page-5
ANTENTOP- 01- 2010, # 012 Aperture Antennas – Part II
www.antentop.org Page-6
ANTENTOP- 01- 2010, # 012 Aperture Antennas – Part II
www.antentop.org Page-7
ANTENTOP- 01- 2010, # 012 Aperture Antennas – Part II
www.antentop.org Page-8
ANTENTOP- 01- 2010, # 012 Aperture Antennas – Part II
www.antentop.org Page-9
ANTENTOP- 01- 2010, # 012 Aperture Antennas – Part II
www.antentop.org Page-10
ANTENTOP- 01- 2010, # 012 Aperture Antennas – Part II
www.antentop.org Page-11
ANTENTOP- 01- 2010, # 012 Aperture Antennas – Part II
www.antentop.org Page-12
ANTENTOP- 01- 2010, # 012 Aperture Antennas – Part II
www.antentop.org Page-13
ANTENTOP- 01- 2010, # 012 Aperture Antennas – Part II
www.antentop.org Page-14
ANTENTOP- 01- 2010, # 012 Aperture Antennas – Part II
www.antentop.org Page-15
ANTENTOP- 01- 2010, # 012 Aperture Antennas – Part II
www.antentop.org Page-16
ANTENTOP- 01- 2010, # 012 Aperture Antennas – Part II
www.antentop.org Page-17
ANTENTOP- 01- 2010, # 012 Aperture Antennas – Part II
www.antentop.org Page-18
ANTENTOP- 01- 2010, # 012 Aperture Antennas – Part II
www.antentop.org Page-19
ANTENTOP- 01- 2010, # 012 Aperture Antennas – Part II
www.antentop.org Page-20
ANTENTOP- 01- 2010, # 012 Aperture Antennas – Part II
www.antentop.org Page-21
ANTENTOP- 01- 2010, # 012 Aperture Antennas – Part II
www.antentop.org Page-22
ANTENTOP- 01- 2010, # 012 Aperture Antennas – Part II
www.antentop.org Page-23
ANTENTOP- 01- 2010, # 012 Aperture Antennas – Part II
www.antentop.org Page-24
ANTENTOP- 01- 2010, # 012 Aperture Antennas – Part II
www.antentop.org Page-25
ANTENTOP- 01- 2010, # 012 Aperture Antennas – Part II
www.antentop.org Page-26
ANTENTOP- 01- 2010, # 012 Aperture Antennas – Part II
www.antentop.org Page-27
ANTENTOP- 01- 2010, # 012 Aperture Antennas – Part II
www.antentop.org Page-28
ANTENTOP- 01- 2010, # 012 Aperture Antennas – Part II
www.antentop.org Page-29
ANTENTOP- 01- 2010, # 012 Aperture Antennas – Part II
www.antentop.org Page-30
ANTENTOP- 01- 2010, # 012 Aperture Antennas – Part II
www.antentop.org Page-31
ANTENTOP- 01- 2010, # 012 Aperture Antennas – Part II
www.antentop.org Page-32
ANTENTOP- 01- 2010, # 012 Aperture Antennas – Part II
www.antentop.org Page-33
ANTENTOP- 01- 2010, # 012 Directional Helical Antennas
I..Kapustin, UA0RW
Radio # 7 1958, pp.: 34-35.
The antenna intended for the 20-meter Band. Figure 1
shows the design of the antenna. There are two Voltage
Fed Helical Dipoles that fed with phase shift in 90
degree.
Figure 1 Directional Dipole Helical Antenna
The distance between the Helical Dipoles is Lambda/4.
A Helical Dipole made of two plastic tubes in 3-cm
diameter (it is possible to use wood rectangular 3x3 –
cm) and 110-cm in length. Two spirals in 77 turns of wire
cord in 3-mm (9-AWG) diameter are coiled above the
each tube. Gap between near coils is 7.5-mm. Ends of
the dipoles (made from tubes) are plugged by wood. In
the plug a copper tube by length in 45-cm and 8-mm OD
is inserted. Antenna wires are soldered to the copper
tube near the plug. Bare wire (or tube) with OD that can
fit inside the copper tube is inserted into. Antenna is
tuned into resonant by moving the bare wire. Figure 2
shows the design of the tube ending.
The Helical Dipoles are fastened to a traverse made
from a strong square wood stick. The stick is fastened to
an antenna mast. Open Wire Line made of copper cord
wire (3- mm (9-AWG) OD), the distance between wires
is 6-cm. The line is sitting on insulators under the strong
square stick. Length of the line is 5.2- m. Design of the
Directional Dipole Helical Antenna is shown on Figure 3.
Front Cover of Radio #7 1958
www.antentop.org Page-34
ANTENTOP- 01- 2010, # 012 Directional Helical Antennas
Figure 2 Ending of the Helical Dipole
Figure 3 Design of the Directional Dipole Helical Antenna
Directional Dipole Helical Antenna was tested compare
with WINDOM for the 20- meters Windom had overall
length 10-m. The WINDOM had maxima radiation to the
South.
At 1-km to the South from the tested antennas was
installed a receiver with S-Meter. Table 1 shows the
Data obtained from the test.
Title of the article
Directional Helical Antennas
From Radio # 7 1958
www.antentop.org Page-35
ANTENTOP- 01- 2010, # 012 Directional Helical Antennas
Table 1 Data for testing of the Helical Antenna
#
Direction of t he maxima Radiation
Of the Helical Antenna
S- Meter
1 North 0,8
2 East 2,0
3 South 2,4
4 West 2,0
Column “S- Meter” shows normalized level – Helical
Antenna/WINDOM. For example, digit “2” shows that
level from the Helical Antenna is in 2 times more
(according to the S- meter of the receiver) compare the
level from the WINDOM
Figure 5 shows the design of the Four- Wire Line.
The Four- Wire Line was placed onto insulators
under the square wood stick. The Small Directional
Dipole Helical The small sized Antenna at the test
showed that this one worked similar to the helical
antenna shown on the Figure 1.
It was tested Directional Dipole Helical Antenna with
reduced sizes. Length between the Helical Dipoles was
lambda/8, or 2.6-m for the 20- Meters Band. However
there was used Four –Wire Open Line between the
Dipoles. Figure 4 shows the design of the Small
Directional Dipole Helical Antenna.
However, the Small Directional Dipole Helical
Antenna was more complicated in the tuning
compare to Antenna from the Figure 1. The
antennas were fed by 500- Ohm two- wire line with
length 15.6-m (3/4- Lambda).
Figure 4 Design of the Small Directional Dipole Helical Antenna
The antennas were fed by 500- Ohm two- wire line with
length 15.6-m (3/4- Lambda).
Tuning of the Directional Dipole Helical Antenna (for
both antennas- Figure 1 and Figure 4):
1. Two wire feeder line (with length 15.6-m)
disconnected from the antenna and turn on to
TX (CAREFUL: To a Tube TX! May be used
semiconductor PA with ATU). (Figure 6A)
2. TX is tuned to the middle of the 20- meter
Band and its PA is tuned to the resonant
with the line.
3. First dipole is connected to the feeder. Tune
the dipole to the resonant (using only the
tuning strand wire at the dipole, do not
change tuning at the PA). (Figure 6B)
www.antentop.org Page-36
ANTENTOP- 01- 2010, # 012 Directional Helical Antennas
Figure 5 Design of the Four- Wire Line
4. If the dipole is loaded too much the feeder,
change distance between wires of the Two-
Wire Line.
5. Second dipole with the phase open wire line
connected to the feeder. (First dipole is
disconnected!) Tune the dipole to the resonant
(using the tuning strand wire). (Figure 6C)
6. If the dipole is loaded too much the feeder,
change distance between wires of the phase
line.
7. Connect the antenna to the feeder. (Both
dipoles, as shown on the Figure 1 and Figure
4) (Figure 6D) Antenna should not detune the
feeder. If it is, repeat tuning process from
paragraph 1.
Figure 6 Steps for Tuning Directional Dipole Helical Antenna
www.antentop.org Page-37
ANTENTOP- 01- 2010, # 012 Narrow DEWD Dipole for the 80- meters
The publications devoted to memory UR0GT.
By: Nikolay Kudryavchenko, UR0GT
It is a variant of a Narrow DEWD Dipole
(distance between wires- 10- cm) with four
equal wires (each wire is in 19.0- meter long).
However, the antenna has enough good
parameters compare to usual DEWD antennas
(that were described at Antentop-01- 2009).
The MMANA model of the antenna may be loaded:
http: // www.antentop.org/012/narrow_dewd_012.htm
Figure 1 Design of the Narrow DEWD Dipole
Figure 2 Z of the Narrow DEWD Dipole (20- m above the real ground)
http://www.antentop.org/ Page 38
ANTENTOP- 01- 2010, # 012 Narrow DEWD Dipole for the 80- meters
Figure 3 SWR of the Narrow DEWD Dipole (20- m above the real ground)
Figure 3 DD of the Narrow DEWD Dipole (20- m above the real ground)
73 Nick Credit Line: Forum from:
www.cqham.ru
http://www.antentop.org/ Page 39
ANTENTOP- 01- 2010, # 012 Dipole Antenna for the 80- meters
With Rectangular UR0GT- Match
The publications devoted to memory UR0GT.
By: Nikolay Kudryavchenko, UR0GT
It is an alternative way (compare to DEWD)
to design a broadband antenna- use so
called “UR0GT- Match.” The match was
offered by UR0GT at 2004 at HZ- Forum.
The match was used to feed VHF-
Antennas, but it works at HF too.
The match may be used at all antenna types –
dipoles, verticals, YAGI- either symmetrical or
asymmetrical.
The MMANA model of the Dipole Antenna for the
80- meters with rectangular UR0GT- Match
may be loaded:
http: // www.antentop.org/012/r_ur0gt_012.htm
Figure 1 Design of the Dipole Antenna for the 80- meters with rectangular UR0GT- Match
Figure 2 Z of the Dipole Antenna for the 80- meters with rectangular UR0GT- Match
(30- m above the real ground)
http://www.antentop.org/ Page 40
ANTENTOP- 01- 2010, # 012 Dipole Antenna for the 80- meters
With Rectangular UR0GT- Match
Figure 3 SWR of the Dipole Antenna for the 80- meters with rectangular UR0GT- Match (30- m
above the real ground)
Figure 4 DD of the Dipole Antenna for the 80- meters with rectangular UR0GT- Match (30- m
above the real ground)
73 Nick Credit Line: Forum from:
www.cqham.ru
http://www.antentop.org/ Page 41
ANTENTOP- 01- 2010, # 012 Dipole Antenna for the 80- meters
With Triangular UR0GT- Match
The publications devoted to memory UR0GT.
By: Nikolay Kudryavchenko, UR0GT
It is an alternative way (compare to DEWD)
to design a broadband antenna- use so
called “UR0GT- Match.” The match was
offered by UR0GT at 2004 at HZ- Forum.
The match was used to feed VHF-
Antennas, but it works at HF too.
The match may be used at all antenna types –
dipoles, verticals, YAGI- either symmetrical or
asymmetrical.
The MMANA model of the Dipole Antenna for the
80- meters with triangular UR0GT- Match
may be loaded:
http: // www.antentop.org/012/t_ur0gt_012.htm
Figure 1 Design of the Dipole Antenna for the 80- meters with triangular UR0GT- Match
Figure 2 Z of the Dipole Antenna for the 80- meters with triangular UR0GT- Match
(30- m above the real ground)
http://www.antentop.org/ Page 42
ANTENTOP- 01- 2010, # 012 Dipole Antenna for the 80- meters
With Triangular UR0GT- Match
Figure 3 SWR of the Dipole Antenna for the 80- meters with triangular UR0GT- Match (30- m
above the real ground)
Figure 4 DD of the Dipole Antenna for the 80- meters with triangular UR0GT- Match (30- m above
the real ground)
73 Nick Credit Line: Forum from:
www.cqham.ru
http://www.antentop.org/ Page 43
ANTENTOP- 01- 2010, # 012 DEWD Dipole for the 80- meters with
A Stub Matching
The publications devoted to memory UR0GT.
By: Nikolay Kudryavchenko, UR0GT
It is just a variant of a DEWD Dipole for the 80-
meters with Stub Matching.
The antenna has enough good parameters –
Pass Band and Efficiency.
The MMANA model of the antenna may be loaded:
http: // www.antentop.org/012/stub_dewd_012.htm,
file: Broadband 80m.5
Figure 1 Design of the DEWD Dipole for the 80- meters with Stub Matching
Figure 2 Z of the DEWD Dipole for the 80- meters with a Stub Matching
(30- m above the real ground)
http://www.antentop.org/ Page 44
ANTENTOP- 01- 2010, # 012 Narrow DEWD Dipole for the 80- meters
Figure 3 SWR of the DEWD Dipole for the 80- meters with a Stub Matching
(30- m above the real ground)
Figure 4 DD of the DEWD Dipole for the 80- meters with a Stub Matching
(30- m above the real ground)
73 Nick Credit Line: Forum from:
www.cqham.ru
http://www.antentop.org/ Page 45
ANTENTOP- 01- 2010, # 012 Narrow DEWD Dipole for the 80- meters with
a Stub Matching
The publications devoted to the memory UR0GT.
By: Nikolay Kudryavchenko, UR0GT
It is just a variant of a DEWD Dipole for the 80-
meters with Stub Matching.
The antenna has enough good parameters –
Pass Band and Efficiency.
The MMANA model of the antenna may be loaded:
http: // www.antentop.org/012/n_dewd_012.htm, file
Broadband 80m.6
Figure 1 Design of the Narrow DEWD Dipole for the 80- meters with a Stub Matching
Figure 2 Z of the Narrow DEWD Dipole for the 80- meters with a Stub Matching
(30- m above the real ground)
http://www.antentop.org/ Page 46
ANTENTOP- 01- 2010, # 012 Narrow DEWD Dipole for the 80- meters with
a Stub Matching
Figure 3 SWR of the Narrow DEWD Dipole for the 80- meters with a Stub Matching
(30- m above the real ground)
Figure 4 DD of the Narrow DEWD Dipole for the 80- meters with a Stub Matching
(30- m above the real ground)
73 Nick Credit Line: Forum from:
www.cqham.ru
http://www.antentop.org/ Page 47
ANTENTOP- 01- 2010, # 012 Narrow DEWD Dipole for the 80- meters with
an Inductance Matching
The publications devoted to the memory UR0GT.
By: Nikolay Kudryavchenko, UR0GT
It is just a variant of a DEWD Dipole for the 80-
meters with Stub Matching.
The antenna has enough good parameters –
Pass Band and Efficiency.
The MMANA model of the antenna may be loaded:
http: // www.antentop.org/012/nl_dewd_012.htm, file
Broadband 80m.7
Figure 1 Design of the Narrow DEWD Dipole for the 80- meters with an Inductance Matching
Figure 2 Z of the Narrow DEWD Dipole for the 80- meters with an Inductance Matching
(30- m above the real ground)
http://www.antentop.org/ Page 48
ANTENTOP- 01- 2010, # 012 Narrow DEWD Dipole for the 80- meters with
an Inductance Matching
Figure 3 SWR of the Narrow DEWD Dipole for the 80- meters with an Inductance Matching
(30- m above the real ground)
Figure 4 DD of the Narrow DEWD Dipole for the 80- meters with an Inductance Matching
(30- m above the real ground)
73 Nick Credit Line: Forum from:
www.cqham.ru
http://www.antentop.org/ Page 49
ANTENTOP- 01- 2010, # 012 Super Narrow DEWD Dipole for the 80- meters
with A Stub Matching
The publications devoted to memory UR0GT.
By: Nikolay Kudryavchenko, UR0GT
It is just a variant of a DEWD Dipole for the 80-
meters with Stub Matching.
The antenna has enough good parameters –
Pass Band and Efficiency.
The MMANA model of the antenna may be loaded:
http: // www.antentop.org/012/sn_dewd_012.htm, file
Broadband 80m.8
Figure 1 Design of the Super Narrow DEWD Dipole for the 80- meters with a Stub Matching
Figure 2 Z of the Super Narrow DEWD Dipole for the 80- meters with a Stub Matching
(30- m above the real ground)
http://www.antentop.org/ Page 50
ANTENTOP- 01- 2010, # 012 Super Narrow DEWD Dipole for the 80- meters
with A Stub Matching
Figure 3 SWR of the Super Narrow DEWD Dipole for the 80- meters with a Stub Matching
(30- m above the real ground)
Figure 4 DD of the Super Narrow DEWD Dipole for the 80- meters with a Stub Matching
(30- m above the real ground)
73 Nick Credit Line: Forum from:
www.cqham.ru
http://www.antentop.org/ Page 51
ANTENTOP- 01- 2010, # 012 Simple Field One- Wire- Length HF Antennas
Igor Lavrushov , UA6HJQ
Credit Line:
http: //
www.hamradio.cmw.ru/antenna/kusok.htm
Below will be described simple one- length- wire HF
antennas. The antennas were designed for mountain’s
radio- expeditions. The main criteria were- low weight
plus simplicity. All described below HF- Antennas
were tested in Northern Caucasus Mountains with a
transceiver FT- 817 and ATU MFJ- 902 and provided
good result.
... About Antenna Wire
Copper wire in the plastic insulation is the best choice.
Diameter of the copper wire should be 1.5- 2- mm.
Wire that is thinner – has no enough mechanical
strength, wire that is thicker - heavy. Antenna wires
should be not too hard but not too soft. It should have
reasonable rigidity. Photo 1 shows some examples of
good wires.
After choosing wires we should determinate the length
for the antenna. In common the length depends on the
used bands. 7- and 14- MHz bands are common used
in the radio- expedition.
UA6HJQ
Photo 1 Examples of Some Good Antenna Wires
http://www.antentop.org/ Page 52
ANTENTOP- 01- 2010, # 012 Simple Field One- Wire- Length HF Antennas
Expedition antenna for the bands should have length
not less the 9 meter and no more the 21 meter. Why?
Because we need antenna that would be work without
counterpoises, so, the antenna should have length
lambda or lambda/2. Shorten antenna has low
efficiency, long- high weight.
Wire in length 10-meters would be enough if you would
like to use bands 14- 28- MHz at the expedition.
Antenna with such length is suitable for local and DX-
QSO on 14- MHz and has good efficiency on 18- 28-
MHz. Such antenna still is working on 7-MHz
(lambda/4 length).
Wire in length 20-meters would work efficiency on 7- and
14- MHz as well as at 18- 28- MHz. The antenna
provides local QSO at the 3.6- MHz. However at good
propagation and if the end of the antenna is hanged up
at 10 and more meters the antenna allows to make DX-
QSO on the 3.6- MHz.
… How would it hang up?
Classical mountain expedition antenna is Sloper. Figure
1 shows the antenna. Use any natural support- tree,
stone, etc., to install the antenna.
Figure 1 Expedition Antenna Sloper 10- meters length
For Sloper having length 20 meters use additional
support. It may be any natural support- tree for
example, or artificial- plastic fishing pole, for example.
Figure 2 shows Sloper 20 meters length. DD of the
antennas shown on Figure 1 and Figure 2 has
maxima radiation in direction of the incline of the
antenna wire.
Antenna wire may be placed along the fishing pole. DD
of the antenna has maxima radiation into another side
from the incline of the wire. Figure 3 shows Sloper
with fishing pole as antenna part.
It is possible to install support or fishing pole at any
place of the wire. In this case it is a variant of an
asymmetrical dipole with the end fed. Figure 4 shows
the antenna. Good solution is to install the support in the
center of the antenna wire how it is shown on Figure 5.
In this case we have got a kind of I.V. antenna with the
end fed. The antenna has enough efficiency at 7- and
14- MHz.
The feature of the Sloper antennas on the base of one
wire is that all of the antennas are radiated almost
50/50% horizon/vertical polarization. It looks like a lack
of the antennas. If you need antenna with the vertical
polarization you may try helical antenna shown in the
Figure 6. However the antenna needs good grounding
or counterpoises.
http://www.antentop.org/ Page 53
ANTENTOP- 01- 2010, # 012 Simple Field One- Wire- Length HF Antennas
Figure 2 Expedition Antenna Sloper 20- meters length
Figure 3 Antenna Sloper with Fishing Pole as Antenna Part
Figure 4 Asymmetrical Dipole Antenna with the End Fed
http://www.antentop.org/ Page 54
ANTENTOP- 01- 2010, # 012 Simple Field One- Wire- Length HF Antennas
Figure 5 Symmetrical Dipole Antenna with the End Fed
All antennas, shown at Figure 1- Figure 6 may work
with ATU MFJ- 902 at 7- 28- MHz.
…In conclusion there are below some practical
advices.
1. If you will use transceiver in known for you place
where you can find natural support you may leave
antenna mast (fishing pole) at home.
2. At emergency situation try wire 10 or 20 meters
length at height 2- 3 meters above the ground.
3. Avoid place antenna end near tree or bushes, use
plastic rope for distance between antenna and the
subjects.
4. Very often grounding of the case of the ATU MFJ-
902 may increase antenna efficiency. For grounding
use a counterpoise in length 5- 20 meter. Sometimes
several metal sticks inserted to the earth and
connected (by wire any length) with the case of the
MFJ-902 may provide good grounding.
5. In the forest use antenna shown in the Figure 5.
6. Protect antenna tuner (MFJ-902) from rain and
snow. You may just install the tuner inside a tent.
7. Connect Transceiver and ATU by 50-Ohm coaxial
cable of any length.
Figure 6 Helical Vertical Antenna
73!
June – 2007, UA6HJQ
http://www.antentop.org/ Page 55
ANTENTOP- 01- 2010, # 012 Flat EH- Antenna for 10- MHz
Vladimir Kononov, UA1ACO, St.-Petersburg
Credit Line: http://ehant.qrz.ru/exp_eh31.htm
Some days I heard 10- MHz. Good propagation
conditions, lots stations but no antenna. Only 42-
meters length of wire was connected to my ICOM-
7000 through ICOM AT-180. So, I decided to make
EH-Antenna for the band. To avoid too much job
with cylinders (that are commonly used at EH-
Antenna) I made a Flat EH- Antenna from stuff from
my scrap- box. It takes only 3- 4 hours for making
and tuning of the antenna.
I made the antenna like an experimental for short
time work. But the antenna showed so good
performance that I leave it for my every- day work in
the Air. Figure 1 shows the Flat EH- Antenna.
Vladimir Kononov, UA1ACO
Figure 1 Flat EH- Antenna for 10- MHz
http://www.antentop.org/ Page 56
ANTENTOP- 01- 2010, # 012 Flat EH- Antenna for 10- MHz
Below it is the Parts List for the EH- Antenna. For
reference see Figure 1.
1. Two copper plate in dimension 180x315- mm and
thickness not less the 1- mm.
2. Wood or plastic plate in dimension 150x400- mm
and thickness near 10- mm.
3. Plastic plate in dimension 150x320- mm and
thickness near 3- 4- mm.
4. Tens screw (M3- M4).
5. Plastic Coupling (dia near 50-mm) for water
pipers.
6. Two caps for the Coupling.
7. Length of plastic water pipe, dia 32-mm and length 100-
mm.
8. RF Socket, I used Female SO- 239.
9. Insulated wire 0.85-mm (AWG-20) OD, near 8-meters
length.
10. Glue- Gun.
11. Soldering Iron.
Figure 2 shows the antenna draft. In Blue there are shown
item 2 and item 4.
Figure 2 Draft of the Flat EH- Antenna
How to Do
1. Prepare the EH- Antenna work-piece.
Take item 2. Put it on a desk. Take item 1 and put it above
item 2 according the draft (Figure 2). Put item 3 above
item 1. Fasten the sandwich (item 2 to item 1 to item 3)
with help of item 4. 50% of the job is done.
http://ehant.qrz.ru/
http://www.antentop.org/ Page 57
ANTENTOP- 01- 2010, # 012 Flat EH- Antenna for 10- MHz
2. The next step is to make inductor.
The inductor will be placed inside of the item 5. It
needs to save the inductor from atmospheric
influence- rain, snow, etc. At first prepare low cap
(one of item 6). Install at centre of the item 6 the RF-
Socket (item 8). At the second cap (one of item 6)
make two holes in dia 2- 3-mm for wires going from
the inductor to the EH- Antenna. Note, that after
antenna tuning, the holes should be covered with
glue from Glue Gun.
Inductor is wound at the item 7. Divide wire (item 9) in two
lengths by 4- meters each. Twist the wire, 2-3 twist on
centimeter. Then one end of the Wire is fastened to the
form (item 7) leaving 100- 150- mm of the wire free.
Coil 39 turns and second end of the wire is fastened to the
form. Beginning and ending parts of the inductor is coiled
with some gap. Do tap from 5.5- turn from the bottom. It is
tuning tap. Antenna is tuned by the tap (choosing the tap
from the inductor) or moving coils coiled with gap between
each other. The inductor is fastened with help of Glue- Gun
at the bottom cap. Figure 3 shows inductor installed on
the coupling cap.
Figure 3 Inductor of the Flat EH- Antenna
3. Antenna tuning
Solder upper end of the inductor to one copper plate,
bottom end to another. (Inductor is still outside the
coupling box- item 5.) Tune the antenna. With help
moving of the upper coils the antenna is tuned to
needed frequency, with help moving the bottom coils
the antenna is tuned to minimum SWR and maxima
EMF. After tuning of the inductor, glue the coils by
several drops of the glue. Tuned inductor should be
placed inside item 5, then item 6, then protect with
the glue all jointing and holes of the detail. Figure 4
shows the inductor inside of the coupling.
That is all. Flat EH- Antenna is ready. I installed the
antenna on a wooden mast in 2- meters length.
Three guys supported the mast. Antenna was fed by
coaxial cable RG-58/U –MIL in length 19.2- meters.
Antenna was installed near my home, in 12 meters
from the wall. Coaxial cable that is going from Flat
EH- Antenna was buried into the earth (on a small
depth). Near the antenna were trees that were
higher that the antenna. Figure 5 shows the
installations of the EH- Antenna.
Figure 4 Inductor of the EH- Antenna inside of the
Coupling
http://www.antentop.org/ Page 58
ANTENTOP- 01- 2010, # 012 Flat EH- Antenna for 10- MHz
Figure 5 Flat EH- Antenna near my Home
Figure 6 Parameters of the EH- Antenna.
http://www.antentop.org/ Page 59
ANTENTOP- 01- 2010, # 012 Flat EH- Antenna for 10- MHz
It was a lots deal to do at that day (when I made the
antenna), so at last I just measured the antenna
parameters but not tested the antenna in the Air.
Figure 6 shows the parameters of the EH- Antenna.
The antenna has band- pass in 930-kHz (at SWR
less the 2).
Near the antenna was installed RF- Choke- several turns
of coaxial cable around of a ferrite ring. The choke is
visible on the Figure 5.
The next day a rain was coming. Water dropped from the
antenna and I thought that no chance the antenna alive.
Figure 7 shows the antenna into the rain.
Figure 7 Rain and Flat EH- Antenna
I turned on the EH-Antenna instead of my 42- meters
wire… Noise (compare to 42-m- LW, the antenna
installed from another side of my home) dropped
down but stations went up. First QSO was with
UA0AV, Sergey, Krasnoyarsk- 599. Next ones-
M0IOW, RK4HE, SP3OOC and VK3XQ, Australia,
my rapport 539, I heard him 56/79. May be good
propagation… anyway, for small EH-Antenna placed
at 2- meters above the ground- it is very good. Then
I had QSOs with OK1HAJ, RV3QX, SP9FVO, YU5R,
GM0IXO, ON3URT, OZ1HVL, UA4SKW, SP4NDV,
UT0EG, DR600UL, RA9FFF, UN1L, RA9JAT,
RM9WK, ON3WP/qrp, LA9SN, RD3BD, RV3SBS
So, I decided do not remove the EH- Antenna and tested it
in next days. For me it was interesting how the antenna
would be worked at show conditions.
.
73!
Vladimir, UA1ACO
St. Petersburg, October- 2009
See next article
Flat EH- Antenna for 10- MHz in the Winter
ANTENTOP- 01- 2010, pp.:61-62
Tube M89
http://www.antentop.org/ Page 60
ANTENTOP- 01- 2010, # 012 Flat EH- Antenna for 10- MHz in the Winter
Continued from ANTENTOP- 01- 2010
Flat EH- Antenna for 10- MHz
pp.: 56- 60
Vladimir Kononov, UA1ACO, St.-Petersburg
Credit Line: http://ehant.qrz.ru/exp_eh31.htm
In three weeks the winter came in my town. I made
more the 100 QSOs with 25 countries using power
30- Wtts. Antenna was covered by snow but it is
worked. I did lots QSOs with the snow- EH-Antenna.
As rule I could make QSO with any station that I
heard.
It seems that the weather did not influenced onto the
antenna. Really when I measured parameters of the
antenna I discovered that it were unchanged. Figure 8
shows Flat EH- Antenna covered with snow.
Figure 8 Flat EH- Antenna covered with snow
Snow fall, then thawed, and again fall down. Antenna
was still working. However I decided to bring the
antenna indoor and checked it. Antenna begun to thaw
out and water was coming from the antenna. From
hermetic (as I believed) coupling water begun to drop. I
remove caps from the coupling and discovered there
near 10 grams of water. Figure 9 shows water dropping
from the coupling.
Conclusion- simple “Glue- Gun” sealing cannot provide
full hermetic. After the antenna was fully dried, I
checked the antenna parameters (they were
unchanged). Then the antenna was assembled again,
covered “protected” bag and installed at the old place.
Figure 10 shows new installed Flat EH- Antenna.
http://www.antentop.org/ Page 61
ANTENTOP- 01- 2010, # 012 Flat EH- Antenna for 10- MHz in the Winter
Figure 9 Water is coming from “hermetic” coupling
Figure 10 New Installed Flat – EH- Antenna
I checked the antenna in the Air- working excellent.
OK, I will test the antenna further.
Flat EH- Antenna may be tuned on to others bands.
Design of the antenna is leaved the same only
numbers of coils are changed in the inductor. Table
1 shows the Theoretical Data for the others bands.
73!
Vladimir, UA1ACO
St. Petersburg, November- 2009
Table 1 Theoretical Data of the Inductor for the 7, 10,
14 and 18- MHz Band.
Band Theoretical Data for Inductor
7 MHz 60 turns
10 MHz 39 turns
14 MHz 24 turns
18 MHz 17 turns
http://www.antentop.org/ Page 62
ANTENTOP- 01- 2010, # 012 Some Thoughts on Regenerative Receivers
Paul W. Ross, W3FIS
After having monitored, and occasionally
participating, in the discussions on the Yahoo
Regenerative Receiver Newsgroup, I thought it might
be of interest to throw in both some of my
experiences, and professional thoughts. I suffer from
being an E.E. by training, having grown up at the tail
end of the vacuum tube era, as well as having held
an amateur radio license for half a century.
In no way is this paper comprehensive. A Google
search will turn up all sorts of things. The purpose of
this paper is to provide a starting point for discussion
and experimentation for the person new to the field
of regenerative receivers, who may be utterly
overwhelmed by the plethora of information.
I've always been fascinated by regenerative receivers, with
my first one being built from an article in "Popular
Mechanics," using a 1T4 and the usual "ticker" coil
Armstrong design. In this paper, tutorial, or what you might
want to call it, I'd like to look at some of the general design
issues. Some of this is based on a discussion of general
receiver design considerations that I gave recently before
the Nanticoke Amateur Radio club in Seaford, Delaware,
as well as discussions with members of the Yahoo
Regenerative Receiver group.
Classic Regenerative Receiver, the base of lots regenerative receivers.
Figure Credit Line: Wiki
http://www.antentop.org/ Page 63
ANTENTOP- 01- 2010, # 012 Some Thoughts on Regenerative Receivers
Page of Armstrong’s Patent of the Tickler Oscillator
Note I.G.: On the base of the Regenerative Receiver Armstrong patented several so called “Tickler
Oscillator.”
Figure Credit Line: Wiki
Everybody is likely familiar with the original
Armstrong design -- tickler coil for feedback,
"throttle" with a variable capacitor RF bypass from
plate to ground, etc., etc., etc. Keep that in mind, as
this discussion progresses. If you aren't familiar with
the basic design -- grid lead detector, "tickler"
feedback and regeneration control with a variable
capacitor, look this up. Actually, Armstrong's original
circuit was slightly more complicated, but the
scheme I've mentioned covers the basic design.
One needs to keep firm in mind that early receivers,
as well as transmitter designs were governed
strongly by cost and complexity considerations.
Early vacuum tubes were expensive, and parts generally
difficult to come by, and expensive as well. Also, simplicity
was a major consideration, as the more complex
something is, the lest reliable it will tend to be.
As a consequence, there were some design compromises
that we've been working to overcome over the years.
The following discussion applies to vacuum tube designs
as well as their modern cousins with bipolar and field effect
devices. They really differ only in the details. Every person
has their "pet" designs, of course, as do I. Well, here
goes...
Classic Colpitts regenerative receiver may be found:
http://www.antentop/012/regen_rx_012.htm
http://www.antentop.org/ Page 64
ANTENTOP- 01- 2010, # 012 Some Thoughts on Regenerative Receivers
One of Armstrong Regenerative Receiver
Credit Line: Thermionic Tubes in Radio Telegraphy and Telephony, by: John Scott- Taggart, The
Wireless Press LTD, 1921
• Effectively increases the "Q" of the tuned
circuit by the concept of "negative
resistance." Any circuit that accomplishes
this will do the trick. Typically, an oscillator
circuit, such as a Hartley, Colpitts, or the like
is chosen. One then sets the loop gain of the
oscillator circuit by some means to be just
below the point of oscillation. Later, it will be
seen that there are some clear design
advantages to some circuits over the others.
• Runs in "oscillation" mode, if desired, to act
as a direct conversion or autodyne detector
for CW or Single Sideband signals. The
oscillation mode provides the BFO, or
course.
The workings are not dependent on vacuum tubes
versus transistors. The real problems in any design
at least, are:
1. Interaction with the antenna, and QRM generated
by the receiver itself. "Grounded Grid" or equivalent
isolation amplifier does the trick here. An un-tuned
grounded gate FET amplifier seems to be the
modern choice.
2. There is massive interaction with tuning as a function of
regeneration setting. If there is a way to separate detection
from regeneration, this problem can be addressed. One
typical vacuum tube design uses a Colpitts oscillator in
parallel with a plate or grid leak detector (my favorite for
vacuum tube designs). Another alternative (my Senior EE
project in 1960!) was to insert a cathode follower between
the tuned circuit and the detector/feedback vacuum tube).
Edwin H. Colpitts, “Oscillation Generator,”
U.S. patent 1,624,537 (filed: 1 February 1918:
issued: 12 April 1927)
Figure Credit Line: Wiki
http://www.antentop.org/ Page 65
ANTENTOP- 01- 2010, # 012 Some Thoughts on Regenerative Receivers
Note from Wiki: The Hartley oscillator was invented by Ralph V. L. Hartley while he was working for the
Research Laboratory of the Western Electric Company. Hartley invented and patented the design in
1915 while overseeing Bell System’s transatlantic radiotelephone test. It was awarded patent number
1,356,763 on October 26, 1920.
Figure Credit Line: Wiki
3. Smooth regeneration. This is the hard nut to
crack. There is no really good answer here, in my
opinion. This , plus the interaction problem was one
of the major reasons for the decline in popularity of
the regenerative receiver, as well as reduced
component costs which made superhetrodyne
receivers practical. However, a well regulated power
supply to the regeneration stage helps a great deal.
A Zener or comparable regulator in transistor
circuits, or gas discharge tube for vacuum tubes will
work well. I note that one commercial regenerative
receiver simply uses a separate 9 volt battery for the
detector, and a second for the audio amplifier.
Now, keeping in mind the "simplicity" issue, we can
see where these fit into our design process.
The decoupling of the tuned circuit from the antenna
serves two purposes. First, it reduces the interaction
of your antenna with the detector tuned circuit. If you
have ever hooked an antenna analyzer to a random
wire antenna, the impedance is all over the place.
Investment in a good antenna tuner, such as the
MFJ-16010 is money well spent. Of course, a home-
brewed tuner is also feasible, either built-in to the
receiver, or as a separate unit. Any of the the "QRP"
designs will do the trick. The coupling of a resonant
antenna into the detector can often lead to "dead"
spots in tuning. Hence, the advantage of isolating
the antenna from the detector with a "front end."
There is no need to have this front end tuned, but just to
keep the antenna interactions from the detector, and
reduce or partially prevent radiation from the oscillating
detector from producing QRM for other radio users in the
vicinity.
When running in "oscillation" mode, or close to it, a
regenerative detector is its own little QRP transmitter! For
domestic and neighborhood tranquility, the isolation
amplifier greatly reduces radiation back into the antenna. It
is not perfect, and my two commercial kit regenerative
receivers make an impromptu signal generator in the ham
shack when needed. An "RF" gain control can be easily
introduced to reduce the strength of incoming strong
signals, such as some of the major SW stations, like Radio
Havana, or the PRC stations.
Along with the simplicity issue, the design for convenient
band switching of the detector's tuned circuit is a hassle. If
the "tickler" design of the classic Armstrong set is used,
then there are either two or three coils that have to be
switched. This means at least a three-pole n-throw switch if
there is a "primary" coil to the antenna. Three of the six coil
points are "ground" for RF, so only a three pole switch is
needed. If a coupling adjustment capacitor is placed on the
primary side to ground, then at least four points are "hot"
for RF. These switches are not only complex, but they are
expensive and add a large measure of complexity and
increased size to the receiver. There are at least two
common alternative solutions:
http://www.antentop.org/ Page 66
ANTENTOP- 01- 2010, # 012 Some Thoughts on Regenerative Receivers
Torn.E.b
Credit Line: http://www.radiostation.ru/home/museum.html
Regenerative Receiver for professional communication Torn.E.b. was designed by Telefunken in
1935- 1936 for military use. The receiver was at WEHRMACHT by the end of wwII. The receiver had (may
be first in the World ) rotary switch for the coils.
KUB- 4M
Regenerative Receiver for professional communication KUB- 4 was designed in 1930 in
Kozitskiy plant, Leningrad, USSR. The receiver was used everywhere where HF- communication
was used- in military and civil. Later, for marine use was designed KUB- 4M. The receiver was
used at marine and submarine ships. The receivers were in use up to 1945.
KUB- 4 and KYB- 4M had Plug- In Coils
http://www.antentop.org/ Page 67
ANTENTOP- 01- 2010, # 012 Some Thoughts on Regenerative Receivers
Plug-in coils -- the classic solution, but clumsy to do,
and you have to have some place to conveniently
store the un-used coils. My own early sets used
these, mostly because I could buy a nice set of short
wave and broadcast band coils, versus winding my
own coils. If you note pictures of early commercial
sets for marine use, there was a coil box near the
receiver. The "Sierra" QRP transceiver suffers from
this problem.
A design that uses only a single coil in the tuned circuit
such as the Colpitts design is one such solution that
greatly reduces the complexity of band switching. Of
course, a Hartley oscillator design uses a single tap on the
coil, but again, this is an additional source of complexity
due to the tap on the coil. The Colpitts design does
require a DC return for the cathode in the case of vacuum
tubes or source in the case of FET designs.
Plug- In Coils at Radio “Sierra”
Credit Line: http://www.w0ch.net/sierra/sierra.htm
By the way, FETs have an advantage as they are
high input impedance devices like vacuum tubes,
and do not load the tuned circuit to any degree. Both
of the two commercial regenerative receivers I have
use FETs in the detector and isolation amplifier. The
MFJ-8100 has a series of inductors in series with a
simple single pole selector switch. The Ten-Tec
1253 uses nine separate inductors, but switches
them with a clever PIN diode and counter circuit.
Both of these designs use an isolation "front end,"
which eases the complexity of coupling into the
tuned detector circuit.
It is generally agreed that designing a receiver for a
single or small range of frequencies is much easier
than developing a general coverage receiver. If you
can get a 10:1 range of capacitance change with a
variable capacitor, for example, then you can expect
about a 3:1 tuning range (square root of the ratio of
the maximum to minimum capacitance). This
problem rears its ugly head especially in the case of
varactor tuning, where the capacitance change
range is more modest. More about this later, with a
couple of "real life" receiver designs.
The usual approach to fine tuning, when using a
variable capacitor is to have a "band set" capacitor
and then a "band spread" capacitor of about 10% of
the value of the main capacitor.
To save money, an alternate approach is to use some sort
of mechanical vernier reduction drive, such as the MFJ-
8100. With varactor tuning, a secondary variable voltage
source with a smaller voltage variation range serves the
same purpose. Kitchin used a combination of varactor
(fine) and variable capacitor (coarse) tuning in one of his
designs.
If we are willing to accept a modest degree of increase in
complexity, the so-called "Regenodyne" receiver is a good
choice as a solution to the difficulties of developing a wide
coverage receiver. A Google search will turn up some
extensive discussions of this concept.
The idea here is to have a regenerative receiver of
modest tuning range as a "back end" to a superhetrodyne
front end, which converts a series of band segments with
a crystal oscillator with a series of switched crystal
frequencies. A somewhat similar line of attack was used
with the "Q Multiplier" tuned/regenerative IF system on
early vacuum tube general coverage receivers. This was
available from Heathkit. I had one on a Hallicrafters S-
20R, which was quite effective. The front end can be
pretty broad, and only need remove the image response.
http://www.antentop.org/ Page 68
ANTENTOP- 01- 2010, # 012 Some Thoughts on Regenerative Receivers
Hallicrafters S-20R
Credit Line: http://www.radionewjerusalem.com/Radio/S-20R%20Hallicrafters.html
In the 1960s, the ARRL handbook showed an
interesting receiver along these lines. It used a 1700
kHz IF frequency with the local oscillator between
the 40 and 80 meter ham bands. The 1700 kHz IF
had good selectivity with a half-lattice crystal filter.
The front end was tuned to either 40 or 80 meters,
as desired.
As to controlling the regeneration, any scheme that
allows you to control the feedback will work. The
more common themes:
• Armstrong "RF" throttle - another expensive
variable capacitor, plus frequency issues.
• Variable resistor across the tickler coil -- "kill"
some of the feedback signal. My original 1T4
regenerative receiver used this scheme.
• Change filament voltage! Used in many of
the early directly heated filament tubes.
• Change the screen voltage in a Pentode.
Probably one of the cleanest strategies. This
is used in the World War II Paraset design.
• Change the coupling between the tickler and
tuning coil mechanically.
• Add a variable resistor in the emitter circuit
(Kitchin's design, who uses a Hartley
oscillator, and he also uses a separate diode
detector). This reduces the loop gain of the
oscillator.
Change the plate voltage of the detector.
Again, due to the various interactions, and a desire to get
smooth transition into regeneration, some sort of good
voltage regulation for the detector stage is essential. This
doesn't add any great complexity to the design with the
availability of nice integrated circuit voltage regulator
chips. Kitchin uses a simple string of diodes to get around
1.5 volts for the detector.
Now, for an analysis of a couple of current commercial kit
designs. Where I live in rural "Slower Lower" Delaware, it
is hard to get electronic parts other than at the local Radio
Shack, unless I do a lot of mail ordering. As a
consequence, getting back into radio after a 30+ year
hiatus, I opted to go the kit route for my initial efforts in
regenerative receivers. There are a couple of clear
advantages to kits -- all the parts were there, and the
design was liable to work the first time round. Any
modifications on my part could be done with ease, either
during construction, or later, as I might choose.
For my first regenerative receiver kit, I chose the Ten-tec
1253. As I mentioned, the band switching scheme is quite
clever -- it uses a series of inductors switched by PIN
diodes and a counter. It also has nine bands. This is
mostly due to the rather limited tuning range with the
varactor diode, but nine bands is pretty cool. It covers
from the low end of the 160 meter band up through 13
meters with a few unimportant gaps. The upper
frequencies are a bit problematical, but this is typical of
both vacuum tube and solid state regenerative receivers.
If you want to go to higher frequencies, and use a
regenerative detector, then the Regenodyne approach is
a good bet.
http://www.antentop.org/ Page 69
ANTENTOP- 01- 2010, # 012 Some Thoughts on Regenerative Receivers
Ten-Tec 1253
Credit Line: RigReference.com
Paraset
Note from Credit Line: The PARASET is a small British "Spy set" transceiver supplied during the WW2 to
the Resistence forces mainly in France, Belgium and Netherland.
It uses 3 metal tubes :
1) 6SK7 - Detector
2) 6SK7 - AF Amplifier
3) 6V6 - Cristall Oscillator/P.Amplifier
The range covered from the receiver is 3.2 - 8 MHz on AM and CW modes.
The transmitter is cristall controlled and works on the same receiver range.
The power output is around 5-7 W on CW mode only.
The set were supplied by a 6 Vdc vibrator type PSU.
Credit Line: http://www.qsl.net/ik0moz/paraset_eng.htm
http://www.antentop.org/ Page 70
ANTENTOP- 01- 2010, # 012 Some Thoughts on Regenerative Receivers
Fine tuning on the Ten-Tec 1253 is done with an
additional voltage control on the tuning varactor. This
is a quite satisfactory solution, in my opinion. You
just have to remember to return the fine tuning
control to the center position before you move up or
down the band when scanning for additional stations.
The only clear problems that I experienced with the
Ten-tec 1253 were:
• Lack of a shielded antenna connection - I
added an SO-259 connector to replace the
binding post. A random length wire can be
attached through a banana plug.
• Ugly tuning knob - a trip to Radio Shack
fixed this.
• I added the "enhanced sensitivity option." I
might want to re-think this. With it, the
regeneration setting is somewhat "twitchy."
• Calibration required borrowing a signal
generator from a friend. I have to consult a
chart for the band coverage. I simply stuck a
chart with the tuning ranges to the top of the
receiver.
The second regenerative receiver kit I built was the
MFJ-8100. They take a slightly different tack in the
design. They use a series of inductors with a simple
multi-position switch to tap into the inductor string for
band switching. They, as do Ten-tec, use simple
ferrite miniature inductors, except for one that is a
toroid that you have to wind. All the inductors in the
Ten-tec 1254 design are miniature ferrite inductors.
MJF-8100 uses a nice variable capacitor with a vernier
reduction drive for tuning. This "feels" better than the
potentiometer used in the Ten-tec 1253. The tuning is a
little "fast" on the upper bands, but acceptable. I admit to
being a tradtionalist on the issue of real variable
capacitors. I am not sure God intended us to tune circuits
with varactors. The MFJ-8100 has five bands to cover
most of the same range as the Ten-tec 1253, but this is
due to using a variable capacitor instead of a varactor.
• Again, lack of a shielded antenna connection. I
added an SO-259 connector on the back panel. I
did retain the supplied binding post for the
antenna, however.
• Lack of external power supply connection. A
power jack from Radio Shack and a SPDT toggle
switch took care of this. I can use an external 9
volt battery. There are eight screws to remove to
get the case apart to change the battery, so an
external battery is handy.
• Exact calibration can effectively be done at one
point. I zero beat to WWV at 15 MHz. At worst,
dial seems to be off by +/- 200 kHz at the lowest
or highest tunable frequencies. I made a couple of
dots with a marker for CW portions of the 40 and
20 meter bands for CW QRP monitoring.
• Headphone only operation. A small external
speaker/amplifier from Radio Shack took care of
this. I might add a more robust internal AF
amplifier, as there is plenty of room in the case. A
small speaker could be fitted as well. A project for
the future...
MFJ- 8100
Credit Line: http://www.radiomuseum.org/r/mfj_mfj_8100.html
http://www.antentop.org/ Page 101
ANTENTOP- 01- 2010, # 012 Some Thoughts on Regenerative Receivers
• The RF gain control is internal. At some
point, I might put a 10K Ohm potentiometer
on the back panel to replace the internal
control, which is accessed through a small
hole with a screwdriver. However, I find that
with either the Ten-tec 1253 and MFJ-8100
that I rarely have to adjust the RF gain
control unless I have a very strong station.
• I found it useful to "tie" the toroid down to the
circuit board after final adjustment with a dab
of hot glue from a glue gun. Very handy stuff.
Both receivers are sufficiently stable for CW and
SSB reception. The Ten-tec 1253 seems to show a
small amount of warm up drift. I have no idea why
this should be. It goes away in about 10 minutes.
The best bet seems to be to run it from an external
power supply and leave it running all evening.
I have found that external battery operation (12 volt
gel cell for Ten-tec 1253 and 9 volt battery for MFJ-
8100) is the best bet. The usual "wall wart" or
converted PC power supplies generate too much
hash at HF for good clean reception.
Both receivers benefit from the use of an antenna
tuner to optimize the matching between the antenna
and the receiver input impedance.
For further reading and study, Google is your friend.
A very good discussion of regenerative receivers can
be found in the paper by Ramon Vargas at
http://cidtel.inictel.gob.pe/cidtel/contenido/Pu
blicaciones.php?autor=rvargas
The seminal article by Charles Kitchen is to be found in
the November/December 1998 QST. He has an extensive
discussion, and shows both photos and schematics of an
excellent complete solid-state regenerative receiver.
Also, some very nice material on direct conversion and
Wheatstone bridge regenerative receivers can be found
at:
http://mjrainey.googlepages.com/radio
A good source of early books on vacuum tube receivers
and the like can be found at :
http://www.pmillett.com/tecnical_books_online.ht
m
I'd like especially thank Rob Grasing for some
suggestions on modifications to the Ten-tec 1253 and the
source for some of the links that I have suggested, as well
as on-going discussion during the development and
writing of this paper. It is always good to have a "second
set" of eyes during a writing project.
I look forward to hearing from other members of the group
for their insights on a always fascinating topic.
73
/paul w. ross
W3FIS
Russian Military/Spy/Partisan 3- tubes Transceiver “Sever.”
Regenerative RX + Xtall TX. Produced: 1940- 1945
Band: RX/TX: 3.62-12.25/3.62-6.25
Credit Line: http://www.cqham.ru/trx/sever.html
http://www.antentop.org/ Page 102
ANTENTOP- 01- 2010, # 012 Simple Short Wave Receiver
V. Egorov, UA3AB
Credit Line: Radio # 3, 1950, p.p.: 37- 40
Note from va3znw: It was the first tube regenerative
receiver that I have made by myself. At the far times
I was a thirteen years old boy that fall into radio and
certainly into amateur radio. I already made a
transistors’ then tubes’ HF converter for my old tube
receiver “Muromets.” So, I could hear amateur
stations.
However, one friend of mine, old ham (he was at the
times in his forties) told me about my converters:-
“Good job! But.. what I would like to say… all the
stuff (converter and receiver) you may change for
one tube receiver. It would get the same reception.”
Another day he gave me an old soviet magazine
“Radio” with the schematic. When the receiver was
made and tuned, I discovered that the one- tube
receiver really worked almost similar to converter
with “Muromets.” Later I made several tens such
receivers for 16- 13- meters but for receiving “Voice
of America” and “Radio Liberty.” The stations were
jammed in the USSR, but there were not jammed at
the 16- 13 meters because the bands were not at the
receivers produced in the USSR. I ever recorded
some music from the stations. At the 70s the stations
sounded at 6- 13- meters band similar to FM
stations. Front Cover
Radio # 3, 1950
After that first regenerative receiver I made lots
different regenerative receivers, both transistor and
tube. I made lots superheterodyne and DC receivers.
But I still remember that old Radio with shabby cover
with rosin on the pages, with some strange pencil-
notes on the pages border, and that one tube
receiver that by some miracle worked like a big
superheterodyne … and that exiting feeling while
tuning the capacitor’s knob…
6N8S (6H8C in Russian)
Title of the Article
http://www.antentop.org/ Page 71
ANTENTOP- 01- 2010, # 012 Simple Short Wave Receiver
Schematic
It is a regenerative receiver assembled on a double
triode tube. One triode is a regenerative stage
another is an audio stage. Figure 1 shows
schematic of the receiver.
For pictorial view some parts are shown in drawn view.
L1C2 is input circuit. Antenna is connected through a small
capacitor C1. High- Ohmic headphones is directly
connected to plate circuit of the triode.
Figure 1 Simple Regenerative Receiver
Parts and Design
Inductors of the receiver are wound on the tube base
of old tube UO- 186 or V0- 188.
Note of va3znw: At the time (70s) my friend gave
me some old defective tubes UO- 186. I used the
tube base for inductors for my receiver. Today, in
Russia, good UO- 186 tube made in 40- 50s may
cost (for audio- fans) almost 100 USD.
Inductor for the 40- meter has 19 coils. It is wound
“turn to turn” by wire in diameter of 0.8- mm (20-
AWG), tap made from 7s coil from the cold end.
Ends and tap of the inductor are soldered to the pins
in the tube base. .
Inductor for the 20- meter has 9 coils. It is wound by
wire in diameter of 1.0- mm (18- AWG), tap made
from 3d coil from the cold end. Between wires is
wound a thick tread to provide gap in 0.3- 0.4- mm.
Ends and tap of the inductor are soldered to the pins
in the tube base.
The Plug- In inductor for needed band is plugged to
socket installed on the receiver chassis.
Figure 2 shows the regenerative receiver and plug-
in inductor. Figure 3 shows the plug- in inductor at
the receiver chassis.
UO- 186
http://www.antentop.org/ Page 72
ANTENTOP- 01- 2010, # 012 Simple Short Wave Receiver
Figure 2 Regenerative Receiver and Plug- In Inductor
Figure 3 Plug- In Inductor at the Receiver Chassis.
Capacitor C1 is very important part for good job of
the regenerative receiver. Best choice is to use a
variable capacitor up to 5- 10-pF. However at this
receiver a home- made capacitor is used. It is done
in very simple way.
Insulated wire in 0.3- 0.5- mm (24- 29-AWG) (one
capacitor plate) is coiled (possible with one turn of
thin paper) above wire in 1.5- mm (15-AWG)
(another capacitor plate) on the length 8- 10-mm.
Capacity of the capacitor could be changed by
winding/unwinding thin wire.
Resistor R2 may have resistance from 2-kOhm to 15-
kOhm. Important thing- it should be quality made.
Resistor R1 may have resistance from 1- mega-Ohm to 2-
mega-Ohm. Resistor R3 may have resistance from 1-
kOhm to 1.5- kOhm. Resistor R4 may have resistance
from 100- kOhm to 500- kOhm. Capacitor C3 may have
capacitance from 200- 1000- pF.
http://www.antentop.org/ Page 73
ANTENTOP- 01- 2010, # 012 Simple Short Wave Receiver
Figure 4 Montage of the regenerative receiver
Capacitor C4 may have capacitance from 50- 100-
pF. Capacitors C5 and C7 may have capacitance
from 0/05- 0.2- microF. Capacitor C6 may have
capacitance from 500- 1000- pF. Almost any double
triode should be used in the receiver. Figure 4
shows montage of the receiver. It made by insulated
wire in 1.5- mm (15- AWG) diameter.
Power Supply
The receiver needs for plate any high voltage in
range 100- 200-V DC. Receiver consumes 5- 10-
mA at plate circuit. For tube heater the receiver
needs 6.3- V AC. Figure 5 shows power supply for
the receiver. However it is possible to use any power
supply that can be provide above mentioned
parameters.
Adjustment
The first it needs to check generation at the all
working bands. For the checking receiver turn on
without antenna and with help of R2 the receiver is
turned on to generation mode. At the generation
mode you may hear whilst in the head- phones. If
you will turn slowly the dial of the C2 you may hear
(in generation mode, without antenna) strong (in the
area) signals of CW stations. Then turn on antenna
to the receiver (that is stayed in generation mode).
The antenna should not break the generation. If the
generation is broken it needs to decrease capacity of
the C1. If it is not help or help a little- try to change
tap from the L1.
After optimum C1 and optimum tap is found it is
possible to calibrate the receiver. For this you may
use or special RF- Generator or another receiver (to
receive generation of the regenerative receiver).
Figure 5 Power Supply for the Regenerative
Receiver
http://www.antentop.org/ Page 74
ANTENTOP- 01- 2010, # 012 A Multi Band Tube 10 w QSK Transceiver
Igor Grigorov, UZ3ZK
Credit Line: SPRAT – № 74. – 1993. – Spring. – Р. 8-9.
In the SPRAT # 67 (SPRAT is the journal of the G-
QRP- Club) was published a circuit of a tube DC
receiver. I made this G0ILL receiver and enjoyed of it
perfect reception. Later I modified the receiver to
transceiver. It was tried several versions of the
transceiver. The final one was made on a PCB-
board 200 x 240- mm with plug- in inductors in old
tube sockets. So, the transceiver was tested on all
amateurs HF- Bands. The frequency stability was
not good enough at 24 and 28- MHz but was good
on the lower bands. Figure 1 shows the schematic
of the tube DC transceiver.
Circuit Details:
RX RF Amplifier made on V1. V4 is mixer. Audio Amplifier
made on V7. Audio amplification is adjusted by R16. RF
amplification is adjusted by R5.
VFO and Doubler made on V2. Circuit L3C3C2 is tuned on
frequency twice below the used.
Circuit L6C7 is tuned on main frequency. V5 is driver, V6 is
PA. Transceiver works at QSK mode, i.e. to turn the
transceiver for TX just press key. Cathodes of the driver
and PA are grounded, RL1 grounded RX antenna.
Table 1 International Alternatives for Russian tubes (thanks to G3FCK)
http://www.antentop.org/ Page 75
ANTENTOP- 01- 2010, # 012 A Multi Band Tube 10 w QSK Transceiver
Figure 1 Tube DC transceiver
http://www.antentop.org/ Page 76
ANTENTOP- 01- 2010, # 012 A Multi Band Tube 10 w QSK Transceiver
Tuning and Adjustment
Transceiver made from right parts should work
straight away. You need only to tune (by GDO or
RF- Voltmeter) the plug-in inductors for the needed
frequencies. At self-exciting of the RF-Amplifier at
the any band vary the value of the R4 that is
installed at plug- in inductor. C24 can adjust
amplification of the audio amplifier. The audio
amplifier works well only with high- ohmic
headphones.
The transceiver has no special circuit for frequency
shift at RX/TX mode. The shift occurs automatically
because of a difference in parameters “cold” and
“hot” V5.
In my case the shift was near 300- Hz at 160 and 80-
meters and more the 1000 Hz at 10- meters. You may
install the shift by playing with C7, C14 and C16.
*Note from I.G.: At the old times, when the transceiver
was made (80- 90s) I had a box with headphones. There
were old headphones (from 1941- to 1980) from receivers
and phone systems. The headphones were made in
different countries- Russia, German, Britain and Poland
and may be in some others. I tested the phones at first with
a simple crystal (diode) receivers then with DC- receivers
and choose most sensitivity ones. With such phones I
could receive very weak stations that at less sensitivity
headphones were not unheard. If you have box with high-
ohmic head phones (or several samples anyway) try to find
mostly sensitivity ones from them.
Table 2 Data for Inductors
Band,
MHz
1,8 3,5 7 10 14 18 21 24 28 Note
- - 28 18 15 15 15 14 11 1L3
* 120/30 70/20 - - - - - - - 2
C3 1000 800 600 600 500 400 300 300 200 pF
- - 25 19 15 14 11 10 10 1L2
L5
L6
L7
*
120/20 60/20 - - - - - - - 2
C4,
C7
C9,
C16
200 200 180 150 120 100 100 91 62 pF
L8 * 53/45 27/45 14/40 10/45 8/45 7/45 7/45 6/45 6/45 **
C31 150 150 120 120 100 100 80 50 30 pF
C32 2000 2000 1500 1200 1000 600 600 500 300 pF
C26 1500 1000 1000 1000 470 470 390 300 300 pF
Note 1. Inductors made on Russian resistors MLT-2 (value more the 100- kOhm), winding on all the length.
Figure 2 shows the resistor.
Note 2. Inductors made on Russian resistors WS- 2 (value more the 100- kOhm), winding on all the length.
Figure 3 shows the resistor.
* First column- numbers of turns, second – length in mm
** Diameter L8- 34- mm
L1 (numbers of coil near 30% from L2) is wound above L2. L4 (numbers of coil near 30% from L5) is wound above
L5.
http://www.antentop.org/ Page 77
ANTENTOP- 01- 2010, # 012 A Multi Band Tube 10 w QSK Transceiver
Parts
At the transceiver I used Russian tubes. Table 1
shows their international alternatives (thanks to
G3FCK)
Table 2 shows data for inductors. Values of
capacitors C31 and C32 are real for specific
impedance of your antenna. If you would like use
several antennas with different impedances you
need use plug- in inductor (L8C26C31C32) for each
antenna (or use variable C31 and C32).
Design
Transceiver was made on a chassis with dimensions 200 x
240 x 40- mm made from two- sided copper plate PCB.
Pattern of the parts at the chassis the same as the pattern
at the Figure 1. Plug- in inductors was made on the base
from old octal tubes. Figure 4 shows the design. It is
possible to add some modifications to the transceiver-
milliampermeter for metering plate current at the V6 and
install variable capacitors instead fixed C31 and C32.
Dimensions of the transceiver would be increased but
operation in the Air improved.
Beware: Turn off high voltage when change the plug- in
inductors!
Figure 2 Russian Resistor MLT- 2
Figure 3 Russian Resistor WS- 2
Figure 4 Design of the Plug- In Inductors
http://www.antentop.org/ Page 78
ANTENTOP- 01- 2010, # 012 A 10- meter Band CW Transceiver
Vladimir Polyakov, RA3AAE
It is a variant of a simple DC transceiver. Transistor
of PA works like a mixer in receiving mode. So, there
is no any commutation in the RF circuits. The
transceiver has output power 0.35- Wtts, shift
TX/RX- 400-Hz, RX sensitivity 2 microV. Power
voltage is 15-V, current at RX/TX – 30/120-mA.
Figure 1 shows schematic of the transceiver. VFO is
made on V2. C6C7L4C8C9C10 is tuned on 14-MHz.
L3C4 is tuned on 28- MHz. When key (connected to
X2) is “down” (TX- mode) relay K1 provides plus 15-
V onto transistor V1. At RX mode the transistor
works like a mixer. Audio signal (at RX-mode) goes
through filter C3L5C11 (3- kHz cutoff frequency)
onto audio amplifier made on V4,V5,V6
(amplification factor more the 10000). High-Ohmic
headphones (3- 4-kOhm at DC, old military ones)
are used with the amplifier. The phones are
connected to X3. Low Ohmic phones does not work
good with the amplifier.
Inductor L4 has 18 turns of wire in 0.6-mm (23-AWG)
diameter, winding length is 12- mm, coiled on a form of 8-
mm diameter. L3 has 9 turns of wire in 0.25- mm (30-
AWG) diameter, coiled on a ferrite ring 10 –mm OD x 5-
mm ID x- 10- mm- H with permeability 50, tap made from
6-turn from “cold” end. L2 has 3 turns of wire in 0.25- mm
(30- AWG) diameter, coiled above L3. Inductor L1 has 10
turns of wire in 0.6-mm (23-AWG) diameter, winding length
is 14- mm, coiled on a form of 10-mm diameter, tap made
from 3-turn from “cold” end. L5 has inductance 0.15- H. It
is possible to use collector’s coil from an output
transformer from any transistor radio.
Credit Line: V. Polyakov. Transivery pryamogo
preobrazovania, Moscow, DOSAAF, 1984
(DC- Tranceivers, Moscow, P.H.: DOSAAF, 1984)
Figure 1 A 10- meter Band CW Transceiver
http://www.antentop.org/ Page 79
ANTENTOP- 01- 2010, # 012 An 80 m CW Valve Transceiver
Igor Grigorov, RK3ZK
Credit Line: SPRAT # 82. 1995.pp. 22-23
It is possible to build this transceiver in one evening
using surplus parts. It has a sensitivity of near 5-
microV and output power on 3.5- 3.6- MHz near 1-
Wtts. The RX/TX changes the function of V3, the
Mixer and Power Amplifier. L3 provides tuning in the
transmit and receive modes.
I used an old cabinet from a valve broadcast
receiver, also using its power supply and audio
transformer.
If L1, L2, and L3 are tuned for the band, the
transceiver should work straight away.
Parts:
RL1 and RL2: Old Telephone (60- V) Relays
TR1: Audio Transformer from old broadcast receiver
L1: 40 turns 0.5mm wire on 20-mmformer, winding
length 20mm
L2: 20 turns 0.7mm wire on 20mm former, winding
length 20mm
L1 and L2 were wound on old plastic shotgun
cartridges
L3: 17 turns 1mm wire on 50mm former, winding
length 50mm
L3 was wound on a glass
RFC1: 400 turns 0.2mm wire on an old plastic pencil
8mm diameter
http://www.antentop.org/ Page 80
ANTENTOP- 01- 2010, # 012 Practical Photos for P.A. on Tube GU-43B
Nikolay Kisel, UA3AIC, Moscow
mailto: ua3aic@mail.ru
Photo # 1. The photo shows circuits for first (right)
and second (left) grids. It is possible to see (under
tube socket red resistor- 56- Ohms, anti- self-
excitation. Value may be increased to 100- Ohm at
some cases. Choke for heater circuit is wound on a
ferrite ring (permeability does not matter). Wire for
each heater terminal is placed on the one half of the
ring.
Photo #2. Circuit of the second grid is shown on the
photo. At “hot” end: Red capacitors – 0.01-microF- 4
pcs, Blue capacitor – 6800- pF- 1-pcs, Red resistors
56- kOhm -2-Wtts (to eliminate dynatron effect at the
second grid). Thereof it is Choke (yellow one) and
resistor 100- Ohm- 5-Wtts for limiting current of the
second grid. Between the choke and resistor there
are capacitors 1.0- microF, and some mica
capacitors for shortening RF.
Photo # 1
Photo #2
http://www.antentop.org/ Page 81
ANTENTOP- 01- 2010, # 012 Practical Photos for P.A. on Tube GU-43B
Photo # 3
Photo # 3. Plate Choke is at the front. I made my
Plate Choke from high- Ohmic (manganin) wire in
silk insulation. The Choke was wound 2x 0.33-
manganin wire. It has R= 18.3- Ohm , L= 34.5-
microH. Two capacitors 3300- pF x 3300- V are
installed at “cold” end of the choke. Near the tube
socket is Red capacitor 0.01-microF. Input RF is
going through the capacitor.
Photo #4. Here is shown assembled RF- Part of the PA.
Front Panel is attached to the bottom by L- parts. Bottom
and Front Panel are aluminum plate in 4- mm thick. Fan
here is only for the time tuning of the PA. At the ready
design the fan is at rear panel. The fan is blown inside the
box.
Photo #4
http://www.antentop.org/ Page 82
ANTENTOP- 01- 2010, # 012 Practical Photos for P.A. on Tube GU-43B
Photo # 5
Photo # 5. Here is shown tube socket. Grids ring are
used from original socket. Cathode and heater is
made by myself. I made it from phosphor bronze in
0.35- mm thick.
Photo # 6. Tube Inductor wound from copper wire in
diameter 3.6- mm (7 AWG). It was used main
electric wire (plastic insulation was removed).
One inductor has diameter 45- mm another one 32- mm.
Box- it is capacitor at antenna terminal. It was used old
German Capacitor 3x 495- pF. Green resistor is antistatic
resistor 30- kOhm x 2-Wtts that is connected to bridge to
antenna. White wire is high- voltage wire to the RF- Choke.
Photo # 6
http://www.antentop.org/ Page 83
ANTENTOP- 01- 2010, # 012 Practical Photos for P.A. on Tube GU-43B
Photo # 7
Photo # 7. Here is shown Electric Power Part of the
PA. PCB plate with rectifiers bridges for 2500- V,
300- V, 30- V and 100- V is attached at the main
transformer. At the right lower corner you can see
antenna- switching PCB. Two green terminals are
intended for fan.
Photo # 8. Take attention to the gang switch. It is insulated
from the metal case. It is stay on a textolite plate. Screw
that came through front panel are in Teflon insulation.
Plate variable capacitor is an old military capacitor from
Russian transmitter RSB. Black wire at the lower right
corner is coaxial cable for input RF. At the tube place its
braid is not grounded. Coaxial cable braid is grounded only
at switching relay.
Photo # 8
http://www.antentop.org/ Page 84
ANTENTOP- 01- 2010, # 012 Practical Photos for P.A. on Tube GU-43B
Photo # 9
Photo # 9. Here is PCB for PA. It is possible to use
A PCB of any reasonable sizes. Dot in the center is
place for heater’s tube. Four Dashes are places for
soldering of the cathode tube. Three dots round the
dashes are for holes for holders for screen greed.
The holes should be insulated from the ground.
Photo # 10. Heater’s tube and Cathode’s tube are already
soldered at their places. There were soldered with help of
a small Gas Burner HT- 950 (it is shown at the left upper
corner).
Photo # 10
http://www.antentop.org/ Page 85
ANTENTOP- 01- 2010, # 012 Practical Photos for P.A. on Tube GU-43B
Photo # 11
Photo # 11. Process is going.
Photo # 12. Process is going. Here is at right lower
side is shown Interface Panel. Small RF- Socket-
RF input, large RF – Socket is for RF output.
PCA Socket is intended for pedal or another external
control of the PA. Near it is a main fuse. Two Green
terminals are for fan.
73!, UA3AIC
Credit Line: http://www.qsl.net/ua3aic/gu43b.html
Photo # 12
http://www.antentop.org/ Page 86
ANTENTOP- 01- 2010, # 012 Linear Power Amplifier on G811
S. Bunin, L. Yailenko
Credit Line: Spravochnic Radiolyubitelya
Korotkovolnovika, - 2 Izdanie, Kiev : Tehnika, 1984.
(“Reference for Ham”)
The PA is designed for ham bands 160- 10- meters.
It provides 200 Wtts CW/ 500 Wtts PEP SSB.
Efficiency of the PA is 65- 70% in depend on used
rband. Figure 1 shows the schematic of the PA.
Four tubes G811 (switched in bridge, grounded grid)
are used in the PA. Four tubes may dissipative 160-
Watts on their plates, so, the PA can work
continuously with 200- Wtts output. Input resistance
of the PA is closed to 75- Ohm at 160- 10- meters.
RX: Tubes are closed by minus 27-V that is coming
by relay K1. Contacts of the relay switch antenna to
X3- Receiver Input.
TX: Grids of the tubes are connected to the ground
by pedal S1, antenna through contacts of Relay K1
goes to PA output.
Transformer T1 provides 2x6.5-V at 8- A. It should stand
110- Wtts.
Inductors L1, L2, L3, L4 are wound on Russian Resistors
MLT- 2 (for sizes see:
http://www.antentop.org/009/tst009.htm). Each inductor
contains 5 turns and coiled by wire in dia 0.62- mm (22-
AWG).
Plate choke L6 is wound on porcelain form in dia 20- 25-
mm and 150-mm length. It contains 150 turns, 50 turns at
plate side is wound with gap 0.5- mm. Was used wire in
dia 0.35- mm (27- AWG) in silk insulation.
Chokes L7 and L8 is commercial made from old military
equipment. May be used any suitable chokes.
Figure 1 Schematic of the Four- G811 PA
http://www.antentop.org/ Page 87
ANTENTOP- 01- 2010, # 012 Linear Power Amplifier on G811
Capacitor C12 should have plate gap not less the
1.2- mm.
Capacitor C13 should have plate gap not less the
0.3- mm.
Variometer L5 is from old military TX.
For right tuning C12 should have 250- pF at 80-
meters, 120- pF at 40- meters, 50- pF at 20- meters,
close to minimum at 15- meters and minimum at 10-
meters.
Montage of the PA is usual for such equipment. Grid
wires should be screened from Plate wires. Wires
with RF should be short and straight.
As rule, PA made correctly from good parts works
straight away. At self-excitation it needs to decrease
value for R1- R4 in1.5- 2 times. It needs input power
near 25- Wtts for plate current 400- mA.
PA is assembled in metal box h- 200-mm x w-400-
mm x d- 300- mm. A small fan is installed inside for
cooling of the tubes. Spravochnic Radiolyubitelya Korotkovolnovika
http://www.antentop.org/ Page 88
ANTENTOP- 01- 2010, # 012 Ground and/or feedline independent
resonant
Ground and/or feedline independent resonant feed device for
coupling antennas and the likes
www.antentop.org Page-89
ANTENTOP- 01- 2010, # 012 Ground and/or feedline independent
resonant
www.antentop.org Page-90
ANTENTOP- 01- 2010, # 012 Ground and/or feedline independent
resonant
www.antentop.org Page-91
ANTENTOP- 01- 2010, # 012 Ground and/or feedline independent
resonant
www.antentop.org Page-92
ANTENTOP- 01- 2010, # 012 Ground and/or feedline independent
resonant
www.antentop.org Page-93
ANTENTOP- 01- 2010, # 012 Ground and/or feedline independent
resonant
www.antentop.org Page-94
ANTENTOP- 01- 2010, # 012 Ground and/or feedline independent
resonant
www.antentop.org Page-95
ANTENTOP- 01- 2010, # 012 Ground and/or feedline independent
resonant
www.antentop.org Page-96
ANTENTOP- 01- 2010, # 012 Ground and/or feedline independent
resonant
www.antentop.org Page-97
ANTENTOP- 01- 2010, # 012 Ground and/or feedline independent
resonant
www.antentop.org Page-98
ANTENTOP- 01- 2010, # 012 Ground and/or feedline independent
resonant
www.antentop.org Page-99
ANTENTOP- 01- 2010, # 012 Ground and/or feedline independent
resonant
www.antentop.org Page-100
ANTENTOP- 01- 2010, # 012
ANTENTOP is FREE e- magazine, made in PDF,
devoted to antennas and amateur radio. Everyone
may share his experience with others hams on the
pages. Your opinions and articles are published
without any changes, as I know, every your word has
the mean.
A little note, I am not a native English, so, of
course, there are some sentence and grammatical
mistakes there… Please, be indulgent!
Publishing: If you have something for share with
your friends, and if you want to do it FREE, just send
me an email. Also, if you want to offer for publishing
any stuff from your website, you are welcome!
Copyright: Here, at ANTENTOP, we just follow
traditions of FREE flow of information in our great
radio hobby around the world. A whole issue of
ANTENTOP may be photocopied, printed, pasted
onto websites. We don't want to control this process.
It comes from all of us, and thus it belongs to all of
us. This doesn't mean that there are no copyrights.
There is! Any work is copyrighted by the author. All
rights to a particular work are reserved by the author.
Copyright Note: Dear friends, please, note, I
respect Copyright. Always, when I want to use some
stuff for ANTENTOP, I ask owners about it. But…
sometimes my efforts are failed. I have some very
interesting stuff from closed websites, but I can not
go to touch with their owners… as well as I have no
response on some my emails from some owners.
I do not know, why the owners do not response me.
Are they still alive? Do their companys are a
bankrupt? Or do they move anywhere? Where they
are in the end?
I have a big collection of pictures, I have got the pictures
in others way, from FREE websites, from commercial
CDs, intended for FREE using, and so on... I use to the
pictures (and seldom, some stuff from closed websites)
in ANTENTOP. If the owners still are alive and have the
right, please, contact with me, I immediately remove any
Copyright stuff, or, necessary references will be made
there.
Business Advertising: ANTENTOP is not a
commercial magazine. Authors and I (Igor Grigorov,
the editor of the magazine) do not receive any profit from
the issue. But off course, I do not mention from
commercial ads in ANTENTOP. It allows me to do the
magazine in most great way, allows to pay some money
for authors to compensate their hard work. I have lots
interesting stuff in Russian, and owners of the stuff
agree to publish the stuff in ANTENTOP… but I have no
enough time to translate the interesting stuff in English,
however I may pay money to translators, and they will do
this work, and we will see lots interesting articles there.
So, if you want to put a commercial advertisement in
ANTENTOP, please contact with me. A commercial
advertisement will do ANTENTOP even greater
interesting and various! I hope, readers do not mention
against such commercial ads.
And, of course, tradition approach to ANY stuff of the
magazine:
BEWARE:
All the information you find at AntenTop website and
any hard (printed) copy of the AnTentop Publications
are only for educational and/or private use! I and/or
authors of the AntenTop e- magazine are not
responsible for everything including disasters/deaths
coming from the usage of the data/info given at
AntenTop website/hard (printed) copy of the
magazine.
You use all these information of your own
risk.

More Related Content

What's hot

Antentop 2005 01
Antentop 2005 01Antentop 2005 01
Antentop 2005 01BlackOnion
 
Antentop 2007 01
Antentop 2007 01Antentop 2007 01
Antentop 2007 01BlackOnion
 
Antentop 2009 01
Antentop 2009 01Antentop 2009 01
Antentop 2009 01BlackOnion
 
Antentop 2004 01
Antentop 2004 01Antentop 2004 01
Antentop 2004 01BlackOnion
 
Antentop 2003 02
Antentop 2003 02Antentop 2003 02
Antentop 2003 02BlackOnion
 
Instructions for Assembly and Use
Instructions for Assembly and UseInstructions for Assembly and Use
Instructions for Assembly and UseNathanael H Jones
 

What's hot (6)

Antentop 2005 01
Antentop 2005 01Antentop 2005 01
Antentop 2005 01
 
Antentop 2007 01
Antentop 2007 01Antentop 2007 01
Antentop 2007 01
 
Antentop 2009 01
Antentop 2009 01Antentop 2009 01
Antentop 2009 01
 
Antentop 2004 01
Antentop 2004 01Antentop 2004 01
Antentop 2004 01
 
Antentop 2003 02
Antentop 2003 02Antentop 2003 02
Antentop 2003 02
 
Instructions for Assembly and Use
Instructions for Assembly and UseInstructions for Assembly and Use
Instructions for Assembly and Use
 

Similar to ANTENTOP 01 2010 # 012 Editorial Welcome to ANTENTOP, FREE e-magazine

Antentop 2010 02
Antentop 2010 02Antentop 2010 02
Antentop 2010 02BlackOnion
 
Antentop 2004 02
Antentop 2004 02Antentop 2004 02
Antentop 2004 02BlackOnion
 
Antentop 2003 01
Antentop 2003 01Antentop 2003 01
Antentop 2003 01BlackOnion
 
Antentop 2003 03
Antentop 2003 03Antentop 2003 03
Antentop 2003 03BlackOnion
 
Antenna Manuscript_2016.pdf
Antenna Manuscript_2016.pdfAntenna Manuscript_2016.pdf
Antenna Manuscript_2016.pdfivan ion
 
200 transistor circuits.pdf
200 transistor circuits.pdf200 transistor circuits.pdf
200 transistor circuits.pdfivan ion
 
Voltage Amplifier
Voltage Amplifier Voltage Amplifier
Voltage Amplifier jawad ahmad
 
Insructables fm listening bug
Insructables   fm listening bugInsructables   fm listening bug
Insructables fm listening bugzubeditufail
 
ham radio cubical quad
ham radio cubical quadham radio cubical quad
ham radio cubical quadPateKline88
 
Dipole Antenna Design, Working, and Types.pdf
Dipole Antenna Design, Working, and Types.pdfDipole Antenna Design, Working, and Types.pdf
Dipole Antenna Design, Working, and Types.pdfGurleen Nayar
 
Budget radio telescope
Budget radio telescopeBudget radio telescope
Budget radio telescopeJordi Soto
 
Infrared string bass
Infrared string bassInfrared string bass
Infrared string bassEngr Ali
 
Arduino obstacle avoidance robot
Arduino obstacle avoidance robotArduino obstacle avoidance robot
Arduino obstacle avoidance robotSteven Radigan
 
How to make your first robot report
How to make your first robot reportHow to make your first robot report
How to make your first robot reportRamki M
 

Similar to ANTENTOP 01 2010 # 012 Editorial Welcome to ANTENTOP, FREE e-magazine (17)

Antentop 2010 02
Antentop 2010 02Antentop 2010 02
Antentop 2010 02
 
Antentop 2004 02
Antentop 2004 02Antentop 2004 02
Antentop 2004 02
 
Antentop 2003 01
Antentop 2003 01Antentop 2003 01
Antentop 2003 01
 
Antentop 2003 03
Antentop 2003 03Antentop 2003 03
Antentop 2003 03
 
Antenna Manuscript_2016.pdf
Antenna Manuscript_2016.pdfAntenna Manuscript_2016.pdf
Antenna Manuscript_2016.pdf
 
Antenna
AntennaAntenna
Antenna
 
200 transistor circuits.pdf
200 transistor circuits.pdf200 transistor circuits.pdf
200 transistor circuits.pdf
 
Voltage Amplifier
Voltage Amplifier Voltage Amplifier
Voltage Amplifier
 
Insructables fm listening bug
Insructables   fm listening bugInsructables   fm listening bug
Insructables fm listening bug
 
Warau fail
Warau failWarau fail
Warau fail
 
ham radio cubical quad
ham radio cubical quadham radio cubical quad
ham radio cubical quad
 
Dipole Antenna Design, Working, and Types.pdf
Dipole Antenna Design, Working, and Types.pdfDipole Antenna Design, Working, and Types.pdf
Dipole Antenna Design, Working, and Types.pdf
 
Internal Antenna VS. External Antenna.pdf
Internal Antenna VS. External Antenna.pdfInternal Antenna VS. External Antenna.pdf
Internal Antenna VS. External Antenna.pdf
 
Budget radio telescope
Budget radio telescopeBudget radio telescope
Budget radio telescope
 
Infrared string bass
Infrared string bassInfrared string bass
Infrared string bass
 
Arduino obstacle avoidance robot
Arduino obstacle avoidance robotArduino obstacle avoidance robot
Arduino obstacle avoidance robot
 
How to make your first robot report
How to make your first robot reportHow to make your first robot report
How to make your first robot report
 

More from BlackOnion

Muse 2017-catalogue-rev5-small
Muse 2017-catalogue-rev5-smallMuse 2017-catalogue-rev5-small
Muse 2017-catalogue-rev5-smallBlackOnion
 
M 089-r-cs-r-3199-dees-1-1
M 089-r-cs-r-3199-dees-1-1M 089-r-cs-r-3199-dees-1-1
M 089-r-cs-r-3199-dees-1-1BlackOnion
 
M 02 r-cs-r-3745-dees-2
M 02 r-cs-r-3745-dees-2M 02 r-cs-r-3745-dees-2
M 02 r-cs-r-3745-dees-2BlackOnion
 
M 089-r-r-3199-ib-muse-001-rev2
M 089-r-r-3199-ib-muse-001-rev2M 089-r-r-3199-ib-muse-001-rev2
M 089-r-r-3199-ib-muse-001-rev2BlackOnion
 
M 089-r-r-3199-ib-muse-001-rev2-1
M 089-r-r-3199-ib-muse-001-rev2-1M 089-r-r-3199-ib-muse-001-rev2-1
M 089-r-r-3199-ib-muse-001-rev2-1BlackOnion
 
M 089-r-cs-r-3199-dees-1
M 089-r-cs-r-3199-dees-1M 089-r-cs-r-3199-dees-1
M 089-r-cs-r-3199-dees-1BlackOnion
 
M 068 r-cs-r-3567-dees-1
M 068 r-cs-r-3567-dees-1M 068 r-cs-r-3567-dees-1
M 068 r-cs-r-3567-dees-1BlackOnion
 
M 068-r-r-3567-ib-muse-001-rev3
M 068-r-r-3567-ib-muse-001-rev3M 068-r-r-3567-ib-muse-001-rev3
M 068-r-r-3567-ib-muse-001-rev3BlackOnion
 
M 02-r-r-3745-ib-muse-001-rev1
M 02-r-r-3745-ib-muse-001-rev1M 02-r-r-3745-ib-muse-001-rev1
M 02-r-r-3745-ib-muse-001-rev1BlackOnion
 
M 01 rs-cs-r-1791-dees-2
M 01 rs-cs-r-1791-dees-2M 01 rs-cs-r-1791-dees-2
M 01 rs-cs-r-1791-dees-2BlackOnion
 
M 01-rs-r-1791-ib-muse-005-rev3
M 01-rs-r-1791-ib-muse-005-rev3M 01-rs-r-1791-ib-muse-005-rev3
M 01-rs-r-1791-ib-muse-005-rev3BlackOnion
 

More from BlackOnion (13)

Rpds 30 black
Rpds 30 blackRpds 30 black
Rpds 30 black
 
Muse 2017-catalogue-rev5-small
Muse 2017-catalogue-rev5-smallMuse 2017-catalogue-rev5-small
Muse 2017-catalogue-rev5-small
 
M 089-r-cs-r-3199-dees-1-1
M 089-r-cs-r-3199-dees-1-1M 089-r-cs-r-3199-dees-1-1
M 089-r-cs-r-3199-dees-1-1
 
M 02 r-cs-r-3745-dees-2
M 02 r-cs-r-3745-dees-2M 02 r-cs-r-3745-dees-2
M 02 r-cs-r-3745-dees-2
 
M 089-r-r-3199-ib-muse-001-rev2
M 089-r-r-3199-ib-muse-001-rev2M 089-r-r-3199-ib-muse-001-rev2
M 089-r-r-3199-ib-muse-001-rev2
 
M 089-r-r-3199-ib-muse-001-rev2-1
M 089-r-r-3199-ib-muse-001-rev2-1M 089-r-r-3199-ib-muse-001-rev2-1
M 089-r-r-3199-ib-muse-001-rev2-1
 
M 089-r-cs-r-3199-dees-1
M 089-r-cs-r-3199-dees-1M 089-r-cs-r-3199-dees-1
M 089-r-cs-r-3199-dees-1
 
M 068 r-cs-r-3567-dees-1
M 068 r-cs-r-3567-dees-1M 068 r-cs-r-3567-dees-1
M 068 r-cs-r-3567-dees-1
 
M 068-r-r-3567-ib-muse-001-rev3
M 068-r-r-3567-ib-muse-001-rev3M 068-r-r-3567-ib-muse-001-rev3
M 068-r-r-3567-ib-muse-001-rev3
 
M 02-r-r-3745-ib-muse-001-rev1
M 02-r-r-3745-ib-muse-001-rev1M 02-r-r-3745-ib-muse-001-rev1
M 02-r-r-3745-ib-muse-001-rev1
 
M 01 rs-cs-r-1791-dees-2
M 01 rs-cs-r-1791-dees-2M 01 rs-cs-r-1791-dees-2
M 01 rs-cs-r-1791-dees-2
 
M 01-rs-r-1791-ib-muse-005-rev3
M 01-rs-r-1791-ib-muse-005-rev3M 01-rs-r-1791-ib-muse-005-rev3
M 01-rs-r-1791-ib-muse-005-rev3
 
Rev ea3url 06
Rev ea3url 06Rev ea3url 06
Rev ea3url 06
 

Recently uploaded

Decoding Kotlin - Your guide to solving the mysterious in Kotlin.pptx
Decoding Kotlin - Your guide to solving the mysterious in Kotlin.pptxDecoding Kotlin - Your guide to solving the mysterious in Kotlin.pptx
Decoding Kotlin - Your guide to solving the mysterious in Kotlin.pptxJoão Esperancinha
 
High Profile Call Girls Dahisar Arpita 9907093804 Independent Escort Service ...
High Profile Call Girls Dahisar Arpita 9907093804 Independent Escort Service ...High Profile Call Girls Dahisar Arpita 9907093804 Independent Escort Service ...
High Profile Call Girls Dahisar Arpita 9907093804 Independent Escort Service ...Call girls in Ahmedabad High profile
 
Booking open Available Pune Call Girls Koregaon Park 6297143586 Call Hot Ind...
Booking open Available Pune Call Girls Koregaon Park  6297143586 Call Hot Ind...Booking open Available Pune Call Girls Koregaon Park  6297143586 Call Hot Ind...
Booking open Available Pune Call Girls Koregaon Park 6297143586 Call Hot Ind...Call Girls in Nagpur High Profile
 
IMPLICATIONS OF THE ABOVE HOLISTIC UNDERSTANDING OF HARMONY ON PROFESSIONAL E...
IMPLICATIONS OF THE ABOVE HOLISTIC UNDERSTANDING OF HARMONY ON PROFESSIONAL E...IMPLICATIONS OF THE ABOVE HOLISTIC UNDERSTANDING OF HARMONY ON PROFESSIONAL E...
IMPLICATIONS OF THE ABOVE HOLISTIC UNDERSTANDING OF HARMONY ON PROFESSIONAL E...RajaP95
 
HARDNESS, FRACTURE TOUGHNESS AND STRENGTH OF CERAMICS
HARDNESS, FRACTURE TOUGHNESS AND STRENGTH OF CERAMICSHARDNESS, FRACTURE TOUGHNESS AND STRENGTH OF CERAMICS
HARDNESS, FRACTURE TOUGHNESS AND STRENGTH OF CERAMICSRajkumarAkumalla
 
(PRIYA) Rajgurunagar Call Girls Just Call 7001035870 [ Cash on Delivery ] Pun...
(PRIYA) Rajgurunagar Call Girls Just Call 7001035870 [ Cash on Delivery ] Pun...(PRIYA) Rajgurunagar Call Girls Just Call 7001035870 [ Cash on Delivery ] Pun...
(PRIYA) Rajgurunagar Call Girls Just Call 7001035870 [ Cash on Delivery ] Pun...ranjana rawat
 
MANUFACTURING PROCESS-II UNIT-5 NC MACHINE TOOLS
MANUFACTURING PROCESS-II UNIT-5 NC MACHINE TOOLSMANUFACTURING PROCESS-II UNIT-5 NC MACHINE TOOLS
MANUFACTURING PROCESS-II UNIT-5 NC MACHINE TOOLSSIVASHANKAR N
 
(ANVI) Koregaon Park Call Girls Just Call 7001035870 [ Cash on Delivery ] Pun...
(ANVI) Koregaon Park Call Girls Just Call 7001035870 [ Cash on Delivery ] Pun...(ANVI) Koregaon Park Call Girls Just Call 7001035870 [ Cash on Delivery ] Pun...
(ANVI) Koregaon Park Call Girls Just Call 7001035870 [ Cash on Delivery ] Pun...ranjana rawat
 
Introduction to IEEE STANDARDS and its different types.pptx
Introduction to IEEE STANDARDS and its different types.pptxIntroduction to IEEE STANDARDS and its different types.pptx
Introduction to IEEE STANDARDS and its different types.pptxupamatechverse
 
(TARA) Talegaon Dabhade Call Girls Just Call 7001035870 [ Cash on Delivery ] ...
(TARA) Talegaon Dabhade Call Girls Just Call 7001035870 [ Cash on Delivery ] ...(TARA) Talegaon Dabhade Call Girls Just Call 7001035870 [ Cash on Delivery ] ...
(TARA) Talegaon Dabhade Call Girls Just Call 7001035870 [ Cash on Delivery ] ...ranjana rawat
 
VIP Call Girls Service Kondapur Hyderabad Call +91-8250192130
VIP Call Girls Service Kondapur Hyderabad Call +91-8250192130VIP Call Girls Service Kondapur Hyderabad Call +91-8250192130
VIP Call Girls Service Kondapur Hyderabad Call +91-8250192130Suhani Kapoor
 
College Call Girls Nashik Nehal 7001305949 Independent Escort Service Nashik
College Call Girls Nashik Nehal 7001305949 Independent Escort Service NashikCollege Call Girls Nashik Nehal 7001305949 Independent Escort Service Nashik
College Call Girls Nashik Nehal 7001305949 Independent Escort Service NashikCall Girls in Nagpur High Profile
 
SPICE PARK APR2024 ( 6,793 SPICE Models )
SPICE PARK APR2024 ( 6,793 SPICE Models )SPICE PARK APR2024 ( 6,793 SPICE Models )
SPICE PARK APR2024 ( 6,793 SPICE Models )Tsuyoshi Horigome
 
(ANJALI) Dange Chowk Call Girls Just Call 7001035870 [ Cash on Delivery ] Pun...
(ANJALI) Dange Chowk Call Girls Just Call 7001035870 [ Cash on Delivery ] Pun...(ANJALI) Dange Chowk Call Girls Just Call 7001035870 [ Cash on Delivery ] Pun...
(ANJALI) Dange Chowk Call Girls Just Call 7001035870 [ Cash on Delivery ] Pun...ranjana rawat
 
Structural Analysis and Design of Foundations: A Comprehensive Handbook for S...
Structural Analysis and Design of Foundations: A Comprehensive Handbook for S...Structural Analysis and Design of Foundations: A Comprehensive Handbook for S...
Structural Analysis and Design of Foundations: A Comprehensive Handbook for S...Dr.Costas Sachpazis
 
Processing & Properties of Floor and Wall Tiles.pptx
Processing & Properties of Floor and Wall Tiles.pptxProcessing & Properties of Floor and Wall Tiles.pptx
Processing & Properties of Floor and Wall Tiles.pptxpranjaldaimarysona
 
HARMONY IN THE NATURE AND EXISTENCE - Unit-IV
HARMONY IN THE NATURE AND EXISTENCE - Unit-IVHARMONY IN THE NATURE AND EXISTENCE - Unit-IV
HARMONY IN THE NATURE AND EXISTENCE - Unit-IVRajaP95
 
Coefficient of Thermal Expansion and their Importance.pptx
Coefficient of Thermal Expansion and their Importance.pptxCoefficient of Thermal Expansion and their Importance.pptx
Coefficient of Thermal Expansion and their Importance.pptxAsutosh Ranjan
 

Recently uploaded (20)

Decoding Kotlin - Your guide to solving the mysterious in Kotlin.pptx
Decoding Kotlin - Your guide to solving the mysterious in Kotlin.pptxDecoding Kotlin - Your guide to solving the mysterious in Kotlin.pptx
Decoding Kotlin - Your guide to solving the mysterious in Kotlin.pptx
 
High Profile Call Girls Dahisar Arpita 9907093804 Independent Escort Service ...
High Profile Call Girls Dahisar Arpita 9907093804 Independent Escort Service ...High Profile Call Girls Dahisar Arpita 9907093804 Independent Escort Service ...
High Profile Call Girls Dahisar Arpita 9907093804 Independent Escort Service ...
 
Booking open Available Pune Call Girls Koregaon Park 6297143586 Call Hot Ind...
Booking open Available Pune Call Girls Koregaon Park  6297143586 Call Hot Ind...Booking open Available Pune Call Girls Koregaon Park  6297143586 Call Hot Ind...
Booking open Available Pune Call Girls Koregaon Park 6297143586 Call Hot Ind...
 
IMPLICATIONS OF THE ABOVE HOLISTIC UNDERSTANDING OF HARMONY ON PROFESSIONAL E...
IMPLICATIONS OF THE ABOVE HOLISTIC UNDERSTANDING OF HARMONY ON PROFESSIONAL E...IMPLICATIONS OF THE ABOVE HOLISTIC UNDERSTANDING OF HARMONY ON PROFESSIONAL E...
IMPLICATIONS OF THE ABOVE HOLISTIC UNDERSTANDING OF HARMONY ON PROFESSIONAL E...
 
HARDNESS, FRACTURE TOUGHNESS AND STRENGTH OF CERAMICS
HARDNESS, FRACTURE TOUGHNESS AND STRENGTH OF CERAMICSHARDNESS, FRACTURE TOUGHNESS AND STRENGTH OF CERAMICS
HARDNESS, FRACTURE TOUGHNESS AND STRENGTH OF CERAMICS
 
(PRIYA) Rajgurunagar Call Girls Just Call 7001035870 [ Cash on Delivery ] Pun...
(PRIYA) Rajgurunagar Call Girls Just Call 7001035870 [ Cash on Delivery ] Pun...(PRIYA) Rajgurunagar Call Girls Just Call 7001035870 [ Cash on Delivery ] Pun...
(PRIYA) Rajgurunagar Call Girls Just Call 7001035870 [ Cash on Delivery ] Pun...
 
MANUFACTURING PROCESS-II UNIT-5 NC MACHINE TOOLS
MANUFACTURING PROCESS-II UNIT-5 NC MACHINE TOOLSMANUFACTURING PROCESS-II UNIT-5 NC MACHINE TOOLS
MANUFACTURING PROCESS-II UNIT-5 NC MACHINE TOOLS
 
(ANVI) Koregaon Park Call Girls Just Call 7001035870 [ Cash on Delivery ] Pun...
(ANVI) Koregaon Park Call Girls Just Call 7001035870 [ Cash on Delivery ] Pun...(ANVI) Koregaon Park Call Girls Just Call 7001035870 [ Cash on Delivery ] Pun...
(ANVI) Koregaon Park Call Girls Just Call 7001035870 [ Cash on Delivery ] Pun...
 
Introduction to IEEE STANDARDS and its different types.pptx
Introduction to IEEE STANDARDS and its different types.pptxIntroduction to IEEE STANDARDS and its different types.pptx
Introduction to IEEE STANDARDS and its different types.pptx
 
(TARA) Talegaon Dabhade Call Girls Just Call 7001035870 [ Cash on Delivery ] ...
(TARA) Talegaon Dabhade Call Girls Just Call 7001035870 [ Cash on Delivery ] ...(TARA) Talegaon Dabhade Call Girls Just Call 7001035870 [ Cash on Delivery ] ...
(TARA) Talegaon Dabhade Call Girls Just Call 7001035870 [ Cash on Delivery ] ...
 
VIP Call Girls Service Kondapur Hyderabad Call +91-8250192130
VIP Call Girls Service Kondapur Hyderabad Call +91-8250192130VIP Call Girls Service Kondapur Hyderabad Call +91-8250192130
VIP Call Girls Service Kondapur Hyderabad Call +91-8250192130
 
College Call Girls Nashik Nehal 7001305949 Independent Escort Service Nashik
College Call Girls Nashik Nehal 7001305949 Independent Escort Service NashikCollege Call Girls Nashik Nehal 7001305949 Independent Escort Service Nashik
College Call Girls Nashik Nehal 7001305949 Independent Escort Service Nashik
 
9953056974 Call Girls In South Ex, Escorts (Delhi) NCR.pdf
9953056974 Call Girls In South Ex, Escorts (Delhi) NCR.pdf9953056974 Call Girls In South Ex, Escorts (Delhi) NCR.pdf
9953056974 Call Girls In South Ex, Escorts (Delhi) NCR.pdf
 
SPICE PARK APR2024 ( 6,793 SPICE Models )
SPICE PARK APR2024 ( 6,793 SPICE Models )SPICE PARK APR2024 ( 6,793 SPICE Models )
SPICE PARK APR2024 ( 6,793 SPICE Models )
 
(ANJALI) Dange Chowk Call Girls Just Call 7001035870 [ Cash on Delivery ] Pun...
(ANJALI) Dange Chowk Call Girls Just Call 7001035870 [ Cash on Delivery ] Pun...(ANJALI) Dange Chowk Call Girls Just Call 7001035870 [ Cash on Delivery ] Pun...
(ANJALI) Dange Chowk Call Girls Just Call 7001035870 [ Cash on Delivery ] Pun...
 
Structural Analysis and Design of Foundations: A Comprehensive Handbook for S...
Structural Analysis and Design of Foundations: A Comprehensive Handbook for S...Structural Analysis and Design of Foundations: A Comprehensive Handbook for S...
Structural Analysis and Design of Foundations: A Comprehensive Handbook for S...
 
Call Us -/9953056974- Call Girls In Vikaspuri-/- Delhi NCR
Call Us -/9953056974- Call Girls In Vikaspuri-/- Delhi NCRCall Us -/9953056974- Call Girls In Vikaspuri-/- Delhi NCR
Call Us -/9953056974- Call Girls In Vikaspuri-/- Delhi NCR
 
Processing & Properties of Floor and Wall Tiles.pptx
Processing & Properties of Floor and Wall Tiles.pptxProcessing & Properties of Floor and Wall Tiles.pptx
Processing & Properties of Floor and Wall Tiles.pptx
 
HARMONY IN THE NATURE AND EXISTENCE - Unit-IV
HARMONY IN THE NATURE AND EXISTENCE - Unit-IVHARMONY IN THE NATURE AND EXISTENCE - Unit-IV
HARMONY IN THE NATURE AND EXISTENCE - Unit-IV
 
Coefficient of Thermal Expansion and their Importance.pptx
Coefficient of Thermal Expansion and their Importance.pptxCoefficient of Thermal Expansion and their Importance.pptx
Coefficient of Thermal Expansion and their Importance.pptx
 

ANTENTOP 01 2010 # 012 Editorial Welcome to ANTENTOP, FREE e-magazine

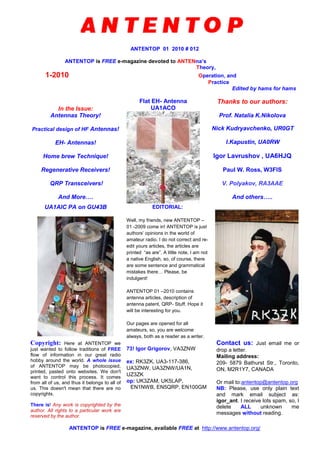
  • 1. ANTENTOP 01 2010 # 012 ANTENTOP is FREE e-magazine devoted to ANTENna’s Theory, 1-2010 Operation, and Practice Edited by hams for hams In the Issue: Antennas Theory! Practical design of HF Antennas! EH- Antennas! Home brew Technique! Regenerative Receivers! QRP Transceivers! And More…. Flat EH- Antenna UA1ACO Thanks to our authors: Prof. Natalia K.Nikolova Nick Kudryavchenko, UR0GT I.Kapustin, UA0RW Igor Lavrushov , UA6HJQ Paul W. Ross, W3FIS V. Polyakov, RA3AAE And others….. UA1AIC PA on GU43B EDITORIAL: Well, my friends, new ANTENTOP – 01 -2009 come in! ANTENTOP is just authors’ opinions in the world of amateur radio. I do not correct and re- edit yours articles, the articles are printed “as are”. A little note, I am not a native English, so, of course, there are some sentence and grammatical mistakes there… Please, be indulgent! ANTENTOP 01 –2010 contains antenna articles, description of antenna patent, QRP- Stuff. Hope it will be interesting for you. Our pages are opened for all amateurs, so, you are welcome always, both as a reader as a writer. Copyright: Here at ANTENTOP we just wanted to follow traditions of FREE flow of information in our great radio hobby around the world. A whole issue of ANTENTOP may be photocopied, printed, pasted onto websites. We don't want to control this process. It comes from all of us, and thus it belongs to all of us. This doesn't mean that there are no copyrights. There is! Any work is copyrighted by the author. All rights to a particular work are reserved by the author. 73! Igor Grigorov, VA3ZNW ex: RK3ZK, UA3-117-386, UA3ZNW, UA3ZNW/UA1N, UZ3ZK op: UK3ZAM, UK5LAP, EN1NWB, EN5QRP, EN100GM Contact us: Just email me or drop a letter. Mailing address: 209- 5879 Bathurst Str., Toronto, ON, M2R1Y7, CANADA Or mail to:antentop@antentop.org NB: Please, use only plain text and mark email subject as: igor_ant. I receive lots spam, so, I delete ALL unknown me messages without reading. ANTENTOP is FREE e-magazine, available FREE at http://www.antentop.org/
  • 2. ANTENTOP- 01- 2010, # 012 Editorial Welcome to ANTENTOP, FREE e - magazine! ANTENTOP is FREE e- magazine, made in PDF, devoted to antennas and amateur radio. Everyone may share his experience with others hams on the pages. Your opinions and articles are published without any changes, as I know, every your word has the mean. Every issue of ANTENTOP is going to have 100 pages and this one will be paste in whole on the site. Preview's files will be removed in this case. I do not know what a term for one issue will need, may be 8- 10 month or so. A whole issue of ANTENTOP hold nearly 10 MB. A little note, I am not a native English, so, of course, there are some sentence and grammatical mistakes there… Please, be indulgent! Preview: Some articles from "cooking" issue will be pasted for preview on this site, others no. Because, as I think, it must be something mysterious in every issue. Publishing: If you have something for share with your friends, and if you want to do it FREE, just send me an email. Also, if you want to offer for publishing any stuff from your website, you are welcome! Your opinion is important for me, so, contact if you want to say something! Copyright Note: Dear friends, please, note, I respect Copyright. Always, when I want to use some stuff for ANTENTOP, I ask owners about it. But… sometimes my efforts are failed. I have some very interesting stuff from closed websites, but I can not go to touch with their owners… as well as I have no response on some my emails from some owners. I have a big collection of pictures, I have got the pictures and stuff in others ways, from FREE websites, from commercial CDs, intended for FREE using, and so on... I use to the pictures (and seldom, some stuff from closed websites) in ANTENTOP. If the owners still are alive, please, contact with me, I immediately remove any Copyright stuff, or, if it is necessary, all needed references will be made there. I do not know, why the owners do not response me. Are they still alive? Do their companies are a bankrupt? Or do they move anywhere? Where they are in the end? Business Advertising: ANTENTOP is not a commercial magazine. Authors and I (Igor Grigorov, the editor of the magazine) do not get any profit from the issue. But off course, I do not mention from commercial ads in ANTENTOP. It allows me to do the magazine in most great way, allows me to pay some money for authors to compensate their hard work. I have lots interesting stuff in Russian, and owners of the stuff agree to publish the stuff in ANTENTOP… but I have no enough time to translate the interesting stuff in English, however I may pay money to translators, and, they will do this work, and we will see lots interesting articles there. So, if you want to put a commercial advertisement in ANTENTOP, please contact with me. A commercial advertisement will do ANTENTOP even greater interesting and various! I hope, readers do not mention against such commercial ads. Book Advertising: I do not think, that Book Advertising is a commercial advertisement. So, Book Advertising is FREE at ANTENTOP. Contact with me for details. Email: igor.grigorov@gmail.com subject: igor_ant NB: Please, use only plain text and mark email subject as: igor_ant. I receive lots spam and viruses, so, I delete ALL unknown me messages without reading. 73! Igor Grigorov, VA3ZNW ex: UA3-117-386, UA3ZNW, UA3ZNW/UA1N, UZ3ZK, RK3ZK op: UK3ZAM, UK5LAP,EN1NWB, EN5QRP, EN100GM http://www.antentop.org/ Editorial
  • 3. ANTENTOP- 01- 2010, # 012 Table of Contents Table of Contents Antenna Theory Page 1 Aperture Antennas – Part I : by: Prof. Natalia K. Nikolova Dear friends, I would like to give to you an interesting and reliable antenna theory. Hours searching in the web gave me lots theoretical information about antennas. Really, at first I did not know what information to chose for ANTENTOP. Now I want to present to you one more very interesting Lecture - it is a Lecture Aperture Antennas – Part II. I believe, you cannot find such info anywhere for free! Very interesting and very useful info for every ham, for every radio- engineer. (Rectangular horn antennas. Circular horns.) 5- 33 HF- Antenna Practice 2 Directional Helical Antennas: by: I..Kapustin, UA0RW Practical Design of a small sized two Directional Helical Antennas for the 20- meters Band. 34- 37 3 Narrow DEWD Dipole for the 80- meters: Nikolay Kudryavchenko, UR0GT Practical Design of a small sized two Directinoal Helical Antennas for the 20- meters Band. 38- 39 4 Dipole Antenna for the 80- meters With Rectangular UR0GT- Match : By: Nikolay Kudryavchenko, UR0GT It is an alternative way (compare to DEWD) to design a broadband antenna- use so called "UR0GT- Match." The match was offered by UR0GT at 2004 at HZ- Forum. The match was used to feed VHF- Antennas, but it works at HF too. 40- 41 5 Dipole Antenna for the 80- meters With Triangular UR0GT- Match: By: Nikolay Kudryavchenko, UR0GT It is an alternative way (compare to DEWD) to design a broadband antenna- use so called "UR0GT- Match." The match was offered by UR0GT at 2004 at HZ- Forum. The match was used to feed VHF- Antennas, but it works at HF too. 42- 43 Page 1 http://www.antentop.org/
  • 4. ANTENTOP- 01- 2010, # 012 Table of Contents Table of Contents Page 6 DEWD Dipole for the 80- meters with a Stub Matching: By: Nikolay Kudryavchenko, UR0GT It is just a variant of a DEWD Dipole for the 80- meters with Stub Matching. The antenna has enough good parameters - Pass Band and Efficiency. 44- 45 7 Narrow DEWD Dipole for the 80- meters with a Stub Matching: By: Nikolay Kudryavchenko, UR0GT It is just a variant of a Narrow DEWD Dipole for the 80- meters with Stub Matching. The antenna has enough good parameters - Pass Band and Efficiency. 46- 47 8 Narrow DEWD Dipole for the 80- meters with an Inductance Matching: By: Nikolay Kudryavchenko, UR0GT It is just a variant of a Narrow DEWD Dipole for the 80- meters with an Inductance Matching. The antenna has enough good parameters - Pass Band and Efficiency. 48- 49 9 Super Narrow DEWD Dipole for the 80- meters with A Stub Matching: By: Nikolay Kudryavchenko, UR0GT It is just a variant of a Narrow DEWD Dipole for the 80- meters with an Inductance Matching. The antenna has enough good parameters - Pass Band and Efficiency. 50- 51 10 Simple Field One- Wire- Length HF Antennas : By: Igor Lavrushov , UA6HJQ Below will be described simple one- length- wire HF antennas. The antennas were designed for mountain's radio- expeditions. The main criteria were- low weight plus simplicity. All described below HF- Antennas were tested in Northern Caucasus Mountains with a transceiver FT- 817 and ATU MFJ- 902 and provided good result. 52- 55 11 Flat EH- Antenna for 10- MHz: By: Vladimir Kononov, UA1ACO, St.- Petersburg Some days I heard 10- MHz. Good propagation conditions, lots stations but no antenna. Only 42- meters length of wire was connected to my ICOM-7000 through ICOM AT-180. So, I decided to make EH-Antenna for the band. To avoid too much job with cylinders (that are commonly used at EH- Antenna) I made a Flat EH- Antenna from stuff from my scrap- box. It takes only 3- 4 hours for making and tuning of the antenna. 56- 60 Page 2 http://www.antentop.org/
  • 5. ANTENTOP- 01- 2010, # 012 Table of Contents Table of Contents Page 12 Flat EH- Antenna for 10- MHz in the Winter: By: Vladimir Kononov, UA1ACO, St.-Petersburg In three weeks the winter came in my town. I made more the 100 QSOs with 25 countries using power 30- Wtts. Antenna was covered by snow but it is worked. I did lots QSOs with the snow- EH-Antenna. As rule I could make QSO with any station that I heard. 61- 62 Regenerative Receivers 13 Some Thoughts on Regenerative Receivers : By: Paul W. Ross, W3FIS After having monitored, and occasionally participating, in the discussions on the Yahoo Regenerative Receiver Newsgroup, I thought it might be of interest to throw in both some of my experiences, and professional thoughts. I suffer from being an E.E. by training, having grown up at the tail end of the vacuum tube era, as well as having held an amateur radio license for half a century. 63- 70 101- 102 14 Simple Short Wave Receiver : By: V. Egorov, UA3AB Note from va3znw: It was the first tube regenerative receiver that I have made by myself. At the far times I was a thirteen years old boy that fall into radio and certainly into amateur radio. I already made a transistors' then tubes' HF converter for my old tube receiver "Muromets." So, I could hear amateur stations. However, one friend of mine, old ham (he was at the times in his forties) told me about my converters:- "Good job! But.. what I would like to say… all the stuff (converter and receiver) you may change for one tube receiver. It would get the same reception." Another day he gave me an old soviet magazine "Radio" with the schematic. When the receiver was made and tuned, I discovered that the one- tube receiver really worked almost similar to converter with "Muromets." 71- 74 Simple QRP Transceivers 15 A Multi Band Tube 10 w QSK Transceiver: by Igor Grigorov, UZ3ZK In the SPRAT # 67 (SPRAT is the journal of the G- QRP- Club) was published a circuit of a tube DC receiver. I made this G0ILL receiver and enjoyed of it perfect reception. Later I modified the receiver to transceiver. 75- 78 16 A 10- meter Band CW Transceiver : Vladimir Polyakov, RA3AAE It is a variant of a simple DC transceiver. Transistor of PA works like a mixer in receiving mode. So, there is no any commutation in the RF circuits. The transceiver has output power 0.35- Wtts, shift TX/RX- 400-Hz, RX sensitivity 2 microV. Power voltage is 15-V, current at RX/TX - 30/120-mA. 79 Page 3 http://www.antentop.org/
  • 6. ANTENTOP- 01- 2009, # 011 Table of Contents Table of Contents Page 17 An 80 m CW Valve Transceiver :.: by Igor Grigorov, RK3ZK It is possible to build this transceiver in one evening using surplus parts. It has a sensitivity of near 5- microV and output power on 3.5- 3.6- MHz near 1-Wtts. 80 18 PA Practical Photos for P.A. on Tube GU-43B: By: Nikolay Kisel, UA3AIC, Moscow Just photos and steps how to do a simple PA on a power tube GU-43B 81- 86 19 Linear Power Amplifier on G811: By: S. Bunin, L. Yailenko The PA is designed for ham bands 160- 10- meters. It provides 200 Wtts CW/ 500 Wtts PEP SSB. Efficiency of the PA is 65- 70% in depend on used rband. 87- 88 20 Patents Ground and/or feedline independent resonant feed device for coupling antennas and the likes. Just a description of the patent USB- TUBE 89- 100 Page 4 http://www.antentop.org/
  • 7. ANTENTOP- 01- 2010, # 012 Aperture Antennas – Part I I Feel Yourself a Student! Dear friends, I would like to give to you an interesting and reliable antenna theory. Hours searching in the web gave me lots theoretical information about antennas. Really, at first I did not know what information to chose for ANTENTOP. Finally, I stopped on lectures “Modern Antennas in Wireless Telecommunications” written by Prof. Natalia K. Nikolova from McMaster University, Hamilton, Canada. You ask me: Why? Well, I have read many textbooks on Antennas, both, as in Russian as in English. So, I have the possibility to compare different textbook, and I think, that the lectures give knowledge in antenna field in great way. Here first lecture “Introduction into Antenna Study” is here. Next issues of ANTENTOP will contain some other lectures. So, feel yourself a student! Go to Antenna Studies! I.G. My Friends, the above placed Intro was given at ANTENTOP- 01- 2003 to Antennas Lectures. Now I know, that the Lecture is one of popular topics of ANTENTOP. Every Antenna Lecture was downloaded more than 1000 times! Now I want to present to you one more very interesting Lecture - it is a Lecture Aperture Antennas – Part II. I believe, you cannot find such info anywhere for free! Very interesting and very useful info for every ham, for every radio- engineer. So, feel yourself a student! Go to Antenna Studies! I.G. McMaster University Hall Prof. Natalia K. Nikolova Aperture Antennas – Part II (Rectangular horn antennas. Circular horns.) by Prof. Natalia K. Nikolova www.antentop.org Page-5
  • 8. ANTENTOP- 01- 2010, # 012 Aperture Antennas – Part II www.antentop.org Page-6
  • 9. ANTENTOP- 01- 2010, # 012 Aperture Antennas – Part II www.antentop.org Page-7
  • 10. ANTENTOP- 01- 2010, # 012 Aperture Antennas – Part II www.antentop.org Page-8
  • 11. ANTENTOP- 01- 2010, # 012 Aperture Antennas – Part II www.antentop.org Page-9
  • 12. ANTENTOP- 01- 2010, # 012 Aperture Antennas – Part II www.antentop.org Page-10
  • 13. ANTENTOP- 01- 2010, # 012 Aperture Antennas – Part II www.antentop.org Page-11
  • 14. ANTENTOP- 01- 2010, # 012 Aperture Antennas – Part II www.antentop.org Page-12
  • 15. ANTENTOP- 01- 2010, # 012 Aperture Antennas – Part II www.antentop.org Page-13
  • 16. ANTENTOP- 01- 2010, # 012 Aperture Antennas – Part II www.antentop.org Page-14
  • 17. ANTENTOP- 01- 2010, # 012 Aperture Antennas – Part II www.antentop.org Page-15
  • 18. ANTENTOP- 01- 2010, # 012 Aperture Antennas – Part II www.antentop.org Page-16
  • 19. ANTENTOP- 01- 2010, # 012 Aperture Antennas – Part II www.antentop.org Page-17
  • 20. ANTENTOP- 01- 2010, # 012 Aperture Antennas – Part II www.antentop.org Page-18
  • 21. ANTENTOP- 01- 2010, # 012 Aperture Antennas – Part II www.antentop.org Page-19
  • 22. ANTENTOP- 01- 2010, # 012 Aperture Antennas – Part II www.antentop.org Page-20
  • 23. ANTENTOP- 01- 2010, # 012 Aperture Antennas – Part II www.antentop.org Page-21
  • 24. ANTENTOP- 01- 2010, # 012 Aperture Antennas – Part II www.antentop.org Page-22
  • 25. ANTENTOP- 01- 2010, # 012 Aperture Antennas – Part II www.antentop.org Page-23
  • 26. ANTENTOP- 01- 2010, # 012 Aperture Antennas – Part II www.antentop.org Page-24
  • 27. ANTENTOP- 01- 2010, # 012 Aperture Antennas – Part II www.antentop.org Page-25
  • 28. ANTENTOP- 01- 2010, # 012 Aperture Antennas – Part II www.antentop.org Page-26
  • 29. ANTENTOP- 01- 2010, # 012 Aperture Antennas – Part II www.antentop.org Page-27
  • 30. ANTENTOP- 01- 2010, # 012 Aperture Antennas – Part II www.antentop.org Page-28
  • 31. ANTENTOP- 01- 2010, # 012 Aperture Antennas – Part II www.antentop.org Page-29
  • 32. ANTENTOP- 01- 2010, # 012 Aperture Antennas – Part II www.antentop.org Page-30
  • 33. ANTENTOP- 01- 2010, # 012 Aperture Antennas – Part II www.antentop.org Page-31
  • 34. ANTENTOP- 01- 2010, # 012 Aperture Antennas – Part II www.antentop.org Page-32
  • 35. ANTENTOP- 01- 2010, # 012 Aperture Antennas – Part II www.antentop.org Page-33
  • 36. ANTENTOP- 01- 2010, # 012 Directional Helical Antennas I..Kapustin, UA0RW Radio # 7 1958, pp.: 34-35. The antenna intended for the 20-meter Band. Figure 1 shows the design of the antenna. There are two Voltage Fed Helical Dipoles that fed with phase shift in 90 degree. Figure 1 Directional Dipole Helical Antenna The distance between the Helical Dipoles is Lambda/4. A Helical Dipole made of two plastic tubes in 3-cm diameter (it is possible to use wood rectangular 3x3 – cm) and 110-cm in length. Two spirals in 77 turns of wire cord in 3-mm (9-AWG) diameter are coiled above the each tube. Gap between near coils is 7.5-mm. Ends of the dipoles (made from tubes) are plugged by wood. In the plug a copper tube by length in 45-cm and 8-mm OD is inserted. Antenna wires are soldered to the copper tube near the plug. Bare wire (or tube) with OD that can fit inside the copper tube is inserted into. Antenna is tuned into resonant by moving the bare wire. Figure 2 shows the design of the tube ending. The Helical Dipoles are fastened to a traverse made from a strong square wood stick. The stick is fastened to an antenna mast. Open Wire Line made of copper cord wire (3- mm (9-AWG) OD), the distance between wires is 6-cm. The line is sitting on insulators under the strong square stick. Length of the line is 5.2- m. Design of the Directional Dipole Helical Antenna is shown on Figure 3. Front Cover of Radio #7 1958 www.antentop.org Page-34
  • 37. ANTENTOP- 01- 2010, # 012 Directional Helical Antennas Figure 2 Ending of the Helical Dipole Figure 3 Design of the Directional Dipole Helical Antenna Directional Dipole Helical Antenna was tested compare with WINDOM for the 20- meters Windom had overall length 10-m. The WINDOM had maxima radiation to the South. At 1-km to the South from the tested antennas was installed a receiver with S-Meter. Table 1 shows the Data obtained from the test. Title of the article Directional Helical Antennas From Radio # 7 1958 www.antentop.org Page-35
  • 38. ANTENTOP- 01- 2010, # 012 Directional Helical Antennas Table 1 Data for testing of the Helical Antenna # Direction of t he maxima Radiation Of the Helical Antenna S- Meter 1 North 0,8 2 East 2,0 3 South 2,4 4 West 2,0 Column “S- Meter” shows normalized level – Helical Antenna/WINDOM. For example, digit “2” shows that level from the Helical Antenna is in 2 times more (according to the S- meter of the receiver) compare the level from the WINDOM Figure 5 shows the design of the Four- Wire Line. The Four- Wire Line was placed onto insulators under the square wood stick. The Small Directional Dipole Helical The small sized Antenna at the test showed that this one worked similar to the helical antenna shown on the Figure 1. It was tested Directional Dipole Helical Antenna with reduced sizes. Length between the Helical Dipoles was lambda/8, or 2.6-m for the 20- Meters Band. However there was used Four –Wire Open Line between the Dipoles. Figure 4 shows the design of the Small Directional Dipole Helical Antenna. However, the Small Directional Dipole Helical Antenna was more complicated in the tuning compare to Antenna from the Figure 1. The antennas were fed by 500- Ohm two- wire line with length 15.6-m (3/4- Lambda). Figure 4 Design of the Small Directional Dipole Helical Antenna The antennas were fed by 500- Ohm two- wire line with length 15.6-m (3/4- Lambda). Tuning of the Directional Dipole Helical Antenna (for both antennas- Figure 1 and Figure 4): 1. Two wire feeder line (with length 15.6-m) disconnected from the antenna and turn on to TX (CAREFUL: To a Tube TX! May be used semiconductor PA with ATU). (Figure 6A) 2. TX is tuned to the middle of the 20- meter Band and its PA is tuned to the resonant with the line. 3. First dipole is connected to the feeder. Tune the dipole to the resonant (using only the tuning strand wire at the dipole, do not change tuning at the PA). (Figure 6B) www.antentop.org Page-36
  • 39. ANTENTOP- 01- 2010, # 012 Directional Helical Antennas Figure 5 Design of the Four- Wire Line 4. If the dipole is loaded too much the feeder, change distance between wires of the Two- Wire Line. 5. Second dipole with the phase open wire line connected to the feeder. (First dipole is disconnected!) Tune the dipole to the resonant (using the tuning strand wire). (Figure 6C) 6. If the dipole is loaded too much the feeder, change distance between wires of the phase line. 7. Connect the antenna to the feeder. (Both dipoles, as shown on the Figure 1 and Figure 4) (Figure 6D) Antenna should not detune the feeder. If it is, repeat tuning process from paragraph 1. Figure 6 Steps for Tuning Directional Dipole Helical Antenna www.antentop.org Page-37
  • 40. ANTENTOP- 01- 2010, # 012 Narrow DEWD Dipole for the 80- meters The publications devoted to memory UR0GT. By: Nikolay Kudryavchenko, UR0GT It is a variant of a Narrow DEWD Dipole (distance between wires- 10- cm) with four equal wires (each wire is in 19.0- meter long). However, the antenna has enough good parameters compare to usual DEWD antennas (that were described at Antentop-01- 2009). The MMANA model of the antenna may be loaded: http: // www.antentop.org/012/narrow_dewd_012.htm Figure 1 Design of the Narrow DEWD Dipole Figure 2 Z of the Narrow DEWD Dipole (20- m above the real ground) http://www.antentop.org/ Page 38
  • 41. ANTENTOP- 01- 2010, # 012 Narrow DEWD Dipole for the 80- meters Figure 3 SWR of the Narrow DEWD Dipole (20- m above the real ground) Figure 3 DD of the Narrow DEWD Dipole (20- m above the real ground) 73 Nick Credit Line: Forum from: www.cqham.ru http://www.antentop.org/ Page 39
  • 42. ANTENTOP- 01- 2010, # 012 Dipole Antenna for the 80- meters With Rectangular UR0GT- Match The publications devoted to memory UR0GT. By: Nikolay Kudryavchenko, UR0GT It is an alternative way (compare to DEWD) to design a broadband antenna- use so called “UR0GT- Match.” The match was offered by UR0GT at 2004 at HZ- Forum. The match was used to feed VHF- Antennas, but it works at HF too. The match may be used at all antenna types – dipoles, verticals, YAGI- either symmetrical or asymmetrical. The MMANA model of the Dipole Antenna for the 80- meters with rectangular UR0GT- Match may be loaded: http: // www.antentop.org/012/r_ur0gt_012.htm Figure 1 Design of the Dipole Antenna for the 80- meters with rectangular UR0GT- Match Figure 2 Z of the Dipole Antenna for the 80- meters with rectangular UR0GT- Match (30- m above the real ground) http://www.antentop.org/ Page 40
  • 43. ANTENTOP- 01- 2010, # 012 Dipole Antenna for the 80- meters With Rectangular UR0GT- Match Figure 3 SWR of the Dipole Antenna for the 80- meters with rectangular UR0GT- Match (30- m above the real ground) Figure 4 DD of the Dipole Antenna for the 80- meters with rectangular UR0GT- Match (30- m above the real ground) 73 Nick Credit Line: Forum from: www.cqham.ru http://www.antentop.org/ Page 41
  • 44. ANTENTOP- 01- 2010, # 012 Dipole Antenna for the 80- meters With Triangular UR0GT- Match The publications devoted to memory UR0GT. By: Nikolay Kudryavchenko, UR0GT It is an alternative way (compare to DEWD) to design a broadband antenna- use so called “UR0GT- Match.” The match was offered by UR0GT at 2004 at HZ- Forum. The match was used to feed VHF- Antennas, but it works at HF too. The match may be used at all antenna types – dipoles, verticals, YAGI- either symmetrical or asymmetrical. The MMANA model of the Dipole Antenna for the 80- meters with triangular UR0GT- Match may be loaded: http: // www.antentop.org/012/t_ur0gt_012.htm Figure 1 Design of the Dipole Antenna for the 80- meters with triangular UR0GT- Match Figure 2 Z of the Dipole Antenna for the 80- meters with triangular UR0GT- Match (30- m above the real ground) http://www.antentop.org/ Page 42
  • 45. ANTENTOP- 01- 2010, # 012 Dipole Antenna for the 80- meters With Triangular UR0GT- Match Figure 3 SWR of the Dipole Antenna for the 80- meters with triangular UR0GT- Match (30- m above the real ground) Figure 4 DD of the Dipole Antenna for the 80- meters with triangular UR0GT- Match (30- m above the real ground) 73 Nick Credit Line: Forum from: www.cqham.ru http://www.antentop.org/ Page 43
  • 46. ANTENTOP- 01- 2010, # 012 DEWD Dipole for the 80- meters with A Stub Matching The publications devoted to memory UR0GT. By: Nikolay Kudryavchenko, UR0GT It is just a variant of a DEWD Dipole for the 80- meters with Stub Matching. The antenna has enough good parameters – Pass Band and Efficiency. The MMANA model of the antenna may be loaded: http: // www.antentop.org/012/stub_dewd_012.htm, file: Broadband 80m.5 Figure 1 Design of the DEWD Dipole for the 80- meters with Stub Matching Figure 2 Z of the DEWD Dipole for the 80- meters with a Stub Matching (30- m above the real ground) http://www.antentop.org/ Page 44
  • 47. ANTENTOP- 01- 2010, # 012 Narrow DEWD Dipole for the 80- meters Figure 3 SWR of the DEWD Dipole for the 80- meters with a Stub Matching (30- m above the real ground) Figure 4 DD of the DEWD Dipole for the 80- meters with a Stub Matching (30- m above the real ground) 73 Nick Credit Line: Forum from: www.cqham.ru http://www.antentop.org/ Page 45
  • 48. ANTENTOP- 01- 2010, # 012 Narrow DEWD Dipole for the 80- meters with a Stub Matching The publications devoted to the memory UR0GT. By: Nikolay Kudryavchenko, UR0GT It is just a variant of a DEWD Dipole for the 80- meters with Stub Matching. The antenna has enough good parameters – Pass Band and Efficiency. The MMANA model of the antenna may be loaded: http: // www.antentop.org/012/n_dewd_012.htm, file Broadband 80m.6 Figure 1 Design of the Narrow DEWD Dipole for the 80- meters with a Stub Matching Figure 2 Z of the Narrow DEWD Dipole for the 80- meters with a Stub Matching (30- m above the real ground) http://www.antentop.org/ Page 46
  • 49. ANTENTOP- 01- 2010, # 012 Narrow DEWD Dipole for the 80- meters with a Stub Matching Figure 3 SWR of the Narrow DEWD Dipole for the 80- meters with a Stub Matching (30- m above the real ground) Figure 4 DD of the Narrow DEWD Dipole for the 80- meters with a Stub Matching (30- m above the real ground) 73 Nick Credit Line: Forum from: www.cqham.ru http://www.antentop.org/ Page 47
  • 50. ANTENTOP- 01- 2010, # 012 Narrow DEWD Dipole for the 80- meters with an Inductance Matching The publications devoted to the memory UR0GT. By: Nikolay Kudryavchenko, UR0GT It is just a variant of a DEWD Dipole for the 80- meters with Stub Matching. The antenna has enough good parameters – Pass Band and Efficiency. The MMANA model of the antenna may be loaded: http: // www.antentop.org/012/nl_dewd_012.htm, file Broadband 80m.7 Figure 1 Design of the Narrow DEWD Dipole for the 80- meters with an Inductance Matching Figure 2 Z of the Narrow DEWD Dipole for the 80- meters with an Inductance Matching (30- m above the real ground) http://www.antentop.org/ Page 48
  • 51. ANTENTOP- 01- 2010, # 012 Narrow DEWD Dipole for the 80- meters with an Inductance Matching Figure 3 SWR of the Narrow DEWD Dipole for the 80- meters with an Inductance Matching (30- m above the real ground) Figure 4 DD of the Narrow DEWD Dipole for the 80- meters with an Inductance Matching (30- m above the real ground) 73 Nick Credit Line: Forum from: www.cqham.ru http://www.antentop.org/ Page 49
  • 52. ANTENTOP- 01- 2010, # 012 Super Narrow DEWD Dipole for the 80- meters with A Stub Matching The publications devoted to memory UR0GT. By: Nikolay Kudryavchenko, UR0GT It is just a variant of a DEWD Dipole for the 80- meters with Stub Matching. The antenna has enough good parameters – Pass Band and Efficiency. The MMANA model of the antenna may be loaded: http: // www.antentop.org/012/sn_dewd_012.htm, file Broadband 80m.8 Figure 1 Design of the Super Narrow DEWD Dipole for the 80- meters with a Stub Matching Figure 2 Z of the Super Narrow DEWD Dipole for the 80- meters with a Stub Matching (30- m above the real ground) http://www.antentop.org/ Page 50
  • 53. ANTENTOP- 01- 2010, # 012 Super Narrow DEWD Dipole for the 80- meters with A Stub Matching Figure 3 SWR of the Super Narrow DEWD Dipole for the 80- meters with a Stub Matching (30- m above the real ground) Figure 4 DD of the Super Narrow DEWD Dipole for the 80- meters with a Stub Matching (30- m above the real ground) 73 Nick Credit Line: Forum from: www.cqham.ru http://www.antentop.org/ Page 51
  • 54. ANTENTOP- 01- 2010, # 012 Simple Field One- Wire- Length HF Antennas Igor Lavrushov , UA6HJQ Credit Line: http: // www.hamradio.cmw.ru/antenna/kusok.htm Below will be described simple one- length- wire HF antennas. The antennas were designed for mountain’s radio- expeditions. The main criteria were- low weight plus simplicity. All described below HF- Antennas were tested in Northern Caucasus Mountains with a transceiver FT- 817 and ATU MFJ- 902 and provided good result. ... About Antenna Wire Copper wire in the plastic insulation is the best choice. Diameter of the copper wire should be 1.5- 2- mm. Wire that is thinner – has no enough mechanical strength, wire that is thicker - heavy. Antenna wires should be not too hard but not too soft. It should have reasonable rigidity. Photo 1 shows some examples of good wires. After choosing wires we should determinate the length for the antenna. In common the length depends on the used bands. 7- and 14- MHz bands are common used in the radio- expedition. UA6HJQ Photo 1 Examples of Some Good Antenna Wires http://www.antentop.org/ Page 52
  • 55. ANTENTOP- 01- 2010, # 012 Simple Field One- Wire- Length HF Antennas Expedition antenna for the bands should have length not less the 9 meter and no more the 21 meter. Why? Because we need antenna that would be work without counterpoises, so, the antenna should have length lambda or lambda/2. Shorten antenna has low efficiency, long- high weight. Wire in length 10-meters would be enough if you would like to use bands 14- 28- MHz at the expedition. Antenna with such length is suitable for local and DX- QSO on 14- MHz and has good efficiency on 18- 28- MHz. Such antenna still is working on 7-MHz (lambda/4 length). Wire in length 20-meters would work efficiency on 7- and 14- MHz as well as at 18- 28- MHz. The antenna provides local QSO at the 3.6- MHz. However at good propagation and if the end of the antenna is hanged up at 10 and more meters the antenna allows to make DX- QSO on the 3.6- MHz. … How would it hang up? Classical mountain expedition antenna is Sloper. Figure 1 shows the antenna. Use any natural support- tree, stone, etc., to install the antenna. Figure 1 Expedition Antenna Sloper 10- meters length For Sloper having length 20 meters use additional support. It may be any natural support- tree for example, or artificial- plastic fishing pole, for example. Figure 2 shows Sloper 20 meters length. DD of the antennas shown on Figure 1 and Figure 2 has maxima radiation in direction of the incline of the antenna wire. Antenna wire may be placed along the fishing pole. DD of the antenna has maxima radiation into another side from the incline of the wire. Figure 3 shows Sloper with fishing pole as antenna part. It is possible to install support or fishing pole at any place of the wire. In this case it is a variant of an asymmetrical dipole with the end fed. Figure 4 shows the antenna. Good solution is to install the support in the center of the antenna wire how it is shown on Figure 5. In this case we have got a kind of I.V. antenna with the end fed. The antenna has enough efficiency at 7- and 14- MHz. The feature of the Sloper antennas on the base of one wire is that all of the antennas are radiated almost 50/50% horizon/vertical polarization. It looks like a lack of the antennas. If you need antenna with the vertical polarization you may try helical antenna shown in the Figure 6. However the antenna needs good grounding or counterpoises. http://www.antentop.org/ Page 53
  • 56. ANTENTOP- 01- 2010, # 012 Simple Field One- Wire- Length HF Antennas Figure 2 Expedition Antenna Sloper 20- meters length Figure 3 Antenna Sloper with Fishing Pole as Antenna Part Figure 4 Asymmetrical Dipole Antenna with the End Fed http://www.antentop.org/ Page 54
  • 57. ANTENTOP- 01- 2010, # 012 Simple Field One- Wire- Length HF Antennas Figure 5 Symmetrical Dipole Antenna with the End Fed All antennas, shown at Figure 1- Figure 6 may work with ATU MFJ- 902 at 7- 28- MHz. …In conclusion there are below some practical advices. 1. If you will use transceiver in known for you place where you can find natural support you may leave antenna mast (fishing pole) at home. 2. At emergency situation try wire 10 or 20 meters length at height 2- 3 meters above the ground. 3. Avoid place antenna end near tree or bushes, use plastic rope for distance between antenna and the subjects. 4. Very often grounding of the case of the ATU MFJ- 902 may increase antenna efficiency. For grounding use a counterpoise in length 5- 20 meter. Sometimes several metal sticks inserted to the earth and connected (by wire any length) with the case of the MFJ-902 may provide good grounding. 5. In the forest use antenna shown in the Figure 5. 6. Protect antenna tuner (MFJ-902) from rain and snow. You may just install the tuner inside a tent. 7. Connect Transceiver and ATU by 50-Ohm coaxial cable of any length. Figure 6 Helical Vertical Antenna 73! June – 2007, UA6HJQ http://www.antentop.org/ Page 55
  • 58. ANTENTOP- 01- 2010, # 012 Flat EH- Antenna for 10- MHz Vladimir Kononov, UA1ACO, St.-Petersburg Credit Line: http://ehant.qrz.ru/exp_eh31.htm Some days I heard 10- MHz. Good propagation conditions, lots stations but no antenna. Only 42- meters length of wire was connected to my ICOM- 7000 through ICOM AT-180. So, I decided to make EH-Antenna for the band. To avoid too much job with cylinders (that are commonly used at EH- Antenna) I made a Flat EH- Antenna from stuff from my scrap- box. It takes only 3- 4 hours for making and tuning of the antenna. I made the antenna like an experimental for short time work. But the antenna showed so good performance that I leave it for my every- day work in the Air. Figure 1 shows the Flat EH- Antenna. Vladimir Kononov, UA1ACO Figure 1 Flat EH- Antenna for 10- MHz http://www.antentop.org/ Page 56
  • 59. ANTENTOP- 01- 2010, # 012 Flat EH- Antenna for 10- MHz Below it is the Parts List for the EH- Antenna. For reference see Figure 1. 1. Two copper plate in dimension 180x315- mm and thickness not less the 1- mm. 2. Wood or plastic plate in dimension 150x400- mm and thickness near 10- mm. 3. Plastic plate in dimension 150x320- mm and thickness near 3- 4- mm. 4. Tens screw (M3- M4). 5. Plastic Coupling (dia near 50-mm) for water pipers. 6. Two caps for the Coupling. 7. Length of plastic water pipe, dia 32-mm and length 100- mm. 8. RF Socket, I used Female SO- 239. 9. Insulated wire 0.85-mm (AWG-20) OD, near 8-meters length. 10. Glue- Gun. 11. Soldering Iron. Figure 2 shows the antenna draft. In Blue there are shown item 2 and item 4. Figure 2 Draft of the Flat EH- Antenna How to Do 1. Prepare the EH- Antenna work-piece. Take item 2. Put it on a desk. Take item 1 and put it above item 2 according the draft (Figure 2). Put item 3 above item 1. Fasten the sandwich (item 2 to item 1 to item 3) with help of item 4. 50% of the job is done. http://ehant.qrz.ru/ http://www.antentop.org/ Page 57
  • 60. ANTENTOP- 01- 2010, # 012 Flat EH- Antenna for 10- MHz 2. The next step is to make inductor. The inductor will be placed inside of the item 5. It needs to save the inductor from atmospheric influence- rain, snow, etc. At first prepare low cap (one of item 6). Install at centre of the item 6 the RF- Socket (item 8). At the second cap (one of item 6) make two holes in dia 2- 3-mm for wires going from the inductor to the EH- Antenna. Note, that after antenna tuning, the holes should be covered with glue from Glue Gun. Inductor is wound at the item 7. Divide wire (item 9) in two lengths by 4- meters each. Twist the wire, 2-3 twist on centimeter. Then one end of the Wire is fastened to the form (item 7) leaving 100- 150- mm of the wire free. Coil 39 turns and second end of the wire is fastened to the form. Beginning and ending parts of the inductor is coiled with some gap. Do tap from 5.5- turn from the bottom. It is tuning tap. Antenna is tuned by the tap (choosing the tap from the inductor) or moving coils coiled with gap between each other. The inductor is fastened with help of Glue- Gun at the bottom cap. Figure 3 shows inductor installed on the coupling cap. Figure 3 Inductor of the Flat EH- Antenna 3. Antenna tuning Solder upper end of the inductor to one copper plate, bottom end to another. (Inductor is still outside the coupling box- item 5.) Tune the antenna. With help moving of the upper coils the antenna is tuned to needed frequency, with help moving the bottom coils the antenna is tuned to minimum SWR and maxima EMF. After tuning of the inductor, glue the coils by several drops of the glue. Tuned inductor should be placed inside item 5, then item 6, then protect with the glue all jointing and holes of the detail. Figure 4 shows the inductor inside of the coupling. That is all. Flat EH- Antenna is ready. I installed the antenna on a wooden mast in 2- meters length. Three guys supported the mast. Antenna was fed by coaxial cable RG-58/U –MIL in length 19.2- meters. Antenna was installed near my home, in 12 meters from the wall. Coaxial cable that is going from Flat EH- Antenna was buried into the earth (on a small depth). Near the antenna were trees that were higher that the antenna. Figure 5 shows the installations of the EH- Antenna. Figure 4 Inductor of the EH- Antenna inside of the Coupling http://www.antentop.org/ Page 58
  • 61. ANTENTOP- 01- 2010, # 012 Flat EH- Antenna for 10- MHz Figure 5 Flat EH- Antenna near my Home Figure 6 Parameters of the EH- Antenna. http://www.antentop.org/ Page 59
  • 62. ANTENTOP- 01- 2010, # 012 Flat EH- Antenna for 10- MHz It was a lots deal to do at that day (when I made the antenna), so at last I just measured the antenna parameters but not tested the antenna in the Air. Figure 6 shows the parameters of the EH- Antenna. The antenna has band- pass in 930-kHz (at SWR less the 2). Near the antenna was installed RF- Choke- several turns of coaxial cable around of a ferrite ring. The choke is visible on the Figure 5. The next day a rain was coming. Water dropped from the antenna and I thought that no chance the antenna alive. Figure 7 shows the antenna into the rain. Figure 7 Rain and Flat EH- Antenna I turned on the EH-Antenna instead of my 42- meters wire… Noise (compare to 42-m- LW, the antenna installed from another side of my home) dropped down but stations went up. First QSO was with UA0AV, Sergey, Krasnoyarsk- 599. Next ones- M0IOW, RK4HE, SP3OOC and VK3XQ, Australia, my rapport 539, I heard him 56/79. May be good propagation… anyway, for small EH-Antenna placed at 2- meters above the ground- it is very good. Then I had QSOs with OK1HAJ, RV3QX, SP9FVO, YU5R, GM0IXO, ON3URT, OZ1HVL, UA4SKW, SP4NDV, UT0EG, DR600UL, RA9FFF, UN1L, RA9JAT, RM9WK, ON3WP/qrp, LA9SN, RD3BD, RV3SBS So, I decided do not remove the EH- Antenna and tested it in next days. For me it was interesting how the antenna would be worked at show conditions. . 73! Vladimir, UA1ACO St. Petersburg, October- 2009 See next article Flat EH- Antenna for 10- MHz in the Winter ANTENTOP- 01- 2010, pp.:61-62 Tube M89 http://www.antentop.org/ Page 60
  • 63. ANTENTOP- 01- 2010, # 012 Flat EH- Antenna for 10- MHz in the Winter Continued from ANTENTOP- 01- 2010 Flat EH- Antenna for 10- MHz pp.: 56- 60 Vladimir Kononov, UA1ACO, St.-Petersburg Credit Line: http://ehant.qrz.ru/exp_eh31.htm In three weeks the winter came in my town. I made more the 100 QSOs with 25 countries using power 30- Wtts. Antenna was covered by snow but it is worked. I did lots QSOs with the snow- EH-Antenna. As rule I could make QSO with any station that I heard. It seems that the weather did not influenced onto the antenna. Really when I measured parameters of the antenna I discovered that it were unchanged. Figure 8 shows Flat EH- Antenna covered with snow. Figure 8 Flat EH- Antenna covered with snow Snow fall, then thawed, and again fall down. Antenna was still working. However I decided to bring the antenna indoor and checked it. Antenna begun to thaw out and water was coming from the antenna. From hermetic (as I believed) coupling water begun to drop. I remove caps from the coupling and discovered there near 10 grams of water. Figure 9 shows water dropping from the coupling. Conclusion- simple “Glue- Gun” sealing cannot provide full hermetic. After the antenna was fully dried, I checked the antenna parameters (they were unchanged). Then the antenna was assembled again, covered “protected” bag and installed at the old place. Figure 10 shows new installed Flat EH- Antenna. http://www.antentop.org/ Page 61
  • 64. ANTENTOP- 01- 2010, # 012 Flat EH- Antenna for 10- MHz in the Winter Figure 9 Water is coming from “hermetic” coupling Figure 10 New Installed Flat – EH- Antenna I checked the antenna in the Air- working excellent. OK, I will test the antenna further. Flat EH- Antenna may be tuned on to others bands. Design of the antenna is leaved the same only numbers of coils are changed in the inductor. Table 1 shows the Theoretical Data for the others bands. 73! Vladimir, UA1ACO St. Petersburg, November- 2009 Table 1 Theoretical Data of the Inductor for the 7, 10, 14 and 18- MHz Band. Band Theoretical Data for Inductor 7 MHz 60 turns 10 MHz 39 turns 14 MHz 24 turns 18 MHz 17 turns http://www.antentop.org/ Page 62
  • 65. ANTENTOP- 01- 2010, # 012 Some Thoughts on Regenerative Receivers Paul W. Ross, W3FIS After having monitored, and occasionally participating, in the discussions on the Yahoo Regenerative Receiver Newsgroup, I thought it might be of interest to throw in both some of my experiences, and professional thoughts. I suffer from being an E.E. by training, having grown up at the tail end of the vacuum tube era, as well as having held an amateur radio license for half a century. In no way is this paper comprehensive. A Google search will turn up all sorts of things. The purpose of this paper is to provide a starting point for discussion and experimentation for the person new to the field of regenerative receivers, who may be utterly overwhelmed by the plethora of information. I've always been fascinated by regenerative receivers, with my first one being built from an article in "Popular Mechanics," using a 1T4 and the usual "ticker" coil Armstrong design. In this paper, tutorial, or what you might want to call it, I'd like to look at some of the general design issues. Some of this is based on a discussion of general receiver design considerations that I gave recently before the Nanticoke Amateur Radio club in Seaford, Delaware, as well as discussions with members of the Yahoo Regenerative Receiver group. Classic Regenerative Receiver, the base of lots regenerative receivers. Figure Credit Line: Wiki http://www.antentop.org/ Page 63
  • 66. ANTENTOP- 01- 2010, # 012 Some Thoughts on Regenerative Receivers Page of Armstrong’s Patent of the Tickler Oscillator Note I.G.: On the base of the Regenerative Receiver Armstrong patented several so called “Tickler Oscillator.” Figure Credit Line: Wiki Everybody is likely familiar with the original Armstrong design -- tickler coil for feedback, "throttle" with a variable capacitor RF bypass from plate to ground, etc., etc., etc. Keep that in mind, as this discussion progresses. If you aren't familiar with the basic design -- grid lead detector, "tickler" feedback and regeneration control with a variable capacitor, look this up. Actually, Armstrong's original circuit was slightly more complicated, but the scheme I've mentioned covers the basic design. One needs to keep firm in mind that early receivers, as well as transmitter designs were governed strongly by cost and complexity considerations. Early vacuum tubes were expensive, and parts generally difficult to come by, and expensive as well. Also, simplicity was a major consideration, as the more complex something is, the lest reliable it will tend to be. As a consequence, there were some design compromises that we've been working to overcome over the years. The following discussion applies to vacuum tube designs as well as their modern cousins with bipolar and field effect devices. They really differ only in the details. Every person has their "pet" designs, of course, as do I. Well, here goes... Classic Colpitts regenerative receiver may be found: http://www.antentop/012/regen_rx_012.htm http://www.antentop.org/ Page 64
  • 67. ANTENTOP- 01- 2010, # 012 Some Thoughts on Regenerative Receivers One of Armstrong Regenerative Receiver Credit Line: Thermionic Tubes in Radio Telegraphy and Telephony, by: John Scott- Taggart, The Wireless Press LTD, 1921 • Effectively increases the "Q" of the tuned circuit by the concept of "negative resistance." Any circuit that accomplishes this will do the trick. Typically, an oscillator circuit, such as a Hartley, Colpitts, or the like is chosen. One then sets the loop gain of the oscillator circuit by some means to be just below the point of oscillation. Later, it will be seen that there are some clear design advantages to some circuits over the others. • Runs in "oscillation" mode, if desired, to act as a direct conversion or autodyne detector for CW or Single Sideband signals. The oscillation mode provides the BFO, or course. The workings are not dependent on vacuum tubes versus transistors. The real problems in any design at least, are: 1. Interaction with the antenna, and QRM generated by the receiver itself. "Grounded Grid" or equivalent isolation amplifier does the trick here. An un-tuned grounded gate FET amplifier seems to be the modern choice. 2. There is massive interaction with tuning as a function of regeneration setting. If there is a way to separate detection from regeneration, this problem can be addressed. One typical vacuum tube design uses a Colpitts oscillator in parallel with a plate or grid leak detector (my favorite for vacuum tube designs). Another alternative (my Senior EE project in 1960!) was to insert a cathode follower between the tuned circuit and the detector/feedback vacuum tube). Edwin H. Colpitts, “Oscillation Generator,” U.S. patent 1,624,537 (filed: 1 February 1918: issued: 12 April 1927) Figure Credit Line: Wiki http://www.antentop.org/ Page 65
  • 68. ANTENTOP- 01- 2010, # 012 Some Thoughts on Regenerative Receivers Note from Wiki: The Hartley oscillator was invented by Ralph V. L. Hartley while he was working for the Research Laboratory of the Western Electric Company. Hartley invented and patented the design in 1915 while overseeing Bell System’s transatlantic radiotelephone test. It was awarded patent number 1,356,763 on October 26, 1920. Figure Credit Line: Wiki 3. Smooth regeneration. This is the hard nut to crack. There is no really good answer here, in my opinion. This , plus the interaction problem was one of the major reasons for the decline in popularity of the regenerative receiver, as well as reduced component costs which made superhetrodyne receivers practical. However, a well regulated power supply to the regeneration stage helps a great deal. A Zener or comparable regulator in transistor circuits, or gas discharge tube for vacuum tubes will work well. I note that one commercial regenerative receiver simply uses a separate 9 volt battery for the detector, and a second for the audio amplifier. Now, keeping in mind the "simplicity" issue, we can see where these fit into our design process. The decoupling of the tuned circuit from the antenna serves two purposes. First, it reduces the interaction of your antenna with the detector tuned circuit. If you have ever hooked an antenna analyzer to a random wire antenna, the impedance is all over the place. Investment in a good antenna tuner, such as the MFJ-16010 is money well spent. Of course, a home- brewed tuner is also feasible, either built-in to the receiver, or as a separate unit. Any of the the "QRP" designs will do the trick. The coupling of a resonant antenna into the detector can often lead to "dead" spots in tuning. Hence, the advantage of isolating the antenna from the detector with a "front end." There is no need to have this front end tuned, but just to keep the antenna interactions from the detector, and reduce or partially prevent radiation from the oscillating detector from producing QRM for other radio users in the vicinity. When running in "oscillation" mode, or close to it, a regenerative detector is its own little QRP transmitter! For domestic and neighborhood tranquility, the isolation amplifier greatly reduces radiation back into the antenna. It is not perfect, and my two commercial kit regenerative receivers make an impromptu signal generator in the ham shack when needed. An "RF" gain control can be easily introduced to reduce the strength of incoming strong signals, such as some of the major SW stations, like Radio Havana, or the PRC stations. Along with the simplicity issue, the design for convenient band switching of the detector's tuned circuit is a hassle. If the "tickler" design of the classic Armstrong set is used, then there are either two or three coils that have to be switched. This means at least a three-pole n-throw switch if there is a "primary" coil to the antenna. Three of the six coil points are "ground" for RF, so only a three pole switch is needed. If a coupling adjustment capacitor is placed on the primary side to ground, then at least four points are "hot" for RF. These switches are not only complex, but they are expensive and add a large measure of complexity and increased size to the receiver. There are at least two common alternative solutions: http://www.antentop.org/ Page 66
  • 69. ANTENTOP- 01- 2010, # 012 Some Thoughts on Regenerative Receivers Torn.E.b Credit Line: http://www.radiostation.ru/home/museum.html Regenerative Receiver for professional communication Torn.E.b. was designed by Telefunken in 1935- 1936 for military use. The receiver was at WEHRMACHT by the end of wwII. The receiver had (may be first in the World ) rotary switch for the coils. KUB- 4M Regenerative Receiver for professional communication KUB- 4 was designed in 1930 in Kozitskiy plant, Leningrad, USSR. The receiver was used everywhere where HF- communication was used- in military and civil. Later, for marine use was designed KUB- 4M. The receiver was used at marine and submarine ships. The receivers were in use up to 1945. KUB- 4 and KYB- 4M had Plug- In Coils http://www.antentop.org/ Page 67
  • 70. ANTENTOP- 01- 2010, # 012 Some Thoughts on Regenerative Receivers Plug-in coils -- the classic solution, but clumsy to do, and you have to have some place to conveniently store the un-used coils. My own early sets used these, mostly because I could buy a nice set of short wave and broadcast band coils, versus winding my own coils. If you note pictures of early commercial sets for marine use, there was a coil box near the receiver. The "Sierra" QRP transceiver suffers from this problem. A design that uses only a single coil in the tuned circuit such as the Colpitts design is one such solution that greatly reduces the complexity of band switching. Of course, a Hartley oscillator design uses a single tap on the coil, but again, this is an additional source of complexity due to the tap on the coil. The Colpitts design does require a DC return for the cathode in the case of vacuum tubes or source in the case of FET designs. Plug- In Coils at Radio “Sierra” Credit Line: http://www.w0ch.net/sierra/sierra.htm By the way, FETs have an advantage as they are high input impedance devices like vacuum tubes, and do not load the tuned circuit to any degree. Both of the two commercial regenerative receivers I have use FETs in the detector and isolation amplifier. The MFJ-8100 has a series of inductors in series with a simple single pole selector switch. The Ten-Tec 1253 uses nine separate inductors, but switches them with a clever PIN diode and counter circuit. Both of these designs use an isolation "front end," which eases the complexity of coupling into the tuned detector circuit. It is generally agreed that designing a receiver for a single or small range of frequencies is much easier than developing a general coverage receiver. If you can get a 10:1 range of capacitance change with a variable capacitor, for example, then you can expect about a 3:1 tuning range (square root of the ratio of the maximum to minimum capacitance). This problem rears its ugly head especially in the case of varactor tuning, where the capacitance change range is more modest. More about this later, with a couple of "real life" receiver designs. The usual approach to fine tuning, when using a variable capacitor is to have a "band set" capacitor and then a "band spread" capacitor of about 10% of the value of the main capacitor. To save money, an alternate approach is to use some sort of mechanical vernier reduction drive, such as the MFJ- 8100. With varactor tuning, a secondary variable voltage source with a smaller voltage variation range serves the same purpose. Kitchin used a combination of varactor (fine) and variable capacitor (coarse) tuning in one of his designs. If we are willing to accept a modest degree of increase in complexity, the so-called "Regenodyne" receiver is a good choice as a solution to the difficulties of developing a wide coverage receiver. A Google search will turn up some extensive discussions of this concept. The idea here is to have a regenerative receiver of modest tuning range as a "back end" to a superhetrodyne front end, which converts a series of band segments with a crystal oscillator with a series of switched crystal frequencies. A somewhat similar line of attack was used with the "Q Multiplier" tuned/regenerative IF system on early vacuum tube general coverage receivers. This was available from Heathkit. I had one on a Hallicrafters S- 20R, which was quite effective. The front end can be pretty broad, and only need remove the image response. http://www.antentop.org/ Page 68
  • 71. ANTENTOP- 01- 2010, # 012 Some Thoughts on Regenerative Receivers Hallicrafters S-20R Credit Line: http://www.radionewjerusalem.com/Radio/S-20R%20Hallicrafters.html In the 1960s, the ARRL handbook showed an interesting receiver along these lines. It used a 1700 kHz IF frequency with the local oscillator between the 40 and 80 meter ham bands. The 1700 kHz IF had good selectivity with a half-lattice crystal filter. The front end was tuned to either 40 or 80 meters, as desired. As to controlling the regeneration, any scheme that allows you to control the feedback will work. The more common themes: • Armstrong "RF" throttle - another expensive variable capacitor, plus frequency issues. • Variable resistor across the tickler coil -- "kill" some of the feedback signal. My original 1T4 regenerative receiver used this scheme. • Change filament voltage! Used in many of the early directly heated filament tubes. • Change the screen voltage in a Pentode. Probably one of the cleanest strategies. This is used in the World War II Paraset design. • Change the coupling between the tickler and tuning coil mechanically. • Add a variable resistor in the emitter circuit (Kitchin's design, who uses a Hartley oscillator, and he also uses a separate diode detector). This reduces the loop gain of the oscillator. Change the plate voltage of the detector. Again, due to the various interactions, and a desire to get smooth transition into regeneration, some sort of good voltage regulation for the detector stage is essential. This doesn't add any great complexity to the design with the availability of nice integrated circuit voltage regulator chips. Kitchin uses a simple string of diodes to get around 1.5 volts for the detector. Now, for an analysis of a couple of current commercial kit designs. Where I live in rural "Slower Lower" Delaware, it is hard to get electronic parts other than at the local Radio Shack, unless I do a lot of mail ordering. As a consequence, getting back into radio after a 30+ year hiatus, I opted to go the kit route for my initial efforts in regenerative receivers. There are a couple of clear advantages to kits -- all the parts were there, and the design was liable to work the first time round. Any modifications on my part could be done with ease, either during construction, or later, as I might choose. For my first regenerative receiver kit, I chose the Ten-tec 1253. As I mentioned, the band switching scheme is quite clever -- it uses a series of inductors switched by PIN diodes and a counter. It also has nine bands. This is mostly due to the rather limited tuning range with the varactor diode, but nine bands is pretty cool. It covers from the low end of the 160 meter band up through 13 meters with a few unimportant gaps. The upper frequencies are a bit problematical, but this is typical of both vacuum tube and solid state regenerative receivers. If you want to go to higher frequencies, and use a regenerative detector, then the Regenodyne approach is a good bet. http://www.antentop.org/ Page 69
  • 72. ANTENTOP- 01- 2010, # 012 Some Thoughts on Regenerative Receivers Ten-Tec 1253 Credit Line: RigReference.com Paraset Note from Credit Line: The PARASET is a small British "Spy set" transceiver supplied during the WW2 to the Resistence forces mainly in France, Belgium and Netherland. It uses 3 metal tubes : 1) 6SK7 - Detector 2) 6SK7 - AF Amplifier 3) 6V6 - Cristall Oscillator/P.Amplifier The range covered from the receiver is 3.2 - 8 MHz on AM and CW modes. The transmitter is cristall controlled and works on the same receiver range. The power output is around 5-7 W on CW mode only. The set were supplied by a 6 Vdc vibrator type PSU. Credit Line: http://www.qsl.net/ik0moz/paraset_eng.htm http://www.antentop.org/ Page 70
  • 73. ANTENTOP- 01- 2010, # 012 Some Thoughts on Regenerative Receivers Fine tuning on the Ten-Tec 1253 is done with an additional voltage control on the tuning varactor. This is a quite satisfactory solution, in my opinion. You just have to remember to return the fine tuning control to the center position before you move up or down the band when scanning for additional stations. The only clear problems that I experienced with the Ten-tec 1253 were: • Lack of a shielded antenna connection - I added an SO-259 connector to replace the binding post. A random length wire can be attached through a banana plug. • Ugly tuning knob - a trip to Radio Shack fixed this. • I added the "enhanced sensitivity option." I might want to re-think this. With it, the regeneration setting is somewhat "twitchy." • Calibration required borrowing a signal generator from a friend. I have to consult a chart for the band coverage. I simply stuck a chart with the tuning ranges to the top of the receiver. The second regenerative receiver kit I built was the MFJ-8100. They take a slightly different tack in the design. They use a series of inductors with a simple multi-position switch to tap into the inductor string for band switching. They, as do Ten-tec, use simple ferrite miniature inductors, except for one that is a toroid that you have to wind. All the inductors in the Ten-tec 1254 design are miniature ferrite inductors. MJF-8100 uses a nice variable capacitor with a vernier reduction drive for tuning. This "feels" better than the potentiometer used in the Ten-tec 1253. The tuning is a little "fast" on the upper bands, but acceptable. I admit to being a tradtionalist on the issue of real variable capacitors. I am not sure God intended us to tune circuits with varactors. The MFJ-8100 has five bands to cover most of the same range as the Ten-tec 1253, but this is due to using a variable capacitor instead of a varactor. • Again, lack of a shielded antenna connection. I added an SO-259 connector on the back panel. I did retain the supplied binding post for the antenna, however. • Lack of external power supply connection. A power jack from Radio Shack and a SPDT toggle switch took care of this. I can use an external 9 volt battery. There are eight screws to remove to get the case apart to change the battery, so an external battery is handy. • Exact calibration can effectively be done at one point. I zero beat to WWV at 15 MHz. At worst, dial seems to be off by +/- 200 kHz at the lowest or highest tunable frequencies. I made a couple of dots with a marker for CW portions of the 40 and 20 meter bands for CW QRP monitoring. • Headphone only operation. A small external speaker/amplifier from Radio Shack took care of this. I might add a more robust internal AF amplifier, as there is plenty of room in the case. A small speaker could be fitted as well. A project for the future... MFJ- 8100 Credit Line: http://www.radiomuseum.org/r/mfj_mfj_8100.html http://www.antentop.org/ Page 101
  • 74. ANTENTOP- 01- 2010, # 012 Some Thoughts on Regenerative Receivers • The RF gain control is internal. At some point, I might put a 10K Ohm potentiometer on the back panel to replace the internal control, which is accessed through a small hole with a screwdriver. However, I find that with either the Ten-tec 1253 and MFJ-8100 that I rarely have to adjust the RF gain control unless I have a very strong station. • I found it useful to "tie" the toroid down to the circuit board after final adjustment with a dab of hot glue from a glue gun. Very handy stuff. Both receivers are sufficiently stable for CW and SSB reception. The Ten-tec 1253 seems to show a small amount of warm up drift. I have no idea why this should be. It goes away in about 10 minutes. The best bet seems to be to run it from an external power supply and leave it running all evening. I have found that external battery operation (12 volt gel cell for Ten-tec 1253 and 9 volt battery for MFJ- 8100) is the best bet. The usual "wall wart" or converted PC power supplies generate too much hash at HF for good clean reception. Both receivers benefit from the use of an antenna tuner to optimize the matching between the antenna and the receiver input impedance. For further reading and study, Google is your friend. A very good discussion of regenerative receivers can be found in the paper by Ramon Vargas at http://cidtel.inictel.gob.pe/cidtel/contenido/Pu blicaciones.php?autor=rvargas The seminal article by Charles Kitchen is to be found in the November/December 1998 QST. He has an extensive discussion, and shows both photos and schematics of an excellent complete solid-state regenerative receiver. Also, some very nice material on direct conversion and Wheatstone bridge regenerative receivers can be found at: http://mjrainey.googlepages.com/radio A good source of early books on vacuum tube receivers and the like can be found at : http://www.pmillett.com/tecnical_books_online.ht m I'd like especially thank Rob Grasing for some suggestions on modifications to the Ten-tec 1253 and the source for some of the links that I have suggested, as well as on-going discussion during the development and writing of this paper. It is always good to have a "second set" of eyes during a writing project. I look forward to hearing from other members of the group for their insights on a always fascinating topic. 73 /paul w. ross W3FIS Russian Military/Spy/Partisan 3- tubes Transceiver “Sever.” Regenerative RX + Xtall TX. Produced: 1940- 1945 Band: RX/TX: 3.62-12.25/3.62-6.25 Credit Line: http://www.cqham.ru/trx/sever.html http://www.antentop.org/ Page 102
  • 75. ANTENTOP- 01- 2010, # 012 Simple Short Wave Receiver V. Egorov, UA3AB Credit Line: Radio # 3, 1950, p.p.: 37- 40 Note from va3znw: It was the first tube regenerative receiver that I have made by myself. At the far times I was a thirteen years old boy that fall into radio and certainly into amateur radio. I already made a transistors’ then tubes’ HF converter for my old tube receiver “Muromets.” So, I could hear amateur stations. However, one friend of mine, old ham (he was at the times in his forties) told me about my converters:- “Good job! But.. what I would like to say… all the stuff (converter and receiver) you may change for one tube receiver. It would get the same reception.” Another day he gave me an old soviet magazine “Radio” with the schematic. When the receiver was made and tuned, I discovered that the one- tube receiver really worked almost similar to converter with “Muromets.” Later I made several tens such receivers for 16- 13- meters but for receiving “Voice of America” and “Radio Liberty.” The stations were jammed in the USSR, but there were not jammed at the 16- 13 meters because the bands were not at the receivers produced in the USSR. I ever recorded some music from the stations. At the 70s the stations sounded at 6- 13- meters band similar to FM stations. Front Cover Radio # 3, 1950 After that first regenerative receiver I made lots different regenerative receivers, both transistor and tube. I made lots superheterodyne and DC receivers. But I still remember that old Radio with shabby cover with rosin on the pages, with some strange pencil- notes on the pages border, and that one tube receiver that by some miracle worked like a big superheterodyne … and that exiting feeling while tuning the capacitor’s knob… 6N8S (6H8C in Russian) Title of the Article http://www.antentop.org/ Page 71
  • 76. ANTENTOP- 01- 2010, # 012 Simple Short Wave Receiver Schematic It is a regenerative receiver assembled on a double triode tube. One triode is a regenerative stage another is an audio stage. Figure 1 shows schematic of the receiver. For pictorial view some parts are shown in drawn view. L1C2 is input circuit. Antenna is connected through a small capacitor C1. High- Ohmic headphones is directly connected to plate circuit of the triode. Figure 1 Simple Regenerative Receiver Parts and Design Inductors of the receiver are wound on the tube base of old tube UO- 186 or V0- 188. Note of va3znw: At the time (70s) my friend gave me some old defective tubes UO- 186. I used the tube base for inductors for my receiver. Today, in Russia, good UO- 186 tube made in 40- 50s may cost (for audio- fans) almost 100 USD. Inductor for the 40- meter has 19 coils. It is wound “turn to turn” by wire in diameter of 0.8- mm (20- AWG), tap made from 7s coil from the cold end. Ends and tap of the inductor are soldered to the pins in the tube base. . Inductor for the 20- meter has 9 coils. It is wound by wire in diameter of 1.0- mm (18- AWG), tap made from 3d coil from the cold end. Between wires is wound a thick tread to provide gap in 0.3- 0.4- mm. Ends and tap of the inductor are soldered to the pins in the tube base. The Plug- In inductor for needed band is plugged to socket installed on the receiver chassis. Figure 2 shows the regenerative receiver and plug- in inductor. Figure 3 shows the plug- in inductor at the receiver chassis. UO- 186 http://www.antentop.org/ Page 72
  • 77. ANTENTOP- 01- 2010, # 012 Simple Short Wave Receiver Figure 2 Regenerative Receiver and Plug- In Inductor Figure 3 Plug- In Inductor at the Receiver Chassis. Capacitor C1 is very important part for good job of the regenerative receiver. Best choice is to use a variable capacitor up to 5- 10-pF. However at this receiver a home- made capacitor is used. It is done in very simple way. Insulated wire in 0.3- 0.5- mm (24- 29-AWG) (one capacitor plate) is coiled (possible with one turn of thin paper) above wire in 1.5- mm (15-AWG) (another capacitor plate) on the length 8- 10-mm. Capacity of the capacitor could be changed by winding/unwinding thin wire. Resistor R2 may have resistance from 2-kOhm to 15- kOhm. Important thing- it should be quality made. Resistor R1 may have resistance from 1- mega-Ohm to 2- mega-Ohm. Resistor R3 may have resistance from 1- kOhm to 1.5- kOhm. Resistor R4 may have resistance from 100- kOhm to 500- kOhm. Capacitor C3 may have capacitance from 200- 1000- pF. http://www.antentop.org/ Page 73
  • 78. ANTENTOP- 01- 2010, # 012 Simple Short Wave Receiver Figure 4 Montage of the regenerative receiver Capacitor C4 may have capacitance from 50- 100- pF. Capacitors C5 and C7 may have capacitance from 0/05- 0.2- microF. Capacitor C6 may have capacitance from 500- 1000- pF. Almost any double triode should be used in the receiver. Figure 4 shows montage of the receiver. It made by insulated wire in 1.5- mm (15- AWG) diameter. Power Supply The receiver needs for plate any high voltage in range 100- 200-V DC. Receiver consumes 5- 10- mA at plate circuit. For tube heater the receiver needs 6.3- V AC. Figure 5 shows power supply for the receiver. However it is possible to use any power supply that can be provide above mentioned parameters. Adjustment The first it needs to check generation at the all working bands. For the checking receiver turn on without antenna and with help of R2 the receiver is turned on to generation mode. At the generation mode you may hear whilst in the head- phones. If you will turn slowly the dial of the C2 you may hear (in generation mode, without antenna) strong (in the area) signals of CW stations. Then turn on antenna to the receiver (that is stayed in generation mode). The antenna should not break the generation. If the generation is broken it needs to decrease capacity of the C1. If it is not help or help a little- try to change tap from the L1. After optimum C1 and optimum tap is found it is possible to calibrate the receiver. For this you may use or special RF- Generator or another receiver (to receive generation of the regenerative receiver). Figure 5 Power Supply for the Regenerative Receiver http://www.antentop.org/ Page 74
  • 79. ANTENTOP- 01- 2010, # 012 A Multi Band Tube 10 w QSK Transceiver Igor Grigorov, UZ3ZK Credit Line: SPRAT – № 74. – 1993. – Spring. – Р. 8-9. In the SPRAT # 67 (SPRAT is the journal of the G- QRP- Club) was published a circuit of a tube DC receiver. I made this G0ILL receiver and enjoyed of it perfect reception. Later I modified the receiver to transceiver. It was tried several versions of the transceiver. The final one was made on a PCB- board 200 x 240- mm with plug- in inductors in old tube sockets. So, the transceiver was tested on all amateurs HF- Bands. The frequency stability was not good enough at 24 and 28- MHz but was good on the lower bands. Figure 1 shows the schematic of the tube DC transceiver. Circuit Details: RX RF Amplifier made on V1. V4 is mixer. Audio Amplifier made on V7. Audio amplification is adjusted by R16. RF amplification is adjusted by R5. VFO and Doubler made on V2. Circuit L3C3C2 is tuned on frequency twice below the used. Circuit L6C7 is tuned on main frequency. V5 is driver, V6 is PA. Transceiver works at QSK mode, i.e. to turn the transceiver for TX just press key. Cathodes of the driver and PA are grounded, RL1 grounded RX antenna. Table 1 International Alternatives for Russian tubes (thanks to G3FCK) http://www.antentop.org/ Page 75
  • 80. ANTENTOP- 01- 2010, # 012 A Multi Band Tube 10 w QSK Transceiver Figure 1 Tube DC transceiver http://www.antentop.org/ Page 76
  • 81. ANTENTOP- 01- 2010, # 012 A Multi Band Tube 10 w QSK Transceiver Tuning and Adjustment Transceiver made from right parts should work straight away. You need only to tune (by GDO or RF- Voltmeter) the plug-in inductors for the needed frequencies. At self-exciting of the RF-Amplifier at the any band vary the value of the R4 that is installed at plug- in inductor. C24 can adjust amplification of the audio amplifier. The audio amplifier works well only with high- ohmic headphones. The transceiver has no special circuit for frequency shift at RX/TX mode. The shift occurs automatically because of a difference in parameters “cold” and “hot” V5. In my case the shift was near 300- Hz at 160 and 80- meters and more the 1000 Hz at 10- meters. You may install the shift by playing with C7, C14 and C16. *Note from I.G.: At the old times, when the transceiver was made (80- 90s) I had a box with headphones. There were old headphones (from 1941- to 1980) from receivers and phone systems. The headphones were made in different countries- Russia, German, Britain and Poland and may be in some others. I tested the phones at first with a simple crystal (diode) receivers then with DC- receivers and choose most sensitivity ones. With such phones I could receive very weak stations that at less sensitivity headphones were not unheard. If you have box with high- ohmic head phones (or several samples anyway) try to find mostly sensitivity ones from them. Table 2 Data for Inductors Band, MHz 1,8 3,5 7 10 14 18 21 24 28 Note - - 28 18 15 15 15 14 11 1L3 * 120/30 70/20 - - - - - - - 2 C3 1000 800 600 600 500 400 300 300 200 pF - - 25 19 15 14 11 10 10 1L2 L5 L6 L7 * 120/20 60/20 - - - - - - - 2 C4, C7 C9, C16 200 200 180 150 120 100 100 91 62 pF L8 * 53/45 27/45 14/40 10/45 8/45 7/45 7/45 6/45 6/45 ** C31 150 150 120 120 100 100 80 50 30 pF C32 2000 2000 1500 1200 1000 600 600 500 300 pF C26 1500 1000 1000 1000 470 470 390 300 300 pF Note 1. Inductors made on Russian resistors MLT-2 (value more the 100- kOhm), winding on all the length. Figure 2 shows the resistor. Note 2. Inductors made on Russian resistors WS- 2 (value more the 100- kOhm), winding on all the length. Figure 3 shows the resistor. * First column- numbers of turns, second – length in mm ** Diameter L8- 34- mm L1 (numbers of coil near 30% from L2) is wound above L2. L4 (numbers of coil near 30% from L5) is wound above L5. http://www.antentop.org/ Page 77
  • 82. ANTENTOP- 01- 2010, # 012 A Multi Band Tube 10 w QSK Transceiver Parts At the transceiver I used Russian tubes. Table 1 shows their international alternatives (thanks to G3FCK) Table 2 shows data for inductors. Values of capacitors C31 and C32 are real for specific impedance of your antenna. If you would like use several antennas with different impedances you need use plug- in inductor (L8C26C31C32) for each antenna (or use variable C31 and C32). Design Transceiver was made on a chassis with dimensions 200 x 240 x 40- mm made from two- sided copper plate PCB. Pattern of the parts at the chassis the same as the pattern at the Figure 1. Plug- in inductors was made on the base from old octal tubes. Figure 4 shows the design. It is possible to add some modifications to the transceiver- milliampermeter for metering plate current at the V6 and install variable capacitors instead fixed C31 and C32. Dimensions of the transceiver would be increased but operation in the Air improved. Beware: Turn off high voltage when change the plug- in inductors! Figure 2 Russian Resistor MLT- 2 Figure 3 Russian Resistor WS- 2 Figure 4 Design of the Plug- In Inductors http://www.antentop.org/ Page 78
  • 83. ANTENTOP- 01- 2010, # 012 A 10- meter Band CW Transceiver Vladimir Polyakov, RA3AAE It is a variant of a simple DC transceiver. Transistor of PA works like a mixer in receiving mode. So, there is no any commutation in the RF circuits. The transceiver has output power 0.35- Wtts, shift TX/RX- 400-Hz, RX sensitivity 2 microV. Power voltage is 15-V, current at RX/TX – 30/120-mA. Figure 1 shows schematic of the transceiver. VFO is made on V2. C6C7L4C8C9C10 is tuned on 14-MHz. L3C4 is tuned on 28- MHz. When key (connected to X2) is “down” (TX- mode) relay K1 provides plus 15- V onto transistor V1. At RX mode the transistor works like a mixer. Audio signal (at RX-mode) goes through filter C3L5C11 (3- kHz cutoff frequency) onto audio amplifier made on V4,V5,V6 (amplification factor more the 10000). High-Ohmic headphones (3- 4-kOhm at DC, old military ones) are used with the amplifier. The phones are connected to X3. Low Ohmic phones does not work good with the amplifier. Inductor L4 has 18 turns of wire in 0.6-mm (23-AWG) diameter, winding length is 12- mm, coiled on a form of 8- mm diameter. L3 has 9 turns of wire in 0.25- mm (30- AWG) diameter, coiled on a ferrite ring 10 –mm OD x 5- mm ID x- 10- mm- H with permeability 50, tap made from 6-turn from “cold” end. L2 has 3 turns of wire in 0.25- mm (30- AWG) diameter, coiled above L3. Inductor L1 has 10 turns of wire in 0.6-mm (23-AWG) diameter, winding length is 14- mm, coiled on a form of 10-mm diameter, tap made from 3-turn from “cold” end. L5 has inductance 0.15- H. It is possible to use collector’s coil from an output transformer from any transistor radio. Credit Line: V. Polyakov. Transivery pryamogo preobrazovania, Moscow, DOSAAF, 1984 (DC- Tranceivers, Moscow, P.H.: DOSAAF, 1984) Figure 1 A 10- meter Band CW Transceiver http://www.antentop.org/ Page 79
  • 84. ANTENTOP- 01- 2010, # 012 An 80 m CW Valve Transceiver Igor Grigorov, RK3ZK Credit Line: SPRAT # 82. 1995.pp. 22-23 It is possible to build this transceiver in one evening using surplus parts. It has a sensitivity of near 5- microV and output power on 3.5- 3.6- MHz near 1- Wtts. The RX/TX changes the function of V3, the Mixer and Power Amplifier. L3 provides tuning in the transmit and receive modes. I used an old cabinet from a valve broadcast receiver, also using its power supply and audio transformer. If L1, L2, and L3 are tuned for the band, the transceiver should work straight away. Parts: RL1 and RL2: Old Telephone (60- V) Relays TR1: Audio Transformer from old broadcast receiver L1: 40 turns 0.5mm wire on 20-mmformer, winding length 20mm L2: 20 turns 0.7mm wire on 20mm former, winding length 20mm L1 and L2 were wound on old plastic shotgun cartridges L3: 17 turns 1mm wire on 50mm former, winding length 50mm L3 was wound on a glass RFC1: 400 turns 0.2mm wire on an old plastic pencil 8mm diameter http://www.antentop.org/ Page 80
  • 85. ANTENTOP- 01- 2010, # 012 Practical Photos for P.A. on Tube GU-43B Nikolay Kisel, UA3AIC, Moscow mailto: ua3aic@mail.ru Photo # 1. The photo shows circuits for first (right) and second (left) grids. It is possible to see (under tube socket red resistor- 56- Ohms, anti- self- excitation. Value may be increased to 100- Ohm at some cases. Choke for heater circuit is wound on a ferrite ring (permeability does not matter). Wire for each heater terminal is placed on the one half of the ring. Photo #2. Circuit of the second grid is shown on the photo. At “hot” end: Red capacitors – 0.01-microF- 4 pcs, Blue capacitor – 6800- pF- 1-pcs, Red resistors 56- kOhm -2-Wtts (to eliminate dynatron effect at the second grid). Thereof it is Choke (yellow one) and resistor 100- Ohm- 5-Wtts for limiting current of the second grid. Between the choke and resistor there are capacitors 1.0- microF, and some mica capacitors for shortening RF. Photo # 1 Photo #2 http://www.antentop.org/ Page 81
  • 86. ANTENTOP- 01- 2010, # 012 Practical Photos for P.A. on Tube GU-43B Photo # 3 Photo # 3. Plate Choke is at the front. I made my Plate Choke from high- Ohmic (manganin) wire in silk insulation. The Choke was wound 2x 0.33- manganin wire. It has R= 18.3- Ohm , L= 34.5- microH. Two capacitors 3300- pF x 3300- V are installed at “cold” end of the choke. Near the tube socket is Red capacitor 0.01-microF. Input RF is going through the capacitor. Photo #4. Here is shown assembled RF- Part of the PA. Front Panel is attached to the bottom by L- parts. Bottom and Front Panel are aluminum plate in 4- mm thick. Fan here is only for the time tuning of the PA. At the ready design the fan is at rear panel. The fan is blown inside the box. Photo #4 http://www.antentop.org/ Page 82
  • 87. ANTENTOP- 01- 2010, # 012 Practical Photos for P.A. on Tube GU-43B Photo # 5 Photo # 5. Here is shown tube socket. Grids ring are used from original socket. Cathode and heater is made by myself. I made it from phosphor bronze in 0.35- mm thick. Photo # 6. Tube Inductor wound from copper wire in diameter 3.6- mm (7 AWG). It was used main electric wire (plastic insulation was removed). One inductor has diameter 45- mm another one 32- mm. Box- it is capacitor at antenna terminal. It was used old German Capacitor 3x 495- pF. Green resistor is antistatic resistor 30- kOhm x 2-Wtts that is connected to bridge to antenna. White wire is high- voltage wire to the RF- Choke. Photo # 6 http://www.antentop.org/ Page 83
  • 88. ANTENTOP- 01- 2010, # 012 Practical Photos for P.A. on Tube GU-43B Photo # 7 Photo # 7. Here is shown Electric Power Part of the PA. PCB plate with rectifiers bridges for 2500- V, 300- V, 30- V and 100- V is attached at the main transformer. At the right lower corner you can see antenna- switching PCB. Two green terminals are intended for fan. Photo # 8. Take attention to the gang switch. It is insulated from the metal case. It is stay on a textolite plate. Screw that came through front panel are in Teflon insulation. Plate variable capacitor is an old military capacitor from Russian transmitter RSB. Black wire at the lower right corner is coaxial cable for input RF. At the tube place its braid is not grounded. Coaxial cable braid is grounded only at switching relay. Photo # 8 http://www.antentop.org/ Page 84
  • 89. ANTENTOP- 01- 2010, # 012 Practical Photos for P.A. on Tube GU-43B Photo # 9 Photo # 9. Here is PCB for PA. It is possible to use A PCB of any reasonable sizes. Dot in the center is place for heater’s tube. Four Dashes are places for soldering of the cathode tube. Three dots round the dashes are for holes for holders for screen greed. The holes should be insulated from the ground. Photo # 10. Heater’s tube and Cathode’s tube are already soldered at their places. There were soldered with help of a small Gas Burner HT- 950 (it is shown at the left upper corner). Photo # 10 http://www.antentop.org/ Page 85
  • 90. ANTENTOP- 01- 2010, # 012 Practical Photos for P.A. on Tube GU-43B Photo # 11 Photo # 11. Process is going. Photo # 12. Process is going. Here is at right lower side is shown Interface Panel. Small RF- Socket- RF input, large RF – Socket is for RF output. PCA Socket is intended for pedal or another external control of the PA. Near it is a main fuse. Two Green terminals are for fan. 73!, UA3AIC Credit Line: http://www.qsl.net/ua3aic/gu43b.html Photo # 12 http://www.antentop.org/ Page 86
  • 91. ANTENTOP- 01- 2010, # 012 Linear Power Amplifier on G811 S. Bunin, L. Yailenko Credit Line: Spravochnic Radiolyubitelya Korotkovolnovika, - 2 Izdanie, Kiev : Tehnika, 1984. (“Reference for Ham”) The PA is designed for ham bands 160- 10- meters. It provides 200 Wtts CW/ 500 Wtts PEP SSB. Efficiency of the PA is 65- 70% in depend on used rband. Figure 1 shows the schematic of the PA. Four tubes G811 (switched in bridge, grounded grid) are used in the PA. Four tubes may dissipative 160- Watts on their plates, so, the PA can work continuously with 200- Wtts output. Input resistance of the PA is closed to 75- Ohm at 160- 10- meters. RX: Tubes are closed by minus 27-V that is coming by relay K1. Contacts of the relay switch antenna to X3- Receiver Input. TX: Grids of the tubes are connected to the ground by pedal S1, antenna through contacts of Relay K1 goes to PA output. Transformer T1 provides 2x6.5-V at 8- A. It should stand 110- Wtts. Inductors L1, L2, L3, L4 are wound on Russian Resistors MLT- 2 (for sizes see: http://www.antentop.org/009/tst009.htm). Each inductor contains 5 turns and coiled by wire in dia 0.62- mm (22- AWG). Plate choke L6 is wound on porcelain form in dia 20- 25- mm and 150-mm length. It contains 150 turns, 50 turns at plate side is wound with gap 0.5- mm. Was used wire in dia 0.35- mm (27- AWG) in silk insulation. Chokes L7 and L8 is commercial made from old military equipment. May be used any suitable chokes. Figure 1 Schematic of the Four- G811 PA http://www.antentop.org/ Page 87
  • 92. ANTENTOP- 01- 2010, # 012 Linear Power Amplifier on G811 Capacitor C12 should have plate gap not less the 1.2- mm. Capacitor C13 should have plate gap not less the 0.3- mm. Variometer L5 is from old military TX. For right tuning C12 should have 250- pF at 80- meters, 120- pF at 40- meters, 50- pF at 20- meters, close to minimum at 15- meters and minimum at 10- meters. Montage of the PA is usual for such equipment. Grid wires should be screened from Plate wires. Wires with RF should be short and straight. As rule, PA made correctly from good parts works straight away. At self-excitation it needs to decrease value for R1- R4 in1.5- 2 times. It needs input power near 25- Wtts for plate current 400- mA. PA is assembled in metal box h- 200-mm x w-400- mm x d- 300- mm. A small fan is installed inside for cooling of the tubes. Spravochnic Radiolyubitelya Korotkovolnovika http://www.antentop.org/ Page 88
  • 93. ANTENTOP- 01- 2010, # 012 Ground and/or feedline independent resonant Ground and/or feedline independent resonant feed device for coupling antennas and the likes www.antentop.org Page-89
  • 94. ANTENTOP- 01- 2010, # 012 Ground and/or feedline independent resonant www.antentop.org Page-90
  • 95. ANTENTOP- 01- 2010, # 012 Ground and/or feedline independent resonant www.antentop.org Page-91
  • 96. ANTENTOP- 01- 2010, # 012 Ground and/or feedline independent resonant www.antentop.org Page-92
  • 97. ANTENTOP- 01- 2010, # 012 Ground and/or feedline independent resonant www.antentop.org Page-93
  • 98. ANTENTOP- 01- 2010, # 012 Ground and/or feedline independent resonant www.antentop.org Page-94
  • 99. ANTENTOP- 01- 2010, # 012 Ground and/or feedline independent resonant www.antentop.org Page-95
  • 100. ANTENTOP- 01- 2010, # 012 Ground and/or feedline independent resonant www.antentop.org Page-96
  • 101. ANTENTOP- 01- 2010, # 012 Ground and/or feedline independent resonant www.antentop.org Page-97
  • 102. ANTENTOP- 01- 2010, # 012 Ground and/or feedline independent resonant www.antentop.org Page-98
  • 103. ANTENTOP- 01- 2010, # 012 Ground and/or feedline independent resonant www.antentop.org Page-99
  • 104. ANTENTOP- 01- 2010, # 012 Ground and/or feedline independent resonant www.antentop.org Page-100
  • 105. ANTENTOP- 01- 2010, # 012 ANTENTOP is FREE e- magazine, made in PDF, devoted to antennas and amateur radio. Everyone may share his experience with others hams on the pages. Your opinions and articles are published without any changes, as I know, every your word has the mean. A little note, I am not a native English, so, of course, there are some sentence and grammatical mistakes there… Please, be indulgent! Publishing: If you have something for share with your friends, and if you want to do it FREE, just send me an email. Also, if you want to offer for publishing any stuff from your website, you are welcome! Copyright: Here, at ANTENTOP, we just follow traditions of FREE flow of information in our great radio hobby around the world. A whole issue of ANTENTOP may be photocopied, printed, pasted onto websites. We don't want to control this process. It comes from all of us, and thus it belongs to all of us. This doesn't mean that there are no copyrights. There is! Any work is copyrighted by the author. All rights to a particular work are reserved by the author. Copyright Note: Dear friends, please, note, I respect Copyright. Always, when I want to use some stuff for ANTENTOP, I ask owners about it. But… sometimes my efforts are failed. I have some very interesting stuff from closed websites, but I can not go to touch with their owners… as well as I have no response on some my emails from some owners. I do not know, why the owners do not response me. Are they still alive? Do their companys are a bankrupt? Or do they move anywhere? Where they are in the end? I have a big collection of pictures, I have got the pictures in others way, from FREE websites, from commercial CDs, intended for FREE using, and so on... I use to the pictures (and seldom, some stuff from closed websites) in ANTENTOP. If the owners still are alive and have the right, please, contact with me, I immediately remove any Copyright stuff, or, necessary references will be made there. Business Advertising: ANTENTOP is not a commercial magazine. Authors and I (Igor Grigorov, the editor of the magazine) do not receive any profit from the issue. But off course, I do not mention from commercial ads in ANTENTOP. It allows me to do the magazine in most great way, allows to pay some money for authors to compensate their hard work. I have lots interesting stuff in Russian, and owners of the stuff agree to publish the stuff in ANTENTOP… but I have no enough time to translate the interesting stuff in English, however I may pay money to translators, and they will do this work, and we will see lots interesting articles there. So, if you want to put a commercial advertisement in ANTENTOP, please contact with me. A commercial advertisement will do ANTENTOP even greater interesting and various! I hope, readers do not mention against such commercial ads. And, of course, tradition approach to ANY stuff of the magazine: BEWARE: All the information you find at AntenTop website and any hard (printed) copy of the AnTentop Publications are only for educational and/or private use! I and/or authors of the AntenTop e- magazine are not responsible for everything including disasters/deaths coming from the usage of the data/info given at AntenTop website/hard (printed) copy of the magazine. You use all these information of your own risk.