SlideShare a Scribd company logo
1 of 104
Download to read offline
ANTENTOP 01 2008 # 010
ANTENTOP is FREE e-magazine devoted to ANTENna’s
Theory,
1-2008 Operation, and
Practice
Edited by hams for hams
In the Issue:
Antennas Theory!
Practical design of HF-VHF-
Antennas!
Home brew Technique!
P.A.!
QRP!
And More….
UA6HJQ Antenna
Thanks to our authors:
Prof. Natalia K.Nikolova
N. Filenko, UA9XBI
Boris Popov (UN7CI)
Valentin, RZ3DK
Igor Lavroushov UA6HJQ
Aleksandr, RZ3AIX
V. Polyakov, RA3AAE
N. Kisel, UA3AIC G4AYO
Yaroslav Zhukov, UA1TAT
And others…..
Micro Key UA6HJQ EDITORIAL:
Well, my friends, new ANTENTOP – 01 -
2008 come in! ANTENTOP is just
authors’ opinions in the world of amateur
radio. I do not correct and re-edit yours
articles, the articles are printed “as are”.
A little note, I am not a native English, so,
of course, there are some sentence and
grammatical mistakes there… Please, be
indulgent!
ANTENTOP 01 –2008 contains antenna
articles, QRO and QRP articles,
technical topics. Hope, it will be
interesting for you.
Our pages are opened for all amateurs,
so, you are welcome always, both as a
reader as a writer.
Copyright: Here at ANTENTOP we
just wanted to follow traditions of FREE
flow of information in our great radio
hobby around the world. A whole
issue of ANTENTOP may be
photocopied, printed, pasted onto
websites. We don't want to control this
process. It comes from all of us, and
thus it belongs to all of us. This doesn't
mean that there are no copyrights.
There is! Any work is copyrighted by
the author. All rights to a particular work
are reserved by the author.
73! Igor Grigorov, VA3ZNW
ex: RK3ZK, UA3-117-386, UA3ZNW,
UA3ZNW/UA1N, UZ3ZK
op: UK3ZAM, UK5LAP,
EN1NWB, EN5QRP, EN100GM
Contact us: Just email me or
drop a letter.
Mailing address:
209- 5879 Bathurst Str., Toronto,
ON, M2R1Y7, CANADA
Or mail
to:igor.grigorov@gmail.com
NB: Please, use only plain text
and mark email subject as:
igor_ant. I receive lots spam, so,
I delete ALL unknown me
messages without reading.
ANTENTOP is FREE e-magazine, available FREE at http://www.antentop.org/
ANTENTOP- 01- 2008, # 010 Editorial
Welcome to ANTENTOP, FREE e - magazine!
ANTENTOP is FREE e- magazine, made in PDF,
devoted to antennas and amateur radio. Everyone
may share his experience with others hams on the
pages. Your opinions and articles are published
without any changes, as I know, every your word has
the mean.
Every issue of ANTENTOP is going to have 100
pages and this one will be paste in whole on the site.
Preview's files will be removed in this case. I do not
know what a term for one issue will need, may be 8-
10 month or so. A whole issue of ANTENTOP hold
nearly 10 MB.
A little note, I am not a native English, so, of course,
there are some sentence and grammatical mistakes
there… Please, be indulgent!
Preview: Some articles from "cooking" issue will be
pasted for preview on this site, others no. Because, as
I think, it must be something mysterious in every issue.
Publishing: If you have something for share with your
friends, and if you want to do it FREE, just send me an
email. Also, if you want to offer for publishing any stuff
from your website, you are welcome!
Your opinion is important for me, so,
contact if you want to say something!
Copyright Note:
Dear friends, please, note, I respect Copyright.
Always, when I want to use some stuff for
ANTENTOP, I ask owners about it. But… sometimes
my efforts are failed. I have some very interesting stuff
from closed websites, but I can not go to touch with
their owners… as well as I have no response on some
my emails from some owners.
I have a big collection of pictures, I have got the
pictures and stuff in others ways, from FREE
websites, from commercial CDs, intended for FREE
using, and so on... I use to the pictures (and seldom,
some stuff from closed websites) in ANTENTOP. If the
owners still are alive, please, contact with me, I
immediately remove any Copyright stuff, or, if it is
necessary, all needed references will be made there.
I do not know, why the owners do not response me. Are they still alive? Do their companies are a
bankrupt? Or do they move anywhere? Where they are in the end?
Business Advertising: ANTENTOP is not a
commercial magazine. Authors and I (Igor Grigorov,
the editor of the magazine) do not get any profit from
the issue. But off course, I do not mention from
commercial ads in ANTENTOP. It allows me to do the
magazine in most great way, allows me to pay some
money for authors to compensate their hard work. I
have lots interesting stuff in Russian, and owners of
the stuff agree to publish the stuff in ANTENTOP…
but I have no enough time to translate the interesting
stuff in English, however I may pay money to
translators,
and, they will do this work, and we will see lots
interesting articles there.
So, if you want to put a commercial advertisement in
ANTENTOP, please contact with me. A commercial
advertisement will do ANTENTOP even greater
interesting and various! I hope, readers do not mention
against such commercial ads.
Book Advertising: I do not think, that Book
Advertising is a commercial advertisement. So, Book
Advertising is FREE at ANTENTOP. Contact with me
for details.
Email: antentop@antentop.org subject: igor_ant NB: Please, use only plain text and mark email subject
as: igor_ant. I receive lots spam and viruses, so, I
delete ALL unknown me messages without reading.
73! Igor Grigorov, VA3ZNW
ex: UA3-117-386, UA3ZNW, UA3ZNW/UA1N, UZ3ZK, RK3ZK
op: UK3ZAM, UK5LAP,EN1NWB, EN5QRP, EN100GM
http://www.antentop.org/ Editorial
ANTENTOP- 01- 2008, # 010 Table of Contents
Table of Contents
Antenna Theory Page
1
Radiation from Infinitesimal (Elementary) Sources : By
Prof. Natalia K. Nikolova
Dear friends, I would like to give to you an interesting and reliable antenna
theory. Hours searching in the web gave me lots theoretical information about
antennas. Really, at first I did not know what information to chose for
ANTENTOP.
Now I want to present to you one more very interesting Lecture - it is a Lecture
Radiation from Infinitesimal (Elementary) Sources. I believe, you cannot find
such info anywhere for free! Very interesting and very useful info for every
ham, for every radio- engineer.
Radiation from an infinitesimal dipole. Duality in Maxwell’s equations.
Radiation from an infinitesimal loop. Radiation zones.
5- 21
Receiving Antennas
2
Atmospheric Current: Practical Experiments: By V. T. Polaykov,
RA3AAE, Ph. D in technical science
The Article describes some experimenters that prove the mysterious current
from the Broom Antenna
22- 25
HF- Antenna Practice
3
Expedition Two Element Antenna
for the 20-meter Band: By N. Filenko, UA9XBI
The antenna was designed for using at DX- peditions. Antenna consists of two
elements- mast in height 10 meters and in diameter 30-50-mm (it is reflector)
and a dipole for the 20-m (it is driver).
26- 28
4
Simple All- Band HF- Antenna: By Eugene Erohov (US4EM)
Dream of each of amateurs working from a hard for antenna installation
conditions to have a small invisible antenna for all bands. I have tried to solve
the dream. My all band antenna is something middle between T2FD and
loaded Loop.
29
5
Rectangular UB5UG: By Yuri Medinets, UB5UG, Kiev
Rectangular shown at Figure 1 has good parameters and not so sensitive to
height (that is very important for low amateurs HF-ranges) compare with
dipole. Upper horizon wire is broken by a nut insulator at it’s center. Due to a
small height the antenna is suitable for 80- and 40-meters Band.
30- 32
Page 1 http://www.antentop.org/
ANTENTOP- 01- 2008, # 010 Table of Contents
Table of Contents
Page
6
Delta Loop UN7CI for 7, 10, 14 and 21- MHz: By Boris Popov (UN7CI),
Petropavlovsk, Kazakhstan
The antenna was designed to work from a field conditions at amateur’s bands
7, 10, 14 and 21-MHz. The antenna has SWR less the 2.0:1.0 at height of the
lower side 1.2 meters above the ground. Antenna has good efficiency.
33- 34
7
Vertical UN7CI for 7, 14 and 21- MHz: By Boris Popov (UN7CI),
Petropavlovsk, Kazakhstan
The antenna was designed for amateur’s bands’ 7, 14 and 21-MHz. Antenna
fed throw 50-Ohm coax. The antenna has SWR less the 1.5:1.0 at any band.
Antenna has good efficiency and low angle of radiation at vertical plane (that is
good for DX-ing). Only one power relay is used to switch a working band.
35-36
8
Delta for 80 and 40- meters: By Valentin, RZ3DK
The Delta for 80 and 40 meters was designed for installation on the roof of a
building with help of a metal mast. Matching of the antenna at both bands is
possible with the help of the length of 75-Ohm Coaxial in 4.82-meters.
37- 41
VHF- Antenna Practice
9
Two Elements YAGI for 145 MHz: Balcony Project: By Aleksandr,
RZ3AIX
Well, why I did a Two- Elements YAGI? Why not Three, Four or more Elements
YAGI? Or, say, so popular 2-5/8 or 3-5/8 Vertical Collinear Antenna?
42- 44
10
Simple Weekend Antenna for 145-MHz: By Igor Lavroushov UA6HJQ
Yes, I need an antenna for 144-MHz. Not just antenna, but antenna that can work in
different conditions, from my home, from a car, from my mountain trip. Have been
tried different design I suddenly stopped to those one. It is two elements YAGI that
is very simple to design but has good characteristics.
46- 48
11
Fixture for Fast Assembling of VHF- Antennas: By Il’ya Yarushkin,
UA9UKO
The Fixture is intended for fast assembly and disassembly of VHF antennas. It is
very useful for experimenters with the antennas or assembling of portable VHF-
antennas.
49- 50
12
Water Pipe T-Joint at VHF Antennas: By N. Filenko, UA9XBI
By the way, I was (and may be am) not an experienced VHF- man before I decided
to do my VHF YAGI. I had serous doubt that I spoiled lots stuff while I made my
YAGI. So I found for solution how to do the antenna without turning in garbage my
antenna’s material.
51- 53
Page 2 http://www.antentop.org/
ANTENTOP- 01- 2007, # 009 Table of Contents
Table of Contents
Page
P.A.
13
Matching a Transceiver with PA on several GU50: By N. Filenko,
UA9XBI
Matching input of PA that contained several tubes GU50 with a transceiver is
not a simple matter as it seems at first look. Sometimes for simplicity of the
design PA the driver power from a transceiver going straight away to several
connected to bridge cathodes of the GU50.
….
45
14
2xGU50 and 3xGU50 PA from UA1TAT: By Yaroslav Zhukov, UA1TAT
Two simple schematic PA made on Russian popular tubes GU50. 54- 56
15
PA 3xGU50. Photos of the Design: By N. Kisel, UA3AIC,
Photos show how to do a simple PA 3xGU50. 57- 60
16
PA 2xGU50. Photos of the Design: By N. Kisel, UA3AIC,
Photos show how to do a simple PA 2xGU50.
61
17
PA 5xGU50. Photos of the Design: By N. Kisel, UA3AIC,
Photos show how to do a simple PA 5xGU50.
62
18
Simple Broadband P.A.: By Igor Grigorov, UA3ZNW
The P.A. is very simple. It is usual push- pull with some tricks which allows to
make the P.A. in easy style.
63- 68
19
Matching Circuit for Tube PA: By Sergey Lebedev, UA0UG
As usual, at a Vacuum Tube PA an output tube is matched with antenna with
help of a p-circuit. It is refer to use switching inductors or variometer. This
matching circuit can work from 3- 30-MHz without switching inductors. The
circuit is widely known among radio amateurs of 9-0 amateurs region of Russia.
69
Page 3 http://www.antentop.org/
ANTENTOP- 01- 2007, # 009 Table of Contents
Table of Contents
Free E-books Page
20
QRP Transceivers and PAs from Accessible Part.: By Igor Grigorov,
UA3ZNW
(*pdf), 38 pages.
Book in English "QRP Transceivers and PAs from Accessible Parts " (*pdf), 38
pages is a translation of Russian Book "QRP Transceivers and PAs from
Accessible Parts " (*pdf), 28 pages. Russian version was published by me (on
my own expenses) in 1991, in Belgorod, Russia. I had printed 2000 samples of
the book.
Of course, it was not best paper used for the book as well as not good quality of
printing. The book describes kits which my own company ("Vibrissa") produced
at the times. Naturally, the book was the manual for the kits. Were produced
400 kits of TST (Tube- Semi- conductor- Transceiver) near 50 of them were
assembled by me for customers, 200 kits SQT (Semi- conductor- Quartz-
Transceiver), near 30 were of them were assembled by me for customers, 200
kits of PA, near 60 were of them were assembled by me for customers. Of
course, the book will be interesting for all amateurs, not only for QRP- funs
70
21
CQ- QRP- 03
U- QRP- C was alive only 9 years, from 1986 to 1995. At the times the club
had managed lots deals. At first were united QRPers from all former USSR. It
was the base for recently QRP Clubs of the former USSR- for RU- QRP- C and
for UR- QRP-C. At second, a new amateur code “72” was accepted in the ham
World due to efforts of Oleg Borodin, former president of the U- QRP-C. At
third, 3 nice QRP- magazines were printed out. One of the magazines, CQ-
QRP # 3 is pasted to AntenTop Library. The magazine is in Russian, but the
schematics are international understandable.
71
22
CQ- QRP- 02
U- QRP- C was alive only 9 years, from 1986 to 1995. At the times the club
had managed lots deals. At first were united QRPers from all former USSR. It
was the base for recently QRP Clubs of the former USSR- for RU- QRP- C and
for UR- QRP-C. At second, a new amateur code “72” was accepted in the ham
World due to efforts of Oleg Borodin, former president of the U- QRP-C. At
third, 3 nice QRP- magazines was printed out. One of the magazines, CQ- QRP
# 2 is pasted to AntenTop Library. The magazine is in Russian, but the
schematics are international understandable.
72
23
Book "Radio Antenna Engineering" by Edmund A Laport,
Chief Engineer, RCA International Division, Radio Corporation of
America, Fellow, Institute of Radio Engineers 1952
--- Scanned and Prepared by Dave Platt AE6EO---
About the book comment by Dave Platt AE6EO: "Radio Antenna Engineering is
certainly of significant historical interest, and may be of practical use as well.
Although some of the designs and practices portrayed in it have been
supplanted in commercial service, much of its content can still be of significant
value to amateur-radio operators and to those interested in the practical
aspects of high-power radio operation in the lower-frequency RF bands..."
Just brief description, photos and schematic diagram.
73-75
Page 4 http://www.antentop.org/
ANTENTOP- 01- 2007, # 009 Table of Contents
Table of Contents
Keys
Page
24
CW Key That Never Have Been Smallest: By Igor Lavroushov UA6HJQ
This micro key newer will be heavy for any mountain radio-expedition. It is
possible to use the key as backup or ever as main key of the amateur radio.
This key may be used at tuning antennas with hand- control tuner (for example
like MFJ- 902). For example the key may be used for tuning ATAS- 25 with
YAESU FT8x7 (FT817, FT 857, FT897). Okey, go ahead to make it!
76- 77
25
Simple “PIC- KEY”: By Mike Kislinsky, RX9CBI
This simple “PIC- KEY” provides sending Morse Code in two modes. First,
that was written in the memory (four memory cluster), second, with hand
jambic manipulator.
78- 79
QRP Transceivers
26
Transceiver SQT: By Igor Grigorov, UA3ZNW
Transceiver SQT (Semiconductor Quartz Transceiver) firstly was described at
book "QRP Transceivers and PAs from Accessible Parts." The book (in
Russian) is at Antentop Free Library. The article is English translation of the
Russian one. Shortly about SQT:
DC CW Transceiver, X- tall VFO, VFO range up to 20 kHz (depenfs on used
crystal), 50-Ohms Antenna, head-phone RX with sensetivity near 1- micro-
Volt, Power Supply is 12-V, RF out is near 1-Wtts, any HF- amateur band or
2-3 amateur band (options, depends on used crystal), made on transistors.
80- 93
Useful Data
27
Logos of ex- USSR Electronics Factories
The table shows Logos of Electronics Factories used in ex-USSR. Some of
the Logos are used up to our days
94- 100
Page 4.1 http://www.antentop.org/
ANTENTOP- 01- 2008, # 010 Radiation from Infinitesimal (Elementary)
Sources
Feel Yourself a Student!
Dear friends, I would like to give to you an interesting and reliable antenna theory. Hours searching in the web
gave me lots theoretical information about antennas. Really, at first I did not know what information to chose for
ANTENTOP. Finally, I stopped on lectures “Modern Antennas in Wireless Telecommunications” written by Prof.
Natalia K. Nikolova from McMaster University, Hamilton, Canada.
You ask me: Why?
Well, I have read many textbooks on Antennas, both, as in Russian as in English. So, I have the possibility to
compare different textbook, and I think, that the lectures give knowledge in antenna field in great way. Here first
lecture “Introduction into Antenna Study” is here. Next issues of ANTENTOP will contain some other lectures.
So, feel yourself a student! Go to Antenna Studies!
I.G.
My Friends, the above placed Intro was given at ANTENTOP- 01- 2003 to Antennas Lectures.
Now I know, that the Lecture is one of popular topics of ANTENTOP. Every Antenna Lecture
was downloaded more than 1000 times!
Now I want to present to you one more very interesting Lecture - it is a Lecture Radiation from
Infinitesimal (Elementary) Sources. I believe, you cannot find such info anywhere for free! Very
interesting and very useful info for every ham, for every radio- engineer.
So, feel yourself a student! Go to Antenna Studies!
I.G.
McMaster University Hall Prof. Natalia K.
Nikolova
Radiation from Infinitesimal (Elementary) Sources
(Radiation from an infinitesimal dipole. Duality in Maxwell’s equations.
Radiation from an infinitesimal loop. Radiation zones.)
by Prof. Natalia K. Nikolova
www.antentop.org Page-5
ANTENTOP- 01- 2008, # 010 Atmospheric Current: Practical Experiments
V. T. Polaykov, RA3AAE, Ph. D in technical science
The Article describes some experimenters that prove
the mysterious current from the Broom Antenna Credit Line: http://qrp.ru/
The article is described my experiments to measure
“atmosphere current” (see Reference 1).At first I
tried to measure the current at field conditions. For
antenna mast I have used a telescopic plastic fishing
tackle in 7 meters long. Broom was made from
opened multistrand cable. Branches of the broom
had length in 10 centimeters. Grounding was made
from a steel rod in diameter of 4 millimeter and
length in 50 centimeters.
The experiment was made in a forest at a wide
glade. It was good calm weather. A thin wire is going
from the broom to the digital multimeter M830B,
another wire from the multimeter is going to the
ground. Multimeter was installed at scale “200 mV”.
At the scale the multimeter has input impedance 1
million Ohms, so, the maximum measurement
current is 200 nano A. However, the multimeter has
digits at scale that show 0.1-nano A.
V. T. Polaykov, RA3AAE
It was discovered no any current. A weak sensitivity
of the multimeter may be the reason. However,
another phenomenon was discovered. At swing of
the fishing rod (with broom) that is usual matter at
the experimenters, the multimeter shows current.
The current reached up to 10 nano A and changed
by amplitude and polarity.
I tried to count the current. The speed of a flow of
ions is equal to mobility of ions multiplied by intensity
of E- field. The mobility of negative ions (on
Chizhevsky ) under normal atmospheric conditions
is equal 1,83 centimeter /second, and intensity of an
atmospheric static field - about 1,3 V / centimeter.
So, speed of flow of ions V near 2,5
centimeter/second.
Density of flow of ions j = nVe. Concentration n of
ions at natural conditions is estimate equal near
1000 on cubic centimeter, charge of an ion е =
1,6.10-19 ql. So, ionic current near ground is near
about 4 pico A/square meter, that is not practically
matched with some data found by me in technical
reference- near 2,5 … 3,5 pico A/ square meter.
It is less of the sensitivity of the multimeter in 10-100 times.
At the same time we may assume, that grounded (through
the digital multimeter) antenna creates around of it’s end top
a volumetric charge with a zero potential relative to the
ground.
Moving fast (faster than ions can move) the broom antenna
end from one air area (that almost has potential of the
broom) to other air are (that has potential U near 1000 V
relative to the ground- 130 V (electrical gradient) multiply to
7.5 meters (height of the fishing rod)) is caused recharge
current i for the antenna. Let’s find the current.
I= dq/dt,
Where: q= CU.
Assume that antenna has C= 20 pF and time of antenna
moving- 1 second. So, antenna current would be 20 nano-
A, that the multimeter is shown to us.
Conclusion 1: Although I cannot measure the antenna
current at the field conditions the experiment prove the
electrization of the air around the antenna broom.
http://www.antentop.org/ Page 22
ANTENTOP- 01- 2008, # 010 Atmospheric Current: Practical Experiments
Other experiment I made in summer, in hot weather
(+28 C) at weak wind. Broom was made from a steel
wire rope. The rope contained 49 steel wires, I
untwisted the rope in length near 20 centimeter.
Figure 1 shows my “Broom- Rope Antenna.”
Figure 1 Broom- Rope Antenna from the
untwisted rope
Broom was fixed on the end of the 7-meter fishing
tackle, end of this one was fixed to a dry pine pole.
The mast of 12 meters length was fixed to the
bungalow, so the Broom Antenna was at 9 meters
over grounded metal roof. Figure 2 shows the
design.
A thin insulated wire was going from the Broom to
the “plus” of the multimeter, “minus” of the
multimeter was connected with the ground. A
capacitor 4-mkFx250-V having very low leaking was
connected to bridge to the multimeter probes. The
capacitor shunts RF and filters fast fluctuation of the
antenna current. Now the antenna current was
measured for sure. The current was +0.15 nano-A at
with some unexpectedly big fluctuations. Several
hours of measurement showed that max current was
several nano-A (Figure 3). Sometimes the current
changed the polarity, I observed minus 0.3 nano-A.
The antenna current fluctuations may be caused by
wind that moves air areas with different volumetric
charge around Broom Antenna.
Figure 2 Broom Antenna in the night sky
Conclusion 2: Current from the Broom to the antenna wire
is existed and prove the “quite” discharge from ends of
broom wires. The current is very unstable by amplitude and
may change polarity at clear weather. Ever simple digital
multimeter can measure the current.
There are no doubts that “quiet” discharge has an area with
a negative resistance. It is possible to find lots data about it
in the Internet. Figure 4 (taken from Reference 2) shows a
Volt/ Ampere diagram of such discharge. Almost the same
diagram you may find at Reference 3.
Take attention that at the left area there are nano-Ampere
current area. It is so-called “quite” or Townsend’s discharge.
At right area (arc discharge) there are current at several
Amperes. Both areas have parts with a negative resistance.
Nano-area begins from current near 100- nano- Ampere.
However the current depends on lots conditions…
My experimenters (made in 2000- 2001 years) proved that
discharge may began at relative low voltage and enough
large distance between electrodes (see Reference 4). I did
the experimenters at my table so I do not know how
discharge would be flow at a Broom Antenna. At the
experimenters I was observed relaxation oscillations. The
oscillations were detected by the help of oscilloscope. It may
be detected by ear like weak hissing. Townsend was
observed this phenomenon at 20- 30s of the 20- century.
http://www.antentop.org/ Page 23
ANTENTOP- 01- 2008, # 010 Atmospheric Current: Practical Experiments
Figure 3 One of the maximum of the Antenna Current
Figure 4 Volt/Ampere diagram of air discharge.
www.qrp.ru
http://www.antentop.org/ mirror: www.antentop.boom.ru Page 24
ANTENTOP- 01- 2008, # 010 Atmospheric Current: Practical Experiments
Recently I have repeated these experiments to find the
top frequency of the discharge generation. I switched on
in the circuit of a discharge needle, (also I have tried a
small broom made from thin wires) different LC- circuits.
It was easy to obtain generation at 1-MHz. But I
managed to get generation up to 5-MHz. However, I
believe it is possible to get generation above 5-MHz.
The Broom Antenna was tested with a detector receiver.
This receiver with a LW antenna (12- meters, 45° above
the ground) provided 1.5-V across a high-ohmic phones
(day time, broadcasting Russian radio station Mayak,
549 –kHz, the station was located at 28-km from my
Broom Antenna). Vertical Broom Antenna (that was
described above) provided 4.5-V across the high-ohmic
phones. I do not insist that it was caused by
“amplification” of the Broom Antenna, but… No any
fluctuations at receiving were detected with the Broom
Antenna.
To prove the efficiency of the Broom Antenna more
experimenters are needed to do. Very useful would be
experimenters with receiving very weak signals- nano
and pico- Watts in power. However it needs to use at the
experimenters receivers with high-resistance antenna
input because the Broom Antenna has extremely high
output resistance- may be Giga and ever Tera- Ohm.
Be Careful! Experimenters with high-ohmic
antennas that may do ionization of the air are
extremely dangerous at any (and especially at
storm) weather. Any experimenters with the Broom
Antenna you are doing at your own risk!
References:
1. http://www.antentop.org/009/ra3aae009.htm
2. http://shira.iic.kyoto-u.ac.jp/lecture_notes/plasma-
process/DBD-Lecture-Note.pdf%3Cbr
3. http://www.glow-
discharge.com/GlowDischargesRegimes.htm%3Cbr
4.”Singing” quiet discharge: Radio, 2001, #7, p.55
Thomas Townsend BROWN Alexander Leonidovich Chizhevsky
More about :
Thomas Townsend BROWN
http://n-t.ru/tp/ns/eb.htm
http://www.rexresearch.com/ttbrown/ttbrown.htm
http://www.ttbrown.com/
http://www.borderlands.de/gravity.bb-effect.php3#2
Alexander Leonidovich Chizhevsky
http://en.wikipedia.org/wiki/Alexander_Chizhevsky
http://www.cyclesresearchinstitute.org/chizhevsky.html
Broadcasting Russian Radio Station Mayak
http://www.radiomayak.ru/
http://www.antentop.org/ mirror: www.antentop.boom.ru Page 25
ANTENTOP- 01- 2008, # 010 Expedition Two Element Antenna
for the 20-meter Band
By: N. Filenko, UA9XBI ua9xbi@online.ru
Credit Line: www.cqham.ru
The antenna was designed for using at DX- peditions.
Antenna consists of two elements- mast in height 10
meters and in diameter 30-50-mm (it is reflector) and a
dipole for the 20-m (it is driver). Dipole has length 2x
495 centimeters for bare copper wire in diameter 1.5-
mm (15-AWG). For best operation of the antenna the
mast should be isolated from the ground, for example
with help a simple insulator in height 5- 10
centimeters. Input impedance for the (tuned) antenna
is close to 50-Ohm. Gain is near 4 = dBi. Main
radiation is going up to 20-22 degree to horizon.
The upper part of the dipole works like guy for the
mast. It fixed to the mast with strong synthetic rope in
50 centimeter length. Lower part of the dipole hangs
free. Lower part of the dipole allows tune the antenna.
Coaxial cable goes aside and down from the mast.
Figure 1 shows the drawing of the Two Element
Antenna. Figure 2 shows Patterns for Two Element
Antenna (MMANA made).
UA9XBI
Radio club ‘Arktika’ Championship 2004
Photo Credit Line:
http://www.arktika.komi.com/Champ_2004.htm
Figure 2 Patterns for Two Element Antenna
www.cqham.ru
http://www.antentop.org/ Page 26
ANTENTOP- 01- 2008, # 010 Expedition Two Element Antenna
for the 20-meter Band
Figure 1.1 Two Element Antenna
http://www.antentop.org/ Page 27
ANTENTOP- 01- 2008, # 010 Expedition Two Element Antenna for
the 20-meter Band
Figure 1.2 Two Element Antenna
Figure 1.3 Two Element Antenna
http://www.antentop.org/ Page 28
ANTENTOP- 01- 2008, # 010 Simple All- Band HF- Antenna
By: Eugene Erohov (US4EM), Nikopol, Ukraine
Credit Line: www.cqham.ru
Dream of each of amateurs working from a hard for
antenna installation conditions to have a small invisible
antenna for all bands. I have tried to solve the dream.
My all band antenna is something middle between
T2FD and loaded Loop. It is possible to find lots about
those antennas in the internet. Figure 1 shows the
design of my antenna.
Antenna load is 16 two- watts resistors on 72-k
connected to bridge. The combine resistor has 32 –
watts in dissipative power, it was enough to work with
my 100-watts ICOM-756 transceiver. Transformer 1:9
was made accordingly to recommendation of G5IJ
(References 1,2). Perimeter of the loop is 24 meters
of wire in 1-mm (18-AWG). Top side of the loop was
fixed at end of a fishing rod in length 8- meters. Low
side was at 1.5-meters above the ground. The
antenna has SWR low 1.2:1 and high 2.0:1 at 1.8- 50-
MHz (without tuner).
The practice has confirmed the theory: that the
antenna has good amplification only if the perimeter
more the used wavelength. So, the antenna could
work at 10- 50- MHz with good efficiency. However,
the antenna has amplification – 12 dBi at 7-MHz, - 20
dBi at 3.5- MHz and – 40-dBi at 1.8-MHz. At those
bands the antenna, however, very good works for
receiving. For example, at 1.8-MHz it was noise at
level 2-3 S-points with the antenna (and two switch on
preamplifiers) but with good receiving of amateurs’
stations.
Conclusion: The antenna could be used for receiving
at 1.8- 7-MHz and for receiving/transmitting at 10-50-
MHz. Antenna with perimeter 30-40 meters could be
used atall amateurs HF-Bands.
Figure 1 Design of the Simple All-Band HF-
Antenna
For the load of the antenna a usual Dummy Load on 50-
Ohm that is switched to the antenna through HF-
transformer 9:1 may be used. The load transformer may
have ferrite ring in twice less sizes compare to antenna
feeding transformer.
Reference 1: http://www.qsl.net/gw6hmj/antenna.htm
Reference 2:
http://www.gairney.plus.com/Radio/G5IJ_aerial.htm
More about loaded Loop Antenna:
1: Antennas for Radio Amateurs: by Igor Grigorov,
RK3ZK:
http://www.antentop.org/library/shelf_hamant.htm
www.cqham.ru
http://www.antentop.org/ Page 29
ANTENTOP- 01- 2008, # 010 Rectangular UB5UG
By: Yuri Medinets, UB5UG, Kiev
Credit Line: Radio #7, 1963, p.20
Rectangular shown at Figure 1 has good parameters
and not so sensitive to height (that is very important
for low amateurs HF-ranges) compare with dipole.
Upper horizon wire is broken by a nut insulator at it’s
center. Due to a small height the antenna is suitable
for 80- and 40-meters Band. However, it should not be
any high objects near the antenna (that do “shadow” to
the antenna). Distance between low wire and roof or
ground may be several tens centimeters.
Input impedance of the antenna may depend on
installation conditions. Matching of the antenna with
the feeder provides by choice of a feeding point at low
horizon wire. At corner feeding the antenna has input
impedance near 30-40-Ohms. The more far the
feeding point from the corner is- the more input
impedance (up to several thousands Ohms) would be.
Feeder is going along antenna wires then from the
middle of a vertical side the feeder is going aside (to
any direction). For good symmetrical it is desirable to
connect the braid of the coaxial with antenna.
Radiation parts at the antenna are the vertical sides.
For increasing of the efficiency of the Rectangular the
sides should be made from aluminum tubes in
diameter 10- 20-mm. Horizon sides of the antenna
provide very low radiation (because the currents
distribution at the antenna), so, they could be made
from antenna wire in diameter of 1-2 mm. Figure 2
shows the currents distribution at the Rectangular
(made by MMANA).
Rectangular antenna has gain near 2- 3 dBi, pass-
band (at SWR 1.5:1.0) near 2% from the center
frequency.
Yuri Medinets
(1932-23.09.2003)
Credit Line: http://ham.kiev.ua/ub5ug/
Figure 2 Currents distribution at the Rectangular.
http://www.antentop.org/ Page 30
ANTENTOP- 01- 2008, # 010 Rectangular UB5UG
Figure 1 Rectangular UB5UG
Figure 3 Input impedance for Rectangular for 40-meters
http://www.antentop.org/ Page 31
ANTENTOP- 01- 2008, # 010 Rectangular UB5UG
Figure 3 shows input impedance for rectangular for
the 40-meters Band. Figure 4 shows SWR for
rectangular for the 40-meters Band. Figure 5 shows
vertical and horizon patterns. All diagrams made by
MMANA for the Rectangular designed for 7.050-MHz,
placed at height of the 2 –meters above the real
ground, vertical parts of the antenna –aluminum tube
in diameter 10- mm (000-AWG), horizon wires-
aluminum wire in diameter of 1-mm (18-AWG).
MMANA file for the antenna made by UR0GT.
It is possible to design directional antennas on the
base of the Rectangular. Reflector and director may be
designed on the base of the rectangular. Such
directional antennas may be designed for all amateurs
HF bands. Parameters of Three- Elements Antenna
made on the base of the Rectangular elements are
almost equal to parameters of a Four Elements
Antenna made on the base of linear wires (YAGI).
Figure 4 SWR for Rectangular for 40-meters
Figure 5 Vertical and horizon patterns for Rectangular for 40-meters
http://www.antentop.org/ Page 32
ANTENTOP- 01- 2008, # 010 Delta Loop UN7CI for 7, 10, 14 and 21- MHz
By: Boris Popov (UN7CI), Petropavlovsk,
jjjjjjjjjjjjjjjjjjjjjjjjjjjjjjjjjjjjjjjj Kazakhstan
Credit Line: www.cqham.ru
The antenna was designed to work from a field
conditions at amateur’s bands 7, 10, 14 and 21-MHz.
The antenna has SWR less the 2.0:1.0 at height of the
lower side 1.2 meters above the ground. Antenna has
good efficiency.
At band 14-MHz the antenna is working like a full-
sized “Delta Loop” (Figure 1). At band 10-MHz the
antenna is working like an electrically lengthened (with
inductor) “Delta Loop” (Figure 2). At band 7-MHz the
antenna is working like a lambda/2 I.V. (Figure 3). At
band 21-MHz the antenna is working like a 3lambda/2
I.V. (Figure 4).
Figure 1. Full sized “Delta Loop” for 14-MHz
Figure 2. Electrically Lengthened “Delta Loop” for 10-
MHz
Figure 3. Lambda/2 I.V. for 7-MHz
Figure 4. 3Lambda/2 I.V. for 21-MHz
So, on the base a Delta Loop with perimeter 20 meters
(or I.V. having two 10 meters wire) it is possible to do a
four band antenna. Figure 5 shows the design of the
antenna.
If the antenna is used for a field operation and the
middle of the antenna is accessible it is possible to
switch operation band with help of any suitable manual
switch. Off course, it is possible to use RF- relays to
choose the band. Inductor L contains 20 turns of
insulated wire in diameter of 1.5-mm (15-AWG), coiled
turn to turn on diameter 50- mm.
Tuning
Step 1: Antenna is installed at working position. Band’s
Switch is installed at position “3”- 14-MHz. RF signal
(14.150-MHz) is sent to the antenna. Antenna is tuned
to resonance with help of length A and B.
Step 2: Band’s Switch is installed in position “1”- 10-
MHz. RF signal (10.12-MHz) is sent to the antenna.
Antenna is tuned to resonance with help of inductor L.
After the antenna is tuned to the 14- and 10-MHz
matching at bands 7- and 21-MHz should be reached
without any additional tuning of the antenna.
73! de UN7CI
http://www.antentop.org/ Page 33
ANTENTOP- 01- 2008, # 010 Delta Loop UN7CI for 7, 10, 14 and 21- MHz
Figure 5 Design of the Four Bands Antenna
http://www.antentop.org/ Page 34
ANTENTOP- 01- 2008, # 010 Vertical UN7CI for 7, 14 and 21- MHz
By: Boris Popov (UN7CI)
Petropavlovsk, Kazakhstan
Credit Line: www.cqham.ru
The antenna was designed for amateur’s
bands’ 7, 14 and 21-MHz. Antenna fed
throw 50-Ohm coax. The antenna has
SWR less the 1.5:1.0 at any band. Antenna
has good efficiency and low angle of
radiation at vertical plane (that is good for
DX-ing). Only one power relay is used to
switch a working band.
Operation:
The antenna made of on a base a vertical
tube that has diameter of 22-mm and
length 8.5-meters. With help of matching
networks this vertical is tuned to each used
band. At the 7-MHz band the vertical (with
the lengthen inductor) is a lambda/4 one, at
14-MHz the vertical is a 5lambda/8 one, at
21-MHz band the vertical (with the lengthen
inductor) is a lambda/2 one. Figure 1
shows the antenna with matching circuits.
Band 7 and 21-MHz: When D.C. voltage
of 24-V is across the relay its contacts
switch on the vertical through the lengthen
inductor to 50-Ohm coaxial cable.
Band 14-MHz: If the 24-V cut off from the
relay the vertical is working at 14-MHz. In
the situation one relay’s contact is
grounded the vertical. Second relay’s
contact turns on the omega- matching
network to 50-Ohm coaxial.
Design
Vertical may be made from aluminum tube
in diameter 22- 30 millimeters. The vertical
is installed onto a home-made insulator.
The omega matching may be made from
aluminum wire in diameter 4.5- 8-
millimeters. Lengthen inductor has 5 coils
of silvered copper wire in diameter of 2.5-
mm (10-AWG). The inductor has length of
30-mm and coiled diameter 45-mm (air-
wound inductor). It was used a Russian
power relay REN-33. However, it is
possible to use any power relay that will
work at RF-power going to the antenna. Figure 1 Vertical with matching circuits
http://www.antentop.org/ Page 35
ANTENTOP- 01- 2008, # 010 Vertical UN7CI for 7, 14 and 21- MHz
Figure 2 Design of the Vertical
Omega matching network is tuned to the resonance
with help of C1 and C2. At power up to 100-Wtts
capacitors C1 and C2 may be used ceramic ones. For
high power (more the 100-Wtts) it should be used high
quality capacitors. There are: air variable capacitors
with gap more the 1-mm, lengths of a coaxial cable
having the needed capacity or just fixed high voltage
capacitors having high reactive power.
Parts of the matching networks (L and C) were placed
inside a plastic box. Radials are placed above the heat
insulation of the roof. Radials should have a plastic
insulation (with good insulation of the ends) if these
ones would be contacted with stuff of the roof. Figure
2 shows the design of the antenna.
My vertical was fixed to the roof beams. No guys were
used for the fixing of the vertical. Hole through the roof
(where the vertical is going on) was water proofed.
However, conditions for the installation of the vertical
at another roof may differ from mine. So, guys for the
fixing of the vertical and hard waterproofing of the hole
may be needed.
Tuning:
Tuning of the antenna made to minimum SWR at the
center of the working band. At the 14-MHz the tuning is
made by C1-C2. At the 21-MHz the tuning is made by
the lengthen inductor. It needs to choose numbers of
coils or by changing of the physical dimension of the
inductor. Since the antenna is tuned to 21-MHz no
additional tuning needed at 7-MHz.
The antenna was compared with I.V. No difference at
local (up to 2000-kms) contact. The vertical beat an
I.V. at DX- at distance more the 5000-kms. At the
distance the vertical gave 1-1.5- points at S-Scale at
reception and 1.5- 2 points at scale “S” at transmitting.
73! de UN7CI
www.cqham.ru
http://www.antentop.org/ Page 36
ANTENTOP- 01- 2008, # 010 Delta for 80 and 40- meters
By: Valentin, RZ3DK
Credit Line: www.cqham.ru
Figure 1 Design of the Delta for 80- 40 meters
The Delta for 80 and 40 meters was designed for
installation on the roof of a building with help of a
metal mast. Design of the antenna is shown on
Figure 1. Link for file *maa for the antenna is given
below at the article.
File *maa contains correct dimension for the
antenna. However, MMANA simulates the antenna in
not correct way. Correct data may be reached using
NEC for MMANA. All of these programs are free.
Figure 2 shows patterns (in horizon and vertical
plane) of the antenna on the 80 meters. Figure 3
shows patterns (in horizon and vertical plane) of the
antenna on the 40 meters.
Matching of the antenna at both bands is possible with
the help of the length of 75-Ohm Coaxial in 4.82-meters.
SWR at the both bands (at this case) is 1.46:1.0. Figure
4 shows diagrams and data for the matching. Improved
variant of the matching is shown on the Figure 5. A
length of 75-Ohm coaxial cable in 3.9 meters and
opened stub from a length of 75-Ohm coaxial cable in
1.7 meters are connected to antenna’s terminal. SWR at
the both bands (at this case) is 1.23:1.0.
It is a theoretical model. In the coming spring I hope to
install and check the antenna.
73!
Link: http://www.antentop.org/010/
rz3dk_010.htm
http://www.antentop.org/ Page 37
ANTENTOP- 01- 2008, # 010 Delta for 80 and 40- meters
Figure 2 Patterns (in horizon and vertical plane) of the Delta on the 80 meters.
www.cqham.ru
http://www.antentop.org/ Page 38
ANTENTOP- 01- 2008, # 010 Delta for 80 and 40- meters
Figure 3 Patterns (in horizon and vertical plane) of the Delta on the 40 meters.
www.cqham.ru
http://www.antentop.org/ Page 39
ANTENTOP- 01- 2008, # 010 Delta for 80 and 40- meters
Figure 4 Matching of the antenna with the help of one length of the 75-coaxial cable
http://www.antentop.org/ Page 40
ANTENTOP- 01- 2008, # 010 Delta for 80 and 40- meters
Figure 5 Improved matching of the antenna with the help of two length of the 75-coaxial cable
http://www.antentop.org/ Page 41
ANTENTOP- 01- 2008, # 010 Two Elements YAGI for 145 MHz:
Balcony Project
By: Aleksandr, RZ3AIX, kcb121@yandex.ru
Credit Line: www.cqham.ru
Two-Elements YAGI for 145-MHz: Balcony Project
Well, why I did a Two- Elements YAGI? Why not
Three, Four or more Elements YAGI? Or, say, so
popular 2-5/8 or 3-5/8 Vertical Collinear Antenna?
Okey, at first, just begin from the beginning. From the
theory. As the theory says, multi elements antennas
(in the case, YAGI) have a large near field zone. The
more elements the antenna contains – the more sized
near field zone the antenna has. All subjects that are
located inside the near field zone are influenced to the
parameters of the antenna.
Conclusion: So- the more elements an antenna is
contained - the more free space should be around the
antenna.
The conclusion was proved by me. For a while I had to
use a commercial (from www.tangenta.ru) made Four
and Six Elements YAGI. The antennas are perfect
antennas only the antennas have enough large free
space around, for example, the antennas are installed
on the roof. But I need a balcony antenna. Place at
balcony was very limited. I could install only antenna
that goes at 1- 1.5- meters outside the balcony. Only
the limitation makes me to look for an antenna suitable
for such conditions.
Four Elements YAGI works bad at such close to wall
(up to 1-meter) installation. There was so called
“ladder” effect. The effect means that at one frequency
a station is going at 59, step to 25 –kHz the station is
going at 58, another step 25-kHz- 59. The more
elements have YAGI- the more the “ladder” effect
presents. Where a Two Elements YAGI is working at 1
meter from a wall there Four Elements YAGI is
required 1.5-meter distance from the wall.
Second question is- why not collinear but YAGI.
Collinear works badly at my installation on the balcony.
Lots reflected and spurious signals from nearest
buildings do the reception too noise and unpredictable.
www.cqham.ru
http://www.antentop.org/ Page 42
ANTENTOP- 01- 2008, # 010 Two Elements YAGI for 145 MHz:
Balcony Project
Compare to 2-5/8 and 3-5/8 collinear the Two
Elements YAGI has more gain. Experience shows that
the more distance between radio stations the more
Two Elements YAGI beat the collinear. My Two
Elements YAGI has room near 100-centimeters x 40
centimeters. Collinear antenna that has close to the
Two Elements YAGI gain is 3-5/8 collinear. Such
collinear has height near 5 meters. So, what is easy to
install at the balcony?
Two Elements YAGI loses 1-dB in gain compare to
Three Elements YAGI. However, Two Elements YAGI
has boom twice less in length compare to Three
Elements YAGI. That is why I have chosen the Two
Elements YAGI.
And the last. Why I did configuration “Vibrator-
Reflector?” Because the combination has good forward
gain thought not good suppression of back lobe.
Combination “Vibrator- Director” has good suppression
of back lobe but bad forward gain. I need good forward
gain.
Figure 1 Design of the Two Elements YAGI.
Design.
Figure 1 shows the design of the Two Elements YAGI.
Antenna elements are made from aluminum tube in
10-mm diameter. Traverse made of from L- Shape
aluminum with sizes 20x20 millimeters. Antenna has
input impedance 50-Ohms, so, coaxial cable straight
away turns on to the antenna.
Several ferrite rings (that do an RF-Choke) are
installed on the coaxial cable near feeding terminal.
Vibrator is insulated from the traverse. Plastic pieces
are installed between antenna elements and traverse.
The pieces made from a water pipe with OD 20-
millimeters (3/4”). Length of 70 millimeters is cut
(longitudinal section) on to halves. One piece is going
for vibrator another one to reflector. At the vibrator’s
piece drill a hole in the centre.
http://www.antentop.org/ Page 43
ANTENTOP- 01- 2008, # 010 Two Elements YAGI for 145 MHz:
Balcony Project
Screw going through the hole fastened the plastic to
traverse. Halves of the vibrator fastened to the plastic
with help of plastic ties. Reflector electrically
connected to the boom through a screw that is going
through the reflector and the centre of the plastic
insulator. (However, it would be better for antenna
performance to isolate the reflector from the traverse.)
Vibrator made of aluminum, so, it needs to install at
feeding terminal of the vibrator (with help of screw)
solder lugs. Coaxial cable is soldered to the solder
lugs. Traverse could be made from any strength stuff-
for example ever wood could be used.
That is all. Antenna is very simple and reliable. I install
the antenna at distance 1.5-meter from a wall. There
were made lots local and DX-QSO (FM-MODE) at 5-
Wtts power. If you will have made the antenna, your
comments are welcome to my e-mail.
73!
References:
Igor Lavrushov, UA6HJQ http://www.hamradio.cmw.ru/
Igor Gocharenko, DL2KQ, Antennas HF- VHF, Part- IV
Pictures of my old Four and Six- Elements YAGI.
http://www.antentop.org/ Page 44
ANTENTOP- 01- 2008, # 010 Matching a Transceiver
with PA on several GU50
By: N. Filenko, UA9XBI ua9xbi@online.ru
Credit Line: www.cqham.ru
Matching input of PA that contained several tubes
GU50 with a transceiver is not a simple matter as it
seems at first look. Sometimes for simplicity of the
design PA the driver power from a transceiver going
straight away to several connected to bridge cathodes
of the GU50.
However, input resistance of a PA containing 2 tubes
GU50 (that is close to 50- Ohm at major amateur HF-
ranges) is differed from input resistance of a PA with 3
tubes GU50 (the resistance lower in 1.5 times
compare to 2xGU50- sample), and of course differ
from input resistance of 4xGU50- PA (the resistance
lower in 2 times compare to 2xGU50- sample). So,
the input resistance for those PAs with 3 and 4 tubes
is differ the 50-Ohm that requires proper matching of
the PA with driving transceiver.
UA9XBI
Radio club ‘Arktika’ Championship 2004
Photo Credit Line:
http://www.arktika.komi.com/Champ_2004.htm
Figure 1 Matching Autotransformer
Figure 1 shows a simple autotransformer that helps
match input impedance of the PA to 50-Ohm in wide
frequencies range.
The autotransformer was made on a Russian ferrite
toroid with permeability 60. It is possible to use Amidon
T-50-2 (OR t-50-6). At some cases it is better to use 2
toroids putting together. Coil contains 12 turns of wire
in diameter 2-mm (12-AWG). Tap is chosen for best
matching of the transceiver with the PA in wide
frequency range. Experience shows that best matching
for 3xGU50 PA gives tap from 8th
turn (from “cold”
end). For 2xGU50 PA best matching gives tap from 5th
turn (from “cold” end). Anyway, try to find best tap and
best quantity of coils in the autotransformer for your
design of the PA.
73!
www.cqham.ru
http://www.antentop.org/ Page 45
ANTENTOP- 01- 2008, # 010 Simple Weekend Antenna for 145-MHz
Igor Lavroushov UA6HJQ,
May 2005.
Yes, I need an antenna for 144-MHz. Not just antenna,
but antenna that can work in different conditions, from
my home, from a car, from my mountain trip. Have
been tried different design I suddenly stopped to those
one. It is two element YAGI that is very simple to
design but has good characteristics.
Photos below show the antenna installed on my
balcony. The antenna is very sustainable to weather.
Rain, wind and snow are no matter for this one.
Before the antenna I had used another ones (among
them A-100 and A-200), but my design could sustain
in the sever mountain conditions… I had compared the
antenna with A-1000 (5-meters long), at distance 50
kms I got the same reports, as for A-1000 as for my
YAGI. Two phased YAGI are defeated A-1000 for
sure, you may prove in it. UA6HJQ
Design of the antenna is very simple. Personally I have
made the antenna in 40 minutes. Antenna consists from
reflector (length 1002-millimeters) and vibrator (length
972- millimeters, gap for coaxial cable- 10-millimeters).
Distance between reflector and vibrator is
approximately 204 – 210- millimeters.
Antennas parts are made from insulated wire in
diameter 4 millimeters. Place of vibrator, where a coax
was installed, was protected with a raw compound. You
may use another protector… SWR for the antenna
(measured by SWR-121) was (1.0-1.1):1.
http://www.antentop.org/ Page 46
ANTENTOP- 01- 2008, # 010 Simple Weekend Antenna for 145-MHz
Design of the antenna is very simple. Personally I have
made the antenna in 40 minutes. Antenna consists
from reflector (length 1002-millimeters) and vibrator
(length 972- millimeters, gap for coaxial cable- 10-
millimeters). Distance between reflector and vibrator is
approximately 204 – 210- millimeters. Antennas parts
are made from insulated wire in diameter 4 millimeters.
Place of vibrator, where a coax was installed, was
protected with a raw compound.
You may use another protector… SWR for the antenna
(measured by SWR-121) was (1.0-1.1):1.
Input resistance of the antenna is 12,5 –Ohm, for
matching with 50-Ohm Coaxial I have used a
transformer made with two bridged length of 50-Ohms
coaxial cable. The coax must have the similar length
near 370- 440- millimeters (should be find at adjusting).
Both pieces must be tied at all length one to another.
Another Big Gun
I was asked how is it possible to improve gain but save
wide DD? To do this it is impossible to add another
director, but it is possible to use two phase antennas.
Picture below shows this way. Good chose to phase 2
or 4 antennas. We get good DD, good gain and the
system can receive mobile stations in very good way
compare to collinear antennas in 5- 7 meter long.
Credit Line:
http://www.hamradio.cmw.ru/antenna/145-2el.htm
http://www.antentop.org/ Page 47
ANTENTOP- 01- 2008, # 010 Simple Weekend Antenna for 145-MHz
Trip Variant of the Antenna
A bit later, I made a kit of the antenna suitable for my
mountain trip. Testing of the antenna in the mountains
shows, that my YAGI is compared to collinear in 3- 5
meters long on distance up to 50 kms and beats the
antennas up to 90 kms and more.
Photos below shows kit of my trip YAGI. Only 30
seconds are needed to install the antenna. Boom for the
YAGI was made from a plastic water pipe in 510-
millimeters length and 21- millimeters in diameters.
Transformer 12.5-Ohms/50-Ohms is placed inside the
plastic tube. The antenna is good fit to rucksack and may
be easy repaired in the trip.
50-Ohms YAGI
For those who do not want cut length oh matching
transformer was calculated antenna having 50- Ohms
input impedance. So coaxial cable may be directly to
connected to antenna terminals. View of the antenna is
almost the same, however, simple RF-Choke near
antenna terminal (0ne- three turns around a ferrite ring
is recommended for the design. Distance between
reflector and director should be chosen (415- 440 –
millimeters) for minimum SWR. The antenna has gain
near 4,3 dbd.
New Year Pictures from UA6HJQ
http://www.antentop.org/ Page 48
ANTENTOP- 01- 2008, # 010 Fixture for Fast Assembling of VHF-
Antennas
Il’ya Yarushkin, UA9UKO
Credit Line:
http://www.cqham.ru/ant85_27.htm
The Fixture is intended for fast assembly and disassembly of VHF antennas. It is very useful for experimenters
with the antennas or assembling of portable VHF- antennas.
The fixture is made on the base of clamp- it may be any strength clamp that you find at your local household
shop. (In Canada such shop is Home Depot or Canadian Tire, lots, lots of different clamps are there.I.G.)
Fixture on a boom is shown below.
www.cqham.ru
http://www.antentop.org/ Page 49
ANTENTOP- 01- 2008, # 010 Fixture for Fast Assembling of VHF-
Antennas
You can see that antenna parts are reliable fastened to the boom, it is possible to move these ones along the
boom as well as fast to remove the parts apart the boom.
Oh, yes, I forget, you need a traveler that should fit to the boom. I did such traveler from a plexiglass in 10-
millimeters (near ½-inch) thick. Design of the traveler is clear shown at the pictures. The traveler should sit at the
boom evenly not crookedly. Off course, is it possible to use for design of traveler any suitable staff (instead
plexiglass). Local craft shop for sure gives you lots ideas.
73! UA9UKO
Antennas after hail. Picture by LZ2ZK
http://www.antentop.org/ Page 50
ANTENTOP- 01- 2008, # 010 Water Pipe T-Joint at VHF Antennas
By the way, I was (and may be am) not an
experienced VHF- man before I decided to do my VHF
YAGI. I had serous doubt that I spoiled lots stuff while
I made my YAGI. So I found for solution how to do the
antenna without turning in garbage my antenna’s
material. When I went around a house-ware store I
have seen polystyrene water pipe T-joint. Picture 1
shows the T- joint.
Picture 1
By: N. Filenko, UA9XBI ua9xbi@online.ru
Credit Line: www.cqham.ru
UA9
XBI
Radio club ‘Arktika’ Championship 2004
Photo Credit Line:
http://www.arktika.komi.com/Champ_2004.htm
I have bought some these ones. While making the
VHF antenna several of T-joints spoiled were spoiled
but other ones worked well in my design. Picture 2
shows T- joint installed at my antenna.
The design has some benefits:
1. Antenna elements are isolated from traverse with
gap in 6-10 mm
2. It is possible to move the antenna elements along
the traverse.
3. It is possible to play with antenna design- change
length between antennas elements and easy to
change the elements
Picture 2
http://www.antentop.org/ Page 51
ANTENTOP- 01- 2008, # 010 Water Pipe T-Joint at VHF Antennas
4. Antenna elements are fastened without drilling the
traverse.
5. Avoid screw, nuts and clamp in fastening of
antenna elements.
6. T- joint is mechanically strong the antenna
element.
7. Weight of one antenna element in length of 1
meter made from of a silumin tube in 10-mm OD with
the T- joint was only 70 grams
8. Antenna made by step by step stringing of the T-
joints with already installed there antenna elements.
How to use T- joint at antenna? Picture1 and 2 show
the way. However, some advices are below. Take T-
joint that has ID closest to a diameter of antenna
traverse. If the T-joint has ID
Less the diameter of antenna traverse you need
gnaw through to obtain needed ID. Leave wall
thickness not less the 2 millimeters.
Do ID on to 0.5- 1 –millimeters less the OD of the
traverse and do longitudinal cut in the lower part of
the T- joint. At the case before installation of the T-
joint to the traverse a small thing (like wooden or
metal bar) should be inserted into the cutting. See
Picture 3. When the T- joint is sitting at the right
place at the traverse just remove the bar and the T-
joint would be fastened well to the traverse.
Picture 3.
It is possible hard fastened the T- joint to the traverse by 1-
2 small screw. Another way for hard fastening – put some
glue in to pipe-bend. The pipe- bend was closed by a
plastic washer and epoxy. ( See Picture 3.)
Holes for antenna elements should have ID on to 0.2- 0.5 –
millimeters less the OD of the antenna element. The holes
should be drilled with drilling machine. T-joint at drilling
should be placed on to horizontal table of the drilling
machine. Antenna elements go through the holes with
pressure but then hard fastened at the T-joint.
Active dipole vibrator made from two halves may be
fastened to T- joint with help of a plate made from a good
and mechanically hard insulated stuff. It may be thick PC,
thick plexiglass.
The plate is fastened to cut side tap. See picture 4.
Picture 4
However, it is possible to insert two half vibrator into a thick
rod from an insulated stuff, then the rod with the active
vibrator is fastened into the T- joint above mentioned ways
(See picture 2, 3)
T- joint was tested to strength after being three hours at
minus 28 degrees Celsius. Attempt to break the T- joint
pooling of the antenna element (fastened inside the T –
joint) is failed. Antenna element was broken (4-mm OD
silumin) , T-joint- no. It was tried to break the T- joint with
help of a hammer. Hammer left only slight dent on the T-
joint but no any crack.
Using prepared T-joints (with drilled holes for antenna
element and traverse) it takes from me only several hours
to assemble 7- elements VHF antenna. Hope, it will work
long time for me. See picture 5.
www.cqham.ru
http://www.antentop.org/ Page 52
ANTENTOP- 01- 2008, # 010 Water Pipe T-Joint at VHF Antennas
Picture 5
T-joint may be used for fast assembling of field VHF
antennas. It needs drilled hole for traverse on to 1-1.5 –
mm less then the OD of the traverse. Then partially cut
T- joint toward to side tap. Do smooth the cut sides with
the help of a file, See Figure 1.
So, it is possible to put the rework T- joint with antenna
element on to traverse, then push the T- joint and snap it
onto the traverse. If it is need you may fastened the
reworking T- joint with help of a clamp.
73 de UA9XBI!
Figure 1
http://www.antentop.org/ Page 53
ANTENTOP- 01- 2008, # 010 2xGU50 and 3xGU50 PA from UA1TAT
2xGU50 PA
The PA was designed and then made (in several
samples) by Yaroslav Zhukov, UA1TAT. It is a
“classical” Tubes PA with grounded first grid.
However, the feature of the PA is the individual bias
for the first grid of each of the used tubes. It allows use
tubes with slight different anode/grid characteristics.
Yaroslav Zhukov, UA1TAT
Credit Line: http://hamnv.boom.ru/2gu50.htm
Credit Line: http://hamnv.boom.ru/3gu50.htm
Figure 1 shows the schematic. Third grid of both
tubes is grounded. Second grids of the both tubes are
connected to 250-V voltage stabilizer.
Figure 1 2xGU50 PA
The PA was designed for CB-station for 27-MHz. It is
defined the input circuit that provides good matching at
the band.
3xGU50 PA
The PA is made on the base of 2xGU50 PA. Output
power of the 3xGU50 PA is 180- 200 Wtts. The PA
was designed for 160, 80, 40 and 20 meters. Input
circuit is broadband and can match the PA in wide
frequencies range. The input circuit is described at
Antentop- 1-2008, p.45. Figure 2 shows the schematic
of the 3xGU50 PA
Figure 2 3xGU50 PA
At practical design it was found that capacity of the
high-voltage capacitor at matching circuit is changed a
little inside the working band. It allows to me to change
the hard-to- find capacitor for available for me constant
capacitors. The capacitors are switched with help of a
usual ceramic switch.
P.S. My thanks to Sergey Mironov for the help during
design, manufacturing and tuning of the PA.
GU81M- Made in the USSR
http://hamnv.boom.ru/
http://www.antentop.org/ Page 54
ANTENTOP- 01- 2008, # 010 2xGU50 and 3xGU50 PA from UA1TAT
Figure 1 2xGU50 PA
http://www.antentop.org/ Page 55
ANTENTOP- 01- 2008, # 010 2xGU50 and 3xGU50 PA from UA1TAT
Figure 2 3xGU50 PA
http://www.antentop.org/ Page 56
ANTENTOP- 01- 2008, # 010 PA 3xGU50. Photos of the Design
N. Kisel, UA3AIC,
Moscow, Russia
ua3aic@mail.ru
Credit Line: www.cqham.ru
Photos step by step show how to do simple PA
3xGU50.
Schematic of the PA is shown on Figure 1.
Copper foil for tap used from a power coaxial cable. If
for the PA two sided PC-board is used you should
remove foil from back side opposite to anode trace.
The path free from foil should be in 15-20 mm wide.
www.cqham.ru
http://www.antentop.org/ Page 57
ANTENTOP- 01- 2008, # 010 PA 3xGU50. Photos of the Design
Figure 1 PA 3xGU50
www.antentop.org
http://www.antentop.org/ Page 58
ANTENTOP- 01- 2008, # 010 PA 3xGU50. Photos of the Design
http://www.antentop.org/ Page 59
ANTENTOP- 01- 2008, # 010 PA 3xGU50. Photos of the Design
http://www.antentop.org/ Page 60
ANTENTOP- 01- 2008, # 010 PA 2xGU50. Photos of the Design
N. Kisel, UA3AIC,
Moscow, Russia
ua3aic@mail.ru
Credit Line: www.cqham.ru
Photos show how to do simple PA 2xGU50.
Schematic of the PA is similar to PA shown on Figure
1, page 58, ANTENTOP- 01- 2008, # 010.
It is a “field” variant PA. Transceiver having output 20-
30-Wtts can drive the PA up to 200-Wtts (300-mA plate
current at + 850 –V).
http://www.antentop.org/ Page 61
ANTENTOP- 01- 2008, # 010 PA 5xGU50. Photos of the Design
N. Kisel, UA3AIC,
Moscow, Russia
ua3aic@mail.ru
Credit Line: www.cqham.ru
Photos show how to do simple PA 5xGU50.
Schematic of the PA is similar to PA shown on Figure
1, page 58, ANTENTOP- 01- 2008, # 010.
www.cqham.ru
http://www.antentop.org/ Page 62
ANTENTOP- 01- 2008, # 010 Simple Broadband P.A.
Igor Grigorov, UA3ZNW
Credit Line:
"QRP Transceivers and PAs from Accessible
Parts ": by Igor Grigorov, UA3ZNW
The P.A. is very simple. It is usual push- pull (made on
VT1, VT2) with some tricks which allows to make the
P.A. in easy style.
How it is work: Transformer Tp1 provides matching 50-
Ohm input of the P.A. with low resistance input
impedance of the and makes symmetrical of the
unsymmetrical50-Ohm input with the symmetrical push-
pull input. Transformer Tp2 works something like RF-
Choke plus Push- pull transformer. Transformer Tp3
provides matching “balance” push- pull output with
unbalance output 50-Ohm. If you use to a symmetrical
antenna (for example dipole, quad, delta) which is
connected to the P.A. by a short length of a coaxial
cable you may do not ground the pin “4” at the
transformer Tp3. Figure 1 shows the schematic
diagram of the P.A.
(Note I.G.: Generally speaking it is not correct
description, but I leave it as is for some reason. The
schematic is only first step for ham to the miracle world
of the P.A. I would like to leave “academic” description
for next steps…)
Correctly assembled (using right parts) amplifier
requires a minimal adjustment. At first it needs to install
collector current. It is equal 50-mA/ at power 20-Wtts,
100-mA/ at power 40-Wtts, 150-mA/ at power 60-Wtts.
It is desirable to use a low- frequency (or resonated)
filter before the P.A. and antenna.
For example, you may use filters from References
1. If a high impedance antenna will be used with the
P.A., it is possible to install transformer 50/300-
Ohm or 50/450-Ohm at the output of the
transformer and feed the antenna through a two-
wire line. At radio-amateurs source it is possible to
find lots different designs for such transformers, for
example in Reference 2.
Matched pair of the RF-power transistors should be
used in the amplifier. Best way is to buy such
matched transistors from supplier. However, if you
have a stock of 10- 20 RF- power transistors, you
may to find a matched pair from these ones. To
provide this it is necessary to measure some
parameters of the transistors. Transistor is switched
on in the circuit shown in Figure 2. Install with help
R2 collector’s current equal to
50/100/200/500/1000-mA. Do measuring fast
enough while the transistor should not be warm too
much. Better way is to use a heat sink for the
transistor. Transistors which plots are mostly close
are the matched pair. Remember, that collector
current divide to base current is amplification factor
(gain). Matched pair should consist of from
transistors with gain that do not differ more then
20% at different currents.
Figure 2 Circuit for finding of matched pair of the RF power transistor
http://www.antentop.org/ Page 63
ANTENTOP- 01- 2008, # 010 Simple Broadband P.A.
Figure 1 schematic diagram of the P.A.
(Note I.G.: Generally speaking, 5 points it is not
enough for normal selection of matched pair of
transistors. It is desirable to do the selection using 7-
10 points, thus the tolerance at amplification factor
should be not more the 10%. I do not speak about
selection of a matched pair using measuring of the
transistor parameters at different frequencies because
it goes away from the radio- amateur technology. )
It is possible to use non matched transistors but it
needs install individual for each transistor biasing. To
do this cut jumper between L1 and L2. A capacitor 50-
micro- farads is soldered in bridge with C3. A capacitor
1-micro- farads is soldered in bridge with C4. With help
of additional base resistors install equal current for
each of the transistors. Turn RF power to the input of
the P.A. With help of an oscillograph check the shape
of RF- voltage on the Dummy Load and on the
collector of each of the transistors.
http://www.antentop.org/ Page 64
ANTENTOP- 01- 2008, # 010 Simple Broadband P.A.
Do the check at different frequencies. Adjust biasing on
to minimum distortions. Capacitor C* (200- 600-pF) may
help to illuminate distortions. However the method
required some experience. Sometimes (when the
transistors are too different) satisfied result is not
possible.
Resistors Re have nominal from 1to 4 –Ohms, depend
on output power. Less at high power and more at low
power. Sometimes, when not matched transistor pair is
used to the P.A. the resistors may have different
nominal, it is possible to fond right value with help of
oscillograph on to minimum distortions.
P.A. has two modes: SSB and CW. At CW mode the
transistors work in mode “B’- the bases closed to
ground (with help of S1) through RFC1 and RFC2.
Practically any RF transistors can be used at the P.A.
RFC1 and RFC2 are wound on a ferrite core 8-
millimeter OD and 10 millimeter in length. The
ferrite core is cut off from a ferrite rod using in
“magnet antenna” for a transistor radio. RFC1 and
RFC2 have 80 turns each wound by copper wire
in 0.1- millimeter (38-AWG). Transformers Tp1,
Tp2 and Tp3 are wound on a ferrite core. As usual
for the P.A. I use to a ferrite from TV Flyback. Not
bad work a ferrite core from a monitor Flyback. It
is possible to use ferrite core from T.V. yoke.
Transformer Tp3 works well when it is wound on a
ferrite from yoke. All transformers are wound by
insulated copper wire in diameter 0.5- millimeter.
Transformer Tp1 is wound by twisted and tripled
wires, one turn to one centimeter of the length.
Transformers Tp2 and Tp3 are wound by twisted
wires, one turn to one centimeter of the length.
Design of the transformers is shown on Figure 3.
Figure 3 Design of the transformers Tp1, Tp2- Tp3
Ferrite core is wound by soft plastic insulation tape.
After winding the coils also are wound by soft plastic
insulation tape. Transformer is installed on the main
PCB. Two PCB square are installed at the sides of the
transformer. With help bare copper wire (1-millimeter or
18-AWG diameter) the squares are soldered between
each other and soldered to the main PCB. Installation of
the transformers is shown on Figure 4.
The heat sink for the P.A.’s transistors made from
aluminum H- stuff. It is possible to by such stuff at a
household shop (such like Home Depot). Figure 5 shows
the installation of RF-power transistor to the H-stuff.
Figure 6 shows PCB for the P.A.
The adjusted PCB is installed inside a cabinet
made from two- sided PCB. Jointing of the PCB-
stuff is carefully soldered. P.A.’s PCB may be
soldered to the PCB – stuff of the cabinet. At four
corners (up and down) of the cabinet a nuts M4 are
soldered. To the nuts upper and low cover is
fastened. Near the heat sink of the transistors (at
cabinet and at covers) are drilled ventilation holes
(3-4 millimeter in diameter). RF connector “Input”
and toggle switches “SSB/CW” and “OFF/ON” are
installed at front panel. Connector “Antenna” and
DC power supply terminals are installed at back
panel. Figure 7 shows the design of the P.A.
http://www.antentop.org/ Page 65
ANTENTOP- 01- 2008, # 010 Simple Broadband P.A.
Figure 4 Installation of the transformers Tp1, Tp2- Tp3
Figure 5 Installations of an RF-power transistor to a heat sink
Figure 7 Design of the P.A.
http://www.antentop.org/ Page 66
ANTENTOP- 01- 2008, # 010 Simple Broadband P.A.
Figure 6 PCB for the P.A.
Home ferrite core made from a flat ferrite
The good results give transformers (Tp1, Tp2 and Tp3)
wound on a home made ferrite core made from a
flat ferrite. Such flat ferrite is used at some
transistor LW/MW radio.
http://www.antentop.org/ Page 67
ANTENTOP- 01- 2008, # 010 Simple Broadband P.A.
To make all three transformers it needs several such
flat ferrites. I have bought a pile of the ferrites at a
scrap-radio shop by very nice price.
Flat ferrite is cut on to pieces then the pieces are glued
on to needed shape. It is possible to cut the ferrite with
help a device shown on Figure 8. I cut ferrites having
different shape (flat, round rod, toroid) with help of the
device.
The device is very simple. It is an incandescent 40-
Watts bulb (or simple soldering iron) that is turn on into
the main. Any main -110 or 220-V works good,
however, main on 220-V works better the 110-V. Two
probes with hard steels sewing needle are inserting in
one wire. To cut a ferrite it needs to mark the ferrite on
to cutting line by a lead pencil.
Figure 8 Cutter for ferrite core
(Note I.G.: Lead pencil is very important at the
process. Try several pencils at a scrap ferrite to find
the pencil that helps cut the ferrite in the best way.)
Turn on the cutting device in to the main. Touch by
the needles the graphite line. Gap between the
needles should be 1-2 millimeters. An arc going onto
the graphite line will appear. The arc leaves a cavity
on to the line. Move the probes and do the cavity on to
all mark line. Then break the ferrite on to the line. It
needs some experiences, it needs very quick to break
this ferrite. )
(Note I.G.: Be very careful because the PROBE IS
SWITCH ON IN TO MAIN. Use good insulator for the
probes and be very careful. )
The needles are heat up at the process, so, use heat-
resistant stuff for the probes. After cutting several
ferrites the needle’s point should be sharpened or the
needles should be changed.
As usual a flat ferrite used at “magnetic antenna” of a
transistor radio has length in 90… 12- millimeters. At
the case length for Tp1 is 1/3 from the length of the
ferrite. Length for Tp2 is 1/2 from the length of the
ferrite. Tp3 made like a double Tp2 or has the same
design like a Tp2. Figure 9 shows design of the
transformers.
Figure 9 Design of the P.A. transformers
References:
1. S.G. Bunin, L. P. Yajlenko. Reference Book for
Amateur Radio,- Kiev, Publishing House “Tehnika”.
1978. (in Russian)
2. Igor Grigorov . Antennas: Tuning and Adjusting.-
Moscow, Publishing House “RadioSoft”, 2002, ISBN:
5- 93037-087-7 (in Russian)
http://www.antentop.org/ Page 68
ANTENTOP- 01- 2008, # 010 Matching Circuit for Tube PA
Sergey Lebedev, UA0UG
Radiolubitel KV –UKV # 3, 1996, page 28.
Published in Byelorussia, Minsk.
As usual, at a Vacuum Tube PA an output tube is
matched with antenna with help of a p-circuit. It is refer
to use switching inductors or variometer. This
matching circuit can work from 3- 30-MHz without
switching inductors. The circuit is widely know among
radio amateurs of 9-0 amateurs region of Russia.
The circuit has good efficiency at upper HF bands and
good suppression of the high harmonics.
Parts:
C1, C2: Double Air Gap (gap 1 millimeter between
plates) Capacitor.
C3: Air Gap (gap 1 millimeter between plates) Capacitor.
L1: Form Diameter 60 millimeters, wound by wire in 1.2-
2.0- millimeter (17- 12 AWG)
This circuit works good with Russian vacuum tube like
GU50 (1000-V Anode, 100-mA plate current), GU29
(600-V Anode 180-mA plate current).
Simple Design of Antenna RF- Choke
Antenna RF choke from RV9CPK Antenna RF choke from LZ2ZK
http://www.antentop.org/ Page 69
ANTENTOP- 01- 2008, # 010 QRP Transceivers and PAs from…
Book in English “QRP Transceivers and PAs from
Accessible Parts “ (*pdf), 38 pages is a translation
of Russian Book “QRP Transceivers and PAs
from Accessible Parts “ (*pdf), 28 pages. Russian
version was published by me (on my own expenses)
in 1991, in Belgorod, Russia. I had printed 2000
samples of the book.
Of course, it was not a best paper used for the book
as well as not a good quality of printing. The book
describes kits which my own company (“Vibrissa”)
produced at the times. Naturally, the book was the
manual for the kits. Were produced 400 kits of TST
(Tube- Semi- conductor- Transceiver) near 50 of
them were assembled by me for customers, 200 kits
SQT (Semi- conductor- Quartz- Transceiver), near
30 of them were assembled by me for customers,
200 kits of PA, near 60 were of them were
assembled by me for customers.
Well, 1991- 1995 years were very interesting in my
life in Russia. For now I have only 5 samples of the
Russian book, other ones were sold. I have no
boards for the transceivers and PAs.
QRP Transceivers and PAs from Accessible
Parts
Free e- book!
38 pages, size 5- 1/2"x 8"
Download!
http://www.antentop.org/library/
But you, if you want, can do the equipment again. The
book contains copies of the PC- boards, manuals for
tuning. The equipment is really the equipment that
works great.
English version has some corrections compare to
Russian one. English version of the book is uploaded to
www.lulu.com
so, you may buy a ready printed book.
Off course, feel you free to load and print the book (free)
from www.antentop,org
.
Russian version of the book English version of the book
http://www.antentop.org/ mirror: www.antentop.boom.ru Page 70
ANTENTOP- 01- 2008, # 010 CQ- QRP- 03
Technical Magazine
CQ- QRP- 3
From U- QRP-C
U- QRP- C was alive only 9 years, from 1986 to 1995.
At the times the club had managed lots deals. At first
were united QRPers from all former USSR. It was the
base for recently QRP Clubs of the former USSR- for
RU- QRP- C and for UR- QRP-C. At second, a new
amateur code “72” was accepted in the ham World due
to efforts of Oleg Borodin, former president of the U-
QRP-C. At third, 3 nice QRP- magazines were printed
out. One of the magazines, CQ- QRP # 3 is pasted to
AntenTop Library. The magazine is in Russian, but the
schematics are international understandable.
To download the magazine you need go to
http://www.antentop.org/library/library.htm
Contest of CQ- QRP # 3
Broad Band Transformer 4:1.
QRP PA for 28-MHz.
7-MHz CW- QRP-TX.
Simple AM TX for 160 –meters.
Converter for 10 MHz (by W1FB).
Regenerative RXs.
Vertical Antenna for 160-meters by RA3QJD.
DisCone for 160-meters
CW Transceiver for 20-meters
Tubes DC Transceiver
This nice and old naïve- style magazine was made by
members of the U- QRP-C. Printed in Saransk, Russia.
Distributed by Sergey Pichurichkin by snail mail. Were
printed 200 samples of the magazine. One of them is
mine…
http://www.antentop.org/ Page 71
ANTENTOP- 01- 2008, # 010 CQ- QRP- 02
Technical Magazine
CQ- QRP- 2
From U- QRP-C
U- QRP- C was alive only 9 years, from 1986 to 1995.
At the times the club had managed lots deals. At first
were united QRPers from all former USSR. It was the
base for recently QRP Clubs of the former USSR- for
RU- QRP- C and for UR- QRP-C. At second, a new
amateur code “72” was accepted in the ham World due
to efforts of Oleg Borodin, former president of the U-
QRP-C. At third, 3 nice QRP- magazines was printed
out. One of the magazines, CQ- QRP # 2 is pasted to
AntenTop Library. The magazine is in Russian, but the
schematics are international understandable.
To download the magazine you need go to
http://www.antentop.org/library/library.htm
Contest of CQ- QRP # 2
QRPP Transceiver for 10 meters.
Transceiver Unit for superheterodyne receiver for 80
meters.
Simple QRP 2-Band Transceiver
QRP- PA for 1.8- 30 MHz
Regulated Voltage Stabilizer for 3- 13 Volts
2- Wtts QRT TX by G3AEP
VFO for 20- Meters
CW QRP Transceiver for the 80 Meters
QRP TX for 10 MHz by W1FB
Simple TX for 1.8 and 3.5 MHz
Broadband 10 Wtts PA
This nice and old naïve- style magazine was made by
members of the U- QRP-C. Printed in Saransk, Russia.
Distributed by Sergey Pichurichkin by snail mail. Was
printed 150 samples of the magazine. One of them is
mine…
http://www.antentop.org/ Page 72
ANTENTOP- 01- 2008, # 010 Radio Antenna Engineering
Dave Platt AE6EO
I'm pleased to announce that Edmund A. Laport's
textbook Radio Antenna Engineering
is now available in electronic form.
The Book
Radio Antenna Engineering was published in 1952,
and presents an excellent overview of the state of
commercial antenna system engineering as practiced in
the first half of the 20th century. As its name implies, it's
not solely about electromagnetic or radio or antenna
theory although these issues are certainly a part of what
it talks about. Rather, it focuses on matters surrounding
the nuts and bolts (and logs, beams, bars, wires, and
insulators) of actually designing and implementing a
large-scale antenna system. As Laport writes,
There are three basic aspects of antenna engineering.
The first pertains to radiant energy in space around an
antenna system, as well as the current distributions that
produce the radiation pattern. The second pertains to
antenna circuitry and involves such matters as self- and
mutual impedances, currents, potentials, insulation, and
feeder systems that will yield the desired current
distributions. Third there is the structural engineering
which has to do with all the mechanical details of
supports, rigging, materials, strengths, weights,
hardware, assembly, adjustability, stability, and
maintenance. While each aspect must be separately
developed, the final design must be an integration of
the three, with a minimum of compromise and within
reasonable economic limits.
The book includes an introduction to radio theory
(referring the reader to works by Kraus, Terman, and
others for more detail). The first three chapters discuss
the specification and design of large antenna systems,
broken down by the frequency ranges they serve: low
frequency, medium frequency, and high frequency.
Three additional chapters discuss transmission lines,
impedance matching techniques, and logarithmic
potential theory. Each chapter is well supported by
drawings, charts, photographs, and an extensive
bibliography of references.
Edmund A Laport
Chief Engineer,
RCA International Division,
Radio Corporation of America,
Fellow, Institute of Radio Engineers
1952
--- Scanned and Prepared by
Dave Platt AE6EO---
Radio Antenna Engineering is noteworthy for its
collection of photographs of early and mid-20th-century
radio transmission facilities and construction practices.
It also has an extensive discussion of HF long-wire
antennas, including single-wire types, V designs,
rhombics, and fishbones.
Radio Antenna Engineering is certainly of significant
historical interest, and may be of practical use as well.
Although some of the designs and practices portrayed
in it have been supplanted in commercial service, much
of its content can still be of significant value to amateur-
radio operators and to those interested in the practical
aspects of high-power radio operation in the lower-
frequency RF bands.
http://www.antentop.org/ Page 73
ANTENTOP- 01- 2008, # 010 Radio Antenna Engineering
The Electronic Edition
Some time in January 2005, I decided to give up.
I figured I'd never be able to buy a copy of Radio
Antenna Engineering. I'd heard about it ever since
shortly after I got my amateur-radio license. I'd
searched the Web for it, found numerous references,
and found not a single used-book dealer who would
admit to having a copy or knowing where one might be
obtained. It seemed to be frequently sought after, and
not often available. I'd checked eBay, had seen
precisely one copy offered, and had lost the auction
(after bidding a rather extravagant amount of money).
I decided I'd have to "settle". Upon checking with my
city library, I found that although they didn't have a
copy, there were several universities and colleges in the
state which did, and that I could check out a copy for
three weeks via a inter-library loan. At least I'd be able
to read it.
Then, the thought struck me - I have a flatbed scanner.
If I found the book to be interesting enough, I could
scan the book and have an electronic record of the
book that I could consult. I could convert it to a
standard, portable format (PDF) using various freely-
available software tools on Linux.
I could even give this electronic version to other
people... if it was legal to do so. I did a bunch of
research, and concluded that it was! See below for a
discussion of the copyright issues involved.
What I'm making available here, is the results of my
efforts. The book is available in PDF format, complete
with bookmarks for the chapters and sections,
appendices, and index. It has not been through an OCR
(optical character recognition) process: the text and line
drawings and charts are in the form of 300 dpi
black&white scan images. This greatly reduces the risk
of typographical errors or mis-transcriptions, but means
that the text of the book is not searchable via electronic
means.
I've actually created two different electronic versions.
They differ only in the resolution and quality of the
photographs. The "ebook" version has the photographs
stored internally at a resolution of 150 pixels/inch, in
JPEG format, with moderate data reduction. The
"printer" version has the photographs stored at 300 dpi,
with less data reduction, using lossless "Flate" data
compression - it's about 50% larger than the "ebook"
version. Most people won't notice the difference in
image quality. The only reason I'd suggest for
downloading the "printer" version is if you have a really
good 1200-dot/inch (or better) printer, and want a really
high-quality printed version.
There's probably somewhere around 30 hours of work
invested in this project... scanning, re-scanning, writing
Bash and Perl scripts to do things with the NETPBM
software tools which would probably give their authors a
case of the screaming horrors, using The GIMP to clean
up the scans and extract the photographs for special
processing, figuring out how to use GhostScript to
create the PDF, creating the bookmarks and other PDF
markup request, proofreading, etc. The image-
processing steps alone required several hours of CPU-
crunching on a 2.4-gig P4 Celeron system, and heated
up our den quite significantly.
All in all, it was quite an interesting experience. The
results are certainly less than perfect - some artifacts
from the scanning process remain - but even in its
current state I find the end product to be worthwhile. I
hope you do, as well.
And, in one of those marvelous cosmic moments of
irony, it turned out to be unnecessary (at least for me).
After I finished scanning the library's copy and returned
it, and before I got started on the image processing, I
won an eBay auction for a copy of the McGraw-Hill
printed edition in mint condition.
Paperback copies are now available
Beginning on 9/2/2005, perfect-bound trade-paperback
printed copies of Radio Antenna Engineering can be
ordered via the print-on-demand publishing service at
www.lulu.com. The Lulu paperback edition has the
same text and photographs as the freely-downloadable
"printer" version, but is optimized for the 6"-by-9"
printing format and includes only a small single-page
edition of the appendix map. You can see the details
and place an order (if you wish) via
http://www.lulu.com/content/159004
This service is being offered as a convenience, for
those people who may not wish to go to the trouble of
downloading and printing a hardcopy themselves. The
price you pay Lulu is for the printing and binding of the
book and cover - I'm not collecting a royalty and they're
waiving their commission. With standard USPS
shipping, the total cost should be under $20 for U.S.
addresses, and this seems like a very fair price to me.
Copyright and distribution issues
Radio Antenna Engineering was published in 1952,
and bears a copyright in the name of McGraw-Hill (the
publisher). Under the laws of that era, this initial
copyright was valid for a term of 28 years, and expired
in 1980. The copyright could be renewed in the last
year of this initial term for a second term of 67 years.
Under the laws then in effect, this renewal was not
automatic - the renewal had to be registered by the
copyright holder in a timely manner.
http://www.antentop.org/ Page 74
ANTENTOP- 01- 2008, # 010 Radio Antenna Engineering
Based on all I've been able to find out, I believe that the
copyright was not renewed. I've searched the Library of
Congress online database of copyright registrations and
actions for 1976 and onwards, and have found no
evidence that McGraw-Hill, Laport, or anyone else ever
renewed the copyright on this book. I contacted
McGraw-Hill's rights-and-permissions department
asking whether they believed that they still held a valid
copyright, and they sent me a letter stating that they
"no longer control the rights" to this work. They
suggested I contact Laport at RCA... and to the best of
my knowledge Laport is a "silent key" (there's a
greenhouse dedicated to him at an arboretum in New
Jersey).
The upshot of all of the above, is that I believe that the
copyright on Radio Antenna Engineering expired at
the end of its original 28-year term, and that the book
passed into the public domain on December 31st, 1980.
The electronic version I have created is a "derived
work" of the original printed version - it's a translation of
the work into a new format, with significant editorial
effort involved in its creation. As such, it qualifies for its
own independent copyright protection under United
States law, and I am choosing to copyright it in order to
control the terms of its use and distribution.
SOME RIGHT RESERVED!
The terms by which this electronic version can be
copied, distributed, and used are based on one of the
"Creative Commons" public licenses, and can be
viewed in full detail by clicking on the icon above.
To summarize it all briefly: you (as a member of the
public) are granted permission to copy this electronic
work, distribute it, use it, and create further derivative
works, as long as:
• You aren't doing it for commercial purposes,
and
• You give credit to the sources of the work
(Laport as the original author, and me as
creator of the electronic version), and
• You enforce terms equivalent to these, for any
further derivative works that you create and
distribute
So, go ahead - download it, read it, stick it in your
library, print a few copies for your friends, burn a couple
of dozen onto business-card-sized CDs and hand them
out at a hamclub meeting, stick it up on an HTTP server
- as long as you aren't charging money for it, it's cool
with me.
Naturally, the copyright on this electronic version and its
derivatives applies only to those! It doesn't apply to the
original printed version, which is now in the public
domain. Nor does it apply to electronic versions created
independently by someone else. If you think you can
make an honest dollar by selling printed or electronic
copies of this book, you're free to do as I did - find a
printed copy, scan it, and clean it up. As long as you
don't use my version commercially, it's cool. If you do
mis-use my version for commercial purposes, then may
you have a conscience-twinging encounter with a
Rettysnitch in the near future!
Happy reading!
Dave Platt AE6EO
Photo circa 1938
http://www.antentop.org/ Page 75
ANTENTOP- 01- 2008, # 010 CW Key That Never Have Been Smallest
Igor Lavroushov UA6HJQ,
25 November, 2006, Kislovodsk, Russia
This micro key newer will be heavy for any mountain
radio-expedition. It is possible to use the key as back-
up or ever as main key of the amateur radio. This key
may be used at tuning antennas with hand- control
tuner (for example like MFJ- 902). For example the
key may be used for tuning ATAS- 25 with YAESU
FT8x7 (FT817, FT 857, FT897). Okey, go ahead to
make it!
Credit Line:
http://www.hamradio.cmw.ru/techn/cwk.htm
Step 1
Wee need only three parts for the key- it is a stereo
connector (this one is used for connecting CW- Key at
YAESU), little knob and small piece of a tube shrink. If
you have not these items in your junk- box run to
local electronic store, it can provide these parts for
sure. Now, tin the leads of the knob and connector,
knob must sit hard on the connector, cut off
unnecessary leads.
Step 2
Heat up Soldering Iron and solder one pin of the knob
to the ground of the connector, another pin of the knob
to the center pin. Lead for the middle part of the
connector cut off (At the picture the lead is bended
before cut off.)
Step 3
Careful insert this design to the transceiver and make
sure that our key is workable. Then insert shrink tube
to the key, heat up the shrink…. That is all! CW Key
that newer have been smallest lay in your hands.
http://www.antentop.org/ Page 76
ANTENTOP- 01- 2008, # 010 CW Key That Never Have Been Smallest
Conclusion
See lat the key at my FT817. Everything is ready to
Air.
Training takes several minutes and I can work with the
key at 60- 90 –WPM. BTW, it is very conveniently to
use the key with menu functions.
CW Key that newer have been smallest is in my hand.
Nice thing, nice thing for me and nice thing for present
(off course, fo radio- amateur!).
New Year Pictures from UA6HJQ
http://www.antentop.org/ Page 77
ANTENTOP- 01- 2008, # 010 Simple “PIC- KEY”
Credit Line: http://rx9cbi.narod.ru/PICKey.htm
This simple “PIC- KEY” provides sending Morse Code
in two modes. First, that was written in the memory
(four memory cluster), second, with hand jambic
manipulator.
Specification:
Supply Voltage: +7... 17-Volts.
Consumption current: 5... 7 mA.
Keying speed could be adjusted up to 400 WPM.
Capacity of each memory cluster up to 60 letters
(depends on the length of the letters and formatting the
text).
Time of storage information in the memory- - more
than 10 years (as specification on the Parts
mentioned).
Rewriting resource: more than 100000 times (as
specification on the Parts mentioned).
Ratio “dot- gap- dash” is 3 or 5 dots. Gap more then 5
dots is wrote 5-dots.
Used jambic mode A. (The mode is mostly used in
Russia).
Mike Kislinsky, RX9CBI
Figure 1 shows the schematic of Simple “PIC-KEY”
Functions of the Parts.
DA1: 5V- stabilizer;
DD1: Microcontroller;
DD2: Reprogrammable READ-ONLY Memory,
capacity 2048 bits:
DA2: Clock generator for adjusting keying speed.
R14, C11: Set Clock frequency for the DD1 (near 400-
500-kHz, in the schematic WDT set in “OFF”).
VD1, VD2: Show mode of the key.
Operation
Tapping buttons S1… S4 turn on the reproduction of
the Data from Cluster.
Tapping of any buttons (at this case begin reproduction
from the taped button) or pressing the key do ending of
reproduction
Holding buttons S1… S4 more the 1 second permits the
write to the Cluster.
Tapping any buttons does the end of the writing.
First variant of the key was not intended for high speed,
however, LZ2ZK (WITH MY LITTLE HELP) made
increasing of the speed up to 400-WPM (that is nice for
meteoric QSO).
73! Mike, RX9CBI
http://rx9cbi.narod.ru
http://www.antentop.org/ Page 78
ANTENTOP- 01- 2008, # 010 Simple “PIC- KEY”
Figure 1 Schematic of Simple “PIC-KEY”
Home Made Manipulator
Credit Line:
http://foto.cqham.ru/showphoto.php?photo=112
http://www.antentop.org/ Page 79
ANTENTOP- 01- 2008, # 010 Transceiver SQT
Igor Grigorov, UA3ZNW
Credit Line: QRP Transceivers and PAs from
Accessible Parts
http://www.antentop.org/009/qrp009.htm
Transceiver SQT differs from TST only by TX part,
therefore main volume of the article will be devoted to
the TX part. Figure 1 shows the TX part of the SQT.
Transceiver provides output RF power not less then 1
Wtts.
Transmitter consists of from a crystal oscillator (made
on T1), PUSH- PULL amplifier (made on T2, T3).
Transistor T4 provides keying of the Push- Pull
amplifier. Crystal oscillator works both, in RX and TX
mode. Through a coupling coil RF voltage going to
capacitor C6 of RX (see article about TST). From
value of R3 depends function of the RX. To much
value is going to low sensitivity, too low value is going
to bad reception (with spurious channels of reception).
As usual, R3 should be near 100 – 1000-Ohms.
Coupling coil has ¼ turns from L1. Data for L1C2 are
the same like for L1C1 from RX of the TST (see Table
2 for TST article).
You know, that at RX/TX mode in the DC transceiver the
generator should have shift 400- 800-Hz. Sometimes,
when we down on the key of the SQT transceiver, we
get the shift because changing mode of crystal oscillator.
If we have not got reliable shift at the case, we may use
circuit shown in Figure 2. The circuit is switched of
instead jumper and turn on to the RF-amplifier. At TX
mode a current going through inductor coiled above
ferrite that is changed the permeability of the ferrite. So,
we will have shift of the frequency at RX/TX. The shift is
depend on quantity turns switched instead jumper (1- 5)
and value of the resistor R*. It may be near 500- 5000-
Ohms. Any ferrite with permeability 400- 2000 should be
used in the circuit. For example, it may be ferrite ring
with OD 7- 20-millimeter, ferrite road in 3- 8 mm diameter
and 10-40 millimeter long. Wire in diameter of 0.1- 0.3-
millimeter (38AWG- 28AWG) should be okey for both
inductors. First winding ( to point “2”) is coiled turn to
turn, the second one ( to point “1”) by pile-up.
Figure 2 Frequency shift RX/TX circuit
If in serial with frequency- shift inductor an additional
inductor plus capacitor is inserted, we will get circuit for
frequency shift of the quartz in limit near 10-kHz plus
circuit for frequency shift at RX/TX mode.
Figure 3 shows the circuit. Table 1 shows data for L3,
TR1, TR3, C3, L2C9, RFC1, RFC2. Figure 4 shows
design of transformer for frequency – shift circuit
(Figure 2, Figure 3). Figure 5 shows design L2.
http://www.antentop.org/ Page 80
ANTENTOP- 01- 2008, # 010 Transceiver SQT
Figure 1 TX part of the SQT.
http://www.antentop.org/ Page 81
ANTENTOP- 01- 2008, # 010 Transceiver SQT
Figure 3 Circuit for shift quartz frequency plus frequency sift RX/TX
Figure 4 Design of transformer for frequency – shift circuit
Figure 5 Design L2
http://www.antentop.org/ Page 82
ANTENTOP- 01- 2008, # 010
Transceiver SQT
Table 1 Data for inductors of the SQT
Band,
MHz
1,8 3,5 7 10 14 18 21 24 28 Note
L2 32/120 10/60 3,5/36 2,5/30 1,5/22 0,9/18 0,9/18 0,9/18 0,9/18 *
L3 50/150 30/100 20/80 15/60 12/50 10/46 9/42 9/42 8/40 **
RFC1,
RFC2
300 250 200 180 150 150 120 120 100 ***
C9, pF 250 200 150 110 91 68 51 30 30
C3, pF 1000 1000 560 470 470 300 100 56 56
T1, T2 20 17 14 12 11 10 10 8 8 ****
Note
* L2: First column is inductance in microHenry, the numbers of turns. Tap from center of the inductor. Inductor
must be made symmetrically. L2 for 160- 80 meters may be wound by wire in diameter 0.1- 0.2 mm (37- 32
AWG), for 40- 30 meters may be wound by wire in 0.25- 0.5 mm (30- 24 AWG), for 20- 10 meters may be
wound by wire in diameter 0.5- 0.8 mm (24- 20 AWG). L2 for bands 1.8- 3.5 – MHz is wound on Russian
Resistor WS-2, for 7- 28 –MHz is wound on Russian Resistor WS1. Resistance for the resistors should be
more than 51-k
WS-2 (sizes: diameter 9.7-mm, length 49-mm)
WS-1 (sizes: diameter 7.6-mm, length 31-mm)
**L3: First column is inductance in microHenry, the numbers of turns. L3 for 160- 80 meters may be wound by
wire in diameter 0.1- 0.2 mm (37- 32 AWG), for 40- 10 meters may be wound by wire in 0.25- 0.5 mm (30- 24
AWG). L3 for bands 1.8- 3.5 – MHz is wound on Russian Resistor MLT-2, for 7- 28 –MHz is wound on
Russian Resistor MLT-1. Resistance for the resistors should be more than 27-k
MLT-2 (sizes: diameter 8.6-mm, length 18.5-mm)
MLT-1 (sizes: diameter 6.6-mm, length 13-mm)
***RFC1, RFC2: Coiled by pile- up on Russian Resistor WS- 0.5 by wire in diameter 0.1- 0.2 mm (37- 32
AWG).
WS- 0.5 (sizes: diameter 5.5-mm, length 26-mm)
****T1, T2: Coiled by two twisted wires (1 turn to 1 centimeter) by wire in diameter 0.25- mm (30- AWG). Core
– ferrite ring with OD 7… 20-millimeters (not critical), with permeability 100- 1000 (not critical). Figure 6 shows the
design of the transformer.
Pins for Soviet/Russian transistors
KT602 and KT928
http://www.antentop.org/ Page 83
ANTENTOP- 01- 2008, # 010 Transceiver SQT
Figure 6 Design of the T1, T2
Part List TX
Resistors:
R1: 39 k/ 0.25 W* (27- 100 k)
R2: 8.2 k/ 0.25 W* (5.1- 10 k)
R3: 560 Ohm/ 0.25 W* (100-Ohms-1k)
R4, R5: 220 Ohm/ 0.25 W* (51- 300-Ohms-1k)
R6, R7: 3.9 k/ 0.25 W* (2.2 - 10 k)
*Recommended
() In brackets- may be used
Capacitors:
C1: 1000- pF 0.1 uF
C2: See Table 1 article TST trcv
C3: See Table 1
C4: 1000- pF 0.1 uF
C5: 47 pF
C6, C7, C8: 0.022- 0.1-uF
C9: See Table 1
Semiconductors
Transistors
VT1: Small power NPN bipolar RF transistor (250-
mWtts/250-MHz)
VT2, VT3: Middle power NPN bipolar RF transistor (1-
Wtts/250-MHz) *
VT4: Middle power Switch PNP transistor (Ic not less
the 0.2-A)
“ Small heater is must or VT2, VT3. It may be a little
length of a copper tube that is sitting on the case of the
transistors.
Diodes
VD1: Any small power diode 50-mA/50-V
VD2, VD3: Any small power RF diodes
Connectors:
X1: Any RF Connector
X2: 5- PIN Audio Connector
Do not down the key too long because VT2, VT3 may
be overheated. If quartz is too active, switch in serial
with it a resistor in 15-100 Ohm.
The capacity for C3 is given (at Table 1) for active
quartz. If quartz is low- active the capacity of C3
should be pick- up. As usual it needs a little reduce the
capacity compare to Table 1.
Caution: Moving frequency for quartz described below
suits for OLD QUARTZ made in 30- 60s years of 20
century, which installed in the socket on holders (i.e.,
has not wires soldered to the quartz plate). Moving
frequency by the methods may destroy modern tiny
quartz plate. Only experienced ham have to use the
Procedure that described below.
Old Crystal
http://www.antentop.org/ Page 84
Antentop 2008 01
Antentop 2008 01
Antentop 2008 01
Antentop 2008 01
Antentop 2008 01
Antentop 2008 01
Antentop 2008 01
Antentop 2008 01
Antentop 2008 01
Antentop 2008 01
Antentop 2008 01
Antentop 2008 01
Antentop 2008 01
Antentop 2008 01
Antentop 2008 01
Antentop 2008 01
Antentop 2008 01

More Related Content

What's hot

Antentop 2007 01
Antentop 2007 01Antentop 2007 01
Antentop 2007 01BlackOnion
 
Antentop 2016 01
Antentop 2016 01Antentop 2016 01
Antentop 2016 01BlackOnion
 
Antentop 2004 01
Antentop 2004 01Antentop 2004 01
Antentop 2004 01BlackOnion
 
Antentop 2003 01
Antentop 2003 01Antentop 2003 01
Antentop 2003 01BlackOnion
 
Antentop 2009 01
Antentop 2009 01Antentop 2009 01
Antentop 2009 01BlackOnion
 
Antentop 2004 02
Antentop 2004 02Antentop 2004 02
Antentop 2004 02BlackOnion
 
Antentop 2010 02
Antentop 2010 02Antentop 2010 02
Antentop 2010 02BlackOnion
 
Antentop 2003 02
Antentop 2003 02Antentop 2003 02
Antentop 2003 02BlackOnion
 

What's hot (8)

Antentop 2007 01
Antentop 2007 01Antentop 2007 01
Antentop 2007 01
 
Antentop 2016 01
Antentop 2016 01Antentop 2016 01
Antentop 2016 01
 
Antentop 2004 01
Antentop 2004 01Antentop 2004 01
Antentop 2004 01
 
Antentop 2003 01
Antentop 2003 01Antentop 2003 01
Antentop 2003 01
 
Antentop 2009 01
Antentop 2009 01Antentop 2009 01
Antentop 2009 01
 
Antentop 2004 02
Antentop 2004 02Antentop 2004 02
Antentop 2004 02
 
Antentop 2010 02
Antentop 2010 02Antentop 2010 02
Antentop 2010 02
 
Antentop 2003 02
Antentop 2003 02Antentop 2003 02
Antentop 2003 02
 

Similar to Antentop 2008 01

Antentop 2003 03
Antentop 2003 03Antentop 2003 03
Antentop 2003 03BlackOnion
 
Antenna Manuscript_2016.pdf
Antenna Manuscript_2016.pdfAntenna Manuscript_2016.pdf
Antenna Manuscript_2016.pdfivan ion
 
200 transistor circuits.pdf
200 transistor circuits.pdf200 transistor circuits.pdf
200 transistor circuits.pdfivan ion
 
Arduino obstacle avoidance robot
Arduino obstacle avoidance robotArduino obstacle avoidance robot
Arduino obstacle avoidance robotSteven Radigan
 
How to make your first robot report
How to make your first robot reportHow to make your first robot report
How to make your first robot reportRamki M
 
Voltage Amplifier
Voltage Amplifier Voltage Amplifier
Voltage Amplifier jawad ahmad
 
ham radio cubical quad
ham radio cubical quadham radio cubical quad
ham radio cubical quadPateKline88
 
The Last Great Hardware Show
The Last Great Hardware ShowThe Last Great Hardware Show
The Last Great Hardware ShowDave Appleton
 
Insructables fm listening bug
Insructables   fm listening bugInsructables   fm listening bug
Insructables fm listening bugzubeditufail
 
Infrared string bass
Infrared string bassInfrared string bass
Infrared string bassEngr Ali
 
Intro to Hardware Programming with the Arduino Uno
Intro to Hardware Programming with the Arduino UnoIntro to Hardware Programming with the Arduino Uno
Intro to Hardware Programming with the Arduino UnoVui Nguyen
 

Similar to Antentop 2008 01 (12)

Antentop 2003 03
Antentop 2003 03Antentop 2003 03
Antentop 2003 03
 
Antenna Manuscript_2016.pdf
Antenna Manuscript_2016.pdfAntenna Manuscript_2016.pdf
Antenna Manuscript_2016.pdf
 
200 transistor circuits.pdf
200 transistor circuits.pdf200 transistor circuits.pdf
200 transistor circuits.pdf
 
Antenna
AntennaAntenna
Antenna
 
Arduino obstacle avoidance robot
Arduino obstacle avoidance robotArduino obstacle avoidance robot
Arduino obstacle avoidance robot
 
How to make your first robot report
How to make your first robot reportHow to make your first robot report
How to make your first robot report
 
Voltage Amplifier
Voltage Amplifier Voltage Amplifier
Voltage Amplifier
 
ham radio cubical quad
ham radio cubical quadham radio cubical quad
ham radio cubical quad
 
The Last Great Hardware Show
The Last Great Hardware ShowThe Last Great Hardware Show
The Last Great Hardware Show
 
Insructables fm listening bug
Insructables   fm listening bugInsructables   fm listening bug
Insructables fm listening bug
 
Infrared string bass
Infrared string bassInfrared string bass
Infrared string bass
 
Intro to Hardware Programming with the Arduino Uno
Intro to Hardware Programming with the Arduino UnoIntro to Hardware Programming with the Arduino Uno
Intro to Hardware Programming with the Arduino Uno
 

More from BlackOnion

Muse 2017-catalogue-rev5-small
Muse 2017-catalogue-rev5-smallMuse 2017-catalogue-rev5-small
Muse 2017-catalogue-rev5-smallBlackOnion
 
M 089-r-cs-r-3199-dees-1-1
M 089-r-cs-r-3199-dees-1-1M 089-r-cs-r-3199-dees-1-1
M 089-r-cs-r-3199-dees-1-1BlackOnion
 
M 02 r-cs-r-3745-dees-2
M 02 r-cs-r-3745-dees-2M 02 r-cs-r-3745-dees-2
M 02 r-cs-r-3745-dees-2BlackOnion
 
M 089-r-r-3199-ib-muse-001-rev2
M 089-r-r-3199-ib-muse-001-rev2M 089-r-r-3199-ib-muse-001-rev2
M 089-r-r-3199-ib-muse-001-rev2BlackOnion
 
M 089-r-r-3199-ib-muse-001-rev2-1
M 089-r-r-3199-ib-muse-001-rev2-1M 089-r-r-3199-ib-muse-001-rev2-1
M 089-r-r-3199-ib-muse-001-rev2-1BlackOnion
 
M 089-r-cs-r-3199-dees-1
M 089-r-cs-r-3199-dees-1M 089-r-cs-r-3199-dees-1
M 089-r-cs-r-3199-dees-1BlackOnion
 
M 068 r-cs-r-3567-dees-1
M 068 r-cs-r-3567-dees-1M 068 r-cs-r-3567-dees-1
M 068 r-cs-r-3567-dees-1BlackOnion
 
M 068-r-r-3567-ib-muse-001-rev3
M 068-r-r-3567-ib-muse-001-rev3M 068-r-r-3567-ib-muse-001-rev3
M 068-r-r-3567-ib-muse-001-rev3BlackOnion
 
M 02-r-r-3745-ib-muse-001-rev1
M 02-r-r-3745-ib-muse-001-rev1M 02-r-r-3745-ib-muse-001-rev1
M 02-r-r-3745-ib-muse-001-rev1BlackOnion
 
M 01 rs-cs-r-1791-dees-2
M 01 rs-cs-r-1791-dees-2M 01 rs-cs-r-1791-dees-2
M 01 rs-cs-r-1791-dees-2BlackOnion
 
M 01-rs-r-1791-ib-muse-005-rev3
M 01-rs-r-1791-ib-muse-005-rev3M 01-rs-r-1791-ib-muse-005-rev3
M 01-rs-r-1791-ib-muse-005-rev3BlackOnion
 

More from BlackOnion (13)

Rpds 30 black
Rpds 30 blackRpds 30 black
Rpds 30 black
 
Muse 2017-catalogue-rev5-small
Muse 2017-catalogue-rev5-smallMuse 2017-catalogue-rev5-small
Muse 2017-catalogue-rev5-small
 
M 089-r-cs-r-3199-dees-1-1
M 089-r-cs-r-3199-dees-1-1M 089-r-cs-r-3199-dees-1-1
M 089-r-cs-r-3199-dees-1-1
 
M 02 r-cs-r-3745-dees-2
M 02 r-cs-r-3745-dees-2M 02 r-cs-r-3745-dees-2
M 02 r-cs-r-3745-dees-2
 
M 089-r-r-3199-ib-muse-001-rev2
M 089-r-r-3199-ib-muse-001-rev2M 089-r-r-3199-ib-muse-001-rev2
M 089-r-r-3199-ib-muse-001-rev2
 
M 089-r-r-3199-ib-muse-001-rev2-1
M 089-r-r-3199-ib-muse-001-rev2-1M 089-r-r-3199-ib-muse-001-rev2-1
M 089-r-r-3199-ib-muse-001-rev2-1
 
M 089-r-cs-r-3199-dees-1
M 089-r-cs-r-3199-dees-1M 089-r-cs-r-3199-dees-1
M 089-r-cs-r-3199-dees-1
 
M 068 r-cs-r-3567-dees-1
M 068 r-cs-r-3567-dees-1M 068 r-cs-r-3567-dees-1
M 068 r-cs-r-3567-dees-1
 
M 068-r-r-3567-ib-muse-001-rev3
M 068-r-r-3567-ib-muse-001-rev3M 068-r-r-3567-ib-muse-001-rev3
M 068-r-r-3567-ib-muse-001-rev3
 
M 02-r-r-3745-ib-muse-001-rev1
M 02-r-r-3745-ib-muse-001-rev1M 02-r-r-3745-ib-muse-001-rev1
M 02-r-r-3745-ib-muse-001-rev1
 
M 01 rs-cs-r-1791-dees-2
M 01 rs-cs-r-1791-dees-2M 01 rs-cs-r-1791-dees-2
M 01 rs-cs-r-1791-dees-2
 
M 01-rs-r-1791-ib-muse-005-rev3
M 01-rs-r-1791-ib-muse-005-rev3M 01-rs-r-1791-ib-muse-005-rev3
M 01-rs-r-1791-ib-muse-005-rev3
 
Rev ea3url 06
Rev ea3url 06Rev ea3url 06
Rev ea3url 06
 

Recently uploaded

data_management_and _data_science_cheat_sheet.pdf
data_management_and _data_science_cheat_sheet.pdfdata_management_and _data_science_cheat_sheet.pdf
data_management_and _data_science_cheat_sheet.pdfJiananWang21
 
Thermal Engineering -unit - III & IV.ppt
Thermal Engineering -unit - III & IV.pptThermal Engineering -unit - III & IV.ppt
Thermal Engineering -unit - III & IV.pptDineshKumar4165
 
Double rodded leveling 1 pdf activity 01
Double rodded leveling 1 pdf activity 01Double rodded leveling 1 pdf activity 01
Double rodded leveling 1 pdf activity 01KreezheaRecto
 
PVC VS. FIBERGLASS (FRP) GRAVITY SEWER - UNI BELL
PVC VS. FIBERGLASS (FRP) GRAVITY SEWER - UNI BELLPVC VS. FIBERGLASS (FRP) GRAVITY SEWER - UNI BELL
PVC VS. FIBERGLASS (FRP) GRAVITY SEWER - UNI BELLManishPatel169454
 
Call Girls Walvekar Nagar Call Me 7737669865 Budget Friendly No Advance Booking
Call Girls Walvekar Nagar Call Me 7737669865 Budget Friendly No Advance BookingCall Girls Walvekar Nagar Call Me 7737669865 Budget Friendly No Advance Booking
Call Girls Walvekar Nagar Call Me 7737669865 Budget Friendly No Advance Bookingroncy bisnoi
 
Call for Papers - African Journal of Biological Sciences, E-ISSN: 2663-2187, ...
Call for Papers - African Journal of Biological Sciences, E-ISSN: 2663-2187, ...Call for Papers - African Journal of Biological Sciences, E-ISSN: 2663-2187, ...
Call for Papers - African Journal of Biological Sciences, E-ISSN: 2663-2187, ...Christo Ananth
 
Call for Papers - International Journal of Intelligent Systems and Applicatio...
Call for Papers - International Journal of Intelligent Systems and Applicatio...Call for Papers - International Journal of Intelligent Systems and Applicatio...
Call for Papers - International Journal of Intelligent Systems and Applicatio...Christo Ananth
 
Unit 1 - Soil Classification and Compaction.pdf
Unit 1 - Soil Classification and Compaction.pdfUnit 1 - Soil Classification and Compaction.pdf
Unit 1 - Soil Classification and Compaction.pdfRagavanV2
 
VIP Call Girls Ankleshwar 7001035870 Whatsapp Number, 24/07 Booking
VIP Call Girls Ankleshwar 7001035870 Whatsapp Number, 24/07 BookingVIP Call Girls Ankleshwar 7001035870 Whatsapp Number, 24/07 Booking
VIP Call Girls Ankleshwar 7001035870 Whatsapp Number, 24/07 Bookingdharasingh5698
 
Call Girls Pimpri Chinchwad Call Me 7737669865 Budget Friendly No Advance Boo...
Call Girls Pimpri Chinchwad Call Me 7737669865 Budget Friendly No Advance Boo...Call Girls Pimpri Chinchwad Call Me 7737669865 Budget Friendly No Advance Boo...
Call Girls Pimpri Chinchwad Call Me 7737669865 Budget Friendly No Advance Boo...roncy bisnoi
 
KubeKraft presentation @CloudNativeHooghly
KubeKraft presentation @CloudNativeHooghlyKubeKraft presentation @CloudNativeHooghly
KubeKraft presentation @CloudNativeHooghlysanyuktamishra911
 
chapter 5.pptx: drainage and irrigation engineering
chapter 5.pptx: drainage and irrigation engineeringchapter 5.pptx: drainage and irrigation engineering
chapter 5.pptx: drainage and irrigation engineeringmulugeta48
 
Unleashing the Power of the SORA AI lastest leap
Unleashing the Power of the SORA AI lastest leapUnleashing the Power of the SORA AI lastest leap
Unleashing the Power of the SORA AI lastest leapRishantSharmaFr
 
VIP Call Girls Palanpur 7001035870 Whatsapp Number, 24/07 Booking
VIP Call Girls Palanpur 7001035870 Whatsapp Number, 24/07 BookingVIP Call Girls Palanpur 7001035870 Whatsapp Number, 24/07 Booking
VIP Call Girls Palanpur 7001035870 Whatsapp Number, 24/07 Bookingdharasingh5698
 
notes on Evolution Of Analytic Scalability.ppt
notes on Evolution Of Analytic Scalability.pptnotes on Evolution Of Analytic Scalability.ppt
notes on Evolution Of Analytic Scalability.pptMsecMca
 
XXXXXXXXXXXXXXXXXXXXXXXXXXXXXXXXXXXXXXXXXXXXXXXXXXXX
XXXXXXXXXXXXXXXXXXXXXXXXXXXXXXXXXXXXXXXXXXXXXXXXXXXXXXXXXXXXXXXXXXXXXXXXXXXXXXXXXXXXXXXXXXXXXXXXXXXXXXXX
XXXXXXXXXXXXXXXXXXXXXXXXXXXXXXXXXXXXXXXXXXXXXXXXXXXXssuser89054b
 

Recently uploaded (20)

data_management_and _data_science_cheat_sheet.pdf
data_management_and _data_science_cheat_sheet.pdfdata_management_and _data_science_cheat_sheet.pdf
data_management_and _data_science_cheat_sheet.pdf
 
Thermal Engineering -unit - III & IV.ppt
Thermal Engineering -unit - III & IV.pptThermal Engineering -unit - III & IV.ppt
Thermal Engineering -unit - III & IV.ppt
 
Call Girls in Ramesh Nagar Delhi 💯 Call Us 🔝9953056974 🔝 Escort Service
Call Girls in Ramesh Nagar Delhi 💯 Call Us 🔝9953056974 🔝 Escort ServiceCall Girls in Ramesh Nagar Delhi 💯 Call Us 🔝9953056974 🔝 Escort Service
Call Girls in Ramesh Nagar Delhi 💯 Call Us 🔝9953056974 🔝 Escort Service
 
Double rodded leveling 1 pdf activity 01
Double rodded leveling 1 pdf activity 01Double rodded leveling 1 pdf activity 01
Double rodded leveling 1 pdf activity 01
 
PVC VS. FIBERGLASS (FRP) GRAVITY SEWER - UNI BELL
PVC VS. FIBERGLASS (FRP) GRAVITY SEWER - UNI BELLPVC VS. FIBERGLASS (FRP) GRAVITY SEWER - UNI BELL
PVC VS. FIBERGLASS (FRP) GRAVITY SEWER - UNI BELL
 
Call Girls Walvekar Nagar Call Me 7737669865 Budget Friendly No Advance Booking
Call Girls Walvekar Nagar Call Me 7737669865 Budget Friendly No Advance BookingCall Girls Walvekar Nagar Call Me 7737669865 Budget Friendly No Advance Booking
Call Girls Walvekar Nagar Call Me 7737669865 Budget Friendly No Advance Booking
 
Call for Papers - African Journal of Biological Sciences, E-ISSN: 2663-2187, ...
Call for Papers - African Journal of Biological Sciences, E-ISSN: 2663-2187, ...Call for Papers - African Journal of Biological Sciences, E-ISSN: 2663-2187, ...
Call for Papers - African Journal of Biological Sciences, E-ISSN: 2663-2187, ...
 
Call for Papers - International Journal of Intelligent Systems and Applicatio...
Call for Papers - International Journal of Intelligent Systems and Applicatio...Call for Papers - International Journal of Intelligent Systems and Applicatio...
Call for Papers - International Journal of Intelligent Systems and Applicatio...
 
Unit 1 - Soil Classification and Compaction.pdf
Unit 1 - Soil Classification and Compaction.pdfUnit 1 - Soil Classification and Compaction.pdf
Unit 1 - Soil Classification and Compaction.pdf
 
VIP Call Girls Ankleshwar 7001035870 Whatsapp Number, 24/07 Booking
VIP Call Girls Ankleshwar 7001035870 Whatsapp Number, 24/07 BookingVIP Call Girls Ankleshwar 7001035870 Whatsapp Number, 24/07 Booking
VIP Call Girls Ankleshwar 7001035870 Whatsapp Number, 24/07 Booking
 
Call Girls Pimpri Chinchwad Call Me 7737669865 Budget Friendly No Advance Boo...
Call Girls Pimpri Chinchwad Call Me 7737669865 Budget Friendly No Advance Boo...Call Girls Pimpri Chinchwad Call Me 7737669865 Budget Friendly No Advance Boo...
Call Girls Pimpri Chinchwad Call Me 7737669865 Budget Friendly No Advance Boo...
 
KubeKraft presentation @CloudNativeHooghly
KubeKraft presentation @CloudNativeHooghlyKubeKraft presentation @CloudNativeHooghly
KubeKraft presentation @CloudNativeHooghly
 
chapter 5.pptx: drainage and irrigation engineering
chapter 5.pptx: drainage and irrigation engineeringchapter 5.pptx: drainage and irrigation engineering
chapter 5.pptx: drainage and irrigation engineering
 
Water Industry Process Automation & Control Monthly - April 2024
Water Industry Process Automation & Control Monthly - April 2024Water Industry Process Automation & Control Monthly - April 2024
Water Industry Process Automation & Control Monthly - April 2024
 
Unleashing the Power of the SORA AI lastest leap
Unleashing the Power of the SORA AI lastest leapUnleashing the Power of the SORA AI lastest leap
Unleashing the Power of the SORA AI lastest leap
 
VIP Call Girls Palanpur 7001035870 Whatsapp Number, 24/07 Booking
VIP Call Girls Palanpur 7001035870 Whatsapp Number, 24/07 BookingVIP Call Girls Palanpur 7001035870 Whatsapp Number, 24/07 Booking
VIP Call Girls Palanpur 7001035870 Whatsapp Number, 24/07 Booking
 
NFPA 5000 2024 standard .
NFPA 5000 2024 standard                                  .NFPA 5000 2024 standard                                  .
NFPA 5000 2024 standard .
 
Call Now ≽ 9953056974 ≼🔝 Call Girls In New Ashok Nagar ≼🔝 Delhi door step de...
Call Now ≽ 9953056974 ≼🔝 Call Girls In New Ashok Nagar  ≼🔝 Delhi door step de...Call Now ≽ 9953056974 ≼🔝 Call Girls In New Ashok Nagar  ≼🔝 Delhi door step de...
Call Now ≽ 9953056974 ≼🔝 Call Girls In New Ashok Nagar ≼🔝 Delhi door step de...
 
notes on Evolution Of Analytic Scalability.ppt
notes on Evolution Of Analytic Scalability.pptnotes on Evolution Of Analytic Scalability.ppt
notes on Evolution Of Analytic Scalability.ppt
 
XXXXXXXXXXXXXXXXXXXXXXXXXXXXXXXXXXXXXXXXXXXXXXXXXXXX
XXXXXXXXXXXXXXXXXXXXXXXXXXXXXXXXXXXXXXXXXXXXXXXXXXXXXXXXXXXXXXXXXXXXXXXXXXXXXXXXXXXXXXXXXXXXXXXXXXXXXXXX
XXXXXXXXXXXXXXXXXXXXXXXXXXXXXXXXXXXXXXXXXXXXXXXXXXXX
 

Antentop 2008 01

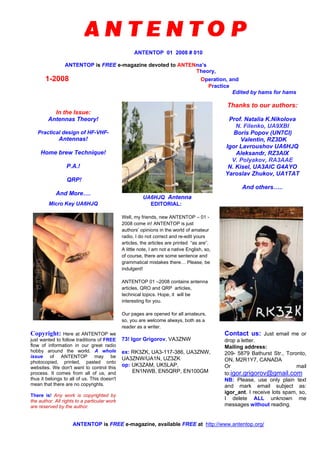
  • 1. ANTENTOP 01 2008 # 010 ANTENTOP is FREE e-magazine devoted to ANTENna’s Theory, 1-2008 Operation, and Practice Edited by hams for hams In the Issue: Antennas Theory! Practical design of HF-VHF- Antennas! Home brew Technique! P.A.! QRP! And More…. UA6HJQ Antenna Thanks to our authors: Prof. Natalia K.Nikolova N. Filenko, UA9XBI Boris Popov (UN7CI) Valentin, RZ3DK Igor Lavroushov UA6HJQ Aleksandr, RZ3AIX V. Polyakov, RA3AAE N. Kisel, UA3AIC G4AYO Yaroslav Zhukov, UA1TAT And others….. Micro Key UA6HJQ EDITORIAL: Well, my friends, new ANTENTOP – 01 - 2008 come in! ANTENTOP is just authors’ opinions in the world of amateur radio. I do not correct and re-edit yours articles, the articles are printed “as are”. A little note, I am not a native English, so, of course, there are some sentence and grammatical mistakes there… Please, be indulgent! ANTENTOP 01 –2008 contains antenna articles, QRO and QRP articles, technical topics. Hope, it will be interesting for you. Our pages are opened for all amateurs, so, you are welcome always, both as a reader as a writer. Copyright: Here at ANTENTOP we just wanted to follow traditions of FREE flow of information in our great radio hobby around the world. A whole issue of ANTENTOP may be photocopied, printed, pasted onto websites. We don't want to control this process. It comes from all of us, and thus it belongs to all of us. This doesn't mean that there are no copyrights. There is! Any work is copyrighted by the author. All rights to a particular work are reserved by the author. 73! Igor Grigorov, VA3ZNW ex: RK3ZK, UA3-117-386, UA3ZNW, UA3ZNW/UA1N, UZ3ZK op: UK3ZAM, UK5LAP, EN1NWB, EN5QRP, EN100GM Contact us: Just email me or drop a letter. Mailing address: 209- 5879 Bathurst Str., Toronto, ON, M2R1Y7, CANADA Or mail to:igor.grigorov@gmail.com NB: Please, use only plain text and mark email subject as: igor_ant. I receive lots spam, so, I delete ALL unknown me messages without reading. ANTENTOP is FREE e-magazine, available FREE at http://www.antentop.org/
  • 2. ANTENTOP- 01- 2008, # 010 Editorial Welcome to ANTENTOP, FREE e - magazine! ANTENTOP is FREE e- magazine, made in PDF, devoted to antennas and amateur radio. Everyone may share his experience with others hams on the pages. Your opinions and articles are published without any changes, as I know, every your word has the mean. Every issue of ANTENTOP is going to have 100 pages and this one will be paste in whole on the site. Preview's files will be removed in this case. I do not know what a term for one issue will need, may be 8- 10 month or so. A whole issue of ANTENTOP hold nearly 10 MB. A little note, I am not a native English, so, of course, there are some sentence and grammatical mistakes there… Please, be indulgent! Preview: Some articles from "cooking" issue will be pasted for preview on this site, others no. Because, as I think, it must be something mysterious in every issue. Publishing: If you have something for share with your friends, and if you want to do it FREE, just send me an email. Also, if you want to offer for publishing any stuff from your website, you are welcome! Your opinion is important for me, so, contact if you want to say something! Copyright Note: Dear friends, please, note, I respect Copyright. Always, when I want to use some stuff for ANTENTOP, I ask owners about it. But… sometimes my efforts are failed. I have some very interesting stuff from closed websites, but I can not go to touch with their owners… as well as I have no response on some my emails from some owners. I have a big collection of pictures, I have got the pictures and stuff in others ways, from FREE websites, from commercial CDs, intended for FREE using, and so on... I use to the pictures (and seldom, some stuff from closed websites) in ANTENTOP. If the owners still are alive, please, contact with me, I immediately remove any Copyright stuff, or, if it is necessary, all needed references will be made there. I do not know, why the owners do not response me. Are they still alive? Do their companies are a bankrupt? Or do they move anywhere? Where they are in the end? Business Advertising: ANTENTOP is not a commercial magazine. Authors and I (Igor Grigorov, the editor of the magazine) do not get any profit from the issue. But off course, I do not mention from commercial ads in ANTENTOP. It allows me to do the magazine in most great way, allows me to pay some money for authors to compensate their hard work. I have lots interesting stuff in Russian, and owners of the stuff agree to publish the stuff in ANTENTOP… but I have no enough time to translate the interesting stuff in English, however I may pay money to translators, and, they will do this work, and we will see lots interesting articles there. So, if you want to put a commercial advertisement in ANTENTOP, please contact with me. A commercial advertisement will do ANTENTOP even greater interesting and various! I hope, readers do not mention against such commercial ads. Book Advertising: I do not think, that Book Advertising is a commercial advertisement. So, Book Advertising is FREE at ANTENTOP. Contact with me for details. Email: antentop@antentop.org subject: igor_ant NB: Please, use only plain text and mark email subject as: igor_ant. I receive lots spam and viruses, so, I delete ALL unknown me messages without reading. 73! Igor Grigorov, VA3ZNW ex: UA3-117-386, UA3ZNW, UA3ZNW/UA1N, UZ3ZK, RK3ZK op: UK3ZAM, UK5LAP,EN1NWB, EN5QRP, EN100GM http://www.antentop.org/ Editorial
  • 3. ANTENTOP- 01- 2008, # 010 Table of Contents Table of Contents Antenna Theory Page 1 Radiation from Infinitesimal (Elementary) Sources : By Prof. Natalia K. Nikolova Dear friends, I would like to give to you an interesting and reliable antenna theory. Hours searching in the web gave me lots theoretical information about antennas. Really, at first I did not know what information to chose for ANTENTOP. Now I want to present to you one more very interesting Lecture - it is a Lecture Radiation from Infinitesimal (Elementary) Sources. I believe, you cannot find such info anywhere for free! Very interesting and very useful info for every ham, for every radio- engineer. Radiation from an infinitesimal dipole. Duality in Maxwell’s equations. Radiation from an infinitesimal loop. Radiation zones. 5- 21 Receiving Antennas 2 Atmospheric Current: Practical Experiments: By V. T. Polaykov, RA3AAE, Ph. D in technical science The Article describes some experimenters that prove the mysterious current from the Broom Antenna 22- 25 HF- Antenna Practice 3 Expedition Two Element Antenna for the 20-meter Band: By N. Filenko, UA9XBI The antenna was designed for using at DX- peditions. Antenna consists of two elements- mast in height 10 meters and in diameter 30-50-mm (it is reflector) and a dipole for the 20-m (it is driver). 26- 28 4 Simple All- Band HF- Antenna: By Eugene Erohov (US4EM) Dream of each of amateurs working from a hard for antenna installation conditions to have a small invisible antenna for all bands. I have tried to solve the dream. My all band antenna is something middle between T2FD and loaded Loop. 29 5 Rectangular UB5UG: By Yuri Medinets, UB5UG, Kiev Rectangular shown at Figure 1 has good parameters and not so sensitive to height (that is very important for low amateurs HF-ranges) compare with dipole. Upper horizon wire is broken by a nut insulator at it’s center. Due to a small height the antenna is suitable for 80- and 40-meters Band. 30- 32 Page 1 http://www.antentop.org/
  • 4. ANTENTOP- 01- 2008, # 010 Table of Contents Table of Contents Page 6 Delta Loop UN7CI for 7, 10, 14 and 21- MHz: By Boris Popov (UN7CI), Petropavlovsk, Kazakhstan The antenna was designed to work from a field conditions at amateur’s bands 7, 10, 14 and 21-MHz. The antenna has SWR less the 2.0:1.0 at height of the lower side 1.2 meters above the ground. Antenna has good efficiency. 33- 34 7 Vertical UN7CI for 7, 14 and 21- MHz: By Boris Popov (UN7CI), Petropavlovsk, Kazakhstan The antenna was designed for amateur’s bands’ 7, 14 and 21-MHz. Antenna fed throw 50-Ohm coax. The antenna has SWR less the 1.5:1.0 at any band. Antenna has good efficiency and low angle of radiation at vertical plane (that is good for DX-ing). Only one power relay is used to switch a working band. 35-36 8 Delta for 80 and 40- meters: By Valentin, RZ3DK The Delta for 80 and 40 meters was designed for installation on the roof of a building with help of a metal mast. Matching of the antenna at both bands is possible with the help of the length of 75-Ohm Coaxial in 4.82-meters. 37- 41 VHF- Antenna Practice 9 Two Elements YAGI for 145 MHz: Balcony Project: By Aleksandr, RZ3AIX Well, why I did a Two- Elements YAGI? Why not Three, Four or more Elements YAGI? Or, say, so popular 2-5/8 or 3-5/8 Vertical Collinear Antenna? 42- 44 10 Simple Weekend Antenna for 145-MHz: By Igor Lavroushov UA6HJQ Yes, I need an antenna for 144-MHz. Not just antenna, but antenna that can work in different conditions, from my home, from a car, from my mountain trip. Have been tried different design I suddenly stopped to those one. It is two elements YAGI that is very simple to design but has good characteristics. 46- 48 11 Fixture for Fast Assembling of VHF- Antennas: By Il’ya Yarushkin, UA9UKO The Fixture is intended for fast assembly and disassembly of VHF antennas. It is very useful for experimenters with the antennas or assembling of portable VHF- antennas. 49- 50 12 Water Pipe T-Joint at VHF Antennas: By N. Filenko, UA9XBI By the way, I was (and may be am) not an experienced VHF- man before I decided to do my VHF YAGI. I had serous doubt that I spoiled lots stuff while I made my YAGI. So I found for solution how to do the antenna without turning in garbage my antenna’s material. 51- 53 Page 2 http://www.antentop.org/
  • 5. ANTENTOP- 01- 2007, # 009 Table of Contents Table of Contents Page P.A. 13 Matching a Transceiver with PA on several GU50: By N. Filenko, UA9XBI Matching input of PA that contained several tubes GU50 with a transceiver is not a simple matter as it seems at first look. Sometimes for simplicity of the design PA the driver power from a transceiver going straight away to several connected to bridge cathodes of the GU50. …. 45 14 2xGU50 and 3xGU50 PA from UA1TAT: By Yaroslav Zhukov, UA1TAT Two simple schematic PA made on Russian popular tubes GU50. 54- 56 15 PA 3xGU50. Photos of the Design: By N. Kisel, UA3AIC, Photos show how to do a simple PA 3xGU50. 57- 60 16 PA 2xGU50. Photos of the Design: By N. Kisel, UA3AIC, Photos show how to do a simple PA 2xGU50. 61 17 PA 5xGU50. Photos of the Design: By N. Kisel, UA3AIC, Photos show how to do a simple PA 5xGU50. 62 18 Simple Broadband P.A.: By Igor Grigorov, UA3ZNW The P.A. is very simple. It is usual push- pull with some tricks which allows to make the P.A. in easy style. 63- 68 19 Matching Circuit for Tube PA: By Sergey Lebedev, UA0UG As usual, at a Vacuum Tube PA an output tube is matched with antenna with help of a p-circuit. It is refer to use switching inductors or variometer. This matching circuit can work from 3- 30-MHz without switching inductors. The circuit is widely known among radio amateurs of 9-0 amateurs region of Russia. 69 Page 3 http://www.antentop.org/
  • 6. ANTENTOP- 01- 2007, # 009 Table of Contents Table of Contents Free E-books Page 20 QRP Transceivers and PAs from Accessible Part.: By Igor Grigorov, UA3ZNW (*pdf), 38 pages. Book in English "QRP Transceivers and PAs from Accessible Parts " (*pdf), 38 pages is a translation of Russian Book "QRP Transceivers and PAs from Accessible Parts " (*pdf), 28 pages. Russian version was published by me (on my own expenses) in 1991, in Belgorod, Russia. I had printed 2000 samples of the book. Of course, it was not best paper used for the book as well as not good quality of printing. The book describes kits which my own company ("Vibrissa") produced at the times. Naturally, the book was the manual for the kits. Were produced 400 kits of TST (Tube- Semi- conductor- Transceiver) near 50 of them were assembled by me for customers, 200 kits SQT (Semi- conductor- Quartz- Transceiver), near 30 were of them were assembled by me for customers, 200 kits of PA, near 60 were of them were assembled by me for customers. Of course, the book will be interesting for all amateurs, not only for QRP- funs 70 21 CQ- QRP- 03 U- QRP- C was alive only 9 years, from 1986 to 1995. At the times the club had managed lots deals. At first were united QRPers from all former USSR. It was the base for recently QRP Clubs of the former USSR- for RU- QRP- C and for UR- QRP-C. At second, a new amateur code “72” was accepted in the ham World due to efforts of Oleg Borodin, former president of the U- QRP-C. At third, 3 nice QRP- magazines were printed out. One of the magazines, CQ- QRP # 3 is pasted to AntenTop Library. The magazine is in Russian, but the schematics are international understandable. 71 22 CQ- QRP- 02 U- QRP- C was alive only 9 years, from 1986 to 1995. At the times the club had managed lots deals. At first were united QRPers from all former USSR. It was the base for recently QRP Clubs of the former USSR- for RU- QRP- C and for UR- QRP-C. At second, a new amateur code “72” was accepted in the ham World due to efforts of Oleg Borodin, former president of the U- QRP-C. At third, 3 nice QRP- magazines was printed out. One of the magazines, CQ- QRP # 2 is pasted to AntenTop Library. The magazine is in Russian, but the schematics are international understandable. 72 23 Book "Radio Antenna Engineering" by Edmund A Laport, Chief Engineer, RCA International Division, Radio Corporation of America, Fellow, Institute of Radio Engineers 1952 --- Scanned and Prepared by Dave Platt AE6EO--- About the book comment by Dave Platt AE6EO: "Radio Antenna Engineering is certainly of significant historical interest, and may be of practical use as well. Although some of the designs and practices portrayed in it have been supplanted in commercial service, much of its content can still be of significant value to amateur-radio operators and to those interested in the practical aspects of high-power radio operation in the lower-frequency RF bands..." Just brief description, photos and schematic diagram. 73-75 Page 4 http://www.antentop.org/
  • 7. ANTENTOP- 01- 2007, # 009 Table of Contents Table of Contents Keys Page 24 CW Key That Never Have Been Smallest: By Igor Lavroushov UA6HJQ This micro key newer will be heavy for any mountain radio-expedition. It is possible to use the key as backup or ever as main key of the amateur radio. This key may be used at tuning antennas with hand- control tuner (for example like MFJ- 902). For example the key may be used for tuning ATAS- 25 with YAESU FT8x7 (FT817, FT 857, FT897). Okey, go ahead to make it! 76- 77 25 Simple “PIC- KEY”: By Mike Kislinsky, RX9CBI This simple “PIC- KEY” provides sending Morse Code in two modes. First, that was written in the memory (four memory cluster), second, with hand jambic manipulator. 78- 79 QRP Transceivers 26 Transceiver SQT: By Igor Grigorov, UA3ZNW Transceiver SQT (Semiconductor Quartz Transceiver) firstly was described at book "QRP Transceivers and PAs from Accessible Parts." The book (in Russian) is at Antentop Free Library. The article is English translation of the Russian one. Shortly about SQT: DC CW Transceiver, X- tall VFO, VFO range up to 20 kHz (depenfs on used crystal), 50-Ohms Antenna, head-phone RX with sensetivity near 1- micro- Volt, Power Supply is 12-V, RF out is near 1-Wtts, any HF- amateur band or 2-3 amateur band (options, depends on used crystal), made on transistors. 80- 93 Useful Data 27 Logos of ex- USSR Electronics Factories The table shows Logos of Electronics Factories used in ex-USSR. Some of the Logos are used up to our days 94- 100 Page 4.1 http://www.antentop.org/
  • 8. ANTENTOP- 01- 2008, # 010 Radiation from Infinitesimal (Elementary) Sources Feel Yourself a Student! Dear friends, I would like to give to you an interesting and reliable antenna theory. Hours searching in the web gave me lots theoretical information about antennas. Really, at first I did not know what information to chose for ANTENTOP. Finally, I stopped on lectures “Modern Antennas in Wireless Telecommunications” written by Prof. Natalia K. Nikolova from McMaster University, Hamilton, Canada. You ask me: Why? Well, I have read many textbooks on Antennas, both, as in Russian as in English. So, I have the possibility to compare different textbook, and I think, that the lectures give knowledge in antenna field in great way. Here first lecture “Introduction into Antenna Study” is here. Next issues of ANTENTOP will contain some other lectures. So, feel yourself a student! Go to Antenna Studies! I.G. My Friends, the above placed Intro was given at ANTENTOP- 01- 2003 to Antennas Lectures. Now I know, that the Lecture is one of popular topics of ANTENTOP. Every Antenna Lecture was downloaded more than 1000 times! Now I want to present to you one more very interesting Lecture - it is a Lecture Radiation from Infinitesimal (Elementary) Sources. I believe, you cannot find such info anywhere for free! Very interesting and very useful info for every ham, for every radio- engineer. So, feel yourself a student! Go to Antenna Studies! I.G. McMaster University Hall Prof. Natalia K. Nikolova Radiation from Infinitesimal (Elementary) Sources (Radiation from an infinitesimal dipole. Duality in Maxwell’s equations. Radiation from an infinitesimal loop. Radiation zones.) by Prof. Natalia K. Nikolova www.antentop.org Page-5
  • 9.
  • 10.
  • 11.
  • 12.
  • 13.
  • 14.
  • 15.
  • 16.
  • 17.
  • 18.
  • 19.
  • 20.
  • 21.
  • 22.
  • 23.
  • 24.
  • 25. ANTENTOP- 01- 2008, # 010 Atmospheric Current: Practical Experiments V. T. Polaykov, RA3AAE, Ph. D in technical science The Article describes some experimenters that prove the mysterious current from the Broom Antenna Credit Line: http://qrp.ru/ The article is described my experiments to measure “atmosphere current” (see Reference 1).At first I tried to measure the current at field conditions. For antenna mast I have used a telescopic plastic fishing tackle in 7 meters long. Broom was made from opened multistrand cable. Branches of the broom had length in 10 centimeters. Grounding was made from a steel rod in diameter of 4 millimeter and length in 50 centimeters. The experiment was made in a forest at a wide glade. It was good calm weather. A thin wire is going from the broom to the digital multimeter M830B, another wire from the multimeter is going to the ground. Multimeter was installed at scale “200 mV”. At the scale the multimeter has input impedance 1 million Ohms, so, the maximum measurement current is 200 nano A. However, the multimeter has digits at scale that show 0.1-nano A. V. T. Polaykov, RA3AAE It was discovered no any current. A weak sensitivity of the multimeter may be the reason. However, another phenomenon was discovered. At swing of the fishing rod (with broom) that is usual matter at the experimenters, the multimeter shows current. The current reached up to 10 nano A and changed by amplitude and polarity. I tried to count the current. The speed of a flow of ions is equal to mobility of ions multiplied by intensity of E- field. The mobility of negative ions (on Chizhevsky ) under normal atmospheric conditions is equal 1,83 centimeter /second, and intensity of an atmospheric static field - about 1,3 V / centimeter. So, speed of flow of ions V near 2,5 centimeter/second. Density of flow of ions j = nVe. Concentration n of ions at natural conditions is estimate equal near 1000 on cubic centimeter, charge of an ion е = 1,6.10-19 ql. So, ionic current near ground is near about 4 pico A/square meter, that is not practically matched with some data found by me in technical reference- near 2,5 … 3,5 pico A/ square meter. It is less of the sensitivity of the multimeter in 10-100 times. At the same time we may assume, that grounded (through the digital multimeter) antenna creates around of it’s end top a volumetric charge with a zero potential relative to the ground. Moving fast (faster than ions can move) the broom antenna end from one air area (that almost has potential of the broom) to other air are (that has potential U near 1000 V relative to the ground- 130 V (electrical gradient) multiply to 7.5 meters (height of the fishing rod)) is caused recharge current i for the antenna. Let’s find the current. I= dq/dt, Where: q= CU. Assume that antenna has C= 20 pF and time of antenna moving- 1 second. So, antenna current would be 20 nano- A, that the multimeter is shown to us. Conclusion 1: Although I cannot measure the antenna current at the field conditions the experiment prove the electrization of the air around the antenna broom. http://www.antentop.org/ Page 22
  • 26. ANTENTOP- 01- 2008, # 010 Atmospheric Current: Practical Experiments Other experiment I made in summer, in hot weather (+28 C) at weak wind. Broom was made from a steel wire rope. The rope contained 49 steel wires, I untwisted the rope in length near 20 centimeter. Figure 1 shows my “Broom- Rope Antenna.” Figure 1 Broom- Rope Antenna from the untwisted rope Broom was fixed on the end of the 7-meter fishing tackle, end of this one was fixed to a dry pine pole. The mast of 12 meters length was fixed to the bungalow, so the Broom Antenna was at 9 meters over grounded metal roof. Figure 2 shows the design. A thin insulated wire was going from the Broom to the “plus” of the multimeter, “minus” of the multimeter was connected with the ground. A capacitor 4-mkFx250-V having very low leaking was connected to bridge to the multimeter probes. The capacitor shunts RF and filters fast fluctuation of the antenna current. Now the antenna current was measured for sure. The current was +0.15 nano-A at with some unexpectedly big fluctuations. Several hours of measurement showed that max current was several nano-A (Figure 3). Sometimes the current changed the polarity, I observed minus 0.3 nano-A. The antenna current fluctuations may be caused by wind that moves air areas with different volumetric charge around Broom Antenna. Figure 2 Broom Antenna in the night sky Conclusion 2: Current from the Broom to the antenna wire is existed and prove the “quite” discharge from ends of broom wires. The current is very unstable by amplitude and may change polarity at clear weather. Ever simple digital multimeter can measure the current. There are no doubts that “quiet” discharge has an area with a negative resistance. It is possible to find lots data about it in the Internet. Figure 4 (taken from Reference 2) shows a Volt/ Ampere diagram of such discharge. Almost the same diagram you may find at Reference 3. Take attention that at the left area there are nano-Ampere current area. It is so-called “quite” or Townsend’s discharge. At right area (arc discharge) there are current at several Amperes. Both areas have parts with a negative resistance. Nano-area begins from current near 100- nano- Ampere. However the current depends on lots conditions… My experimenters (made in 2000- 2001 years) proved that discharge may began at relative low voltage and enough large distance between electrodes (see Reference 4). I did the experimenters at my table so I do not know how discharge would be flow at a Broom Antenna. At the experimenters I was observed relaxation oscillations. The oscillations were detected by the help of oscilloscope. It may be detected by ear like weak hissing. Townsend was observed this phenomenon at 20- 30s of the 20- century. http://www.antentop.org/ Page 23
  • 27. ANTENTOP- 01- 2008, # 010 Atmospheric Current: Practical Experiments Figure 3 One of the maximum of the Antenna Current Figure 4 Volt/Ampere diagram of air discharge. www.qrp.ru http://www.antentop.org/ mirror: www.antentop.boom.ru Page 24
  • 28. ANTENTOP- 01- 2008, # 010 Atmospheric Current: Practical Experiments Recently I have repeated these experiments to find the top frequency of the discharge generation. I switched on in the circuit of a discharge needle, (also I have tried a small broom made from thin wires) different LC- circuits. It was easy to obtain generation at 1-MHz. But I managed to get generation up to 5-MHz. However, I believe it is possible to get generation above 5-MHz. The Broom Antenna was tested with a detector receiver. This receiver with a LW antenna (12- meters, 45° above the ground) provided 1.5-V across a high-ohmic phones (day time, broadcasting Russian radio station Mayak, 549 –kHz, the station was located at 28-km from my Broom Antenna). Vertical Broom Antenna (that was described above) provided 4.5-V across the high-ohmic phones. I do not insist that it was caused by “amplification” of the Broom Antenna, but… No any fluctuations at receiving were detected with the Broom Antenna. To prove the efficiency of the Broom Antenna more experimenters are needed to do. Very useful would be experimenters with receiving very weak signals- nano and pico- Watts in power. However it needs to use at the experimenters receivers with high-resistance antenna input because the Broom Antenna has extremely high output resistance- may be Giga and ever Tera- Ohm. Be Careful! Experimenters with high-ohmic antennas that may do ionization of the air are extremely dangerous at any (and especially at storm) weather. Any experimenters with the Broom Antenna you are doing at your own risk! References: 1. http://www.antentop.org/009/ra3aae009.htm 2. http://shira.iic.kyoto-u.ac.jp/lecture_notes/plasma- process/DBD-Lecture-Note.pdf%3Cbr 3. http://www.glow- discharge.com/GlowDischargesRegimes.htm%3Cbr 4.”Singing” quiet discharge: Radio, 2001, #7, p.55 Thomas Townsend BROWN Alexander Leonidovich Chizhevsky More about : Thomas Townsend BROWN http://n-t.ru/tp/ns/eb.htm http://www.rexresearch.com/ttbrown/ttbrown.htm http://www.ttbrown.com/ http://www.borderlands.de/gravity.bb-effect.php3#2 Alexander Leonidovich Chizhevsky http://en.wikipedia.org/wiki/Alexander_Chizhevsky http://www.cyclesresearchinstitute.org/chizhevsky.html Broadcasting Russian Radio Station Mayak http://www.radiomayak.ru/ http://www.antentop.org/ mirror: www.antentop.boom.ru Page 25
  • 29. ANTENTOP- 01- 2008, # 010 Expedition Two Element Antenna for the 20-meter Band By: N. Filenko, UA9XBI ua9xbi@online.ru Credit Line: www.cqham.ru The antenna was designed for using at DX- peditions. Antenna consists of two elements- mast in height 10 meters and in diameter 30-50-mm (it is reflector) and a dipole for the 20-m (it is driver). Dipole has length 2x 495 centimeters for bare copper wire in diameter 1.5- mm (15-AWG). For best operation of the antenna the mast should be isolated from the ground, for example with help a simple insulator in height 5- 10 centimeters. Input impedance for the (tuned) antenna is close to 50-Ohm. Gain is near 4 = dBi. Main radiation is going up to 20-22 degree to horizon. The upper part of the dipole works like guy for the mast. It fixed to the mast with strong synthetic rope in 50 centimeter length. Lower part of the dipole hangs free. Lower part of the dipole allows tune the antenna. Coaxial cable goes aside and down from the mast. Figure 1 shows the drawing of the Two Element Antenna. Figure 2 shows Patterns for Two Element Antenna (MMANA made). UA9XBI Radio club ‘Arktika’ Championship 2004 Photo Credit Line: http://www.arktika.komi.com/Champ_2004.htm Figure 2 Patterns for Two Element Antenna www.cqham.ru http://www.antentop.org/ Page 26
  • 30. ANTENTOP- 01- 2008, # 010 Expedition Two Element Antenna for the 20-meter Band Figure 1.1 Two Element Antenna http://www.antentop.org/ Page 27
  • 31. ANTENTOP- 01- 2008, # 010 Expedition Two Element Antenna for the 20-meter Band Figure 1.2 Two Element Antenna Figure 1.3 Two Element Antenna http://www.antentop.org/ Page 28
  • 32. ANTENTOP- 01- 2008, # 010 Simple All- Band HF- Antenna By: Eugene Erohov (US4EM), Nikopol, Ukraine Credit Line: www.cqham.ru Dream of each of amateurs working from a hard for antenna installation conditions to have a small invisible antenna for all bands. I have tried to solve the dream. My all band antenna is something middle between T2FD and loaded Loop. It is possible to find lots about those antennas in the internet. Figure 1 shows the design of my antenna. Antenna load is 16 two- watts resistors on 72-k connected to bridge. The combine resistor has 32 – watts in dissipative power, it was enough to work with my 100-watts ICOM-756 transceiver. Transformer 1:9 was made accordingly to recommendation of G5IJ (References 1,2). Perimeter of the loop is 24 meters of wire in 1-mm (18-AWG). Top side of the loop was fixed at end of a fishing rod in length 8- meters. Low side was at 1.5-meters above the ground. The antenna has SWR low 1.2:1 and high 2.0:1 at 1.8- 50- MHz (without tuner). The practice has confirmed the theory: that the antenna has good amplification only if the perimeter more the used wavelength. So, the antenna could work at 10- 50- MHz with good efficiency. However, the antenna has amplification – 12 dBi at 7-MHz, - 20 dBi at 3.5- MHz and – 40-dBi at 1.8-MHz. At those bands the antenna, however, very good works for receiving. For example, at 1.8-MHz it was noise at level 2-3 S-points with the antenna (and two switch on preamplifiers) but with good receiving of amateurs’ stations. Conclusion: The antenna could be used for receiving at 1.8- 7-MHz and for receiving/transmitting at 10-50- MHz. Antenna with perimeter 30-40 meters could be used atall amateurs HF-Bands. Figure 1 Design of the Simple All-Band HF- Antenna For the load of the antenna a usual Dummy Load on 50- Ohm that is switched to the antenna through HF- transformer 9:1 may be used. The load transformer may have ferrite ring in twice less sizes compare to antenna feeding transformer. Reference 1: http://www.qsl.net/gw6hmj/antenna.htm Reference 2: http://www.gairney.plus.com/Radio/G5IJ_aerial.htm More about loaded Loop Antenna: 1: Antennas for Radio Amateurs: by Igor Grigorov, RK3ZK: http://www.antentop.org/library/shelf_hamant.htm www.cqham.ru http://www.antentop.org/ Page 29
  • 33. ANTENTOP- 01- 2008, # 010 Rectangular UB5UG By: Yuri Medinets, UB5UG, Kiev Credit Line: Radio #7, 1963, p.20 Rectangular shown at Figure 1 has good parameters and not so sensitive to height (that is very important for low amateurs HF-ranges) compare with dipole. Upper horizon wire is broken by a nut insulator at it’s center. Due to a small height the antenna is suitable for 80- and 40-meters Band. However, it should not be any high objects near the antenna (that do “shadow” to the antenna). Distance between low wire and roof or ground may be several tens centimeters. Input impedance of the antenna may depend on installation conditions. Matching of the antenna with the feeder provides by choice of a feeding point at low horizon wire. At corner feeding the antenna has input impedance near 30-40-Ohms. The more far the feeding point from the corner is- the more input impedance (up to several thousands Ohms) would be. Feeder is going along antenna wires then from the middle of a vertical side the feeder is going aside (to any direction). For good symmetrical it is desirable to connect the braid of the coaxial with antenna. Radiation parts at the antenna are the vertical sides. For increasing of the efficiency of the Rectangular the sides should be made from aluminum tubes in diameter 10- 20-mm. Horizon sides of the antenna provide very low radiation (because the currents distribution at the antenna), so, they could be made from antenna wire in diameter of 1-2 mm. Figure 2 shows the currents distribution at the Rectangular (made by MMANA). Rectangular antenna has gain near 2- 3 dBi, pass- band (at SWR 1.5:1.0) near 2% from the center frequency. Yuri Medinets (1932-23.09.2003) Credit Line: http://ham.kiev.ua/ub5ug/ Figure 2 Currents distribution at the Rectangular. http://www.antentop.org/ Page 30
  • 34. ANTENTOP- 01- 2008, # 010 Rectangular UB5UG Figure 1 Rectangular UB5UG Figure 3 Input impedance for Rectangular for 40-meters http://www.antentop.org/ Page 31
  • 35. ANTENTOP- 01- 2008, # 010 Rectangular UB5UG Figure 3 shows input impedance for rectangular for the 40-meters Band. Figure 4 shows SWR for rectangular for the 40-meters Band. Figure 5 shows vertical and horizon patterns. All diagrams made by MMANA for the Rectangular designed for 7.050-MHz, placed at height of the 2 –meters above the real ground, vertical parts of the antenna –aluminum tube in diameter 10- mm (000-AWG), horizon wires- aluminum wire in diameter of 1-mm (18-AWG). MMANA file for the antenna made by UR0GT. It is possible to design directional antennas on the base of the Rectangular. Reflector and director may be designed on the base of the rectangular. Such directional antennas may be designed for all amateurs HF bands. Parameters of Three- Elements Antenna made on the base of the Rectangular elements are almost equal to parameters of a Four Elements Antenna made on the base of linear wires (YAGI). Figure 4 SWR for Rectangular for 40-meters Figure 5 Vertical and horizon patterns for Rectangular for 40-meters http://www.antentop.org/ Page 32
  • 36. ANTENTOP- 01- 2008, # 010 Delta Loop UN7CI for 7, 10, 14 and 21- MHz By: Boris Popov (UN7CI), Petropavlovsk, jjjjjjjjjjjjjjjjjjjjjjjjjjjjjjjjjjjjjjjj Kazakhstan Credit Line: www.cqham.ru The antenna was designed to work from a field conditions at amateur’s bands 7, 10, 14 and 21-MHz. The antenna has SWR less the 2.0:1.0 at height of the lower side 1.2 meters above the ground. Antenna has good efficiency. At band 14-MHz the antenna is working like a full- sized “Delta Loop” (Figure 1). At band 10-MHz the antenna is working like an electrically lengthened (with inductor) “Delta Loop” (Figure 2). At band 7-MHz the antenna is working like a lambda/2 I.V. (Figure 3). At band 21-MHz the antenna is working like a 3lambda/2 I.V. (Figure 4). Figure 1. Full sized “Delta Loop” for 14-MHz Figure 2. Electrically Lengthened “Delta Loop” for 10- MHz Figure 3. Lambda/2 I.V. for 7-MHz Figure 4. 3Lambda/2 I.V. for 21-MHz So, on the base a Delta Loop with perimeter 20 meters (or I.V. having two 10 meters wire) it is possible to do a four band antenna. Figure 5 shows the design of the antenna. If the antenna is used for a field operation and the middle of the antenna is accessible it is possible to switch operation band with help of any suitable manual switch. Off course, it is possible to use RF- relays to choose the band. Inductor L contains 20 turns of insulated wire in diameter of 1.5-mm (15-AWG), coiled turn to turn on diameter 50- mm. Tuning Step 1: Antenna is installed at working position. Band’s Switch is installed at position “3”- 14-MHz. RF signal (14.150-MHz) is sent to the antenna. Antenna is tuned to resonance with help of length A and B. Step 2: Band’s Switch is installed in position “1”- 10- MHz. RF signal (10.12-MHz) is sent to the antenna. Antenna is tuned to resonance with help of inductor L. After the antenna is tuned to the 14- and 10-MHz matching at bands 7- and 21-MHz should be reached without any additional tuning of the antenna. 73! de UN7CI http://www.antentop.org/ Page 33
  • 37. ANTENTOP- 01- 2008, # 010 Delta Loop UN7CI for 7, 10, 14 and 21- MHz Figure 5 Design of the Four Bands Antenna http://www.antentop.org/ Page 34
  • 38. ANTENTOP- 01- 2008, # 010 Vertical UN7CI for 7, 14 and 21- MHz By: Boris Popov (UN7CI) Petropavlovsk, Kazakhstan Credit Line: www.cqham.ru The antenna was designed for amateur’s bands’ 7, 14 and 21-MHz. Antenna fed throw 50-Ohm coax. The antenna has SWR less the 1.5:1.0 at any band. Antenna has good efficiency and low angle of radiation at vertical plane (that is good for DX-ing). Only one power relay is used to switch a working band. Operation: The antenna made of on a base a vertical tube that has diameter of 22-mm and length 8.5-meters. With help of matching networks this vertical is tuned to each used band. At the 7-MHz band the vertical (with the lengthen inductor) is a lambda/4 one, at 14-MHz the vertical is a 5lambda/8 one, at 21-MHz band the vertical (with the lengthen inductor) is a lambda/2 one. Figure 1 shows the antenna with matching circuits. Band 7 and 21-MHz: When D.C. voltage of 24-V is across the relay its contacts switch on the vertical through the lengthen inductor to 50-Ohm coaxial cable. Band 14-MHz: If the 24-V cut off from the relay the vertical is working at 14-MHz. In the situation one relay’s contact is grounded the vertical. Second relay’s contact turns on the omega- matching network to 50-Ohm coaxial. Design Vertical may be made from aluminum tube in diameter 22- 30 millimeters. The vertical is installed onto a home-made insulator. The omega matching may be made from aluminum wire in diameter 4.5- 8- millimeters. Lengthen inductor has 5 coils of silvered copper wire in diameter of 2.5- mm (10-AWG). The inductor has length of 30-mm and coiled diameter 45-mm (air- wound inductor). It was used a Russian power relay REN-33. However, it is possible to use any power relay that will work at RF-power going to the antenna. Figure 1 Vertical with matching circuits http://www.antentop.org/ Page 35
  • 39. ANTENTOP- 01- 2008, # 010 Vertical UN7CI for 7, 14 and 21- MHz Figure 2 Design of the Vertical Omega matching network is tuned to the resonance with help of C1 and C2. At power up to 100-Wtts capacitors C1 and C2 may be used ceramic ones. For high power (more the 100-Wtts) it should be used high quality capacitors. There are: air variable capacitors with gap more the 1-mm, lengths of a coaxial cable having the needed capacity or just fixed high voltage capacitors having high reactive power. Parts of the matching networks (L and C) were placed inside a plastic box. Radials are placed above the heat insulation of the roof. Radials should have a plastic insulation (with good insulation of the ends) if these ones would be contacted with stuff of the roof. Figure 2 shows the design of the antenna. My vertical was fixed to the roof beams. No guys were used for the fixing of the vertical. Hole through the roof (where the vertical is going on) was water proofed. However, conditions for the installation of the vertical at another roof may differ from mine. So, guys for the fixing of the vertical and hard waterproofing of the hole may be needed. Tuning: Tuning of the antenna made to minimum SWR at the center of the working band. At the 14-MHz the tuning is made by C1-C2. At the 21-MHz the tuning is made by the lengthen inductor. It needs to choose numbers of coils or by changing of the physical dimension of the inductor. Since the antenna is tuned to 21-MHz no additional tuning needed at 7-MHz. The antenna was compared with I.V. No difference at local (up to 2000-kms) contact. The vertical beat an I.V. at DX- at distance more the 5000-kms. At the distance the vertical gave 1-1.5- points at S-Scale at reception and 1.5- 2 points at scale “S” at transmitting. 73! de UN7CI www.cqham.ru http://www.antentop.org/ Page 36
  • 40. ANTENTOP- 01- 2008, # 010 Delta for 80 and 40- meters By: Valentin, RZ3DK Credit Line: www.cqham.ru Figure 1 Design of the Delta for 80- 40 meters The Delta for 80 and 40 meters was designed for installation on the roof of a building with help of a metal mast. Design of the antenna is shown on Figure 1. Link for file *maa for the antenna is given below at the article. File *maa contains correct dimension for the antenna. However, MMANA simulates the antenna in not correct way. Correct data may be reached using NEC for MMANA. All of these programs are free. Figure 2 shows patterns (in horizon and vertical plane) of the antenna on the 80 meters. Figure 3 shows patterns (in horizon and vertical plane) of the antenna on the 40 meters. Matching of the antenna at both bands is possible with the help of the length of 75-Ohm Coaxial in 4.82-meters. SWR at the both bands (at this case) is 1.46:1.0. Figure 4 shows diagrams and data for the matching. Improved variant of the matching is shown on the Figure 5. A length of 75-Ohm coaxial cable in 3.9 meters and opened stub from a length of 75-Ohm coaxial cable in 1.7 meters are connected to antenna’s terminal. SWR at the both bands (at this case) is 1.23:1.0. It is a theoretical model. In the coming spring I hope to install and check the antenna. 73! Link: http://www.antentop.org/010/ rz3dk_010.htm http://www.antentop.org/ Page 37
  • 41. ANTENTOP- 01- 2008, # 010 Delta for 80 and 40- meters Figure 2 Patterns (in horizon and vertical plane) of the Delta on the 80 meters. www.cqham.ru http://www.antentop.org/ Page 38
  • 42. ANTENTOP- 01- 2008, # 010 Delta for 80 and 40- meters Figure 3 Patterns (in horizon and vertical plane) of the Delta on the 40 meters. www.cqham.ru http://www.antentop.org/ Page 39
  • 43. ANTENTOP- 01- 2008, # 010 Delta for 80 and 40- meters Figure 4 Matching of the antenna with the help of one length of the 75-coaxial cable http://www.antentop.org/ Page 40
  • 44. ANTENTOP- 01- 2008, # 010 Delta for 80 and 40- meters Figure 5 Improved matching of the antenna with the help of two length of the 75-coaxial cable http://www.antentop.org/ Page 41
  • 45. ANTENTOP- 01- 2008, # 010 Two Elements YAGI for 145 MHz: Balcony Project By: Aleksandr, RZ3AIX, kcb121@yandex.ru Credit Line: www.cqham.ru Two-Elements YAGI for 145-MHz: Balcony Project Well, why I did a Two- Elements YAGI? Why not Three, Four or more Elements YAGI? Or, say, so popular 2-5/8 or 3-5/8 Vertical Collinear Antenna? Okey, at first, just begin from the beginning. From the theory. As the theory says, multi elements antennas (in the case, YAGI) have a large near field zone. The more elements the antenna contains – the more sized near field zone the antenna has. All subjects that are located inside the near field zone are influenced to the parameters of the antenna. Conclusion: So- the more elements an antenna is contained - the more free space should be around the antenna. The conclusion was proved by me. For a while I had to use a commercial (from www.tangenta.ru) made Four and Six Elements YAGI. The antennas are perfect antennas only the antennas have enough large free space around, for example, the antennas are installed on the roof. But I need a balcony antenna. Place at balcony was very limited. I could install only antenna that goes at 1- 1.5- meters outside the balcony. Only the limitation makes me to look for an antenna suitable for such conditions. Four Elements YAGI works bad at such close to wall (up to 1-meter) installation. There was so called “ladder” effect. The effect means that at one frequency a station is going at 59, step to 25 –kHz the station is going at 58, another step 25-kHz- 59. The more elements have YAGI- the more the “ladder” effect presents. Where a Two Elements YAGI is working at 1 meter from a wall there Four Elements YAGI is required 1.5-meter distance from the wall. Second question is- why not collinear but YAGI. Collinear works badly at my installation on the balcony. Lots reflected and spurious signals from nearest buildings do the reception too noise and unpredictable. www.cqham.ru http://www.antentop.org/ Page 42
  • 46. ANTENTOP- 01- 2008, # 010 Two Elements YAGI for 145 MHz: Balcony Project Compare to 2-5/8 and 3-5/8 collinear the Two Elements YAGI has more gain. Experience shows that the more distance between radio stations the more Two Elements YAGI beat the collinear. My Two Elements YAGI has room near 100-centimeters x 40 centimeters. Collinear antenna that has close to the Two Elements YAGI gain is 3-5/8 collinear. Such collinear has height near 5 meters. So, what is easy to install at the balcony? Two Elements YAGI loses 1-dB in gain compare to Three Elements YAGI. However, Two Elements YAGI has boom twice less in length compare to Three Elements YAGI. That is why I have chosen the Two Elements YAGI. And the last. Why I did configuration “Vibrator- Reflector?” Because the combination has good forward gain thought not good suppression of back lobe. Combination “Vibrator- Director” has good suppression of back lobe but bad forward gain. I need good forward gain. Figure 1 Design of the Two Elements YAGI. Design. Figure 1 shows the design of the Two Elements YAGI. Antenna elements are made from aluminum tube in 10-mm diameter. Traverse made of from L- Shape aluminum with sizes 20x20 millimeters. Antenna has input impedance 50-Ohms, so, coaxial cable straight away turns on to the antenna. Several ferrite rings (that do an RF-Choke) are installed on the coaxial cable near feeding terminal. Vibrator is insulated from the traverse. Plastic pieces are installed between antenna elements and traverse. The pieces made from a water pipe with OD 20- millimeters (3/4”). Length of 70 millimeters is cut (longitudinal section) on to halves. One piece is going for vibrator another one to reflector. At the vibrator’s piece drill a hole in the centre. http://www.antentop.org/ Page 43
  • 47. ANTENTOP- 01- 2008, # 010 Two Elements YAGI for 145 MHz: Balcony Project Screw going through the hole fastened the plastic to traverse. Halves of the vibrator fastened to the plastic with help of plastic ties. Reflector electrically connected to the boom through a screw that is going through the reflector and the centre of the plastic insulator. (However, it would be better for antenna performance to isolate the reflector from the traverse.) Vibrator made of aluminum, so, it needs to install at feeding terminal of the vibrator (with help of screw) solder lugs. Coaxial cable is soldered to the solder lugs. Traverse could be made from any strength stuff- for example ever wood could be used. That is all. Antenna is very simple and reliable. I install the antenna at distance 1.5-meter from a wall. There were made lots local and DX-QSO (FM-MODE) at 5- Wtts power. If you will have made the antenna, your comments are welcome to my e-mail. 73! References: Igor Lavrushov, UA6HJQ http://www.hamradio.cmw.ru/ Igor Gocharenko, DL2KQ, Antennas HF- VHF, Part- IV Pictures of my old Four and Six- Elements YAGI. http://www.antentop.org/ Page 44
  • 48. ANTENTOP- 01- 2008, # 010 Matching a Transceiver with PA on several GU50 By: N. Filenko, UA9XBI ua9xbi@online.ru Credit Line: www.cqham.ru Matching input of PA that contained several tubes GU50 with a transceiver is not a simple matter as it seems at first look. Sometimes for simplicity of the design PA the driver power from a transceiver going straight away to several connected to bridge cathodes of the GU50. However, input resistance of a PA containing 2 tubes GU50 (that is close to 50- Ohm at major amateur HF- ranges) is differed from input resistance of a PA with 3 tubes GU50 (the resistance lower in 1.5 times compare to 2xGU50- sample), and of course differ from input resistance of 4xGU50- PA (the resistance lower in 2 times compare to 2xGU50- sample). So, the input resistance for those PAs with 3 and 4 tubes is differ the 50-Ohm that requires proper matching of the PA with driving transceiver. UA9XBI Radio club ‘Arktika’ Championship 2004 Photo Credit Line: http://www.arktika.komi.com/Champ_2004.htm Figure 1 Matching Autotransformer Figure 1 shows a simple autotransformer that helps match input impedance of the PA to 50-Ohm in wide frequencies range. The autotransformer was made on a Russian ferrite toroid with permeability 60. It is possible to use Amidon T-50-2 (OR t-50-6). At some cases it is better to use 2 toroids putting together. Coil contains 12 turns of wire in diameter 2-mm (12-AWG). Tap is chosen for best matching of the transceiver with the PA in wide frequency range. Experience shows that best matching for 3xGU50 PA gives tap from 8th turn (from “cold” end). For 2xGU50 PA best matching gives tap from 5th turn (from “cold” end). Anyway, try to find best tap and best quantity of coils in the autotransformer for your design of the PA. 73! www.cqham.ru http://www.antentop.org/ Page 45
  • 49. ANTENTOP- 01- 2008, # 010 Simple Weekend Antenna for 145-MHz Igor Lavroushov UA6HJQ, May 2005. Yes, I need an antenna for 144-MHz. Not just antenna, but antenna that can work in different conditions, from my home, from a car, from my mountain trip. Have been tried different design I suddenly stopped to those one. It is two element YAGI that is very simple to design but has good characteristics. Photos below show the antenna installed on my balcony. The antenna is very sustainable to weather. Rain, wind and snow are no matter for this one. Before the antenna I had used another ones (among them A-100 and A-200), but my design could sustain in the sever mountain conditions… I had compared the antenna with A-1000 (5-meters long), at distance 50 kms I got the same reports, as for A-1000 as for my YAGI. Two phased YAGI are defeated A-1000 for sure, you may prove in it. UA6HJQ Design of the antenna is very simple. Personally I have made the antenna in 40 minutes. Antenna consists from reflector (length 1002-millimeters) and vibrator (length 972- millimeters, gap for coaxial cable- 10-millimeters). Distance between reflector and vibrator is approximately 204 – 210- millimeters. Antennas parts are made from insulated wire in diameter 4 millimeters. Place of vibrator, where a coax was installed, was protected with a raw compound. You may use another protector… SWR for the antenna (measured by SWR-121) was (1.0-1.1):1. http://www.antentop.org/ Page 46
  • 50. ANTENTOP- 01- 2008, # 010 Simple Weekend Antenna for 145-MHz Design of the antenna is very simple. Personally I have made the antenna in 40 minutes. Antenna consists from reflector (length 1002-millimeters) and vibrator (length 972- millimeters, gap for coaxial cable- 10- millimeters). Distance between reflector and vibrator is approximately 204 – 210- millimeters. Antennas parts are made from insulated wire in diameter 4 millimeters. Place of vibrator, where a coax was installed, was protected with a raw compound. You may use another protector… SWR for the antenna (measured by SWR-121) was (1.0-1.1):1. Input resistance of the antenna is 12,5 –Ohm, for matching with 50-Ohm Coaxial I have used a transformer made with two bridged length of 50-Ohms coaxial cable. The coax must have the similar length near 370- 440- millimeters (should be find at adjusting). Both pieces must be tied at all length one to another. Another Big Gun I was asked how is it possible to improve gain but save wide DD? To do this it is impossible to add another director, but it is possible to use two phase antennas. Picture below shows this way. Good chose to phase 2 or 4 antennas. We get good DD, good gain and the system can receive mobile stations in very good way compare to collinear antennas in 5- 7 meter long. Credit Line: http://www.hamradio.cmw.ru/antenna/145-2el.htm http://www.antentop.org/ Page 47
  • 51. ANTENTOP- 01- 2008, # 010 Simple Weekend Antenna for 145-MHz Trip Variant of the Antenna A bit later, I made a kit of the antenna suitable for my mountain trip. Testing of the antenna in the mountains shows, that my YAGI is compared to collinear in 3- 5 meters long on distance up to 50 kms and beats the antennas up to 90 kms and more. Photos below shows kit of my trip YAGI. Only 30 seconds are needed to install the antenna. Boom for the YAGI was made from a plastic water pipe in 510- millimeters length and 21- millimeters in diameters. Transformer 12.5-Ohms/50-Ohms is placed inside the plastic tube. The antenna is good fit to rucksack and may be easy repaired in the trip. 50-Ohms YAGI For those who do not want cut length oh matching transformer was calculated antenna having 50- Ohms input impedance. So coaxial cable may be directly to connected to antenna terminals. View of the antenna is almost the same, however, simple RF-Choke near antenna terminal (0ne- three turns around a ferrite ring is recommended for the design. Distance between reflector and director should be chosen (415- 440 – millimeters) for minimum SWR. The antenna has gain near 4,3 dbd. New Year Pictures from UA6HJQ http://www.antentop.org/ Page 48
  • 52. ANTENTOP- 01- 2008, # 010 Fixture for Fast Assembling of VHF- Antennas Il’ya Yarushkin, UA9UKO Credit Line: http://www.cqham.ru/ant85_27.htm The Fixture is intended for fast assembly and disassembly of VHF antennas. It is very useful for experimenters with the antennas or assembling of portable VHF- antennas. The fixture is made on the base of clamp- it may be any strength clamp that you find at your local household shop. (In Canada such shop is Home Depot or Canadian Tire, lots, lots of different clamps are there.I.G.) Fixture on a boom is shown below. www.cqham.ru http://www.antentop.org/ Page 49
  • 53. ANTENTOP- 01- 2008, # 010 Fixture for Fast Assembling of VHF- Antennas You can see that antenna parts are reliable fastened to the boom, it is possible to move these ones along the boom as well as fast to remove the parts apart the boom. Oh, yes, I forget, you need a traveler that should fit to the boom. I did such traveler from a plexiglass in 10- millimeters (near ½-inch) thick. Design of the traveler is clear shown at the pictures. The traveler should sit at the boom evenly not crookedly. Off course, is it possible to use for design of traveler any suitable staff (instead plexiglass). Local craft shop for sure gives you lots ideas. 73! UA9UKO Antennas after hail. Picture by LZ2ZK http://www.antentop.org/ Page 50
  • 54. ANTENTOP- 01- 2008, # 010 Water Pipe T-Joint at VHF Antennas By the way, I was (and may be am) not an experienced VHF- man before I decided to do my VHF YAGI. I had serous doubt that I spoiled lots stuff while I made my YAGI. So I found for solution how to do the antenna without turning in garbage my antenna’s material. When I went around a house-ware store I have seen polystyrene water pipe T-joint. Picture 1 shows the T- joint. Picture 1 By: N. Filenko, UA9XBI ua9xbi@online.ru Credit Line: www.cqham.ru UA9 XBI Radio club ‘Arktika’ Championship 2004 Photo Credit Line: http://www.arktika.komi.com/Champ_2004.htm I have bought some these ones. While making the VHF antenna several of T-joints spoiled were spoiled but other ones worked well in my design. Picture 2 shows T- joint installed at my antenna. The design has some benefits: 1. Antenna elements are isolated from traverse with gap in 6-10 mm 2. It is possible to move the antenna elements along the traverse. 3. It is possible to play with antenna design- change length between antennas elements and easy to change the elements Picture 2 http://www.antentop.org/ Page 51
  • 55. ANTENTOP- 01- 2008, # 010 Water Pipe T-Joint at VHF Antennas 4. Antenna elements are fastened without drilling the traverse. 5. Avoid screw, nuts and clamp in fastening of antenna elements. 6. T- joint is mechanically strong the antenna element. 7. Weight of one antenna element in length of 1 meter made from of a silumin tube in 10-mm OD with the T- joint was only 70 grams 8. Antenna made by step by step stringing of the T- joints with already installed there antenna elements. How to use T- joint at antenna? Picture1 and 2 show the way. However, some advices are below. Take T- joint that has ID closest to a diameter of antenna traverse. If the T-joint has ID Less the diameter of antenna traverse you need gnaw through to obtain needed ID. Leave wall thickness not less the 2 millimeters. Do ID on to 0.5- 1 –millimeters less the OD of the traverse and do longitudinal cut in the lower part of the T- joint. At the case before installation of the T- joint to the traverse a small thing (like wooden or metal bar) should be inserted into the cutting. See Picture 3. When the T- joint is sitting at the right place at the traverse just remove the bar and the T- joint would be fastened well to the traverse. Picture 3. It is possible hard fastened the T- joint to the traverse by 1- 2 small screw. Another way for hard fastening – put some glue in to pipe-bend. The pipe- bend was closed by a plastic washer and epoxy. ( See Picture 3.) Holes for antenna elements should have ID on to 0.2- 0.5 – millimeters less the OD of the antenna element. The holes should be drilled with drilling machine. T-joint at drilling should be placed on to horizontal table of the drilling machine. Antenna elements go through the holes with pressure but then hard fastened at the T-joint. Active dipole vibrator made from two halves may be fastened to T- joint with help of a plate made from a good and mechanically hard insulated stuff. It may be thick PC, thick plexiglass. The plate is fastened to cut side tap. See picture 4. Picture 4 However, it is possible to insert two half vibrator into a thick rod from an insulated stuff, then the rod with the active vibrator is fastened into the T- joint above mentioned ways (See picture 2, 3) T- joint was tested to strength after being three hours at minus 28 degrees Celsius. Attempt to break the T- joint pooling of the antenna element (fastened inside the T – joint) is failed. Antenna element was broken (4-mm OD silumin) , T-joint- no. It was tried to break the T- joint with help of a hammer. Hammer left only slight dent on the T- joint but no any crack. Using prepared T-joints (with drilled holes for antenna element and traverse) it takes from me only several hours to assemble 7- elements VHF antenna. Hope, it will work long time for me. See picture 5. www.cqham.ru http://www.antentop.org/ Page 52
  • 56. ANTENTOP- 01- 2008, # 010 Water Pipe T-Joint at VHF Antennas Picture 5 T-joint may be used for fast assembling of field VHF antennas. It needs drilled hole for traverse on to 1-1.5 – mm less then the OD of the traverse. Then partially cut T- joint toward to side tap. Do smooth the cut sides with the help of a file, See Figure 1. So, it is possible to put the rework T- joint with antenna element on to traverse, then push the T- joint and snap it onto the traverse. If it is need you may fastened the reworking T- joint with help of a clamp. 73 de UA9XBI! Figure 1 http://www.antentop.org/ Page 53
  • 57. ANTENTOP- 01- 2008, # 010 2xGU50 and 3xGU50 PA from UA1TAT 2xGU50 PA The PA was designed and then made (in several samples) by Yaroslav Zhukov, UA1TAT. It is a “classical” Tubes PA with grounded first grid. However, the feature of the PA is the individual bias for the first grid of each of the used tubes. It allows use tubes with slight different anode/grid characteristics. Yaroslav Zhukov, UA1TAT Credit Line: http://hamnv.boom.ru/2gu50.htm Credit Line: http://hamnv.boom.ru/3gu50.htm Figure 1 shows the schematic. Third grid of both tubes is grounded. Second grids of the both tubes are connected to 250-V voltage stabilizer. Figure 1 2xGU50 PA The PA was designed for CB-station for 27-MHz. It is defined the input circuit that provides good matching at the band. 3xGU50 PA The PA is made on the base of 2xGU50 PA. Output power of the 3xGU50 PA is 180- 200 Wtts. The PA was designed for 160, 80, 40 and 20 meters. Input circuit is broadband and can match the PA in wide frequencies range. The input circuit is described at Antentop- 1-2008, p.45. Figure 2 shows the schematic of the 3xGU50 PA Figure 2 3xGU50 PA At practical design it was found that capacity of the high-voltage capacitor at matching circuit is changed a little inside the working band. It allows to me to change the hard-to- find capacitor for available for me constant capacitors. The capacitors are switched with help of a usual ceramic switch. P.S. My thanks to Sergey Mironov for the help during design, manufacturing and tuning of the PA. GU81M- Made in the USSR http://hamnv.boom.ru/ http://www.antentop.org/ Page 54
  • 58. ANTENTOP- 01- 2008, # 010 2xGU50 and 3xGU50 PA from UA1TAT Figure 1 2xGU50 PA http://www.antentop.org/ Page 55
  • 59. ANTENTOP- 01- 2008, # 010 2xGU50 and 3xGU50 PA from UA1TAT Figure 2 3xGU50 PA http://www.antentop.org/ Page 56
  • 60. ANTENTOP- 01- 2008, # 010 PA 3xGU50. Photos of the Design N. Kisel, UA3AIC, Moscow, Russia ua3aic@mail.ru Credit Line: www.cqham.ru Photos step by step show how to do simple PA 3xGU50. Schematic of the PA is shown on Figure 1. Copper foil for tap used from a power coaxial cable. If for the PA two sided PC-board is used you should remove foil from back side opposite to anode trace. The path free from foil should be in 15-20 mm wide. www.cqham.ru http://www.antentop.org/ Page 57
  • 61. ANTENTOP- 01- 2008, # 010 PA 3xGU50. Photos of the Design Figure 1 PA 3xGU50 www.antentop.org http://www.antentop.org/ Page 58
  • 62. ANTENTOP- 01- 2008, # 010 PA 3xGU50. Photos of the Design http://www.antentop.org/ Page 59
  • 63. ANTENTOP- 01- 2008, # 010 PA 3xGU50. Photos of the Design http://www.antentop.org/ Page 60
  • 64. ANTENTOP- 01- 2008, # 010 PA 2xGU50. Photos of the Design N. Kisel, UA3AIC, Moscow, Russia ua3aic@mail.ru Credit Line: www.cqham.ru Photos show how to do simple PA 2xGU50. Schematic of the PA is similar to PA shown on Figure 1, page 58, ANTENTOP- 01- 2008, # 010. It is a “field” variant PA. Transceiver having output 20- 30-Wtts can drive the PA up to 200-Wtts (300-mA plate current at + 850 –V). http://www.antentop.org/ Page 61
  • 65. ANTENTOP- 01- 2008, # 010 PA 5xGU50. Photos of the Design N. Kisel, UA3AIC, Moscow, Russia ua3aic@mail.ru Credit Line: www.cqham.ru Photos show how to do simple PA 5xGU50. Schematic of the PA is similar to PA shown on Figure 1, page 58, ANTENTOP- 01- 2008, # 010. www.cqham.ru http://www.antentop.org/ Page 62
  • 66. ANTENTOP- 01- 2008, # 010 Simple Broadband P.A. Igor Grigorov, UA3ZNW Credit Line: "QRP Transceivers and PAs from Accessible Parts ": by Igor Grigorov, UA3ZNW The P.A. is very simple. It is usual push- pull (made on VT1, VT2) with some tricks which allows to make the P.A. in easy style. How it is work: Transformer Tp1 provides matching 50- Ohm input of the P.A. with low resistance input impedance of the and makes symmetrical of the unsymmetrical50-Ohm input with the symmetrical push- pull input. Transformer Tp2 works something like RF- Choke plus Push- pull transformer. Transformer Tp3 provides matching “balance” push- pull output with unbalance output 50-Ohm. If you use to a symmetrical antenna (for example dipole, quad, delta) which is connected to the P.A. by a short length of a coaxial cable you may do not ground the pin “4” at the transformer Tp3. Figure 1 shows the schematic diagram of the P.A. (Note I.G.: Generally speaking it is not correct description, but I leave it as is for some reason. The schematic is only first step for ham to the miracle world of the P.A. I would like to leave “academic” description for next steps…) Correctly assembled (using right parts) amplifier requires a minimal adjustment. At first it needs to install collector current. It is equal 50-mA/ at power 20-Wtts, 100-mA/ at power 40-Wtts, 150-mA/ at power 60-Wtts. It is desirable to use a low- frequency (or resonated) filter before the P.A. and antenna. For example, you may use filters from References 1. If a high impedance antenna will be used with the P.A., it is possible to install transformer 50/300- Ohm or 50/450-Ohm at the output of the transformer and feed the antenna through a two- wire line. At radio-amateurs source it is possible to find lots different designs for such transformers, for example in Reference 2. Matched pair of the RF-power transistors should be used in the amplifier. Best way is to buy such matched transistors from supplier. However, if you have a stock of 10- 20 RF- power transistors, you may to find a matched pair from these ones. To provide this it is necessary to measure some parameters of the transistors. Transistor is switched on in the circuit shown in Figure 2. Install with help R2 collector’s current equal to 50/100/200/500/1000-mA. Do measuring fast enough while the transistor should not be warm too much. Better way is to use a heat sink for the transistor. Transistors which plots are mostly close are the matched pair. Remember, that collector current divide to base current is amplification factor (gain). Matched pair should consist of from transistors with gain that do not differ more then 20% at different currents. Figure 2 Circuit for finding of matched pair of the RF power transistor http://www.antentop.org/ Page 63
  • 67. ANTENTOP- 01- 2008, # 010 Simple Broadband P.A. Figure 1 schematic diagram of the P.A. (Note I.G.: Generally speaking, 5 points it is not enough for normal selection of matched pair of transistors. It is desirable to do the selection using 7- 10 points, thus the tolerance at amplification factor should be not more the 10%. I do not speak about selection of a matched pair using measuring of the transistor parameters at different frequencies because it goes away from the radio- amateur technology. ) It is possible to use non matched transistors but it needs install individual for each transistor biasing. To do this cut jumper between L1 and L2. A capacitor 50- micro- farads is soldered in bridge with C3. A capacitor 1-micro- farads is soldered in bridge with C4. With help of additional base resistors install equal current for each of the transistors. Turn RF power to the input of the P.A. With help of an oscillograph check the shape of RF- voltage on the Dummy Load and on the collector of each of the transistors. http://www.antentop.org/ Page 64
  • 68. ANTENTOP- 01- 2008, # 010 Simple Broadband P.A. Do the check at different frequencies. Adjust biasing on to minimum distortions. Capacitor C* (200- 600-pF) may help to illuminate distortions. However the method required some experience. Sometimes (when the transistors are too different) satisfied result is not possible. Resistors Re have nominal from 1to 4 –Ohms, depend on output power. Less at high power and more at low power. Sometimes, when not matched transistor pair is used to the P.A. the resistors may have different nominal, it is possible to fond right value with help of oscillograph on to minimum distortions. P.A. has two modes: SSB and CW. At CW mode the transistors work in mode “B’- the bases closed to ground (with help of S1) through RFC1 and RFC2. Practically any RF transistors can be used at the P.A. RFC1 and RFC2 are wound on a ferrite core 8- millimeter OD and 10 millimeter in length. The ferrite core is cut off from a ferrite rod using in “magnet antenna” for a transistor radio. RFC1 and RFC2 have 80 turns each wound by copper wire in 0.1- millimeter (38-AWG). Transformers Tp1, Tp2 and Tp3 are wound on a ferrite core. As usual for the P.A. I use to a ferrite from TV Flyback. Not bad work a ferrite core from a monitor Flyback. It is possible to use ferrite core from T.V. yoke. Transformer Tp3 works well when it is wound on a ferrite from yoke. All transformers are wound by insulated copper wire in diameter 0.5- millimeter. Transformer Tp1 is wound by twisted and tripled wires, one turn to one centimeter of the length. Transformers Tp2 and Tp3 are wound by twisted wires, one turn to one centimeter of the length. Design of the transformers is shown on Figure 3. Figure 3 Design of the transformers Tp1, Tp2- Tp3 Ferrite core is wound by soft plastic insulation tape. After winding the coils also are wound by soft plastic insulation tape. Transformer is installed on the main PCB. Two PCB square are installed at the sides of the transformer. With help bare copper wire (1-millimeter or 18-AWG diameter) the squares are soldered between each other and soldered to the main PCB. Installation of the transformers is shown on Figure 4. The heat sink for the P.A.’s transistors made from aluminum H- stuff. It is possible to by such stuff at a household shop (such like Home Depot). Figure 5 shows the installation of RF-power transistor to the H-stuff. Figure 6 shows PCB for the P.A. The adjusted PCB is installed inside a cabinet made from two- sided PCB. Jointing of the PCB- stuff is carefully soldered. P.A.’s PCB may be soldered to the PCB – stuff of the cabinet. At four corners (up and down) of the cabinet a nuts M4 are soldered. To the nuts upper and low cover is fastened. Near the heat sink of the transistors (at cabinet and at covers) are drilled ventilation holes (3-4 millimeter in diameter). RF connector “Input” and toggle switches “SSB/CW” and “OFF/ON” are installed at front panel. Connector “Antenna” and DC power supply terminals are installed at back panel. Figure 7 shows the design of the P.A. http://www.antentop.org/ Page 65
  • 69. ANTENTOP- 01- 2008, # 010 Simple Broadband P.A. Figure 4 Installation of the transformers Tp1, Tp2- Tp3 Figure 5 Installations of an RF-power transistor to a heat sink Figure 7 Design of the P.A. http://www.antentop.org/ Page 66
  • 70. ANTENTOP- 01- 2008, # 010 Simple Broadband P.A. Figure 6 PCB for the P.A. Home ferrite core made from a flat ferrite The good results give transformers (Tp1, Tp2 and Tp3) wound on a home made ferrite core made from a flat ferrite. Such flat ferrite is used at some transistor LW/MW radio. http://www.antentop.org/ Page 67
  • 71. ANTENTOP- 01- 2008, # 010 Simple Broadband P.A. To make all three transformers it needs several such flat ferrites. I have bought a pile of the ferrites at a scrap-radio shop by very nice price. Flat ferrite is cut on to pieces then the pieces are glued on to needed shape. It is possible to cut the ferrite with help a device shown on Figure 8. I cut ferrites having different shape (flat, round rod, toroid) with help of the device. The device is very simple. It is an incandescent 40- Watts bulb (or simple soldering iron) that is turn on into the main. Any main -110 or 220-V works good, however, main on 220-V works better the 110-V. Two probes with hard steels sewing needle are inserting in one wire. To cut a ferrite it needs to mark the ferrite on to cutting line by a lead pencil. Figure 8 Cutter for ferrite core (Note I.G.: Lead pencil is very important at the process. Try several pencils at a scrap ferrite to find the pencil that helps cut the ferrite in the best way.) Turn on the cutting device in to the main. Touch by the needles the graphite line. Gap between the needles should be 1-2 millimeters. An arc going onto the graphite line will appear. The arc leaves a cavity on to the line. Move the probes and do the cavity on to all mark line. Then break the ferrite on to the line. It needs some experiences, it needs very quick to break this ferrite. ) (Note I.G.: Be very careful because the PROBE IS SWITCH ON IN TO MAIN. Use good insulator for the probes and be very careful. ) The needles are heat up at the process, so, use heat- resistant stuff for the probes. After cutting several ferrites the needle’s point should be sharpened or the needles should be changed. As usual a flat ferrite used at “magnetic antenna” of a transistor radio has length in 90… 12- millimeters. At the case length for Tp1 is 1/3 from the length of the ferrite. Length for Tp2 is 1/2 from the length of the ferrite. Tp3 made like a double Tp2 or has the same design like a Tp2. Figure 9 shows design of the transformers. Figure 9 Design of the P.A. transformers References: 1. S.G. Bunin, L. P. Yajlenko. Reference Book for Amateur Radio,- Kiev, Publishing House “Tehnika”. 1978. (in Russian) 2. Igor Grigorov . Antennas: Tuning and Adjusting.- Moscow, Publishing House “RadioSoft”, 2002, ISBN: 5- 93037-087-7 (in Russian) http://www.antentop.org/ Page 68
  • 72. ANTENTOP- 01- 2008, # 010 Matching Circuit for Tube PA Sergey Lebedev, UA0UG Radiolubitel KV –UKV # 3, 1996, page 28. Published in Byelorussia, Minsk. As usual, at a Vacuum Tube PA an output tube is matched with antenna with help of a p-circuit. It is refer to use switching inductors or variometer. This matching circuit can work from 3- 30-MHz without switching inductors. The circuit is widely know among radio amateurs of 9-0 amateurs region of Russia. The circuit has good efficiency at upper HF bands and good suppression of the high harmonics. Parts: C1, C2: Double Air Gap (gap 1 millimeter between plates) Capacitor. C3: Air Gap (gap 1 millimeter between plates) Capacitor. L1: Form Diameter 60 millimeters, wound by wire in 1.2- 2.0- millimeter (17- 12 AWG) This circuit works good with Russian vacuum tube like GU50 (1000-V Anode, 100-mA plate current), GU29 (600-V Anode 180-mA plate current). Simple Design of Antenna RF- Choke Antenna RF choke from RV9CPK Antenna RF choke from LZ2ZK http://www.antentop.org/ Page 69
  • 73. ANTENTOP- 01- 2008, # 010 QRP Transceivers and PAs from… Book in English “QRP Transceivers and PAs from Accessible Parts “ (*pdf), 38 pages is a translation of Russian Book “QRP Transceivers and PAs from Accessible Parts “ (*pdf), 28 pages. Russian version was published by me (on my own expenses) in 1991, in Belgorod, Russia. I had printed 2000 samples of the book. Of course, it was not a best paper used for the book as well as not a good quality of printing. The book describes kits which my own company (“Vibrissa”) produced at the times. Naturally, the book was the manual for the kits. Were produced 400 kits of TST (Tube- Semi- conductor- Transceiver) near 50 of them were assembled by me for customers, 200 kits SQT (Semi- conductor- Quartz- Transceiver), near 30 of them were assembled by me for customers, 200 kits of PA, near 60 were of them were assembled by me for customers. Well, 1991- 1995 years were very interesting in my life in Russia. For now I have only 5 samples of the Russian book, other ones were sold. I have no boards for the transceivers and PAs. QRP Transceivers and PAs from Accessible Parts Free e- book! 38 pages, size 5- 1/2"x 8" Download! http://www.antentop.org/library/ But you, if you want, can do the equipment again. The book contains copies of the PC- boards, manuals for tuning. The equipment is really the equipment that works great. English version has some corrections compare to Russian one. English version of the book is uploaded to www.lulu.com so, you may buy a ready printed book. Off course, feel you free to load and print the book (free) from www.antentop,org . Russian version of the book English version of the book http://www.antentop.org/ mirror: www.antentop.boom.ru Page 70
  • 74. ANTENTOP- 01- 2008, # 010 CQ- QRP- 03 Technical Magazine CQ- QRP- 3 From U- QRP-C U- QRP- C was alive only 9 years, from 1986 to 1995. At the times the club had managed lots deals. At first were united QRPers from all former USSR. It was the base for recently QRP Clubs of the former USSR- for RU- QRP- C and for UR- QRP-C. At second, a new amateur code “72” was accepted in the ham World due to efforts of Oleg Borodin, former president of the U- QRP-C. At third, 3 nice QRP- magazines were printed out. One of the magazines, CQ- QRP # 3 is pasted to AntenTop Library. The magazine is in Russian, but the schematics are international understandable. To download the magazine you need go to http://www.antentop.org/library/library.htm Contest of CQ- QRP # 3 Broad Band Transformer 4:1. QRP PA for 28-MHz. 7-MHz CW- QRP-TX. Simple AM TX for 160 –meters. Converter for 10 MHz (by W1FB). Regenerative RXs. Vertical Antenna for 160-meters by RA3QJD. DisCone for 160-meters CW Transceiver for 20-meters Tubes DC Transceiver This nice and old naïve- style magazine was made by members of the U- QRP-C. Printed in Saransk, Russia. Distributed by Sergey Pichurichkin by snail mail. Were printed 200 samples of the magazine. One of them is mine… http://www.antentop.org/ Page 71
  • 75. ANTENTOP- 01- 2008, # 010 CQ- QRP- 02 Technical Magazine CQ- QRP- 2 From U- QRP-C U- QRP- C was alive only 9 years, from 1986 to 1995. At the times the club had managed lots deals. At first were united QRPers from all former USSR. It was the base for recently QRP Clubs of the former USSR- for RU- QRP- C and for UR- QRP-C. At second, a new amateur code “72” was accepted in the ham World due to efforts of Oleg Borodin, former president of the U- QRP-C. At third, 3 nice QRP- magazines was printed out. One of the magazines, CQ- QRP # 2 is pasted to AntenTop Library. The magazine is in Russian, but the schematics are international understandable. To download the magazine you need go to http://www.antentop.org/library/library.htm Contest of CQ- QRP # 2 QRPP Transceiver for 10 meters. Transceiver Unit for superheterodyne receiver for 80 meters. Simple QRP 2-Band Transceiver QRP- PA for 1.8- 30 MHz Regulated Voltage Stabilizer for 3- 13 Volts 2- Wtts QRT TX by G3AEP VFO for 20- Meters CW QRP Transceiver for the 80 Meters QRP TX for 10 MHz by W1FB Simple TX for 1.8 and 3.5 MHz Broadband 10 Wtts PA This nice and old naïve- style magazine was made by members of the U- QRP-C. Printed in Saransk, Russia. Distributed by Sergey Pichurichkin by snail mail. Was printed 150 samples of the magazine. One of them is mine… http://www.antentop.org/ Page 72
  • 76. ANTENTOP- 01- 2008, # 010 Radio Antenna Engineering Dave Platt AE6EO I'm pleased to announce that Edmund A. Laport's textbook Radio Antenna Engineering is now available in electronic form. The Book Radio Antenna Engineering was published in 1952, and presents an excellent overview of the state of commercial antenna system engineering as practiced in the first half of the 20th century. As its name implies, it's not solely about electromagnetic or radio or antenna theory although these issues are certainly a part of what it talks about. Rather, it focuses on matters surrounding the nuts and bolts (and logs, beams, bars, wires, and insulators) of actually designing and implementing a large-scale antenna system. As Laport writes, There are three basic aspects of antenna engineering. The first pertains to radiant energy in space around an antenna system, as well as the current distributions that produce the radiation pattern. The second pertains to antenna circuitry and involves such matters as self- and mutual impedances, currents, potentials, insulation, and feeder systems that will yield the desired current distributions. Third there is the structural engineering which has to do with all the mechanical details of supports, rigging, materials, strengths, weights, hardware, assembly, adjustability, stability, and maintenance. While each aspect must be separately developed, the final design must be an integration of the three, with a minimum of compromise and within reasonable economic limits. The book includes an introduction to radio theory (referring the reader to works by Kraus, Terman, and others for more detail). The first three chapters discuss the specification and design of large antenna systems, broken down by the frequency ranges they serve: low frequency, medium frequency, and high frequency. Three additional chapters discuss transmission lines, impedance matching techniques, and logarithmic potential theory. Each chapter is well supported by drawings, charts, photographs, and an extensive bibliography of references. Edmund A Laport Chief Engineer, RCA International Division, Radio Corporation of America, Fellow, Institute of Radio Engineers 1952 --- Scanned and Prepared by Dave Platt AE6EO--- Radio Antenna Engineering is noteworthy for its collection of photographs of early and mid-20th-century radio transmission facilities and construction practices. It also has an extensive discussion of HF long-wire antennas, including single-wire types, V designs, rhombics, and fishbones. Radio Antenna Engineering is certainly of significant historical interest, and may be of practical use as well. Although some of the designs and practices portrayed in it have been supplanted in commercial service, much of its content can still be of significant value to amateur- radio operators and to those interested in the practical aspects of high-power radio operation in the lower- frequency RF bands. http://www.antentop.org/ Page 73
  • 77. ANTENTOP- 01- 2008, # 010 Radio Antenna Engineering The Electronic Edition Some time in January 2005, I decided to give up. I figured I'd never be able to buy a copy of Radio Antenna Engineering. I'd heard about it ever since shortly after I got my amateur-radio license. I'd searched the Web for it, found numerous references, and found not a single used-book dealer who would admit to having a copy or knowing where one might be obtained. It seemed to be frequently sought after, and not often available. I'd checked eBay, had seen precisely one copy offered, and had lost the auction (after bidding a rather extravagant amount of money). I decided I'd have to "settle". Upon checking with my city library, I found that although they didn't have a copy, there were several universities and colleges in the state which did, and that I could check out a copy for three weeks via a inter-library loan. At least I'd be able to read it. Then, the thought struck me - I have a flatbed scanner. If I found the book to be interesting enough, I could scan the book and have an electronic record of the book that I could consult. I could convert it to a standard, portable format (PDF) using various freely- available software tools on Linux. I could even give this electronic version to other people... if it was legal to do so. I did a bunch of research, and concluded that it was! See below for a discussion of the copyright issues involved. What I'm making available here, is the results of my efforts. The book is available in PDF format, complete with bookmarks for the chapters and sections, appendices, and index. It has not been through an OCR (optical character recognition) process: the text and line drawings and charts are in the form of 300 dpi black&white scan images. This greatly reduces the risk of typographical errors or mis-transcriptions, but means that the text of the book is not searchable via electronic means. I've actually created two different electronic versions. They differ only in the resolution and quality of the photographs. The "ebook" version has the photographs stored internally at a resolution of 150 pixels/inch, in JPEG format, with moderate data reduction. The "printer" version has the photographs stored at 300 dpi, with less data reduction, using lossless "Flate" data compression - it's about 50% larger than the "ebook" version. Most people won't notice the difference in image quality. The only reason I'd suggest for downloading the "printer" version is if you have a really good 1200-dot/inch (or better) printer, and want a really high-quality printed version. There's probably somewhere around 30 hours of work invested in this project... scanning, re-scanning, writing Bash and Perl scripts to do things with the NETPBM software tools which would probably give their authors a case of the screaming horrors, using The GIMP to clean up the scans and extract the photographs for special processing, figuring out how to use GhostScript to create the PDF, creating the bookmarks and other PDF markup request, proofreading, etc. The image- processing steps alone required several hours of CPU- crunching on a 2.4-gig P4 Celeron system, and heated up our den quite significantly. All in all, it was quite an interesting experience. The results are certainly less than perfect - some artifacts from the scanning process remain - but even in its current state I find the end product to be worthwhile. I hope you do, as well. And, in one of those marvelous cosmic moments of irony, it turned out to be unnecessary (at least for me). After I finished scanning the library's copy and returned it, and before I got started on the image processing, I won an eBay auction for a copy of the McGraw-Hill printed edition in mint condition. Paperback copies are now available Beginning on 9/2/2005, perfect-bound trade-paperback printed copies of Radio Antenna Engineering can be ordered via the print-on-demand publishing service at www.lulu.com. The Lulu paperback edition has the same text and photographs as the freely-downloadable "printer" version, but is optimized for the 6"-by-9" printing format and includes only a small single-page edition of the appendix map. You can see the details and place an order (if you wish) via http://www.lulu.com/content/159004 This service is being offered as a convenience, for those people who may not wish to go to the trouble of downloading and printing a hardcopy themselves. The price you pay Lulu is for the printing and binding of the book and cover - I'm not collecting a royalty and they're waiving their commission. With standard USPS shipping, the total cost should be under $20 for U.S. addresses, and this seems like a very fair price to me. Copyright and distribution issues Radio Antenna Engineering was published in 1952, and bears a copyright in the name of McGraw-Hill (the publisher). Under the laws of that era, this initial copyright was valid for a term of 28 years, and expired in 1980. The copyright could be renewed in the last year of this initial term for a second term of 67 years. Under the laws then in effect, this renewal was not automatic - the renewal had to be registered by the copyright holder in a timely manner. http://www.antentop.org/ Page 74
  • 78. ANTENTOP- 01- 2008, # 010 Radio Antenna Engineering Based on all I've been able to find out, I believe that the copyright was not renewed. I've searched the Library of Congress online database of copyright registrations and actions for 1976 and onwards, and have found no evidence that McGraw-Hill, Laport, or anyone else ever renewed the copyright on this book. I contacted McGraw-Hill's rights-and-permissions department asking whether they believed that they still held a valid copyright, and they sent me a letter stating that they "no longer control the rights" to this work. They suggested I contact Laport at RCA... and to the best of my knowledge Laport is a "silent key" (there's a greenhouse dedicated to him at an arboretum in New Jersey). The upshot of all of the above, is that I believe that the copyright on Radio Antenna Engineering expired at the end of its original 28-year term, and that the book passed into the public domain on December 31st, 1980. The electronic version I have created is a "derived work" of the original printed version - it's a translation of the work into a new format, with significant editorial effort involved in its creation. As such, it qualifies for its own independent copyright protection under United States law, and I am choosing to copyright it in order to control the terms of its use and distribution. SOME RIGHT RESERVED! The terms by which this electronic version can be copied, distributed, and used are based on one of the "Creative Commons" public licenses, and can be viewed in full detail by clicking on the icon above. To summarize it all briefly: you (as a member of the public) are granted permission to copy this electronic work, distribute it, use it, and create further derivative works, as long as: • You aren't doing it for commercial purposes, and • You give credit to the sources of the work (Laport as the original author, and me as creator of the electronic version), and • You enforce terms equivalent to these, for any further derivative works that you create and distribute So, go ahead - download it, read it, stick it in your library, print a few copies for your friends, burn a couple of dozen onto business-card-sized CDs and hand them out at a hamclub meeting, stick it up on an HTTP server - as long as you aren't charging money for it, it's cool with me. Naturally, the copyright on this electronic version and its derivatives applies only to those! It doesn't apply to the original printed version, which is now in the public domain. Nor does it apply to electronic versions created independently by someone else. If you think you can make an honest dollar by selling printed or electronic copies of this book, you're free to do as I did - find a printed copy, scan it, and clean it up. As long as you don't use my version commercially, it's cool. If you do mis-use my version for commercial purposes, then may you have a conscience-twinging encounter with a Rettysnitch in the near future! Happy reading! Dave Platt AE6EO Photo circa 1938 http://www.antentop.org/ Page 75
  • 79. ANTENTOP- 01- 2008, # 010 CW Key That Never Have Been Smallest Igor Lavroushov UA6HJQ, 25 November, 2006, Kislovodsk, Russia This micro key newer will be heavy for any mountain radio-expedition. It is possible to use the key as back- up or ever as main key of the amateur radio. This key may be used at tuning antennas with hand- control tuner (for example like MFJ- 902). For example the key may be used for tuning ATAS- 25 with YAESU FT8x7 (FT817, FT 857, FT897). Okey, go ahead to make it! Credit Line: http://www.hamradio.cmw.ru/techn/cwk.htm Step 1 Wee need only three parts for the key- it is a stereo connector (this one is used for connecting CW- Key at YAESU), little knob and small piece of a tube shrink. If you have not these items in your junk- box run to local electronic store, it can provide these parts for sure. Now, tin the leads of the knob and connector, knob must sit hard on the connector, cut off unnecessary leads. Step 2 Heat up Soldering Iron and solder one pin of the knob to the ground of the connector, another pin of the knob to the center pin. Lead for the middle part of the connector cut off (At the picture the lead is bended before cut off.) Step 3 Careful insert this design to the transceiver and make sure that our key is workable. Then insert shrink tube to the key, heat up the shrink…. That is all! CW Key that newer have been smallest lay in your hands. http://www.antentop.org/ Page 76
  • 80. ANTENTOP- 01- 2008, # 010 CW Key That Never Have Been Smallest Conclusion See lat the key at my FT817. Everything is ready to Air. Training takes several minutes and I can work with the key at 60- 90 –WPM. BTW, it is very conveniently to use the key with menu functions. CW Key that newer have been smallest is in my hand. Nice thing, nice thing for me and nice thing for present (off course, fo radio- amateur!). New Year Pictures from UA6HJQ http://www.antentop.org/ Page 77
  • 81. ANTENTOP- 01- 2008, # 010 Simple “PIC- KEY” Credit Line: http://rx9cbi.narod.ru/PICKey.htm This simple “PIC- KEY” provides sending Morse Code in two modes. First, that was written in the memory (four memory cluster), second, with hand jambic manipulator. Specification: Supply Voltage: +7... 17-Volts. Consumption current: 5... 7 mA. Keying speed could be adjusted up to 400 WPM. Capacity of each memory cluster up to 60 letters (depends on the length of the letters and formatting the text). Time of storage information in the memory- - more than 10 years (as specification on the Parts mentioned). Rewriting resource: more than 100000 times (as specification on the Parts mentioned). Ratio “dot- gap- dash” is 3 or 5 dots. Gap more then 5 dots is wrote 5-dots. Used jambic mode A. (The mode is mostly used in Russia). Mike Kislinsky, RX9CBI Figure 1 shows the schematic of Simple “PIC-KEY” Functions of the Parts. DA1: 5V- stabilizer; DD1: Microcontroller; DD2: Reprogrammable READ-ONLY Memory, capacity 2048 bits: DA2: Clock generator for adjusting keying speed. R14, C11: Set Clock frequency for the DD1 (near 400- 500-kHz, in the schematic WDT set in “OFF”). VD1, VD2: Show mode of the key. Operation Tapping buttons S1… S4 turn on the reproduction of the Data from Cluster. Tapping of any buttons (at this case begin reproduction from the taped button) or pressing the key do ending of reproduction Holding buttons S1… S4 more the 1 second permits the write to the Cluster. Tapping any buttons does the end of the writing. First variant of the key was not intended for high speed, however, LZ2ZK (WITH MY LITTLE HELP) made increasing of the speed up to 400-WPM (that is nice for meteoric QSO). 73! Mike, RX9CBI http://rx9cbi.narod.ru http://www.antentop.org/ Page 78
  • 82. ANTENTOP- 01- 2008, # 010 Simple “PIC- KEY” Figure 1 Schematic of Simple “PIC-KEY” Home Made Manipulator Credit Line: http://foto.cqham.ru/showphoto.php?photo=112 http://www.antentop.org/ Page 79
  • 83. ANTENTOP- 01- 2008, # 010 Transceiver SQT Igor Grigorov, UA3ZNW Credit Line: QRP Transceivers and PAs from Accessible Parts http://www.antentop.org/009/qrp009.htm Transceiver SQT differs from TST only by TX part, therefore main volume of the article will be devoted to the TX part. Figure 1 shows the TX part of the SQT. Transceiver provides output RF power not less then 1 Wtts. Transmitter consists of from a crystal oscillator (made on T1), PUSH- PULL amplifier (made on T2, T3). Transistor T4 provides keying of the Push- Pull amplifier. Crystal oscillator works both, in RX and TX mode. Through a coupling coil RF voltage going to capacitor C6 of RX (see article about TST). From value of R3 depends function of the RX. To much value is going to low sensitivity, too low value is going to bad reception (with spurious channels of reception). As usual, R3 should be near 100 – 1000-Ohms. Coupling coil has ¼ turns from L1. Data for L1C2 are the same like for L1C1 from RX of the TST (see Table 2 for TST article). You know, that at RX/TX mode in the DC transceiver the generator should have shift 400- 800-Hz. Sometimes, when we down on the key of the SQT transceiver, we get the shift because changing mode of crystal oscillator. If we have not got reliable shift at the case, we may use circuit shown in Figure 2. The circuit is switched of instead jumper and turn on to the RF-amplifier. At TX mode a current going through inductor coiled above ferrite that is changed the permeability of the ferrite. So, we will have shift of the frequency at RX/TX. The shift is depend on quantity turns switched instead jumper (1- 5) and value of the resistor R*. It may be near 500- 5000- Ohms. Any ferrite with permeability 400- 2000 should be used in the circuit. For example, it may be ferrite ring with OD 7- 20-millimeter, ferrite road in 3- 8 mm diameter and 10-40 millimeter long. Wire in diameter of 0.1- 0.3- millimeter (38AWG- 28AWG) should be okey for both inductors. First winding ( to point “2”) is coiled turn to turn, the second one ( to point “1”) by pile-up. Figure 2 Frequency shift RX/TX circuit If in serial with frequency- shift inductor an additional inductor plus capacitor is inserted, we will get circuit for frequency shift of the quartz in limit near 10-kHz plus circuit for frequency shift at RX/TX mode. Figure 3 shows the circuit. Table 1 shows data for L3, TR1, TR3, C3, L2C9, RFC1, RFC2. Figure 4 shows design of transformer for frequency – shift circuit (Figure 2, Figure 3). Figure 5 shows design L2. http://www.antentop.org/ Page 80
  • 84. ANTENTOP- 01- 2008, # 010 Transceiver SQT Figure 1 TX part of the SQT. http://www.antentop.org/ Page 81
  • 85. ANTENTOP- 01- 2008, # 010 Transceiver SQT Figure 3 Circuit for shift quartz frequency plus frequency sift RX/TX Figure 4 Design of transformer for frequency – shift circuit Figure 5 Design L2 http://www.antentop.org/ Page 82
  • 86. ANTENTOP- 01- 2008, # 010 Transceiver SQT Table 1 Data for inductors of the SQT Band, MHz 1,8 3,5 7 10 14 18 21 24 28 Note L2 32/120 10/60 3,5/36 2,5/30 1,5/22 0,9/18 0,9/18 0,9/18 0,9/18 * L3 50/150 30/100 20/80 15/60 12/50 10/46 9/42 9/42 8/40 ** RFC1, RFC2 300 250 200 180 150 150 120 120 100 *** C9, pF 250 200 150 110 91 68 51 30 30 C3, pF 1000 1000 560 470 470 300 100 56 56 T1, T2 20 17 14 12 11 10 10 8 8 **** Note * L2: First column is inductance in microHenry, the numbers of turns. Tap from center of the inductor. Inductor must be made symmetrically. L2 for 160- 80 meters may be wound by wire in diameter 0.1- 0.2 mm (37- 32 AWG), for 40- 30 meters may be wound by wire in 0.25- 0.5 mm (30- 24 AWG), for 20- 10 meters may be wound by wire in diameter 0.5- 0.8 mm (24- 20 AWG). L2 for bands 1.8- 3.5 – MHz is wound on Russian Resistor WS-2, for 7- 28 –MHz is wound on Russian Resistor WS1. Resistance for the resistors should be more than 51-k WS-2 (sizes: diameter 9.7-mm, length 49-mm) WS-1 (sizes: diameter 7.6-mm, length 31-mm) **L3: First column is inductance in microHenry, the numbers of turns. L3 for 160- 80 meters may be wound by wire in diameter 0.1- 0.2 mm (37- 32 AWG), for 40- 10 meters may be wound by wire in 0.25- 0.5 mm (30- 24 AWG). L3 for bands 1.8- 3.5 – MHz is wound on Russian Resistor MLT-2, for 7- 28 –MHz is wound on Russian Resistor MLT-1. Resistance for the resistors should be more than 27-k MLT-2 (sizes: diameter 8.6-mm, length 18.5-mm) MLT-1 (sizes: diameter 6.6-mm, length 13-mm) ***RFC1, RFC2: Coiled by pile- up on Russian Resistor WS- 0.5 by wire in diameter 0.1- 0.2 mm (37- 32 AWG). WS- 0.5 (sizes: diameter 5.5-mm, length 26-mm) ****T1, T2: Coiled by two twisted wires (1 turn to 1 centimeter) by wire in diameter 0.25- mm (30- AWG). Core – ferrite ring with OD 7… 20-millimeters (not critical), with permeability 100- 1000 (not critical). Figure 6 shows the design of the transformer. Pins for Soviet/Russian transistors KT602 and KT928 http://www.antentop.org/ Page 83
  • 87. ANTENTOP- 01- 2008, # 010 Transceiver SQT Figure 6 Design of the T1, T2 Part List TX Resistors: R1: 39 k/ 0.25 W* (27- 100 k) R2: 8.2 k/ 0.25 W* (5.1- 10 k) R3: 560 Ohm/ 0.25 W* (100-Ohms-1k) R4, R5: 220 Ohm/ 0.25 W* (51- 300-Ohms-1k) R6, R7: 3.9 k/ 0.25 W* (2.2 - 10 k) *Recommended () In brackets- may be used Capacitors: C1: 1000- pF 0.1 uF C2: See Table 1 article TST trcv C3: See Table 1 C4: 1000- pF 0.1 uF C5: 47 pF C6, C7, C8: 0.022- 0.1-uF C9: See Table 1 Semiconductors Transistors VT1: Small power NPN bipolar RF transistor (250- mWtts/250-MHz) VT2, VT3: Middle power NPN bipolar RF transistor (1- Wtts/250-MHz) * VT4: Middle power Switch PNP transistor (Ic not less the 0.2-A) “ Small heater is must or VT2, VT3. It may be a little length of a copper tube that is sitting on the case of the transistors. Diodes VD1: Any small power diode 50-mA/50-V VD2, VD3: Any small power RF diodes Connectors: X1: Any RF Connector X2: 5- PIN Audio Connector Do not down the key too long because VT2, VT3 may be overheated. If quartz is too active, switch in serial with it a resistor in 15-100 Ohm. The capacity for C3 is given (at Table 1) for active quartz. If quartz is low- active the capacity of C3 should be pick- up. As usual it needs a little reduce the capacity compare to Table 1. Caution: Moving frequency for quartz described below suits for OLD QUARTZ made in 30- 60s years of 20 century, which installed in the socket on holders (i.e., has not wires soldered to the quartz plate). Moving frequency by the methods may destroy modern tiny quartz plate. Only experienced ham have to use the Procedure that described below. Old Crystal http://www.antentop.org/ Page 84