
Recommended
Recommended
More Related Content
Similar to How to connect raspberry pi to laptop display: 4 steps
Similar to How to connect raspberry pi to laptop display: 4 steps (20)
Recently uploaded
Recently uploaded (20)
How to connect raspberry pi to laptop display: 4 steps
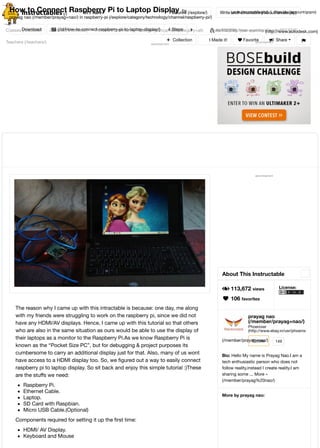
- 1. let's make Featured (/explore/) Write an Instructable (/about/create.jsp)Login (/account/login/) | Sign Up (/account/gopro) Classes (/classes/) Contests (/contest/) Forums (/community/?categoryGroup=all&category=all) Answers (/tag/type-question/?sort=RECENT) Teachers (/teachers/) (http://www.autodesk.com) advertisement The reason why I came up with this intractable is because: one day, me along with my friends were struggling to work on the raspberry pi, since we did not have any HDMI/AV displays. Hence, I came up with this tutorial so that others who are also in the same situation as ours would be able to use the display of their laptops as a monitor to the Raspberry Pi.As we know Raspberry Pi is known as the “Pocket Size PC”, but for debugging & project purposes its cumbersome to carry an additional display just for that. Also, many of us wont have access to a HDMI display too. So, we figured out a way to easily connect raspberry pi to laptop display. So sit back and enjoy this simple tutorial :)These are the stuffs we need: Raspberry Pi. Ethernet Cable. Laptop. SD Card with Raspbian. Micro USB Cable.(Optional) Components required for setting it up the first time: HDMI/ AV Display. Keyboard and Mouse (/file/F60KJLEIH6O58GP/) advertisement About This Instructable 8 113,672 views 106 favorites License: (/member/prayag+nao/) prayag nao (/member/prayag+nao/) Phoenixer (http://www.ebay.in/usr/phoenixer) Follow Bio: Hello My name is Prayag Nao.I am a tech enthusiastic person who does not follow reality,instead I create reality.I am sharing some ... More » (/member/prayag%20nao/) 149 More by prayag nao: advertisement (/) Download FavoriteI Made it! Collection How to Connect Raspberry Pi to Laptop Display by prayag nao (/member/prayag+nao/) in raspberry-pi (/explore/category/technology/channel/raspberry-pi/) 4 Steps . Share h (/id/How-to-connect-raspberry-pi-to-laptop-display/)
- 2. Step 1: Setting Up Your Raspberry Pi How does it work? To connect raspberry pi to laptop display, you can simply use an ethernet cable. The desktop GUI (Graphical User Interface) of the raspberry pi can be viewed through the laptop display using a 100Mbps ethernet connection between the two. There are many softwares available that could establish connection between the raspberry pi and your laptop. We would be using the VNC server software to connect the pi to your laptop. Installing the VNC server on your pi allows you to see the raspberry pi’s desktop remotely, using the mouse and keyboard as if you were sitting right in front of your pi. It also means that you can put your pi anywhere else in your home, but still control it. Also, internet can be shared from laptop’s WiFi over Ethernet. This also lets you access internet on the pi and connect raspberry pi to laptop display. Before moving to connect raspberry pi to laptop display, you need an SD card having the OS preinstalled. You will find lots of blogs and tutorials about preparing an SD card for the Raspberry Pi. But if you are a beginner, you can simply download this free beginner’s guide eBook on pi: Raspberry Pi guide. This will show how to install the OS for the raspberry pi. After setting up your SD Card, insert it into the raspberry pi. Next, for powering the pi connect your micro USB cable to it. Also connect your raspberry pi to the laptop via an ethernet cable. And connect the keyboard & mouse to it. Now, connect the HDMI display (the HDMI is only required for running the pi for the first time). Now power on your Pi. And follow the next steps to connect raspberry pi to laptop display. Step 2: Sharing Internet Over Ethernet advertisement (/file/FYE9T58IH6O58O0/) (/id/How-to- Change-or- Customize- Windows- 78-Boot- Screen/) (/id/Smart- Light-Lamp/) (/id/How-to- Change- Blue-Color- of- Facebook- to-Your- Favor/) Related (/id/How-to- How to send tweets from your Raspberry Pi (/id/How- to-Send-Tweets-From-Your- Raspberry-Pi/) by victoryking (/id/Direct- Direct Network Connection between Windows PC and Raspberry Pi (/id/Direct- Network-Connection- between-Windows-PC-and- (/id/How-to- How to Use Raspberry Pi2 With a Laptop Display Using VNC Server (/id/How-to-Use- Raspberry-Pi2-With-a- Laptop-Display-Usi/) (/id/Make- Make Time Lapse Videos Using Raspberry Pi (11 Lines of Code) (/id/Make-Time- Lapse-Videos-Using- Raspberry-Pi-11-Lines/) (/id/Setting- Setting up Raspberry Pi 3 (/id/Setting-Up-Raspberry- Pi-3/) by AmCoder (/member/AmCoder/)
- 3. This step explains how you can share your laptop internet with the raspberry pi via Ethernet cable.In Windows : For sharing internet to multiple users over Ethernet, go to Network and Sharing Center. Then click on the WiFi network: Click on Properties (shown below), then go to Sharing and click on “Allow other network users to connect”. Make sure that networking connection is changed to “Local Area Connection”: Note : Doing this will provide a dynamic IP to the Ethernet port of your laptop and other Devices connected to your laptop. Now, for checking the IP assigned to your laptop, Click on the new local area connection link created: As shown above, the IP assigned to my laptop is 192.168.137.1. For checking the IP assigned to the connected ethernet device, do the following. Considering that IP assigned to your Laptop is 192.168.137.1 and subnet mask is 255.255.255.0 : Open command prompt. Ping on broadcast address of your IP. (Type) Eg: ping 192.168.137.255. Stop the ping after 5 seconds. Check the reply from device: arp –a Step 3: Setting Up the VNC Server to Connect Raspberry Pi to Laptop Display If you have an HDMI display: Using the connected HDMI display on your pi, you should install VNC server in raspberry pi. Open the LX-Terminal and type the following commands to install VNC: $ sudo apt-get update $ sudo apt-get install tightvncserver If you don’t have an HDMI display: If you do not have a display even for one time setup, then no need to worry. Install Putty as per your windows configuration and via SSH you can connect with your raspberry pi. And, as you (/file/FPFJ78KIH6O58O1/) (/file/FV1MSAHIH6O58O3/) (/file/FV4XLI6IH6O58O4/) (/file/FKXUY5TIH6O58O5/)
- 4. get access of your pi terminal, run the same commands as above to install VNC. Starting VNC Server on Pi : For starting VNC, enter the following command in SSH terminal: $ vncserver :1 You will be prompted to enter and confirm a password. This will be asked only once, during first time setup. Enter an 8 digit password. Note that this is the password you will need to use, to connect to the Raspberry Pi remotely. You will also be asked if you want to create a separate “read-only” password – say no (n). Yippeee :)….The VNC server is now running on your Pi and so we can attempt to connect to it. But first we must switch to the laptop, from which we want to control the pi. Then setup a VNC client to connect to the pi. Step 4: Setting Up the Client Side (Laptop) Download VNC client from here (http://www.realvnc.com/download/vnc/) and install it. When you first run VNC viewer. Enter IP address of your raspberry pi given dynamically by your laptop (you got the address from the earlier step). And append with :1 (denoting port number) and press connect. You will get a warning message, press ‘Continue’ Enter the 8 digit password which was entered in VNC server installation on raspberry pi Finally, the raspberry pi desktop itself should appear as a VNC window. You will be able to access the GUI and do everything, as if you were using the pi’s keyboard, mouse and monitor directly. As with SSH, since this is working over your network, your pi could be situated anywhere as long as it is connected to your network. So, whenever you want to do something with your pi, just connect it with ethernet cable to your laptop and power it. Then open VNCViewer, mention the IP address of your pi. And you can use the display of your laptop as the raspberry pi’s monitor. Don't forget to like. (/file/FJPMPAZIH6O58U2/) (/file/F5Q16F5IH6O58U3/) (/file/FXJRJA0IH6O58U7/)
- 5. We have a be nice comment policy. Please be positive and constructive. w I Made it! Add Images Post Comment Reply2016-03-30 Reply 2017-06-19 Reply2016-08-01 Reply2017-02-26 Reply2016-08-15 Reply2016-07-11 Reply2016-04-27 Reply2016-03-16 Comments BartjeS2 (/member/BartjeS2/) Great tutorial, today i got my new Raspberry Pi 3. This works out of the box :) Only point i found is that this only works as long the RP is powered. After reboot you have to start VNC server manualy before it can work (not a great thing if there is no monitor or keyboard connected). I made a simple script to start VNC at boot. Maybe it's worth adding one more page with those instructions for the ones who like it? AbhishekG77 (/member/AbhishekG77/) . BartjeS2 (/member/BartjeS2/) please share the script 1024 Web Solutions (/member/1024+Web+Solutions/) . BartjeS2 (/member/BartjeS2/) I'm interested in the script. Please do share. JacekP (/member/JacekP/) made it with xrdp on Windows. No need of any startup script. Min JieL (/member/Min+JieL/) always failed :) fatal error coming out from PuTTy navael (/member/navael/) This doesn't work for me - "Make sure that networking connection is changed to “Local Area Connection”. It stays on Ethernet. What do I do? Any help is appreciated, thanks! hydranix (/member/hydranix/) Instead of a VNC server, use SSH and forward X11. For Windows, use MobaXTerm (free) For Linux just use native X11 For Mac just.... rofl apple Jihernandez13 (/member/Jihernandez13/)
- 6. Reply2016-02-14 Reply2016-02-14 Reply2016-01-26 Reply2016-01-23 Reply2015-12-09 Reply2015-11-20 I've gotten all the way until the final part where we have to type in our pi's IP address on the VNC viewer. When I enter the address and the port number, I get a response stating that the host computer is refusing access. Any thoughts on how to troubleshoot this? BertS2 (/member/BertS2/) The hardest thing for me when I was getting started with RasPi's was knowing the IP number, which is definitely required for remote access. I experimented with having it say the IP number, flash the lights for the IP number, but my favorite was having it send an email telling me the current IP number at the end of the boot process. I use my devices on multiple networks, wired and wireless. If you are fixed in one location then this isn't as big of an issue. I use terminal more than graphics console for access. Yet another way to access the Pi is via http. If you have a camera on your Pi then you'll be blown away by this software: http://elinux.org/RPi-Cam-Web- Interface (http://elinux.org/RPi-Cam-Web-Interface) Cheers! BertS2 (/member/BertS2/) The hardest thing for me when I was getting started with RasPi's was knowing the IP number, which is definitely required for remote access. I experimented with having it say the IP number, flash the lights for the IP number, but my favorite was having it send an email telling me the current IP number at the end of the boot process. I use my devices on multiple networks, wired and wireless. If you are fixed in one location then this isn't as big of an issue. I use terminal more than graphics console for access. Yet another way to access the Pi is via http. If you have a camera on your Pi then you'll be blown away by this software: http://elinux.org/RPi-Cam-Web- Interface (http://elinux.org/RPi-Cam-Web-Interface) Cheers! greatidea (/member/greatidea/) Great instructable. Helped me a lot JoeK17 (/member/JoeK17/) nice post.... vbe44bfm (/member/vbe44bfm/) Actually similar way of achieving is by putty "X11 enabled over SSH" (in SSH tab) and Xming installed on laptop and no need for vnc on rpi, once networked. JavaProgrammer (/member/JavaProgrammer/) very useful, I have actually been wondering how to use my laptop as a RPi monitor. IMore Comments
- 7. advertisement Newsletter Let your inbox help you discover our best projects, classes, and contests. Instructables will help you learn how to make anything! I'm in! About Us Who We Are (/about/) Advertise (/advertise/) Contact (/about/contact.jsp) Jobs (/community/Positions-available-at-Instructables/) Help (/id/how-to-write-a-great-instructable/) Find Us Facebook (http://www.facebook.com/instructables) Youtube (http://www.youtube.com/user/instructablestv) Twitter (http://www.twitter.com/instructables) Pinterest (http://www.pinterest.com/instructables) Google+ (https://plus.google.com/+instructables) Resources For Teachers (/teachers/) Residency Program (/pier9residency) Gift Premium Account (/account/give?sourcea=footer) Forums (/community/?categoryGroup=all&category=all) Answers (/tag/type-question/?sort=RECENT) Sitemap (/sitemap/) enter email Terms of Service (http://usa.autodesk.com/adsk/servlet/item?siteID=123112&id=21959721) | Privacy Statement (http://usa.autodesk.com/adsk/servlet/item?siteID=123112&id=21292079) | Legal Notices & Trademarks (http://usa.autodesk.com/legal-notices-trademarks/) | Mobile Site (https://www.instructables.com) (http://usa.autodesk.com/adsk/servlet/pc/index?id=20781545&siteID=123112) © 2016 Autodesk, Inc.