2. Content Layout
Raspberry Pi
o Introduction
o Types & Specifications
o OS
o Architecture
o GPIO Pins
o Hardware & Connectivity
o Use of PI
Wireless Display over Bluetooth using Pi and Android Phone
Video
o Raspberry Pi based FM Transmitter
o Difference between Raspberry Pi & Arduino
3. What is Raspberry Pi?
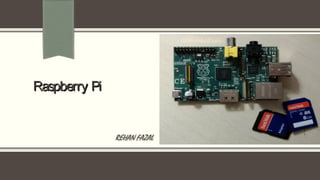
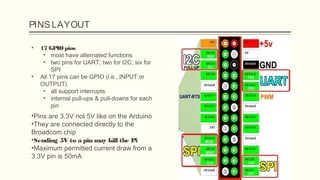
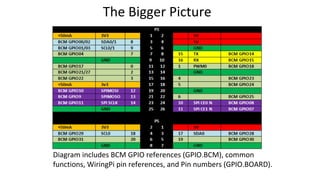
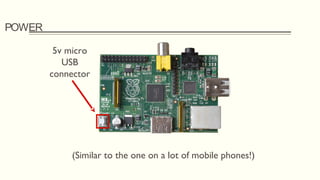
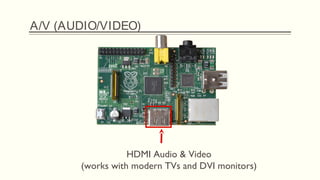
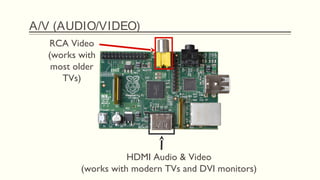
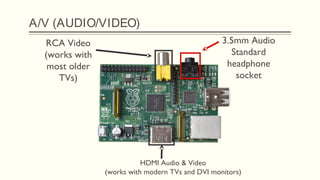
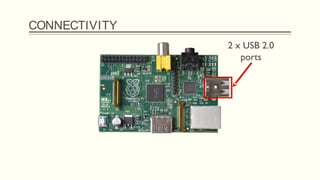
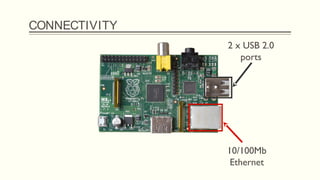
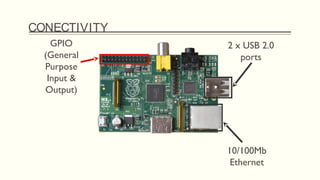
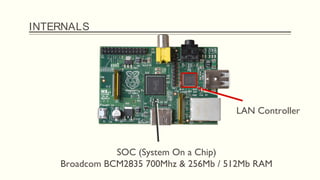
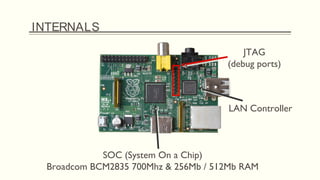
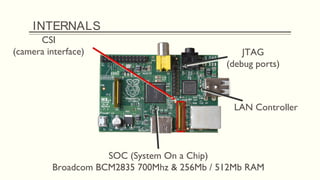
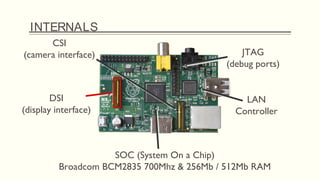
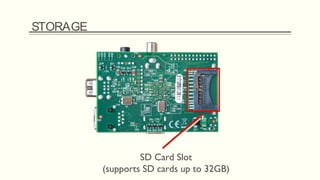
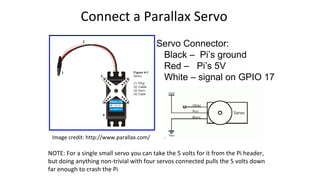
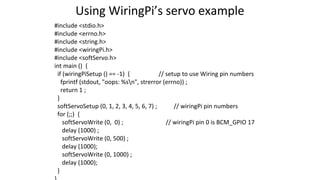
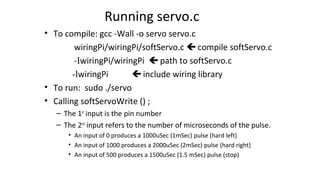
Raspberry Pi is a single board computer which is the size as small as a credit card.
Developed by Raspberry Pi foundation in UK
Costs around US$25 to $35
KEY FEATURES
• Connect to the TV via HDMI interface
• For learning programming
• Act as a media centre for video playback or gaming functions
The Raspberry Pi measures 85.60mm x 56mm x 21mm (or roughly 3.37″ x 2.21″ x 0.83″) & It weighs 45g
5. OPERATING SYSTEM USED IN RASPBERRY PI
First you have to write it to a suitable (2GB or 4GB) SD card using the UNIX tool dd.
Windows users can use Win32 Disk Imager.
Install NOOBS in your primary PC
List of OS
Raspbian “wheezy”
OpenELEC
Occidentalis v0.2
Pidora
RaspBMC
RISC OS
Arch
Linux based OS
7. PINSLAYOUT
• 17 GPIOpins
• most have alternated functions
• two pins for UART; two for I2C; six for
SPI
• All 17 pins can be GPIO (i.e., INPUT or
OUTPUT)
• all support interrupts
• internal pull-ups & pull-downs for each
pin
•Pins are 3.3V not 5V like on the Arduino
•They are connected directly to the
Broadcom chip
•Sending 5V to a pin may kill the Pi
•Maximum permitted current draw from a
3.3V pin is 50mA
8. Diagram includes BCM GPIO references (GPIO.BCM), common
functions, WiringPi pin references, and Pin numbers (GPIO.BOARD).
The Bigger Picture
13. A/V (AUDIO/VIDEO)
RCA Video
(works with
most older
TVs)
HDMI Audio & Video
(works with modern TVs and DVI monitors)
3.5mm Audio
Standard
headphone
socket
45. PROJECT OVERVIEW
Goal is to build a system using Raspberry Pi and an Android phone to
get the wireless display over Bluetooth and setup a Virtual Network
connection between them
The basic idea is to set up Bluetooth networking with the Pi, and use
SDL VNC viewer to display the X screen on the Android device
Virtual NetworkComputing (VNC) is a graphical desktop sharing
system that uses the Remote Frame Buffer protocol (RFB) to remotely
control another computer. It transmits the keyboard and mouse events
from one computer to another, relaying the graphical screen updates
back in the other direction, over a network.
46. MOTIVATION
The basic idea of connecting a raspberry pi and an android
over Bluetooth and VNC
Give usera flexibility to access and workremotely overthe phone
Can help save and store data over the pi and phone. The
phone can be accessed completely over the Raspberry Pi
The Raspberry Pi is a pretty powerful device, but much of its
benefits come when it's connected to the Internet. If we want
to utilize the Pi for mobility, we should try this method of
tethering it to our smartphones to get it online anywhere we
have mobile data
48. BLUETOOTH NETWORK SETUP
The Raspberry pi is not equipped with the built in Bluetooth,
so we need to follow the below steps:
Bluetooth dongle (We used version 2.0)
Install drivers
Commands on the command editor of pi to scan the devices
over Bluetooth. This is needed only for first time
Connect
49. VNC SETUPFOR RASPBERRY PI
Using commands, we installed
TightVNCServer over Raspberry Pi
Set the pixel format and
geometry settings as for the
Android display screen
Install client over android
Connect to Raspberry pi
50. LEARNING
Basic Raspberry Pi setup and connection
Connecting Raspberry Pi and android phone over Bluetooth and access
the data and folders of Android from pi
Establishing the Virtual Network connection between the Pi and Android
This enables the users to remotely access the Raspberry pi system over a phone
Once completely installed, the Pi should automatically mount and
connect to our mobile device when we plug it in, without having to fiddle
around in the command
Can be enhanced and improved for future works like live
demonstrations, programming and learning
52. Controlling a Servo with the Pi
• Controlling the servos requires PWM, aka Pulse Width Modulation
– The Arduino program has complete control of the microcontroller
• when it is running loop() nothing else can use the CPU
– Except for interrupt handlers written as part of the Arduino
program
– On the Raspberry Pi, your program runs within a Linux OS
• The Linux OS may switch to running another program!
– But you can change your program’s scheduling priority
• Some ways of getting the Pi to give the impression that it is a real time
system and to do PWM ‘properly’:
53. Connect a Parallax Servo
Servo Connector:
Black – Pi’s ground
Red – Pi’s 5V
White – signal on GPIO 17
Image credit: http://www.parallax.com/
NOTE: For a single small servo you can take the 5 volts for it from the Pi header,
but doing anything non-trivial with four servos connected pulls the 5 volts down
far enough to crash the Pi
54. Using WiringPi’s servo example
#include <stdio.h>
#include <errno.h>
#include <string.h>
#include <wiringPi.h>
#include <softServo.h>
int main () {
if (wiringPiSetup () == -1) { // setup to use Wiring pin numbers
fprintf (stdout, "oops: %sn", strerror (errno)) ;
return 1 ;
}
softServoSetup (0, 1, 2, 3, 4, 5, 6, 7) ; // wiringPi pin numbers
for (;;) {
softServoWrite (0, 0) ; // wiringPi pin 0 is BCM_GPIO 17
delay (1000) ;
softServoWrite (0, 500) ;
delay (1000);
softServoWrite (0, 1000) ;
delay (1000);
}
55. Running servo.c
• To compile: gcc -Wall -o servo servo.c
wiringPi/wiringPi/softServo.c compile softServo.c
-IwiringPi/wiringPi path to softServo.c
-lwiringPi include wiring library
• To run: sudo ./servo
• Calling softServoWrite () ;
– The 1st
input is the pin number
– The 2nd
input refers to the number of microseconds of the pulse.
• An input of 0 produces a 1000uSec (1mSec) pulse (hard left)
• An input of 1000 produces a 2000uSec (2mSec) pulse (hard right)
• An input of 500 produces a 1500uSec (1.5 mSec) pulse (stop)