Autodesk inventor basic tools
•Download as PPTX, PDF•
3 likes•721 views

mechanical engineering caed related

Recommended
More Related Content
What's hot
What's hot (17)
Viewers also liked
Viewers also liked (20)
Similar to Autodesk inventor basic tools
Similar to Autodesk inventor basic tools (20)
Recently uploaded
Recently uploaded (20)
Autodesk inventor basic tools
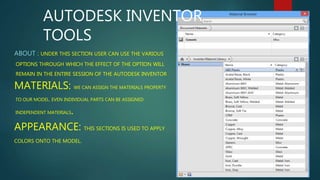
- 1. AUTODESK INVENTOR TOOLS ABOUT : UNDER THIS SECTION USER CAN USE THE VARIOUS OPTIONS THROUGH WHICH THE EFFECT OF THE OPTION WILL REMAIN IN THE ENTIRE SESSION OF THE AUTODESK INVENTOR. MATERIALS: WE CAN ASSIGN THE MATERIALS PROPERTY TO OUR MODEL. EVEN INDIVIDUAL PARTS CAN BE ASSIGNED INDEPENDENT MATERIALS. APPEARANCE: THIS SECTIONS IS USED TO APPLY COLORS ONTO THE MODEL.
- 2. Tools continued… Application options: This relates your software with the rest of the computer. Various visual and hardware settings are also there. Document settings: The settings related to your working environment are enrolled in this section. E.g. dimension, units, tolerance etc
- 3. MANAGE Under this section we can create or modify the styles We can also make the parts and components (will be discussed in next workshop). We can also join or mate two different components under this section. One can also import the caed geometry from the different caed software and work over them here.
- 4. VIEW CENTRE OF GRAVITY : you can find out it of your any geometry. It can be even of your single part. if material is not defined, it gives the value of default material used for your geometry.
- 5. Visual style One can easily see the cad model in different way or in different styles if he likes it so.
- 6. DEGREE OF FREEDOM This feature represent the permissible movement Possible for the given caed geometry. This can also be implemented for the assembly files. It is quite helpful in simulating our project.
- 7. Other visual options The other option include the to toggle between shadow , refection , Textures etc. The figure below contains all the above options
- 8. ORTHOGRAPHIC AND PERSPECTIVE VIEW ORHTOGRAPHIC PERSPECTIVE BOTH ARE SAME GEOMETRY AT THE SAME ORIENTATION
- 9. OTHER GUI REALTED OPTIONS USER INTERFACE : CLEAN SCREEN CASCADE FULL NAVIGATION WHEEL: THIS PROVIDES US THE ABILITIY TO MAKE ALL TYPE OF POSSIBLE MOVEMENTS ONTO OUR CAED GEOMETRY. SLICE GRAPHICS: THIS SLICES YOUR GEOMETRY , FROM A GIVEN PLANE OR THE PLAIN YOU SELECTED.