Are you an educator? If so, you can get a free Animoto account and create professional looking videos that you can email, share using social media, and embed in webpages or blogs. These are great for embedding in online courses, too!
1. Animoto Directions
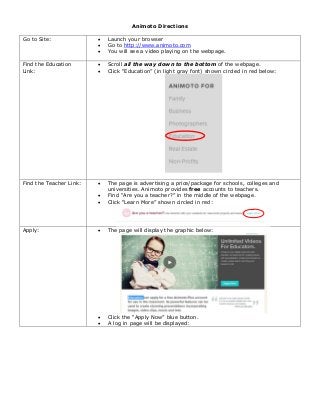
Go to Site: Launch your browser
Go to http://www.animoto.com
You will see a video playing on the webpage.
Find the Education
Link:
Scroll all the way down to the bottom of the webpage.
Click “Education” (in light gray font) shown circled in red below:
Find the Teacher Link: The page is advertising a price/package for schools, colleges and
universities. Animoto provides free accounts to teachers.
Find “Are you a teacher?” in the middle of the webpage.
Click “Learn More” shown circled in red:
Apply: The page will display the graphic below:
Click the “Apply Now” blue button.
A log in page will be displayed:
2. Click “Sign up” in the upper right corner.
Pricing plans will be displayed. Click “Start Trial” at the top of the page.
Once you complete the form, you will automatically be logged in to
your free 14 day trial. This is not the education account.
You will be logged in and you will see your dashboard.
Click “Create” in the upper right portion of the screen. Note: This is to
get to the Education link again. You will not create a video at this step.
You will see the selection of video styles. Do not pick a video style at
this time. Scroll all the way down to the bottom of the screen.
Click “Education” again.
Click “Learn More” again.
Click “Apply Now” again. This time, you’ll see the Animoto for
Education Application:
Use your school email address, your school website or the district’s
website. If you don’t know your school’s email address, type in your
own. For “class blog or website”, enter your school’s URL or your
3. District’s URL.
IMPORTANT: You will not be granted an educational license if you use
any “.com” addresses.
Confirmation: After you complete the Education Application, you’ll see this
confirmation message:
You will also receive an email with the same information including the
promotion code that you can share with your students or with your
colleagues. You do not need to write down this promo code.
Create Video: Click “Create”.
Select a Style. The ones labeled “Pro” are not available to education
users.
To preview the Style, click it and then click the “Play” button. The
music can be changed if you don’t like it.
Click the “X” to close the preview, or click “Create Video” to continue
creating your video.
A video tutorial will open up. You can choose to watch it or not.
Click “Get Started” to begin working on your video.
Click the “+” sign in the first slide to add either a Title or an image.
For this tutorial, click the “T” and add text to title your video (for
example, “My Summer Vacation”.)
4. You have 40 available characters for the title, and 50 available
characters for the subtitle.
After typing your Title and Subtitle, click “Save”.
The title slide will display some of the text, but this is not how the slide
will look in your video.
Click the + sign in the next slide and select the file icon.
Click “Upload Pictures and Video”.
Navigate to the location on your computer where you have your
pictures saved. (For this tutorial, we are skipping adding pictures from
Smug Mug, Facebook,
You can select multiple pictures by holding down the Ctrl key or Shift to
select several in a row.
NOTE: If you do not have any pictures on your computer, click “Image
Library”. You may also add video clips, or video from the “Video Clip
Library”.
Once the pictures are in, you can click and drag them to rearrange
their order.
To delete a picture, click the gear under the picture and then click the
trashcan:
Click “Delete” to delete the picture:
Continue the above steps to add as many pictures or text frames as
you would like.
To change music (if desired) click on the name of the song.
This will display the “Change Music” window.
Click “Popular for Education”. Four songs will be displayed.
Click “See More Songs for Education.”
5. To view the complete music library, click “Browse Full Library”.
Click the image next to the title of the song to see a “Play” button.
Listen to the song. Click “Pause” to stop playing.
When you find a song that you like, click the blue button labeled,
“Select Song”.
When the video is complete, click “Preview Video” to a preview of the
finished product.
After watching the preview, click “Produce”.
Type a title and description of your video.
If you’re ready to produce the video, click “Finish”.
To go back to editing the video, click “Or continue editing”.
Once the video is finished you will see a survey. Click your answers and
then click “Finish Survey”.
Click the “X” to close the survey.
Sharing the Video: There are many ways to share your video, including Facebook, Twitter
and email.
Click “More” to view more options for sharing:
“Email” will generate an email from Animoto containing the link.
You can also share on Facebook and Twitter.
You can get the link to share with others in your own email message.
You can upload the video to YouTube if you have an account.
You can get the embed code so that you can embed it in a blog post.
Click “More” to see more options.
Logging Out: Click your name
Click “Log Out”.