2. 2/74
Table of Contents
Foreword ......................................................................................... 6
System Requirements ....................................................................... 7
Basic Requirements............................................................................ 7
Hardware Encoders ........................................................................... 7
NVIDIA NVENC............................................................................ 7
Intel Quick Sync Video (QSV)............................................................. 8
AMD Advanced Media Framework (AMF) ............................................. 8
OBS Studio Quickstart ....................................................................... 9
1. Run the auto-configuration wizard .................................................... 9
2. Set up your audio devices................................................................ 9
3. Add your sources for video.............................................................. 9
4. Test your stream and record settings .................................................. 9
FAQ ........................................................................................... 10
Where are my recordings saved?........................................................ 10
I need my recordings in MP4! ........................................................... 10
Help, my video is laggy! .................................................................. 10
I need help with other issues! ............................................................ 10
OBS Studio Overview ...................................................................... 11
Quickstart..................................................................................... 11
Settings........................................................................................ 11
General ..................................................................................... 12
Stream...................................................................................... 12
Output...................................................................................... 12
Audio ....................................................................................... 13
Video........................................................................................ 13
Hotkeys..................................................................................... 13
Advanced................................................................................... 14
Scenes and Sources .......................................................................... 14
Filters.......................................................................................... 18
Studio Mode .................................................................................. 20
Scene Transitions ......................................................................... 21
Testing......................................................................................... 21
Test, test, test! ............................................................................. 21
3. 3/74
Resource Links............................................................................... 21
Sources Guide ................................................................................ 23
Scenes and Sources Overview .............................................................. 23
Source Descriptions.......................................................................... 27
Audio Input/Output Capture ............................................................ 27
Blackmagic Device ........................................................................ 28
BrowserSource ............................................................................ 28
Color Source............................................................................... 29
Display Capture ........................................................................... 29
Game Capture............................................................................. 29
Image ....................................................................................... 30
Image Slide Show ......................................................................... 31
Intel® RealSense™ 3D Camera GreenScreen ......................................... 31
Media Source .............................................................................. 31
Scene........................................................................................ 32
Text (GDI+)................................................................................ 32
VLC Video Source ........................................................................ 33
Video Capture Device .................................................................... 33
Window Capture.......................................................................... 34
Deprecated Sources ....................................................................... 34
Filters Guide................................................................................... 35
Scene and Source Filters .................................................................... 35
Image Mask/Blend ........................................................................ 35
Crop ........................................................................................ 36
Color Correction .......................................................................... 37
Scroll........................................................................................ 38
Color Key and Chroma Key ............................................................. 39
LUT Filter.................................................................................. 41
Sharpen..................................................................................... 41
Audio Device Filters ......................................................................... 42
Compressor ................................................................................ 42
Sidechain Compression/Ducking........................................................ 43
Expander................................................................................... 43
Gain......................................................................................... 44
Invert Polarity............................................................................. 44
4. 4/74
Limiter ..................................................................................... 44
Noise Gate.................................................................................. 45
Noise Suppression......................................................................... 45
VST Plugin................................................................................. 45
Keyboard Shortcuts......................................................................... 47
Sources List Shortcuts....................................................................... 47
Only active when a source is selected ................................................... 47
Preview Window Shortcuts ................................................................. 47
Surround Sound Streaming And Recording......................................... 48
Table of Contents: ........................................................................ 48
Overview......................................................................................... 48
Use cases: ..................................................................................... 48
Setup ............................................................................................. 49
Gaming and Streaming Services Support ................................................... 51
Compatible Streaming Services ............................................................ 51
Incompatible Services ....................................................................... 52
Streaming Servers and Players ............................................................... 52
Compatible Streaming Servers .......................................................... 52
Compatible Web Players ................................................................. 52
Streaming Music................................................................................ 52
Filters and VST .............................................................................. 52
High Quality Recording..................................................................... 53
Interfacing with a DAW..................................................................... 53
windows .................................................................................... 53
MacOS...................................................................................... 54
Linux ....................................................................................... 54
Ambisonics ...................................................................................... 54
Higher Order Ambisonics .................................................................. 55
Multilingual Streaming ........................................................................ 55
Detailed list of surround sound features ..................................................... 56
Understanding The Mixer ................................................................. 58
Table of Contents: ........................................................................ 58
General Overview .............................................................................. 58
Reading the Volume Meter .................................................................... 59
Zones .......................................................................................... 59
5. 5/74
Channels ...................................................................................... 59
Indicators ..................................................................................... 60
Setting Audio Levels......................................................................... 61
Technical Details................................................................................ 62
decibel relative to Full Scale (dBFS)....................................................... 62
The Peak Programme Meter (PPM)....................................................... 62
Peak and Hold................................................................................ 63
VU-meter ..................................................................................... 63
Input Level.................................................................................... 63
Streaming With SRT Protocol............................................................ 64
Table of Contents: ........................................................................ 64
General Overview .............................................................................. 64
Can SRT be used with Twitch or my favorite service?..................................... 65
Services........................................................................................ 65
Encoders ...................................................................................... 65
Servers ........................................................................................ 66
Players......................................................................................... 66
Receive srt stream within OBS .......................................................... 67
VLC usage ................................................................................. 67
ffplay usage ................................................................................ 69
How to set up OBS Studio ..................................................................... 69
Option 1: Stream SRT using the Streaming output ..................................... 69
Option 2: Stream SRT with the Custom FFmpeg Record output...................... 71
Examples of setups ............................................................................. 73
Relay server to Twitch ...................................................................... 73
7. 7/74
System Requirements
OBS Studio requires the following hardware and operating systems to function. Having a
compatible system does not guarantee that it is capable of streaming or recording using OBS.
The CPU requirements vary considerably depending on the chosen encoder, resolution, FPS
and your scene complexity. Try the Tools -> Auto Configuration Wizard in OBS itself to find
appropriate settings for your specs.
Basic Requirements
Windows:
• DirectX 10.1 compatible GPU
• Windows 8 / 8.1 / 10
macOS:
• Intel CPU (PPC is not supported)
• OpenGL 3.3 compatible GPU
• macOS High Sierra (10.13) or later
Linux/Unix
• OpenGL 3.3 compatible GPU
• X window system
Hardware Encoders
Hardware encoders are generally recommended for local recordings, but not streaming. They
can be a last resort if software encoding is not possible. They offer minimal performance
impact in exchange for a reduction in quality at the same bitrates as software (x264) encoding
using the default preset of veryfast. Currently, all consumer-level hardware encoders are
provided by certain GPUs, as listed below.
Please make sure to use the latest drivers for your GPU:
• NVIDIA
• AMD
• Intel GPU drivers are usually available from your mainboard manufacturer, but can
also be found here
NVIDIA NVENC
NVIDIA GeForce GTX-class GPU with Kepler architecture (GKxx) or newer (starting with
some cards of GTX 600 series).
Support for mobile GPUs can exist, but most will not support NVENC. If you get an error
8. 8/74
when trying to use the NVENC encoder and your drivers are already up to date, your GPU
very likely does not support NVENC.
Intel Quick Sync Video (QSV)
Intel HD Graphics GPU on Intel Core-i-CPU 2xxx (Sandy Bridge) or newer.
Due to low quality of early iterations of QSV, Intel Core-i-CPU 4xxx (Haswell) or newer is
recommended.
QSV can be unstable on Windows 7 and may require workarounds to enable it.
AMD Advanced Media Framework (AMF)
Please read the AMF plugin documentation for compatible GPUs as well as the
troubleshooting guide for issues.
9. 9/74
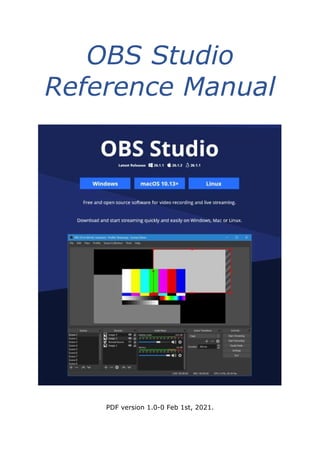
OBS Studio Quickstart
Just follow these 4 steps to start streaming or recording!
1. Run the auto-configuration wizard
When you load OBS Studio for the first time you should see the Auto-Configuration Wizard.
If you're new to OBS or just want to get started as quickly as possible, follow the steps to get
good starting settings for your setup. If you only see the main OBS Studio window, you can
access the Auto-Config Wizard in the Tools menu at the top. This wizard will automatically
test your system and attempt to find settings that your PC can handle. This includes streaming
or recording, resolution, bitrate, encoder, streaming provider and more. You can always
modify the settings manually later.
2. Set up your audio devices
By default, OBS Studio is set to capture your system default desktop audio device and
microphone. You can verify this by looking at the volume meters in the mixer section of the
main OBS Studio window, and see if they are active. If they aren't moving, or you suspect the
wrong device is being captured, click on Settings -> Audio and select the devices manually.
macOS users: If you're on macOS, you'll need an extra app to capture desktop audio. This is
due to limitations in macOS that provide no direct capture methods for desktop audio devices.
3. Add your sources for video
Next, you'll see that the preview is a black screen. OBS does not capture any video by default.
To get started capturing, you need to add a Source. At the bottom of the window is a box
called 'Sources'. Click on the + (or right click inside the box) and pick the source you want.
As a few examples, select Game Capture if you're capturing a game, Window for non-game
applications, or Video Capture Device for a webcam or capture card.
Laptop users: Here's our troubleshooting guide if your game/window/display capture sources
still show a black screen.
Sources and Scenes are the bread and butter of OBS Studio, and can be super powerful. Click
here to read more about them.
4. Test your stream and record settings
Double check that all your settings are how you want them in Settings -> Output. Then, just
hit Start Recording or Start Streaming. We strongly encourage running a test for a few
minutes to make sure that there are no issues, rather than just jumping in to your first stream
or recording. If you run into any issues, or need further help, take a peek at our help portal.
Once you're satisfied, you can go on to creating great content. That's all there is to it!
10. 10/74
If you want to read a more in-depth guide about the power of OBS Studio, jump into the
Overview wiki.
FAQ
Where are my recordings saved?
Once your recording is done, you can find it using File -> Show Recordings. You can change
this in File -> Settings -> Output -> Recording.
I need my recordings in MP4!
File -> Remux Recordings will quickly and easily convert your video files into MP4.
Help, my video is laggy!
Depending on the kind of lag, this could be related to a slow internet connection, your game
using too many resources, or incorrect settings. Read the troubleshooting guides linked below.
I need help with other issues!
• Troubleshooting Guides
• Community Chat & more
11. 11/74
OBS Studio Overview
This guide assumes you already have a basic knowledge of streaming services and streaming
terminology, and aims to give you a quick overview of the most important options and
features in OBS Studio. However, even if you don't have any previous experience, don't be
discouraged! This guide can still be very useful. It may seem like a lot to take in all at once;
just take your time and read carefully.
This guide is broken into these main sections:
• OBS Studio Quickstart
• Settings
• Scenes and Sources
• Filters
• Studio Mode
• Testing/Finishing up
• Resource Links
Quickstart
The 4-step Quickstart guide has been moved to OBS Studio Quickstart. Use it if you're brand
new to OBS Studio and just want to get started as soon as possible!
Settings
12. 12/74
Overall, most settings will be fairly self-explanatory. This will not cover everything, but will
be an overview of the basics and what you can do in each section.
General
• Change theme (light/dark)
• Enable/disable system tray icon (required for hiding to tray)
• Show confirmation for starting/stopping streams
• Enable/Disable Source snapping
• Enable/Disable automatic recording when streaming
Stream
• Select one of the included Services (Check "Show all services" to see the full list in
the dropdown) or set Custom Streaming Server
• Select the server (or enter its URL for Custom Streaming Servers)
• Enter your Streamkey
Output
13. 13/74
Note: This section covers Simple output mode. Advanced output mode gives you further
options to configure your Stream and Recording independently if you want to. We will not be
covering advanced options in this guide (see links at the end). Generally, unless you know
why you need to change it, the default options are recommended.
For Streaming:
• Set your Video Bitrate. This changes according to your upload speed and the
limitations of the service you use (for example, 6000kbps max for Twitch.tv)
• Set your Audio Bitrate. Around 160kbps for streaming, or lower if you have a low
upload speed
For Recording:
• Set your Recording Path
• Record using a preset (Same as stream, High Quality, Indistinguishable Quality, and
Lossless) and a different Encoder (if available)
• Select a Hardware Encoder if available (only if you use a different preset than "same
as stream" and if a Hardware Encoder is available)[QuickSync, NVENC or AMD
VCE]
o Encoder option will not show up until you select a recording quality other than
Same as stream
• Enable the Replay Buffer (hotkey to save the buffer must be set under the Hotkeys
section)
Audio
• Change the Sampling Rate
• Select up to two Desktop Audio Devices
• Select up to three Microphone/Auxiliary Devices
• Enable Push-to-mute or Push-to-talk for each device (keys configured in the Hotkeys
section)
Video
• Base (Canvas) Resolution
o This is the amount of space you have to fit your sources. You usually want this
to match your monitor display resolution, or if you are playing games, the
game resolution. Default is your primary monitor.
• Output (Scaled) Resolution should be the Stream Output Resolution (720p, 480p, etc)
o This is the resolution that the stream/recording will output at, using the
selected downscale filter. If you have 1080p sources, but want to stream at
720p, this is where you would set that.
• Common FPS Value should match your desired output FPS (30/60 for example)
o Note that 60-fps streaming can be very taxing on your system compared to 30-
fps. Test ahead of time and ensure your system has enough resources available.
Hotkeys
Here you can set hotkeys that do a variety of things. Some examples:
14. 14/74
• Start/Stop Streaming/Recording
• Hide/Show Sources
• Switch to a specific Scene
• Push-to-talk/Push-to-mute
• Capture active window for Game Capture
• Start/Stop/Save Replay Buffer
Keyboard keys are supported. To use joysticks as hotkeys on Linux and Windows, you can
use antimicro to map the joystick keys to common keyboard keys and then use them in OBS.
Advanced
Most of these settings should not be changed unless you understand exactly why you need to
change them. However, some settings can be useful for new streamers, such as:
• Change the Filename Formatting (or use folders: %CCYY%MM%DD%hh-%mm-
%ss = 2016071012-35-25.flv)
o Hover over the field for a popup that explains each available variable for
naming
• Activate Stream Delay
• Configure Automatic Reconnect
• Do not touch anything else in Advanced unless you absolutely know what you're
doing. Really, we mean it. If you have questions, search around or hop in the support
chat and ask!
Scenes and Sources
Scenes and Sources are the meat of OBS Studio. These are where you set up your stream
layout, add your games, webcams, and any other devices or media that you want in the output.
Right click in the box under Scenes (or use the plus at the bottom) to add a scene if there are
none listed yet. You can create as many Scenes as you want, and name them to easily
distinguish between them. For example: Welcome, Desktop, Game, Break, End. The arrow
15. 15/74
buttons can be used to change the order. As an important note, all Scenes and Sources are
global in OBS Studio, so they can not share a name. This means if you name a source Game,
you can't have a Scene with the name Game.
Once you have created a Scene, right click in the Sources box (or use the plus at the bottom)
to add what ever you want to capture. Whether it's a specific window, a capture card or game,
image, text or your entire display that you want to capture, there are several different sources
available in OBS Studio for you to choose from. Try them out!
You can re-align sources in the preview and change their order by using drag and drop in the
list, or using the up and down arrow buttons. A Source that is listed above another Source in
the list will be on top and might hide what's beneath it. This can also be useful for situations
where you want something on top of another source, like a webcam to show over your game
play. Any time you see an eye icon, you can click it to show or hide the associated item with
it (this applies to filters as well)
Visible:
Hidden:
When a Source is selected in the Sources list, you will see a red box that shows up around it.
This is the bounding box, and can be used to position sources within the preview as well as
make the source larger or smaller.
16. 16/74
If you need to crop a source, hold the Alt key and drag the bounding box. The edges will
change to green to show it's being cropped. You can see both techniques being used here to
crop and enlarge only the part of the screen we want to show:
17. 17/74
If you later on change the Base (Canvas) Resolution of OBS Studio, you will have to re-align
or re-size the sources. Changing the Output (Scaled) Resolution does not have this effect.
The following Hotkeys are available in the preview to tweak the source position and size:
• Hold CTRL to disable Source/Edge snapping
• Hold ALT to enable cropping
• CTRL+F for fit to Screen
• CTRL+S for stretch to Screen
• CTRL+D for center to Screen
• CTRL+R to reset a source size/position
You can also right-click each source in the list to access further options. This is also how you
access filters, which is discussed in the very next section!
19. 19/74
Filters can be added to each Source/Audio Device, and even to a Scene. You add a filter by
right-clicking onto the desired Source or Scene in the list, and then selecting Filters. For
Audio devices, click the little cogwheel next to the volume bar in the Audio Mixer and select
Filters. Clicking the eye icon next to an added filter will enable/disable that filter, similar to
showing/hiding a source. See the Filters Guide link for a more in-depth guide on Filters and
their specific function.
List of Effect Filters:
• Image Mask/Blend
• Crop/Pad
• Color Correction
• Scaling/Aspect Ratio
• Scroll
• Color Key
• Sharpen
• Chroma Key
List of Audio/Video Filters:
20. 20/74
• Gain
• Video Delay (not available for Window, Display, or Game Capture)
• Noise Suppression
• Noise Gate
Studio Mode
Studio mode can be a bit confusing. First, let's understand what the purpose of Studio mode
is.
Activating Studio Mode allows you to change your Scenes in the background without your
viewers being able to see you making those changes. After you click on the Studio Mode
button, you will see the current Live Scene (what your viewers see) on the right while your
edit Scene on the left.
After you are done editing the Scene you can click on "Transition" (or use a Quick
Transition/Hotkey if you added one) to swap the left and right, making the Scene you were
editing the live Scene. If you are changing Scenes, the last active Scene will be shown in the
edit area on the left. After you are done with everything and transitioned to the changed
Scene, you can deactivate Studio Mode until you need to edit again. Viewers cannot see when
Studio Mode is enabled or not.
21. 21/74
Scene Transitions
Some Transitions in OBS Studio are available from the first launch: Fade and Cut Transition.
You can add more using the plus button in the Scene Transitions section. Currently Swipe,
Slide, Fade to color, and Luma Wipe (with several wipe options) are available. More may
come in the future.
You can switch the currently active Transition with the drop-down menu and change its
duration.
After you have configured a Transition, you can also add it as a Quick Transition in Studio
Mode. For Quick Transitions, you can configure the duration (length) of the transition as well.
For example, you can add the same Fade to your Quick Transitions Menu with 500ms and
1000ms if you wanted. Also, you could configure a Swipe left and a Swipe right transition,
then add them both as Quick Transitions and use them to first swipe left in your Scene A to
change Scene B, and then swipe right back to your newly configured Scene B when you are
done.
Testing
There are many more options and functions inside OBS Studio, but I hope you got a good
idea of the different things that are possible with this great tool.
Test, test, test!
Now it's time to start testing! Are the settings working? Is the stream running smooth? Are all
your Scenes configured how you want them? It's strongly recommended that you test
everything as best as you can before starting your first live stream. This can help work out any
kinks or performance issues you might be having ahead of time, and save the embarrassment
of any issues on the stream itself.
If you have problems, start a thread in the Support section of the forums. Be sure to include a
log file. Alternately, you can join our community chat to get live help from community
volunteers.
If you want more control over your Recording settings or want to record multiple audio
tracks, switch the Output Mode to Advanced and check out this guide: High quality recording
and multiple Audio Tracks
Resource Links
• Advanced local recording guide
• Video guide for OBS Studio
• Buffering issues
• CPU overload/High Encoding issues
22. 22/74
• Dropped Frame issues
• Laptop troubleshooting
• In-depth filters guide
• Enabled CoreAudio encoder for better audio quality
Original guide created by Jack0r, edits/updates by Fenrir
Note: This guide is a work in progress, and any updates/contributions are very welcome!
23. 23/74
Sources Guide
Table of Contents
• Scenes and Sources Overview
• Source Descriptions
o Audio Input Capture
o Audio Output Capture
o Blackmagic Device
o BrowserSource
o Color Source
o Display Capture
o Game Capture
o Image
o Image Slide Show
o Intel® RealSense™ 3D Camera GreenScreen
o Media Source
o Scene
o Text (GDI+)
o VLC Video Source
o Video Capture Device
o Window Capture
o Deprecated Sources
Scenes and Sources Overview
Scenes and Sources are the meat of OBS Studio. These are where you set up your stream
layout, add your games, webcams, and any other devices or media that you want in the output.
Right click in the box under Scenes (or use the plus at the bottom) to add a scene if there are
none listed yet. You can create as many Scenes as you want, and name them to easily
distinguish between them. For example: Welcome, Desktop, Game, Break, End. The arrow
buttons can be used to change the order. As an important note, all Scenes and Sources are
24. 24/74
global in OBS Studio, so they can not share a name. This means if you name a source Game,
you can't have a Scene with the name Game.
Once you have created a Scene, right click in the Sources box (or use the plus at the bottom)
to add what ever you want to capture. Whether it's a specific window, a capture card or game,
image, text or your entire display that you want to capture, there are several different sources
available in OBS Studio for you to choose from. Try them out!
You can re-align sources in the preview and change their order by using drag and drop in the
list, or using the up and down arrow buttons. A Source that is listed above another Source in
the list will be on top and might hide what's beneath it. This can also be useful for situations
where you want something on top of another source, like a webcam to show over your game
play. Any time you see an eye icon, you can click it to show or hide the associated item with
it (this applies to filters as well)
Visible:
Hidden:
When a Source is selected in the Sources list, you will see a red box that shows up around it.
This is the bounding box, and can be used to position sources within the preview as well as
make the source larger or smaller.
25. 25/74
If you need to crop a source, hold the Alt key and drag the bounding box. The edges will
change to green to show it's being cropped. You can see both techniques being used here to
crop and enlarge only the part of the screen we want to show:
26. 26/74
If you later on change the Base (Canvas) Resolution of OBS Studio, you will have to re-align
or re-size the sources. Changing the Output (Scaled) Resolution does not have this effect.
The following Hotkeys are available in the preview to tweak the source position and size:
• Hold CTRL to disable Source/Edge snapping
• Hold ALT + drag the bounding box to crop
• CTRL+F for fit to Screen
• CTRL+S for stretch to Screen
• CTRL+D for center to Screen
• CTRL+R to reset a source size/position
You can also right-click each source in the list to access further options. This is where you
access the Filters sub-menu, which is discussed in detail in our Filters Guide.
27. 27/74
Edit Transform menu:
Source Descriptions
Audio Input/Output Capture
WARNING: Audio Input/Output Capture source can cause an echo effect if you have the
same device selected in Settings -> Audio. If you plan on adding audio devices directly to
your scenes, make sure they are disabled globally first.
This source allows you to add an audio input or output device (i.e. microphone or headset
repsectively) to a specific scene. Simply pick the device you wish to capture, and the audio
from that device will be captured when the source is active. These sources can be useful if
28. 28/74
you only want specific audio devices active in specific scenes, rather than globally through all
of OBS.
Blackmagic Device
The Blackmagic Device source allows you to add a variety of Blackmagic Design capture
cards, using their provided developer SDK to ensure the best possible compatibility.
Blackmagic Device source has the following options:
• Device: Dropdown list that allows you to select the Blackmagic Design device you
wish to use.
• Mode: Sets the video mode of the device. This should match your media (i.e. camera
or game console) output resolution and framerate.
• Format: Selects the video format the device runs in. This should also match your
media output you wish to capture.
• Use Buffering (Checkbox): Enables or disables the use of buffering on the video/audio
for the device. This can help with issues on systems with low resources available or a
device with bad drivers/other hardware issues.
BrowserSource
Browser source is one of the most versatile sources available in OBS. It is, quite literally, a
web browser that you can add directly to OBS. This allows you to perform all sorts of custom
layout, image, video, and even audio tasks. Anything that you can program to run in a normal
browser (within reason, of course), can be added directly to OBS.
Browser Source is fairly straight forward with its options.
• Local File (Checkbox): Tells the source if you are loading a web page from your local
machine, or remotely.
• Width: Sets the viewport width of the browser page.
• Height: Sets the viewport height of the browser page.
• FPS: Sets the FPS the browser page will render at.
• CSS: By default, sets the background to be transparent, removes margins on the body,
and hides the scroll bar (if the page renders larger than your viewport width/height)
o Default CSS: body { background-color: rgba(0, 0, 0, 0); margin: 0px auto;
overflow: hidden; }
• Shutdown source when not visible (Checkbox): Unloads the page when the source is
no longer visible (by clicking the eye icon to hide, or not in the active scene).
• Refresh browser source when scene becomes active (Checkbox): Refresh the page
when it becomes active (scene is switched to)
• Refresh cache of current page (Button): CLicking this will immediately refresh the
page and reload any content.
29. 29/74
As Browser Source is based on CEF, any CEF flags (--enable-gpu for example) can be passed
from the OBS Studio shortcut. A fairly comprehensive list can be found here
Color Source
As the name implies, this source creates a solid color for you to add to your scene. This can
be used for things like background colors or even a global color tint by using the alpha
channel.
Color Source has the following options:
• Color: Allows you to set the color the source will display. This is also where you set
any desired alpha.
• Width/Height: This allows you to set the resolution of the source. The primary point
of changing this would be to set an aspect ratio that matches your canvas display.
Display Capture
Display Capture is used to capture your entire monitor. The options here are few, with a
selection for the display you wish to capture, and a checkbox to enable or disable showing of
your cursor.
You can only add one display capture source per display. If you need your display in multiple
scenes, make sure you use Add Existing!
Game Capture
Game Capture is one of the primary sources that many users will be looking to use. This
Source lets you directly capture the game you are playing, so long as it's DirectX or OpenGL.
Game Capture is the most efficient way you can add your games to OBS, and should always
be tried first. There are only a very small number of games that do not work with Game
Capture. If you have issues with it and cannot solve them on your own, stop by the support
chat!
Once you add your Game Capture Source, you will need to select a few options that suit your
current needs. First is the Mode.
• Capture any fullscreen application
• Capture specific window
• Capture foreground window with hotkey
The first option, capture any fullscreen application, will automatically detect any game
running fullscreen on your primary monitor, and add the video output to the Game Capture
source in OBS. If you play your games fullscreen, this is the option you should choose. Note
30. 30/74
that if you only have a single monitor, alt+tabbing out of the game to check OBS will cause
the game to stop rendering, so you won't see it show up in the OBS preview.
The second option, capture specific window, allows you to simply select the active game
you want to capture. Window Match Priority lets you select which parameters will be used to
separate the available windows. For example, if you have two clients of the same game
running with the same executable name, but different window titles, changing the Window
Match Priority to Window Title can be very helpful in selecting the proper game to be
captured. Experiment if you have issues selecting the right game and see which works best for
you.
The final option, capture foreground window with hotkey, lets you set a specific key to tell
the Game Capture source which game you want to show up. This is very useful if you change
games often during a stream, and you don't want to have to go back into the Game Capture
properties every time to select your new game. The hotkey can be set under Settings ->
Hotkeys once the Game Capture source is added to your scene.
There are several other options, and we'll give a short description of them. In general, the
default options are sufficient for most applications and you should not change them unless
you know why you need to, and understand what they mean. As always, if you have any
questions, please stop by the forums or chat.
• Multi-adapter Compatibility: Used for systems that have multiple GPUs (such as a
laptop). It changes the capture method from shared texture capture to memory capture.
Memory capture is far less efficient than shared texture capture, and this option
should only be enabled if you have no other options.
• Force Scaling: Allows you to force a scale on the capture source.
• Limit capture framerate: Limits the Game Capture source from capturing at a frame
rate higher than OBS it set to use.
• Capture Cursor: As implied, this will either show or hide the mouse cursor in your
game. Does not apply to mouse cursors rendered in the game itself, those will always
be captured.
• Use anti-cheat compatibility hook:
• Capture third-party overlays (such as steam): If your game has an overlay that doesn't
conflict with Game Capture, this will allow Game Capture to capture it as well.
Image
This source allows you to various image types to your scene. Most image formats are
supported. Alpha channel support is also available where applicable.
The only options in Image Source are the path to the image, and unload image when not
showing. This checkbox will unload the image from memory while it is not active, which can
be useful if you have a large amount of images and few system resources available.
Image Source supports the following image formats: .bmp, .tga, .png, .jpeg, .jpg, and .gif.
31. 31/74
Image Slide Show
The Image Slide Show Source allows you to add multiple images that will rotate through as a
slide show. To use this source, click the + sign to add either individual files or directories to
be loaded. Once you have all the images you want, you can configure how you want them to
display.
• Transition: This drop down box allows you to select the animation type that will play
during a transition between files. The default is a simple fade, but it can be changed to
a cut, slide, or swipe
• Time Between Slides (milliseconds): As the name implies, the time each image will be
displayed before initiating a transition to the next.
• Transition Speed (milliseconds): This is how fast the transition animation will take to
go from starting to completely changed to the next image.
o NOTE: This value does not increase the time between slides. For example, if
you have the Time Between Slides set to 10000ms, and the Transition Speed
set to 2000ms, the transition will BEGIN at 8000ms from the end of the last
transition, with the next slide being fully visible at 10000ms. If this value is
HIGHER than the Time Between Slides, it will automatically reduce the time
to match. It also cannot be lower than 50ms.
• Randomize Playback (checkbox): This option will let you choose if you want to
randomize the images being played. If this is enabled, the next image will be
randomized at each transition. If disabled, they will be shown in the order of the file
list.
Image Slide Show Source supports the following image formats: .bmp, .tga, .png, .jpeg, .jpg,
and .gif.
Intel® RealSense™ 3D Camera GreenScreen
This source type will allow you to use the digital green screen features of an Intel RealSense
camera. RealSense cameras have a combination of a normal camera, infrared lasers, and an
infrared camera to map the space in front of your PC and detect which parts of the video can
be removed in a green screen effect. There is no configuration necessary for this source,
simply add the source, pick your camera, and watch the magic!
Media Source
Media source is a great option to add all sorts of different media types to your stream. The
currently supported file types are:
• Video: .mp4, .ts, .mov, .flv, .mkv, .avi, .gif, .webm
• Audio: .mp3, .aac, .ogg, .wav
32. 32/74
Simple click the Browse button to select your file, or uncheck the "Local file" box to allow a
URL or other remote location to be added. For remote files, the URL/path goes in Input, and
generally Input Format can be left blank.
Once the file has been selected, there are only a few options that would need to be looked at.
• Loop: Sets if the file will loop back to the beginning once playback has completed.
Useful for .gifs
• Restart playback when source becomes active: This will allow you to set the file to
restart once the source is active. Active means in the current visible scene
• Use hardware decoding when available: Fairly self explanatory!
• Hide source when playback ends: If enabled, the source will automatically hide itself
when the file has completed playback. Useful for video files so they do not show the
last frame indefinitely.
• Advanced: These options should only be access by users who understand what they
are, and why they need them, so they will not be covered in this guide.
Scene
This Source is often overlooked, and while one of the simplest in function, it can allow for
some of the most powerful functionality in OBS Studio. Since all Scenes are considered
Sources, you can add an entire Scene as a Source anywhere you want.
For example, this can allow you to create a static overlay that you want to use in every Scene,
called Overlay. In several other scenes, let's say Main and Game, you can add the Overlay
Scene. If any changes are necessary to any of the Sources in Overlay, you can just update
them it will be updated everywhere else. This is just one of many examples on how this
Source type can be used!
Text (GDI+)
Text source can allow you to add simple text renders to your stream or recording layout. To
get going, most of the default settings will be fine (except maybe the colors), and you can just
type what you want your text to say in the field labeled "Text."
If you want to load the text from a file, simple check the "Read from file" checkbox, and
select the file that has the text you want to read in it. The file must be UTF-8 (most default
text files will be), and the file will be reloaded on save. This means you can edit the file and it
will automatically update.
Once the text is present, there are quite a few options for styling it. You can:
• Change the foreground color
• Change the background color
• Add a gradient
• Adjust the opacity (transparency/alpha)
33. 33/74
• Set the horizontal and vertical align (relative to the red source bounding box)
• Add an outline (with options for size, color, and opacity)
• Use custom text extents for the size of the source, as well as if the text should wrap if
the width is exceeded.
VLC Video Source
Similar to Media Source, you can add video and other media files to this source to be played
in your scenes. This source type will use the VLC libraries for extended media support over
the built-in Media Source. It requires that VLC be installed on your system to show up as an
available source in OBS. If you are using 64bit OBS, you must install 64bit VLC and if you
are using 32bit OBS, you must install 32bit VLC.
To add files, click the + sign to browse to your file, directory, or URL that you wish to add. If
you add multiple, they will be played in the order they were added. If Loop playlist is
checked, the playlist will start over once the end is reached.
The Visibility behavior drop down menu allows you to choose how visibility affects playback
of the files. They should be self-explanatory.
Video Capture Device
The Video Capture Device Source allows you to add a variety of video devices, including but
not limited to webcams and capture cards. On Windows, for a device to work with OBS the
drivers needs to support DirectShow output. Since DirectShow is the standard output format
for Windows, there's a good chance that this is what your device outputs. All major webcams
and capture cards support DirectShow and will work with OBS.
To add your device, simply add the Source, open the properties and select your device from
the Device drop down list.
You then have several options to configure it:
• Deactivate/Active (Button): Clicking this will either turn your device off (when it
reads Deactivate) or on (when it reads Activate).
• Configure Video (Button): This button will open any driver configuration utilities. For
example, with a Logitech webcam it will open the Logitech camera configuration
software for enabling custom options like facial tracking. With a capture card, it might
open the options to configure the input resolution and FPS.
• Configure Crossbar (Button): Opens the device's Crossbar Configuration, if available.
Consult your device's manual for more information.
• Resolution/FPS Type: Most of the time this can be left on Device Default. If you are
having issues with your device showing up, change it to custom and the following
options become available to set manually:
o Resolution: This sets the base resolution for the video device. Make sure it's a
mode that your device supports!
34. 34/74
o FPS: Sets the FPS of the device.
o Video Format: If your device supports multiple video output formats (Such as
MJPEG or XRGB), you can select the preferred format here.
• YUV Color Space: Sets the color space the device will output in.
• YUV Color range: Sets the color range the device will output in.
• Buffering: This has three different modes, Enable, Disable, and Auto-Detect. Enable
will turn buffering on, which can help if you are getting stuttering during playback.
Setting to Disable will turn buffering off, which can help if you are experiencing a
delay on the device. Auto-Detect is recommended, as it will attempt to ask the device
which method is preferred.
• Flip Vertically (Checkbox): Flips the video image vertically. Some devices will
(rarely) send the video input upside down.
• Audio Output Mode: You can set to Capture Only (meaning you will not hear, without
Audio Monitoring), or Output desktop audio (DirectSound/WaveOut). Enabling
desktop output will send the device's audio out through your system default device.
• Use custom audio device (Checkbox): When enabled, the Audio Device selection
becomes available, and allows you to use a separate audio device that will be linked to
your video device. This can be useful if you want to use an external microphone on a
webcam, for instance, and want to tie the audio directly to the Source itself.
Window Capture
Window Capture allows you to capture a specific window and its contents. The advantages to
using this source over Display Capture is that only the selected window will be shown, even if
there are other windows in front of it (WIN7 NOTE: Having Aero disabled can interfere with
this functionality.).
Deprecated Sources
List of currently deprecated sources. Sources listed here should not be used unless aboslutely
necessary, and are only left in for backwards compatibility reasons.
• Text (FreeType2)
35. 35/74
Filters Guide
In OBS Studio we have the ability to add filters to our Sources, Scenes and even our Audio
Devices. The following filters are available in OBS Studio 23.0.0:
• Scene and Source Filters
o Image Mask/Blend
o Crop
o Color Correction
o Scroll
o Color Key
o LUT Filter
o Sharpen
o Chroma Key
• Audio Device Filters
o Compressor
o Sidechain Compression/Ducking
o Expander
o Gain
o Invert Polarity
o Limiter
o Noise Gate
o Noise Suppression
o VST Plugin
You can add them by right-click your desired Scene, Source or Device and selecting "Filters"
(for Audio Devices, click on the gear icon next to your device). But let me explain what the
different filters allow you to do.
Scene and Source Filters
Image Mask/Blend
36. 36/74
The Image Mask/Blend filter gives us the option to use the Color or Alpha Channel of an
Image as a Mask or to Blend an Image (multiply, addition, subtraction) over your Scene or
Source. This can be used to give your webcam a round border for example:
Crop
37. 37/74
The crop filter should explain itself but in short it lets you cut off the top/left/right/bottom of
your source/scene to only show the parts you want.
Color Correction
38. 38/74
Again, the name says it all. You can change the contrast, brightness and gamma of your
source and even provide a color overlay.
Scroll
39. 39/74
The scroll filter gives us the ability to give our text for example a scrolling effect, left-to-right
and top-to-bottom. Negative and positive values will change the direction in which your
source will scroll and you can limit the height and width if necessary.
Color Key and Chroma Key
Color Key:
41. 41/74
Both the Color Key and Chroma Key filter can be used to remove a certain color of your
source and make it transparent. This can be used for green screens and similar stuff. They
behave slightly differently, so you will need to experiment and see which works best for your
personal use case.
LUT Filter
This filter allows you to apply a LUT to your video sources.
Sharpen
42. 42/74
The sharpen filter should explain itself as well, if you feel your webcam input for example is a
bit blurred and you want to improve the overall sharpness a bit, add the filter and test with
different values.
Audio Device Filters
Compressor
A compressor is very useful if your source (typically a microphone) is set for a normal level
but can sometimes spike much louder, such as impromptu shouting or getting into a heated
discussion. It will automatically lower the source's volume to reduce the likelihood of it
peaking above 0dB, which can cause clipping and distortion, and then turn it back up once the
volume is back to normal.
In short, a compressor makes loud sounds quieter and typically would be placed at or near the
beginning of your filter chain.
• Ratio: The amount of compression or gain reduction to apply to a signal that is above
the threshold. For example, 2:1 will be a weak compression (this translates to an audio
43. 43/74
level 6dB above the threshold will be 3dB above after the compression), while 6:1 will
be a much stronger compression.
• Threshold: Once the signal reaches this level the compressor will begin to apply
compression at the set ratio. When levels are below the threshold the ratio is 1:1 which
translates to no gain reduction.
• Attack: How quickly, in milliseconds, you want the compressor to reach full gain
reduction when levels exceed the threshold.
• Release: How quickly, in milliseconds, you want the compressor to return to zero gain
reduction after levels drop below the threshold.
• Output Gain: When you compress a signal it typically ends up quieter which reduces
your average level. Applying Output gain brings the average level of the source back
up which can help improve its presence over-top of other audio sources.
• Sidechain/Ducking Source: When a compressor is placed on an output audio source
such as your Desktop, Sidechain can use the input from a microphone/aux source to
reduce the volume of the output source. See Sidechain Compression/Ducking.
Note. A source can still exceed 0dB with a compressor if your input level is too loud, your
ratio/threshold are set incorrectly or you apply too much output gain. To ensure you do not
exceed 0dB you can use a Limiter at the end of your filter chain.
Sidechain Compression/Ducking
Sidechain compression, also known as Ducking, can be used to make room for your voice
when speaking over-top of music and games by lowering your desktop audio when you speak.
The following sidechain compression settings are recommended as a place to start. Adjust the
threshold to control the strength of the ducking, attack/release control how quickly the volume
changes.
• Ratio: 32:1
• Threshold: -36dB
• Attack: 100ms (How fast the audio will duck out)
• Release: 600ms (How fast the audio will return to full volume)
• Output Gain: 0dB (You do not apply output gain when using Sidechain compression)
• Sidechain/Ducking Source: Microphone
Expander
An expander can be used to reduce background noise such as computer fans, mouse/keyboard
clicks, breathing and unwanted mouth noises. An expander reduces the level of an audio
signal by applying gain reduction, similar to a compressor but below the threshold instead of
above it.
An expander can be used in place of a gate for noise reduction, they can produce a smoother
open and close due to having an adjustable ratio whereas a gate is a fixed.
In short, an expander makes quiet sounds quieter and typically would be placed near the end
of your filter chain, after any compression/other effects but before a Limiter.
44. 44/74
• Presets: Defines some default values to use for the Ratio and Release time.
o Expander: Low ratio and release time, good for light noise reduction.
o Gate: High ratio and release time, will gain reduce a signal similar to a gate.
• Ratio: The amount of expansion or gain reduction to apply to a signal that is below
the threshold. A lower ratio such as 2:1 is good for light noise reduction, a higher ratio
such as 10:1 will completely gain reduce a signal. A nice balance is 4:1, this should
provide an adequate amount of gain reduction without fully gating the signal.
• Threshold: Once the input reaches this level the expander will stop gain reducing the
signal. Adjust the threshold until the noise you are trying to reduce is gone, but don't
go too far or your voice will begin to get cut off.
• Attack: How quickly, in milliseconds, you want the expander to stop gain reducing or
open once the threshold is exceeded. An attack between 5-10ms is recommended.
• Release: How quickly, in milliseconds, you want the expander to reach full gain
reduction or close once the input drops below the threshold. A release between 50-
120ms is recommended.
• Output Gain: Increases the output level of the expander by applying gain, generally
not needed but can be used to increase your microphone level before outputting it.
• Detection: Changes how the input level is measured, affecting the sensitivity of the
threshold detection. RMS is recommended.
o RMS: Averages the input level measurement over the last 10ms to reduce the
sensitivity of the threshold detection, helps smooth out and prevent the
expander from opening due to quick little peaks of noise.
o Peak: Input level measurement is not averaged over time, expander is quicker
to react to peak level changes.
Gain
Gain should generally be applied at the source before it reaches OBS, but if needed the gain
filter can help with very quiet audio sources to increase the output volume.
Invert Polarity
Used to correct phase cancellation issues.
Limiter
Limiters are used to prevent an audio signal from peaking above 0dB which can cause
clipping and distortion. A limiter is a special type of compressor with a very fast attack and a
very high ratio.
• Threshold: The maximum output level an audio signal can hit, no signal can exceed
this level.
• Release: Because a limiter is a compressor it applies gain reduction to brick-wall the
output level. If and when a signal tries to exceed the threshold, the release is how
45. 45/74
quickly the limiter will stop gain reducing after the level drops below the set
threshold.
When using a Limiter it should be the last filter in your chain.
Noise Gate
The Noise Gate allows you to cut off all background noise while you are not talking. Select a
close threshold above the noise volume and an open threshold slightly below your voice input
to get good results.
Noise Suppression
The Noise Suppression filter can be used to remove mild background noise or white noise that
may be in any of your audio sources. While this is generally not effective at large amounts of
background noise (i.e. in a loud room) it can be quite effective at reducing things like PC fan
noise or other environmental noises.
0 is off. The further you move the slider to the left, the 'stronger' the filter will be, and the
more sounds it will filter out. Keep in mind that this can distort other sounds (like your voice).
VST Plugin
OBS Studio supports many VST2.x plugins. Adding a VST plugin is as simple as adding any
other audio filter, but there are some limitations. VST1.x, VST3.x, MIDI control/input in VST
plugins, and shell VST plugins are not supported at this time. We have not tested all plugins,
and some VST plugins may cause crashes. Make sure you save and back up any settings to
avoid loss of data when experimenting with VST.
Lastly, always keep an eye on CPU usage, some VST plugins can be very CPU hungry!
OBS Studio will search for plugins in the following locations:
• Windows (*.dll)
o C:/Program Files/Steinberg/VstPlugins/
o C:/Program Files/Common Files/Steinberg/Shared Components/
o C:/Program Files/Common Files/VST2
o C:/Program Files/Common Files/VSTPlugins/
o C:/Program Files/VSTPlugins/
• macOS (*.vst)
o /Library/Audio/Plug-Ins/VST/
o ~/Library/Audio/Plug-ins/VST/
• Linux - NOT YET IMPLEMENTED (.so and .o)
o /usr/lib/vst/
46. 46/74
o /usr/lib/lxvst/
o /usr/lib/linux_vst/
o /usr/lib64/vst/
o /usr/lib64/lxvst/
o /usr/lib64/linux_vst/
o /usr/local/lib/vst/
o /usr/local/lib/lxvst/
o /usr/local/lib/linux_vst/
o /usr/local/lib64/vst/
o /usr/local/lib64/lxvst/
o /usr/local/lib64/linux_vst/
o ~/.vst/
o ~/.lxvst/
o NOTE: If the user has set the VST_PATH environmental variable, OBS will
ignore the other search locations and just use the locations listed in
VST_PATH.
A short list of free plugins that were used to develop and test the VST support in OBS Studio
can be found below. Your experiences may differ, but these are the ones we know have been
tested to work in our environments:
• https://www.reaper.fm/reaplugs/
• https://www.meldaproduction.com/download/plugins
Untested, but highly reviewed:
• https://varietyofsound.wordpress.com/
• http://www.vst4free.com/index.php?dev=Kjaerhus_Audio
• http://www.lesliesanford.com/vst/plugins/
In the future more filters will be added to OBS Studio, so always keep an eye out for the next
update of the software.
Original guide by Jack0r, updates/edits by Fenrir and the #obs-dev team
47. 47/74
Keyboard Shortcuts
Sources List Shortcuts
Only active when a source is selected
General
• Copy Source: Ctrl+C
• Paste Source: Ctrl+V
• Remove Source: Del
Order
• Move source up in sources list: Ctrl+Up
• Move source down in sources list: Ctrl+Down
• Move source to top of sources list: Ctrl+Home
• Move source to bottom of sources list: Ctrl+End
Transform
• Edit transform: Ctrl+E
• Reset transform: Ctrl+R
• Fit to screen: Ctrl+F
• Stretch to screen: Ctrl+S
• Center to screen: Ctrl+D
Preview Window Shortcuts
Only active when a bounding box is selected in the preview window
• Nudge source up: Up arrow
• Nudge source down: Down arrow
• Nudge source left: Left arrow
• Nudge source right: Right arrow
• Crop a source: Hold alt and drag the bounding box (edges should turn green)
• Stretch a source: Hold shift and drag the bounding box
• Temporarily disable source snapping (if enabled): Hold ctrl while moving/adjusting
bounding box
Only active when the Preview is set to Fixed Scaling (canvas or output)
• Move preview: Hold space and drag it with your mouse
• Zoom preview: Hold space + mouse scroll wheel
48. 48/74
Surround Sound Streaming
And Recording
These features require OBS-Studio 21.0 or newer.
Table of Contents:
• Overview
o Use cases
• Setup
• Gaming and Streaming Services Support
o Compatible Streaming Services
o Incompatible Services
• Streaming Servers and Players
o Compatible Streaming Servers
o Compatible Web Players
• Streaming Music
o Filters and VST
o High Quality Recording
o Interfacing with a DAW
• Ambisonics
o Higher Order Ambisonics
• Multilingual Streaming
• Detailed list of surround sound features
Overview
OBS-Studio is the first mainstream streaming software to support surround sound streaming
and recording.
Traditionally this is a feature reserved to professional broadcast appliances.
OBS-Studio can stream and record up to 8 audio channels.
The audio channels can be surround sound channels or more general multichannel ones.
Use cases:
• gaming
• music
• ambisonics
• multilingual streaming
49. 49/74
Setup
• Settings > Audio : just select a channel different from Mono or Stereo in the Channels
list. Click OK to the Warning pop-up and restart OBS.
• Settings > Output :
• Output Mode : select Advanced
• Advanced > Audio Tab : larger bitrates are unlocked for surround sound (up to 1024
kbs). Select a large bitrate. By default OBS-Studio selects 160 kbs for stereo. This is
insufficient for surround sound. As a rule of thumb 64 kbs x number of channels
50. 50/74
should be CD quality.
• Recording :
either standard or Custom FFmpeg recording can be selected.
In the prior case the codec used will be aac ; in the latter case, all (free) codecs
supported by FFmpeg are available.
(check the box 'Show all codecs').
For surround sound, will be of interest: libopus, aac (native), pcm formats
51. 51/74
(uncompressed).
• IMPORTANT WARNING: make sure to select the same channel layout as your
input (if you have a 4.1 audio source do not select 7.1). If you don't, channel mixing
may (or may not) occur. There is an automatic channel rematrixing when either
downmixing or upmixing is mandated by a difference in channel layouts between
source and output. This channel rematrixing mixes channels in general. Or it can
remove a channel (ex: 3.1 source to 4.0 output removes the LFE channel).
• DOLBY
Streams can be encoded in ac3 /eac (using Output > Advanced > Custom FFmpeg
recording > stream to URL ). But support of the various streaming services or web
players has not been tested.
Modify this wiki if this works.
Capture of dolby can be tricky if the channels are lumped into two PCM channels; in
order to be decoded correctly and encoded all the channels should be held in different
PCM channels.
Gaming and Streaming Services Support
Compatible Streaming Services
As of now, the following services have been tested and are compatible with live surround
sound streaming:
52. 52/74
• Twitch,
• Mixer (rtmp but NOT with ftl protocol),
• Smashcast ...
• Facebook Live 360 with spacial audio (requires ambisonics capture device)
Incompatible Services
• YouTube Live (discards channels beyond the first two).
• Facebook Live (downmixes all the channels).
Streaming Servers and Players
Apart from streaming to services like Twitch or Facebook Live, you might use your own
streaming server which delivers streams to your website.
Compatible Streaming Servers
The following servers have been tested and ingest surround sound in rtmp protocol :
• wowza
• nginx with rtmp module
Note however that server-side recordings only keep the first two channels although.
Compatible Web Players
• html5 players (tested with hls or mpeg-dash):
o videojs,
o bitmovin,
o mediaelement,
o viblast (hls & dash),
o hls.js
NB: Flash player accepts rtmp surround sound in Dolby; it might work ==> untested.
Streaming Music
For music bands, Djing, ... , bring your production with surround sound to the World !
Up to 7.1 surround sound is available. (For more channels (up to 16.0) check this fork).
Filters and VST
OBS-Studio has built-in audio filters as well as VST 2 support. The filters are compatible
with surround sound; the VST also if they originally support multichannel. Check the Filters-
Guide.
53. 53/74
High Quality Recording
Select Custom FFmpeg recording and a PCM format (e.g. pcm_s24le for 24 bit samples) for
uncompressed audio.
For compressed formats, you can select also libopus and aac which will work very well
(target at least 64 kbs per channel).
Interfacing with a DAW
For that you will need some application ensuring the routing.
windows
Reaper :
• SAR (requires having an ASIO driver, for instance ASIO4ALL if you don't own an
ASIO card).
• rearoute (from Reaper, with up to 256 channels) if using ASIO plugin
• Voicemeeter (Excellent guide here by Jack0r for Voicemeeter Banana)
• Virtual Audio Cable (requires v.4.50 or later).
54. 54/74
•
• For routing in Windows, check this excellent guide again by Jack0r. This other guide
may be of interest too.
MacOS
Tested with Reaper and the following apps ensuring the routing
• Soundflower
• Jack server : check this excellent guide.
• Loopback
• untested: iShow U (guide here).
• untested: WavTap (guide here).
Linux
No DAW tested. Update the Wiki if you tested.
Ambisonics
Although the channel layouts are tagged with position (2.1 5.1 etc), it is possible to encode
your channels for ambisonics use provided your decoding application is setup to supply the
ambisonics positions according to channel order.
55. 55/74
This is the case for Facebook Live 360 with spacial audio.
To use the latter in Settings > Audio, select : channels > 4.0 ; aac codec is mandatory (if you
use Recording > Custom FFmpeg > to URL > select flv container, with rtmp URL to FB live
360 and aac audio codec + x264 video codec).
When streaming to FB Live 360 the four channel rtmp stream will be interpreted as carrying
ambisonics of order 1 .
In order for this feature to work, obviously you will need an ambisonics capture device.
If you have an aac or uncompressed audio recording with 4 ambisonics, you can also play it
by adding a Media Source.
(If it doesn't work, check with ffmpeg that it is decoded correctly.)
Higher Order Ambisonics
No live streaming service supports beyond first-order ambisonics.
For recording, though for order 2 or 3, you can use pkviet's fork.
If you record with libopus (Output > Advanced > Custom FFmpeg recording ) up to 255
channels are available with mkv.
You will have to add the mapping_family=255 option though to FFmpeg audio encoder
options in OBS-Studio.
Multilingual Streaming
Multichannel support in OBS allows to stream several languages simultaneously.
This is useful for live translation (public talks ... ).
The mainstream streaming services do not support such a feature directly.
In the broadcast industry, one usually uses mpeg-ts multi-track streams instead of a
multichannel stream (in single track).
There are workarounds though allowing one to use a single track multichannel audio.
Here is one requiring :
• nginx with rtmp module;
• ffmpeg scripts which will be exec'd by nginx: ffmpeg will split the audio channels and
create mono rtmp streams (as many as there are languages).
• each of these mono rtmp streams can then be pushed by nginx to a service like FB or
YouTube Live.
For nginx setup with rtmp module, check elsewhere. (Make sure to set it up with a single
worker.)
The setup is the following for surround sound capture with each mono channel carrying a
language:
(capture tested: sdi/hdmi decklink cards, reaper, Behringer X32, ASIO sound cards).
• obs with surround sound enabled
• rtmp stream to nginx which is setup with an exec script
• rtmp {
56. 56/74
• server {
• listen 1935;
• ping 30s;
• notify_method get;
•
• application splitter {
• live on;
• allow play all;
• exec /home/me/splitter.sh $name;
• exec_kill_signal term;
• record off;
• }
}
o here nginx executes a ffmpeg script which will split the channels and redirect
rtmp mono streams to nginx.
FFmpeg example script (for two languages and a stereo source):
#!/bin/bash
echo "$(date +"%Y/%m/%d %H:%M:%S"): starting"
on_die() {
# kill all children
pkill -KILL -P $$
}
trap 'on_die' TERM
ffmpeg -i rtmp://IP:port/splitter/
-filter_complex
"[0:a]pan=mono|c0=c0,aresample=async=1000[a0];
[0:a]pan=mono|c0=c1,aresample=async=1000[a1]"
-map 0:v -copyts -start_at_zero -vcodec copy
-map [a0] -bsf:a aac_adtstoasc -copyts -start_at_zero -c:a
libfdk_aac -ab 64k -ac 1
-f flv rtmp://IP:PORT/app/stream_language1
-map 0:v -copyts -start_at_zero -vcodec copy
-map [a1] -bsf:a aac_adtstoasc -copyts -start_at_zero -c:a
libfdk_aac -ab 64k -ac 1
-f flv rtmp://IP:PORT/app/stream_language2 &
wait
For more languages pick a corresponding channel layout and add relevant streams in FFmpeg
script. You should also read the ffmpeg filtering guide. Note that for 5.1 and 7.1 one channel
(the fourth) will be encoded as LFE and so is not useable. For up to 16 channels support,
check the pkviet's fork.
Detailed list of surround sound features
• Recording and Streaming multichannel audio sources (surround sound).
• Compatible streaming services: Twitch, Mixer rtmp (not ftl), smashcast, FB 360 live
• Compatible protocols:
o rtmp
o mpeg-ts tcp udp (others untested).
• Streaming servers tested:
57. 57/74
o wowza,
o nginx-rtmp
(rtmp with multichannel audio passes through and can be distributed by these
servers to another service or cdn supporting surround sound; however, the
recording feature of these servers does not work; only the first two audio
channels are kept).
• html5 players tested and working with live surround:
o videojs,
o bitmovin,
o mediaelement,
o viblast (hls & dash),
o hls.js
• Compatible containers (for recordings):
o mkv
o mp4
o ts
o flv (others untested).
• Compatible codecs:
o ffmpeg aac (native encoder, up to 16 channels),
o libfdk_aac (up to 7.1),
o core audio aac (up to 7.1),
o opus (libopus encoder, up to 255 channels),
o vorbis (up to 7.1),
o pcm (others untested).
• OS: compatible with win, macOS, linux (alsa, pulse-audio).
• Misc:
o Higher audio bitrates (up to 1024 kbs) unlocked to accomodate higher number
of channels.
o audio monitoring, audio filters, VST are all working OOB.
58. 58/74
Understanding The Mixer
This mixer is available in OBS Studio 21.0 or newer.
Table of Contents:
• General Overview
• Reading the Volume Meter
o Zones
o Channels
o Indicators
o Setting Audio Levels
• Technical Details
o decibel relative to Full Scale (dBFS)
o The Peak Programme Meter (PPM)
o Peak and Hold
o VU-meter
o Input Level
General Overview
Clipping refers to the actual distortion that is heard when an audio signal cannot be
accurately reproduced by the gear through which it is passing.
Each entry in the mixer is made up of 5 parts
1. The (Volume) Meter - the coloured bars that light up as audio goes through a source
2. The Fader - the volume slider for that source
3. Mute button - a speaker icon to mute the source without adjusting the fader
59. 59/74
4. Options button - provides extra settings for the source
5. Volume level - The exact value adjusted by the fader or volume % number, measured
in decibels
Most of the time, you want to keep a close eye on the meters. The rest should be 'set once run
forever'.
Reading the Volume Meter
Zones
The volume meter is made up of 3 primary sections signified by the green, yellow and red
zones.
• Red Zone - this area should be avoided as it can cause clipping which sounds
unpleasant
• Yellow Zone - Speech (your own & friends') should always stay in here, occasionally
touching the red zone
• Green Zone - Everything else including music, game audio and alert sound effects
should remain here
1) Even if other sounds look to be the same volume as your voice, they may in reality
sound louder to viewers
Channels
Each audio source will have at least one volume meter assigned to it.
60. 60/74
• (1) Mono source - viewers will automatically hear this in both left and right channels
(headphones/speakers)
• (2) Stereo source - left is shown first, right second. Viewers will only hear these as
they're assigned.
1) If only the first meter lights up, enable "Mixdown to Mono" in the Advanced Audio
Properties, otherwise your viewers will only hear that source in their left channel
• (3 or more) Surround source - when Settings->Audio->Channels is set to Stereo
(default), you won't see surround channels
1) OBS automatically mixes down surround sources to Stereo unless otherwise
specified
2) Ordered as Front Left, Front Right, Front Center, LFE/Sub, Rear Left (5.1), Rear
Right (5.1), Side Left (7.1), Side Right (7.1)
Indicators
1. Left Dot (static): Input level - Live indicator of the volume meter's status
(green/yellow/red)
2. Black Dot (always moving): Vu-meter - Shows 'sound pressure', a more accurate
indicator of 'loudness'
3. Main Line (always moving): Peak Programme Meter - Has a 'fall-off decay'. After
sound stops the bar will slowly go down rather than displaying completely live data,
until it reaches -60 dB (empty) or receives new, louder data
o The 'Audio Meter Decay Rate' (how quickly the bar goes down) can be
changed in the Audio screen of Settings
4. Right Dot (sometimes static): Peak - Displays the loudest the meter has been in 20
seconds, a great way to see if you're clipping
61. 61/74
Setting Audio Levels
There are a number of ways to configure an audio source's volume.
As you adjust the volume at each step of the process, listen to the device both as early as
possible (some devices will have a 'headphone' output or a 'monitor' jack) and again when it
hits OBS using Audio Monitoring via Edit->Advanced Audio Properties.
• Always start at the device in question.
1) Microphones: check if it has a physical knob (usually labeled "Gain")
2) Games/consoles: most game applications and gaming consoles have their own
volume sliders usually hidden in a Settings/Options screen
3) Physical mixers: these have individual gain knobs for their own sources, and a
'Master' before it's sent to your computer & OBS
4) For other devices including audio interfaces, check their user manuals to see how
to configure them, as they may require third party software by the manufacturer.
• Your Operating System (Windows, macOS, Linux, etc) also has its own volume
sliders and mixer
1) Note that some devices may have a 'safe zone' that is well below the 100% mark.
o In Windows for example, Control Panel->Hardware and Sound->Sound, under
the Recording tab, select the device in question (like your mic) and click
Properties. In the Levels tab, right click the % value and choose 'decibels'. You
want this to be at (or around) 0.0dB for the least amount of clipping. It will
retain the setting when you switch back to 'percent'.
2) Your system's primary volume slider does not affect the volume of the
sound that OBS hears
3) Individual application volume sliders do affect the volume of the sound that
OBS hears
Finally, be sure to record a session as you normally would and then listen back to the file
before going live.
• If you still feel the audio needs to be tweaked, now is the time to adjust the Fader
within OBS.
1) If you need something higher than the maximum, you can insert custom percentage
(%) values that can go well above 100% using Edit->Advanced Audio Properties.
Other things to keep in mind:
• Microphones will naturally be quieter than anything computer generated – be it
games, music or general sound effects. Take that into account when balancing your
audio.
• Voice communication software like TeamSpeak, Discord and Mumble allow you to
'boost' the voice volume of other members (both overall and individual users) above
the 100% mark if needed.
• Most games do not allow per-user volume control so keep this in mind when playing
in a matchmaking system.
62. 62/74
Technical Details
decibel relative to Full Scale (dBFS)
Audio is measured in decibel (dB), which is a logarithmic scale which closely resembles how
our ears and brain perceive audio volume.
dB is a relative measurement. We could put the value 0 dB anywhere on the meter and be
correct. In digital audio it is the convention to use 0 dBFS (the FS suffix is to indicate this
convention) as the maximum volume that the sound card, audio interface, DA/AD-converter
can handle. Lower volume levels are shown with negative dBFS values.
OBS internally uses floating point calculations for audio processing, so it does have the
ability to process audio that is louder than 0 dBFS. However in the end when OBS records or
streams the video, the audio will need be below 0 dBFS or the viewer will hear a nasty
distortion called clipping (described at this start of this guide).
The Peak Programme Meter (PPM)
The PPM is the main visual feature on the OBS meter, lighting up as part of the overall
volume meter.
The length of the bar indicates the peak volume level of what the viewer will hear when
playing your video or stream. You can change the volume by moving the fader which is
directly below.
The meter is split into three different coloured sections. At -20 dBFS we have the Alignment
Level (AL) and at -9 dBFS we have the Permitted Maximum Level (PML).
Traditionally a sinus tone is played through the whole system and gain is configured for each
piece of equipment to show the tone to be at exactly the -20 dBFS Alignment Level (AL).
This way the level on your mixing desk will match that of OBS. This is important if you have
a lot of audio equipment in a chain. The value for the alignment level was chosen to be
near the average audio level for speech.
The Permitted Maximum Level (PML) is the level where if you go above this value there is a
small but potential chance that the sound will get clipped before it reaches the viewer. -9
dBFS was chosen because:
• With most PPMs, including the one in OBS, the audio may have a peak level 3 dB
higher than what is read from the meter.
• When reading PPMs it is difficult to see the actual peak, so another 3 dB margin is
added. This problem is eliminated in OBS due to the peak-hold feature which makes
reading accurate.
• Alignment errors, with multiple pieces of equipment in the chain an extra 3 dB margin
was added for difference is levels.
63. 63/74
OBS currently implements a "Sample peak program meter (SPPM)", in the future it would be
preferred to replace it with a proper "4x Over-sampling peak programme meter", which
would make it more accurate for measuring maximum peaks.
Peak and Hold
There is a small line that moves right with the PPM meter, but then stays there when the PPM
moves left again. It will stay there for 20 seconds before returning back to where the PPM
meter currently is. This allows you to easily check what the maximum level was after you
accidentally made a loud noise.
VU-meter
A second small line on the meter, black and inside the bar of the PPM meter, is a VU-meter.
This meter was traditionally used to determine loudness, because it was cheap to manufacture,
and in OBS easy to implement.
It measure the root-mean-square, integrated over a period of 300 ms. Due to the calculation it
shows more closely the sound pressure levels than does a peak-meter.
This meter is less useful, but it kept some structure of the code intact so we can replace it with
a proper loudness meter based on ITU-R BS.1770-2.
Input Level
The input level are the small square indicator at the far left of the meter. This is the best place
to see if the audio is too loud for the audio interface that captures your microphone.
The colours have the following meters:
• dark green: the input level is less than -50 dBFS
• light green: the input level is between -50 and -20 dBFS
• yellow: the input level is between -20 and -9 dBFS
• red: the input level is between -9 dBFS and -0.5 dBFS
• white: the input level is larger than -0.5 dBFS
If the indicator is missing it means there is no audio streaming toward OBS. This may be
simply due to no audio being available yet, waiting for the user to start playback of an audio
file. Or it may indicate a problem like the audio interface having been disconnected.
The input level meter is before the volume fader, but it is behind any filters that are in use by
a source. To correctly determine input level you will need to disable the filters for this source.
64. 64/74
Streaming With SRT Protocol
This feature requires OBS Studio 25.0 or newer.
Table of Contents:
• General Overview
• Can SRT be used with Twitch or my favorite service?
o Services
o Encoders
o Servers
o Players
• How to set up OBS Studio
o Option 1: Stream SRT using the Streaming output
o Option 2: Stream SRT using the Custom FFmpeg Record output
• Examples of setups
o Relay server to Twitch
General Overview
• Secure Reliable Transport (or SRT in short) is a relatively recent open source
streaming protocol, originally developped by Haivision (first demo in 2013) and
promoted by the SRT Alliance which includes many big players in the
streaming/video/telco industry. It promises:
(1) better resilience to network issues (jitter, lost packets, delay, bandwidth
fluctuations) with mechanisms for packet recovery (retransmission or ARQ automatic
repeat request; and also FEC forward error correction) + internet bonding and
(2) low latency (as low as twice the round-trip between encoder and ingest server,
with sub-second latency usually).
For a video demo, see here:
• SRT is mostly used in the broadcast and corporate world at the moment. See the NAB
2018 SRT panel with ESPN, NFL, Microsoft speakers talking about their use of SRT:
The NAB 2019 NAB SRT panel can be watched here:
https://www.haivision.com/resources/webinars/broadcast-panel. (Hey Haivision,
friendly suggestion: it'd be nice to have this vid posted on YouTube instead of having
to enter personal info! :P )
• Unlike RTMP, SRT is an open source protocol, and the source code can be found on
GitHub. While RTMP development has been abandoned since 2012, SRT
development is still very much active.
65. 65/74
• As a protocol, it is content agnostic, although the industry uses it along with an
MPEGTS container, which is the de facto standard in broadcast industry. (In terms of
comparison, RTMP protocol relies on the FLV container.) The MPEGTS container is
usually used along with UDP protocol, which makes it fast, but very unreliable and
prone to packet loss. It can also be used with TCP, which is more reliable but has
larger latency. SRT adds up to these two protocols to transport MPEGTS, with the
best of two worlds: the reliability of TCP, and the lower latency of UDP. It also
supports encryption and bonding.
• Other competing new protocols are WebRTC, Zixi (closed source) and RIST; the
latter two are quite similar to SRT and all go beyond RTMP.
• For further technical details, we recommend this video by Alex Converse, a Twitch
engineer:
There is also a white paper which can be found here
or there. The API is fully documented on GitHub.
A very good source of info is the SRT Cookbook.
Can SRT be used with Twitch or my
favorite service?
Short answer: NO (or not yet?)
Services
Long answer: None of the main streaming services support the SRT protocol for ingest. Most
still use RTMP (Twitch, YouTube, Facebook...). (Mixer though relies on WebRTC through
its proprietary FTL protocol which OBS already supports). If you're using exclusively these
services, no need to read further.
At this stage of the adoption of SRT protocol, you'll have to be technically inclined if you
want to use SRT. If you are able to set up your own streaming server, maybe redirecting your
streams to the main services like Twitch or YouTube and are interested in achieving low-
latency with improved network resilience, read on.
The other category of users who could potentially be interested belong obviously to the
professional broadcast industry. This wiki entry can be considered as fairly advanced in that it
requires access to a server and being able to set it up.
The configuration of OBS itself ranges from easy to medium in terms of difficulty. The server
setup is more challenging since it requires system/network admin knowledge.
Encoders
Live software encoders:
66. 66/74
• FFmpeg,
• OBS Studio which relies on the FFmpeg libraries,
• vMix,
• srt-live-transmit (which is a demo app from libsrt developpers; needs to be compiled
from source)
• Larix Broadcaster and Larix Screencaster can broadcast SRT from Android and iOS.
Larix Talkback feature allows receiving SRT audio return feed back to mobile
devices.
• CameraFi Live (Android only).
Hardware encoders are also available at various vendors.
Servers
The following servers support SRT ingest:
• Wowza (paid service)
o Supports SRT ingest and transmuxing/distributing in RTMP/HLS/DASH
• Nimble Streamer (free, closed source)
o While Nimble Streamer is nominally free, it is used along with a non free
dashboard which is, in all fairness, quite convenient. But it can also be used
without the dashboard and just requires modifying a JSON config file.
o Supports SRT ingest and transmuxing/distributing to RTMP, SRT, NDI,
MPEG-DASH, HLS, Low Latency HLS and more.
• SRT Live Server (free, open source)
o This option only serves SRT streams and does not transmux to
HLS/RTMP/DASH. It is much more rudimentary than the other servers at this
stage but it is FOSS and works fine with OBS Studio in our tests.
Additionally, though it is technically not a server, FFmpeg can be used in listener mode to
ingest an SRT stream. It won't be able to serve the stream as a real genuine server would do.
But it could be used to transmux to RTMP and route to nginx-rtmp for instance, which can
then handle the ingest to Twitch/YouTube/Facebook/etc.
ex: ffmpeg -i srt://IP:port?mode=listener -c copy -f flv
rtmp://IP:1935/app/streamName.
In the same way srt-live-transmit can be used to listen to an srt (or udp) stream and relay to a
final srt URL.
ex: srt-live-transmit srt://IPsrc:port srt://IPdest:port.
Players
The following players can be used to watch an SRT stream :
• VLC (version 3.0+ on Mac/Linux, version 4.0+ on Windows)
• ffplay (part of ffmpeg tools)
• OBS Studio Media Source (an obvious case-use is to broadcast from any SRT source
to an OBS instance).
• Haivision Play Pro - iPhone and Android.
• Larix Player for Android, iOS, Android TV and tvOS.
67. 67/74
Receive srt stream within OBS
This could be useful to two pc setups (although NDI is probably a more common solution).
In a Media Source, uncheck 'Local File'.
For 'Input', enter the srt URL. If the stream is received from a server (in listemer mode), the
srt connexion will be in mode=caller (which is the default one so the option can be omitted).
If however the stream is received straight from an encoder in caller mode, add the
mode=listener to the URL (see screenshot).
For 'Input Format', enter mpegts.
VLC usage
Download VLC 3.0 here or VLC 4.0 here (warning: this is the development version of VLC).
If you just want to test without disturbing your current VLC install, we advise you to
download a portable install (zip).
Go to Media > Open Network Stream:
69. 69/74
ffplay usage
It is required that ffplay be compiled with libsrt support. To the extent of our knowledge,
there does not seem to be any such binary widely available, although there are no license
constraints.
Just launch the command-line:
ffplay srt://IP:port
How to set up OBS Studio
There are two ways of setting up OBS Studio to connect to a server. The first is simpler but
gives less options at the moment. The second is a bit more difficult to setup but gives more
fine tuning capabilities (muxer options for instance are available). Note: ffmpeg may not
come with SRT support in older distributions of Linux, so check the repository sources to
ensure that ffmpeg comes with libsrt support, as there is no easy way of getting OBS Studio to
reference a custom build of ffmpeg.
Note that while the discussion focuses on SRT protocol, UDP or TCP can also be used
instead.
Option 1: Stream SRT using the Streaming output
70. 70/74
Credit: Aaron Boxer, Collabora (SRT Alliance) author of the new SRT output. Output
rewritten from scratch by pkv (pkv@obsproject.com) to solve some bugs.
Works fine with: Wowza, Nimble server, vlc, ffmpeg, srt live server, Makito X decoder.
(those are only the platforms we tested at obsproject; most should work fine.)
1. Go to Settings > Stream
2. In the Service drowdown, select Custom.
3. Enter the SRT URL in the form: srt://IP:port (OBS Studio will also accept any
protocol relying on MPEGTS container and supported by FFmpeg, therefore UDP,
TCP, RTP, etc.)
4. Don't enter anything for the key. It's not used.
OBS Studio will accept options in the syntax:
srt://IP:port?option1=value1&option2=value2. The full list of options is those
supported by FFmpeg: http://ffmpeg.org/ffmpeg-protocols.html#srt.
The most important option is latency in microseconds (μs). It has a default value of 120 ms =
120 000 μs and should be at least 2.5 * (the round-trip time between encoder and ingest
server, in ms).
Ex: for a latency of 1 sec, set latency=1000000 .
71. 71/74
Another sometimes required option is the mode, which can be caller, listener or rendez-
vous. caller opens client connection. listener starts server to listen for incoming
connections. rendezvous use Rendez-Vous connection mode which is a bi-directional link
where the first to initiate handshake is considered caller. The default value is caller and
usually need not be set for OBS Studio since it'll be in caller mode normally.
A case where it's useful to set the mode to listener is when sending a stream to VLC. OBS
Studio then acts as a server to VLC, which is the client. On a LAN for instance, set OBS
Studio to srt://127.0.0.1:port?mode=listener to establish a connection to VLC which
you point to srt://127.0.0.1:port.
Known issues:
• With v25, a bug with MPEGTS muxer makes the stream not completely compliant
with MPEGTS spec. In this case, SRT decoding fails when transmuxing SRT to
another protocol/container than the combination SRT/MPEGTS. This is the case for
instance with Nimble Streamer and Makito X Decoder. A dump of the MPEGTS
stream therefore creates a non-conformant file (this can probably be fixed though by a
remuxing with FFmpeg).
o bug fixed in obs v26 in this PR: PR 2665. Use obs version >= 26.
Option 2: Stream SRT with the Custom FFmpeg Record
output
72. 72/74
This option is a bit more complicated. It relies on the Advanced: Custom FFmpeg
Recording output.
Works fine with: Wowza, Nimble server, vlc, ffmpeg, srt live server (those are only the
platforms we tested at obsproject; most should work fine). Doesn't work well with Makito X
decoder from Haivision.
1. Go to Settings > Output
2. In the Output mode dropdown, select Advanced.
3. Click on Recording Tab.
4. In the Type dropdown, select Custom Output (FFmpeg)
5. In the FFmpeg Output Type dropdown, select Output to URL
6. In the File Path or URL box, type the SRT URL: srt://IP:port (options like
latency are entered with the syntax
srt://IP:port?option1=value1&option2=value2).
For a list of some of these options and a discussion, see the previous section or refer to
FFmpeg documentation : http://ffmpeg.org/ffmpeg-protocols.html#srt.
7. In Container Format dropdown, select mpegts.
8. Muxer Settings can be left blank, or you can use the MPEGTS FFmpeg muxer
options with the following syntax option1=value1 option2=value2 (the
option=value pairs must be separated by a space).
9. The other settings are self-explanatory. Check the box show all codecs to display
all codecs available to FFmpeg.
Note that several audio tracks can be selected. They can be identified on the ingest server side
by what is called a PID. On default value, the video track has pid 0x100 (=256), and the
other audio tracks have pid 0x101 etc. If you need to change the pid of your tracks, use the
muxer option MPEGTS_start_pid in 7.
73. 73/74
Known issues:
There can be issues with Makito X Decoder. (under investigation) Use Option 1 for Makito X
decoder.
Pros/Cons in comparison with Option 1:
Pros:
• MPEGTS muxer options can be customized (ex: set pid for video and audio tracks).
• Several audio tracks can be streamed (for instance, track 1: main track, track 2:
background music, track 3: commentary etc.) while in option 1 only a single track can
be selected. OBS Studio supports up to 6 audio tracks.
Cons:
• More complex to set up.
• One can not record the stream since one leverages the Record Output to stream.
Examples of setups
Relay server to Twitch