Introduction
• One ofthe best open source JavaScript framework for building web applications
• Angular Versions: Angular 2, Angular 4, Angular 5, Angular 6, Angular 7
• Language support: JavaScript, TypeScript, DART
• TypeScript – Most preferred language in the industry to develop angular apps
• Transpilation
• Angular Vs React Vs Vue.js
• Component Oriented Architecture (COA)
• Extendable, Maintainable and Testable
2.
Setting Up DevelopmentEnvironment
• Install latest stable version of Node – 10.15.0 LTS from https://nodejs.org/en/
• Node comes with NPM which is used to install third party libraries
• Install Angular CLI which is used to generate boilerplate code
npm install -g @angular/cli
• Create Angular App using angular CLI command
ng new <Project Name>
• Host the application
cd <Project Name>
npm install
ng serve
• Access the application
http://localhost:<port>
3.
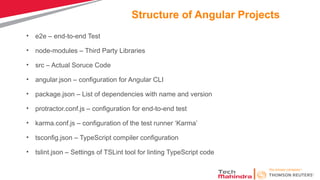
Structure of AngularProjects
• e2e – end-to-end Test
• node-modules – Third Party Libraries
• src – Actual Soruce Code
• angular.json – configuration for Angular CLI
• package.json – List of dependencies with name and version
• protractor.conf.js – configuration for end-to-end test
• karma.conf.js – configuration of the test runner ‘Karma’
• tsconfig.json – TypeScript compiler configuration
• tslint.json – Settings of TSLint tool for linting TypeScript code
4.
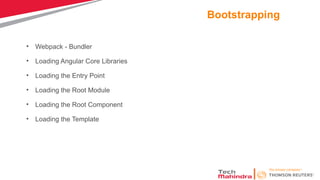
Bootstrapping
• Webpack -Bundler
• Loading Angular Core Libraries
• Loading the Entry Point
• Loading the Root Module
• Loading the Root Component
• Loading the Template
5.
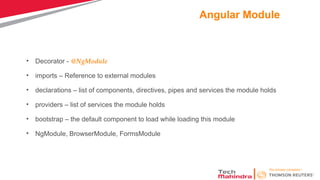
Angular Module
• Decorator- @NgModule
• imports – Reference to external modules
• declarations – list of components, directives, pipes and services the module holds
• providers – list of services the module holds
• bootstrap – the default component to load while loading this module
• NgModule, BrowserModule, FormsModule
6.
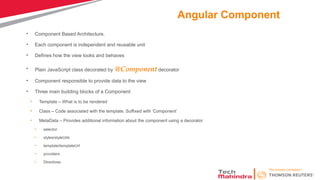
Angular Component
• ComponentBased Architecture.
• Each component is independent and reusable unit
• Defines how the view looks and behaves
• Plain JavaScript class decorated by @Component decorator
• Component responsible to provide data to the view
• Three main building blocks of a Component
• Template – What is to be rendered
• Class – Code associated with the template. Suffixed with ‘Component’
• MetaData – Provides additional information about the component using a decorator
• selector
• styles/styleUrls
• template/templateUrl
• providers
• Directives
7.
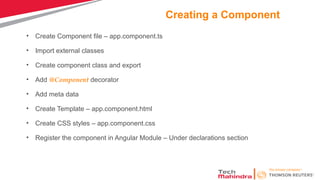
Creating a Component
•Create Component file – app.component.ts
• Import external classes
• Create component class and export
• Add @Component decorator
• Add meta data
• Create Template – app.component.html
• Create CSS styles – app.component.css
• Register the component in Angular Module – Under declarations section
8.
Binding
• Respond touser interactions and react to events
• Data Binding
• Interpolation – {{firstName}} {{getFirstName()}}
• Property Binding – [Property]=“firstName” [innerText]
[style.color]
• Event Binding – (click)=“updateFirstName()”
• Two Way Binding – [(ngModel)] = “firstName” [()] – banana in box syntax
• Part of FormsModule
• Interpolation Vs Property Binding
9.
Directives
• Directive helpsto manipulate the DOM
• Helps to extend the HTML
• Three types of directives
• Component Directive – Special directives of Angular with template
• Structural Directive – To handle DOM layout
• ngFor *ngFor=“let customer of Customers”
• ngSwitch [ngSwitch]=“expression” *ngSwitchCase=“Matching Expression”
• ngIf *ngIf=“condition”
• Attribute Directive – To change the appearance or behavior of an element
• ngModel – To achieve two-way-data binding [(ngModel)]=“firstName”
• ngClass – To add or remove css class/classes [ngClass] = “’’css class”
• ngStyle – To change the style properties [ngStyle]=“{‘color’:’blue’, ‘font-size’:’12px’}”
• Custom Directives - @Directive
10.
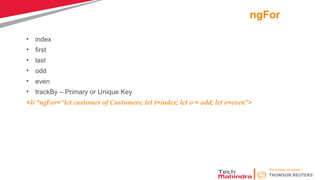
ngFor
• index
• first
•last
• odd
• even
• trackBy – Primary or Unique Key
<li *ngFor=“let customer of Customers; let i=index; let o = odd; let e=even”>
Pipes
• To formator transform data display
Expression | pipeOperator[:pipeArguments]
• Built-in pipes
• currency, date, number, percent, decimal, slice
{{toDate|date:’medium’|uppercase}}
{{Amount|currency:currency code:true}}
• Custom pipes
• import Pipe and PipeTransform modules from angular/core
• Use decorator @Pipe to define the name of the pipe
• Implement PipeTransform interface
• Implement the method transform to apply logic by accepting value and argument
• Declare the pipe in the module
• Import and use the pipe in the component
13.
Passing Data toChild Component
• In the child component
• Import Input from @angular/core
• Mark the property with @Input decorator which we need data from parent component
@input() firstName:string;
@Input(‘firstName') name: string;
• In the parent component
• Bind the child component property in the parent component while instantiating the child
<child-component [firstName]=firstName></child-component>
• Various ways to use @Input Decorator
• Using the @Input decorator to decorate the class property
• Using the input array meta data of the component decorator
@Component({
selector: 'child-component',
inputs: ['count']
})
14.
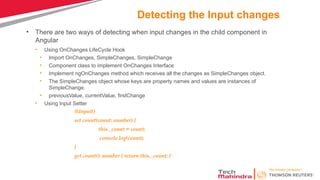
Detecting the Inputchanges
• There are two ways of detecting when input changes in the child component in
Angular
• Using OnChanges LifeCycle Hook
• Import OnChanges, SimpleChanges, SimpleChange
• Component class to implement OnChanges Interface
• Implement ngOnChanges method which receives all the changes as SimpleChanges object.
• The SimpleChanges object whose keys are property names and values are instances of
SimpleChange.
• previousValue, currentValue, firstChange
• Using Input Setter
@Input()
set count(count: number) {
this._count = count;
console.log(count);
}
get count(): number { return this._count; }
15.
Passing Data toParent Component
• Parent component can interact with the child component in three ways
• Parent listens to child event
• In Child component
• Import Output and EventEmitter from @angular/core
import { Component, Input, Output, EventEmitter } from '@angular/core';
• Define an event of type EventEmitter and decorate with @Output decorator
@Output() countChanged: EventEmitter<number> = new EventEmitter();
• Raise event using emit
this.countChanged.emit(this.count)
• In Parent Component
• Need to listen to the emitted event which is enclosed in parentheses and assigned to a method
defined in the parent component.
<child-component [count]=ClickCounter
(countChanged)="countChangedHandler($event)"></child-component>
16.
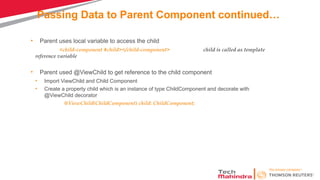
Passing Data toParent Component continued…
• Parent uses local variable to access the child
<child-component #child></child-component> child is called as template
reference variable
• Parent used @ViewChild to get reference to the child component
• Import ViewChild and Child Component
• Create a property child which is an instance of type ChildComponent and decorate with
@ViewChild decorator
@ViewChild(ChildComponent) child: ChildComponent;
17.
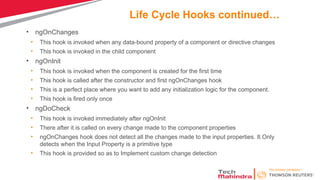
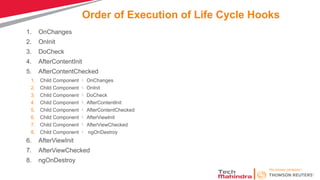
Life Cycle Hooks
•Life cycle hooks are call back functions that are invoked when component/directive
is created/changed/destroyed
• Creates and Renders root component
• Creates and Renders its children
• Checks when its data bound properties change
• Destroys and removes from DOM
• Life Cycle Hooks
• ngOnChanges
• ngOnInit
• ngDoCheck
• ngAfterContentInit
• ngAfterContentChecked
• ngAfterViewInit
• ngAfterViewCheked
• ngOnDestroy
18.
Life Cycle Hookscontinued…
• ngOnChanges
• This hook is invoked when any data-bound property of a component or directive changes
• This hook is invoked in the child component
• ngOnInit
• This hook is invoked when the component is created for the first time
• This hook is called after the constructor and first ngOnChanges hook
• This is a perfect place where you want to add any initialization logic for the component.
• This hook is fired only once
• ngDoCheck
• This hook is invoked immediately after ngOnInit
• There after it is called on every change made to the component properties
• ngOnChanges hook does not detect all the changes made to the input properties. It Only
detects when the Input Property is a primitive type
• This hook is provided so as to Implement custom change detection
19.
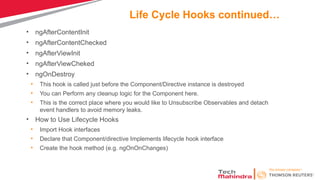
Life Cycle Hookscontinued…
• ngAfterContentInit
• ngAfterContentChecked
• ngAfterViewInit
• ngAfterViewCheked
• ngOnDestroy
• This hook is called just before the Component/Directive instance is destroyed
• You can Perform any cleanup logic for the Component here.
• This is the correct place where you would like to Unsubscribe Observables and detach
event handlers to avoid memory leaks.
• How to Use Lifecycle Hooks
• Import Hook interfaces
• Declare that Component/directive Implements lifecycle hook interface
• Create the hook method (e.g. ngOnOnChanges)
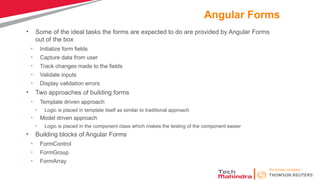
Angular Forms
• Someof the ideal tasks the forms are expected to do are provided by Angular Forms
out of the box
• Initialize form fields
• Capture data from user
• Track changes made to the fields
• Validate inputs
• Display validation errors
• Two approaches of building forms
• Template driven approach
• Logic is placed in template itself as similar to traditional approach
• Model driven approach
• Logic is placed in the component class which makes the testing of the component easier
• Building blocks of Angular Forms
• FormControl
• FormGroup
• FormArray
22.
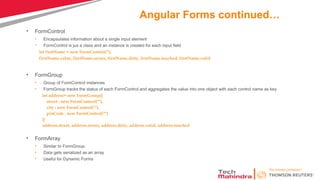
Angular Forms continued…
•FormControl
• Encapsulates information about a single input element
• FormControl is jus a class and an instance is created for each input field
let firstName = new FormControl(‘’);
firstName.value, firstName.errors, firstName.dirty, firstName.touched, firstName.valid
• FormGroup
• Group of FormControl instances
• FormGroup tracks the status of each FormControl and aggregates the value into one object with each control name as key
let address= new FormGroup({
street : new FormControl(""),
city : new FormControl(""),
pinCode : new FormControl("")
})
address.street, address.errors, address.dirty, address.valid, address.touched
• FormArray
• Similar to FormGroup.
• Data gets serialized as an array
• Useful for Dynamic Forms
23.
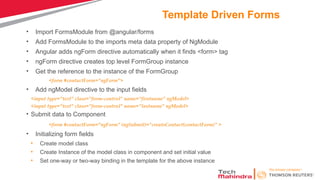
Template Driven Forms
•Import FormsModule from @angular/forms
• Add FormsModule to the imports meta data property of NgModule
• Angular adds ngForm directive automatically when it finds <form> tag
• ngForm directive creates top level FormGroup instance
• Get the reference to the instance of the FormGroup
<form #contactForm="ngForm">
• Add ngModel directive to the input fields
<input type="text" class="form-control" name="firstname" ngModel>
<input type="text" class="form-control" name="lastname" ngModel>
• Submit data to Component
<form #contactForm="ngForm" (ngSubmit)=“createContact(contactForm)" >
• Initializing form fields
• Create model class
• Create Instance of the model class in component and set initial value
• Set one-way or two-way binding in the template for the above instance
24.
Template Driven –Form Validation
• HTML5 validation attributes – required, minlength, maxlength, pattern
• Add noValidate attribute in form tag
• Disable submit button till the time the form is valid
<button type="submit" [disabled]="!contactForm.valid">Submit</button>
• Display validation message
<div *ngIf="!contactForm.controls.firstname?.valid && (contactForm.controls.firstname?.dirty
||
myForm.controls.firstname?.touched)" class="alert alert-danger">
<div [hidden]="!contactForm.controls.firstname.errors.required">
First Name is required
</div>
</div>
25.
Model Driven (Reactive)Forms
• The form is build in the component class
• Import ReactiveFormsModule from @angular/forms
• Add ReactiveFormsModule to the imports meta data property of NgModule
• In Template driven approach, FormGroup and FormContron instance are created by Angular
whereas we need to create explicitly in component class
contactForm = new FormGroup({
firstname: new FormControl(),
lastname: new FormControl(),
})
• Bind the template to the model
<form [formGroup]="contactForm">
• Bind form fields to FormControl models using FromControlName directive
<input type="text" class="form-control" name="firstname" formControlName="firstname">
<input type="text" class="form-control" name="lastname" formControlName="lastname">
• Submitting the form
<form [formGroup]="contactForm" (ngSubmit)="onSubmit()">
• Validation in model driven forms - Validators
26.
Angular Services
• Reusablecode that will be used in many components
• What services are used for
• Features independent of components
• Data across components
• To encapsulate external interactions like data access
• Angular Dependency Injection (DI)
• Consumer
• Dependency
• DI Token
• Provider
• Injector
• How to use dependency injection
• Providers meta data of @component decorator
• @Injectable() decorator
27.
Angular Services continued…
•@Injectible is not needed if the class does not have any dependencies to be
injected. However it is best practice is to decorate every service class with
@Injectable(), even those that don’t have dependencies.
• Angular doesn’t have any options to add Providers in services
• The providers can be added only in component, directive, pipe or module
• To Make the dependencies available to the entire application, we need to register
it in the root module.
providers: [ProductService,LoggerService]


![Binding
• Respond to user interactions and react to events
• Data Binding
• Interpolation – {{firstName}} {{getFirstName()}}
• Property Binding – [Property]=“firstName” [innerText]
[style.color]
• Event Binding – (click)=“updateFirstName()”
• Two Way Binding – [(ngModel)] = “firstName” [()] – banana in box syntax
• Part of FormsModule
• Interpolation Vs Property Binding](https://image.slidesharecdn.com/angular1-250504122335-6ab2ea87/85/yrs-of-IT-experience-in-enterprise-programming-8-320.jpg)
![Directives
• Directive helps to manipulate the DOM
• Helps to extend the HTML
• Three types of directives
• Component Directive – Special directives of Angular with template
• Structural Directive – To handle DOM layout
• ngFor *ngFor=“let customer of Customers”
• ngSwitch [ngSwitch]=“expression” *ngSwitchCase=“Matching Expression”
• ngIf *ngIf=“condition”
• Attribute Directive – To change the appearance or behavior of an element
• ngModel – To achieve two-way-data binding [(ngModel)]=“firstName”
• ngClass – To add or remove css class/classes [ngClass] = “’’css class”
• ngStyle – To change the style properties [ngStyle]=“{‘color’:’blue’, ‘font-size’:’12px’}”
• Custom Directives - @Directive](https://image.slidesharecdn.com/angular1-250504122335-6ab2ea87/85/yrs-of-IT-experience-in-enterprise-programming-9-320.jpg)
![ngSwitch
• [ngSwitch] =“Expression”
• *ngSwitchCase=“Matching Expression”
• *ngSwitchDefault
<div [ngSwitch]="num">
<div *ngSwitchCase="'1'">One</div>
<div *ngSwitchCase="'2'">Two</div>
<div *ngSwitchCase="'3'">Three</div>
<div *ngSwitchCase="'4'">Four</div>
<div *ngSwitchCase="'5'">Five</div>
<div *ngSwitchDefault>This is Default</div>
</div>](https://image.slidesharecdn.com/angular1-250504122335-6ab2ea87/85/yrs-of-IT-experience-in-enterprise-programming-11-320.jpg)
![Pipes
• To format or transform data display
Expression | pipeOperator[:pipeArguments]
• Built-in pipes
• currency, date, number, percent, decimal, slice
{{toDate|date:’medium’|uppercase}}
{{Amount|currency:currency code:true}}
• Custom pipes
• import Pipe and PipeTransform modules from angular/core
• Use decorator @Pipe to define the name of the pipe
• Implement PipeTransform interface
• Implement the method transform to apply logic by accepting value and argument
• Declare the pipe in the module
• Import and use the pipe in the component](https://image.slidesharecdn.com/angular1-250504122335-6ab2ea87/85/yrs-of-IT-experience-in-enterprise-programming-12-320.jpg)
![Passing Data to Child Component
• In the child component
• Import Input from @angular/core
• Mark the property with @Input decorator which we need data from parent component
@input() firstName:string;
@Input(‘firstName') name: string;
• In the parent component
• Bind the child component property in the parent component while instantiating the child
<child-component [firstName]=firstName></child-component>
• Various ways to use @Input Decorator
• Using the @Input decorator to decorate the class property
• Using the input array meta data of the component decorator
@Component({
selector: 'child-component',
inputs: ['count']
})](https://image.slidesharecdn.com/angular1-250504122335-6ab2ea87/85/yrs-of-IT-experience-in-enterprise-programming-13-320.jpg)
![Passing Data to Parent Component
• Parent component can interact with the child component in three ways
• Parent listens to child event
• In Child component
• Import Output and EventEmitter from @angular/core
import { Component, Input, Output, EventEmitter } from '@angular/core';
• Define an event of type EventEmitter and decorate with @Output decorator
@Output() countChanged: EventEmitter<number> = new EventEmitter();
• Raise event using emit
this.countChanged.emit(this.count)
• In Parent Component
• Need to listen to the emitted event which is enclosed in parentheses and assigned to a method
defined in the parent component.
<child-component [count]=ClickCounter
(countChanged)="countChangedHandler($event)"></child-component>](https://image.slidesharecdn.com/angular1-250504122335-6ab2ea87/85/yrs-of-IT-experience-in-enterprise-programming-15-320.jpg)

![Template Driven – Form Validation
• HTML5 validation attributes – required, minlength, maxlength, pattern
• Add noValidate attribute in form tag
• Disable submit button till the time the form is valid
<button type="submit" [disabled]="!contactForm.valid">Submit</button>
• Display validation message
<div *ngIf="!contactForm.controls.firstname?.valid && (contactForm.controls.firstname?.dirty
||
myForm.controls.firstname?.touched)" class="alert alert-danger">
<div [hidden]="!contactForm.controls.firstname.errors.required">
First Name is required
</div>
</div>](https://image.slidesharecdn.com/angular1-250504122335-6ab2ea87/85/yrs-of-IT-experience-in-enterprise-programming-24-320.jpg)
![Model Driven (Reactive) Forms
• The form is build in the component class
• Import ReactiveFormsModule from @angular/forms
• Add ReactiveFormsModule to the imports meta data property of NgModule
• In Template driven approach, FormGroup and FormContron instance are created by Angular
whereas we need to create explicitly in component class
contactForm = new FormGroup({
firstname: new FormControl(),
lastname: new FormControl(),
})
• Bind the template to the model
<form [formGroup]="contactForm">
• Bind form fields to FormControl models using FromControlName directive
<input type="text" class="form-control" name="firstname" formControlName="firstname">
<input type="text" class="form-control" name="lastname" formControlName="lastname">
• Submitting the form
<form [formGroup]="contactForm" (ngSubmit)="onSubmit()">
• Validation in model driven forms - Validators](https://image.slidesharecdn.com/angular1-250504122335-6ab2ea87/85/yrs-of-IT-experience-in-enterprise-programming-25-320.jpg)
![Angular Services continued…
• @Injectible is not needed if the class does not have any dependencies to be
injected. However it is best practice is to decorate every service class with
@Injectable(), even those that don’t have dependencies.
• Angular doesn’t have any options to add Providers in services
• The providers can be added only in component, directive, pipe or module
• To Make the dependencies available to the entire application, we need to register
it in the root module.
providers: [ProductService,LoggerService]](https://image.slidesharecdn.com/angular1-250504122335-6ab2ea87/85/yrs-of-IT-experience-in-enterprise-programming-27-320.jpg)