This document contains summaries of 75 frequently asked Angular interview questions. It begins by defining Angular as a JavaScript framework developed by Google for building applications using web technologies like HTML, CSS, and JavaScript. It then goes on to summarize questions about setting up the Angular development environment, Angular CLI, components, data binding, directives, lifecycle hooks, and various methods for sharing data between components.
![www.credosystemz.com
9. What is Component in Angular?
An Angular component mainly contains a template, class, and metadata. It is used to
represent the data visually. A component can be thought as a web page. An Angular
component is exported as a custom HTML tag like as:
<my-app></my-app>.
When we create new create an Angular app using CLI, it will create default App component
as the entry point of application. To declare a class as a Component, we can use the
Decorators and decorator to declare a component looks like the below example.
import{Component}from'@angular/core';
@Component({
selector:'my-app',
template: `<h1>{{ message }}</h1>`,
styleUrls:['./app.component.css']
})
exportclassAppComponent{
message = "Hello From Angular";
}
For creating a component, we can use decorator @component like the above example. If we
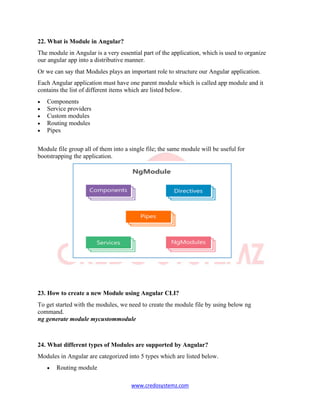
are using Angular CLI than new component will be created using the below ng command.
ng generate component componentName
10. What is Data Binding in Angular?
Data binding is one of the important core concepts which is used to do the communication
between the component and DOM.
In other words, we can say that the Data binding is a way to add/push elements into HTML
Dom or pop the different elements based on the instructions given by the Component.
There are mainly three types of data binding supported in order to achieve the data bindings
in Angular.
· One-way Binding (Interpolation, Attribute, Property, Class, Style)
· Event Binding
· Two-way Binding
Using these different binding mechanisms, we can easily communicate the component with
the DOM element and perform various operations.](https://image.slidesharecdn.com/angularinterviewquestions-pdf-230214100721-949fd87c/85/Angular-Interview-Questions-PDF-pdf-4-320.jpg)

![www.credosystemz.com
And to show this message into the template, we will use a {{ }} symbol which is called
interpolation like this.
App.component.html
<h1>{{ myMessage }}</h1>
Whenever we change the value of the myMessage variable, at that time it will be reflected
in the template but not vice versa.
13. How to implement Two-way data binding in Angular?
Two-way binding is one of the strongest binding mechanisms, where two different bindings
are merged
i.e. input and output bindings.
It means that Event binding works with the two different binding mechanisms at a time and
generates the output based on the event which was triggered.
For two-way data binding, we will use the punctuation [( )] in order to bind the two-way
data.
It can be happen using the directive called ngModel which listen to the input for any
changes and return the output.
We will understand more by implementing the simple example, where we will type the text
into the input and at the same time, we will get the value of the same input value.
App.component.html
Full Name : <inputtype="text"
[(ngModel)]="fullName"> Your Name is : {{ fullName }}
App.component.ts
import{ Component } from '@angular/core';
@Component({ selector:'my-app',
templateUrl:'./app.component.html', styleUrls: ['./app.component.css']
})
Export classAppComponent {
fullName: string = '';
}](https://image.slidesharecdn.com/angularinterviewquestions-pdf-230214100721-949fd87c/85/Angular-Interview-Questions-PDF-pdf-6-320.jpg)
![www.credosystemz.com
Here in this example, fullName is our variable into the component, and from our template,
we are binding the value of textbox and returns to the same variable which holds the current
value of fullName.
As we have discussed that it is combination of two binding mechanism which is equivalent
to below statement.
<input type="text" [ngModel]="fullName" (ngModelChange)="fullName=$event">
14. What is Directive in Angular?
The directive in Angular basically a class with the (@) decorator and duty of the directive is
to modify the JavaScript classes, in other words, we can say that it provides metadata to the
class.
Generally, @Decorator changes the DOM whenever any kind of actions happen and it also
appears within the element tag.
The component is also a directive with the template attached to it, and it has template-
oriented features. The directive in Angular can be classified as follows.
1. Component Directive
2. Structural Directive
3. Attribute Directive
15. What is Structural Directive in Angular?
The structural directive is used to manipulate the DOM parts by letting us add or modify
DOM level elements.
For example, we are adding records every time when we
submit the form. To generate a new directive, we can use
the following command.
ng generate directive mydirective
And the generated directive file can look like this.
// mydirective.directive.ts
import{ Directive } from'@angular/core'; @Directive({
selector:'[appMydirective]'
})
Export class MydirectiveDirective { constructor() { }
}](https://image.slidesharecdn.com/angularinterviewquestions-pdf-230214100721-949fd87c/85/Angular-Interview-Questions-PDF-pdf-7-320.jpg)
![www.credosystemz.com
16. What is Attribute Directive in Angular?
Attribute directive is used to change the behavior or the appearance of different elements,
and these elements act as an attribute for the DOM elements.
This is the same as custom or other directive but the difference is that we are changing the
behavior of elements dynamically.
Let’s see the simple directive example and create new directive named attrdemo.directive.ts
and source code can look like this.
import{ Directive, ElementRef, Input, HostListener } from '@angular/core';
@Directive({
selector: '[appAttdirdemo]'
})
Export classAttdirdemoDirective {
@Input() appAttdirdemo: string; constructor(privateelref: ElementRef) { }
@HostListener('mouseover') onMouseOver() { this.changefontsize(this.appAttdirdemo);
}
@HostListener('mouseleave') onMouseLeave() { this.changefontsize('15px');
}
changefontsize(size) {
this.elref.nativeElement.style.fontSize = this.appAttdirdemo;
}
}
In this example, we are going to change the font size of a string using our custom directive,
please find below code where I have used directive.
<h3 [appAttdirdemo]="'12px'"> This is a Attribute Directive</h3>
As you can see that I have used appAttdirdemo which is my directive name and based on a
mouse event, it will change the font size.
17. How many types of built-in attribute directives are available?
Basically, there is three type of built-in attribute directives are available to use which are
listed below.
• NgStyle
To add or remove the different styles of an HTML element
• NgClass
To set the different classes of an HTML element
• NgModel](https://image.slidesharecdn.com/angularinterviewquestions-pdf-230214100721-949fd87c/85/Angular-Interview-Questions-PDF-pdf-8-320.jpg)

![www.credosystemz.com
selector: 'app-child',
template: `<h3>{{ counter }}</h3>`
})
export classChildComponent { counter: number = 0;
increment() {
this.counter++;
}
decrement() {
this.counter--;
}
}
Here in this example, we are going to implement the counter example, and into the child
component, there are two different methods to increment and decrement the counter value.
Now let’s inject the child component into the parent using ViewChild like this.
// app.component.ts
import { Component, ViewChild } from '@angular/core'; import { ChildComponent } from
'./child/child.component';
@Component({
selector:'my-app',
templateUrl:'./app.component.html', styleUrls: ['./app.component.css']
})
export classAppComponent { @ViewChild(ChildComponent)
privatechildComponent: ChildComponent;
add() {
this.childComponent.increment();
}
sub() {
this.childComponent.decrement();
}
}
In our app component, we have injected child component using ViewChild and using
different methods of child increment () and decrement (), we can add or remove the counter
value directly into our parent component.
<!-- app.component.html -->
<button type="button" (click)="add()">+</button>
<app-child></app-child>
<button type="button" (click)="sub()">-</button>
When we try to click on the plus or minus button, the counter value will be reflected, this is
how we can inject the child component functionality into the parent component using
@ViewChild ().](https://image.slidesharecdn.com/angularinterviewquestions-pdf-230214100721-949fd87c/85/Angular-Interview-Questions-PDF-pdf-12-320.jpg)
![www.credosystemz.com
• Service module
• Features module
• Widget module
• Shared module
25. How to create a Module with routing using CLI?
We can configure the routes along with the Modules by using the command, which
generates the complete routing file as explained below.
ng generate module mymodule--routing
Here in this command, you can notice that we have used the additional flag –routing which
is used to create a Module for the routing as well as the normal module file.
After running above command, it will create one folder along with the two files.
1. Mymodule-routing.module.ts
import{ NgModule } from '@angular/core';
import{ Routes, RouterModule } from '@angular/router'; const routes: Routes = [];
@NgModule({
imports: [RouterModule.forChild(routes)], exports: [RouterModule]
})
Export classMymoduleRoutingModule{ }
2. Mymodule.module.ts
import{ NgModule } from'@angular/core'; import{ CommonModule } from'@angular/common';
import{ MymoduleRoutingModule } from'./mymodule-routing.module';
@NgModule({ declarations: [],
imports: [
CommonModule, MymoduleRoutingModule
]
})
Export classMymoduleModule{ }
26. What is Entry Component?
The bootstrapped component is an entry component which loads the DOM during the
bootstrapping process. In other words, we can say that entry components are the one, which
we are not referencing by type, thus it will be included during the bootstrapping mechanism.
There are mainly two types of entry component declarations can be possible.
1. Using bootstrapped root component](https://image.slidesharecdn.com/angularinterviewquestions-pdf-230214100721-949fd87c/85/Angular-Interview-Questions-PDF-pdf-14-320.jpg)
![www.credosystemz.com
import{ NgModule } from'@angular/core'; import{ CommonModule } from'@angular/common';
import{ MymoduleRoutingModule } from'./mymodule-routing.module';
@NgModule({ declarations: [], imports: [
CommonModule, MymoduleRoutingModule
]
})
Export classMymoduleModule{ }
We can specify our component into bootstrap metadata in an app.module file like this.
2. Using route definition
Const myRoutes: Routes = [
{
path:'',
component: DashboardComponent
}
];
Another way to define the entry component is to use it along with the routing configuration
like this.
27. What is Pipe in Angular?
During the web application development, we need to work with data by getting it from the
database or another platform, at that we get the data into a specific format and we need to
transform it to a suitable format, and for this purpose, we can use pipes in Angular.
The pipe is a decorator and it is used to transform the value within the template.
It is just a simple class with @Pipe decorator with the class definition and it should implement
the PipeTransform interface which accepts the input value and it will return the transformed
value.
To create a new pipe, we can use the below command.
28. What is the use of PipeTransform Interface?
When we want to create custom pipe at a time we should implement an interface named
PipeTransform which accepts input and returns the transformed value using transform()
method.
There are two parameters provided with the transform () method.
· Value - A value to be transformed
· Exponent - Additional arguments along with the value like size, volume, weight etc.](https://image.slidesharecdn.com/angularinterviewquestions-pdf-230214100721-949fd87c/85/Angular-Interview-Questions-PDF-pdf-15-320.jpg)


![www.credosystemz.com
{ path:'contact', component:ContactComponent }
])
2. forChild(): forChild is used to create the module with all of the router directive and
provider registered routes.
37. What isRouterLink?
RouterLink in Angular is a Directive and used to provide a link to the specific route.
We use routerLink to transfer the route from one component to another by identifying the
route value which is configured in the router module.
The basic syntax of routerLink will be like this.
<a [routerLink]="['/home']"> Home Page</a>
38. What is RouterOutlet?
RouterOutlet is a directive provided by Angular which is used to load the different
components based on the router state.
Whenever the user clicks on the link, at a time the activated component will be rendered
and added to HTML DOM inside the router-outlet directive.
To load the different components, we need to use a directive like below into our HTML
template.
<router-outlet></router-outlet>
Here it is the simple example, to load different components inside the router-outlet.
<div class="container">
<a routerLinkActive="active" routerLink="/page1">Page 1</a> |
<a routerLinkActive="active" routerLink="/page2">Page 2</a> |
<a routerLinkActive="active" routerLink="/page3">Page 3</a>
<router-outlet></router-outlet>
</div>
39. Explain the types of Route loading
In Angular, basically, there are three types can be used for Route loading which is listed
below.
• Pre-Loading
• Eager Loading
• Lazy Loading](https://image.slidesharecdn.com/angularinterviewquestions-pdf-230214100721-949fd87c/85/Angular-Interview-Questions-PDF-pdf-19-320.jpg)
![www.credosystemz.com
40. What is Pre-Loading?
Preloading is a completely different thing than lazy loading and eager loading, preloading
means to load the module after any eager module will be loaded, and after eager module
loaded at startup, the router looks for the modules which are unloaded and it can be
preloaded.
Let’s understand by example, assume that we have three different module Home, About and
Contact.
Now Home is the first page when our app will be executed, so remaining two modules will
remain unloaded, but at some point of time user may want to contact about the business
owner to contact them using contact page so that contact page should be ready to load after
the Home page.
We can say that the Homepage will be loaded first, then after contact page should be
preloaded afterward, which is called pre-loading.
41. What is Eager Loading?
We have seen an example that how preloading works, but there is the difference between
both of them is Eagerly loaded module will be executed at a time of application startup.
By default, all the modules in our application are eagerly loaded it means every module will
be loaded in the beginning like we have three modules Home, about and Contact than every
module will be loaded which is completely opposite to the lazy loading approach.
For example, we have three components which are eager loaded.
// app-routing.module.ts
import{ NgModule } from '@angular/core';
import{ Routes, RouterModule } from '@angular/router'; import{ HomeComponent } from
'./home/home.component'; import{ AboutComponent } from './about/about.component';
import{ ContactComponent } from './contact/contact.component';
const routes: Routes = [
{
path:'', redirectTo:'home', pathMatch:'full',
},
{
path:'home', component:HomeComponent
},
{
path:'about', component:AboutComponent
},
{
path:'contact', component:ContactComponent
},
];](https://image.slidesharecdn.com/angularinterviewquestions-pdf-230214100721-949fd87c/85/Angular-Interview-Questions-PDF-pdf-20-320.jpg)
![www.credosystemz.com
@NgModule({
imports: [RouterModule.forRoot(routes)], exports: [RouterModule]
})
Export classAppRoutingModule{ }
We have three different components, Home, About and Contact, so whenever application
loaded at that time all the modules will be loaded at application startup.
42. What is Lazy Loading?
We are loading every module at once, but do you know that the performance of the
application may decrease, for that we need to load only necessary modules which required
for application startup.
When the user navigates to a specific route and the component and module are loaded for
the single page is called lazily loaded modules and it will be directly reflected the app
bundle size.
Here in this question, we are talking about Lazy loading, in which the current screen will
only be loaded and rest of the screen will not be loaded at application startup, we can also call
it On-Demand loading.
Let’s see one simple example of a routing module where we are loading the lazily loaded
module, for that let's assume we have three different pages Home, About and Contact pages.
import{ NgModule } from '@angular/core';
import{ Routes, RouterModule } from '@angular/router'; import{ HomeComponent } from
'./home/home.component';
const routes: Routes = [
{
path:'', redirectTo:'home', pathMatch:'full',
},
{
path:'home',
component: HomeComponent
},
{
path:'about', loadChildren:'./about/index.module#AboutModule'
},
{
path:'contact', loadChildren:'./contact/index.module#ContactModule'
},
];
@NgModule({
imports: [RouterModule.forRoot(routes)], exports: [RouterModule]
})
Export classAppRoutingModule{ }](https://image.slidesharecdn.com/angularinterviewquestions-pdf-230214100721-949fd87c/85/Angular-Interview-Questions-PDF-pdf-21-320.jpg)

![www.credosystemz.com
45. What is Reactive Form in Angular?
One of the widely used forms approach which is called Reactive forms, in which structure of
the form will be implemented in the code I mean to say inside the component itself.
Reactive forms approach is robust, scalable, and one of the best parts is that it is reusable and
it is also called Model-driven forms.
In order to use Reactive forms, we need to import module as described below.
Import { ReactiveFormsModule } from '@angular/forms';
//And then we need to add this module into import array like this.
imports: [ BrowserModule, CommonModule, ReactiveFormsModule
],
46. What is Template-driven Form in Angular?
This is the simplest approach to use forms in Angular, and it will be useful if you have simple
forms which can be managed within your template but it cannot be scalable as compared to
Reactive forms.
In Template-driven forms, Angular will create the models i.e. FormGroups and FormsControl
sand then it uses ngModel to enable template-driven forms approach.
To use template-driven approach, we need to import forms module like this into module file.
import{ FormsModule } from '@angular/forms';
//And also need to add inside imports array like this.
imports: [ BrowserModule, CommonModule, FormsModule
],
47. What are the differences between Reactive form and Template-driven form in
Angular?
The differences between Reactive Form and Template-driven Form are given below:](https://image.slidesharecdn.com/angularinterviewquestions-pdf-230214100721-949fd87c/85/Angular-Interview-Questions-PDF-pdf-23-320.jpg)
![www.credosystemz.com
48. What is FormControl in Angular and how to use it?
To create a reactive form, we use FormGroup, FormControl, and FormArray with the
ReactiveFormsModule.
FormControl is generally used to track the form values and also helps to validate the different
input elements. To use FormControl, we need to import it into the module file like this.
Import { FormsModule, ReactiveFormsModule } from'@angular/forms';
Also, we need to add the same inside the imports array.
imports: [ BrowserModule, FormsModule, ReactiveFormsModule],
To use FormControl with the template, you can see the simple example like this.
<table>
<tr>
<td>Enter Your Name :</td>
<td><input type="text" [formControl]="fullName"/></td>
</tr>
</table>
And inside the component file, we need to import FormControl and create new instance as
described below.
import{ Component } from '@angular/core';
import{ FormControl, Validators } from '@angular/forms';
@Component({ selector:'my-app',
templateUrl:'./app.component.html', styleUrls: [ './app.component.css' ]
})
Export classAppComponent {
fullName = new FormControl('', Validators.required);
}
49. What is FormGroup and how to use it in Angular?
FormGroup in Angular is a collection of different FormControls and it is used to manage the
value of different inputs and implement validations as well.
In other words, we can say that FormGroup is a group of different elements which are the
instance of FormControl.
To use FormGroup, we need to import it into the component like this.
import{ FormGroup, FormControl, Validators } from '@angular/forms';
And to use FormGroup with the different FormControls, here it is the simple structure which
you can follow.](https://image.slidesharecdn.com/angularinterviewquestions-pdf-230214100721-949fd87c/85/Angular-Interview-Questions-PDF-pdf-24-320.jpg)
![www.credosystemz.com
demoForm = new FormGroup({
firstName :new FormControl('Manav', Validators.maxLength(10)), lastName:new
FormControl('Pandya', Validators.maxLength(10)),
});
Here in this example, we have two different form controls firstName and lastName which in
the textbox to get the values from the end user.
Now we will use formControlName which is used to sync the input value with the
FormControl and vice versa.
<form [formGroup]="demoForm" (ngSubmit)="submit()">
<table>
<tr>
<td>First Name :</td>
<td><input type="text" formControlName="firstName"/></td>
</tr>
<tr>
<td>Last Name :</td>
<td><input type="text" formControlName="lastName"/></td>
</tr>
<tr>
<td><input type="submit"/></td>
</tr>
</table>
</form>
After running the above example, we will get the output like this.](https://image.slidesharecdn.com/angularinterviewquestions-pdf-230214100721-949fd87c/85/Angular-Interview-Questions-PDF-pdf-25-320.jpg)
![www.credosystemz.com
50. What are various built-in validators in Angular?
Angular provides a set of inbuilt validators which we can use directly based on the situations
and these validators are.
• required
• min
• max
• requiredTrue
• minLength
• maxLength
• email
• compose
• composeAsync
• nullValidator
51. How to create custom validation in Angular?
Sometimes it may possible that these inbuilt validators would not be helpful to accomplish
our validation requirements, so for that, we can also create our custom validations.
Custom validation is as it’s nothing more than regular function, let’s see one simple example
in which salary should be more than 10000 and for that implement function like this.
functionisSufficientSalary (input: FormControl) {
const isSufficientSalary = input.value>10000;
return isSufficientSalary ?null : { isSufficient :true };
}
Here in this example, we have implemented an isSufficientSalary function which takes an
input value and if the value is not more than expected value than it returns false, and to use
this function inside component like this.
this.demoForm = this.builder.group({
salary:new FormControl('', [ Validators.required, isSufficientSalary ]),
});
As you can see that we have used two different validators, first is required validator and
another is our custom validator, find the template code below.
<form [formGroup]="demoForm" (ngSubmit)="submit()">
<table>
<tr>
<td>
<label for="salary">Salary</label>
</td>
<td>
<input type="text" name="salary" id="salary" [formControlName]="'salary'"><br/>](https://image.slidesharecdn.com/angularinterviewquestions-pdf-230214100721-949fd87c/85/Angular-Interview-Questions-PDF-pdf-26-320.jpg)
![www.credosystemz.com
</td>
<td>
<div [hidden]="!demoForm.get('salary').hasError('isSufficient')"> Salary is not sufficient
</div>
</td>
</tr>
<tr>
<td><input [disabled]="!demoForm.valid" type="submit"></td>
</tr>
</table>
</form>
And when we run this demo, you can see the output like this.
I am going to use salary 10000 which is not valid and see the error message.
When I'm going to provide the expected value then it will be accepted.
52. What is Dependency Injection in Angular?
You may have heard this term called Dependency Injection so many times, but many of them
don’t know the actual importance and meaning about that.
Dependency Injection is an application design pattern which is used to achieve efficiency
and modularity by creating objects which depend on another different object.
In AngujarJs 1.x, we were using string tokens to get different dependencies, but in the
Angular newer version, we can use type definition to assign providers like below example.
constructor(private service: MyDataService) { }
Here in this constructor, we are going to inject MyDataService, so a whenever instance of the
component will be created at that time it determines that which service and other
dependencies needed for a component by just looking the parameters of the constructor.](https://image.slidesharecdn.com/angularinterviewquestions-pdf-230214100721-949fd87c/85/Angular-Interview-Questions-PDF-pdf-27-320.jpg)

![www.credosystemz.com
56. What is a Subscription?
Subscription is a kind of disposable resources such as execution of the Observables.
While working with the Observables, the subscription has one method called unsubscribe ()
which is used to release the different resources held by the subscription and it won’t take
arguments.
For example, we care calling the GET api for getting the employee details using the services.
import { Component } from'@angular/core'; import { Subscription } from'rxjs';
import { MyDataService } from'./mydataservice.service';
@Component({
selector: 'my-app',
templateUrl: './app.component.html', styleUrls: ['./app.component.css']
})
exportclass AppComponent {
employee: string; subscription: Subscription;
constructor(private service: MyDataService) {
}
ngOnInit() {
this.subscription = this.service.getEmployees()
.subscribe((employee: string) =>this.employee = employee);
}
ngOnDestroy(): void { this.subscription.unsubscribe();
}
}
In this example, we are getting the data using service method and subscribed it. But it is
custom observable so that we can manually unsubscribe the Observable when our
component gets destroyed.
The best place to unsubscribe the subscription is ngOnDestroy lifecycle hooks because we
need to destroy the resources which are held by the subscribers.
57. What is Angular Service?
While developing app we need to change or manipulate data constantly, and in order to
work with data, we need to use service, which is used to call the API via HTTP protocol.
Angular Service is a simple function, which allows us to create properties and method to
organize the code.
To generate services, we can use below command which generates service file along
with default service function structure.](https://image.slidesharecdn.com/angularinterviewquestions-pdf-230214100721-949fd87c/85/Angular-Interview-Questions-PDF-pdf-29-320.jpg)
![www.credosystemz.com
ng generate service mydataservice
58. Why we should use Angular Services?
Services in Angular are the primary concern for getting or manipulate data from the server.
The primary use of the services is to invoke the function from the different files like
Component, Directives and so on.
Normally services can be placed separately in order to achieve reusability as well as it will
be easy to distribute the Angular application into small chunks. Using dependency injection,
we can inject the service into the Component’s constructor and can use different functions
of service into the whole component.
One of the main advantages is Code Reusability because when we write any function inside
the service file then it can be used by the different component so that we don’t need to write
same methods into multiple files.
59. What is Singleton Service?
Singleton Service in Angular means to provide Service reference to application root, it can
be created using two different ways.
· Declared service should be provided in the application root
import{ Injectable } from'@angular/core';
@Injectable({
providedIn:'root'
})
Export classMydataserviceService { constructor() { }
}
Add inside AppModule or another module which indirectly imports into the AppModule
import{ NgModule } from '@angular/core'; import{ CommonModule } from
'@angular/common'; import{ AppComponent } from './app.component';
import{ Mydataservice } from './mydataservice.service';
@NgModule({ declarations: [
AppComponent
],
imports: [
CommonModule
],](https://image.slidesharecdn.com/angularinterviewquestions-pdf-230214100721-949fd87c/85/Angular-Interview-Questions-PDF-pdf-30-320.jpg)
![www.credosystemz.com
exports: [], providers: [
ApiService, // Singleton Services
]
})
ExportclassAppModule{ }
60. What is HTTP Client in Angular?
While working with any web-application, we always need the data to work with and for that,
we need to communicate with the database which resides on a server.
In order to communicate from the browser, it supports two types of API.
• Fetch() API
• XMLHttpRequest
Same way in Angular, we have HTTP API which is based on XMLHttpRequest which is
called HttpClient to make a request and response.
Before Angular 5, HTTP Module was used but after that, it was replaced by the
HttpClientModule. To use HttpClientModule in our Angular app, we need to
import it like this.
import{ HttpClientModule } from '@angular/common/http';
61. How many types of HTTP Requests are supported?
There are total 8 types of methods are supported which are listed below.
• GET Request
• Post Request
• Put Request
• Patch Request
• Delete Request
• Head Request
• Jsonp Request
• Options Request
62. How to inject HttpClient in our Angular Service?
After importing theHttpClientModule into the root module file, now we will be able to inject
HttpClient into our service which looks like this.
import{ Injectable } from'@angular/core';
// Importing HttpClient](https://image.slidesharecdn.com/angularinterviewquestions-pdf-230214100721-949fd87c/85/Angular-Interview-Questions-PDF-pdf-31-320.jpg)