SlideShare a Scribd company logo
1 of 12
Download to read offline
X6 Instruction Manual
              Back view


Left View                    Front View
Right View


Bottom View
01. on/off button       13.TF card slot
02 .Reset Button 4.Remote control receiver
03. AV OUT             15.Model /Menu
04. Display     16.Photo / Playback Button
05. Logo lens
  17.G-Sensor Emergence locks Button
06. Sensor Level to        18.CMOS sensors
07.Power Light Switch (blue) 19.Night
light /LED flash light
08. Video /DOWN            20.SENSOR lens
09. Mute /UP                         21.Horn
10. REC (blue) indicator       22.screw hole
11. MIC (blue) indicator            23.Flat
paste pad/3M
12. USB port           24. Back camera port

Install the DVR
1. Put the TF card into the card slot
2. Install the DVR on the car windscreen or
driving instrument platform
by the Flat paste pad. And make sure that he
DVR do not affect driving safe.
3.Close engine, adjust the camera position, in
order to have the best shoot wide.
4.Start the engine; check the machine is
installed correctly. Join up the DVR and car
cigarette lighter by Car charger

Notice:
1. Please install the DVR on position having
the sufficient light and driving safe.
2. When the machine is installed correctly,
the LED will be blue and the display screen
will show.
3. Please try your best to plug in the car
charger after turn on the engine.
4. Please do not install the DVR on the
position that lay the airbag or keep out
driving view or any position where affecting
driving safe.

Features:
1.In the video standby mode, slight click
twice the Model/Menu Button, into video
duration setting list, then click REC/MIC
Button to select the setting you want to, at
last click Emergence lock Button to save your
setting. Slight click third times the Model
/Menu Button again to quit.
2. In the video standby mode slight click once
the Model/Menu Button, into Resolution
setting function list, then click REC/MIC
Button to select the setting you want to, at
last click Emergence lock Button to save your
setting. Slight click twice the Model /Menu
Button again to quit.
3.In the video standby mode slight click third
times the Model/Menu button, into Menu
setting function list, then click REC/MIC
Button to select the setting you want to, then
click Emergence lock Button, click
REC/MIC Button again to locate Parameters,
at last short click Emergence lock Button to
save your setting. Slight click twice the
Model /Menu Button again to quit.
4. After 6 second when auto engine shut
down, the DVR will archive and will be off.
Note: Sensor is/inverse switching methods:
Long press MIC Button last 3 seconds, the
DVR will run inverse video, Long press
Video Button last 3 seconds, the DVR will
run positive video. And the DVR will
automatically keep the setting when it is off.

Playback function
In video or photo mode, long press Photo /
Playback Button last 3 seconds to enter the
playback mode, click the REC/MIC to view,
Slight short press Photo / Playback Button to
play or pause video files.
Or click once the Model /Menu Button to
delete the files twice click the Emergence
lock Button to quit deleting files.

Motion Detect Video mode:
Note: The VCR need joint up car charger or
charging treasure when running this mode.
Turn on the DVR and press Emergence Lock
Button last 3 seconds to enter to Motion
Detect Video mode. When select Motion
detect function, it will be recording
automatically if there is an object movement
and if there is no object movement, 5 minutes
later the video will be stop. Press Video
Button to quit Motion Detect Video mode


Night view function:
Turn on the VCR, The default function of the
night vision is automatic.
When DVR is turn on, the Night Vision mode
will be automatically turn on or off depend
on the night vision sensor feel light degrees.
Manual Night Vision mode:
Turn on the VCR, slight short press ON/OFF
Button to enter to the Night Vision 3 modes
setting. You can select the turn on or off the
Night Vision mode, or select automatic Night
Vision mode.


Flash function:
When DVR is turn on, automatically enter
the Video mode, same time automatically
enter the flashing light mode and flash one
time    every     second.   Manual     close
Automatically Video mode, the Flashing light
mode will be close too

Sensor or     display   is/inverse   switching
functions:
Long press MIC Button last 3 seconds, the
DVR will run inverse video (or display),
Long press Video Button last 3 seconds, the
DVR will run positive video (or display).
Note: the DVR will automatically keep the
setting when it shut down.

Collision Induction Mode:
Turn on the DVR, select the Video mode,
when serious vehicle collision happened, the
DVR will automatically enter Collision
Induction mode, automatically videotaping
what happened and save the flies
automatically. (The files will not be covered
or delete.)

Emergency lock collision induction shortcut
Key functions:
Turn on the DVR, select the Video mode,
When serious vehicle collision happened,
slight short press the [Emergence lock
Button], enter to G-Sensor Emergence lock
mode, DVR automatically videotaping what
happened and Continue videotaping 3
minutes after outage and save the flies
automatically.(The files will not be covered
or delete.) Slight short press the [Emergence
lock Button] again to quit.

Update date and time function:
Time Stamp: Before using the DVR you need
to update date and time. In the video standby
mode slight click third times the Model/Menu
button, into Menu setting function list, then
click REC/MIC Button to select the time
setting menu, then click Emergence lock
Button to get into setting display (the red
word can be adjust), click REC/MIC Button
again to update time or date, then short press
Model/Menu Button to next setting, and
repeat setting as before, at last short click
Emergence lock Button to save your setting.

Cycle-Recording and auto cover function:
Time between cycle-recording and
automatically cover is 200ms-400ms.
External camera function:
Directly plug the 3.5 mm camera cable into
the interface, the external camera function
will be run When the External cameras
connected is right and the screen will show
the white camera sign.


U Disk function:
Shut down the DVR, Connect DVR with
computer by USB cable.LCD will show three
modes (disk, camera or charging) for your
selecting. Click REC/MIC Button to Select
Disk mode and slight short press Emergence
lock Button to confirm it, LCD will show U
disk icon.
When the USB cable is drop out, the DVR
will automatically be shut down.(Note: it is
more easy to copy the files from TF card to
computer by card reader).
Note:
1. Please setting the video resolution to VGA
before using the PC camera function,.
2. The files is stored at TF card, when the
files are read by computer, suggest copying
the files from the TF card to the computer by
Card Reader.
3. Do not need to install PC CAM driver
software when run this function.


2.【Reset Button】
Resetting function: When the DVR is not
work, press the RESET Button to power off,
and then restart
3.【Video /UP Button] 4 functions:
① A key video switch function
②Up function
③Sensor positive switching function
A key video switch function:
When the VCR is turn on, enter the Video
mode, and MIC indicators (blue) light are
flashing when Video is run. Slight short press
[Video /Down Button] videotaping will be
pause, and REC indicator (blue) light will be
off, the files will be saved. Light short press
[Video /Down Button] again, the videotaping
is back on, the REC indicator (blue) light are
flashing again.

4. [Mute/Down Button] 4 functions
①A key mute function
②Down function
③Sensor inverse switching function

Sensor inverse switching function:
When DVR is turn on, if the DVR run
positive. Long press MIC Button last 3
seconds, DVR will switch to run inverse
video.

More Related Content

What's hot

Major and minor diameter of screw thread
Major and minor diameter of screw threadMajor and minor diameter of screw thread
Major and minor diameter of screw threadSamarth Sojitra
 
A few ideas how to integrate Wwise Authoring API (WAAPI) in your project work...
A few ideas how to integrate Wwise Authoring API (WAAPI) in your project work...A few ideas how to integrate Wwise Authoring API (WAAPI) in your project work...
A few ideas how to integrate Wwise Authoring API (WAAPI) in your project work...DevGAMM Conference
 
Workshop Practice manual 2016
 Workshop Practice manual 2016  Workshop Practice manual 2016
Workshop Practice manual 2016 Joseph Konnully
 
Autocad 2007 Workbook Tutorial
Autocad 2007 Workbook TutorialAutocad 2007 Workbook Tutorial
Autocad 2007 Workbook TutorialJhongNatz
 
Weld design symbols
Weld design symbolsWeld design symbols
Weld design symbolsRavi Shankar
 
WORKSHOP TECHNOLOGY PPT.pptx
WORKSHOP TECHNOLOGY PPT.pptxWORKSHOP TECHNOLOGY PPT.pptx
WORKSHOP TECHNOLOGY PPT.pptxmayank bhatt
 
types of mechanical bolts
types of mechanical boltstypes of mechanical bolts
types of mechanical boltsHassan Shokrofy
 
ASSEMBLY TO DETAILS OF MECHINE COMPONENTS
ASSEMBLY TO DETAILS OF MECHINE COMPONENTSASSEMBLY TO DETAILS OF MECHINE COMPONENTS
ASSEMBLY TO DETAILS OF MECHINE COMPONENTSEr Girish More
 
Design for Manufacturing-Module 5
Design for Manufacturing-Module 5 Design for Manufacturing-Module 5
Design for Manufacturing-Module 5 RajuBasava
 
Mechnical cnc machines ppt
Mechnical cnc machines pptMechnical cnc machines ppt
Mechnical cnc machines pptALOK RAJ
 
Unit 1 manufacturing technology I Metal casting process
Unit 1 manufacturing technology I Metal casting processUnit 1 manufacturing technology I Metal casting process
Unit 1 manufacturing technology I Metal casting processGopinath Guru
 
SMAWStickWelding.ppt
SMAWStickWelding.pptSMAWStickWelding.ppt
SMAWStickWelding.pptssuser73de76
 
Introduction to Precision Engineering
Introduction to Precision EngineeringIntroduction to Precision Engineering
Introduction to Precision Engineeringshemsss
 
Speaking band descriptors
Speaking band descriptorsSpeaking band descriptors
Speaking band descriptorsnovietac
 

What's hot (20)

Major and minor diameter of screw thread
Major and minor diameter of screw threadMajor and minor diameter of screw thread
Major and minor diameter of screw thread
 
Cutting tools
Cutting toolsCutting tools
Cutting tools
 
Ppt on catia
Ppt on  catiaPpt on  catia
Ppt on catia
 
Workshop practise
Workshop practiseWorkshop practise
Workshop practise
 
Precision engineering
Precision engineeringPrecision engineering
Precision engineering
 
A few ideas how to integrate Wwise Authoring API (WAAPI) in your project work...
A few ideas how to integrate Wwise Authoring API (WAAPI) in your project work...A few ideas how to integrate Wwise Authoring API (WAAPI) in your project work...
A few ideas how to integrate Wwise Authoring API (WAAPI) in your project work...
 
Workshop Practice manual 2016
 Workshop Practice manual 2016  Workshop Practice manual 2016
Workshop Practice manual 2016
 
Autocad 2007 Workbook Tutorial
Autocad 2007 Workbook TutorialAutocad 2007 Workbook Tutorial
Autocad 2007 Workbook Tutorial
 
Weld design symbols
Weld design symbolsWeld design symbols
Weld design symbols
 
WORKSHOP TECHNOLOGY PPT.pptx
WORKSHOP TECHNOLOGY PPT.pptxWORKSHOP TECHNOLOGY PPT.pptx
WORKSHOP TECHNOLOGY PPT.pptx
 
types of mechanical bolts
types of mechanical boltstypes of mechanical bolts
types of mechanical bolts
 
Threading - MMM
Threading - MMMThreading - MMM
Threading - MMM
 
ASSEMBLY TO DETAILS OF MECHINE COMPONENTS
ASSEMBLY TO DETAILS OF MECHINE COMPONENTSASSEMBLY TO DETAILS OF MECHINE COMPONENTS
ASSEMBLY TO DETAILS OF MECHINE COMPONENTS
 
Computer aided machine drawing manual
Computer aided machine drawing manualComputer aided machine drawing manual
Computer aided machine drawing manual
 
Design for Manufacturing-Module 5
Design for Manufacturing-Module 5 Design for Manufacturing-Module 5
Design for Manufacturing-Module 5
 
Mechnical cnc machines ppt
Mechnical cnc machines pptMechnical cnc machines ppt
Mechnical cnc machines ppt
 
Unit 1 manufacturing technology I Metal casting process
Unit 1 manufacturing technology I Metal casting processUnit 1 manufacturing technology I Metal casting process
Unit 1 manufacturing technology I Metal casting process
 
SMAWStickWelding.ppt
SMAWStickWelding.pptSMAWStickWelding.ppt
SMAWStickWelding.ppt
 
Introduction to Precision Engineering
Introduction to Precision EngineeringIntroduction to Precision Engineering
Introduction to Precision Engineering
 
Speaking band descriptors
Speaking band descriptorsSpeaking band descriptors
Speaking band descriptors
 

Similar to Dual Lens 720p HD DVR X6 I1000 F70 DVR Dash Cam User Manual

GoPro HD Hero 3 Silver
GoPro HD Hero 3 SilverGoPro HD Hero 3 Silver
GoPro HD Hero 3 SilverAV ProfShop
 
GoPro Hero 3 White Edition
GoPro Hero 3 White EditionGoPro Hero 3 White Edition
GoPro Hero 3 White EditionAV ProfShop
 
clock radio hidden camera spy clock camera clock radio camera V21
clock radio hidden camera spy clock camera clock radio camera V21 clock radio hidden camera spy clock camera clock radio camera V21
clock radio hidden camera spy clock camera clock radio camera V21 george david
 
Video conferencing
Video conferencingVideo conferencing
Video conferencingVideoguy
 
Hd128 a7 en_manual_2015.03.18
Hd128 a7 en_manual_2015.03.18Hd128 a7 en_manual_2015.03.18
Hd128 a7 en_manual_2015.03.18标 张
 
Ccd tissue box camera user guide
Ccd tissue box camera user guideCcd tissue box camera user guide
Ccd tissue box camera user guidegeorge david
 
Power bank dvr spy camera sp 007 s user manual
Power bank dvr spy camera sp 007 s user manualPower bank dvr spy camera sp 007 s user manual
Power bank dvr spy camera sp 007 s user manualgeorge david
 
(Hy900)spy button camera user guide
(Hy900)spy button camera user guide(Hy900)spy button camera user guide
(Hy900)spy button camera user guidegeorge david
 
LS650W Car Dash Camcorder Chinese & English manual
LS650W Car Dash Camcorder Chinese & English manualLS650W Car Dash Camcorder Chinese & English manual
LS650W Car Dash Camcorder Chinese & English manualbillkonw
 
Carcam K2000 User Manual
Carcam K2000 User ManualCarcam K2000 User Manual
Carcam K2000 User Manualdashcamtalk
 
User manual for ICAM FHD 18
User manual for ICAM FHD 18User manual for ICAM FHD 18
User manual for ICAM FHD 18TVC Skyshop
 
Hd lighter english instuction
Hd lighter english instuctionHd lighter english instuction
Hd lighter english instuctiongeorge david
 
Blackmagic camera manual
Blackmagic camera manualBlackmagic camera manual
Blackmagic camera manualSang-Dae Jung
 
Blackmagic camera
Blackmagic cameraBlackmagic camera
Blackmagic cameraAV ProfShop
 
Blackmagic camera manual
Blackmagic camera manualBlackmagic camera manual
Blackmagic camera manualSang-Dae Jung
 
Guide to Using the Canon VIXIA HF G30
Guide to Using the Canon VIXIA HF G30Guide to Using the Canon VIXIA HF G30
Guide to Using the Canon VIXIA HF G30Campbell Cameras
 
Uv820 usb3.0 user manual 2014.7.14
Uv820 usb3.0 user manual 2014.7.14Uv820 usb3.0 user manual 2014.7.14
Uv820 usb3.0 user manual 2014.7.14Jill Liang
 
Mouse DVR User Manual
Mouse DVR User ManualMouse DVR User Manual
Mouse DVR User Manualdashcamtalk
 
Conbrov® DV9 HD Book Camera Instruction Manual
Conbrov® DV9 HD Book Camera Instruction ManualConbrov® DV9 HD Book Camera Instruction Manual
Conbrov® DV9 HD Book Camera Instruction Manual志锋 严
 

Similar to Dual Lens 720p HD DVR X6 I1000 F70 DVR Dash Cam User Manual (20)

GoPro HD Hero 3 Silver
GoPro HD Hero 3 SilverGoPro HD Hero 3 Silver
GoPro HD Hero 3 Silver
 
GoPro Hero 3 White Edition
GoPro Hero 3 White EditionGoPro Hero 3 White Edition
GoPro Hero 3 White Edition
 
clock radio hidden camera spy clock camera clock radio camera V21
clock radio hidden camera spy clock camera clock radio camera V21 clock radio hidden camera spy clock camera clock radio camera V21
clock radio hidden camera spy clock camera clock radio camera V21
 
Video conferencing
Video conferencingVideo conferencing
Video conferencing
 
Hd128 a7 en_manual_2015.03.18
Hd128 a7 en_manual_2015.03.18Hd128 a7 en_manual_2015.03.18
Hd128 a7 en_manual_2015.03.18
 
Ccd tissue box camera user guide
Ccd tissue box camera user guideCcd tissue box camera user guide
Ccd tissue box camera user guide
 
Power bank dvr spy camera sp 007 s user manual
Power bank dvr spy camera sp 007 s user manualPower bank dvr spy camera sp 007 s user manual
Power bank dvr spy camera sp 007 s user manual
 
(Hy900)spy button camera user guide
(Hy900)spy button camera user guide(Hy900)spy button camera user guide
(Hy900)spy button camera user guide
 
LS650W Car Dash Camcorder Chinese & English manual
LS650W Car Dash Camcorder Chinese & English manualLS650W Car Dash Camcorder Chinese & English manual
LS650W Car Dash Camcorder Chinese & English manual
 
Carcam K2000 User Manual
Carcam K2000 User ManualCarcam K2000 User Manual
Carcam K2000 User Manual
 
User manual for ICAM FHD 18
User manual for ICAM FHD 18User manual for ICAM FHD 18
User manual for ICAM FHD 18
 
Hd lighter english instuction
Hd lighter english instuctionHd lighter english instuction
Hd lighter english instuction
 
Blackmagic camera manual
Blackmagic camera manualBlackmagic camera manual
Blackmagic camera manual
 
Blackmagic camera
Blackmagic cameraBlackmagic camera
Blackmagic camera
 
Blackmagic camera manual
Blackmagic camera manualBlackmagic camera manual
Blackmagic camera manual
 
Guide to Using the Canon VIXIA HF G30
Guide to Using the Canon VIXIA HF G30Guide to Using the Canon VIXIA HF G30
Guide to Using the Canon VIXIA HF G30
 
Uv820 usb3.0 user manual 2014.7.14
Uv820 usb3.0 user manual 2014.7.14Uv820 usb3.0 user manual 2014.7.14
Uv820 usb3.0 user manual 2014.7.14
 
Mouse DVR User Manual
Mouse DVR User ManualMouse DVR User Manual
Mouse DVR User Manual
 
Conbrov® DV9 HD Book Camera Instruction Manual
Conbrov® DV9 HD Book Camera Instruction ManualConbrov® DV9 HD Book Camera Instruction Manual
Conbrov® DV9 HD Book Camera Instruction Manual
 
Manuale
ManualeManuale
Manuale
 

More from dashcamtalk

Transcend DrivePro 520 Teardown
Transcend DrivePro 520 TeardownTranscend DrivePro 520 Teardown
Transcend DrivePro 520 Teardowndashcamtalk
 
Lukas LK-7900 FHD ACE English User Manual
Lukas LK-7900 FHD ACE English User ManualLukas LK-7900 FHD ACE English User Manual
Lukas LK-7900 FHD ACE English User Manualdashcamtalk
 
808 #18 DR32 DVR English User Manual
808 #18 DR32 DVR English User Manual808 #18 DR32 DVR English User Manual
808 #18 DR32 DVR English User Manualdashcamtalk
 
Dvr 007 english user manual
Dvr 007 english user manualDvr 007 english user manual
Dvr 007 english user manualdashcamtalk
 
Dvr 207 english user manual
Dvr 207 english user manualDvr 207 english user manual
Dvr 207 english user manualdashcamtalk
 
Pittasoft BlackVue DR500GW-HD WiFi User Manual
Pittasoft BlackVue DR500GW-HD WiFi User ManualPittasoft BlackVue DR500GW-HD WiFi User Manual
Pittasoft BlackVue DR500GW-HD WiFi User Manualdashcamtalk
 
FineVu CR-500HD User Manual
FineVu CR-500HD User ManualFineVu CR-500HD User Manual
FineVu CR-500HD User Manualdashcamtalk
 
DOD F900LS User Manual
DOD F900LS User ManualDOD F900LS User Manual
DOD F900LS User Manualdashcamtalk
 
Itronics ITB-100HD User Manual
Itronics ITB-100HD User ManualItronics ITB-100HD User Manual
Itronics ITB-100HD User Manualdashcamtalk
 
FineVu CR-300HD User Manual
FineVu CR-300HD User ManualFineVu CR-300HD User Manual
FineVu CR-300HD User Manualdashcamtalk
 
BlackVue DR400G-HD Season II User Manual
BlackVue DR400G-HD Season II User ManualBlackVue DR400G-HD Season II User Manual
BlackVue DR400G-HD Season II User Manualdashcamtalk
 
GS5000 User Manual
GS5000 User ManualGS5000 User Manual
GS5000 User Manualdashcamtalk
 
DOD GSE550 User Manual
DOD GSE550 User ManualDOD GSE550 User Manual
DOD GSE550 User Manualdashcamtalk
 
DOD GS600 User Manual
DOD GS600 User ManualDOD GS600 User Manual
DOD GS600 User Manualdashcamtalk
 
Ambarella dash cam_direct_usb_user_guide
Ambarella dash cam_direct_usb_user_guideAmbarella dash cam_direct_usb_user_guide
Ambarella dash cam_direct_usb_user_guidedashcamtalk
 
Blackvue DR400G-HD manual_eng _v1.5
Blackvue DR400G-HD manual_eng _v1.5Blackvue DR400G-HD manual_eng _v1.5
Blackvue DR400G-HD manual_eng _v1.5dashcamtalk
 
DOD F900LHD User Manual
DOD F900LHD User ManualDOD F900LHD User Manual
DOD F900LHD User Manualdashcamtalk
 
DOD F500LHD User Manual
DOD F500LHD User ManualDOD F500LHD User Manual
DOD F500LHD User Manualdashcamtalk
 

More from dashcamtalk (18)

Transcend DrivePro 520 Teardown
Transcend DrivePro 520 TeardownTranscend DrivePro 520 Teardown
Transcend DrivePro 520 Teardown
 
Lukas LK-7900 FHD ACE English User Manual
Lukas LK-7900 FHD ACE English User ManualLukas LK-7900 FHD ACE English User Manual
Lukas LK-7900 FHD ACE English User Manual
 
808 #18 DR32 DVR English User Manual
808 #18 DR32 DVR English User Manual808 #18 DR32 DVR English User Manual
808 #18 DR32 DVR English User Manual
 
Dvr 007 english user manual
Dvr 007 english user manualDvr 007 english user manual
Dvr 007 english user manual
 
Dvr 207 english user manual
Dvr 207 english user manualDvr 207 english user manual
Dvr 207 english user manual
 
Pittasoft BlackVue DR500GW-HD WiFi User Manual
Pittasoft BlackVue DR500GW-HD WiFi User ManualPittasoft BlackVue DR500GW-HD WiFi User Manual
Pittasoft BlackVue DR500GW-HD WiFi User Manual
 
FineVu CR-500HD User Manual
FineVu CR-500HD User ManualFineVu CR-500HD User Manual
FineVu CR-500HD User Manual
 
DOD F900LS User Manual
DOD F900LS User ManualDOD F900LS User Manual
DOD F900LS User Manual
 
Itronics ITB-100HD User Manual
Itronics ITB-100HD User ManualItronics ITB-100HD User Manual
Itronics ITB-100HD User Manual
 
FineVu CR-300HD User Manual
FineVu CR-300HD User ManualFineVu CR-300HD User Manual
FineVu CR-300HD User Manual
 
BlackVue DR400G-HD Season II User Manual
BlackVue DR400G-HD Season II User ManualBlackVue DR400G-HD Season II User Manual
BlackVue DR400G-HD Season II User Manual
 
GS5000 User Manual
GS5000 User ManualGS5000 User Manual
GS5000 User Manual
 
DOD GSE550 User Manual
DOD GSE550 User ManualDOD GSE550 User Manual
DOD GSE550 User Manual
 
DOD GS600 User Manual
DOD GS600 User ManualDOD GS600 User Manual
DOD GS600 User Manual
 
Ambarella dash cam_direct_usb_user_guide
Ambarella dash cam_direct_usb_user_guideAmbarella dash cam_direct_usb_user_guide
Ambarella dash cam_direct_usb_user_guide
 
Blackvue DR400G-HD manual_eng _v1.5
Blackvue DR400G-HD manual_eng _v1.5Blackvue DR400G-HD manual_eng _v1.5
Blackvue DR400G-HD manual_eng _v1.5
 
DOD F900LHD User Manual
DOD F900LHD User ManualDOD F900LHD User Manual
DOD F900LHD User Manual
 
DOD F500LHD User Manual
DOD F500LHD User ManualDOD F500LHD User Manual
DOD F500LHD User Manual
 

Dual Lens 720p HD DVR X6 I1000 F70 DVR Dash Cam User Manual

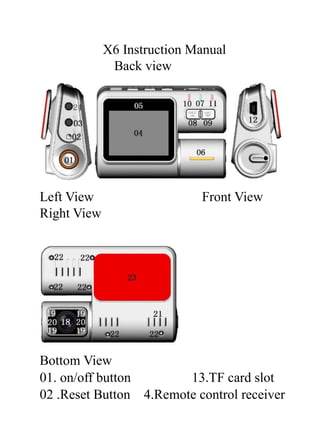
  • 1. X6 Instruction Manual Back view Left View Front View Right View Bottom View 01. on/off button 13.TF card slot 02 .Reset Button 4.Remote control receiver
  • 2. 03. AV OUT 15.Model /Menu 04. Display 16.Photo / Playback Button 05. Logo lens 17.G-Sensor Emergence locks Button 06. Sensor Level to 18.CMOS sensors 07.Power Light Switch (blue) 19.Night light /LED flash light 08. Video /DOWN 20.SENSOR lens 09. Mute /UP 21.Horn 10. REC (blue) indicator 22.screw hole 11. MIC (blue) indicator 23.Flat paste pad/3M 12. USB port 24. Back camera port Install the DVR 1. Put the TF card into the card slot 2. Install the DVR on the car windscreen or driving instrument platform by the Flat paste pad. And make sure that he DVR do not affect driving safe. 3.Close engine, adjust the camera position, in
  • 3. order to have the best shoot wide. 4.Start the engine; check the machine is installed correctly. Join up the DVR and car cigarette lighter by Car charger Notice: 1. Please install the DVR on position having the sufficient light and driving safe. 2. When the machine is installed correctly, the LED will be blue and the display screen will show. 3. Please try your best to plug in the car charger after turn on the engine. 4. Please do not install the DVR on the position that lay the airbag or keep out driving view or any position where affecting driving safe. Features: 1.In the video standby mode, slight click twice the Model/Menu Button, into video
  • 4. duration setting list, then click REC/MIC Button to select the setting you want to, at last click Emergence lock Button to save your setting. Slight click third times the Model /Menu Button again to quit. 2. In the video standby mode slight click once the Model/Menu Button, into Resolution setting function list, then click REC/MIC Button to select the setting you want to, at last click Emergence lock Button to save your setting. Slight click twice the Model /Menu Button again to quit. 3.In the video standby mode slight click third times the Model/Menu button, into Menu setting function list, then click REC/MIC Button to select the setting you want to, then click Emergence lock Button, click REC/MIC Button again to locate Parameters, at last short click Emergence lock Button to save your setting. Slight click twice the
  • 5. Model /Menu Button again to quit. 4. After 6 second when auto engine shut down, the DVR will archive and will be off. Note: Sensor is/inverse switching methods: Long press MIC Button last 3 seconds, the DVR will run inverse video, Long press Video Button last 3 seconds, the DVR will run positive video. And the DVR will automatically keep the setting when it is off. Playback function In video or photo mode, long press Photo / Playback Button last 3 seconds to enter the playback mode, click the REC/MIC to view, Slight short press Photo / Playback Button to play or pause video files. Or click once the Model /Menu Button to delete the files twice click the Emergence lock Button to quit deleting files. Motion Detect Video mode:
  • 6. Note: The VCR need joint up car charger or charging treasure when running this mode. Turn on the DVR and press Emergence Lock Button last 3 seconds to enter to Motion Detect Video mode. When select Motion detect function, it will be recording automatically if there is an object movement and if there is no object movement, 5 minutes later the video will be stop. Press Video Button to quit Motion Detect Video mode Night view function: Turn on the VCR, The default function of the night vision is automatic. When DVR is turn on, the Night Vision mode will be automatically turn on or off depend on the night vision sensor feel light degrees. Manual Night Vision mode: Turn on the VCR, slight short press ON/OFF
  • 7. Button to enter to the Night Vision 3 modes setting. You can select the turn on or off the Night Vision mode, or select automatic Night Vision mode. Flash function: When DVR is turn on, automatically enter the Video mode, same time automatically enter the flashing light mode and flash one time every second. Manual close Automatically Video mode, the Flashing light mode will be close too Sensor or display is/inverse switching functions: Long press MIC Button last 3 seconds, the DVR will run inverse video (or display), Long press Video Button last 3 seconds, the DVR will run positive video (or display). Note: the DVR will automatically keep the
  • 8. setting when it shut down. Collision Induction Mode: Turn on the DVR, select the Video mode, when serious vehicle collision happened, the DVR will automatically enter Collision Induction mode, automatically videotaping what happened and save the flies automatically. (The files will not be covered or delete.) Emergency lock collision induction shortcut Key functions: Turn on the DVR, select the Video mode, When serious vehicle collision happened, slight short press the [Emergence lock Button], enter to G-Sensor Emergence lock mode, DVR automatically videotaping what happened and Continue videotaping 3 minutes after outage and save the flies automatically.(The files will not be covered
  • 9. or delete.) Slight short press the [Emergence lock Button] again to quit. Update date and time function: Time Stamp: Before using the DVR you need to update date and time. In the video standby mode slight click third times the Model/Menu button, into Menu setting function list, then click REC/MIC Button to select the time setting menu, then click Emergence lock Button to get into setting display (the red word can be adjust), click REC/MIC Button again to update time or date, then short press Model/Menu Button to next setting, and repeat setting as before, at last short click Emergence lock Button to save your setting. Cycle-Recording and auto cover function: Time between cycle-recording and automatically cover is 200ms-400ms.
  • 10. External camera function: Directly plug the 3.5 mm camera cable into the interface, the external camera function will be run When the External cameras connected is right and the screen will show the white camera sign. U Disk function: Shut down the DVR, Connect DVR with computer by USB cable.LCD will show three modes (disk, camera or charging) for your selecting. Click REC/MIC Button to Select Disk mode and slight short press Emergence lock Button to confirm it, LCD will show U disk icon. When the USB cable is drop out, the DVR will automatically be shut down.(Note: it is more easy to copy the files from TF card to computer by card reader).
  • 11. Note: 1. Please setting the video resolution to VGA before using the PC camera function,. 2. The files is stored at TF card, when the files are read by computer, suggest copying the files from the TF card to the computer by Card Reader. 3. Do not need to install PC CAM driver software when run this function. 2.【Reset Button】 Resetting function: When the DVR is not work, press the RESET Button to power off, and then restart 3.【Video /UP Button] 4 functions: ① A key video switch function ②Up function ③Sensor positive switching function A key video switch function:
  • 12. When the VCR is turn on, enter the Video mode, and MIC indicators (blue) light are flashing when Video is run. Slight short press [Video /Down Button] videotaping will be pause, and REC indicator (blue) light will be off, the files will be saved. Light short press [Video /Down Button] again, the videotaping is back on, the REC indicator (blue) light are flashing again. 4. [Mute/Down Button] 4 functions ①A key mute function ②Down function ③Sensor inverse switching function Sensor inverse switching function: When DVR is turn on, if the DVR run positive. Long press MIC Button last 3 seconds, DVR will switch to run inverse video.