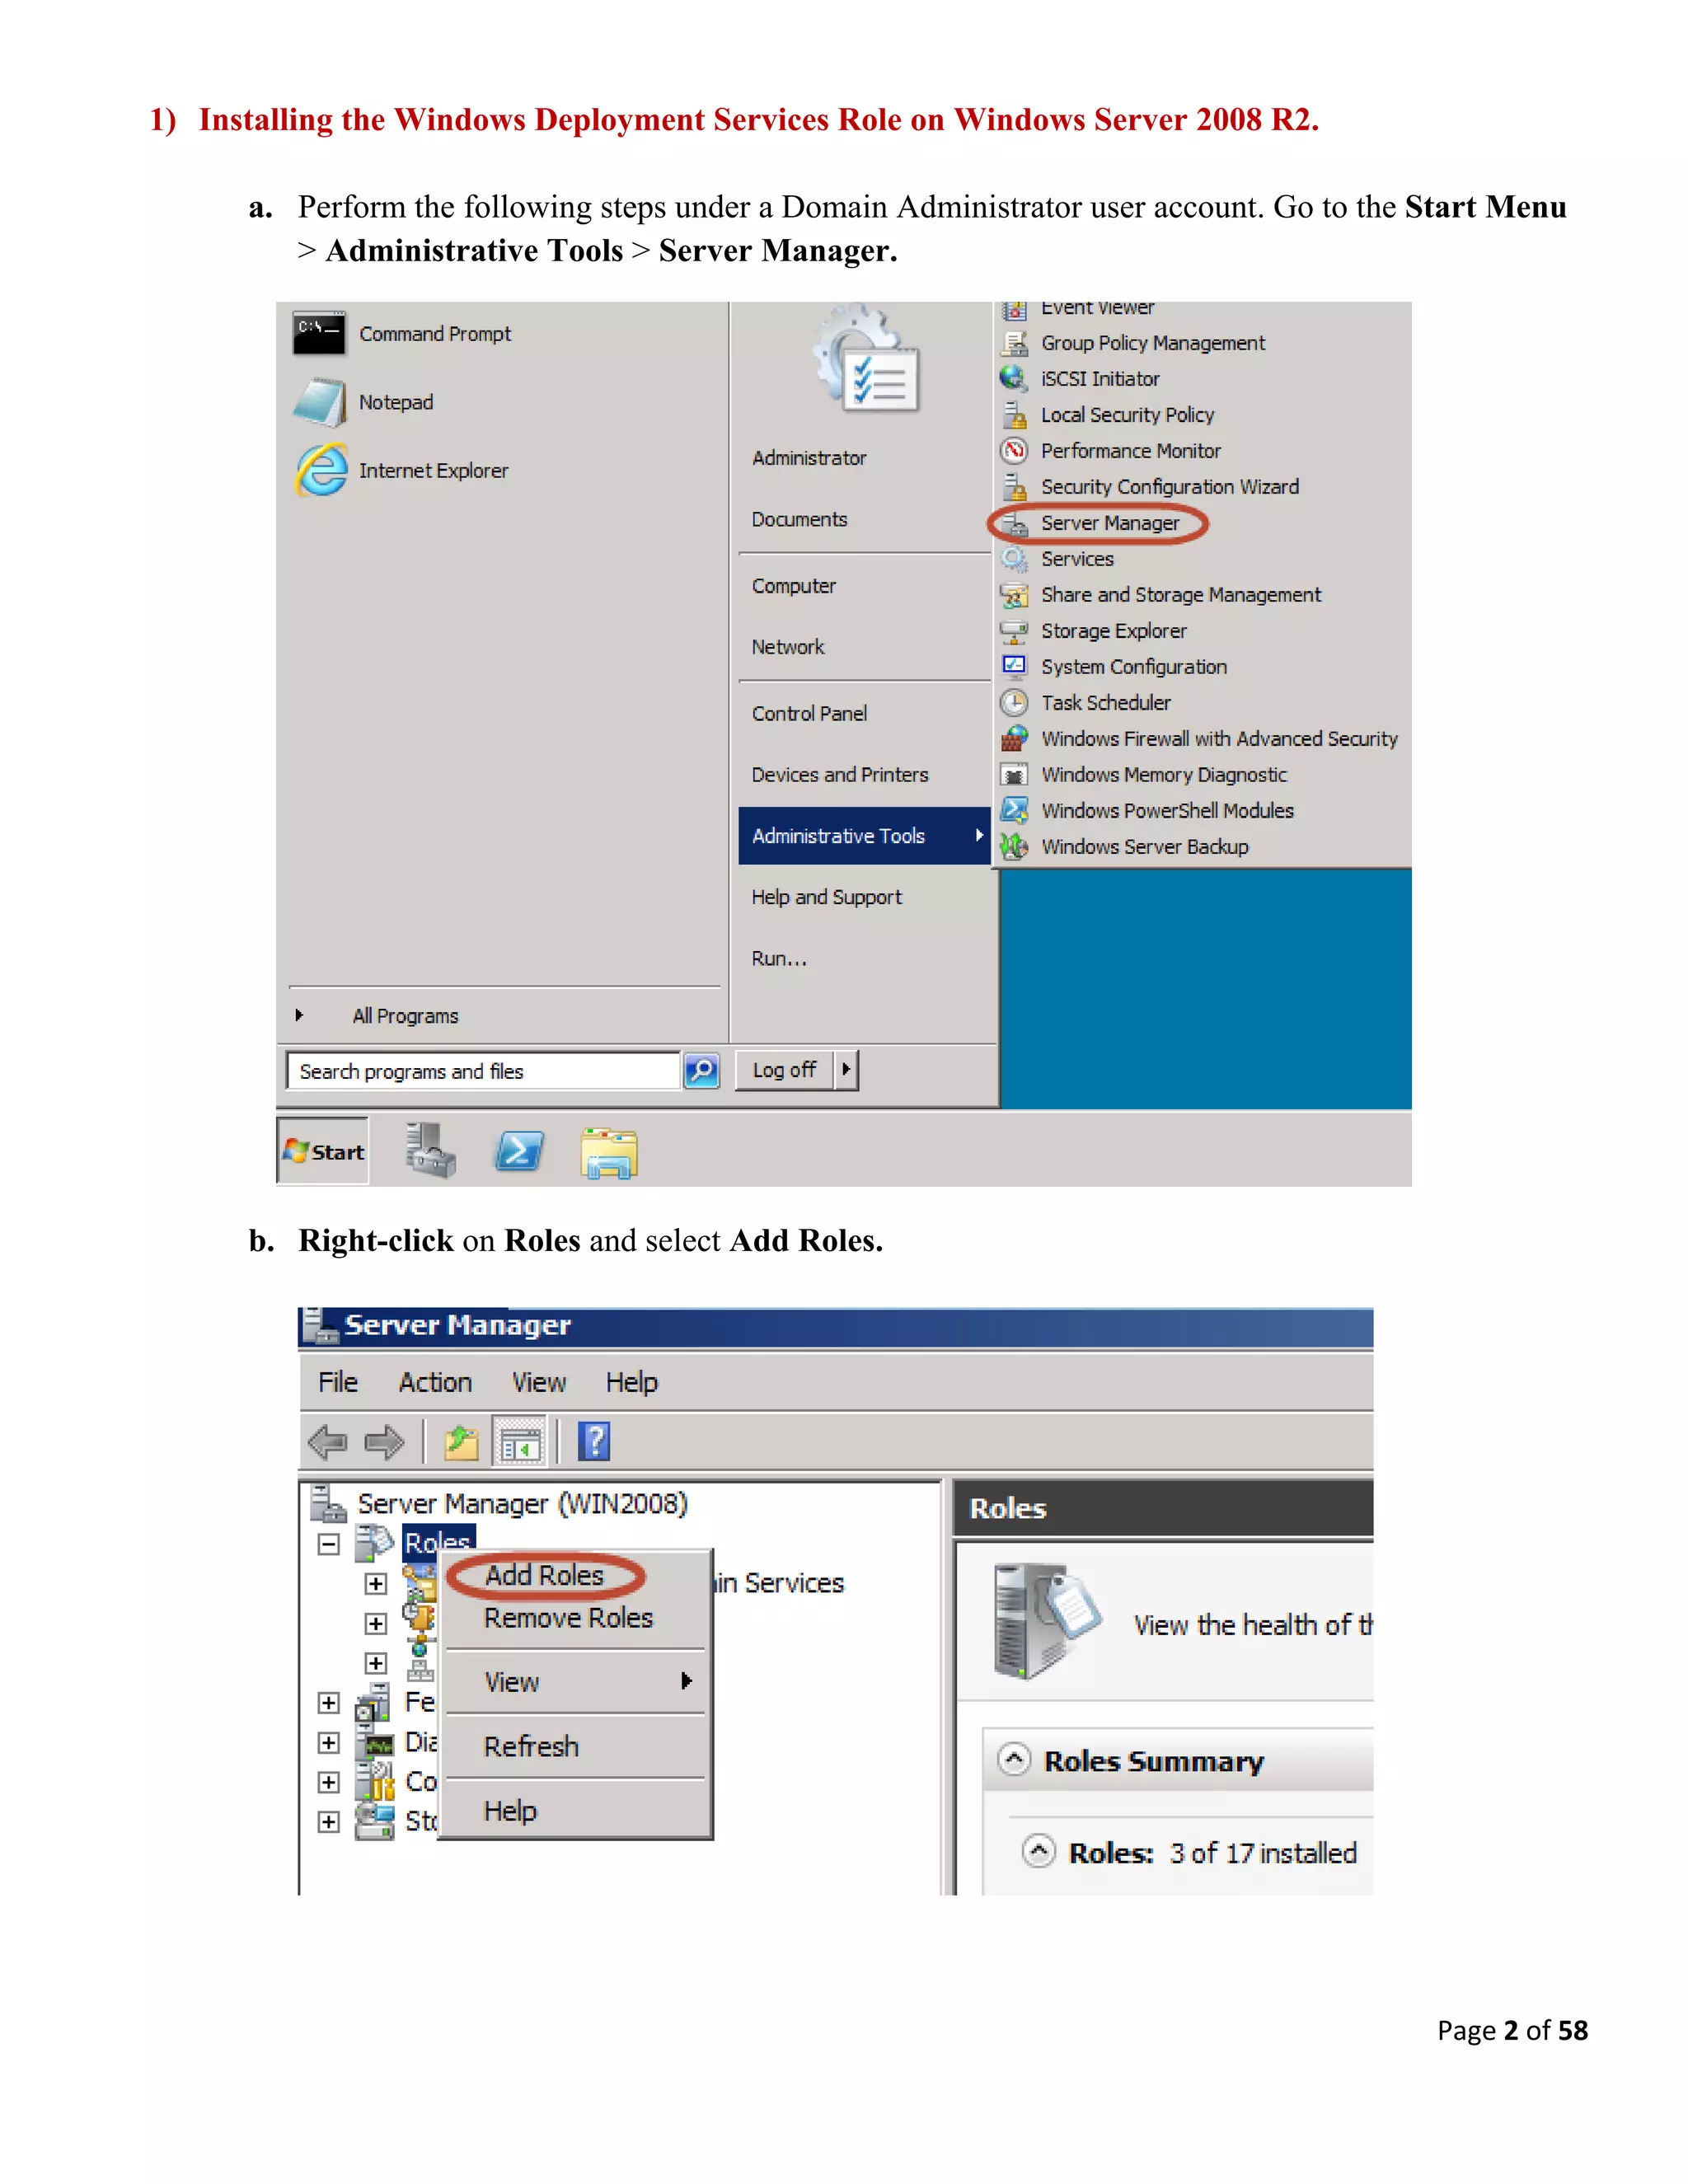
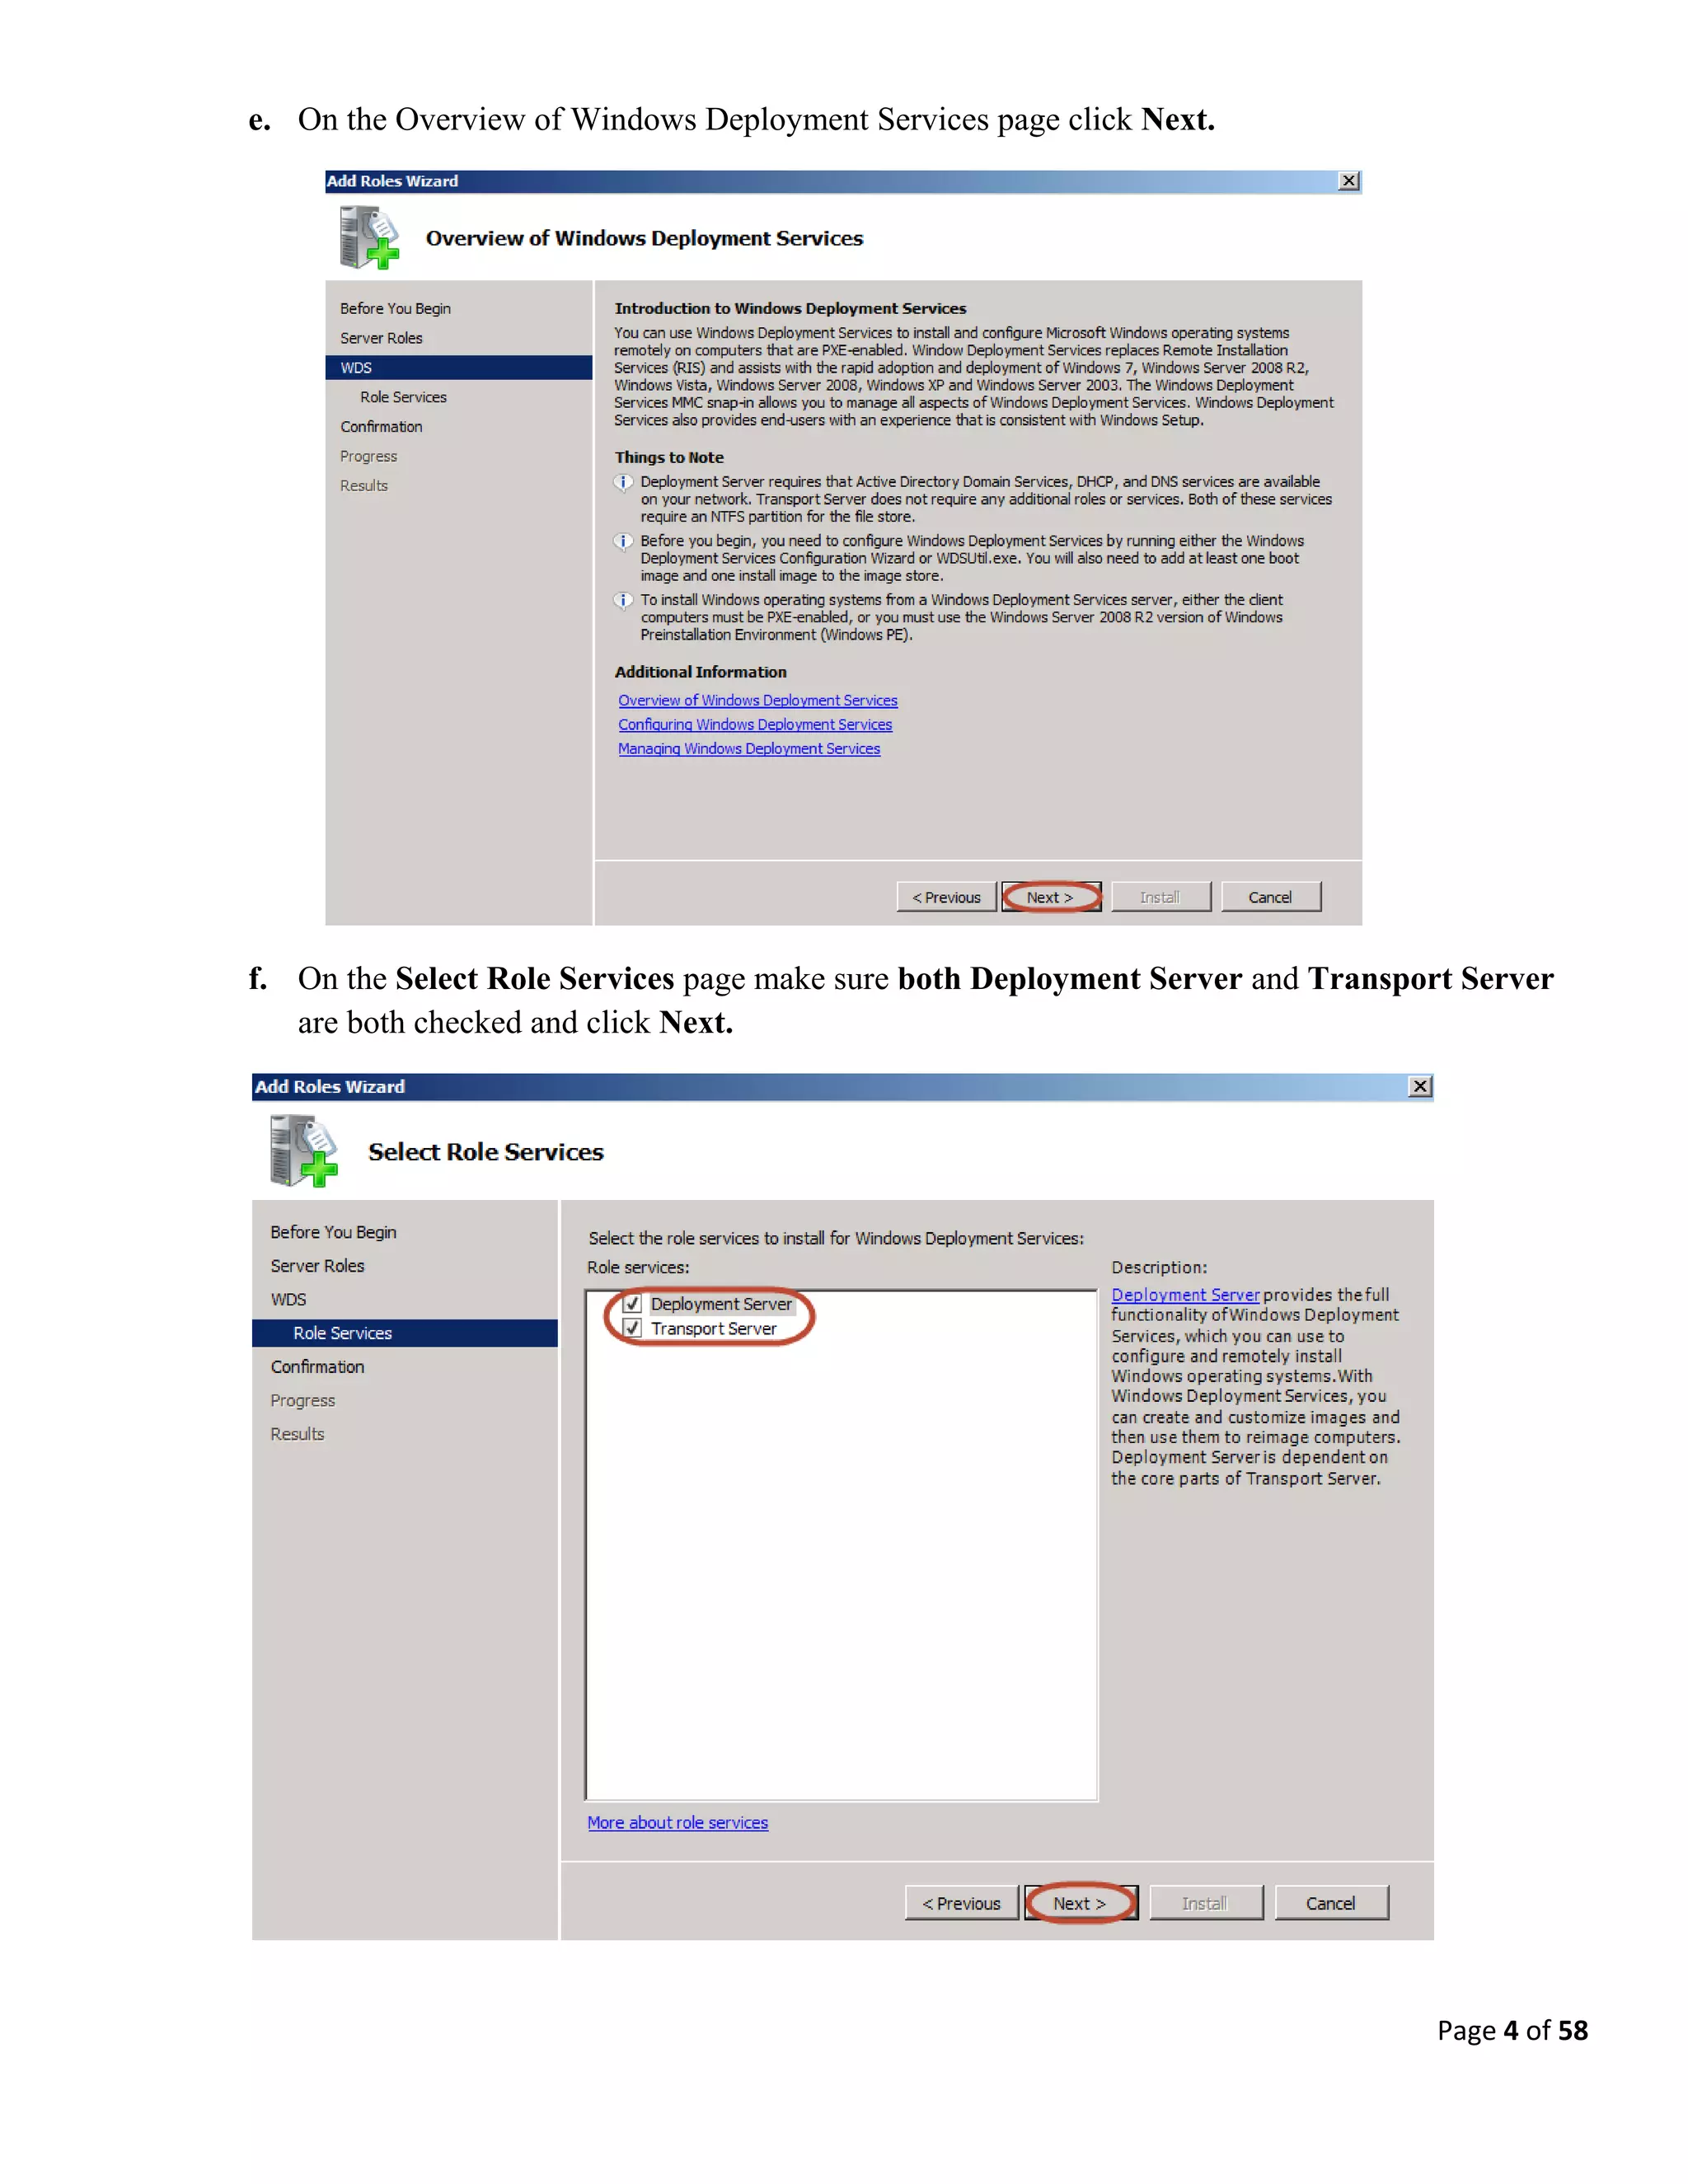
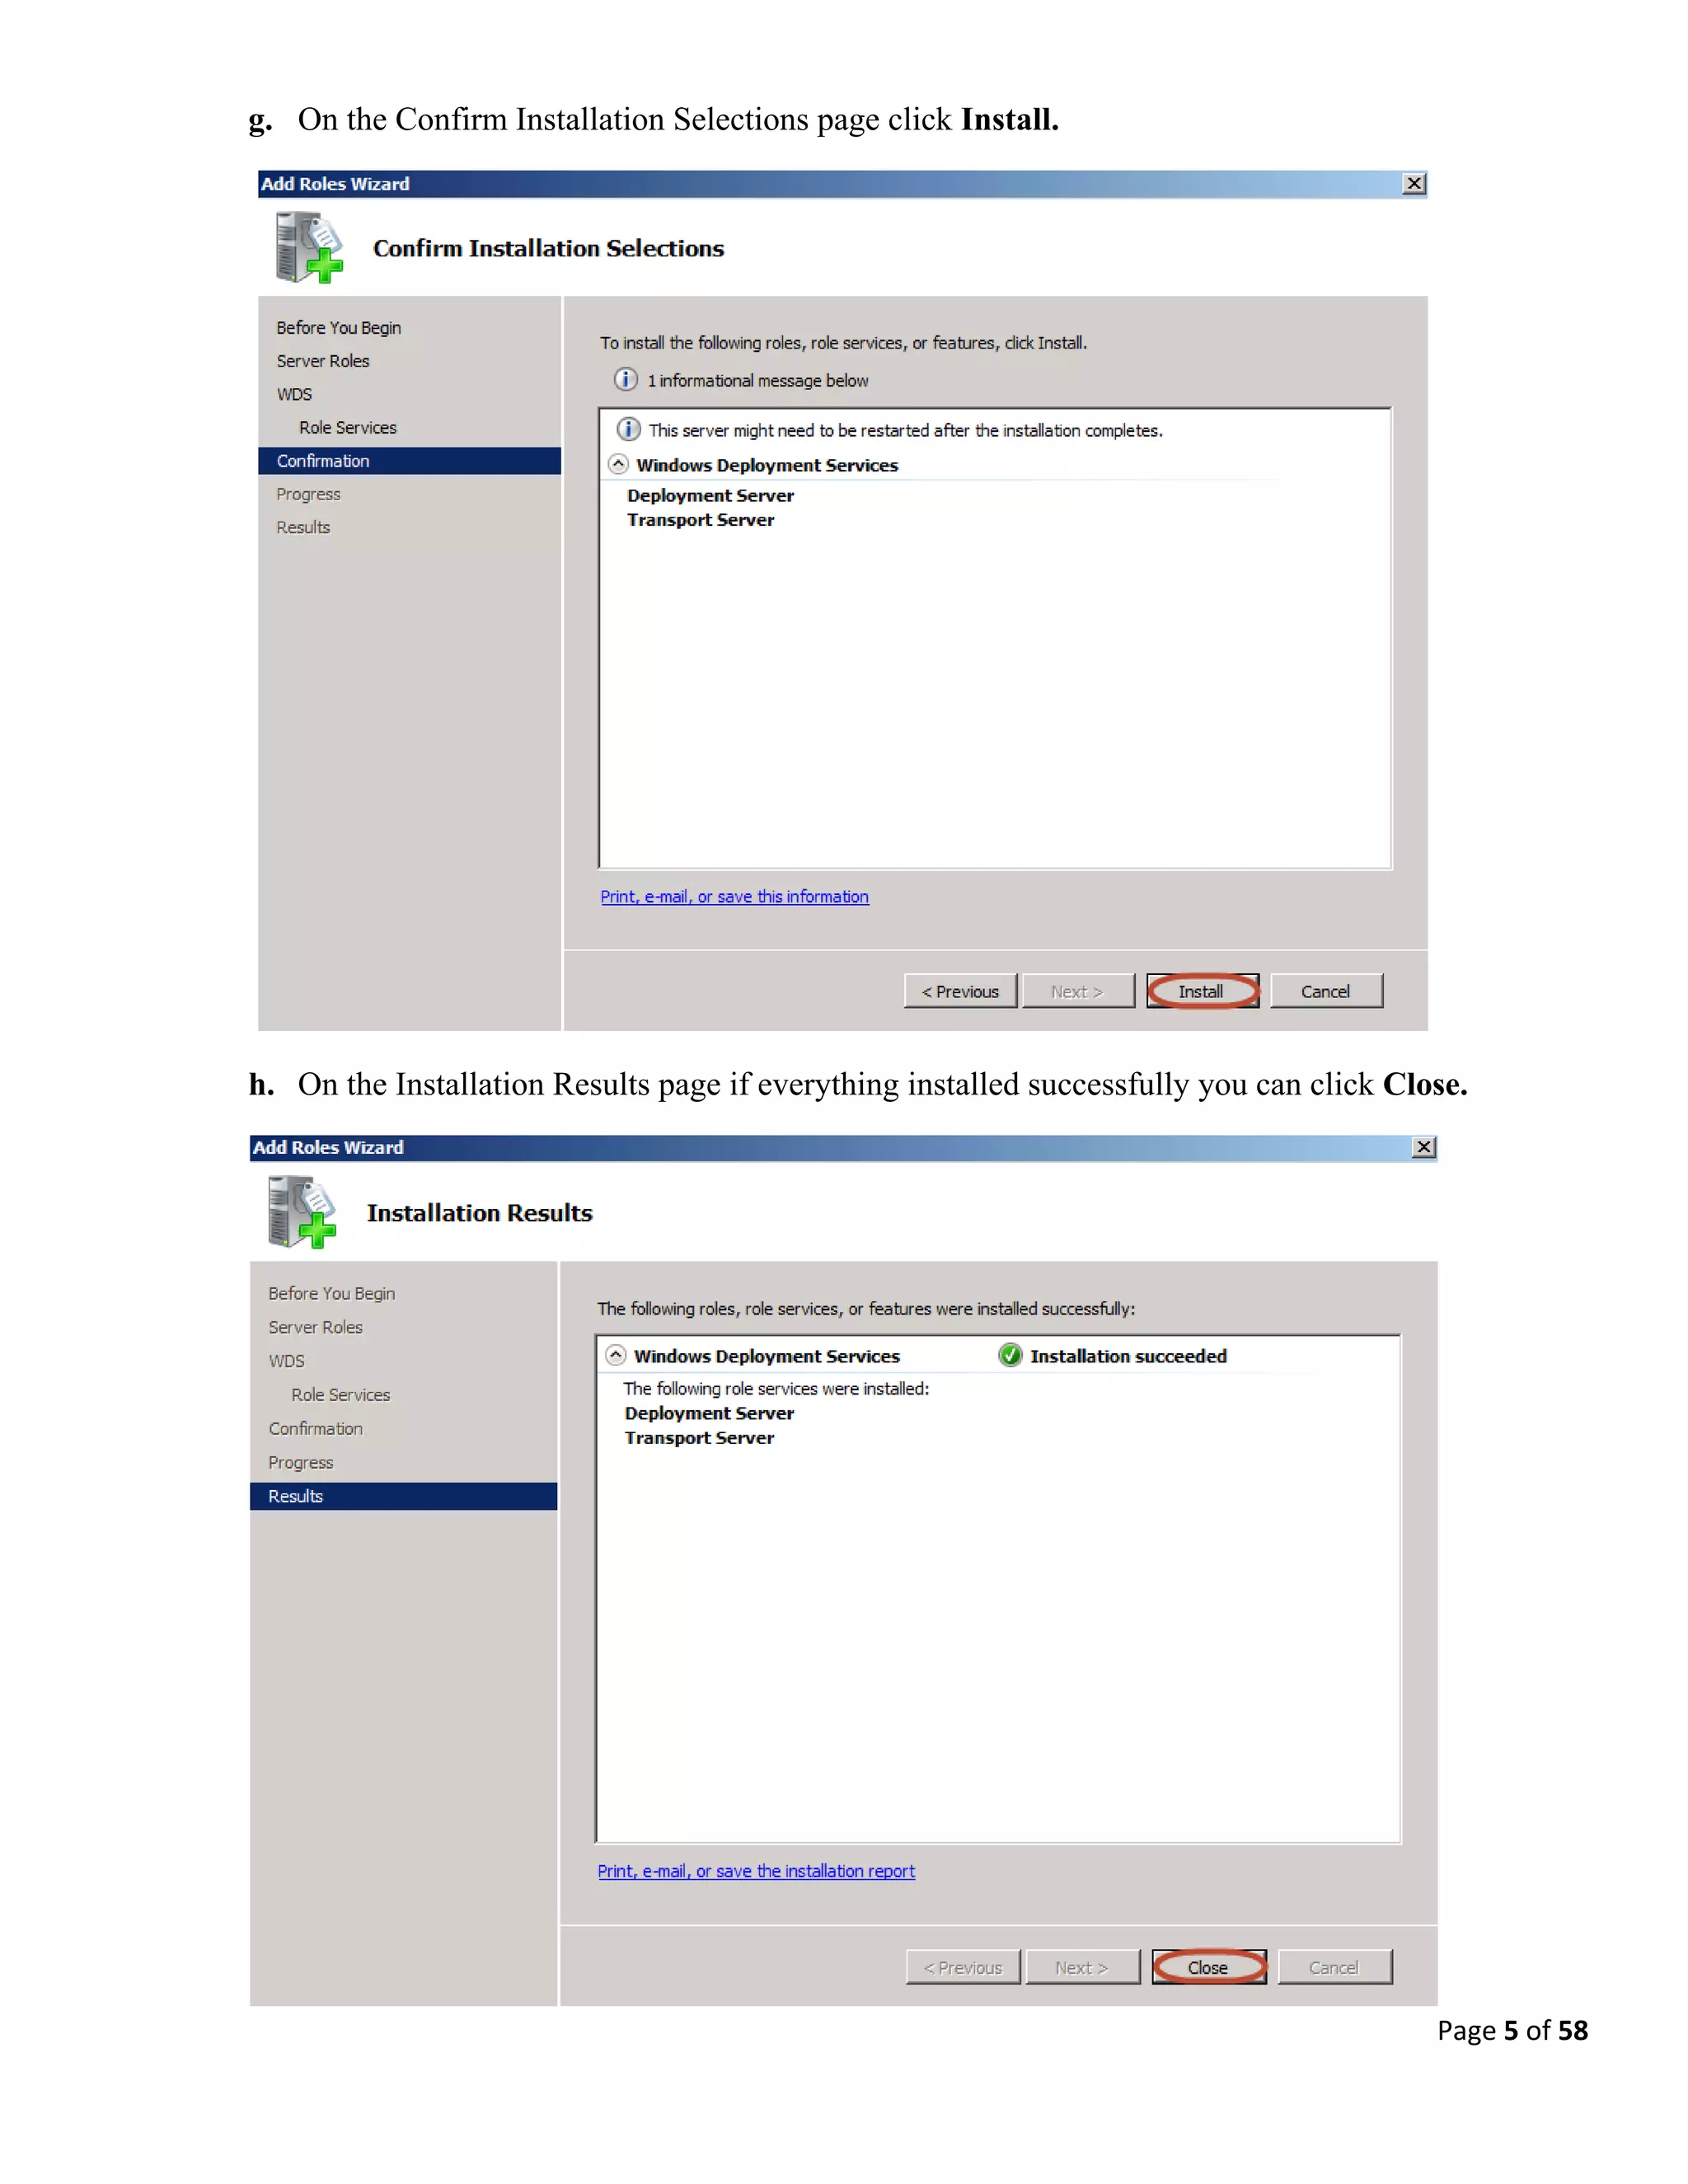
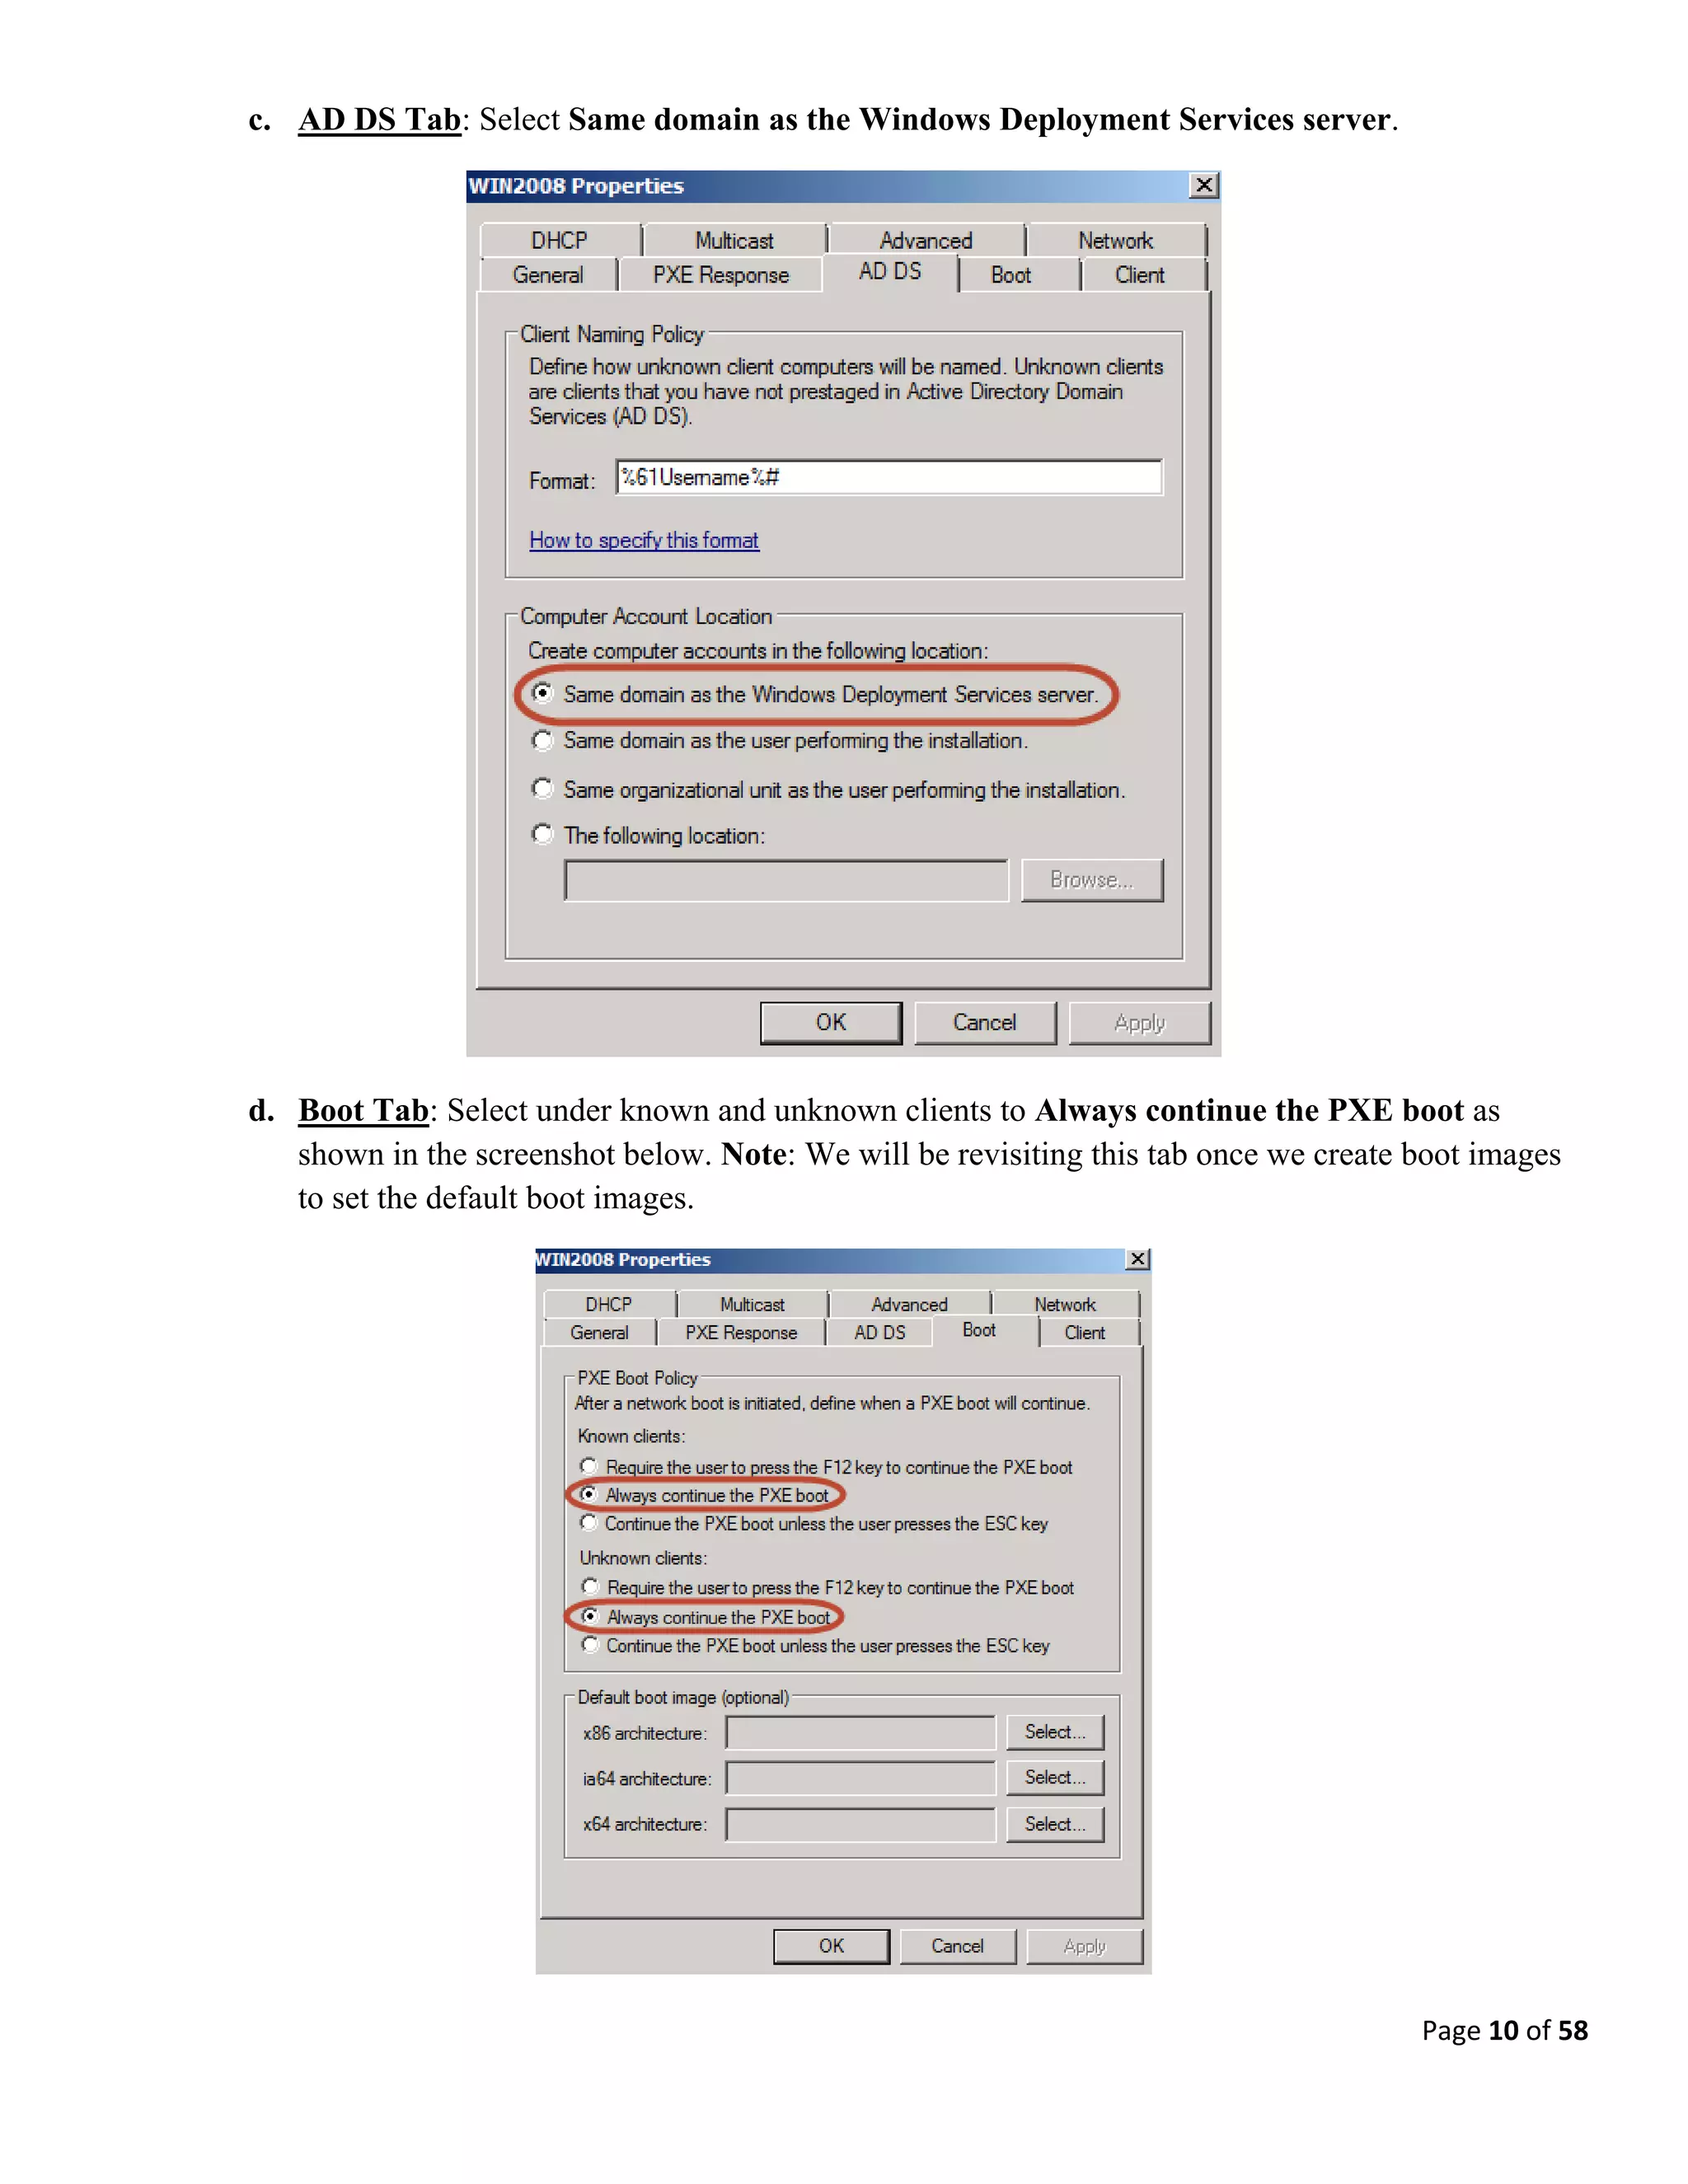
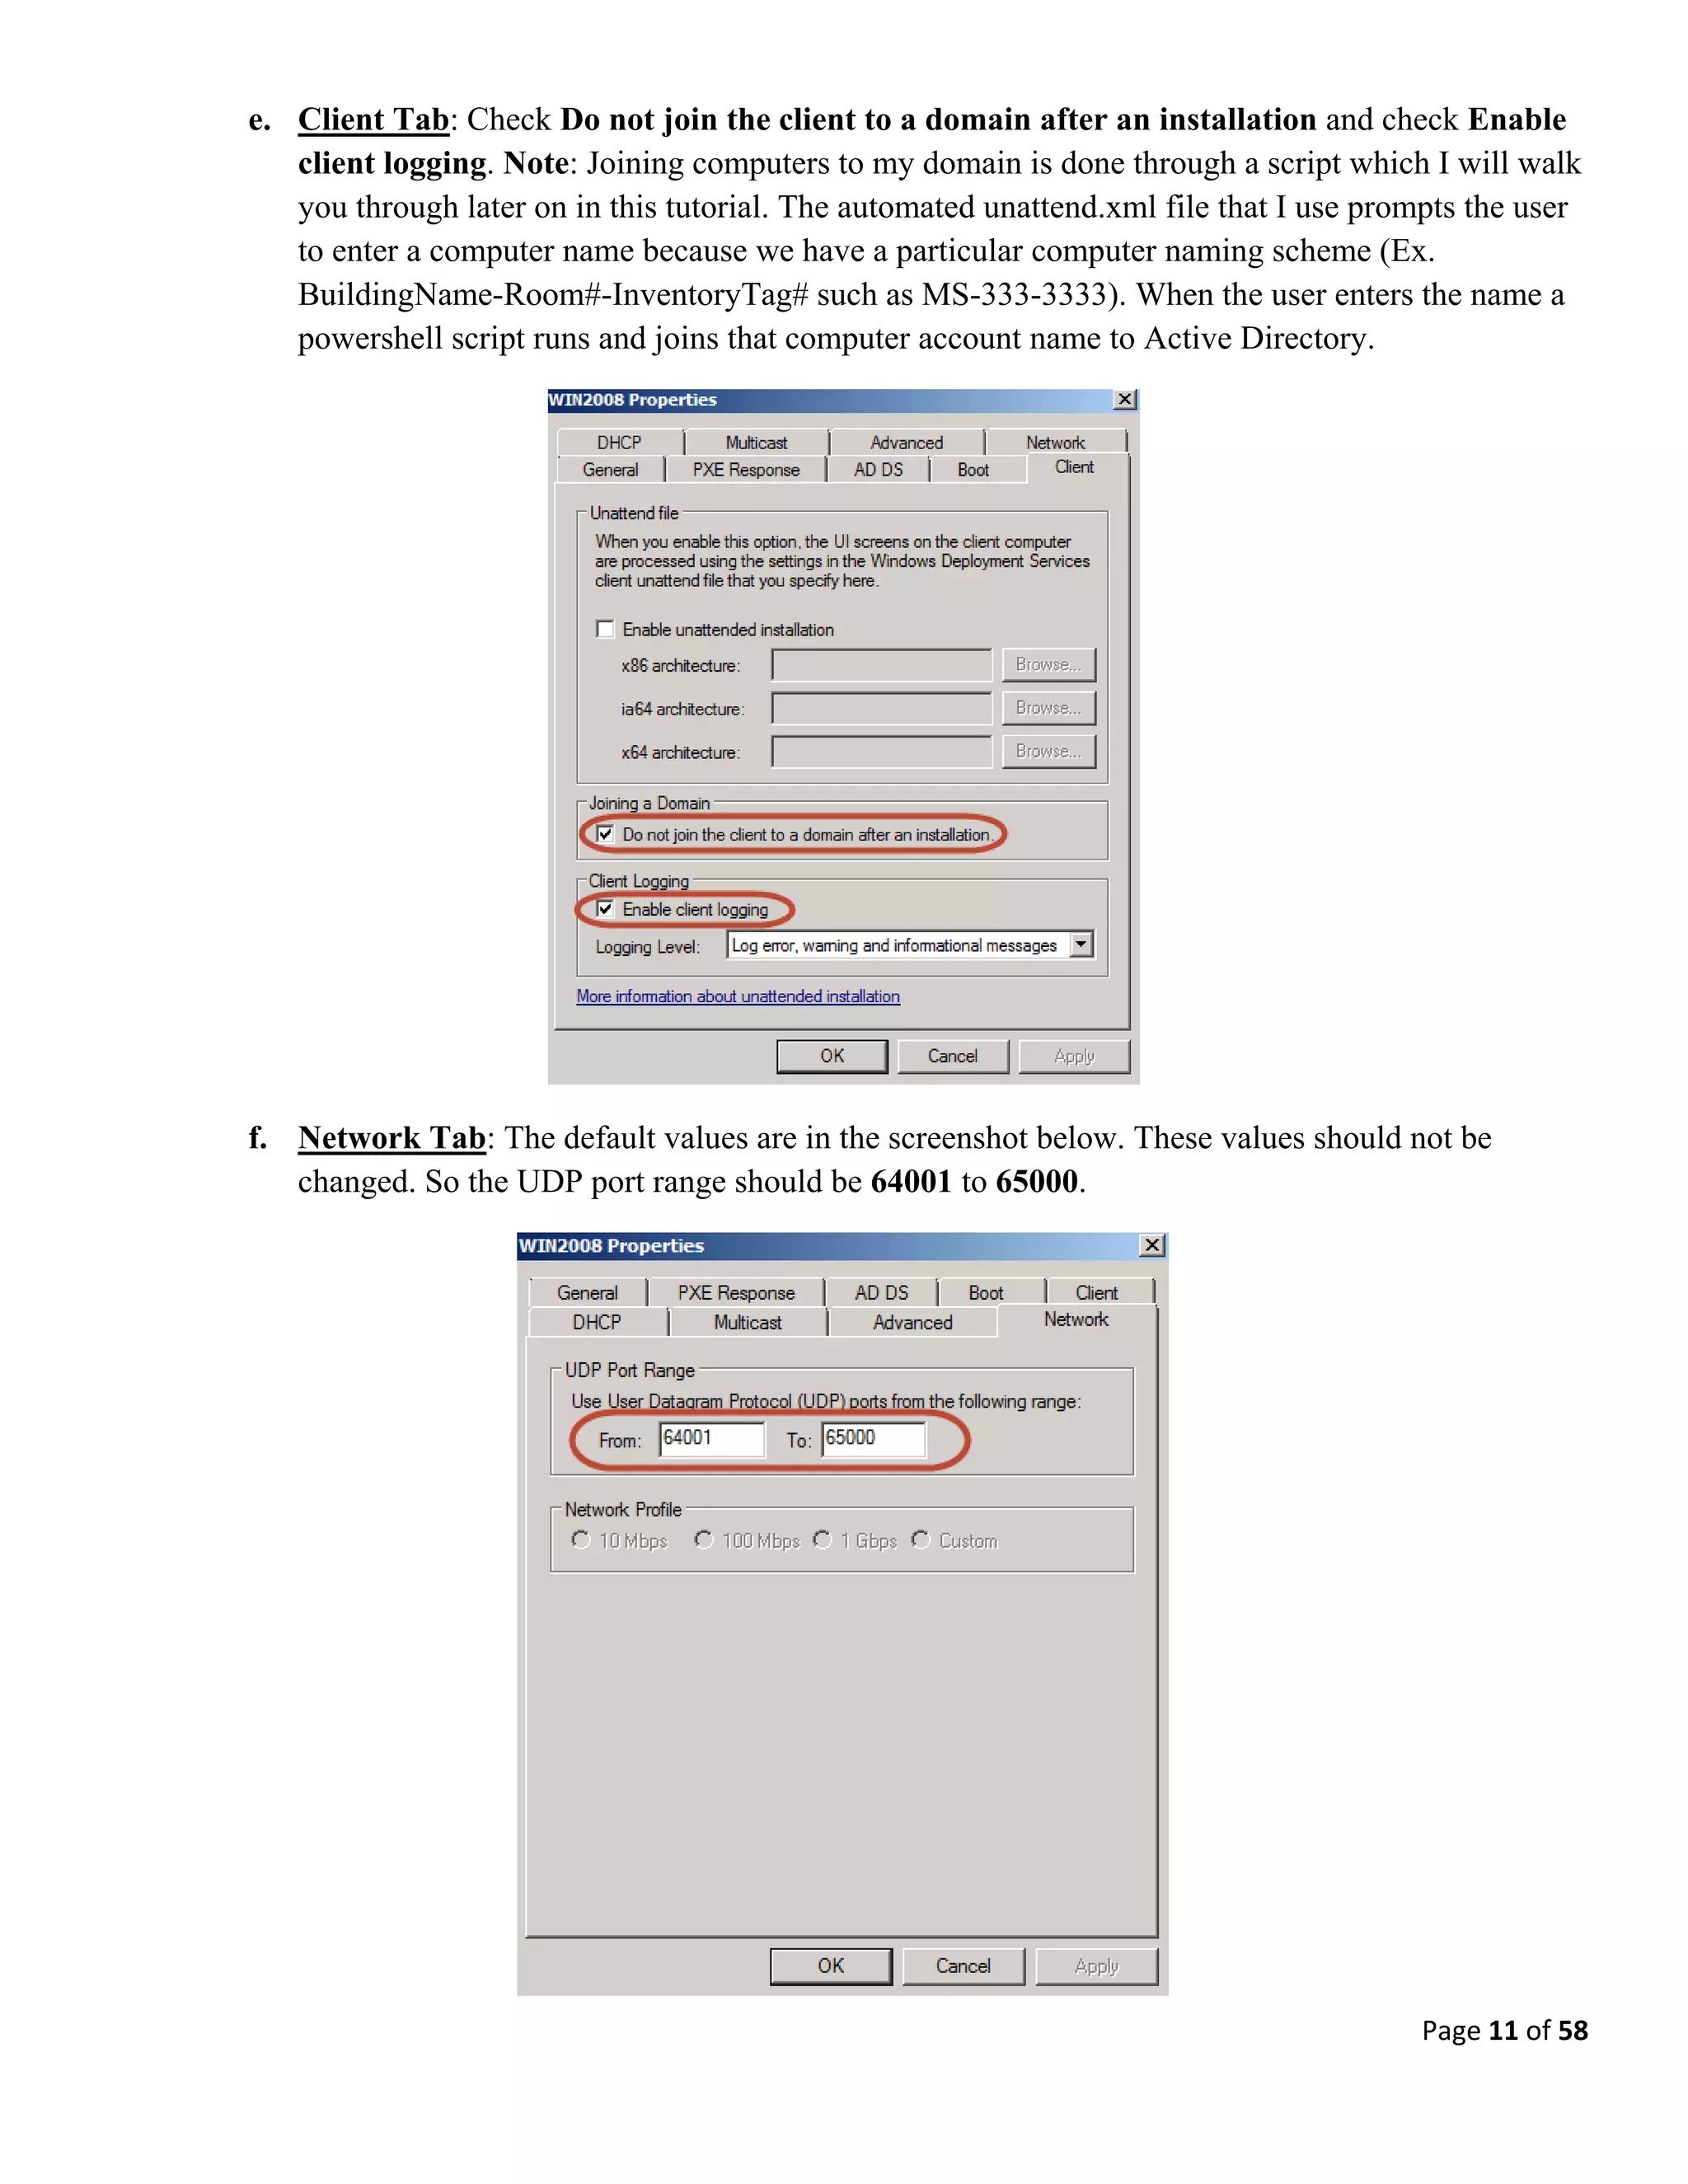
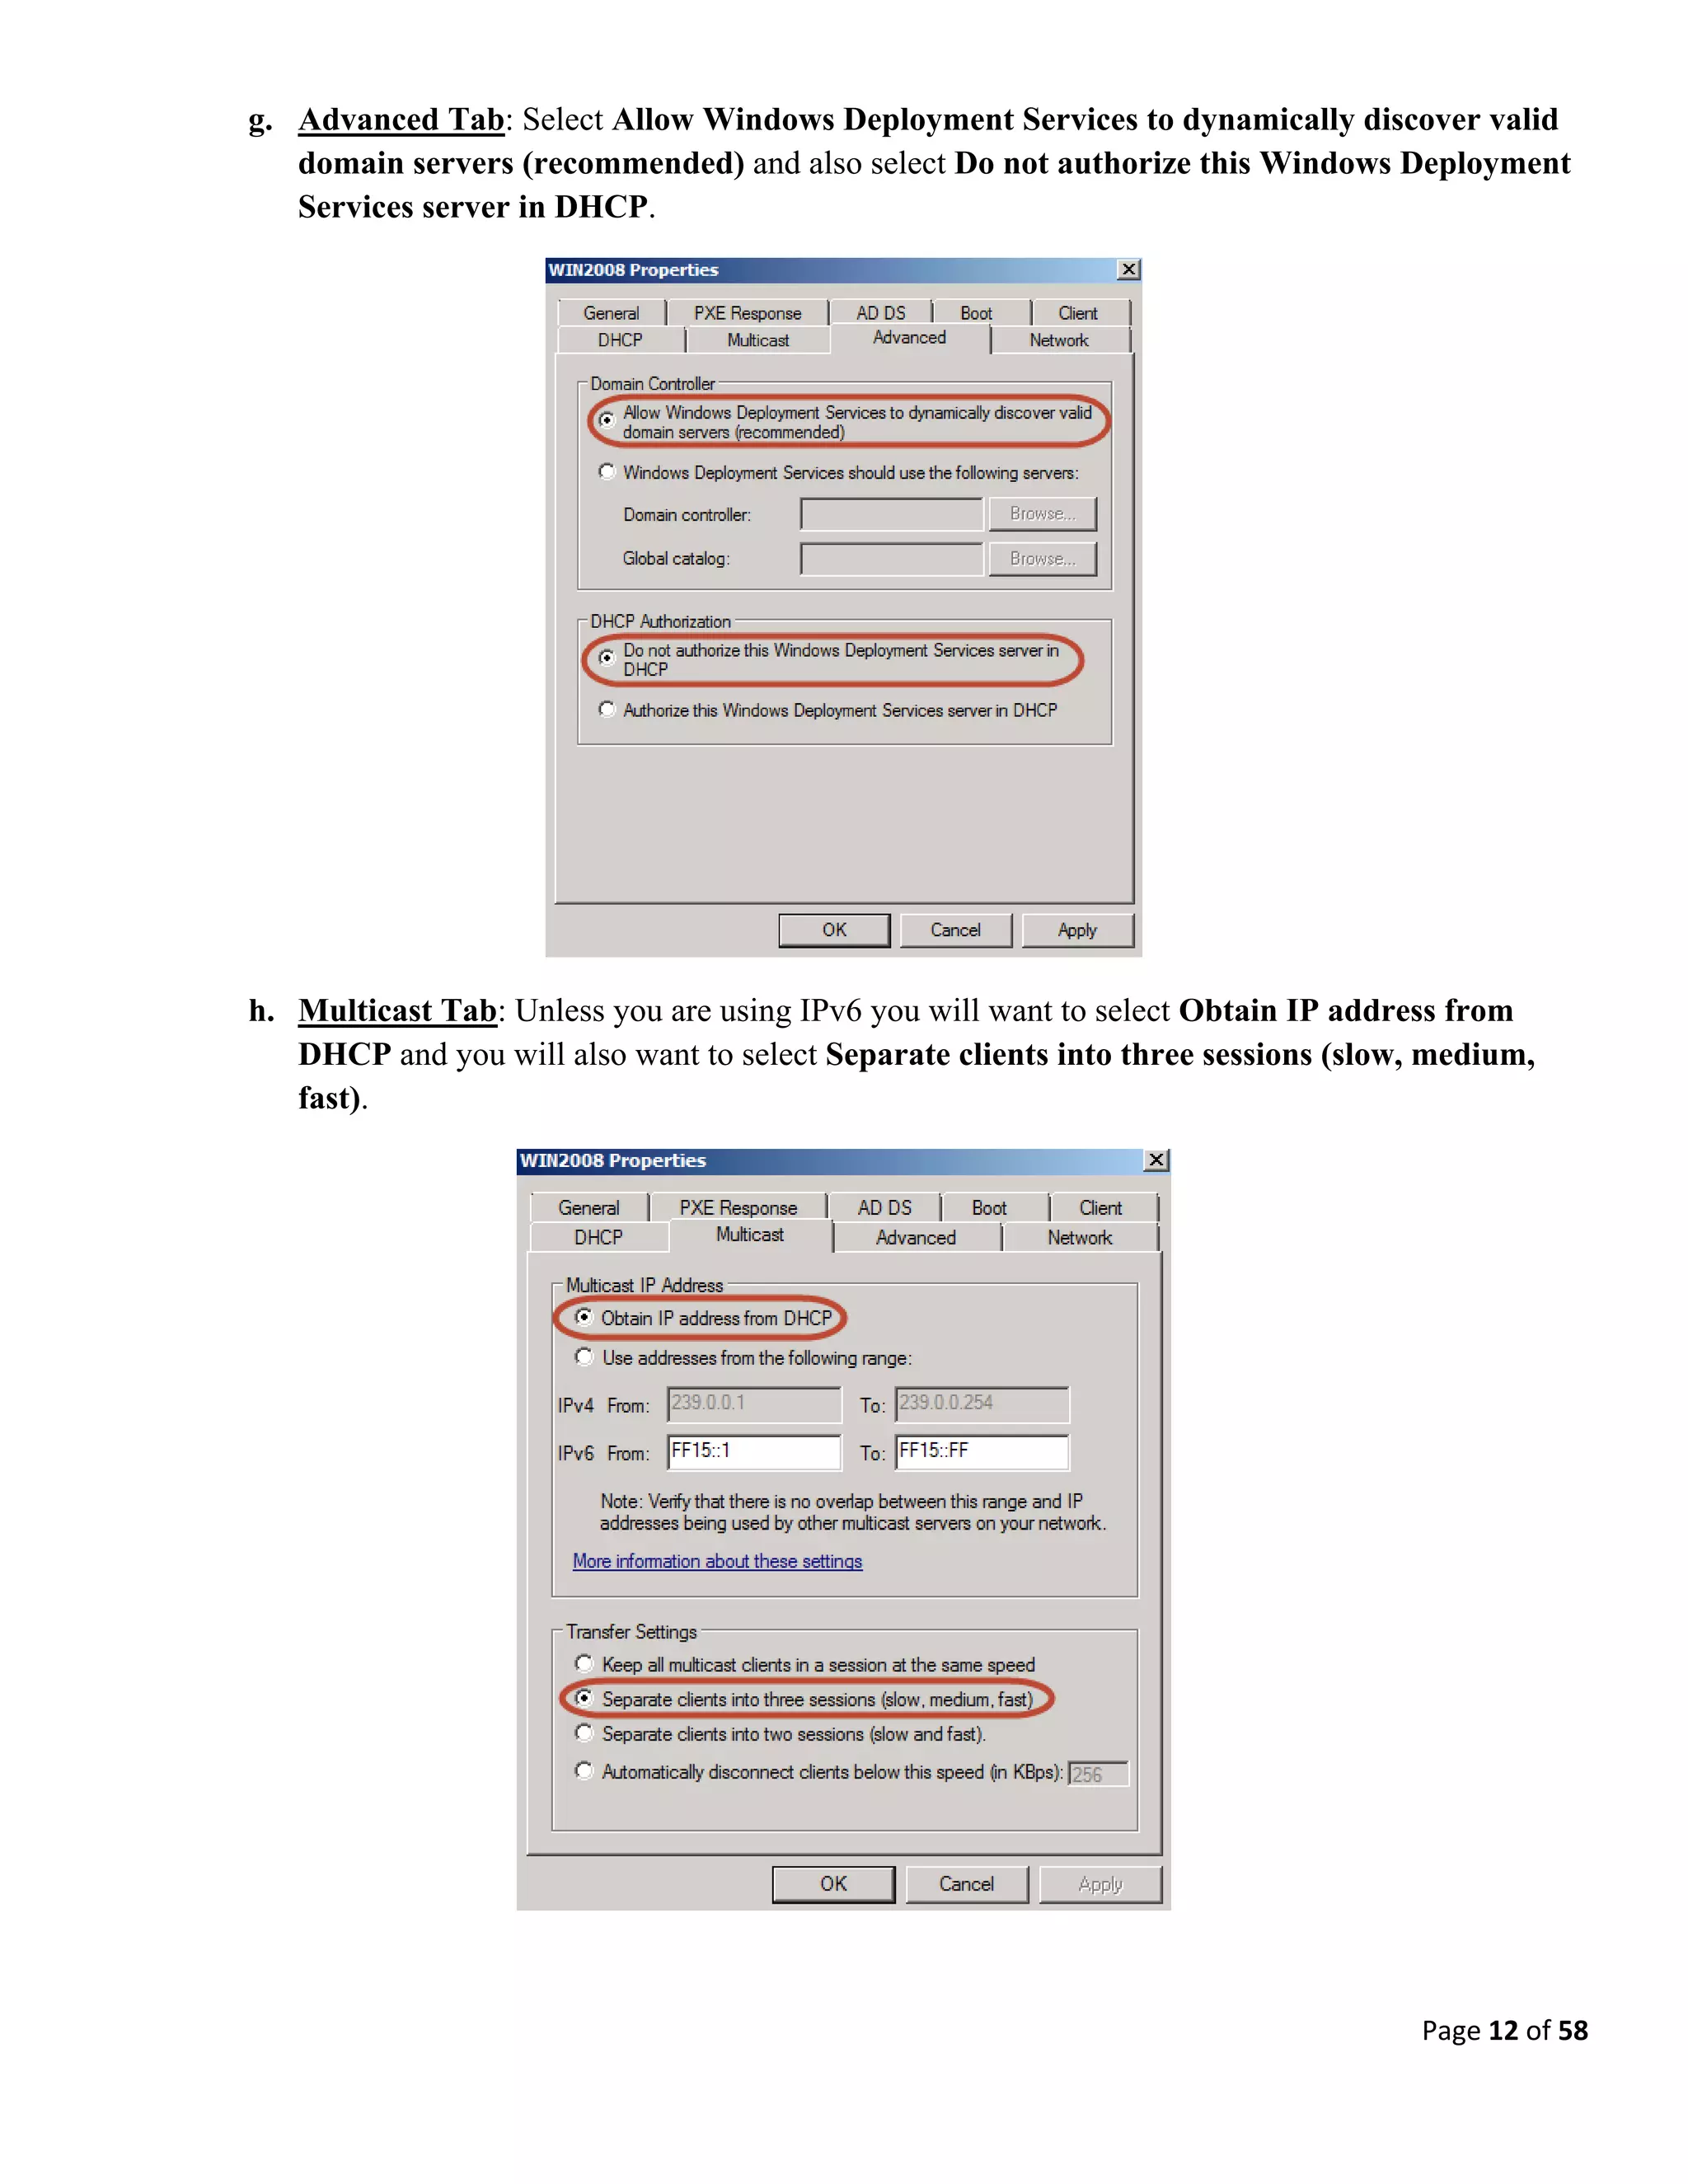
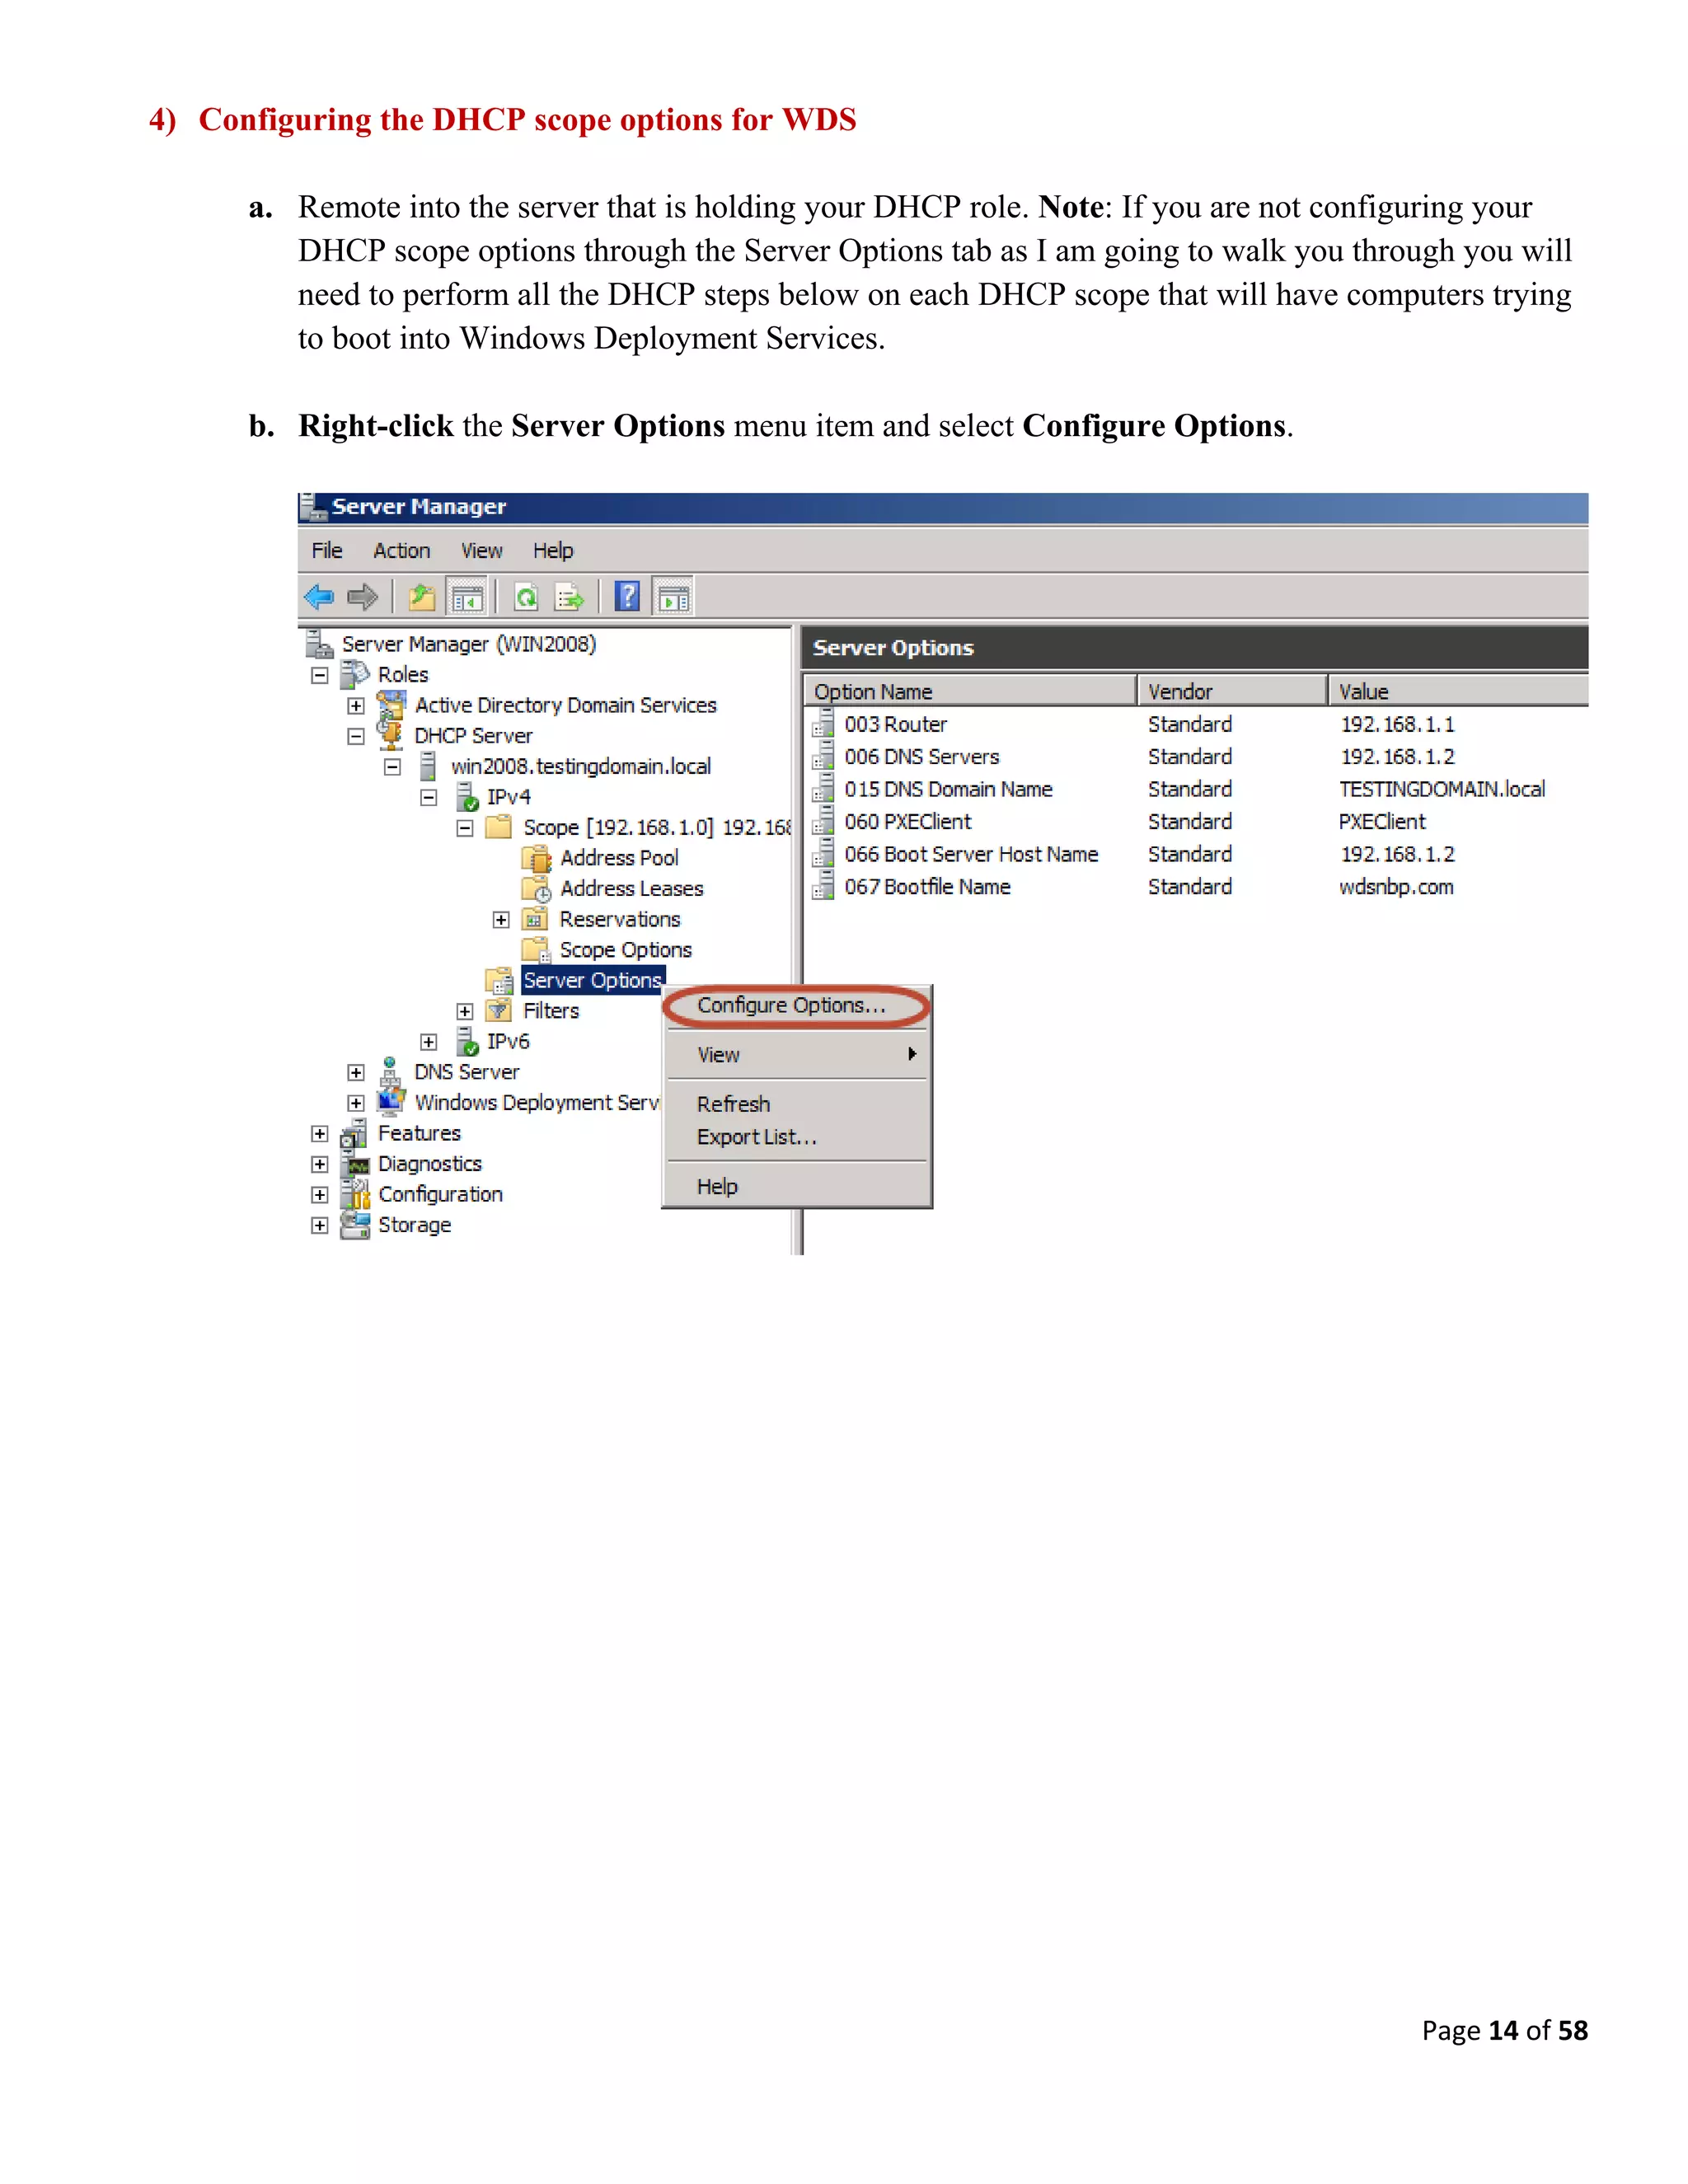
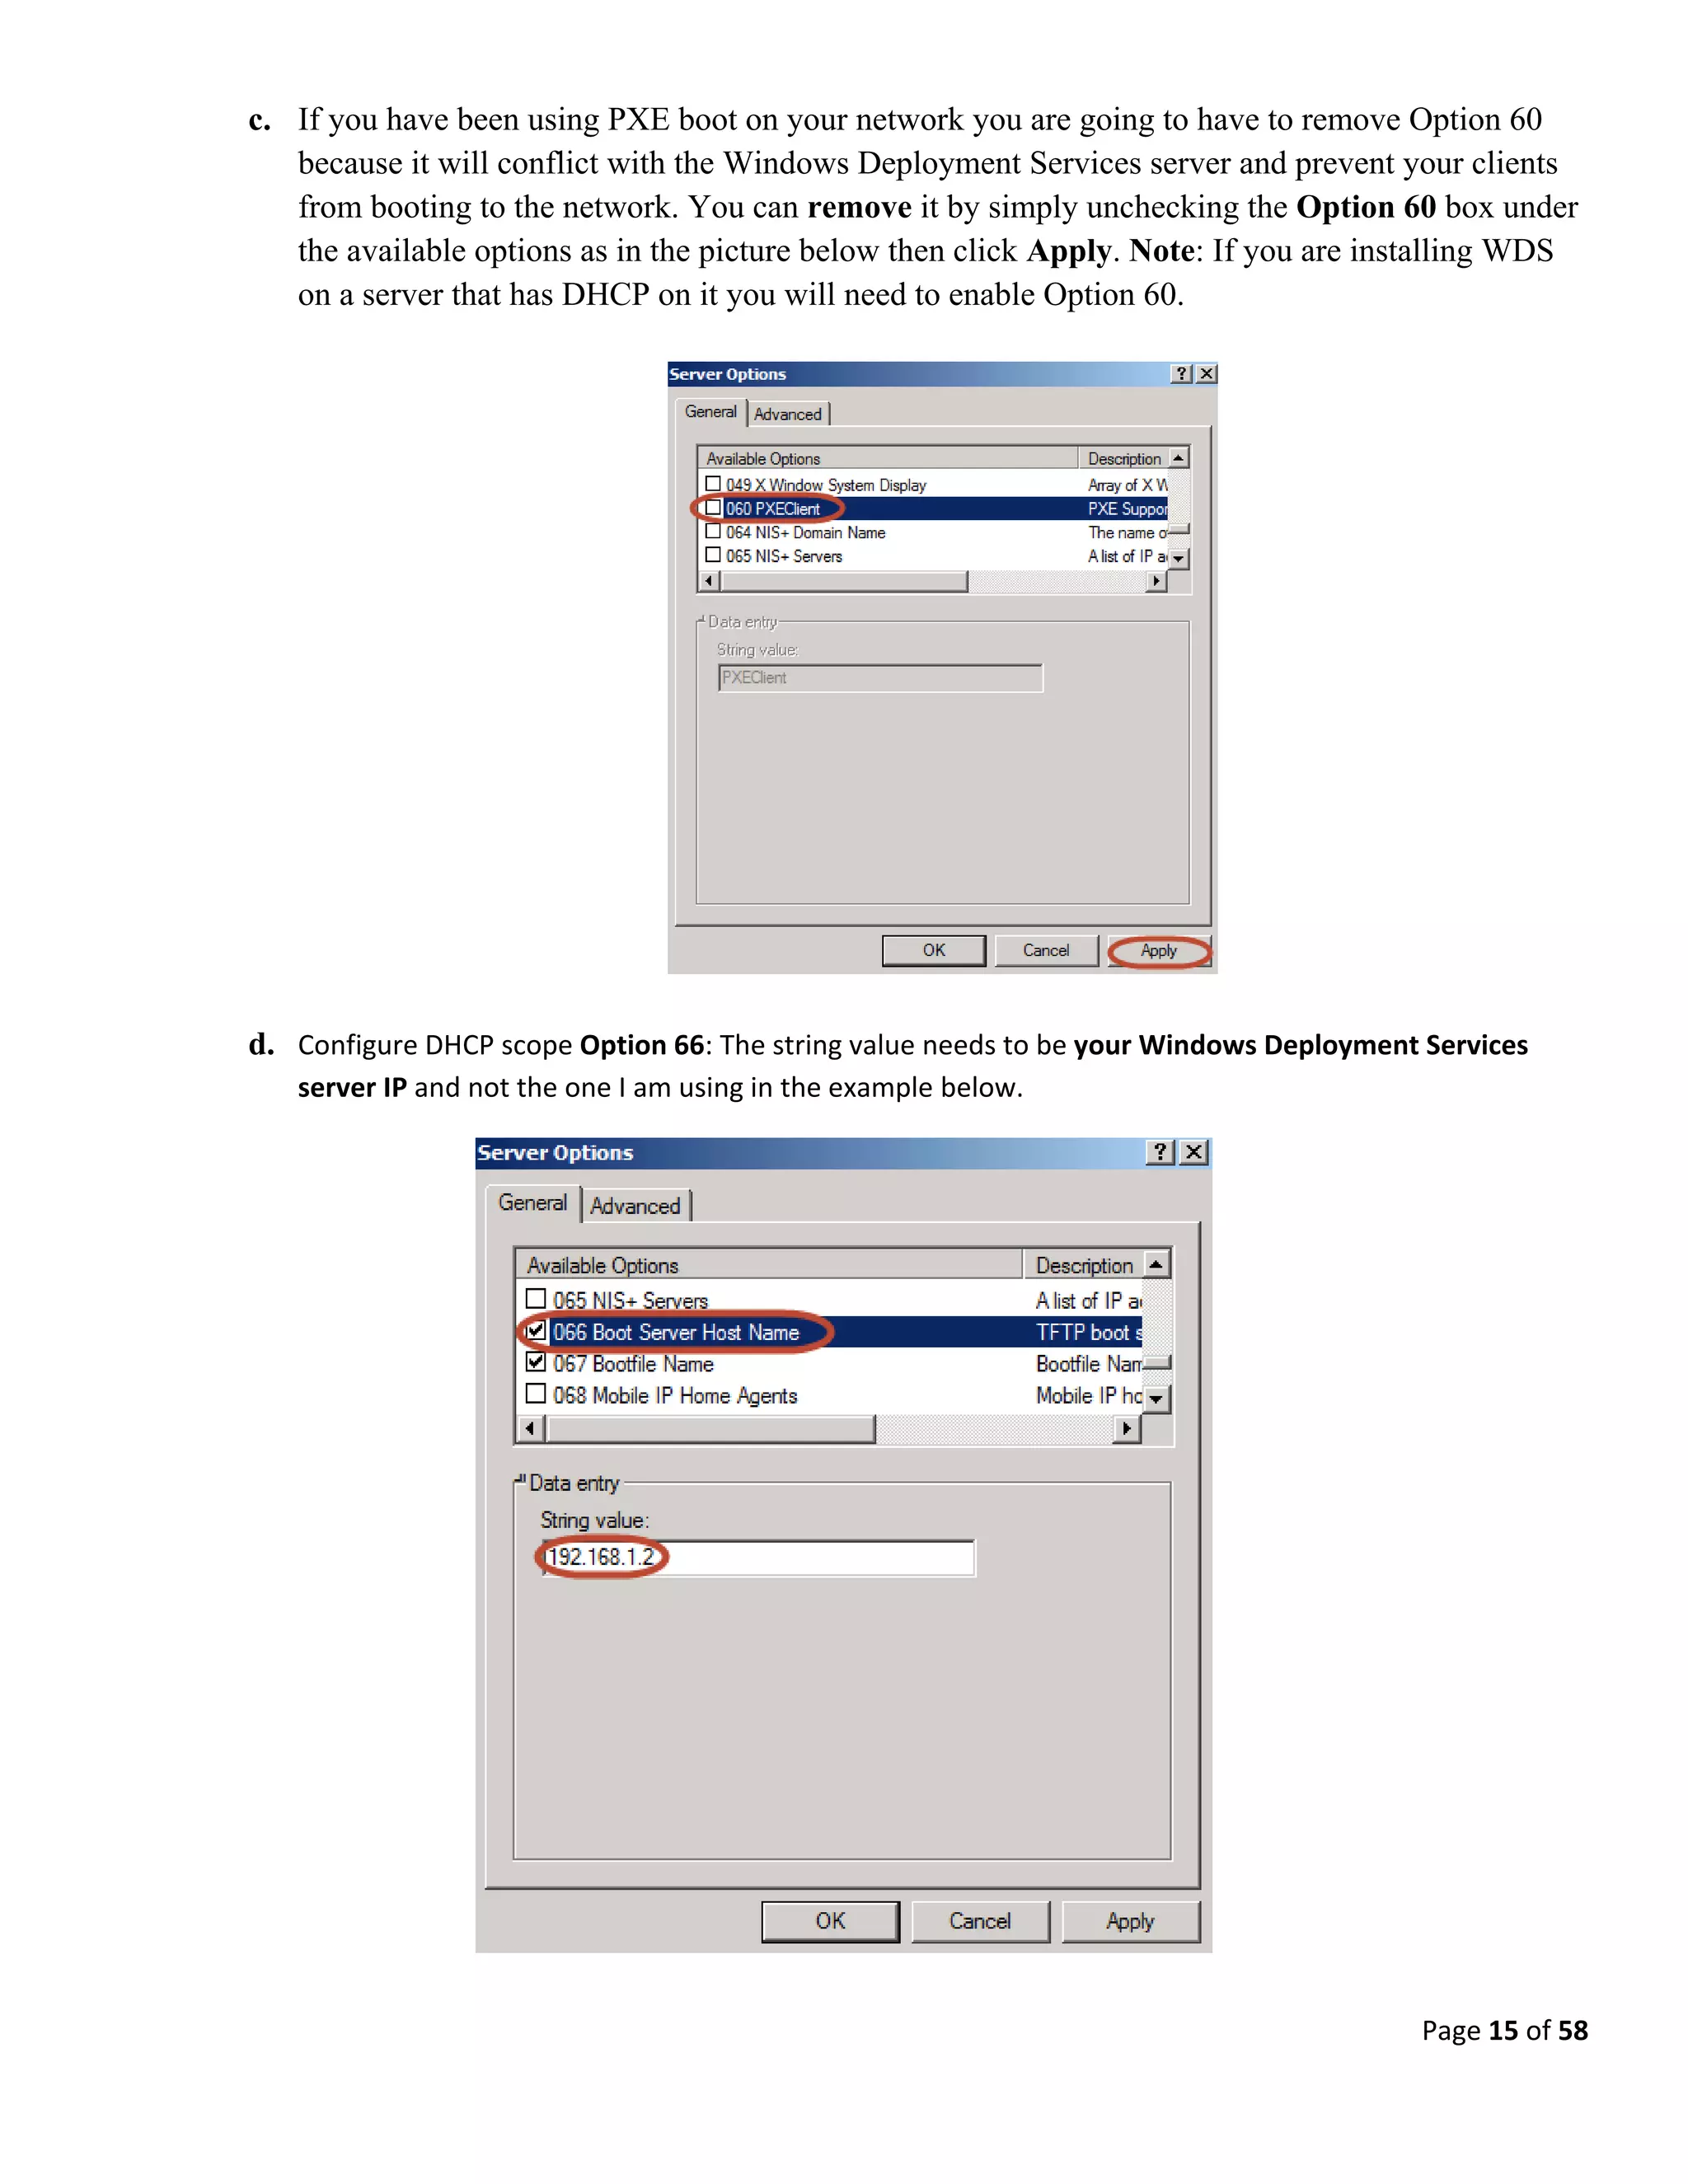
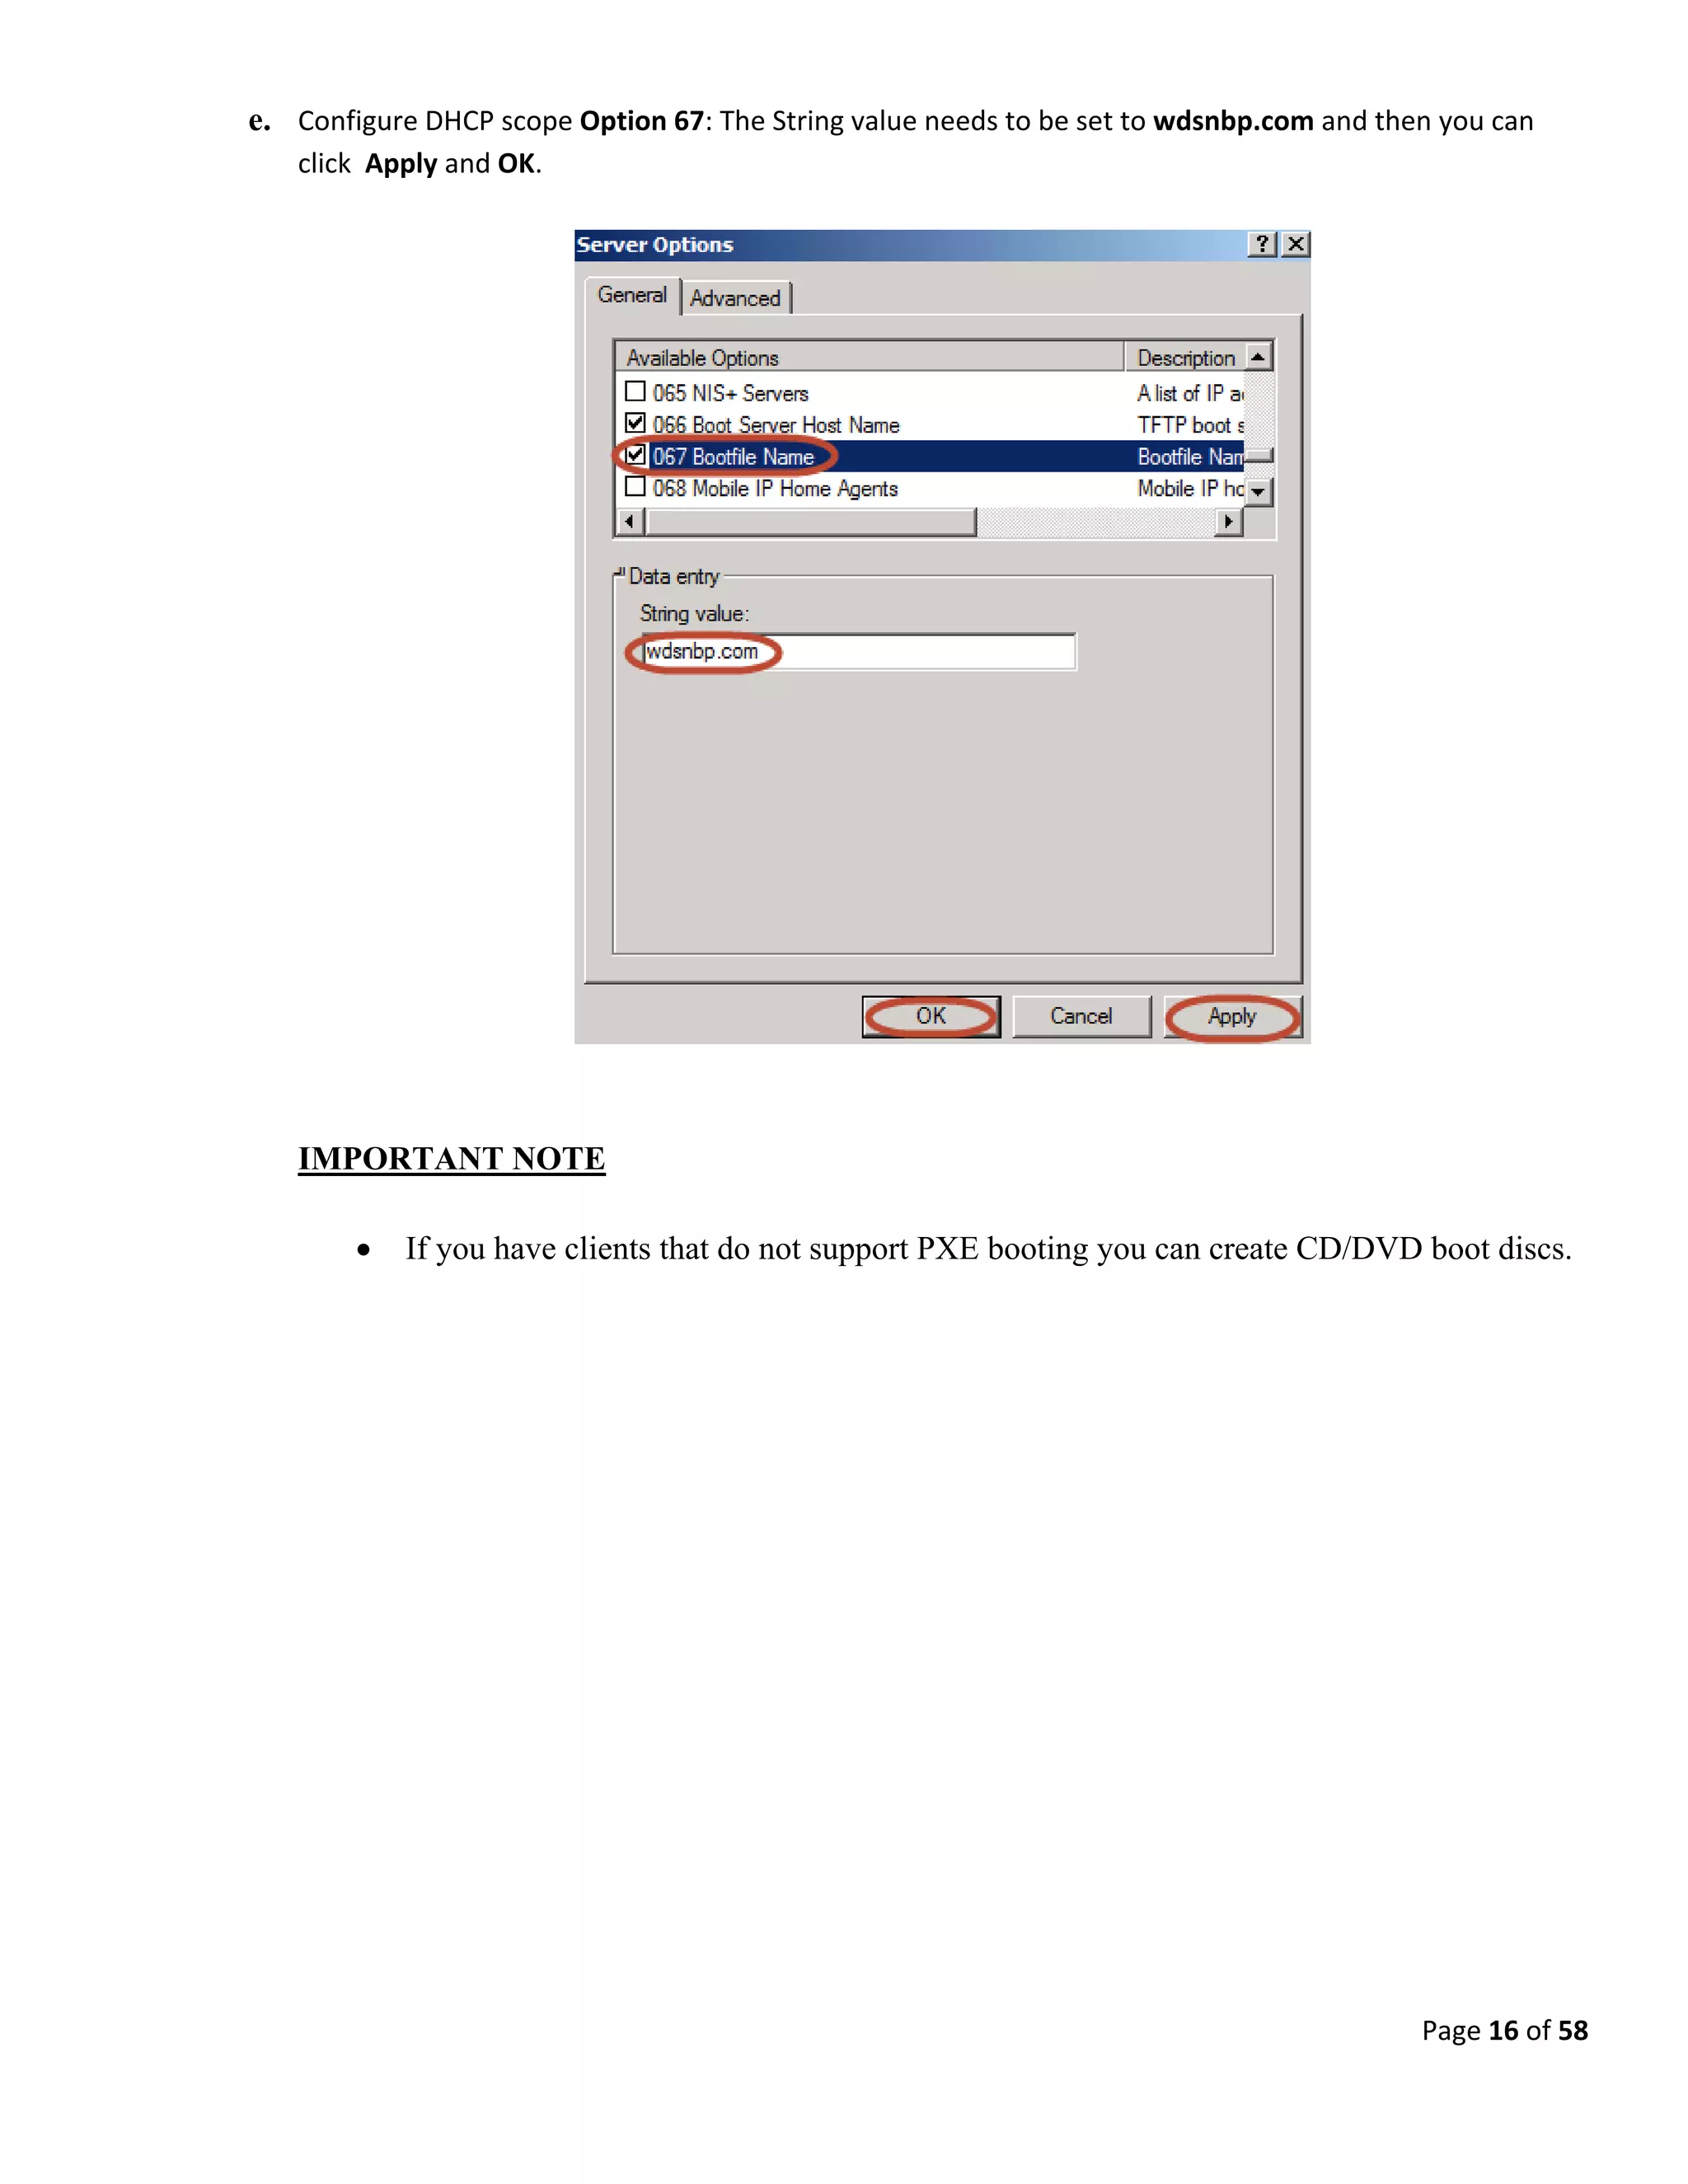
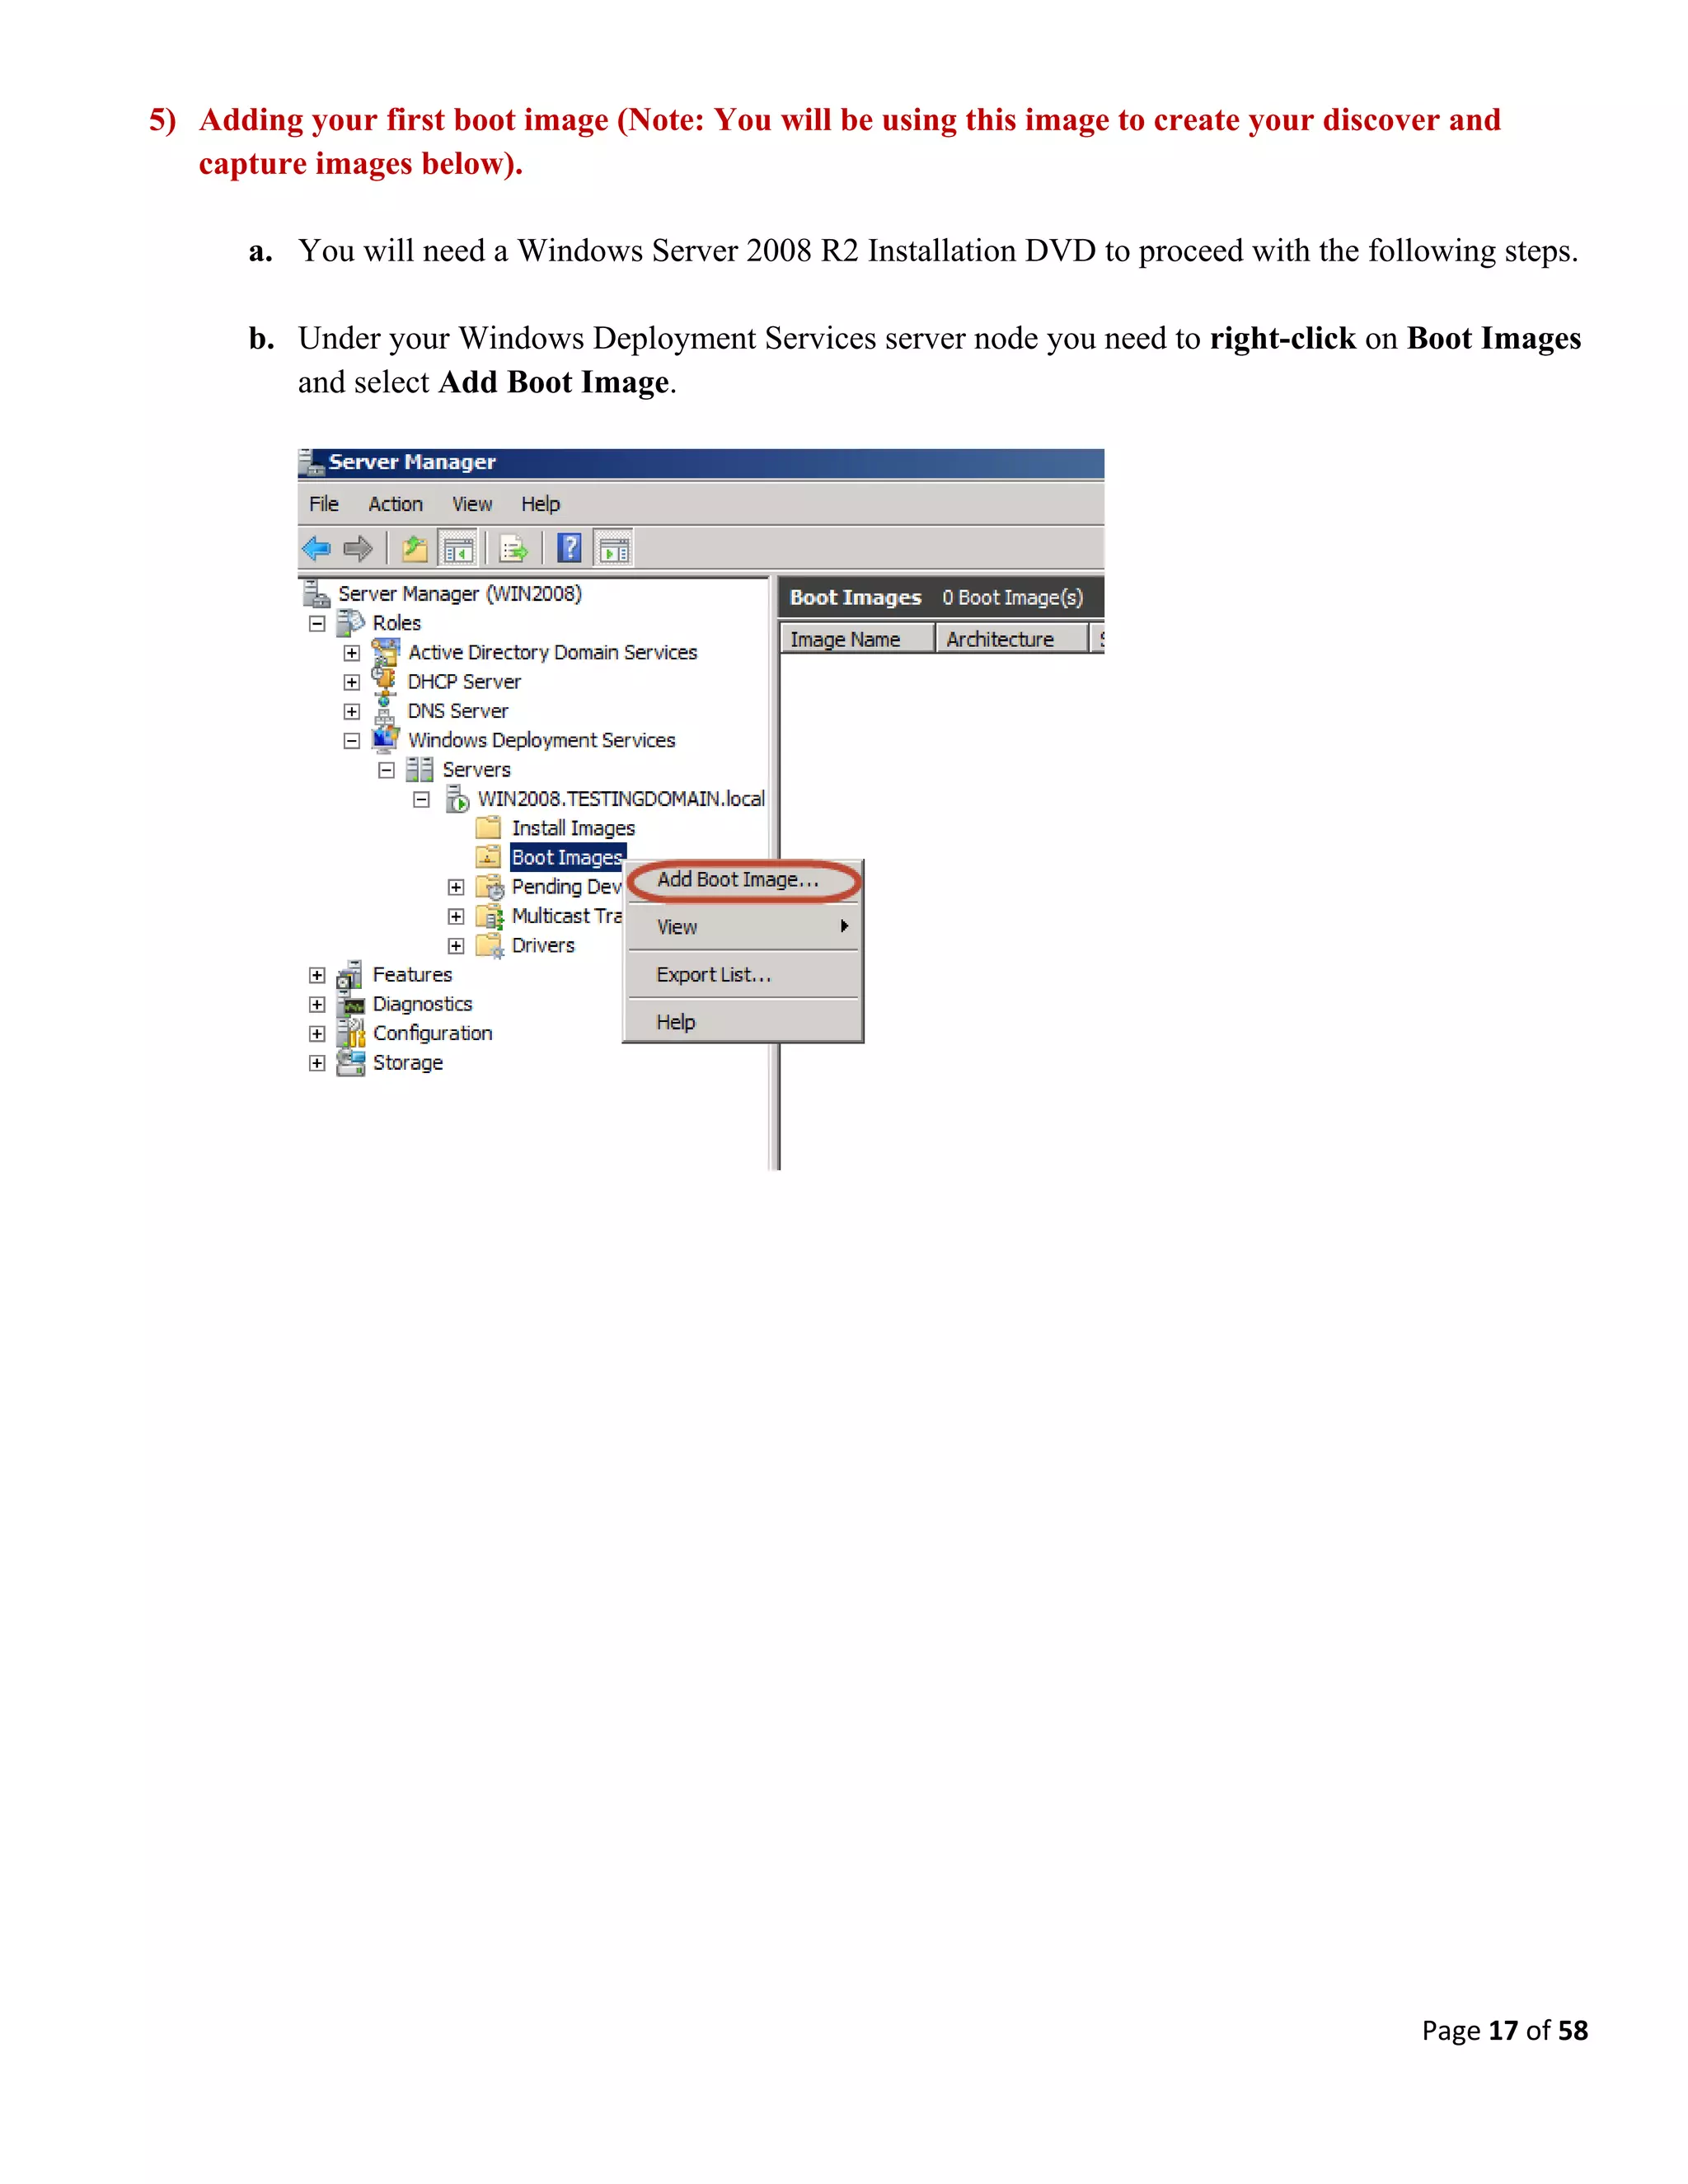
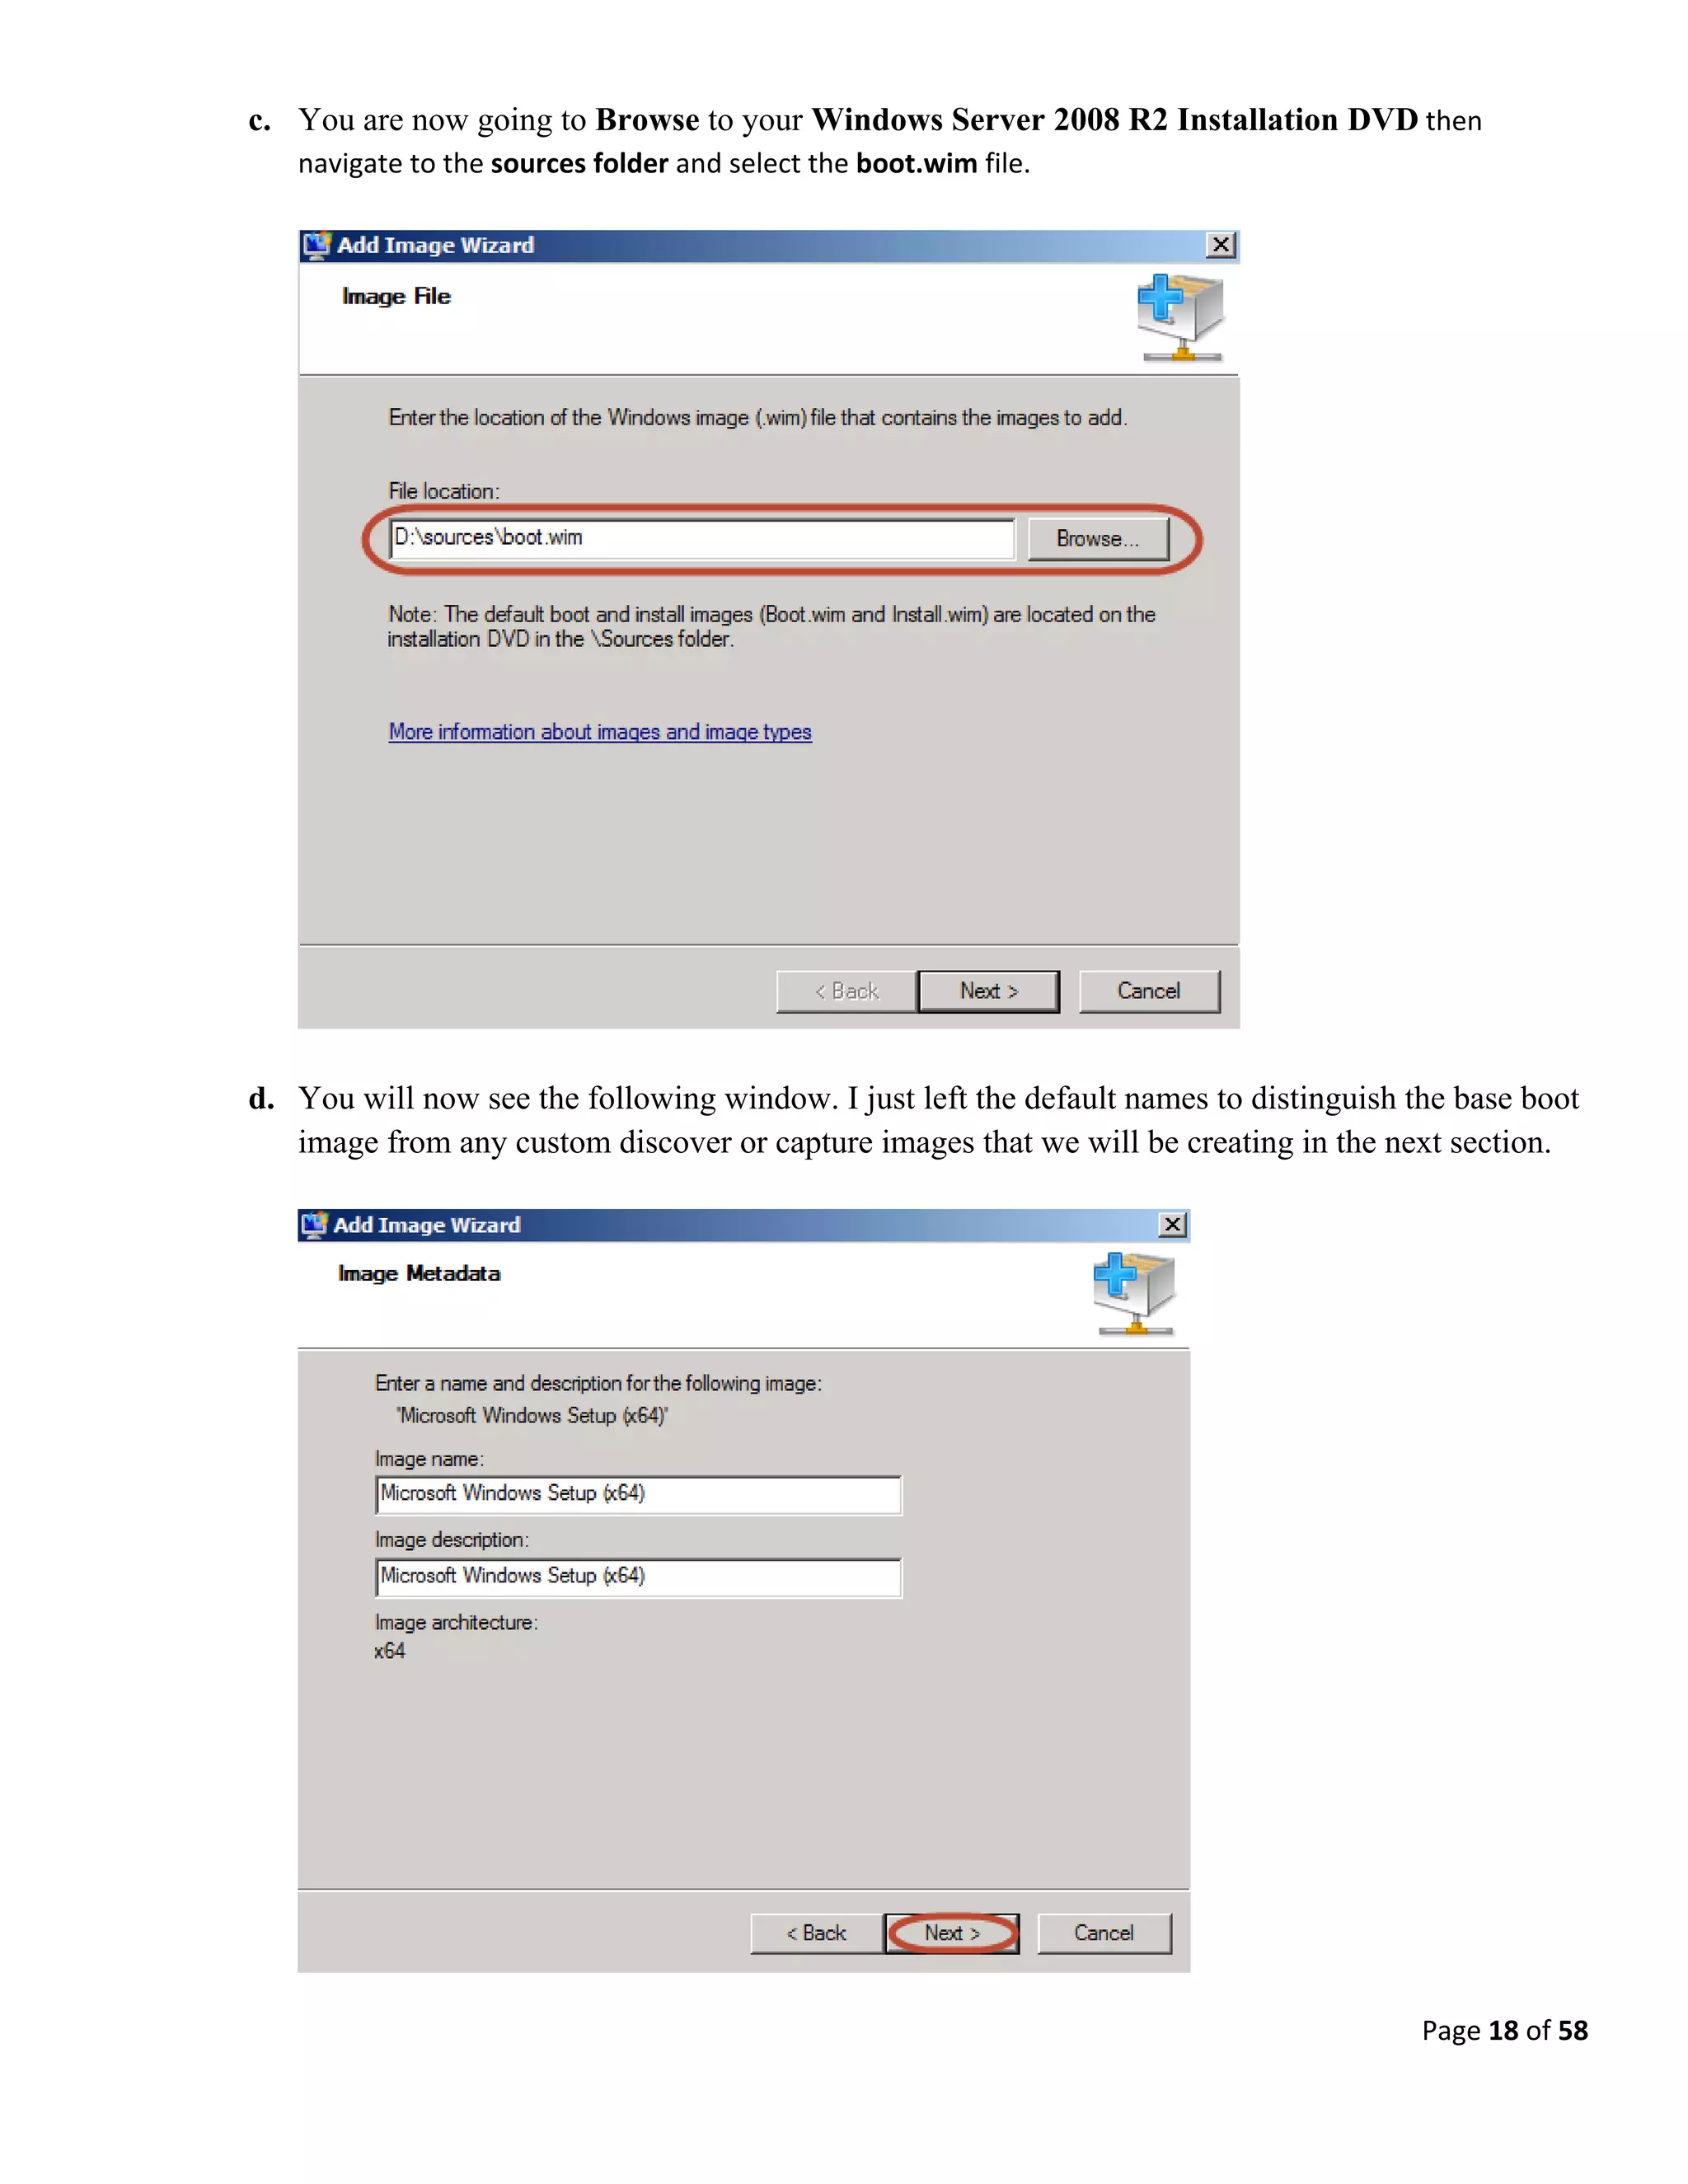
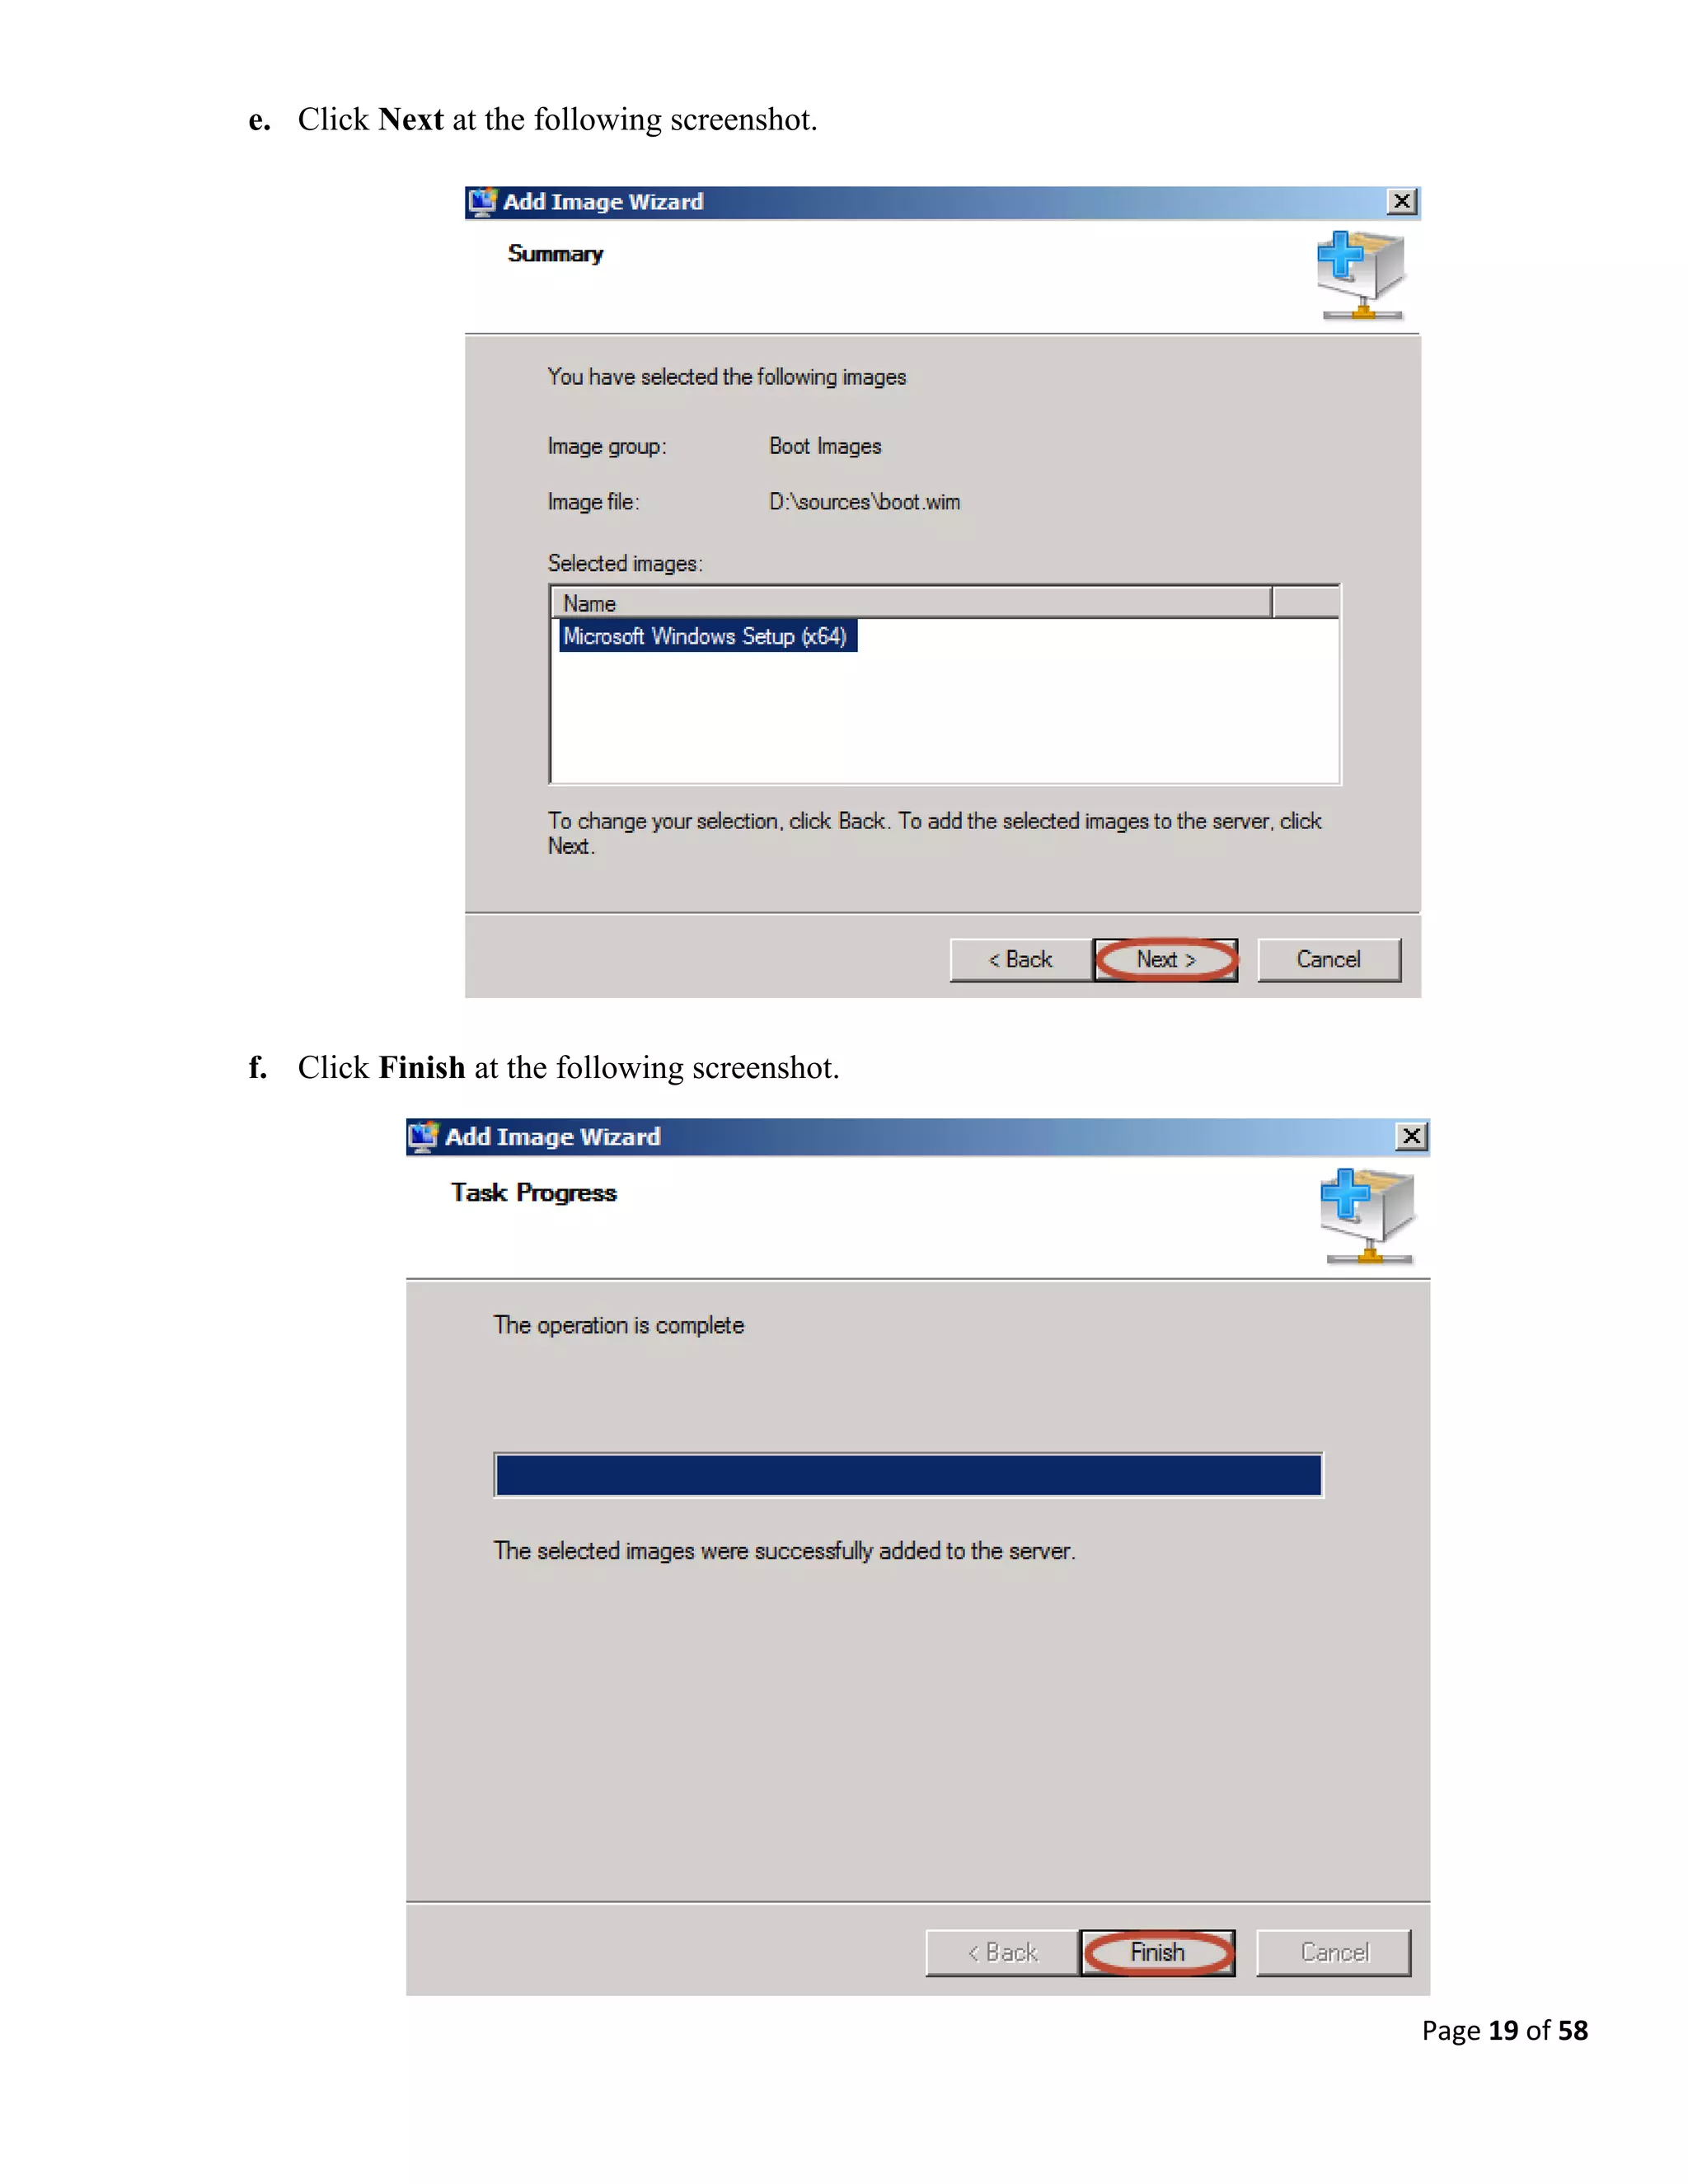
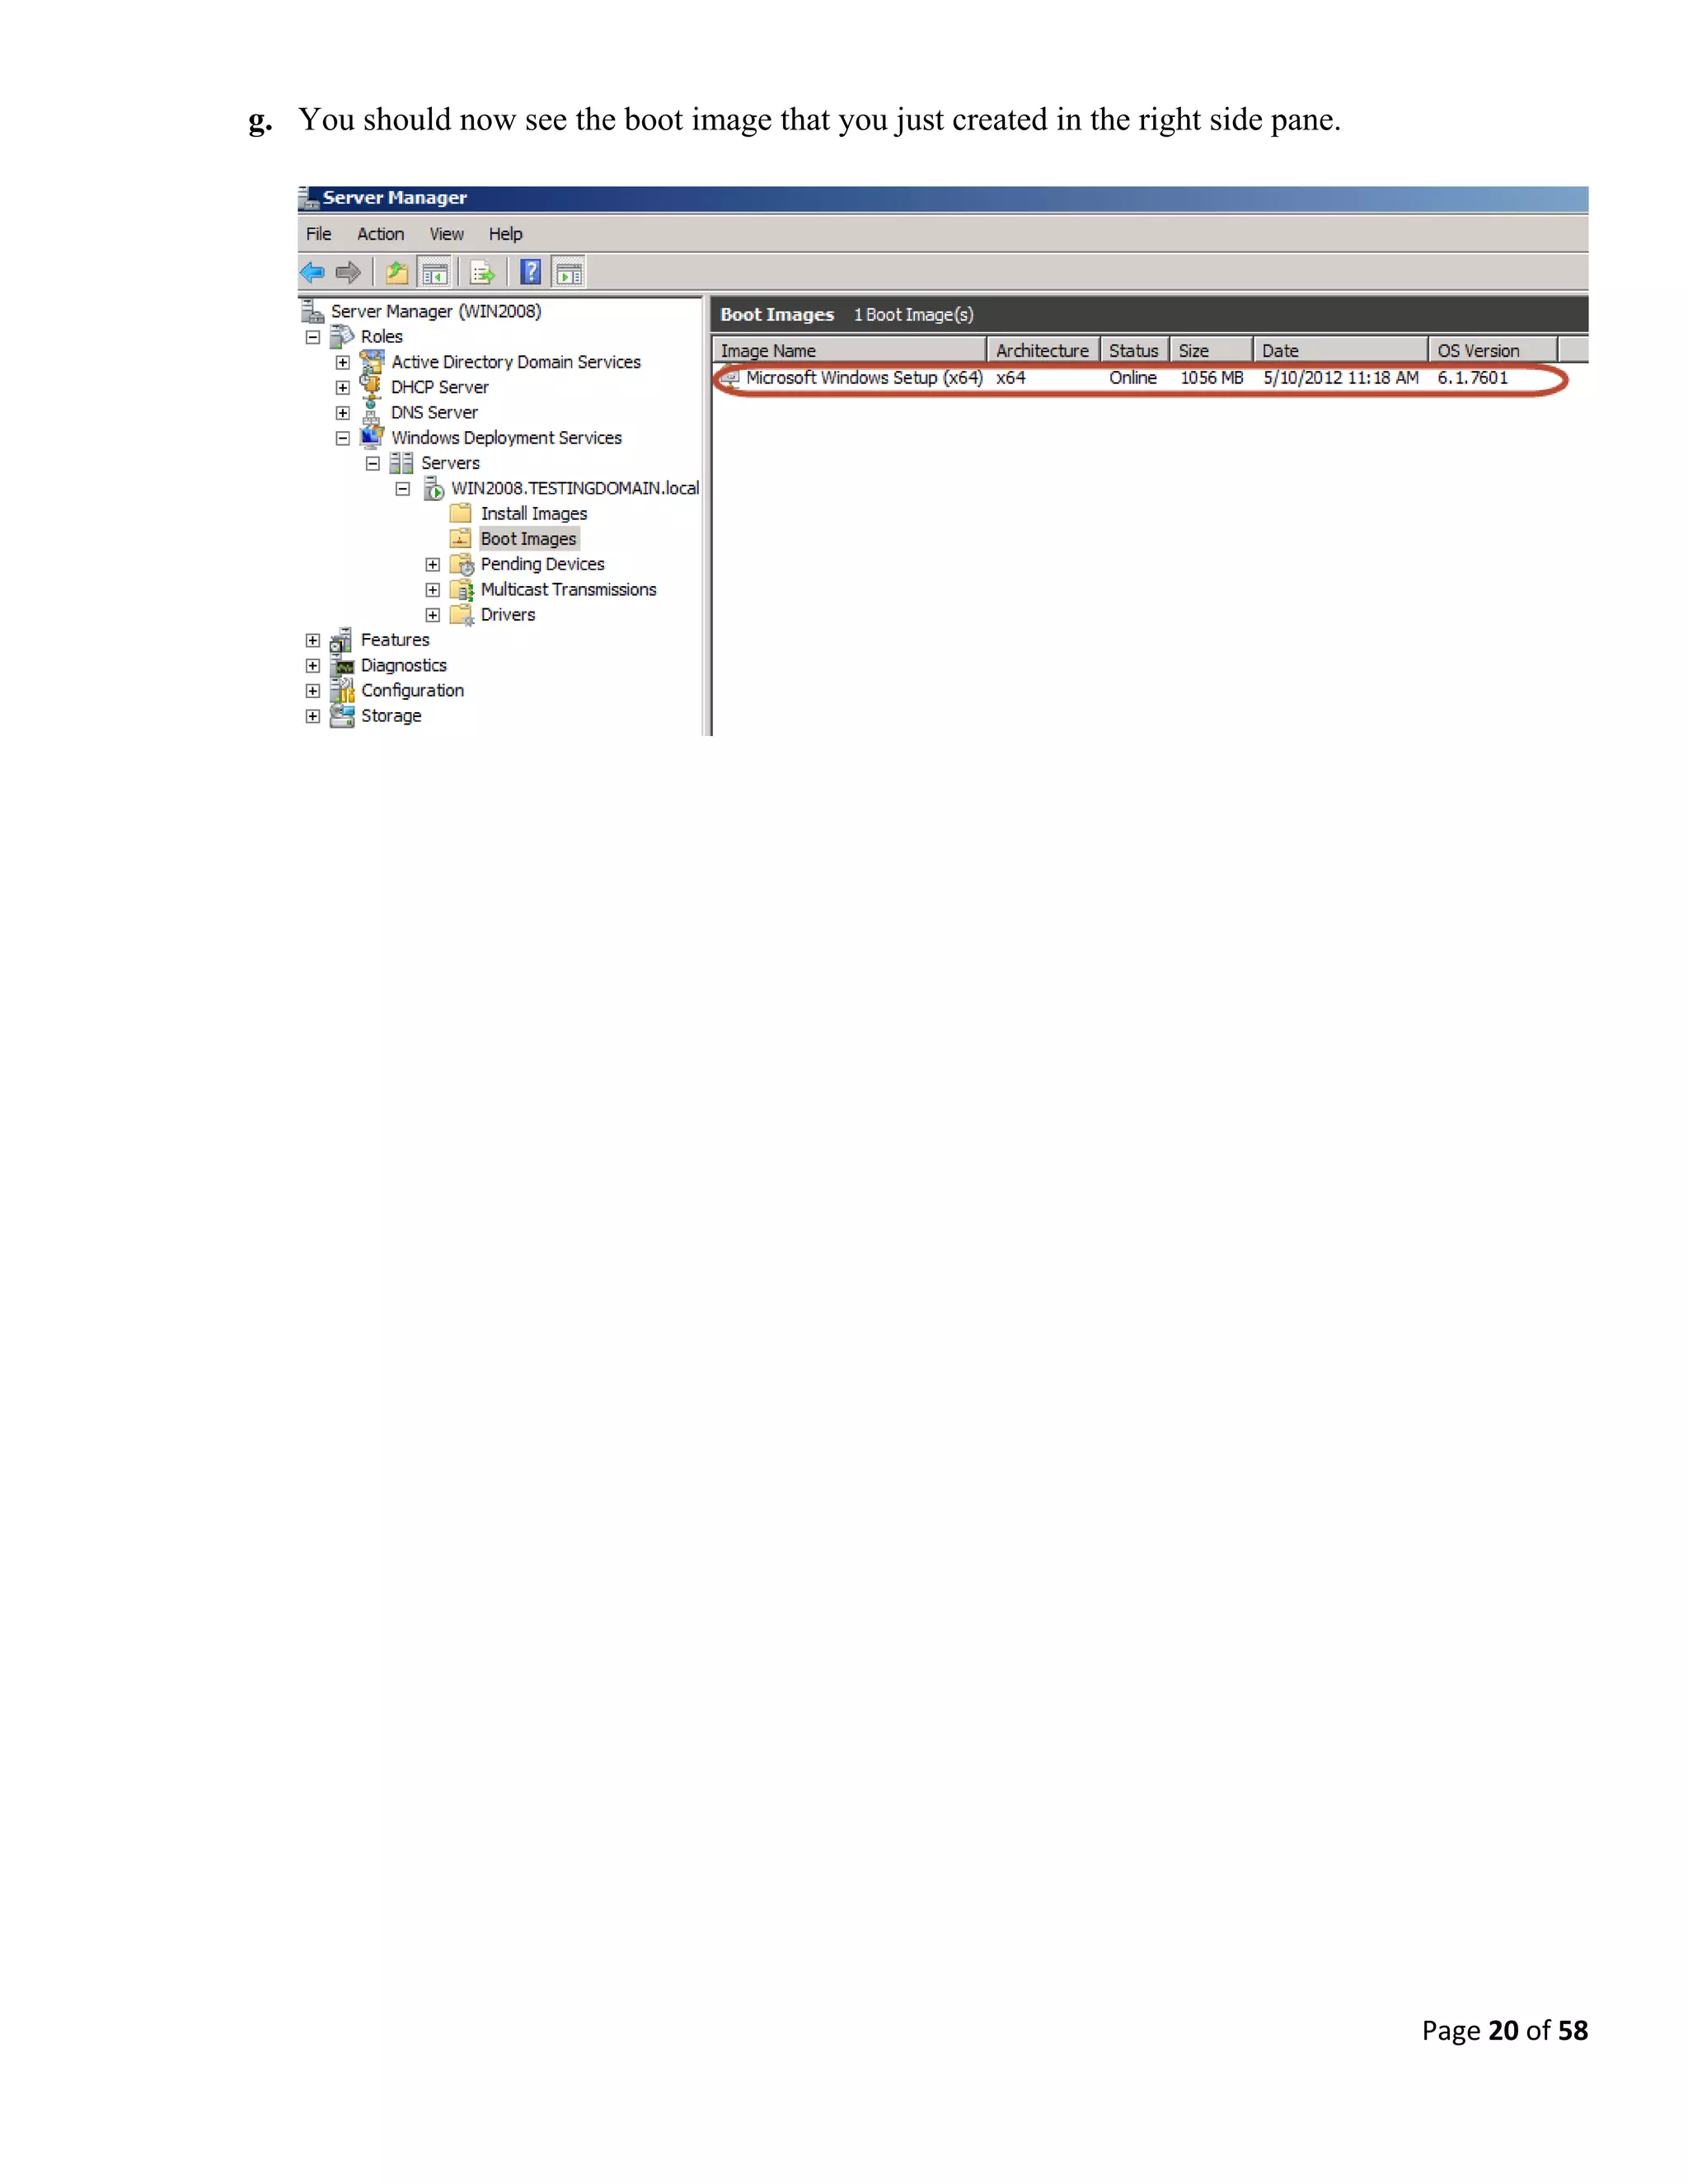
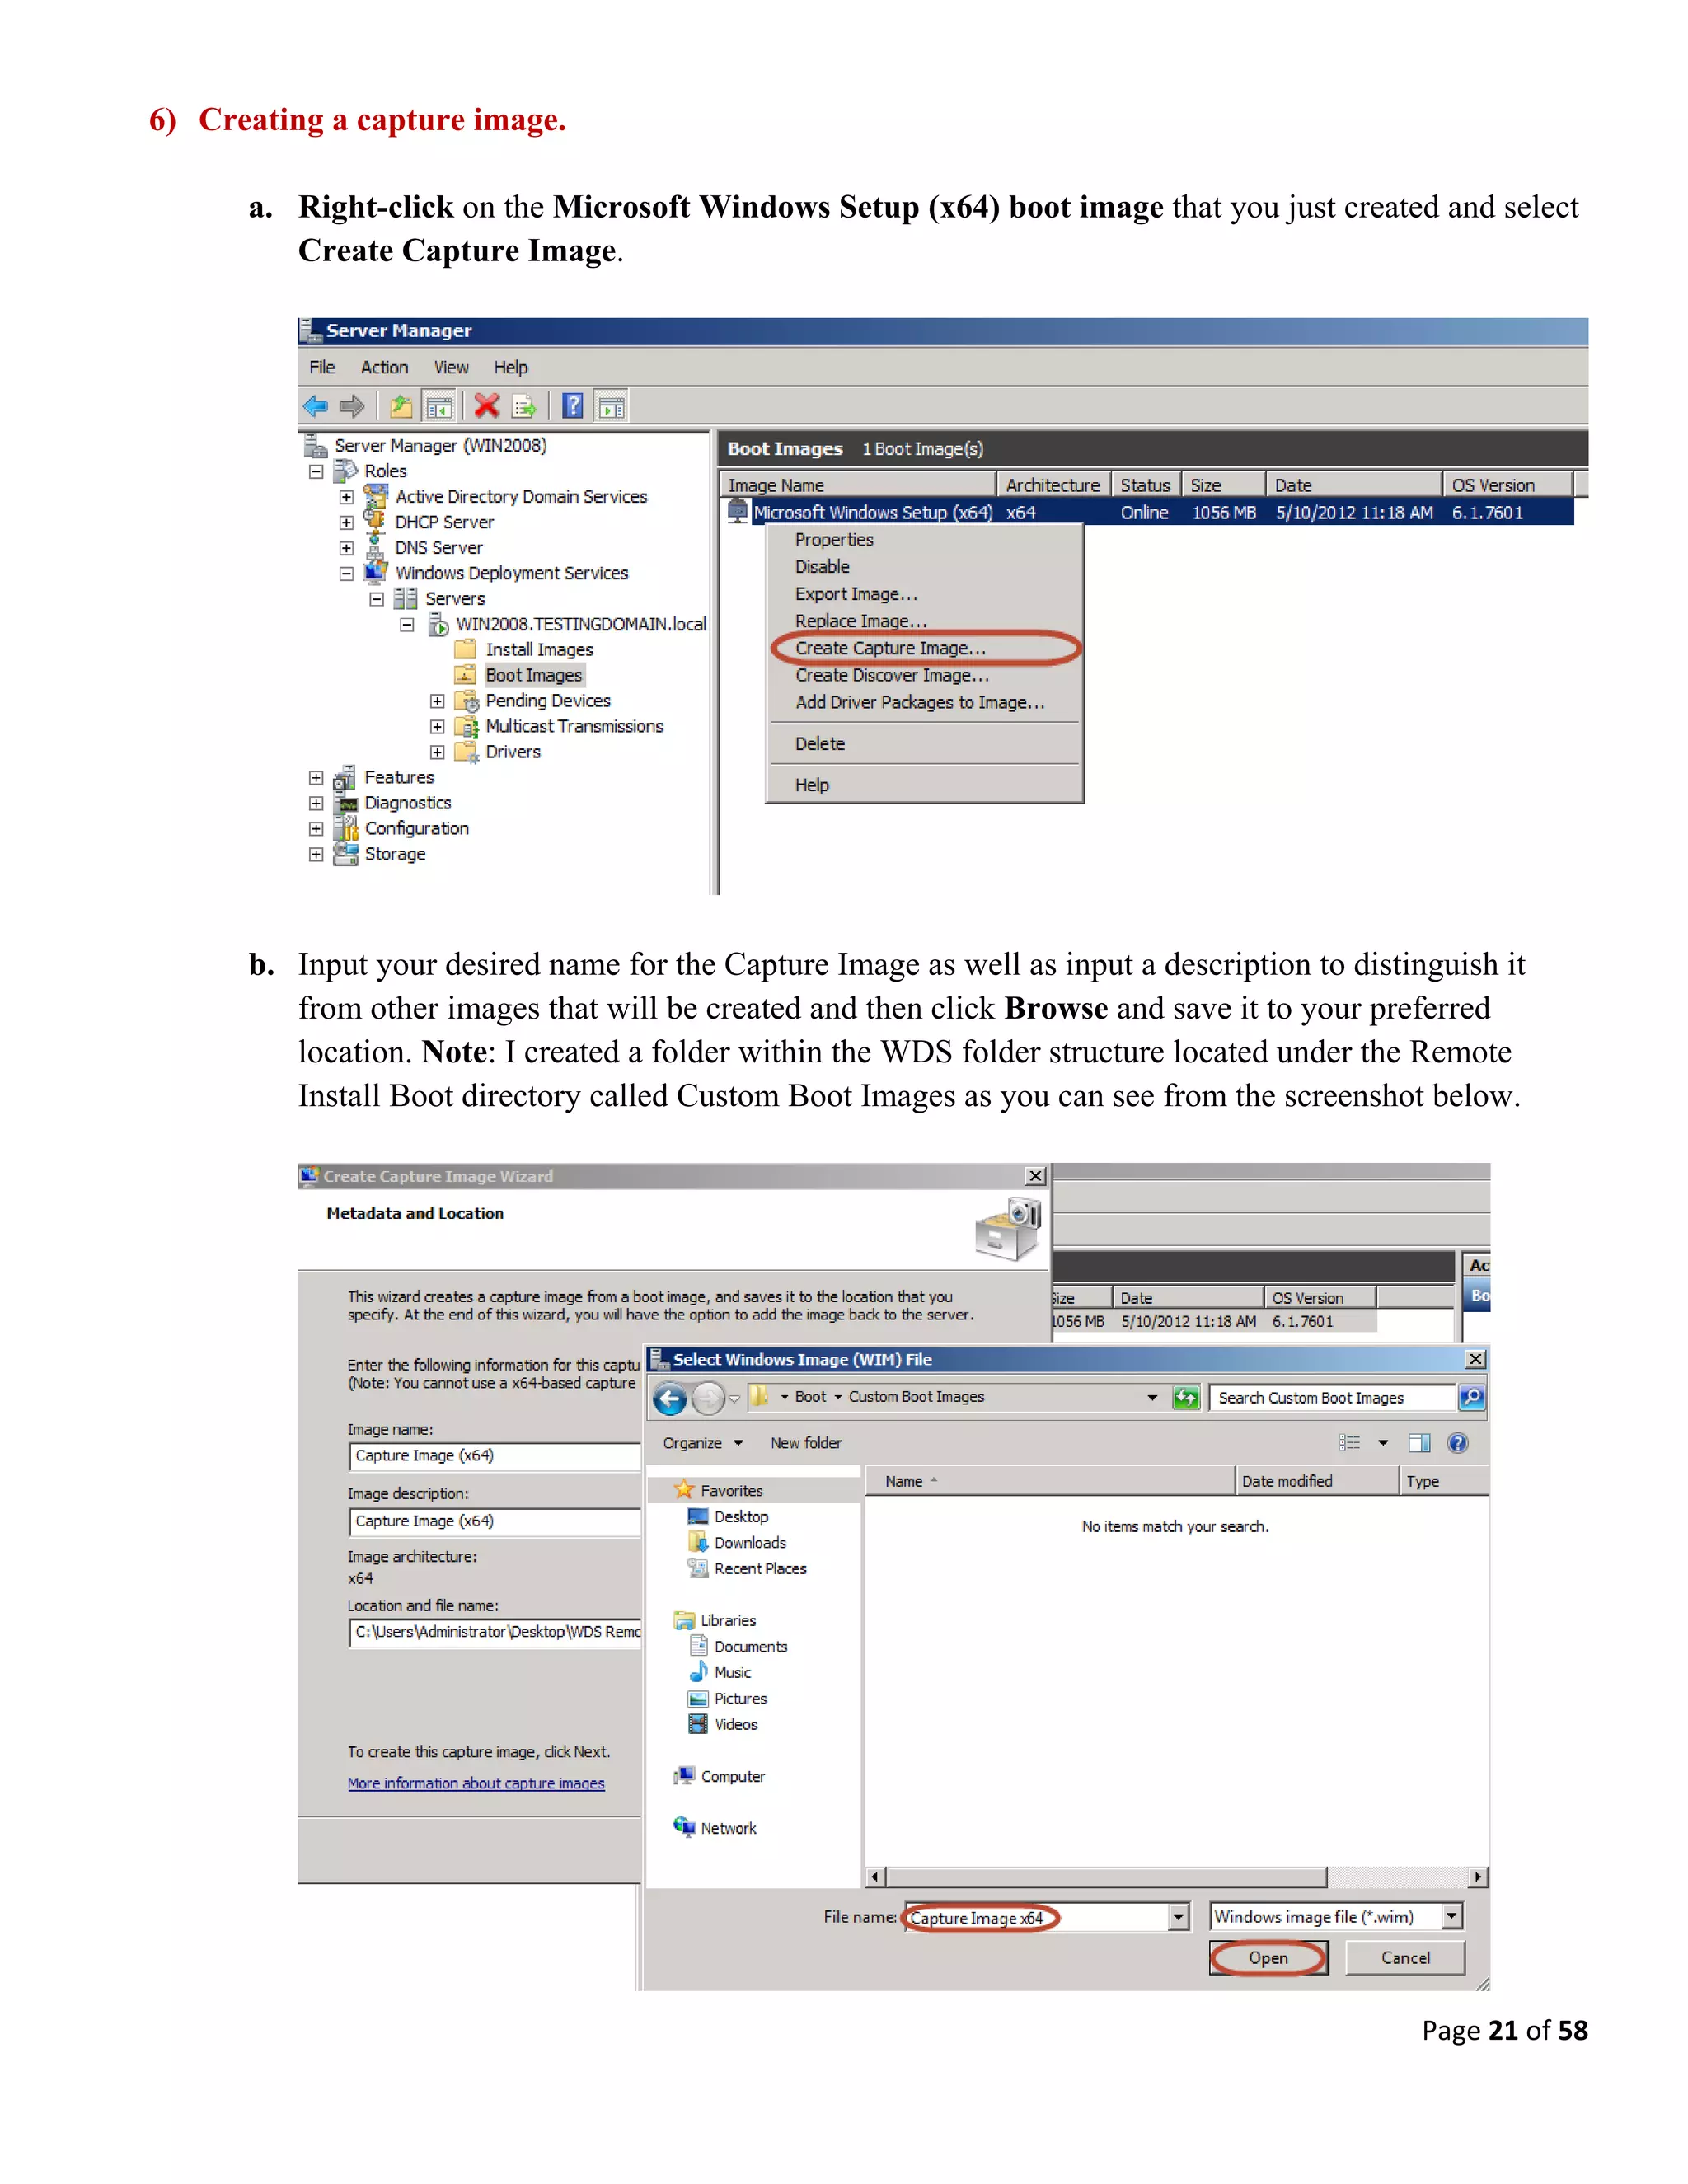
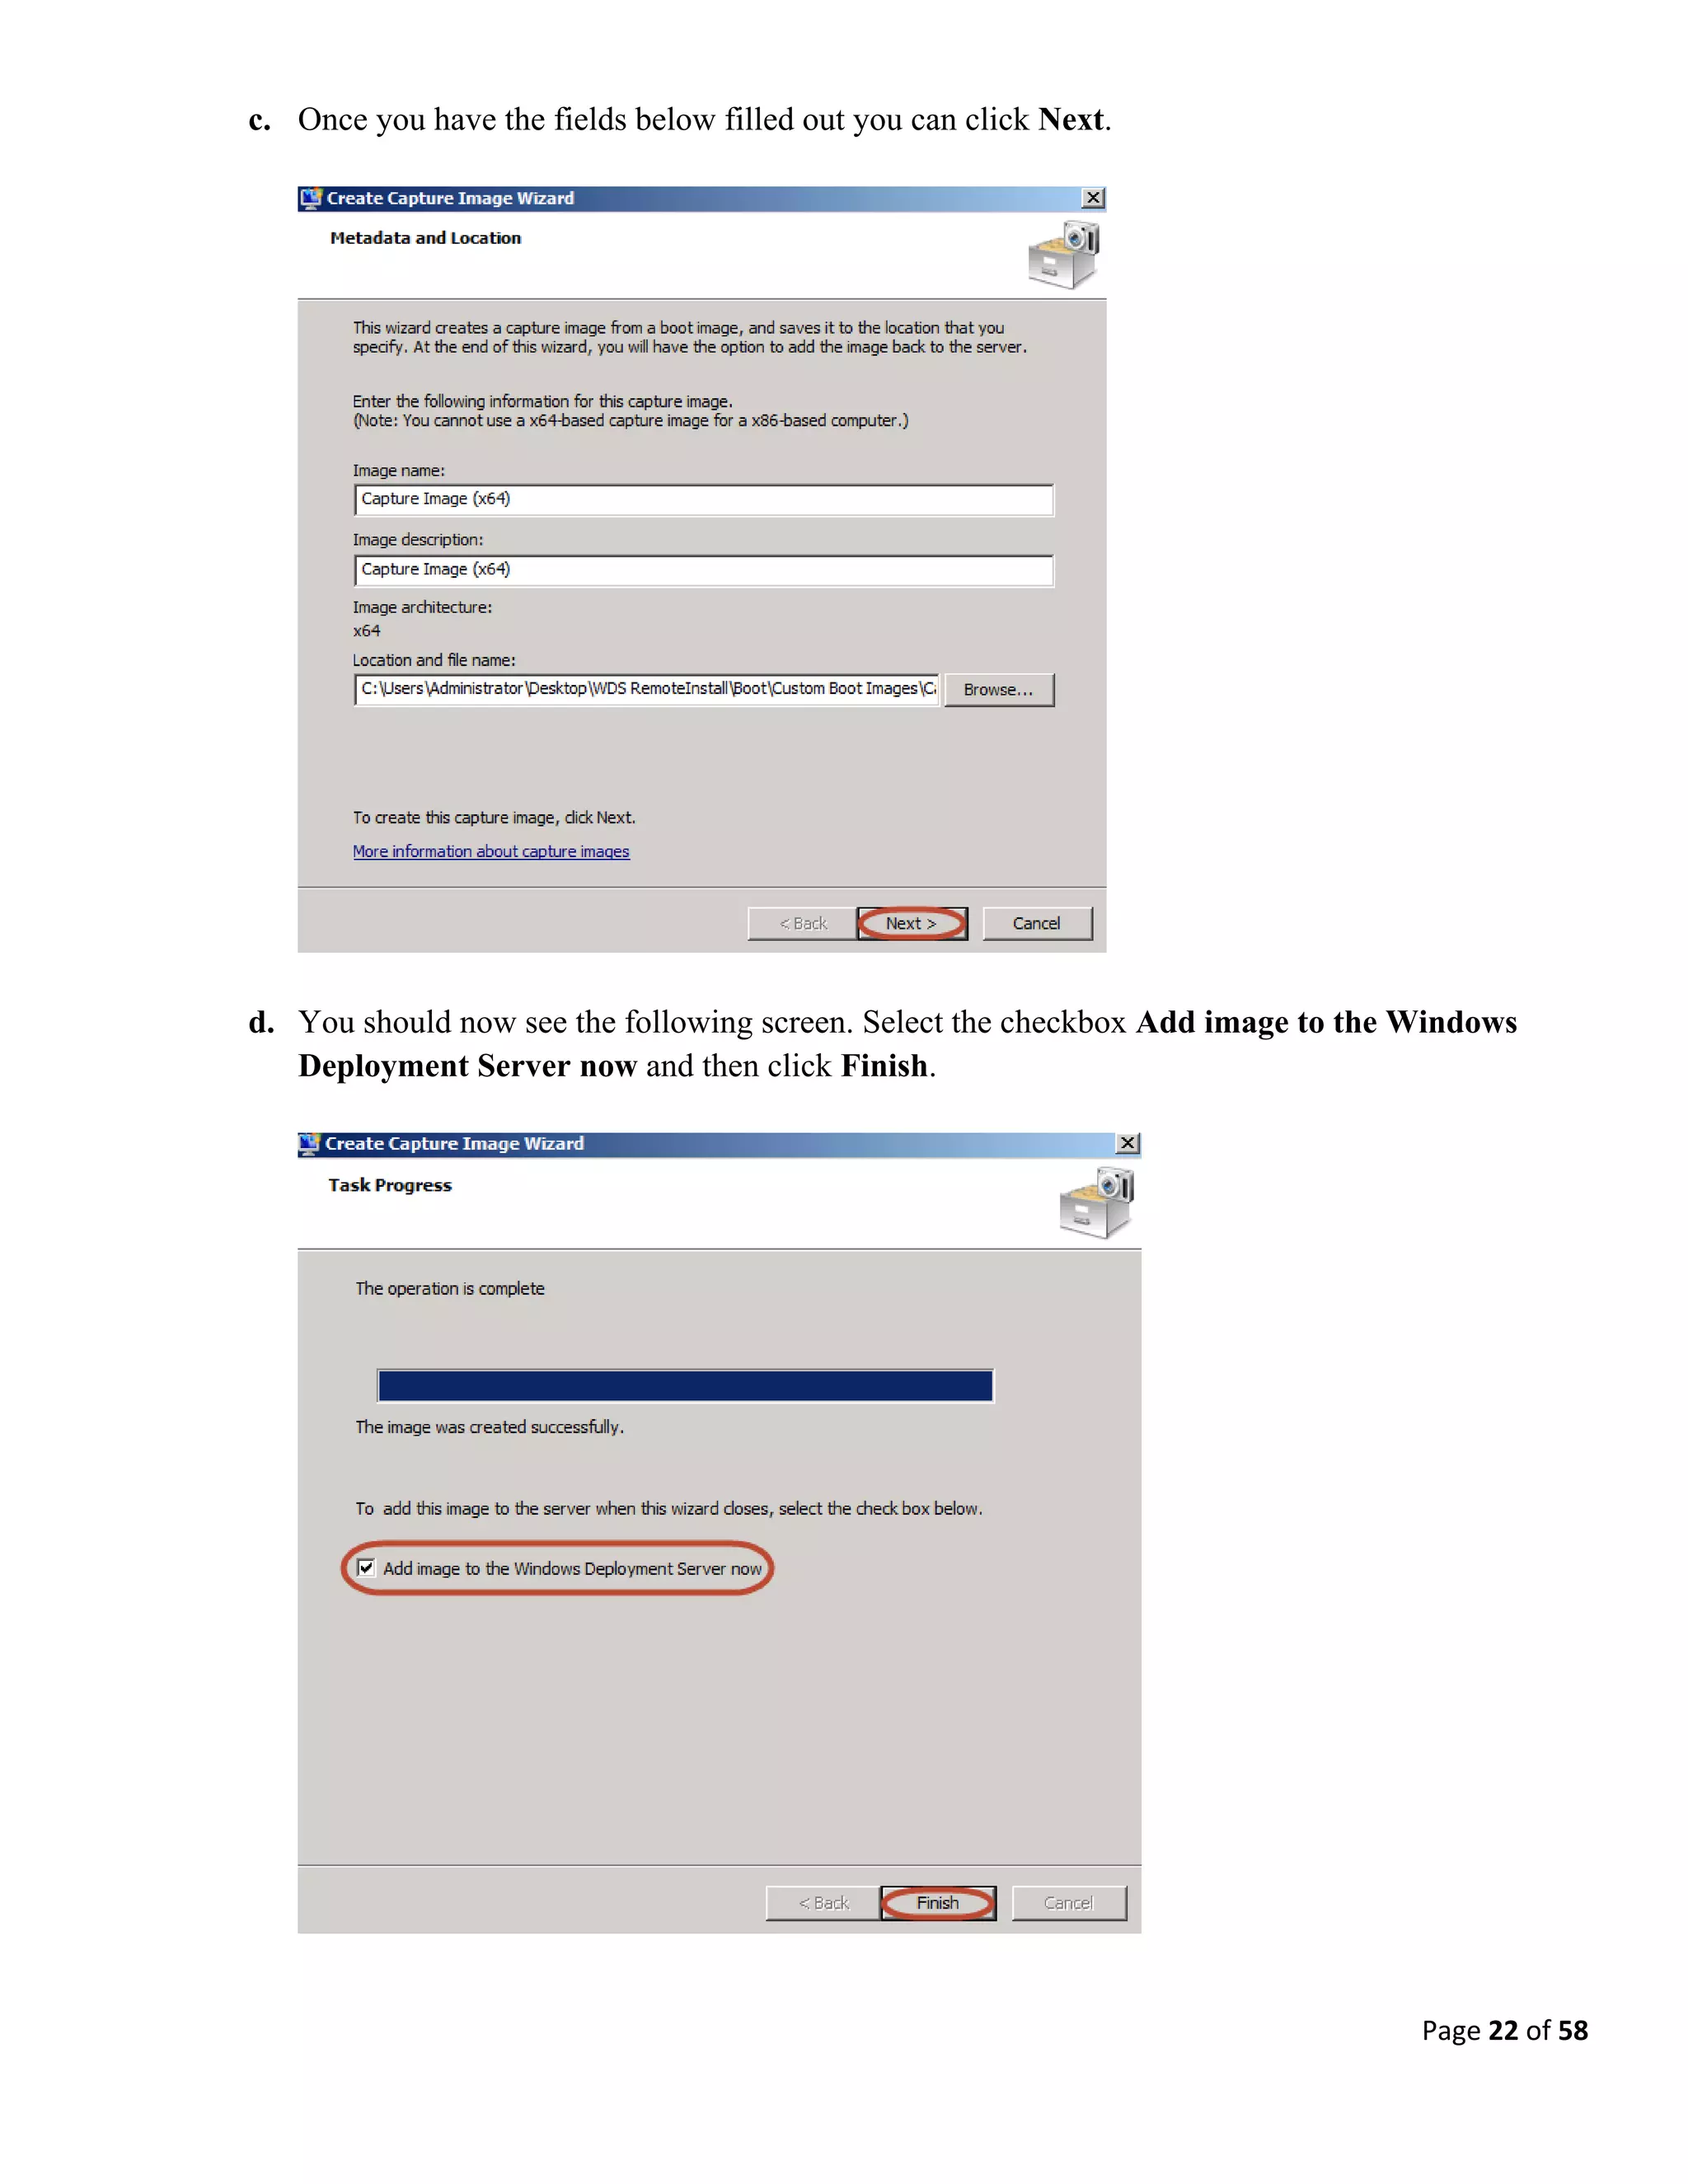
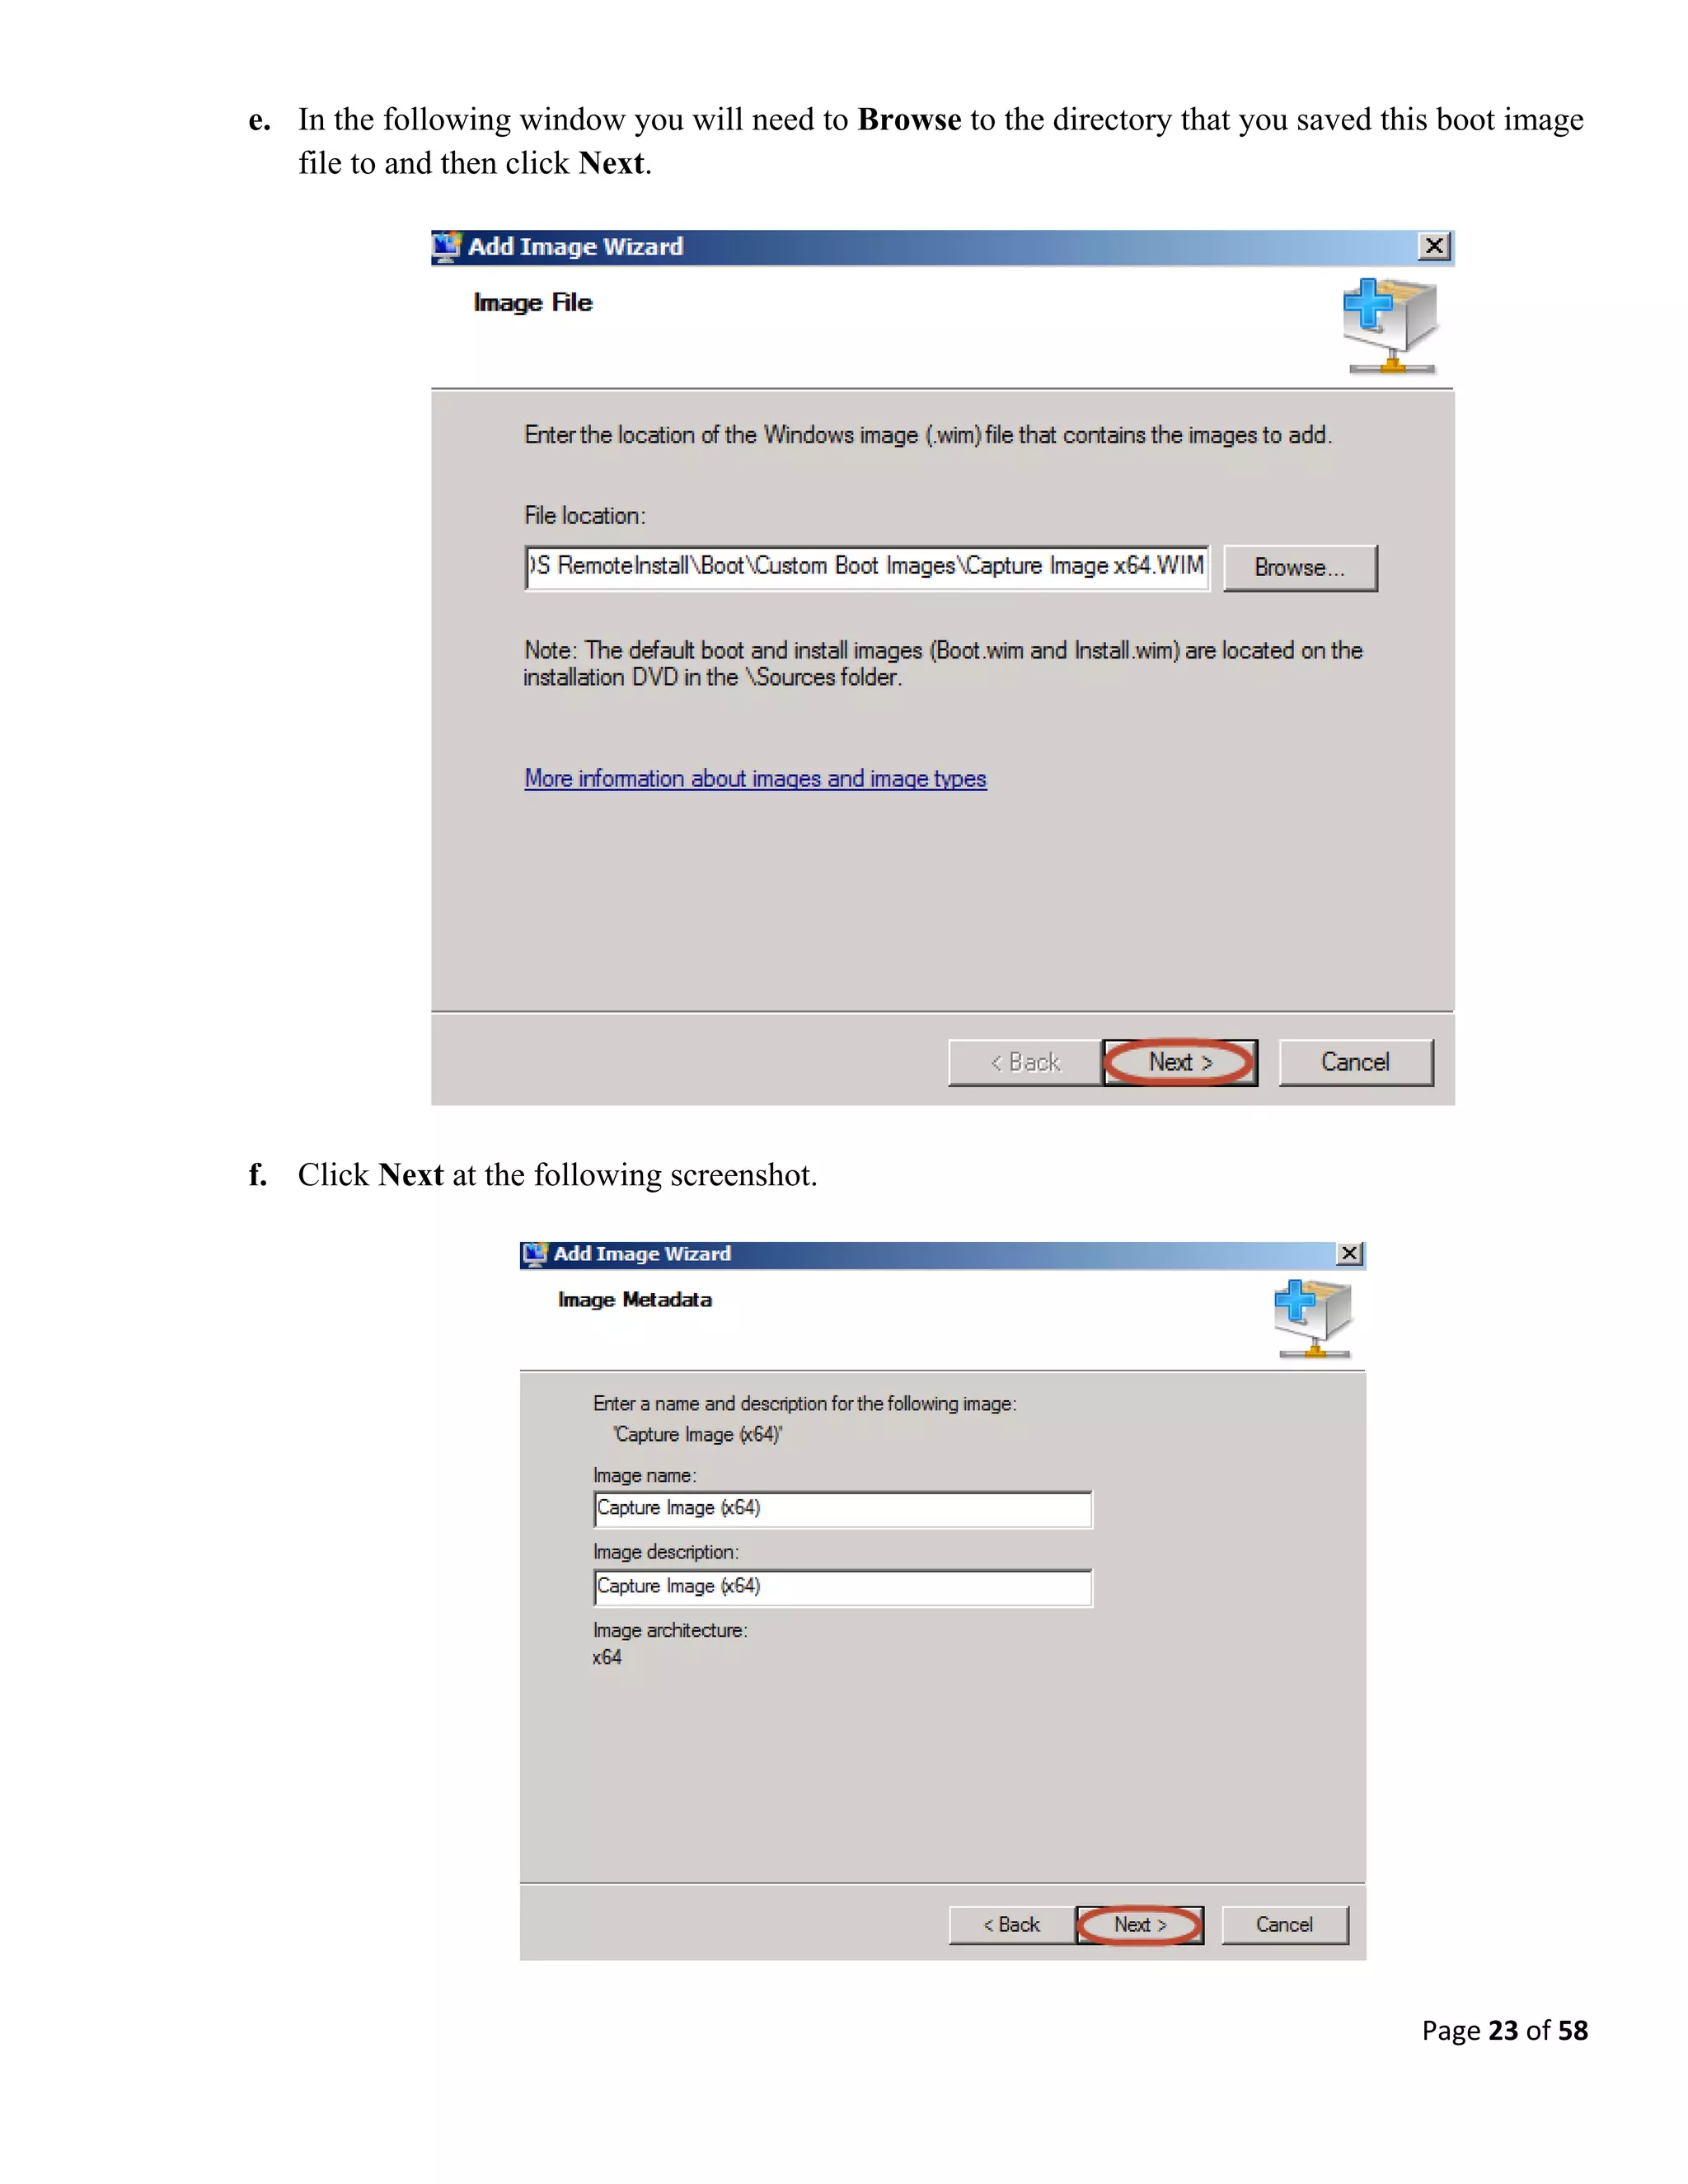
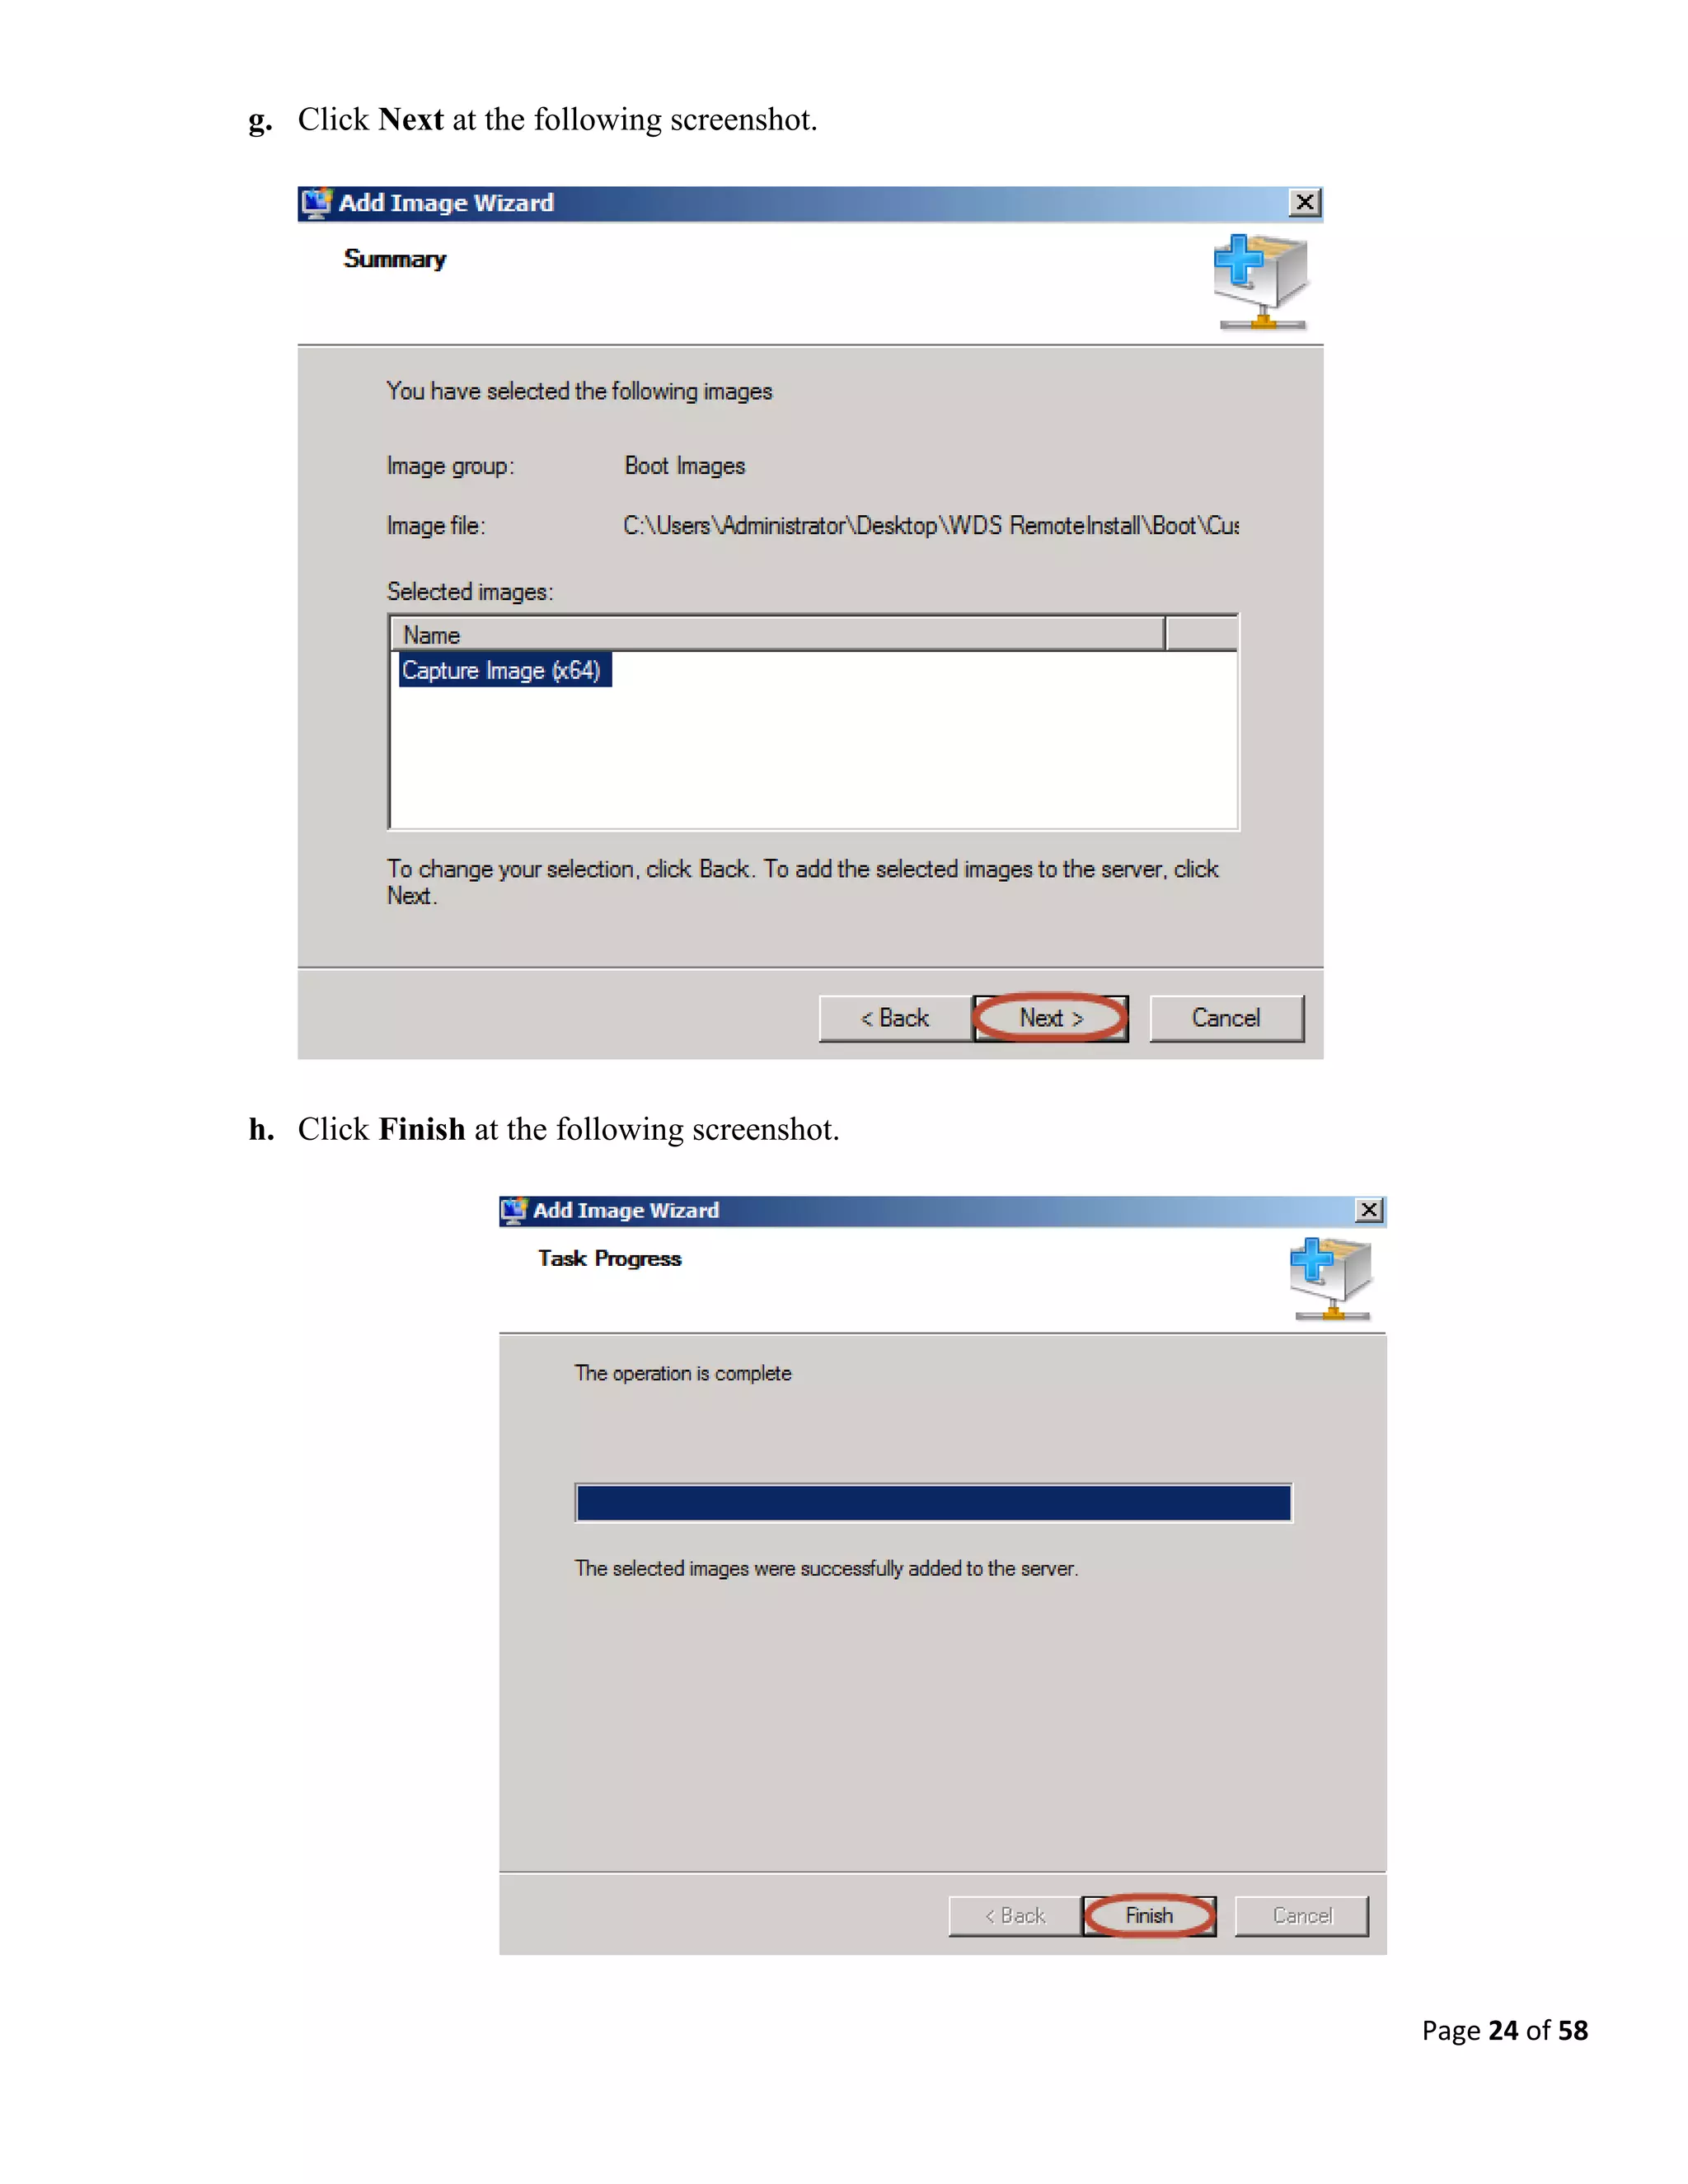
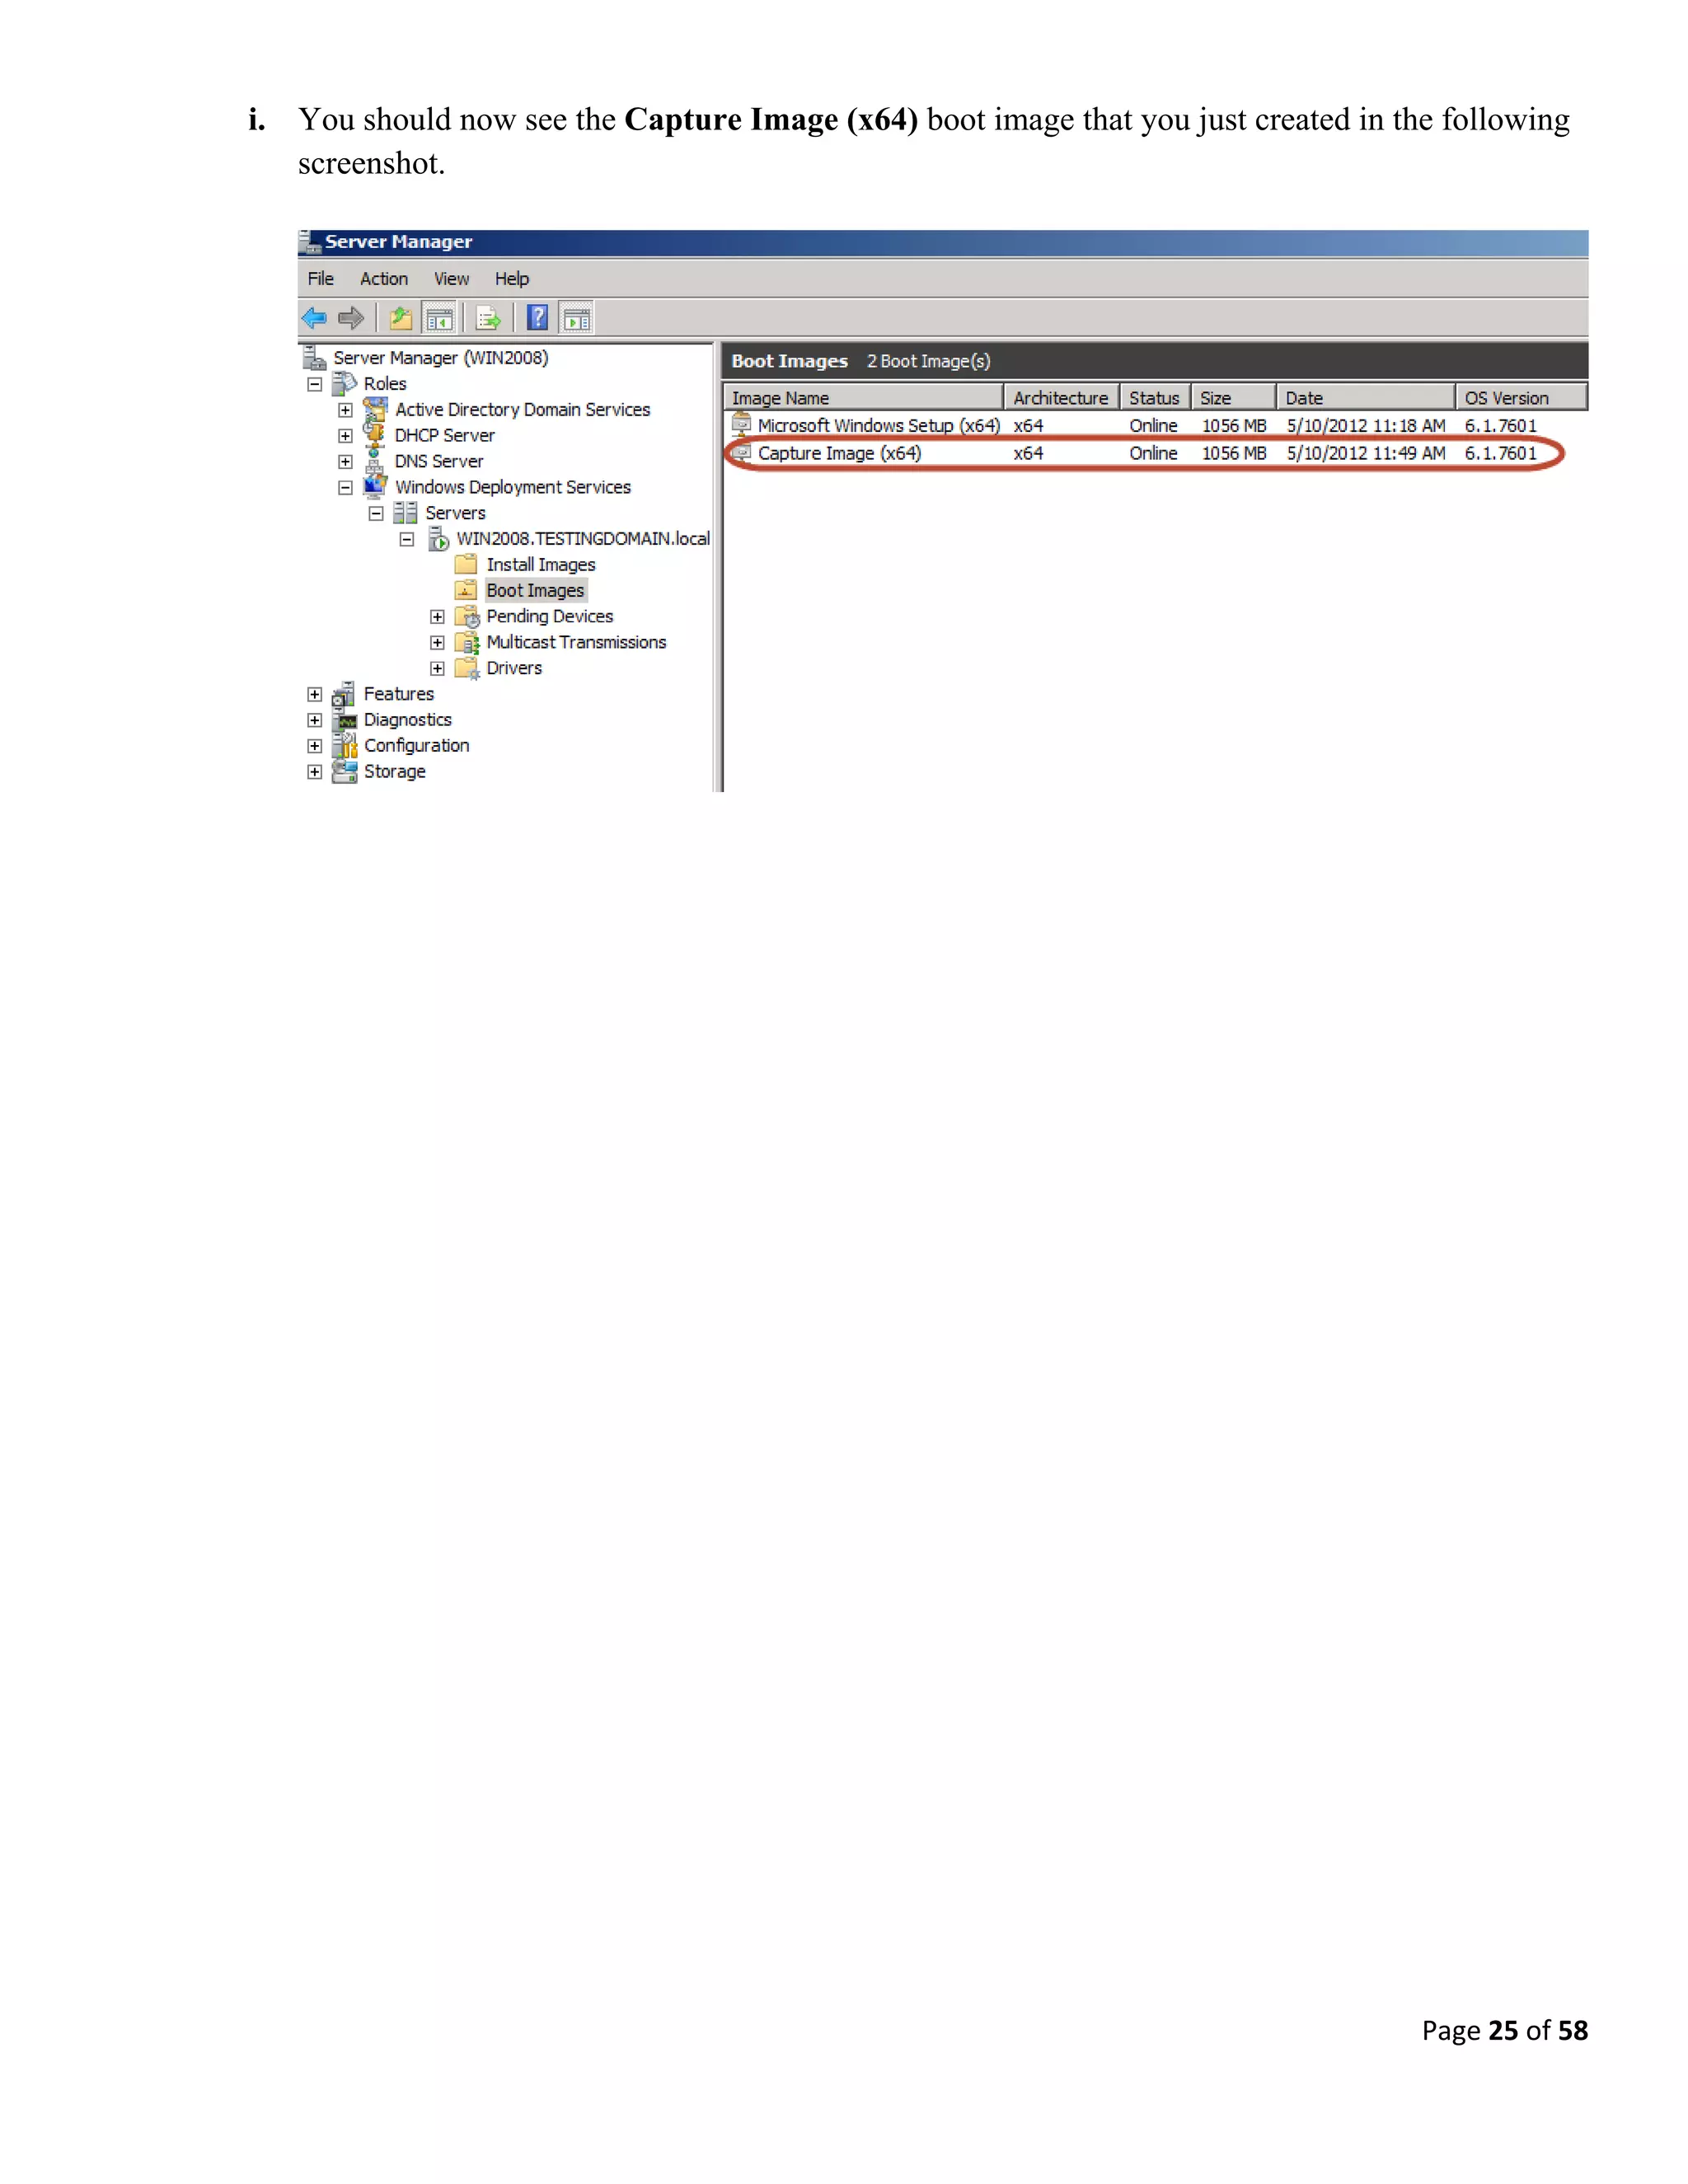
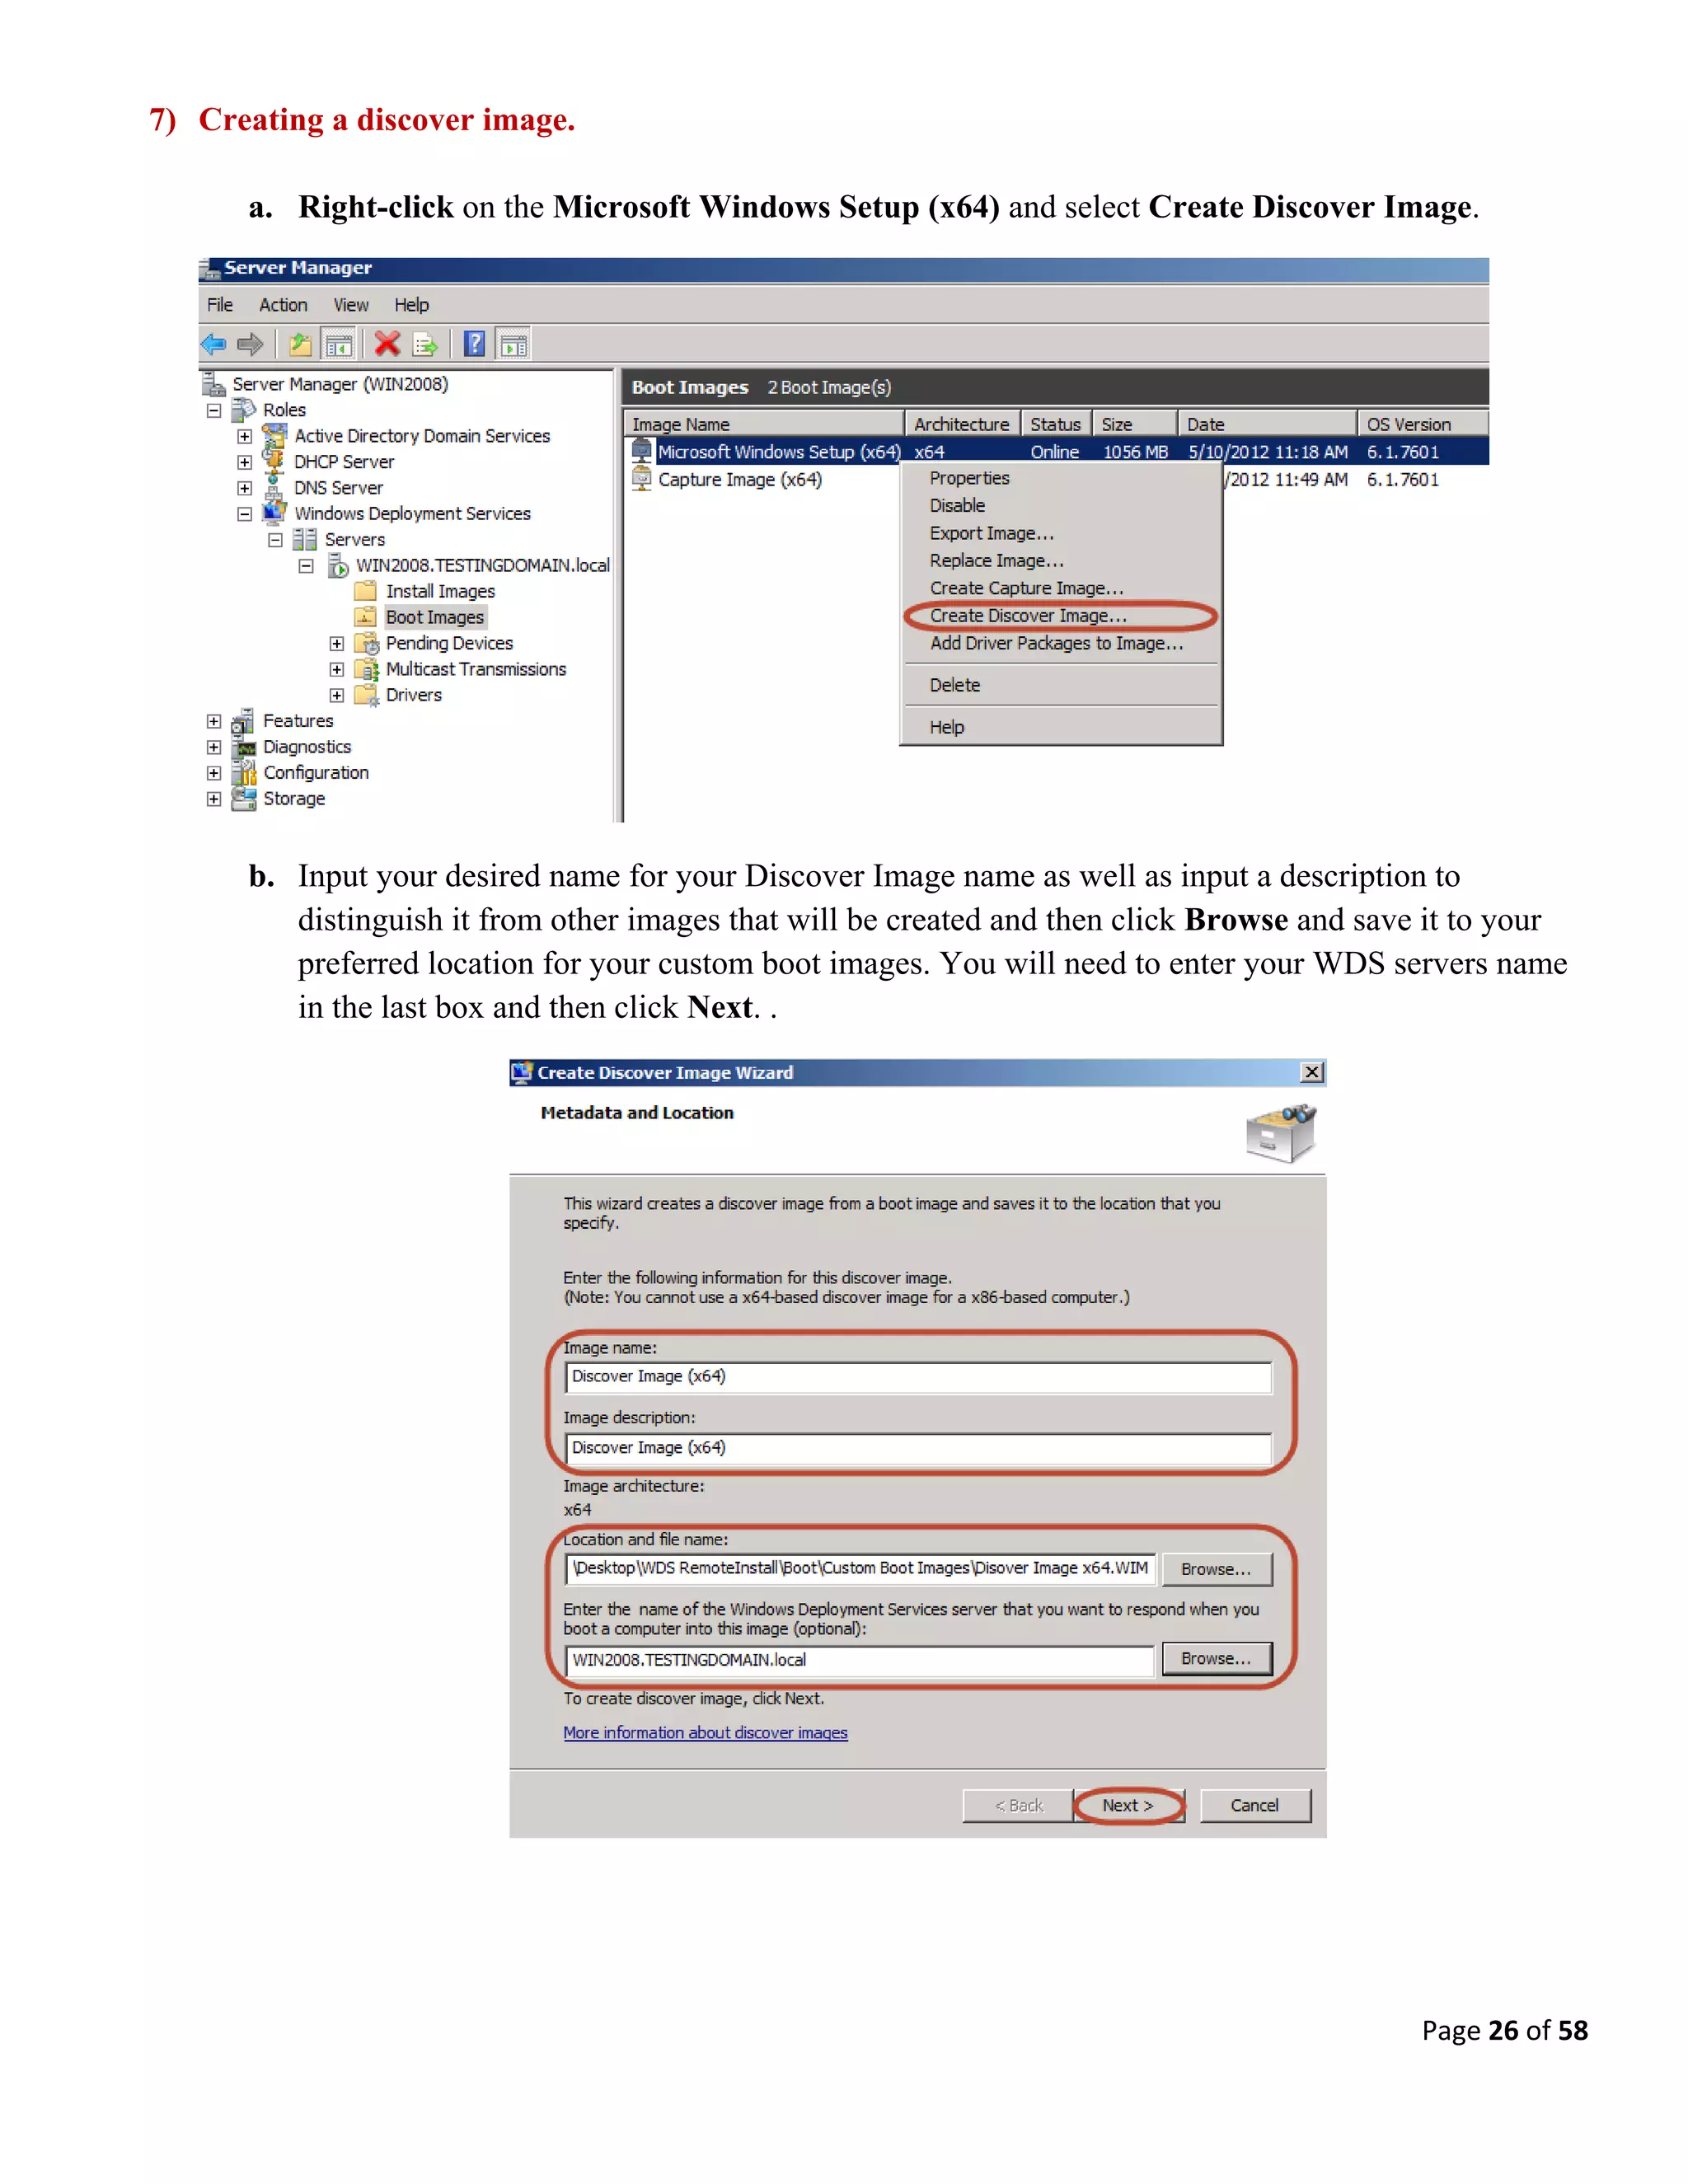
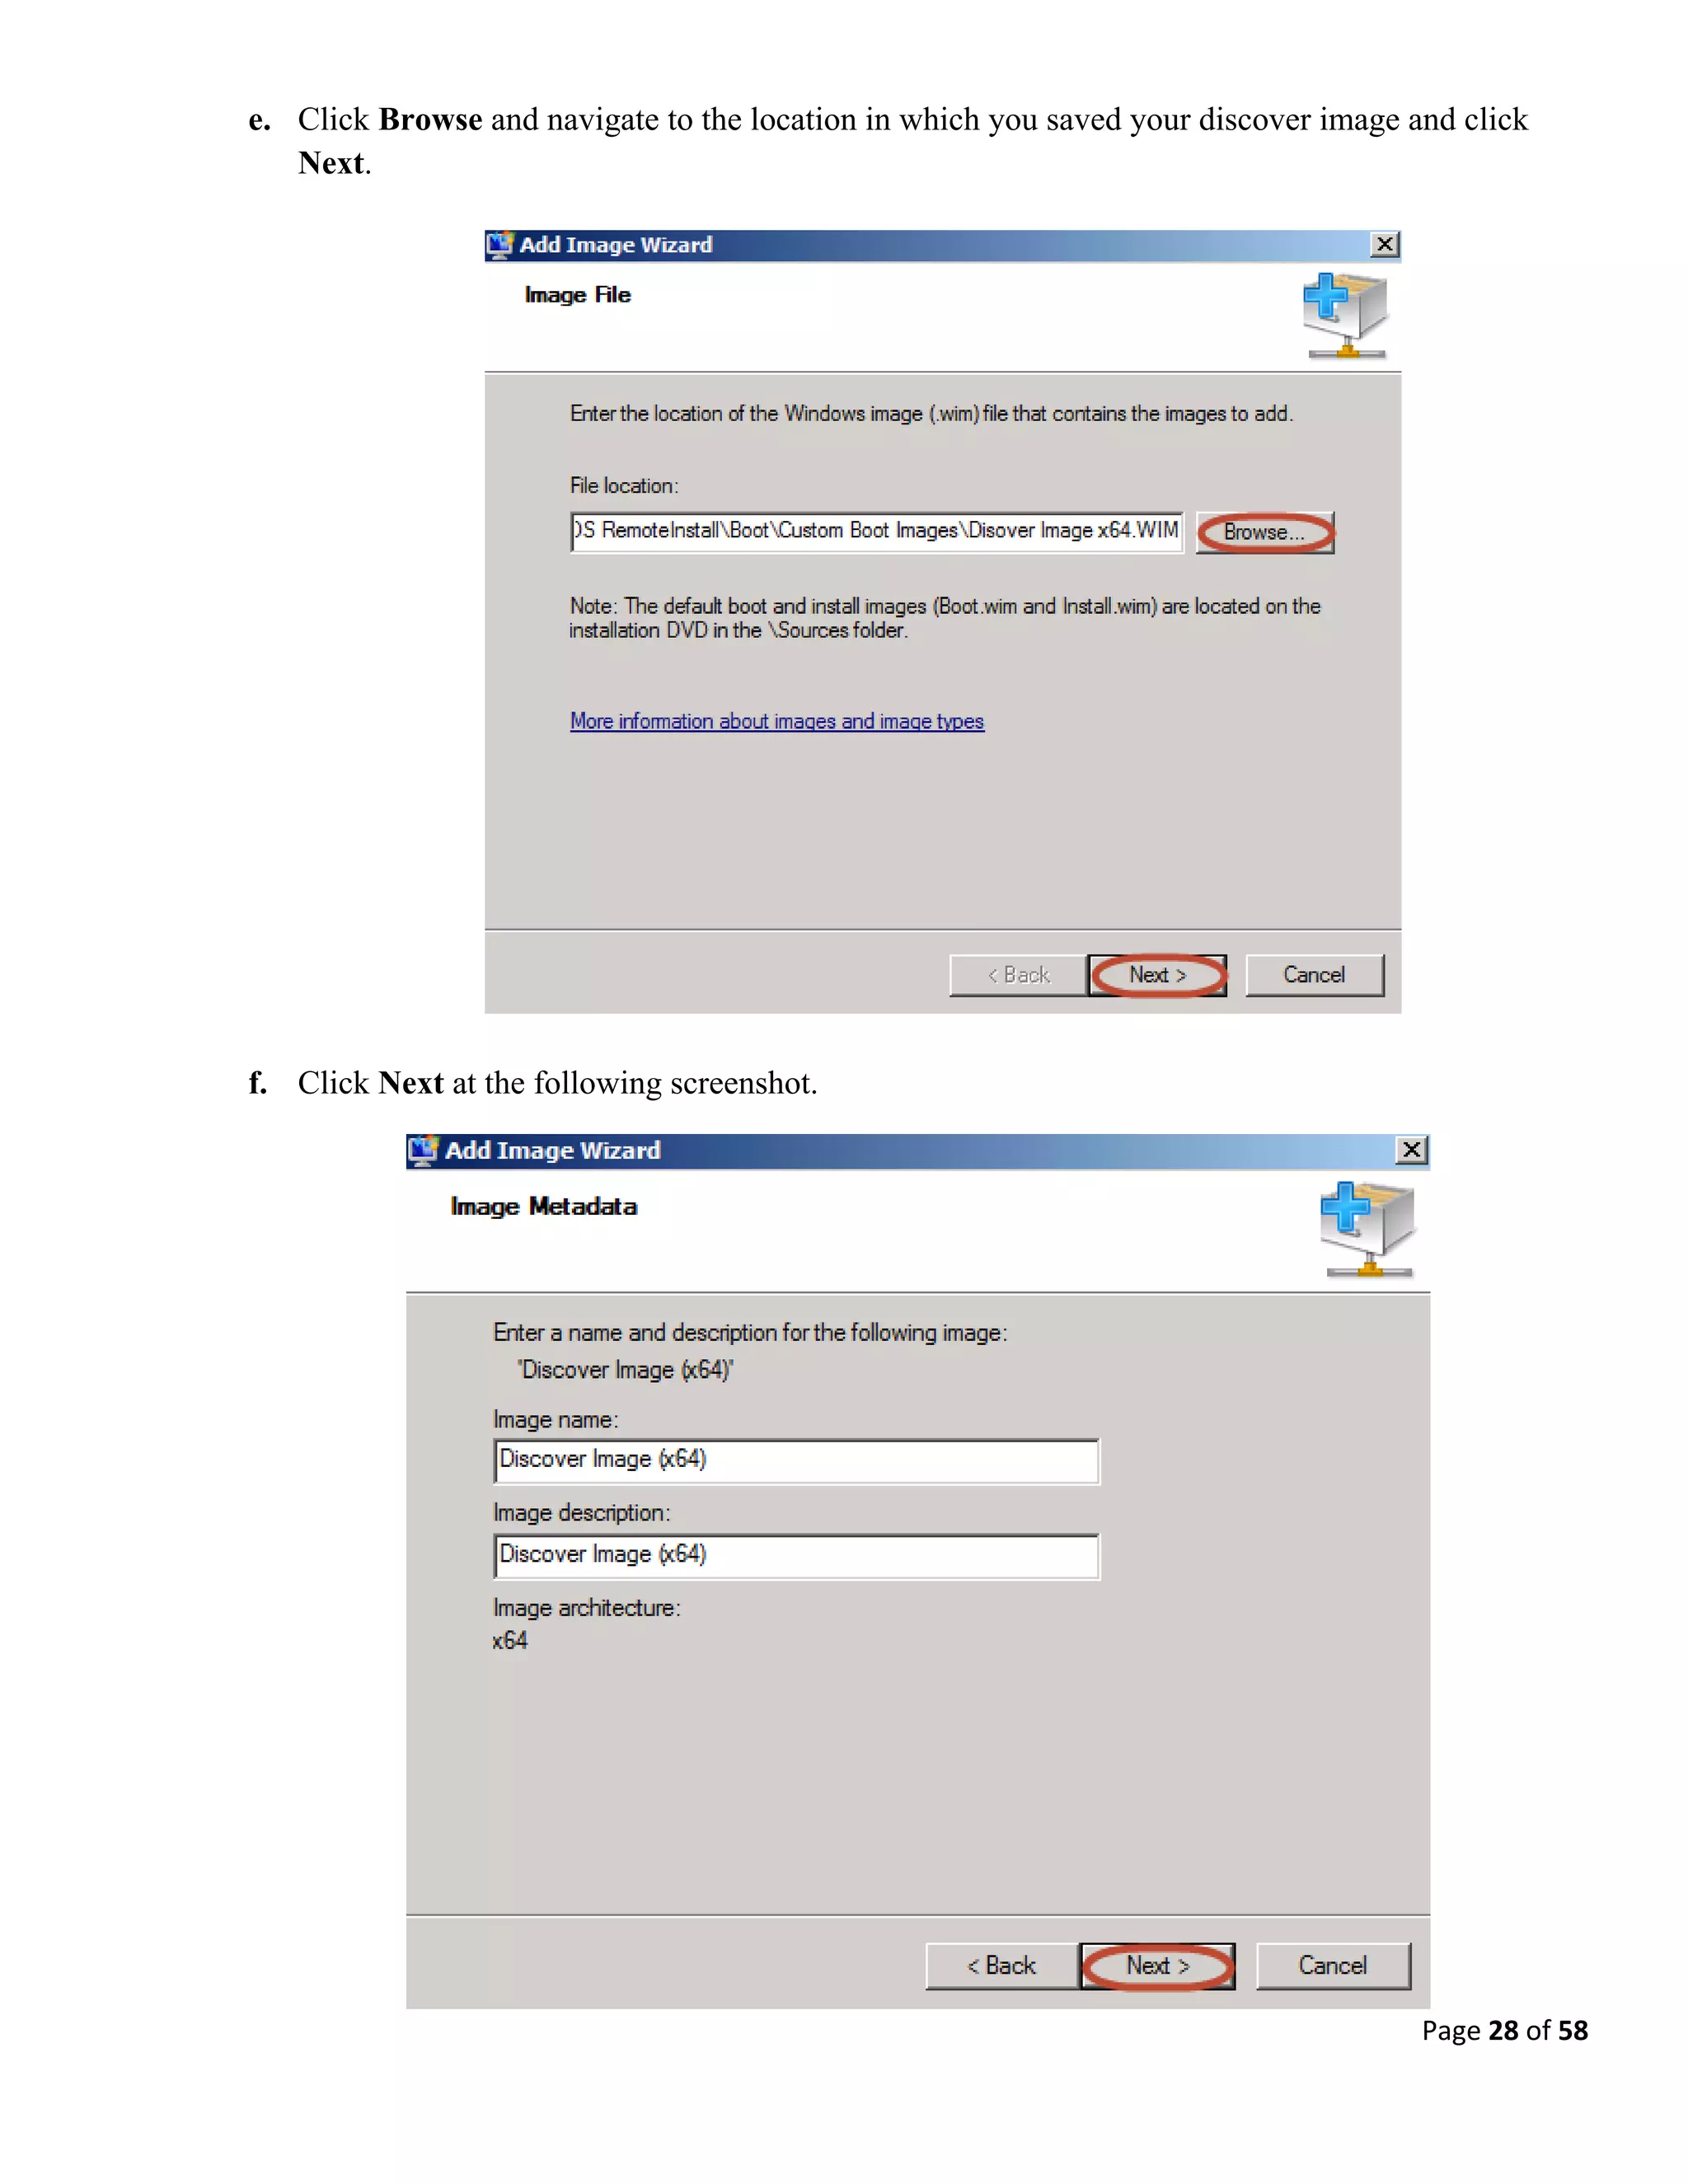
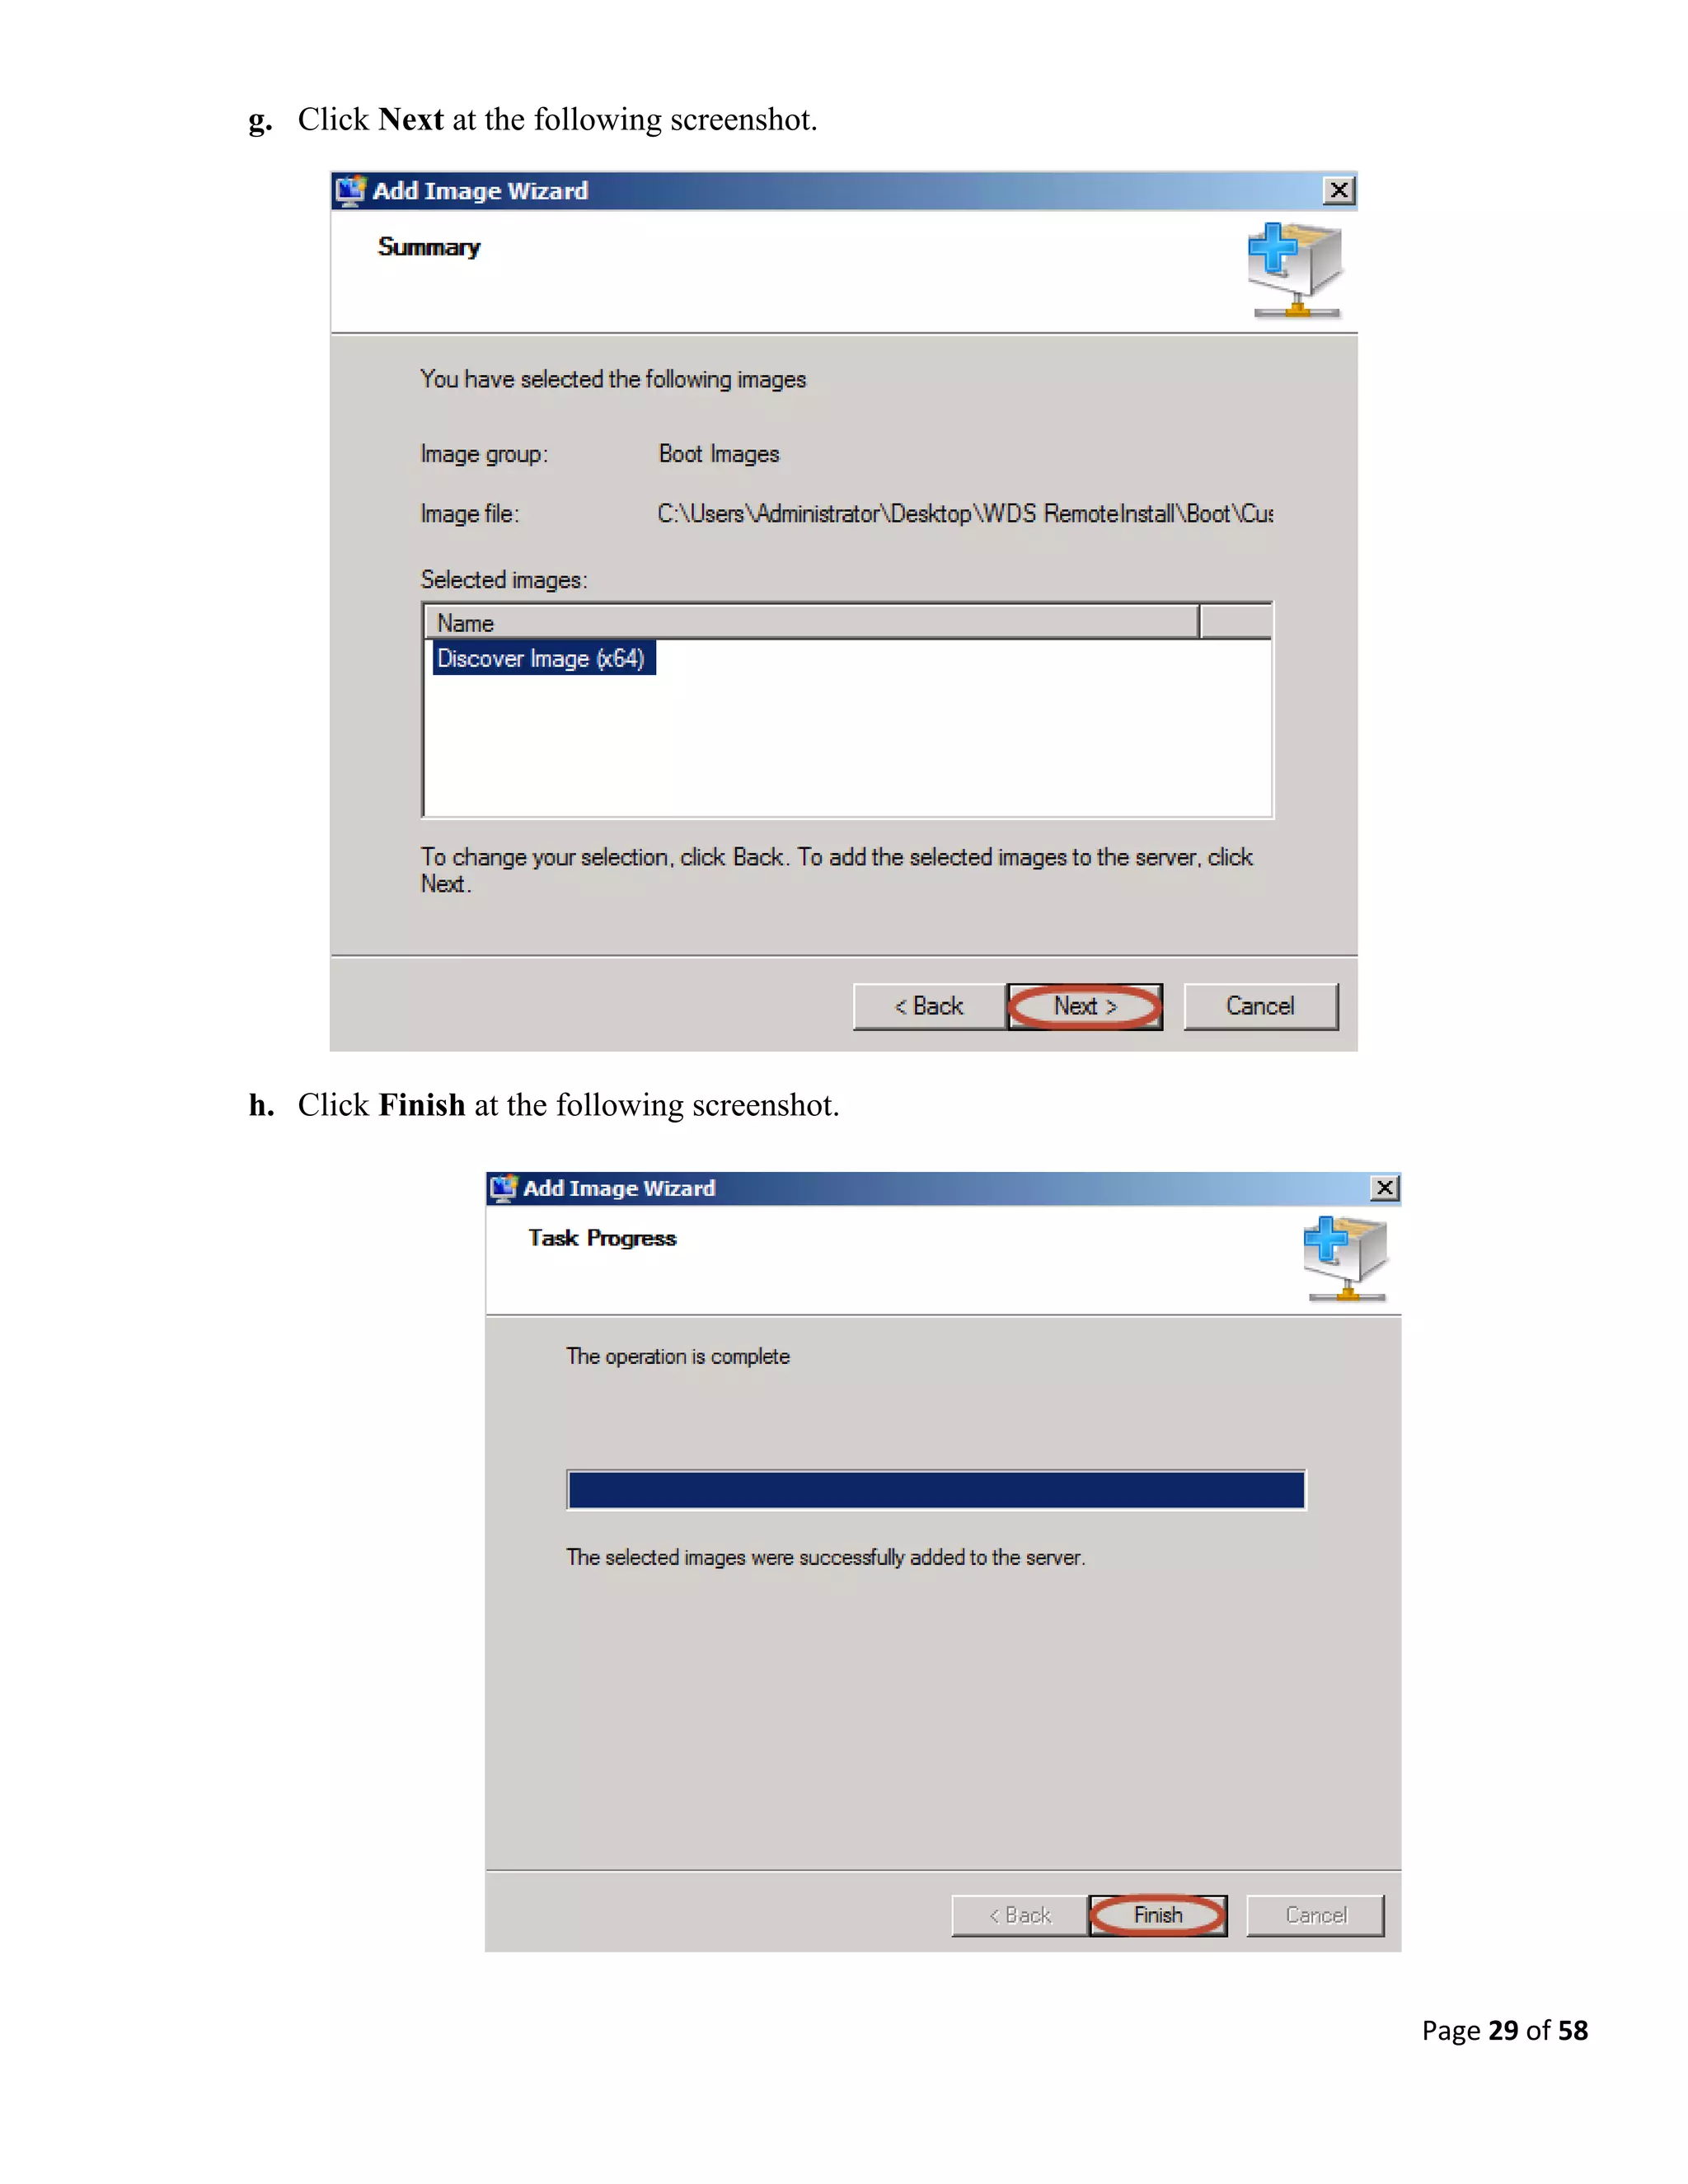
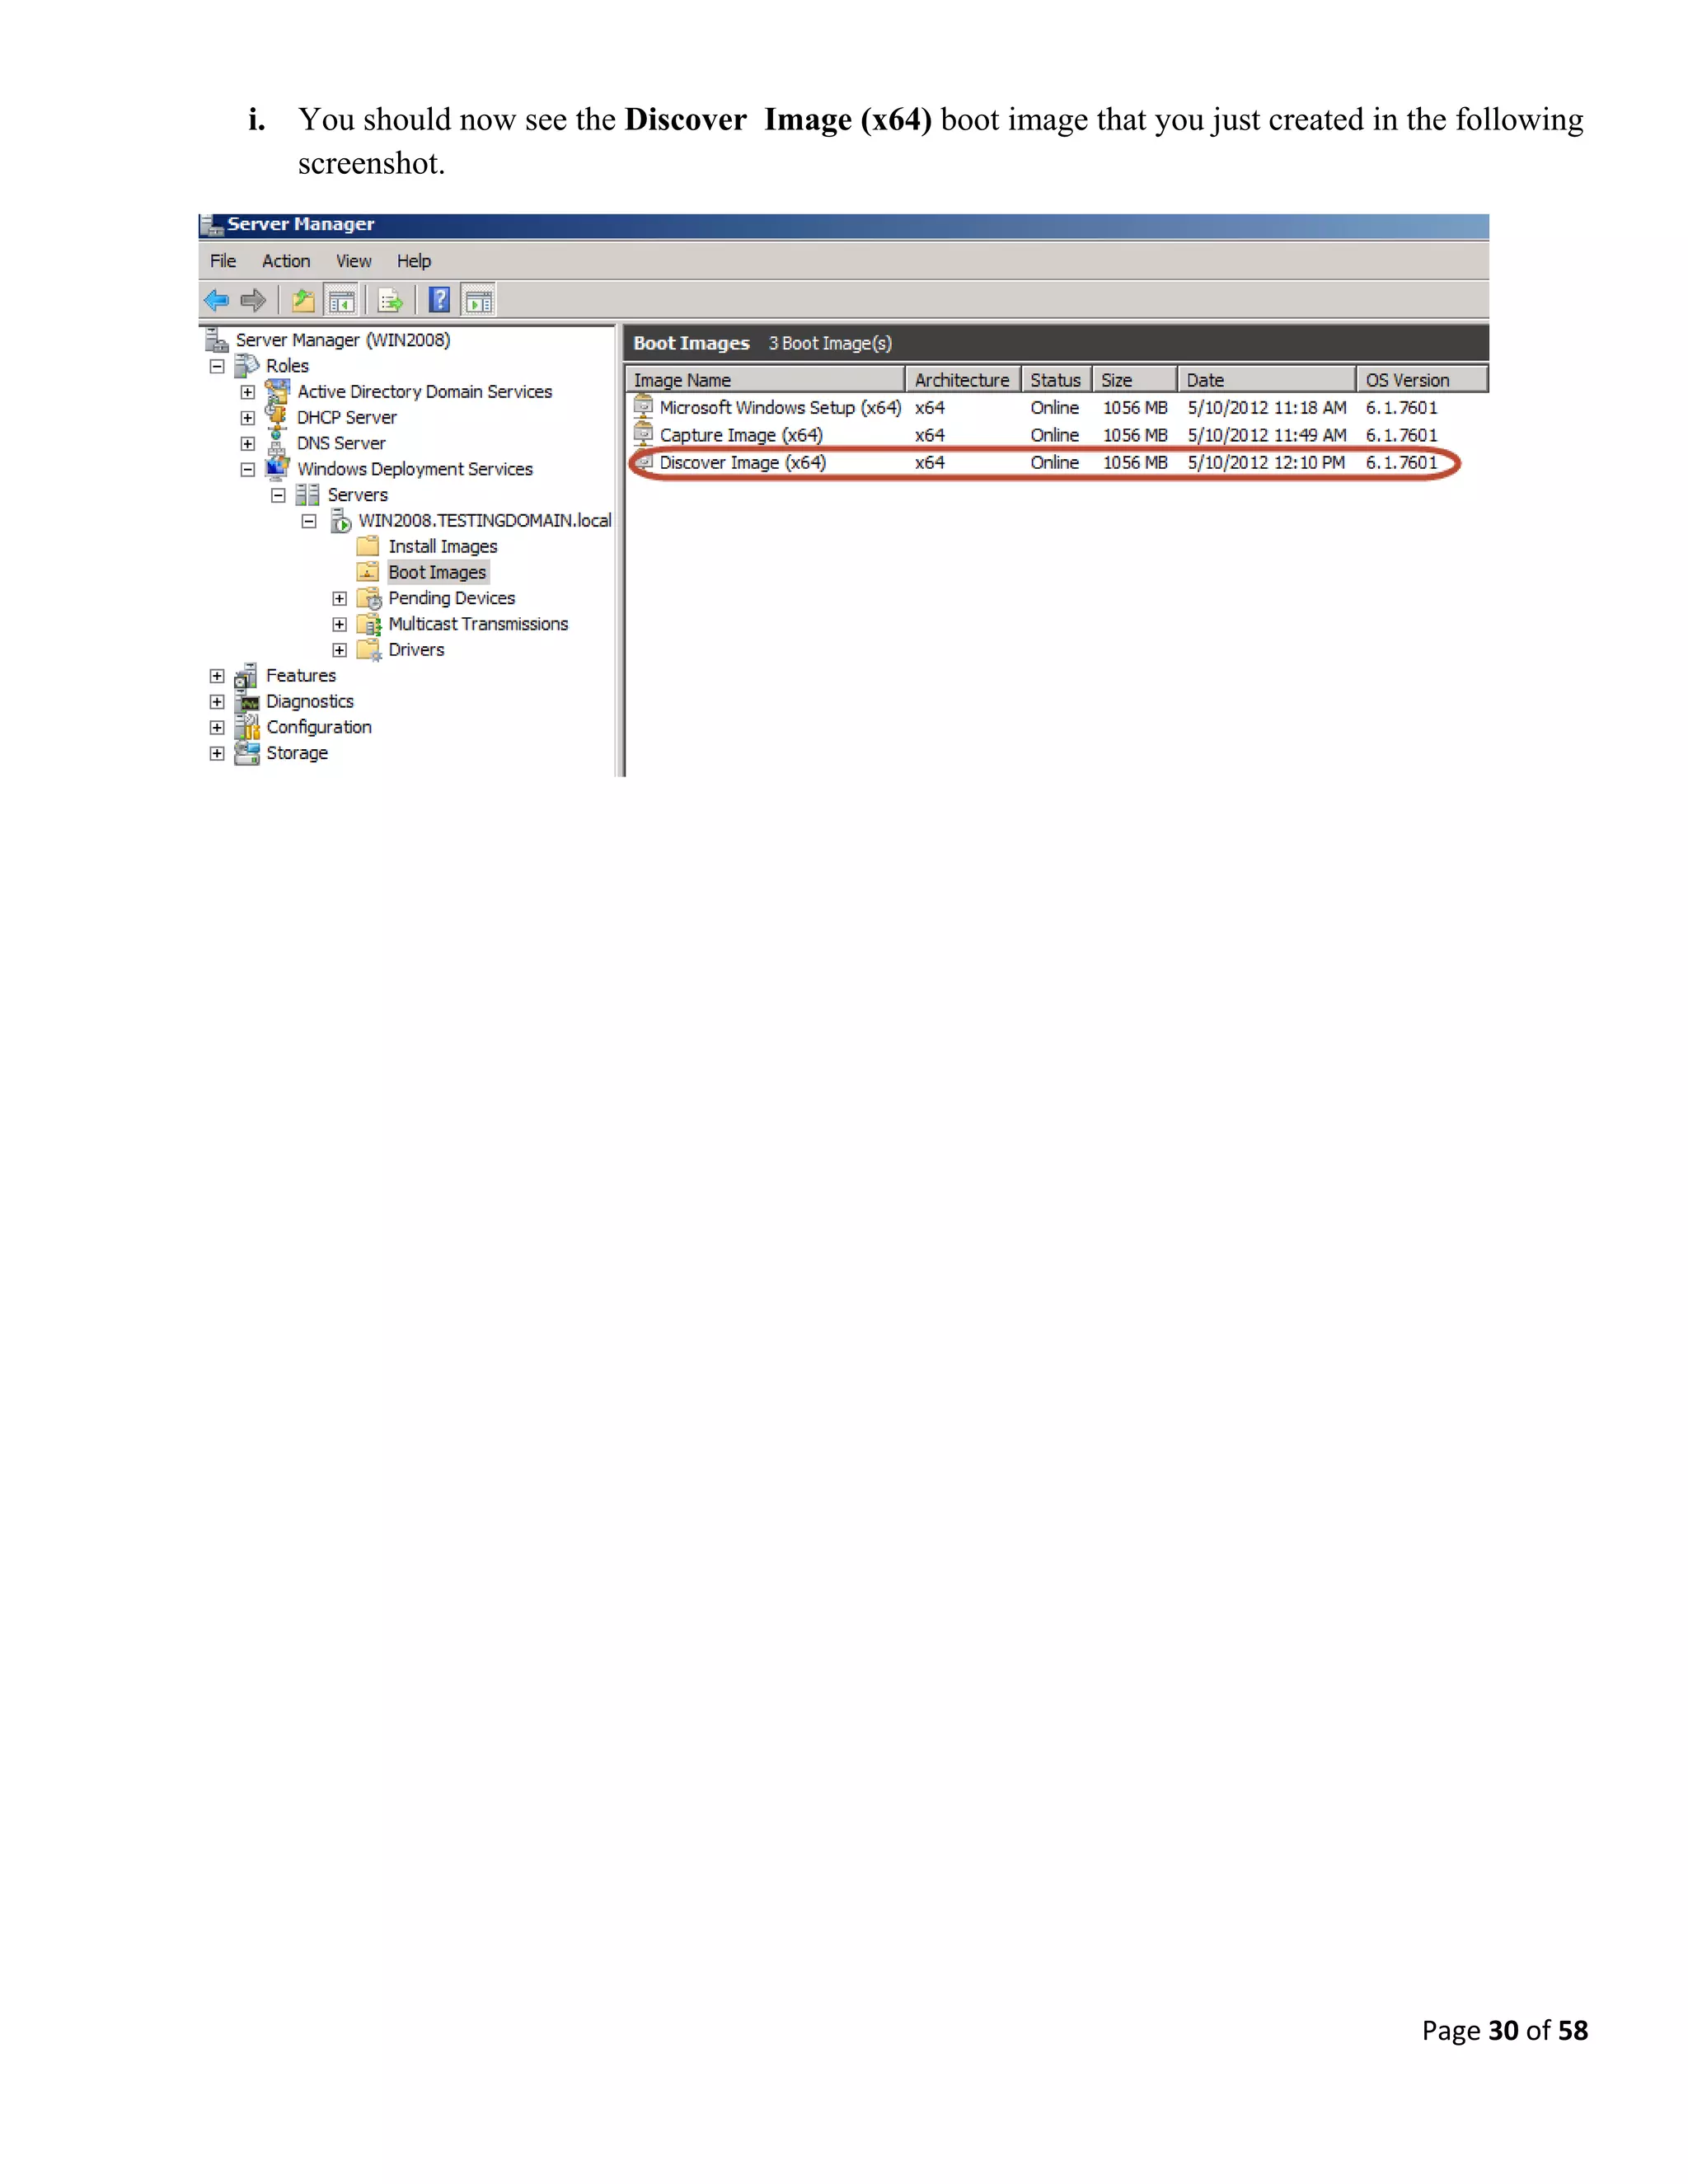
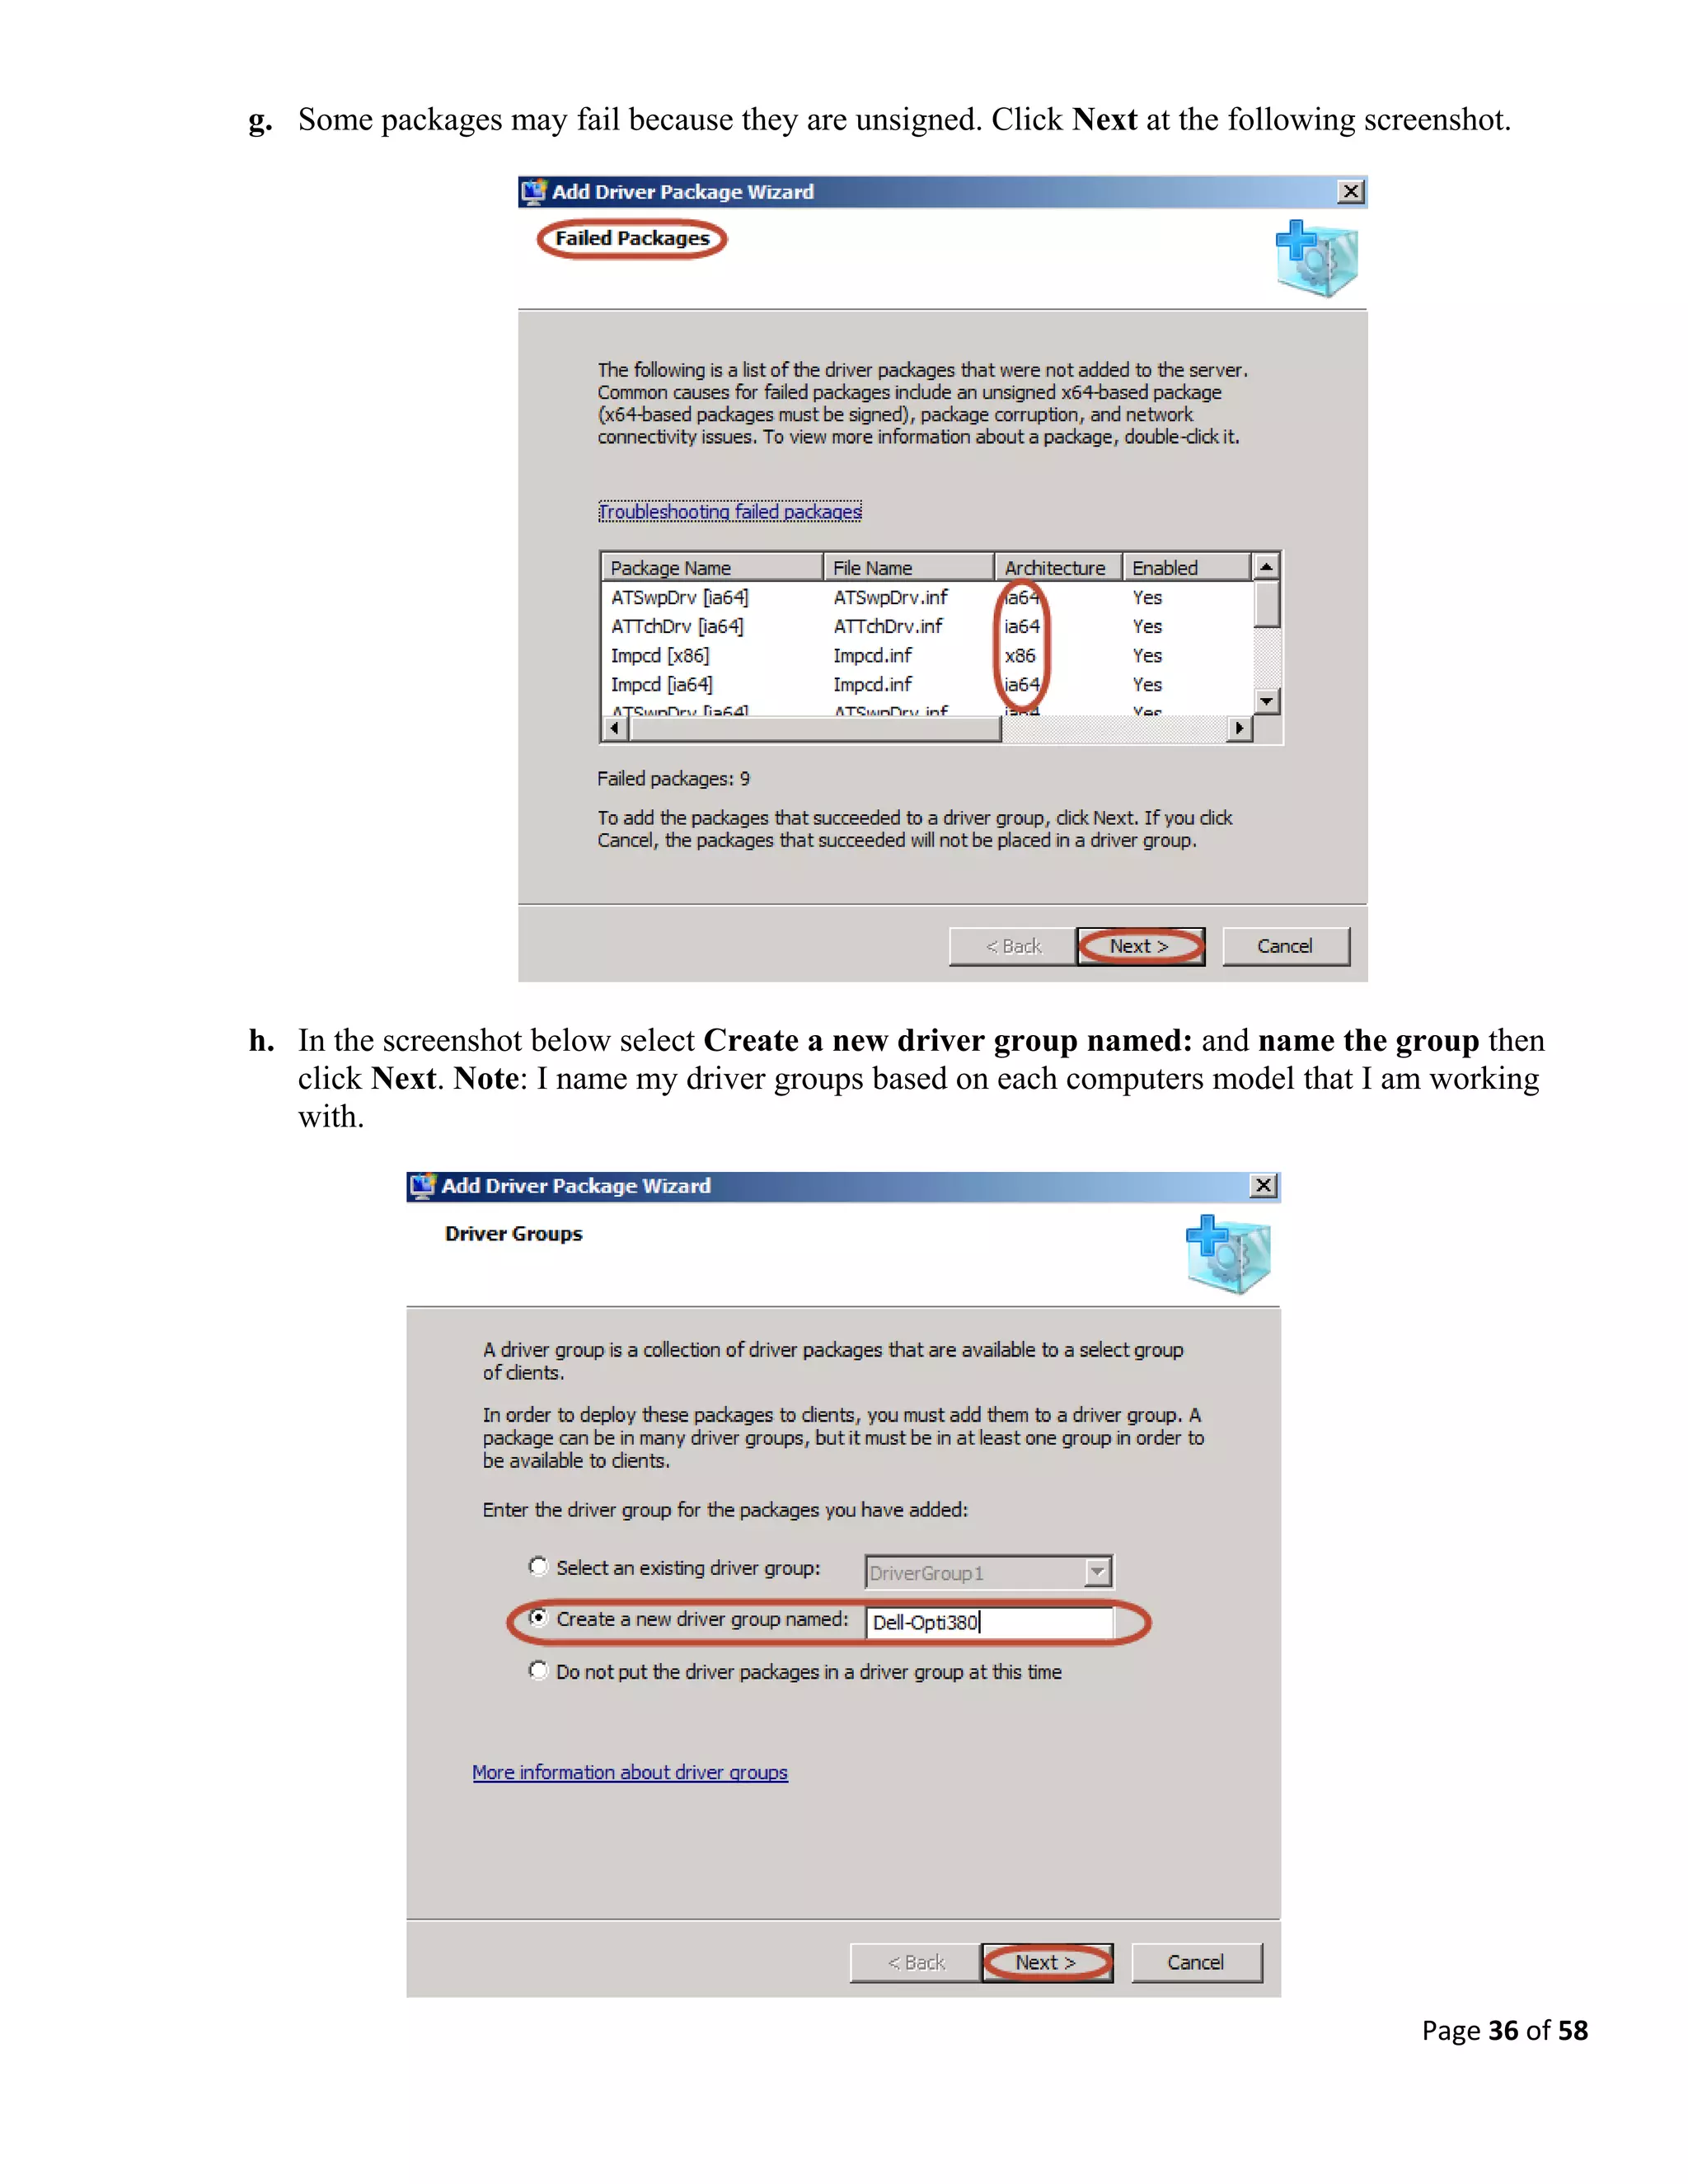
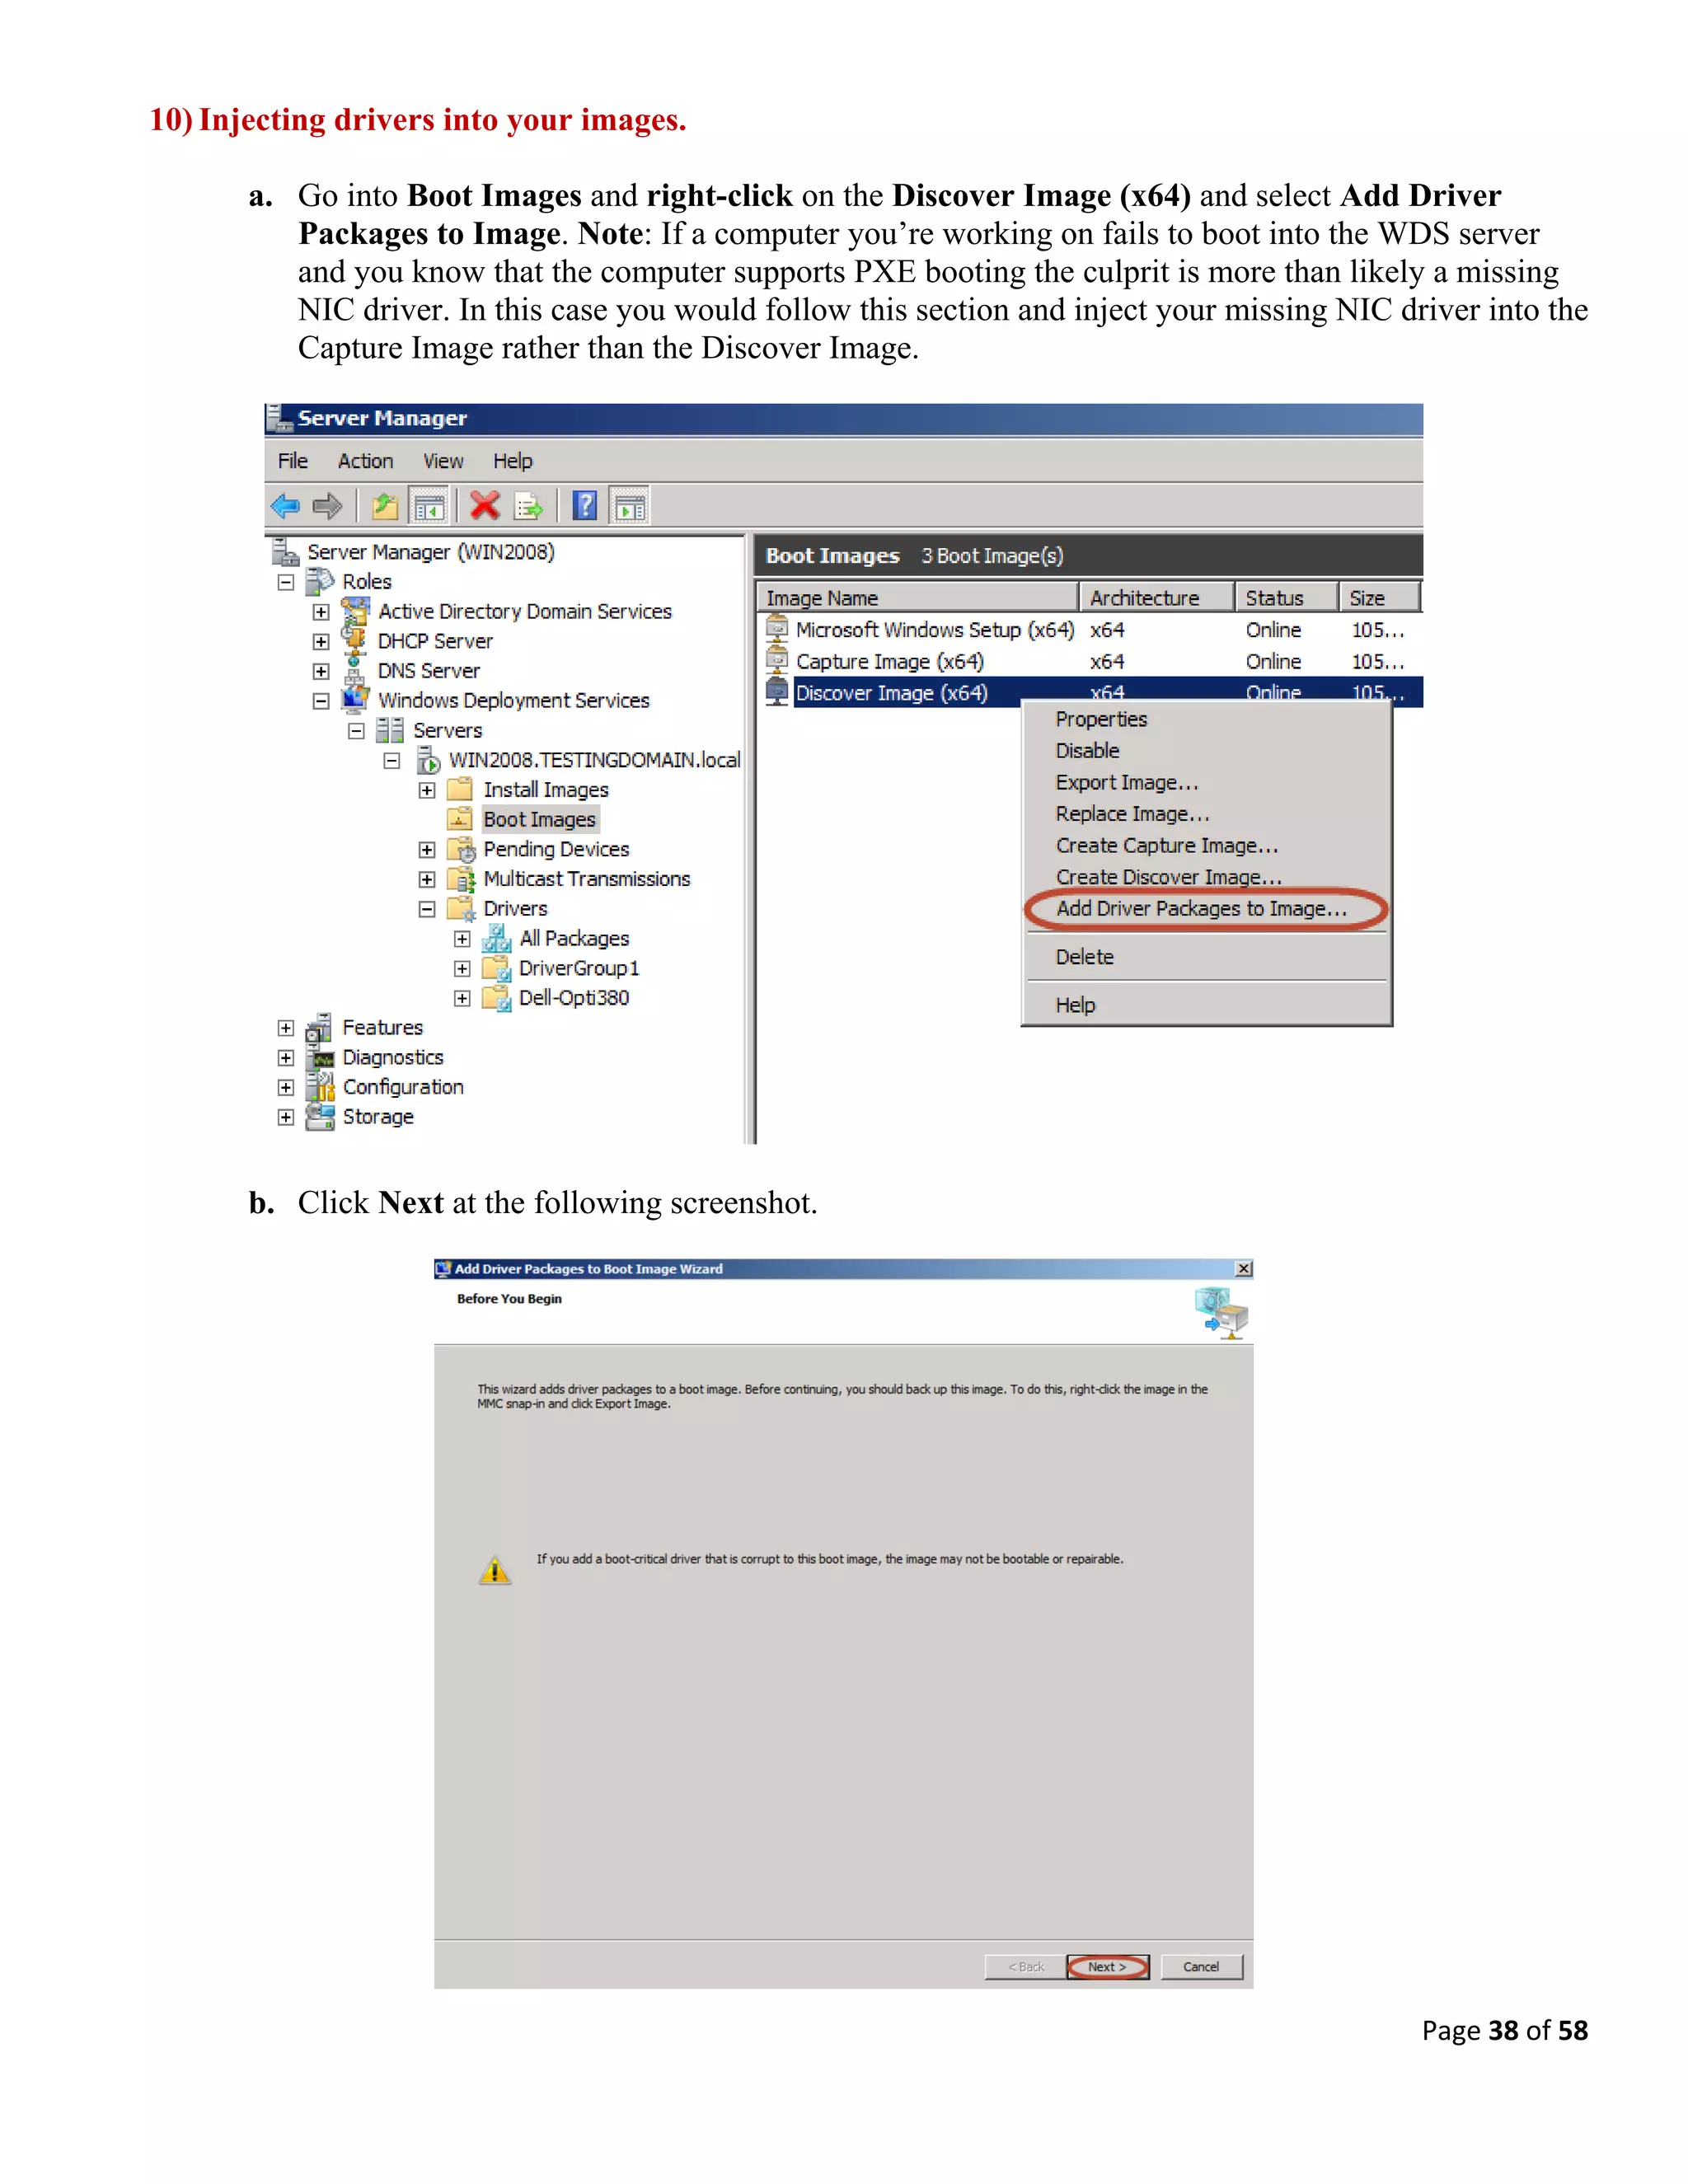
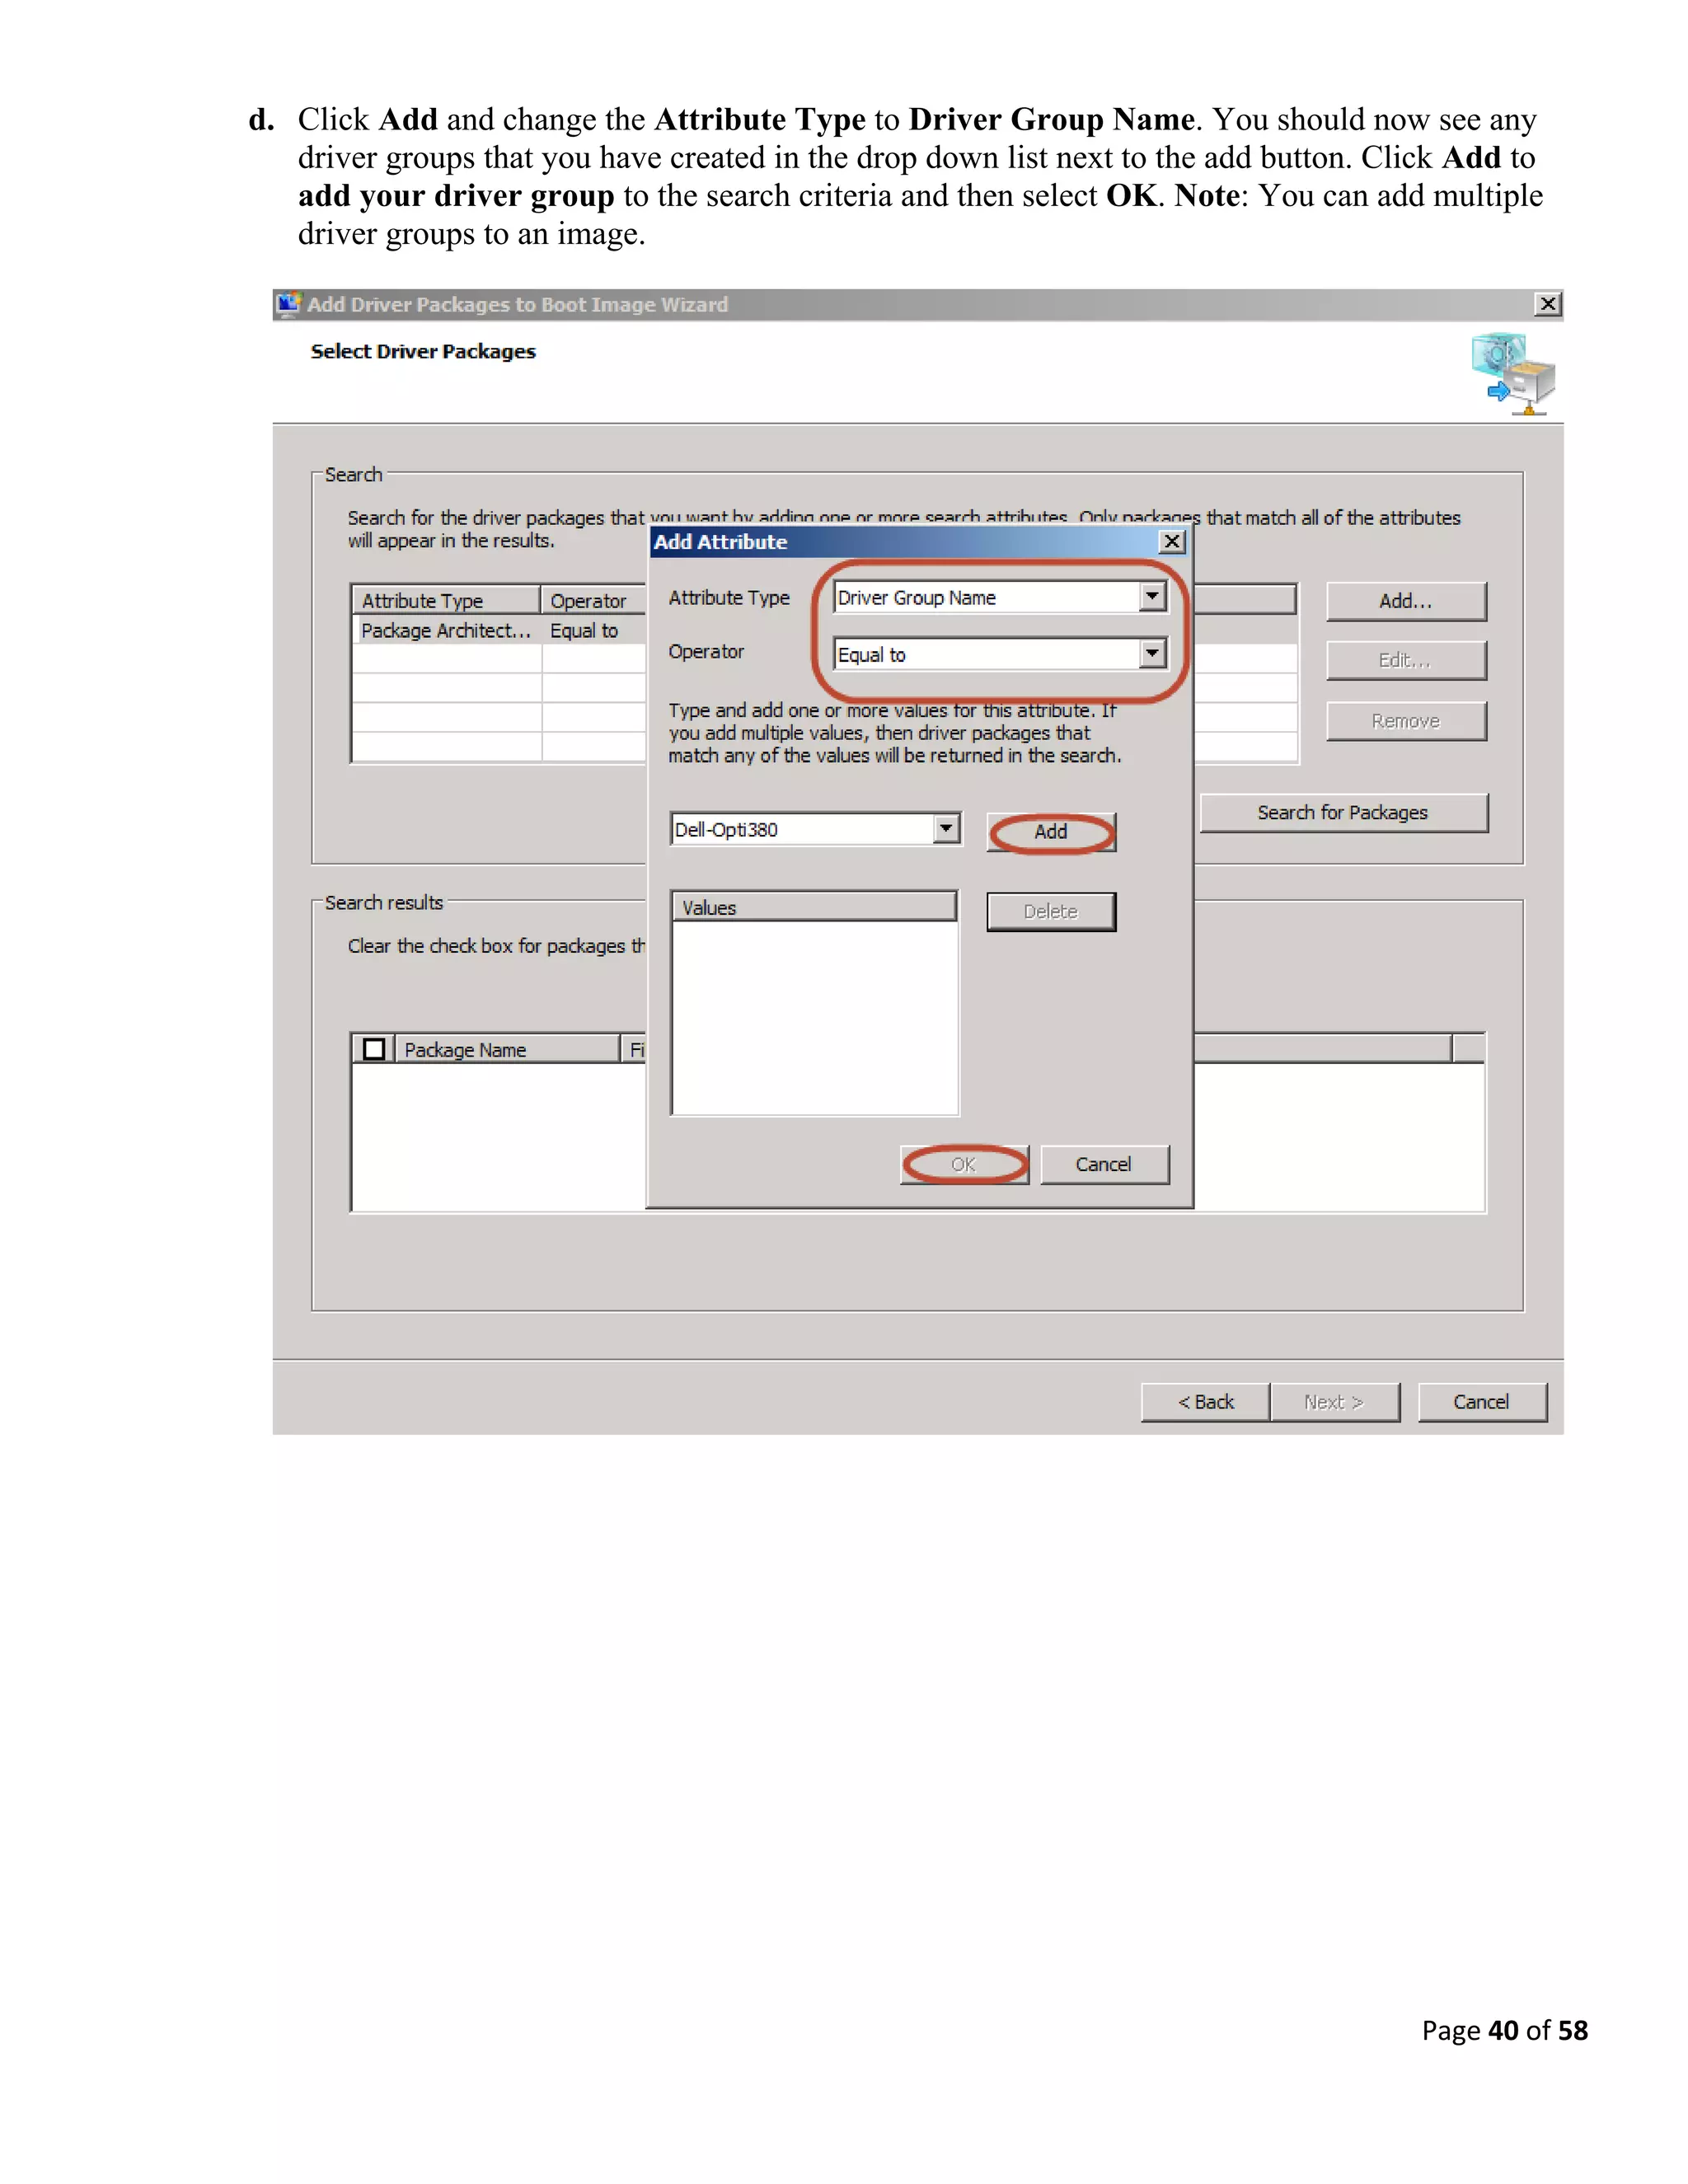
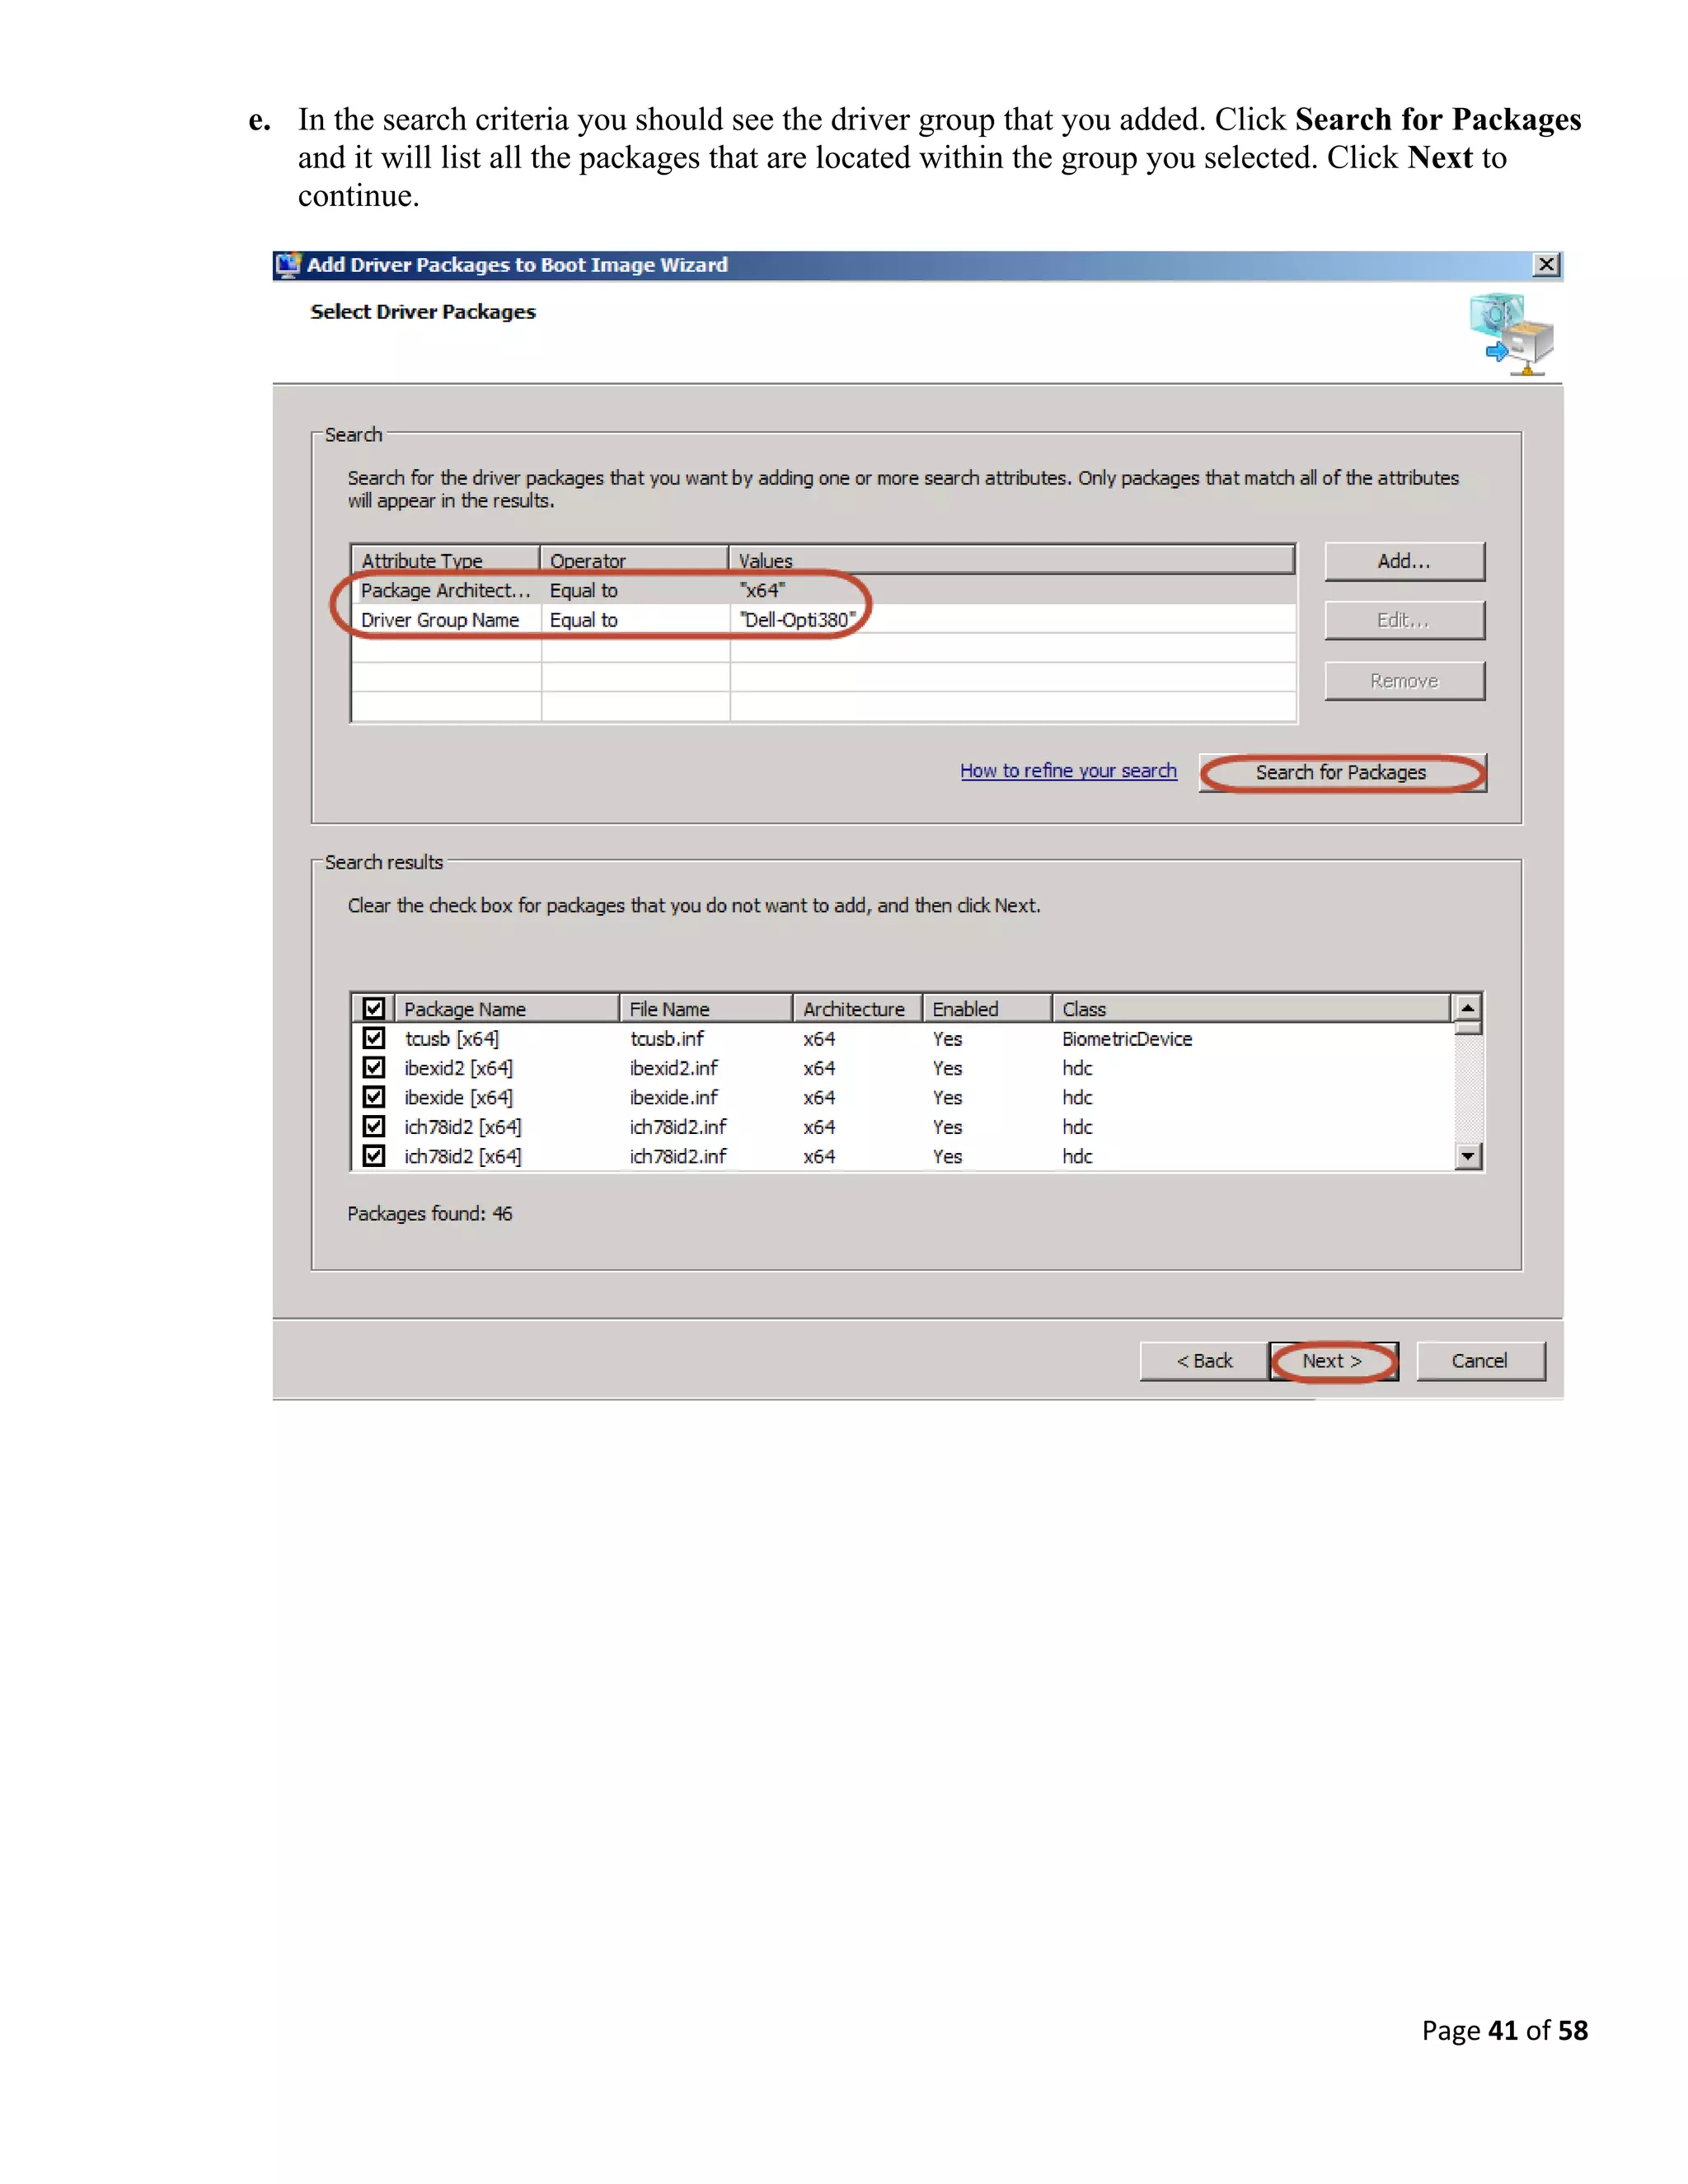
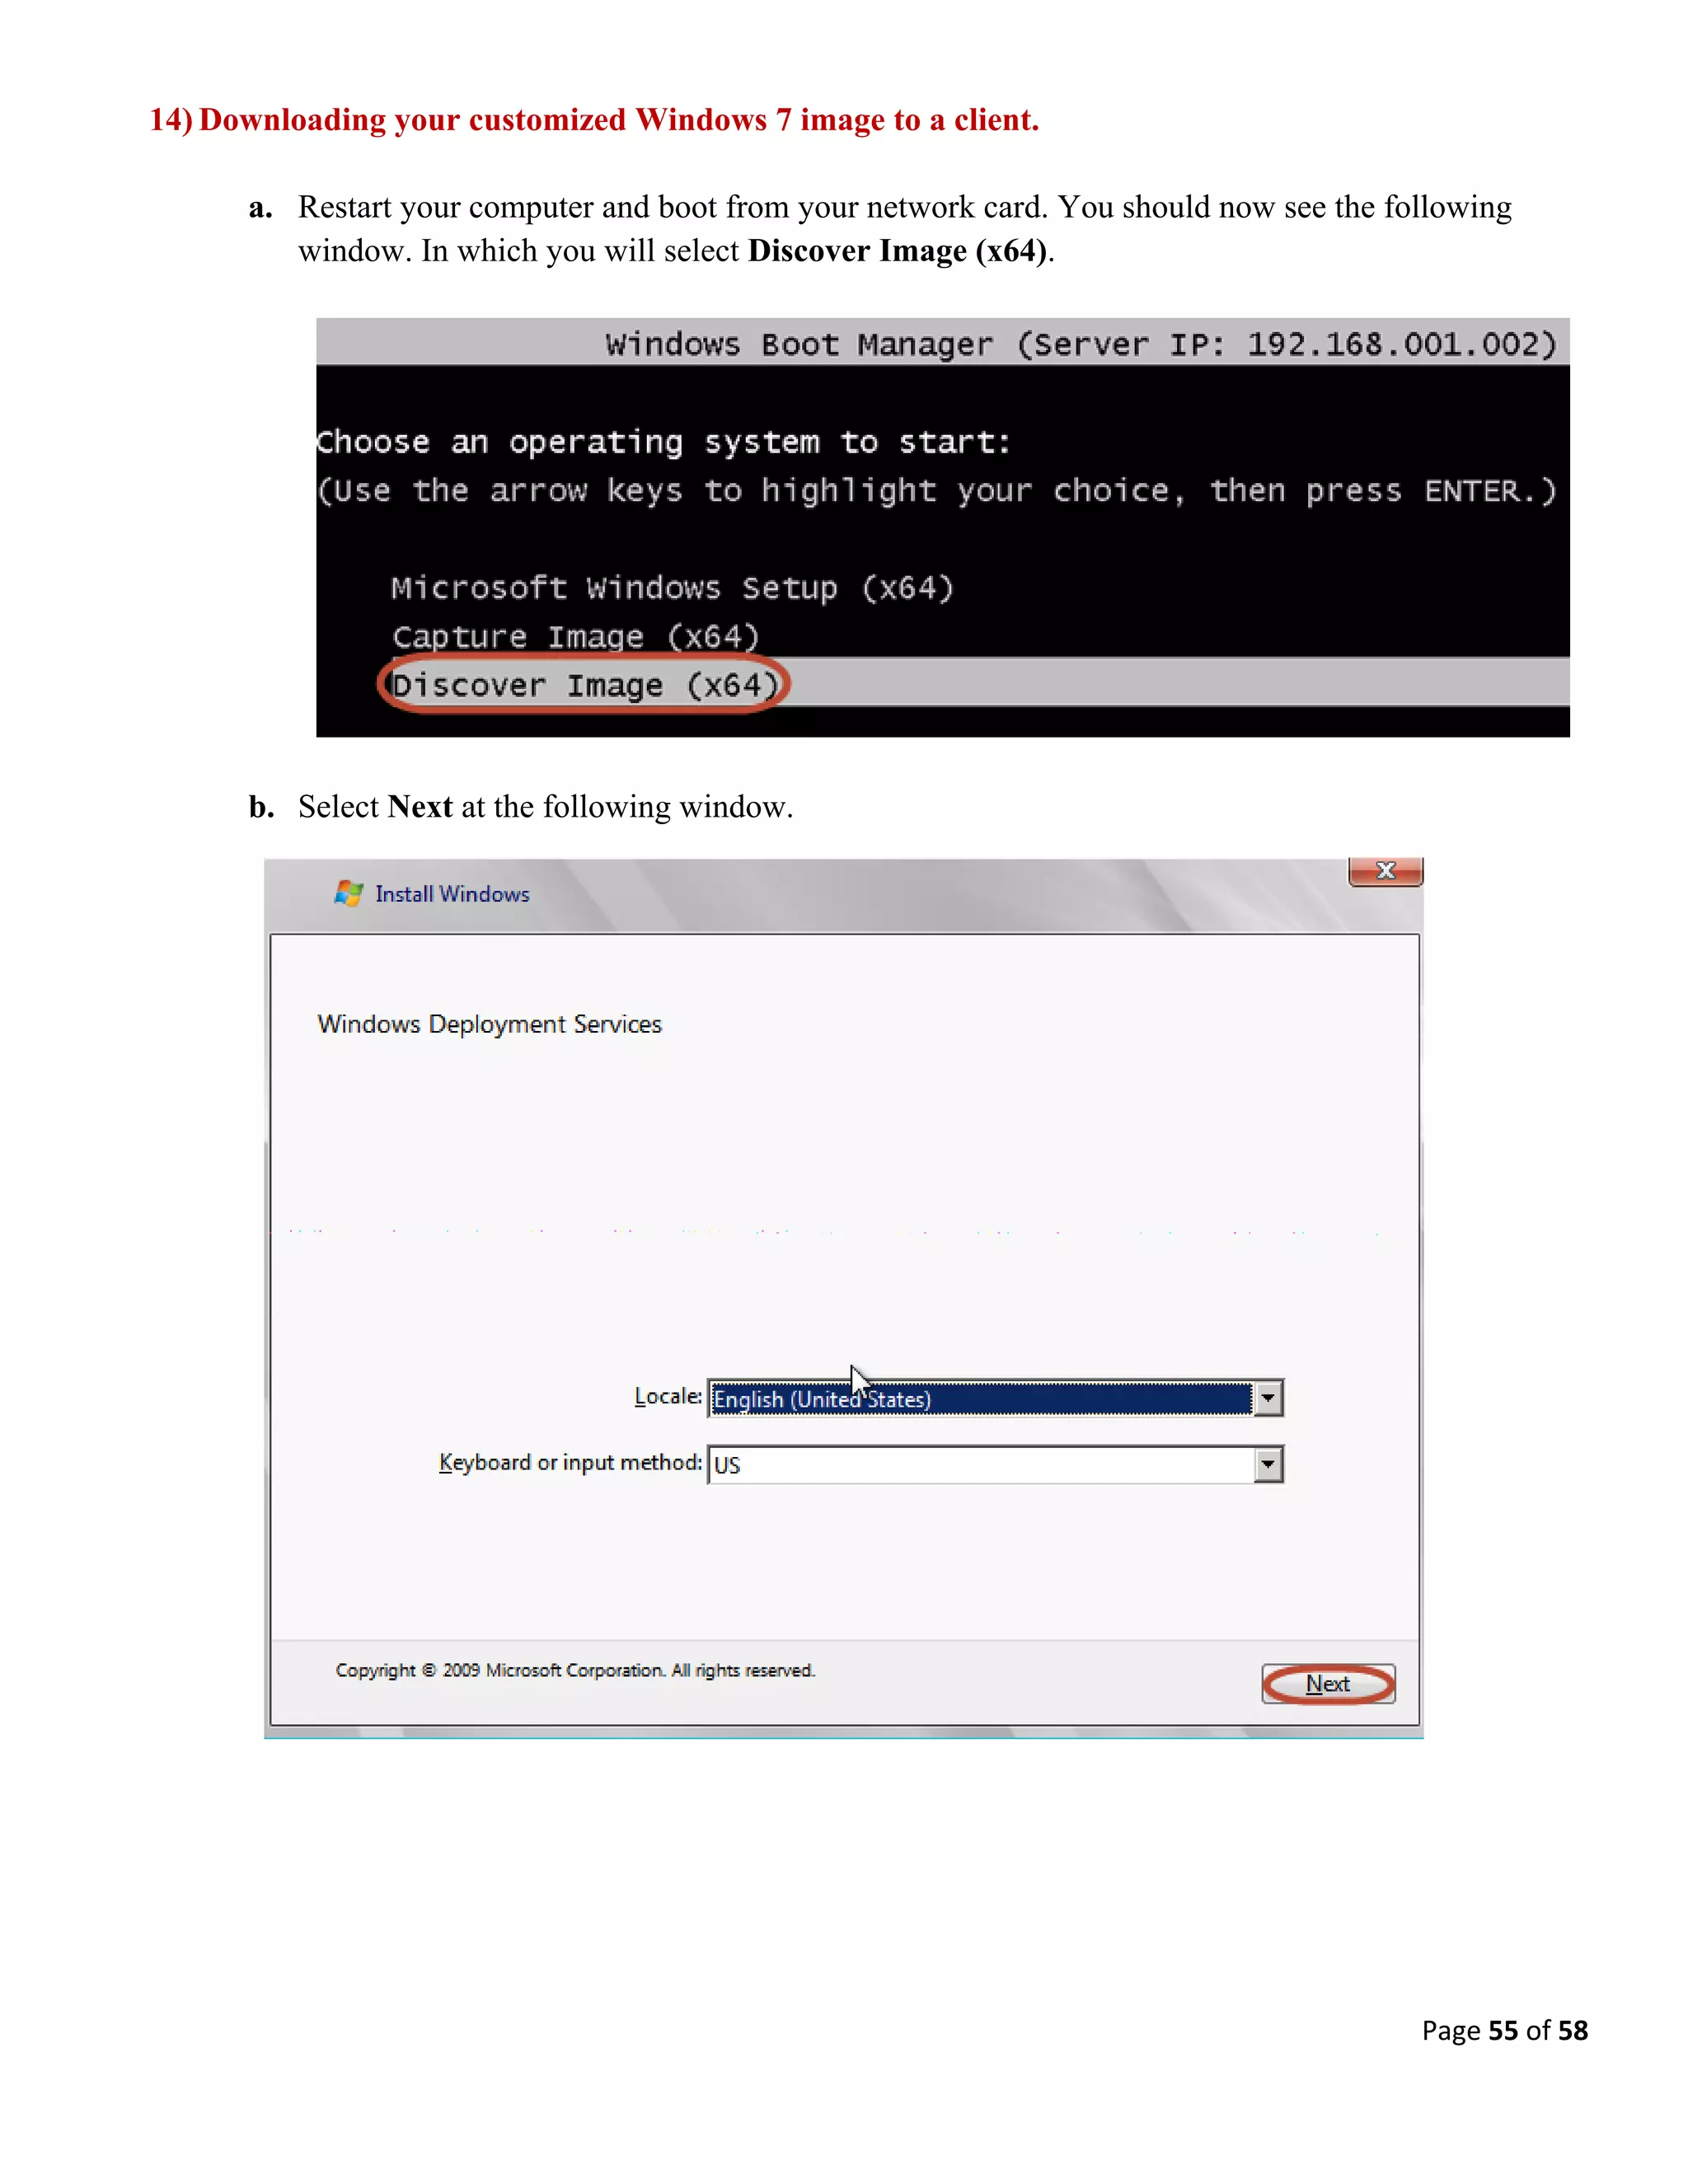
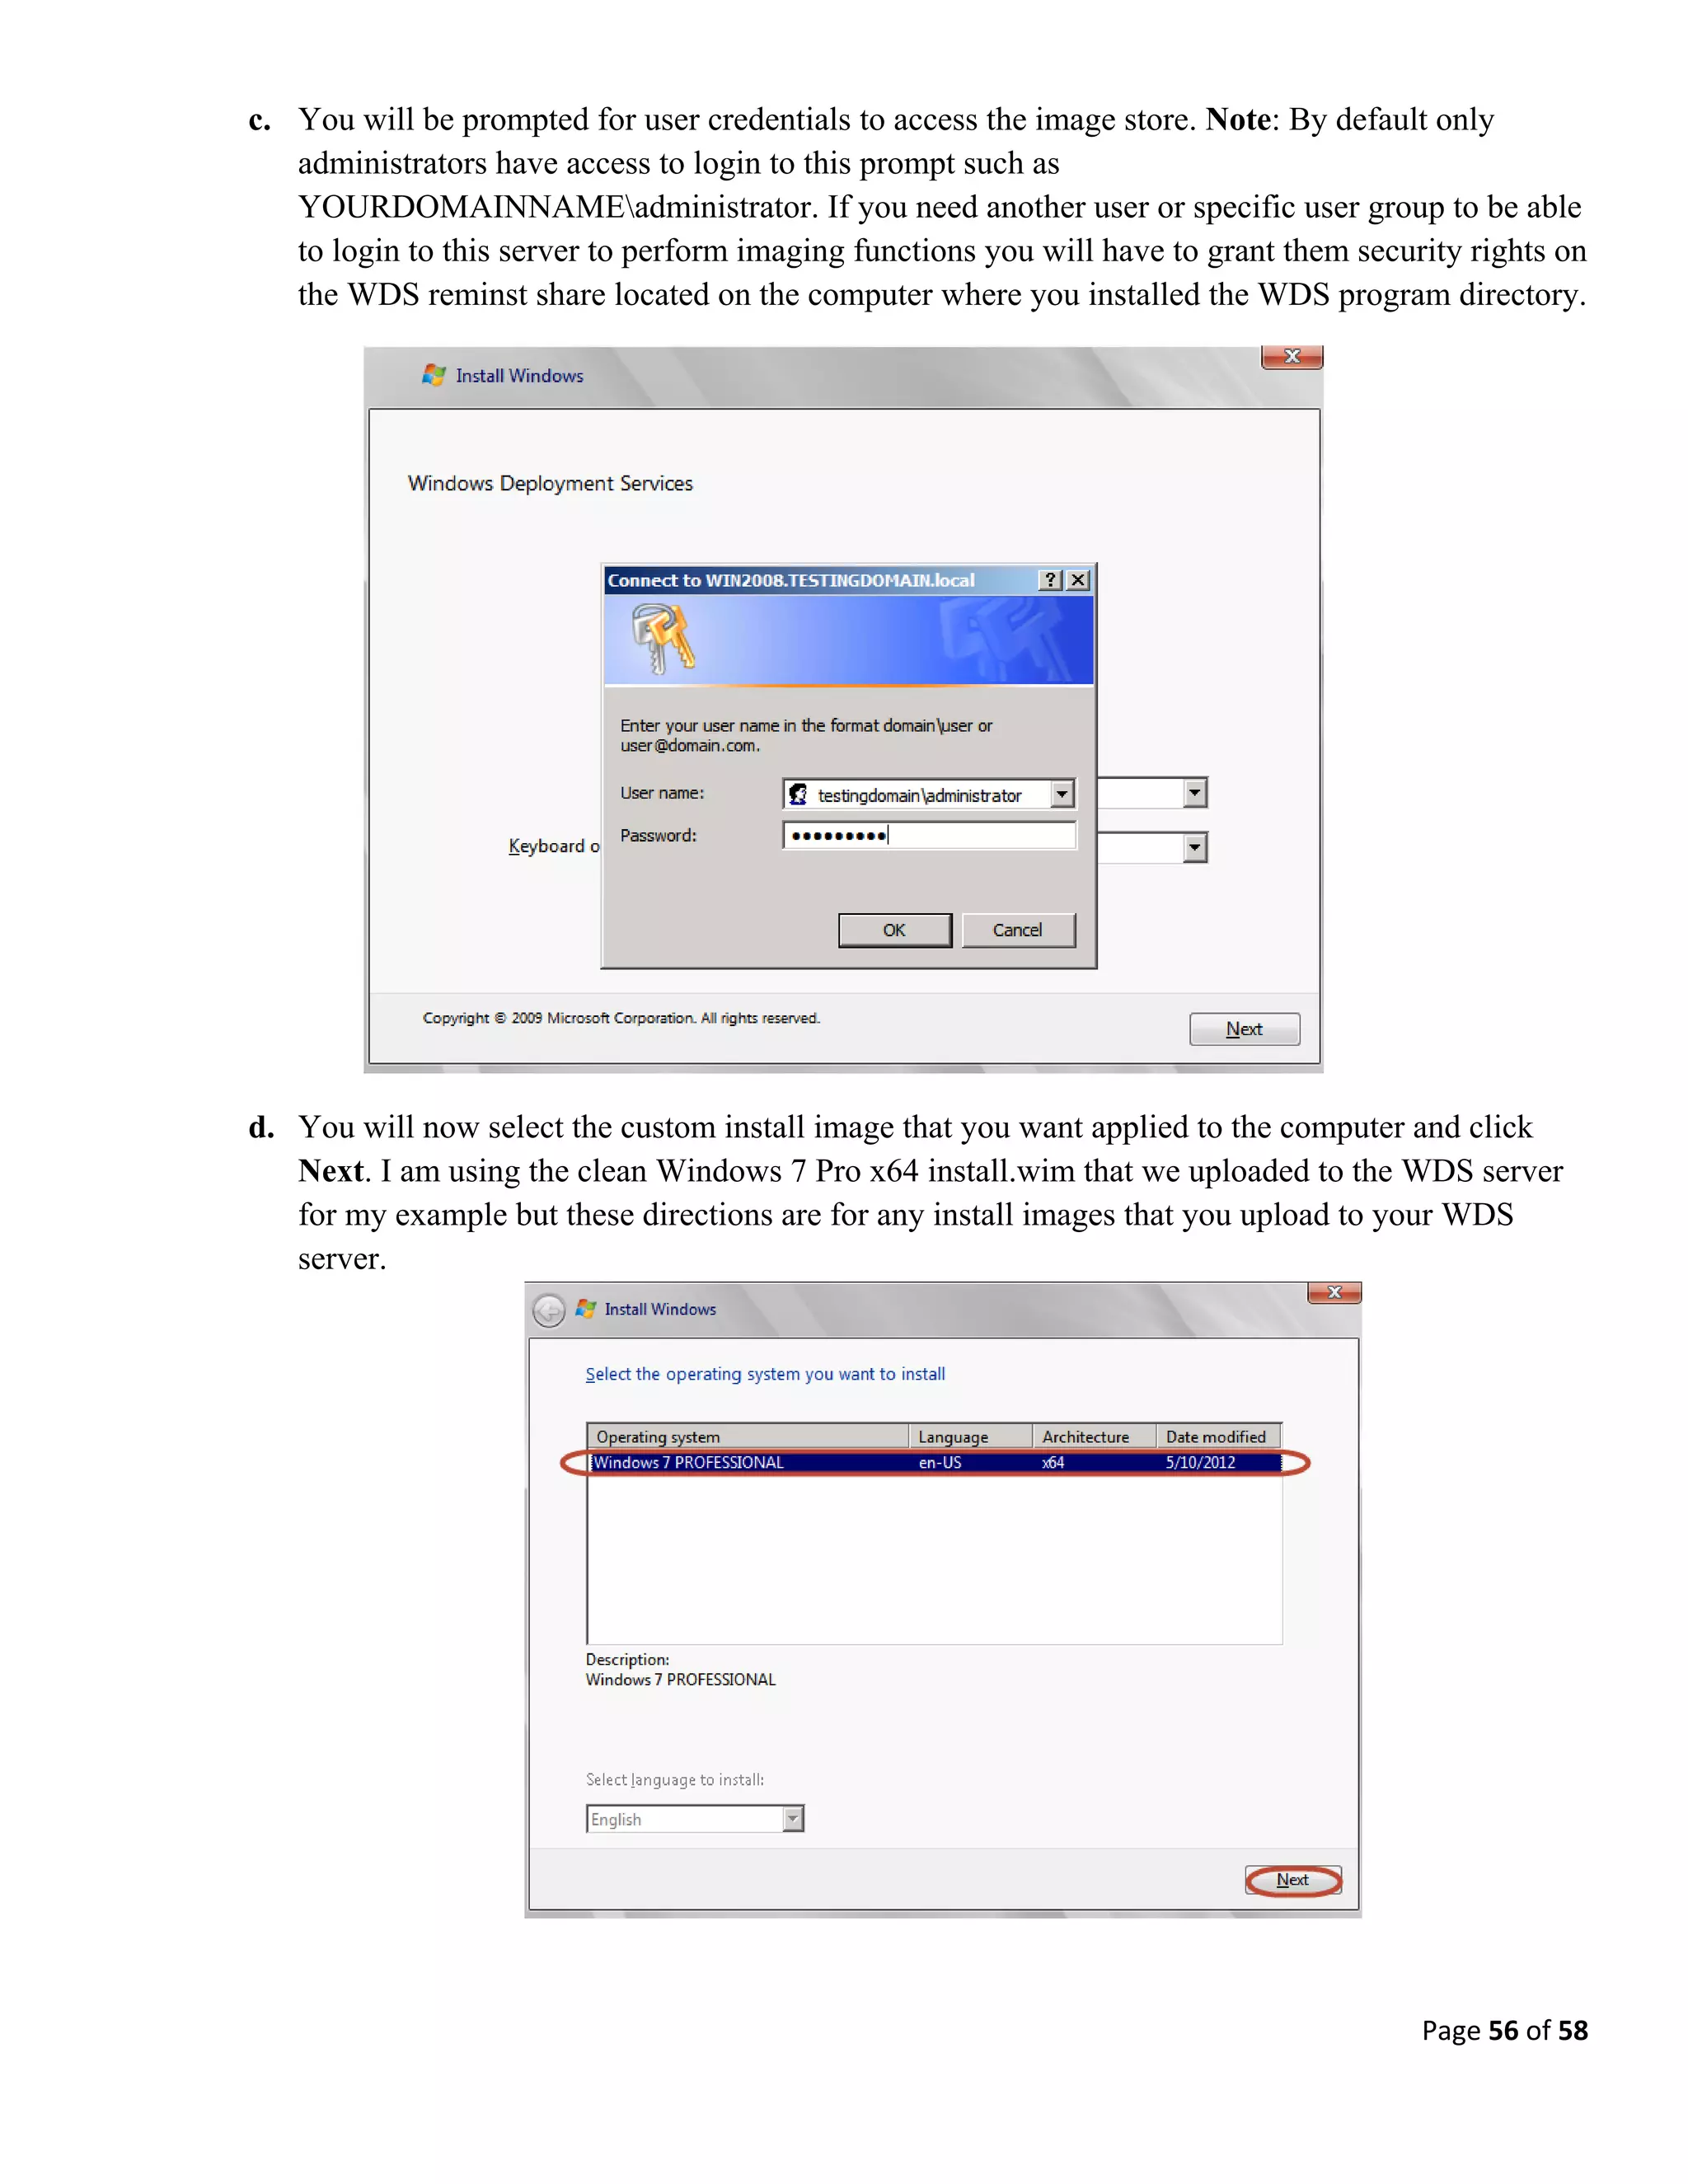
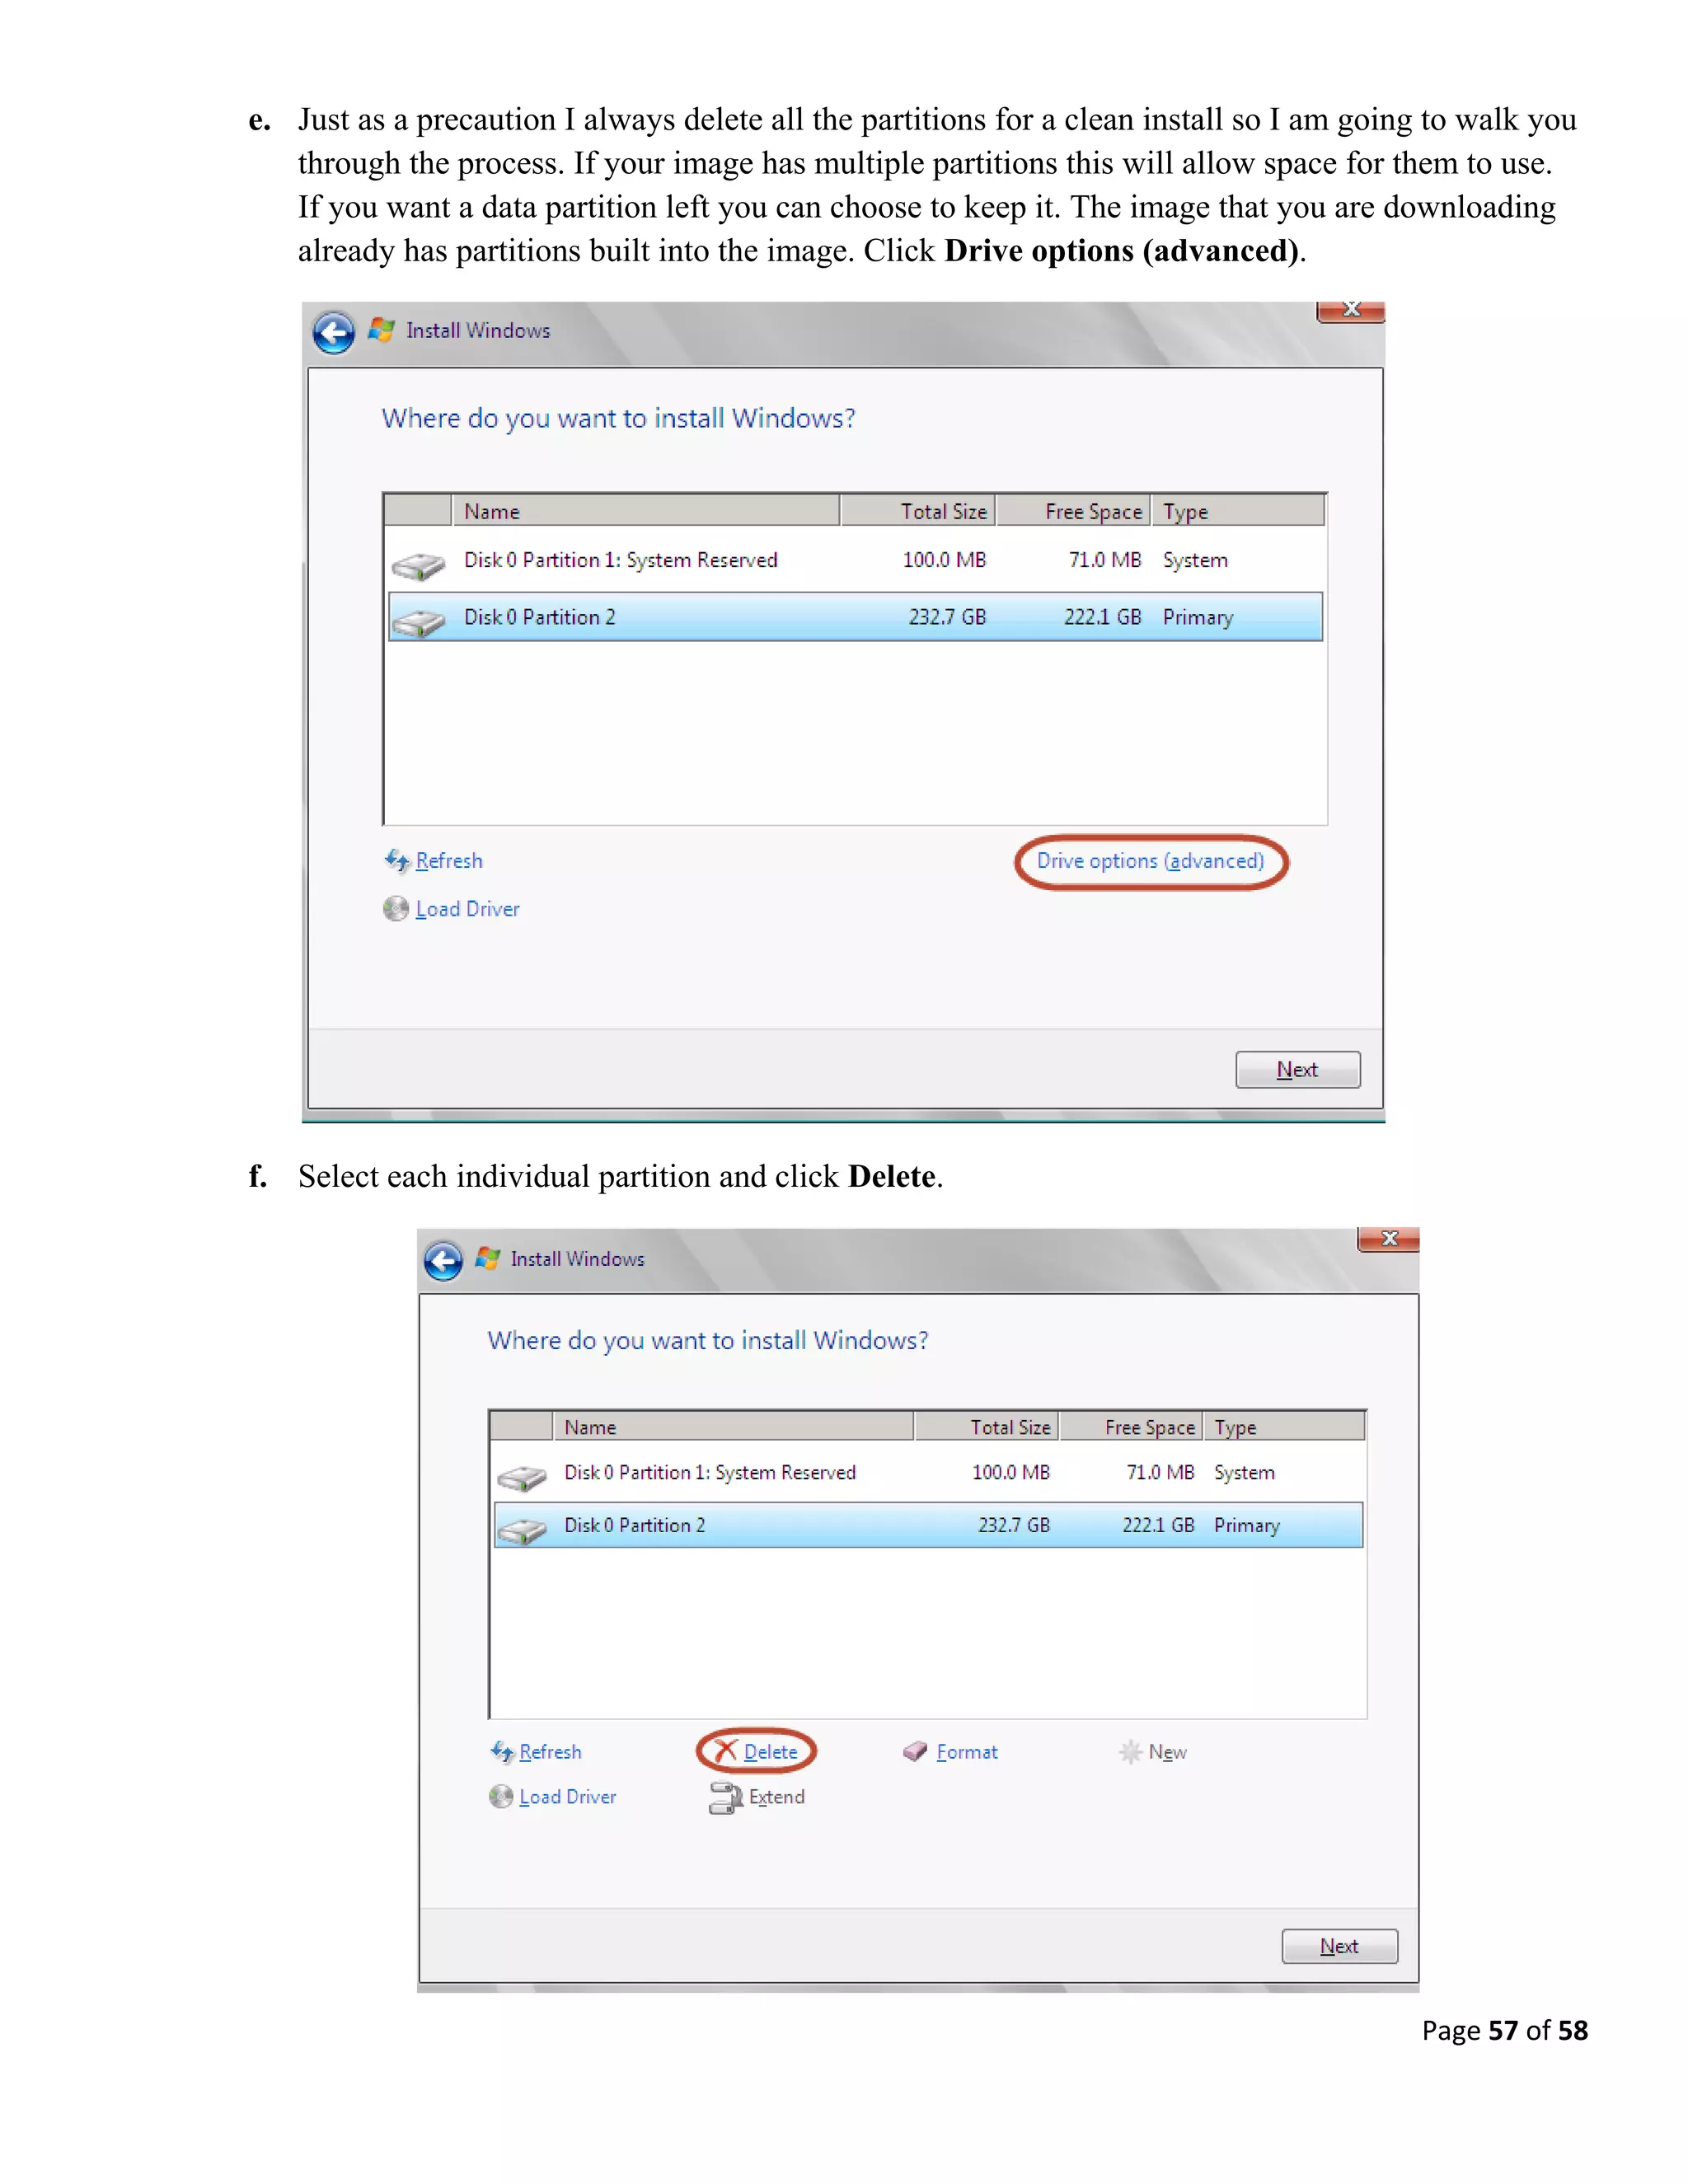
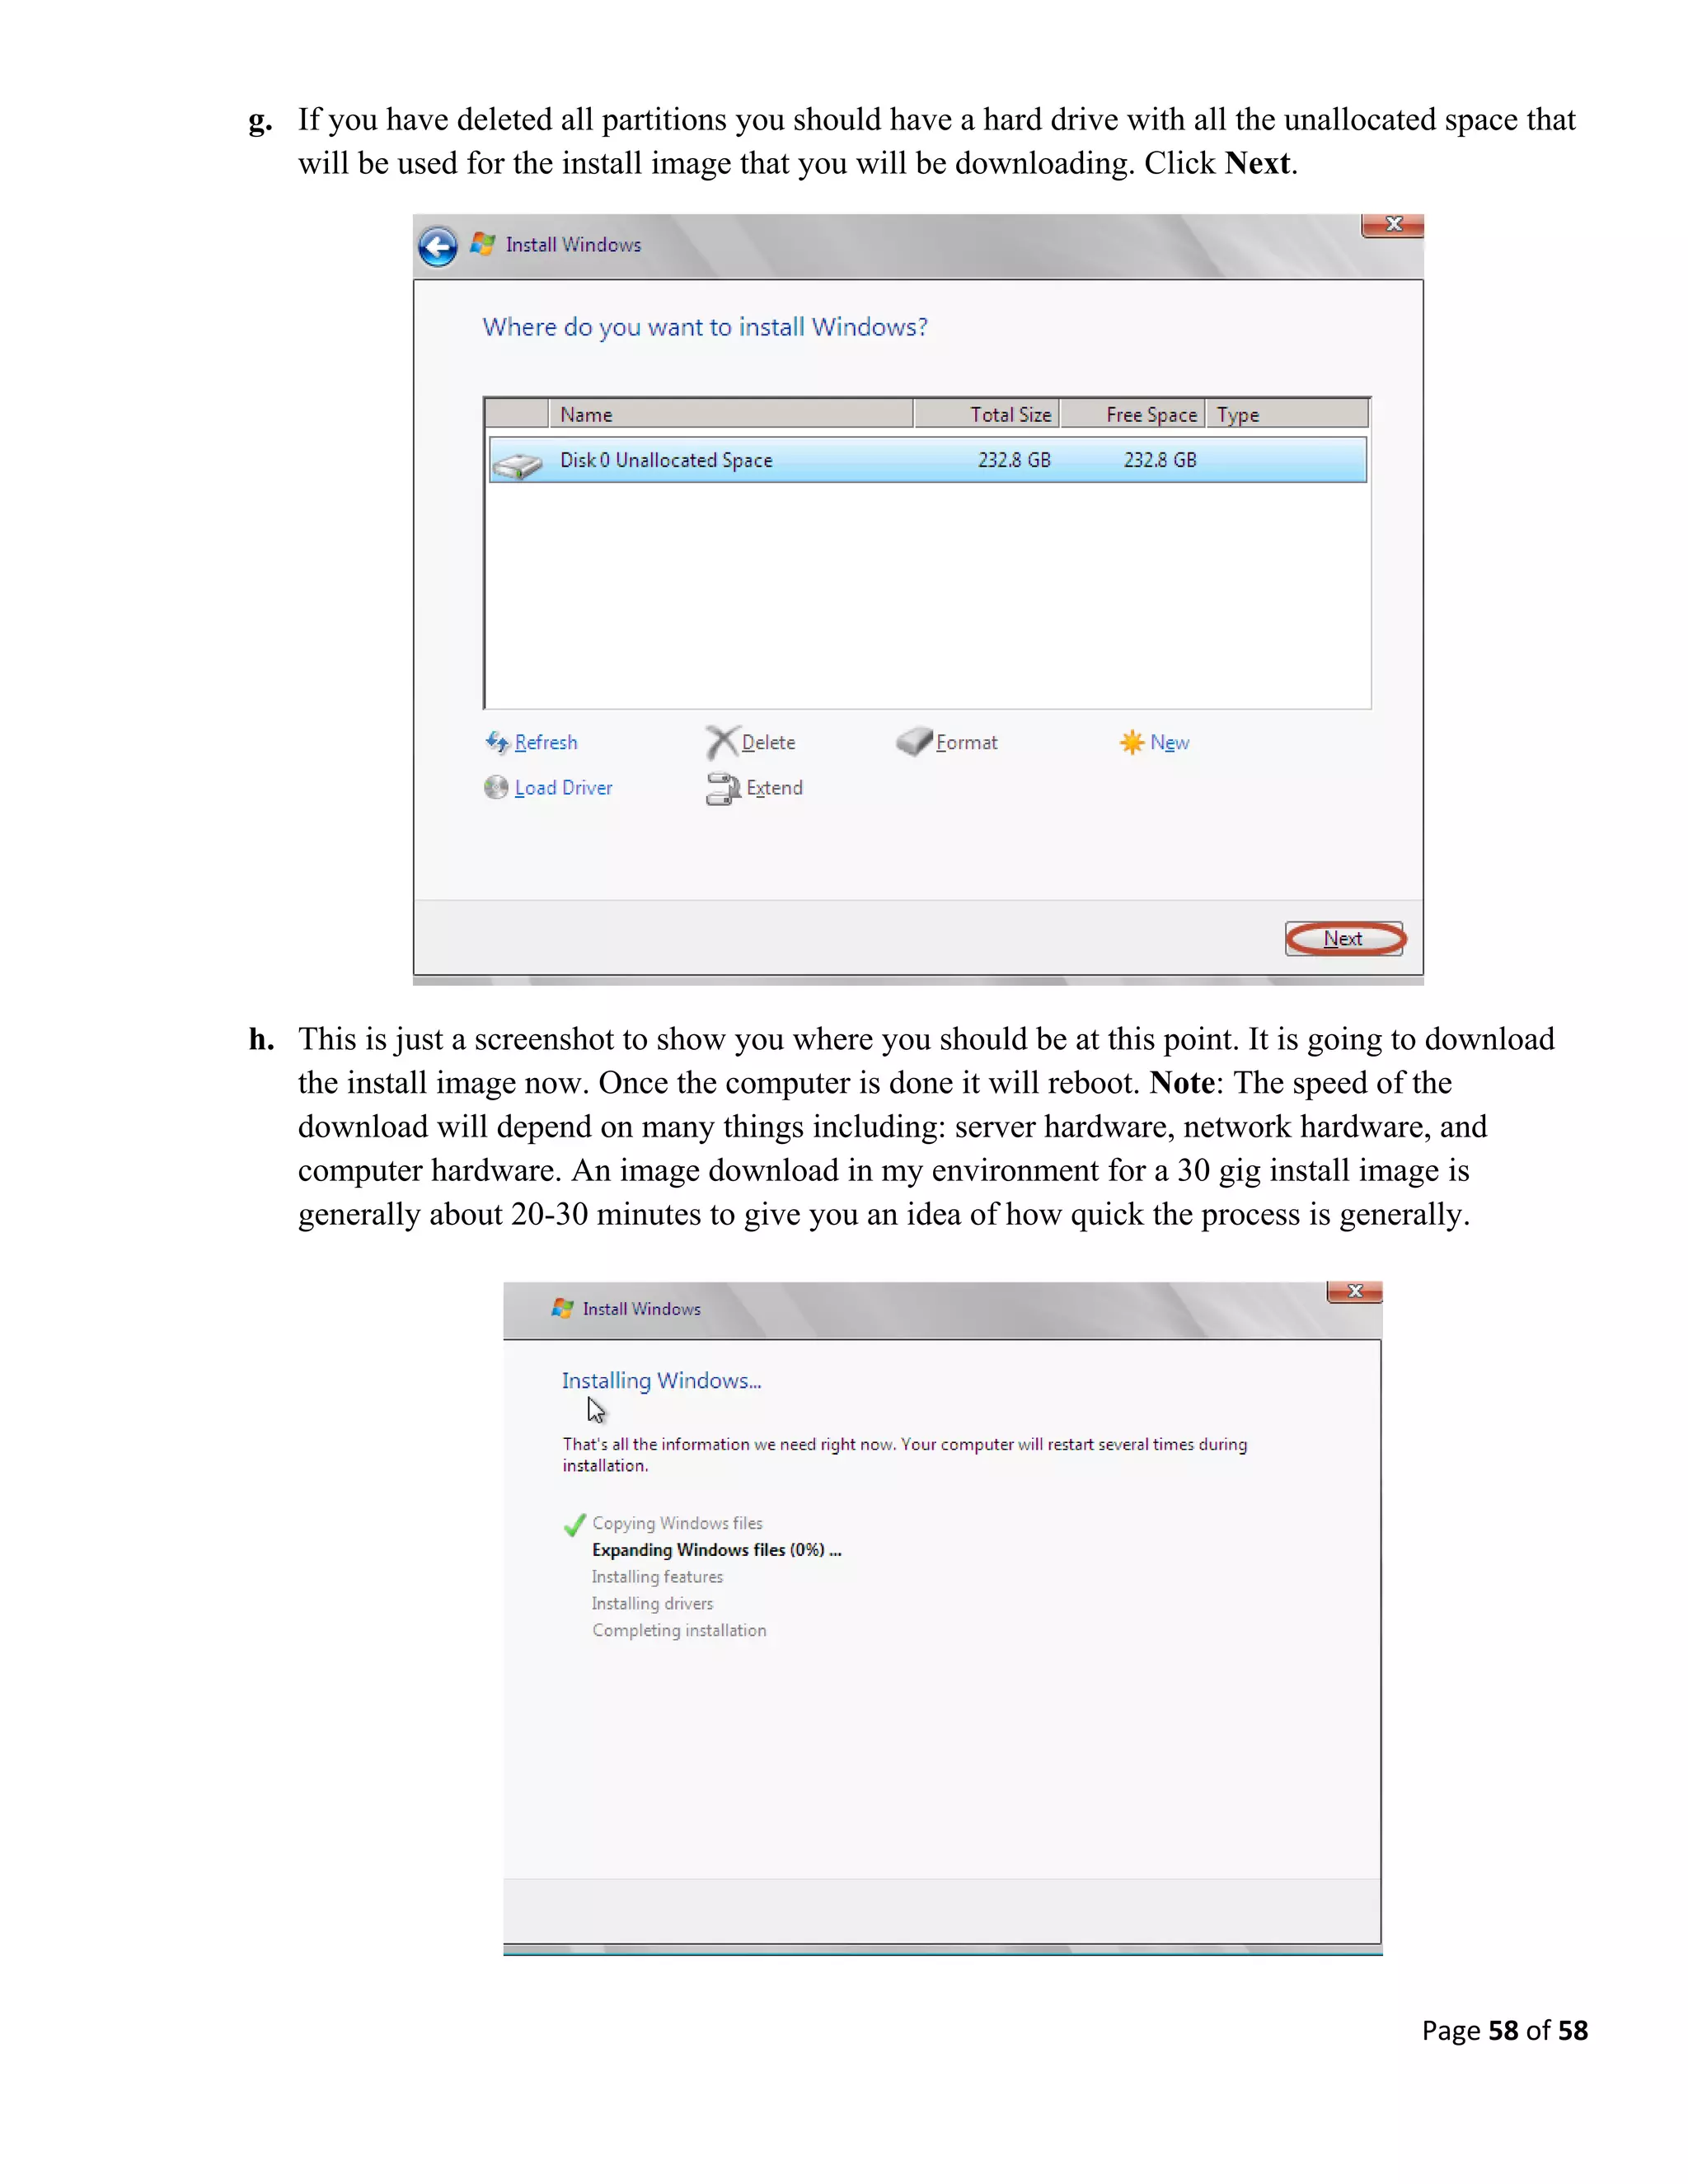
Key Trends Shaping the Future of Infrastructure.pdf
Windows Deployment Services Tutorial
1. Page 1 of 58
Windows Deployment Services Tutorial
Created by. Travis Kench - travis@tkcomputersolutions.com - 5/1/2013
Minimum Requirements:
Windows Server 2008 R2 Server (Joined to a domain)
The Windows Automated Installation Kit for Windows 7
Active Directory / DNS / DHCP (These functions need to be running on your existing network to follow
the instructions in this tutorial.)
Note: I am installing Windows Deployment Services on Server 2008 R2 x64 that doesn’t have DHCP on it so
the screen shots are going to reflect this setup. If you are installing WDS on a server that has DHCP installed on
it there are a few minor changes that I have explained within the notes sections on some of the steps.
Table of Contents
STEP 1: Installing the Windows Deployment Services Role on Windows Server 2008 R2 (Pgs. 1-5)
STEP 2: Configuring the Windows Deployment Server settings (Pgs. 6-8)
STEP 3: Configuring your WDS server node properties (Pgs. 9-13)
STEP 4: Configuring the DHCP scope options for WDS (Pgs. 14-16)
STEP 5: Adding your first boot image (Pgs. 17-20)
STEP 6: Creating a capture image (Pgs. 21-25)
STEP 7: Creating a discover image (Pgs. 26-30)
STEP 8: Configuring the WDS server node’s default boot image (Pgs. 31-32)
STEP 9: Uploading drivers into WDS (Pgs. 33-37)
STEP 10: Injecting drivers into your images (Pgs. 38-42)
STEP 11: Adding a Windows 7 x64 OS DVD install boot image to your server (Pgs. 43-46)
STEP 12: Creating your custom build to deploy to your clients (Pgs. 47-51)
STEP 13: Uploading your custom built Install Image to the WDS server (Pgs. 52-54)
STEP 14: Downloading your customized Windows 7 image to a client (Pgs. 55-58)
2. Page 2 of 58
1) Installing the Windows Deployment Services Role on Windows Server 2008 R2.
a. Perform the following steps under a Domain Administrator user account. Go to the Start Menu
> Administrative Tools > Server Manager.
b. Right-click on Roles and select Add Roles.
3. Page 3 of 58
c. Click Next on the Before You Begin page.
d. Check the box Windows Deployment Services role and click Next.
4. Page 4 of 58
e. On the Overview of Windows Deployment Services page click Next.
f. On the Select Role Services page make sure both Deployment Server and Transport Server
are both checked and click Next.
5. Page 5 of 58
g. On the Confirm Installation Selections page click Install.
h. On the Installation Results page if everything installed successfully you can click Close.
6. Page 6 of 58
2) Configuring the Windows Deployment Server settings.
a. You should now be back at the Server Manager page. In the left pane expand Roles then expand
Windows Deployment Services. Expand Servers and right-click on your servers name and
select Configure Server. Note: If there is not a server listed under the Servers node, right-click
the Servers node and click Add Server to add the local computer. You will need to select the
first option for Local Computer (the computer that this MMC snap-in is running on).
b. Click Next at the following screen.
7. Page 7 of 58
c. You will need to Browse to a path where you want the Windows Deployment Services
RemoteInstall directory to be stored. Note: I installed it on the desktop but only for testing
purposes. It’s recommended to store this share on a partition other than the one the OS is
installed on but you can install it on the OS partition if need be. Once you choose a directory
location click Next.
d. You will not see this prompt if you installed the RemoteInstall share on a partition other than the
one the OS was installed on however if you needed to install it on the OS partition you can click
Yes to continue.
8. Page 8 of 58
e. Since we are installing Windows Deployment Services on a server that isn’t holding the DHCP
role you will need to leave the check boxes in the screenshot below unchecked and click Next.
Note: If you were installing WDS on a server that has DHCP already installed you would check
both of the boxes and click next.
f. Select Respond to all client computers (known and unknown) and then click Next.
9. Page 9 of 58
3) Configuring your WDS server node properties.
a. Right-click on your Windows Deployment Services server node and select Properties.
b. PXE Response Tab: Select Respond to all client computers (known and unknown).
10. Page 10 of 58
c. AD DS Tab: Select Same domain as the Windows Deployment Services server.
d. Boot Tab: Select under known and unknown clients to Always continue the PXE boot as
shown in the screenshot below. Note: We will be revisiting this tab once we create boot images
to set the default boot images.
11. Page 11 of 58
e. Client Tab: Check Do not join the client to a domain after an installation and check Enable
client logging. Note: Joining computers to my domain is done through a script which I will walk
you through later on in this tutorial. The automated unattend.xml file that I use prompts the user
to enter a computer name because we have a particular computer naming scheme (Ex.
BuildingName-Room#-InventoryTag# such as MS-333-3333). When the user enters the name a
powershell script runs and joins that computer account name to Active Directory.
f. Network Tab: The default values are in the screenshot below. These values should not be
changed. So the UDP port range should be 64001 to 65000.
12. Page 12 of 58
g. Advanced Tab: Select Allow Windows Deployment Services to dynamically discover valid
domain servers (recommended) and also select Do not authorize this Windows Deployment
Services server in DHCP.
h. Multicast Tab: Unless you are using IPv6 you will want to select Obtain IP address from
DHCP and you will also want to select Separate clients into three sessions (slow, medium,
fast).
13. Page 13 of 58
i. DHCP Tab: Make sure that the below settings are left unchecked. You can now select Apply
and OK. Note: If you are installing WDS on a server that has DHCP installed on it you will need
to check both of the boxes below and click Apply and OK.
14. Page 14 of 58
4) Configuring the DHCP scope options for WDS
a. Remote into the server that is holding your DHCP role. Note: If you are not configuring your
DHCP scope options through the Server Options tab as I am going to walk you through you will
need to perform all the DHCP steps below on each DHCP scope that will have computers trying
to boot into Windows Deployment Services.
b. Right-click the Server Options menu item and select Configure Options.
15. Page 15 of 58
c. If you have been using PXE boot on your network you are going to have to remove Option 60
because it will conflict with the Windows Deployment Services server and prevent your clients
from booting to the network. You can remove it by simply unchecking the Option 60 box under
the available options as in the picture below then click Apply. Note: If you are installing WDS
on a server that has DHCP on it you will need to enable Option 60.
d. Configure DHCP scope Option 66: The string value needs to be your Windows Deployment Services
server IP and not the one I am using in the example below.
16. Page 16 of 58
e. Configure DHCP scope Option 67: The String value needs to be set to wdsnbp.com and then you can
click Apply and OK.
IMPORTANT NOTE
If you have clients that do not support PXE booting you can create CD/DVD boot discs.
17. Page 17 of 58
5) Adding your first boot image (Note: You will be using this image to create your discover and
capture images below).
a. You will need a Windows Server 2008 R2 Installation DVD to proceed with the following steps.
b. Under your Windows Deployment Services server node you need to right-click on Boot Images
and select Add Boot Image.
18. Page 18 of 58
c. You are now going to Browse to your Windows Server 2008 R2 Installation DVD then
navigate to the sources folder and select the boot.wim file.
d. You will now see the following window. I just left the default names to distinguish the base boot
image from any custom discover or capture images that we will be creating in the next section.
19. Page 19 of 58
e. Click Next at the following screenshot.
f. Click Finish at the following screenshot.
20. Page 20 of 58
g. You should now see the boot image that you just created in the right side pane.
21. Page 21 of 58
6) Creating a capture image.
a. Right-click on the Microsoft Windows Setup (x64) boot image that you just created and select
Create Capture Image.
b. Input your desired name for the Capture Image as well as input a description to distinguish it
from other images that will be created and then click Browse and save it to your preferred
location. Note: I created a folder within the WDS folder structure located under the Remote
Install Boot directory called Custom Boot Images as you can see from the screenshot below.
22. Page 22 of 58
c. Once you have the fields below filled out you can click Next.
d. You should now see the following screen. Select the checkbox Add image to the Windows
Deployment Server now and then click Finish.
23. Page 23 of 58
e. In the following window you will need to Browse to the directory that you saved this boot image
file to and then click Next.
f. Click Next at the following screenshot.
24. Page 24 of 58
g. Click Next at the following screenshot.
h. Click Finish at the following screenshot.
25. Page 25 of 58
i. You should now see the Capture Image (x64) boot image that you just created in the following
screenshot.
26. Page 26 of 58
7) Creating a discover image.
a. Right-click on the Microsoft Windows Setup (x64) and select Create Discover Image.
b. Input your desired name for your Discover Image name as well as input a description to
distinguish it from other images that will be created and then click Browse and save it to your
preferred location for your custom boot images. You will need to enter your WDS servers name
in the last box and then click Next. .
27. Page 27 of 58
c. Click Finish at the following screen
d. This image does not automatically prompt you to add it to WDS boot images. You manually
have to add this image. Right-click on Boot Images and select Add Boot Image.
28. Page 28 of 58
e. Click Browse and navigate to the location in which you saved your discover image and click
Next.
f. Click Next at the following screenshot.
29. Page 29 of 58
g. Click Next at the following screenshot.
h. Click Finish at the following screenshot.
30. Page 30 of 58
i. You should now see the Discover Image (x64) boot image that you just created in the following
screenshot.
31. Page 31 of 58
8) Configuring the WDS server node’s default boot image.
a. Right-click on your Windows Deployment Services server node and select Properties.
b. Boot Tab: Click Select under x64 architecture. When the Select Default Boot Image window
pops up chose Discover Image (x64) and click OK.
32. Page 32 of 58
c. At the following window click Apply and OK.
.
33. Page 33 of 58
9) Uploading drivers into WDS.
a. Download the driver files from the computers manufacturers’ site. Use 7-zip (www.7-zip.org) to
extract the driver packages to folders. Note: To make life easier you can download drivers in
bulk from www.driverpacks.net .
b. Once you have your drivers organized into folders you can begin adding drive packages to the
WDS server. Right-click the Drivers folder and select Add Driver Package.
34. Page 34 of 58
c. Select all driver packages from a folder and the click Browse and navigate to the folder that
has your extracted driver packages and click Next.
d. Click Next at the following screenshot.
35. Page 35 of 58
e. Click Next at the following screenshot.
f. Click Next at the following screenshot.
36. Page 36 of 58
g. Some packages may fail because they are unsigned. Click Next at the following screenshot.
h. In the screenshot below select Create a new driver group named: and name the group then
click Next. Note: I name my driver groups based on each computers model that I am working
with.
37. Page 37 of 58
i. Uncheck Modify the filters for this group now and click Finish.
j. You should now see the driver group you created along with all the imported drivers from the
folder you specified.
38. Page 38 of 58
10) Injecting drivers into your images.
a. Go into Boot Images and right-click on the Discover Image (x64) and select Add Driver
Packages to Image. Note: If a computer you’re working on fails to boot into the WDS server
and you know that the computer supports PXE booting the culprit is more than likely a missing
NIC driver. In this case you would follow this section and inject your missing NIC driver into the
Capture Image rather than the Discover Image.
b. Click Next at the following screenshot.
39. Page 39 of 58
c. The screenshot below has the default search criteria. I am going to try to simplify this process
below. Click on the line that says Package Class and select Remove.
40. Page 40 of 58
d. Click Add and change the Attribute Type to Driver Group Name. You should now see any
driver groups that you have created in the drop down list next to the add button. Click Add to
add your driver group to the search criteria and then select OK. Note: You can add multiple
driver groups to an image.
41. Page 41 of 58
e. In the search criteria you should see the driver group that you added. Click Search for Packages
and it will list all the packages that are located within the group you selected. Click Next to
continue.
42. Page 42 of 58
f. Click Next at the following screen.
43. Page 43 of 58
11) Adding a Windows 7 x64 OS DVD install boot image to your server
a. Right-click on Install Images and select Add Install Image.
b. Create an image group name for your OS installation in which you can group multiple image
builds under and then click Next.
44. Page 44 of 58
c. Browse to your Windows 7 x64 install disc and navigate to the sources directory and select
install.wim and click Next.
d. Select the Windows 7 Professional x64 OS, check Use default name and description for each
of the selected images and click Next.
45. Page 45 of 58
e. Click Next at the following screenshot.
f. Click Finish at the next screenshot.
46. Page 46 of 58
g. You should now see the Install Image that you just created.
47. Page 47 of 58
12) Creating your custom build to deploy to your clients.
a. Install your flavor of Windows 7 (x86/x64).
b. You must create your image in Audit Mode. To enter Audit Mode you need to press Shift-Ctrl-
F3 at the following screen. If you do not follow these steps and create your image outside of
Audit Mode when you Sysprep with your custom unattend.xml file the default profile will not
copy across to all users. When you create your image in Audit Mode you have to think of it as
once you boot into Audit Mode anything that you do under this local administrator account is
going to be copied to all users as their default profile so anything you want your users to have for
customizations you must do in Audit Mode.
48. Page 48 of 58
c. After you press Shift-Ctrl-F3 your computer will reboot into Audit Mode in which you will see
the Sysprep Preparation Tool window in which you can click Cancel because we are not ready to
sysprep the image yet. Note: Each time you reboot your computer from now on until you
Sysprep it will prompt you with this window because it is still in Audit Mode.
d. The days of running updates manually are becoming simpler. All the normal applications that
you would normally install one by one such as Flash / Shockwave / Air / Java / Adobe Reader /
Quicktime and some other programs can be automated with the use of a free program that you
can use to build your images or update them which is called Ninite (www.ninite.com) . There is a
Pro version that gives you remote management of application packages that you can buy but the
free version is a great tool to use also. All you have to do is go to www.ninite.com and on the
main page you can click on each program you want to have packaged up for installation and it
will give you an executable that you can run which basically goes out to the manufacturers sites
and downloads the most current versions of the programs. You can run this executable more than
once and if there are newer versions of the programs it will download and install them for you
without toolbars.
e. Install any other programs or customizations you want your users to have.
f. In order for your computers to automatically join your domain with the name that you will input
you will need to create a powershell script. Create a file called joinDomain.ps1, include the code
below in it and save the file to the C:Windows directory. Make sure that you put in your
networks information in the fields that have quotes around them.
$credential = New-Object
System.Management.Automation.PsCredential("YourDomainName.orgadministrator",
(ConvertTo-SecureString "YourAdministratorPassword" -AsPlainText -Force))
Add-Computer -DomainName "YourDomainName.org" -Credential $credential
49. Page 49 of 58
g. This step is an extra for those of you who would like your computers to automatically join a
wireless network.
i. Open a command prompt.
ii. To see a list of all your saved wlan profiles, use the following command:
netsh wlan show profiles
iii. If you want to see the details of your profiles, use this command:
netsh wlan show all
iv. When you’re ready to export a profile, use the following syntax:
netsh wlan export profile name=”YourWifiProfileName”
folder=PathToLocationToSaveWlanExport
v. Once you have your file exported rename it ssid.xml and save it to the C:Windows
directory.
h. Within the C:WindowsSetup directory create a new folder called Scripts.
i. Create a file called SetupComplete.cmd and include the following code in it then save it to the
C:WindowsSetupScripts directory.
powershell Set-ExecutionPolicy Unrestricted
powershell C:WindowsjoinDomain.ps1
Netsh wlan add profile filename="C:windowsssid.xml"
Netsh wlan connect YourWifiProfileName
del /Q /F C:windowsssid.xml
cscript //b C:windowssystem32slmgr.vbs /ato
del /Q /F C:windowssystem32sysprepunattend.xml
del /Q /F C:Windowspantherunattend.xml
del /Q /F C:WindowsjoinDomain.ps1
j. Now we are ready to Sysprep with our unattend.xml file that you will need to create with the
Windows WAIK (http://www.microsoft.com/en-us/download/details.aspx?id=5753). If you have
already created your unattend.xml file you can copy it to the C:WindowsSystem32sysprep
directory.
k. Here is a copy of my current unattend.xml file that is in production. Feel free to modify it to suit
your needs.
Unattend.xml
<?xml version="1.0" encoding="utf-8"?>
<unattend xmlns="urn:schemas-microsoft-com:unattend">
<settings pass="specialize">
<component name="Microsoft-Windows-Deployment" processorArchitecture="x86"
publicKeyToken="31bf3856ad364e35" language="neutral" versionScope="nonSxS"
xmlns:wcm="http://schemas.microsoft.com/WMIConfig/2002/State"
xmlns:xsi="http://www.w3.org/2001/XMLSchema-instance">
<RunSynchronous>
51. Page 51 of 58
<PlainText>true</PlainText>
</AdministratorPassword>
<LocalAccounts>
<LocalAccount wcm:action="add">
<Description>Local Administrator</Description>
<DisplayName>Administrator</DisplayName>
<Group>Administrators</Group>
<Name>Administrator</Name>
</LocalAccount>
</LocalAccounts>
</UserAccounts>
<RegisteredOrganization>YOUR COMPANY NAME</RegisteredOrganization>
<RegisteredOwner>YOUR COMPANY NAME</RegisteredOwner>
<ShowWindowsLive>false</ShowWindowsLive>
<TimeZone>Eastern Standard Time</TimeZone>
<DoNotCleanTaskBar>true</DoNotCleanTaskBar>
<Display>
<HorizontalResolution>1440</HorizontalResolution>
<VerticalResolution>900</VerticalResolution>
<RefreshRate>60</RefreshRate>
<ColorDepth>32</ColorDepth>
</Display>
</component>
</settings>
<settings pass="generalize">
<component name="Microsoft-Windows-Security-SPP" processorArchitecture="wow64"
publicKeyToken="31bf3856ad364e35" language="neutral" versionScope="nonSxS"
xmlns:wcm="http://schemas.microsoft.com/WMIConfig/2002/State"
xmlns:xsi="http://www.w3.org/2001/XMLSchema-instance">
<SkipRearm>8</SkipRearm>
</component>
</settings>
<cpi:offlineImage
cpi:source="catalog:E:/isos/en_windows_7_professional_with_sp1_vl_build_x64_dvd_u_677791/sources/instal
l_windows 7 professional.clg" xmlns:cpi="urn:schemas-microsoft-com:cpi" />
</unattend>
l. To sysprep the machine utilizing the unattend.xml file you will need to open up a command
prompt and change directory so that you are located in C:WindowsSystem32sysprep
directory and run the following command. If the Sysprep Preparation Tool is open you should
click Cancel before running the command below.
sysprep /generalize /oobe /shutdown /unattend:unattend.xml
m. Your image is now sysprepped and ready to be uploaded to the WDS server.
52. Page 52 of 58
13) Uploading your custom built Install Image to the WDS server.
a. Restart your computer and boot from your network card. You should now see the following
window. In which you will select Capture Image (x64).
b. Click Next at the following screenshot.
53. Page 53 of 58
c. Select the volume to capture then input a name and description for your install image and click
Next.
54. Page 54 of 58
d. Click Browse and save your install image to a directory that has enough space. Note: You can save
your install image to the same partition as the image that you are capturing as long as it has enough free
space because at this stage the image is going to be converted to a .wim file which it will upload to the
WDS server. Check the box for Upload image to a Windows Deployment Services server (optional). In
the server name input your WDS servers name. You will be prompted to enter credentials for a user that
has administative rights to the WDS server. Click the image group name box and select the image group
that you want your install image uploaded to.
e. The image capture has started once you start seeing the progress bar move.
f. When your computer finishes this task it will reboot and prompt you to enter a computer name.
55. Page 55 of 58
14) Downloading your customized Windows 7 image to a client.
a. Restart your computer and boot from your network card. You should now see the following
window. In which you will select Discover Image (x64).
b. Select Next at the following window.
56. Page 56 of 58
c. You will be prompted for user credentials to access the image store. Note: By default only
administrators have access to login to this prompt such as
YOURDOMAINNAMEadministrator. If you need another user or specific user group to be able
to login to this server to perform imaging functions you will have to grant them security rights on
the WDS reminst share located on the computer where you installed the WDS program directory.
d. You will now select the custom install image that you want applied to the computer and click
Next. I am using the clean Windows 7 Pro x64 install.wim that we uploaded to the WDS server
for my example but these directions are for any install images that you upload to your WDS
server.
57. Page 57 of 58
e. Just as a precaution I always delete all the partitions for a clean install so I am going to walk you
through the process. If your image has multiple partitions this will allow space for them to use.
If you want a data partition left you can choose to keep it. The image that you are downloading
already has partitions built into the image. Click Drive options (advanced).
f. Select each individual partition and click Delete.
58. Page 58 of 58
g. If you have deleted all partitions you should have a hard drive with all the unallocated space that
will be used for the install image that you will be downloading. Click Next.
h. This is just a screenshot to show you where you should be at this point. It is going to download
the install image now. Once the computer is done it will reboot. Note: The speed of the
download will depend on many things including: server hardware, network hardware, and
computer hardware. An image download in my environment for a 30 gig install image is
generally about 20-30 minutes to give you an idea of how quick the process is generally.