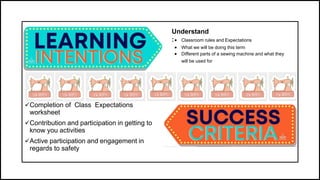
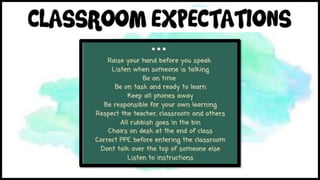
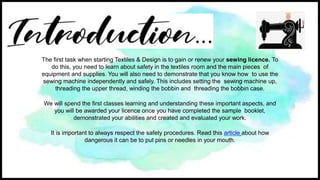
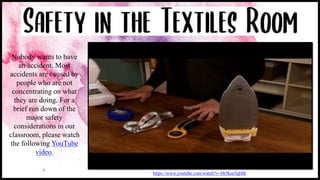
2021
Understand
: Classroom rules and Expectations
 What we will be doing this term
 Different parts of a sewing machine and what they
will be used for
Completion of Class Expectations
worksheet
Contribution and participation in getting to
know you activities
Active participation and engagement in
regards to safety
The first task when starting Textiles & Design is to gain or renew your sewing licence. To
do this, you need to learn about safety in the textiles room and the main pieces of
equipment and supplies. You will also need to demonstrate that you know how to use the
sewing machine independently and safely. This includes setting the sewing machine up,
threading the upper thread, winding the bobbin and threading the bobbin case.
We will spend the first classes learning and understanding these important aspects, and
you will be awarded your licence once you have completed the sample booklet,
demonstrated your abilities and created and evaluated your work.
It is important to always respect the safety procedures. Read this article about how
dangerous it can be to put pins or needles in your mouth.
https://www.youtube.com/watch?v=Ht5ksn5qHfk
Nobody wants to have
an accident. Most
accidents are caused by
people who are not
concentrating on what
they are doing. For a
brief run down of the
major safety
considerations in our
classroom, please watch
the following YouTube
video.
1. Never operate a machine when the teacher is out of the room.
2. Report any slight accident immediately to the teacher.
3. Keep all working areas clean, particularly the floor, so that no one will slip and fall. Threads and pins are slippery on the floor.
4. Always be principled and balanced. Accidents occur most often when people fool around, or are not paying attention to what they
are doing.
5. When inserting a plug into the socket, hold the plug without touching the prongs.
6. When disconnecting a plug, hold the plug. Never pull the cord. You could damage the wire connections or give yourself an
electrical shock.
7. Do not dangle the foot pedal by the cord. This will damage the cords inside.
8. Never touch a plug or socket with wet hands. Water conducts electricity.
9. Unplug irons from the electricity supply after use and wrap the cords loosely. Do not wrap tightly as it may damage connections.
Irons must be cold when put away.
10. To test the temperature of the iron – place iron face down on ironing board for a few seconds. If the ironing board area becomes
hot, then the iron is ready to use.
11. Irons should never be left face down on the ironing board, even if turned off. It could start a fire.
12. Take care of your fingers when you are ironing to avoid getting burns from the iron or scalds from the steam.
To protect yourself and others, learn and follow these safety instructions.
3. Keep your fingers away from the machine needle when sewing.
14. When you are using a sewing machine, be aware of loose clothing; it might get caught. Wear appropriate footwear for
operating the foot pedal.
15. Handle scissors carefully. Carry them by the closed blade, and pass them by the handle first.
16. Never hold pins in your mouth. Think of what could happen if you swallowed a pin. Also no pins under your skin.
17. Store all tools and equipment carefully when not in use.
18.Do not leave needles, scissors, pins, or other sharp-pointed objects on chairs or on furniture (eg. seam ripper).
19.Learn how to use pins, scissors, and the sewing machine properly. If you don’t know, ask for help.
20. Be careful on trying on pinned garments.
21. Use a slow speed on an electric sewing machine while you are learning to operate it. Make sure you are in control
of the machine.
22. Do not touch the hot light bulb in the machine.
23. Arrange electric cords of the machine on the floor so that it will not cause anyone to stumble. Be aware of the
movement of the chairs with the cords.
24. A broken needle can splinter and go in your eyes. Do not sew over pins with the machine.
25. If the machine jams or makes unusual or strange noises,stop immediately – ask the teacher for help.
Using this information and your
knowledge on safety complete
the activities on safety in the
Textiles room in your Google
CLassroom.
•
•
)
•
e.
a. Bobbin thread guide
b. Top thread spool
c. Bobbin Winder
d. Bobbin stopper
e. Hand wheel
f. Stitch width wheel
g. Stitch selector
h. Stitch length dial
i. Reverse
j. Needle plate
k. Presser foot
l. Needle
m. Needle plate release
n. Take up lever
o. Tension wheel
p. Tool box
q. Presser foot lever
QUICK QUESTION: Rohan is operating the sewing machine when he notices there is a
big bird’s nest of thread under his fabric. He keeps sewing, but the thread keeps
bunching up. What should he do?
From the outside, a sewing machine is a wonderful bit of magic. A needle shoves thread up and down, and somehow a
seam is formed. But what is that thread latching to? How, if the needle just bobs up and down, does the thread lock in
place?
The video on the next page reveals what is going on inside the machine as the needle does its little dance.
Beneath the needle (as the GIF shows at a very slowed down speed) a hook
rotates, capturing the thread from above and looping it around another thread, this
one reeling from the bobbin below. The two threads interlock around the layers of
fabric, binding them to one another. So it's not magic; it's mechanics.
 Sit up straight with the
sewing machine needle
in line with the centre of
your chest.
 Ensure that the machine
is sitting on the front
edge of the table, close
to you.
 Place the foot pedal
directly in front of your
foot so that you don’t
have to reach for it but
also so it is safely tucked
under table.
Ensure that you are a safe distance from other students
Only one person at a time operating the machine
.
obbin

Welcome to textiles

  • 1.
  • 2.
    Understand : Classroom rulesand Expectations  What we will be doing this term  Different parts of a sewing machine and what they will be used for Completion of Class Expectations worksheet Contribution and participation in getting to know you activities Active participation and engagement in regards to safety
  • 5.
    The first taskwhen starting Textiles & Design is to gain or renew your sewing licence. To do this, you need to learn about safety in the textiles room and the main pieces of equipment and supplies. You will also need to demonstrate that you know how to use the sewing machine independently and safely. This includes setting the sewing machine up, threading the upper thread, winding the bobbin and threading the bobbin case. We will spend the first classes learning and understanding these important aspects, and you will be awarded your licence once you have completed the sample booklet, demonstrated your abilities and created and evaluated your work. It is important to always respect the safety procedures. Read this article about how dangerous it can be to put pins or needles in your mouth.
  • 6.
    https://www.youtube.com/watch?v=Ht5ksn5qHfk Nobody wants tohave an accident. Most accidents are caused by people who are not concentrating on what they are doing. For a brief run down of the major safety considerations in our classroom, please watch the following YouTube video.
  • 7.
    1. Never operatea machine when the teacher is out of the room. 2. Report any slight accident immediately to the teacher. 3. Keep all working areas clean, particularly the floor, so that no one will slip and fall. Threads and pins are slippery on the floor. 4. Always be principled and balanced. Accidents occur most often when people fool around, or are not paying attention to what they are doing. 5. When inserting a plug into the socket, hold the plug without touching the prongs. 6. When disconnecting a plug, hold the plug. Never pull the cord. You could damage the wire connections or give yourself an electrical shock. 7. Do not dangle the foot pedal by the cord. This will damage the cords inside. 8. Never touch a plug or socket with wet hands. Water conducts electricity. 9. Unplug irons from the electricity supply after use and wrap the cords loosely. Do not wrap tightly as it may damage connections. Irons must be cold when put away. 10. To test the temperature of the iron – place iron face down on ironing board for a few seconds. If the ironing board area becomes hot, then the iron is ready to use. 11. Irons should never be left face down on the ironing board, even if turned off. It could start a fire. 12. Take care of your fingers when you are ironing to avoid getting burns from the iron or scalds from the steam. To protect yourself and others, learn and follow these safety instructions.
  • 8.
    To protect yourselfand others, learn and follow these safety instructions. 3. Keep your fingers away from the machine needle when sewing. 14. When you are using a sewing machine, be aware of loose clothing; it might get caught. Wear appropriate footwear for operating the foot pedal. 15. Handle scissors carefully. Carry them by the closed blade, and pass them by the handle first. 16. Never hold pins in your mouth. Think of what could happen if you swallowed a pin. Also no pins under your skin. 17. Store all tools and equipment carefully when not in use. 18.Do not leave needles, scissors, pins, or other sharp-pointed objects on chairs or on furniture (eg. seam ripper). 19.Learn how to use pins, scissors, and the sewing machine properly. If you don’t know, ask for help. 20. Be careful on trying on pinned garments. 21. Use a slow speed on an electric sewing machine while you are learning to operate it. Make sure you are in control of the machine. 22. Do not touch the hot light bulb in the machine. 23. Arrange electric cords of the machine on the floor so that it will not cause anyone to stumble. Be aware of the movement of the chairs with the cords. 24. A broken needle can splinter and go in your eyes. Do not sew over pins with the machine. 25. If the machine jams or makes unusual or strange noises,stop immediately – ask the teacher for help.
  • 9.
    Using this informationand your knowledge on safety complete the activities on safety in the Textiles room in your Google CLassroom.
  • 10.
  • 11.
  • 12.
    e. a. Bobbin threadguide b. Top thread spool c. Bobbin Winder d. Bobbin stopper e. Hand wheel f. Stitch width wheel g. Stitch selector h. Stitch length dial i. Reverse j. Needle plate k. Presser foot l. Needle m. Needle plate release n. Take up lever o. Tension wheel p. Tool box q. Presser foot lever
  • 13.
    QUICK QUESTION: Rohanis operating the sewing machine when he notices there is a big bird’s nest of thread under his fabric. He keeps sewing, but the thread keeps bunching up. What should he do?
  • 14.
    From the outside,a sewing machine is a wonderful bit of magic. A needle shoves thread up and down, and somehow a seam is formed. But what is that thread latching to? How, if the needle just bobs up and down, does the thread lock in place? The video on the next page reveals what is going on inside the machine as the needle does its little dance. Beneath the needle (as the GIF shows at a very slowed down speed) a hook rotates, capturing the thread from above and looping it around another thread, this one reeling from the bobbin below. The two threads interlock around the layers of fabric, binding them to one another. So it's not magic; it's mechanics.
  • 16.
     Sit upstraight with the sewing machine needle in line with the centre of your chest.  Ensure that the machine is sitting on the front edge of the table, close to you.  Place the foot pedal directly in front of your foot so that you don’t have to reach for it but also so it is safely tucked under table. Ensure that you are a safe distance from other students Only one person at a time operating the machine
  • 18.