Downloaded 290 times

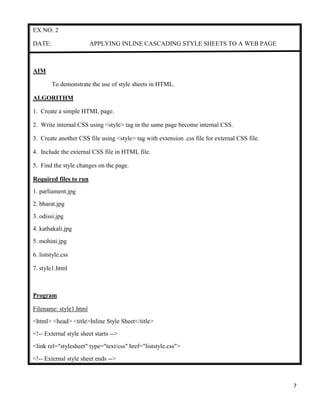
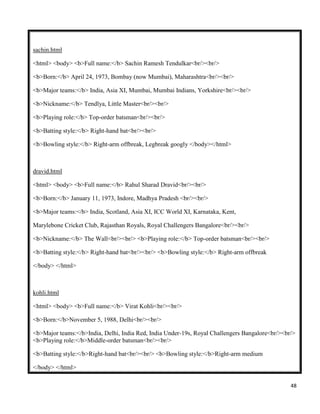
![12
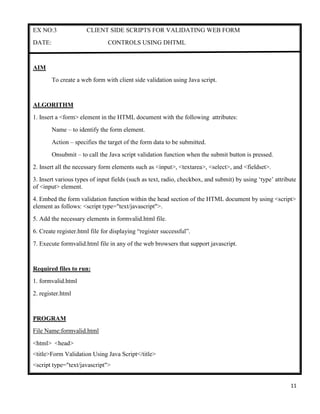
function validation()
{
if(document.f1.name.value=="")
{
window.alert("Plz Enter Your Name");
return false;
}
else if(document.f1.email.value=="")
{
window.alert("Plz Enter Your E-mail:");
return false;
}
else if(document.f1.email.value.indexOf('@gmail.com')==-1)
{
window.alert("Plz Enter Your Valid E-mail");
return false;
}
else if(document.f1.addr.value=="")
{
window.alert("Plz Enter Your Address");
return false;
}
else if(document.f1.country.selectedIndex==0)
{
window.alert("Plz Select Your Country");
return false;
}
else if((document.f1.rdo[0].checked==false)&&(document.f1.rdo[1].checked==false))](https://image.slidesharecdn.com/webtechnologylab2015final-151216164333/85/Web-technology-lab-manual-12-320.jpg)
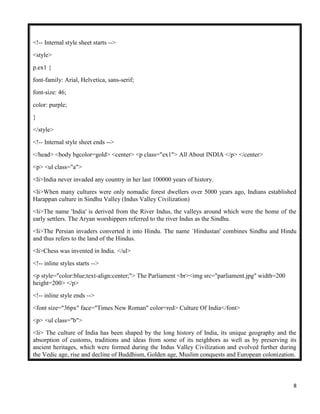
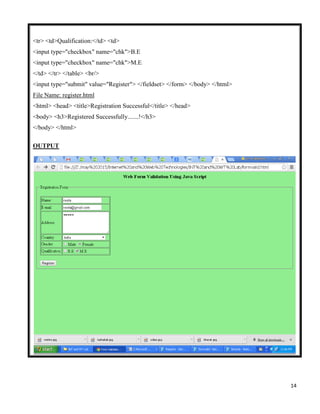
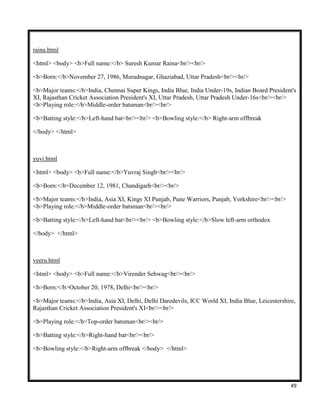
![13
{
window.alert("Plz Choose Your Gender");
return false;
}
else if((document.f1.chk[0].checked==false)&&(document.f1.chk[1].checked==false))
{
window.alert("Plz Select Your Qualification");
return false;
}
else
return true;
}
</script> </head>
<body bgcolor="lightgreen">
<h3 style="text-align:center">Web Form Validation Using Java Script</h3>
<form name="f1" action="Register.html" onsubmit="return validation()">
<fieldset>
<legend>Registration Form</legend> <br/>
<table border="1">
<tr> <td>Name:</td> <td><input type="text" name="name"></td> </tr>
<tr> <td>E-mail:</td> <td><input type="text" name="email"></td> </tr>
<tr> <td>Address:</td> <td><Textarea name="addr" rows="5" cols="20"></Textarea></td> </tr>
<tr> <td>Country:</td> <td> <select name="country">
<option>---Select Your Country---</option>
<option>India</option>
<option>USA</option>
<option>AUS</option>
<option>UK</option>
</select> </td> </tr>
<tr> <td>Gender:</td>
<td> <input type="radio" name="rdo">Male <input type="radio" name="rdo">Female </td> </tr>](https://image.slidesharecdn.com/webtechnologylab2015final-151216164333/85/Web-technology-lab-manual-13-320.jpg)


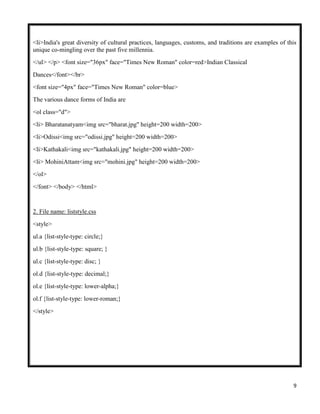
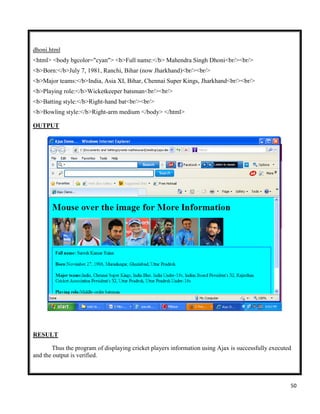
![40
<select name="s1" multiple>
<option value="1">Java Unleashed
<option value="2">Java Server Programming
<option value="3">JSP Bible
<option value="4">Java Servlets
</select> <br>
<input type="submit" value="OK"> <br> </form> </body> </html>
books.jsp
<html> <head> <title>Online Shopping - Sports items</title> </head>
<body>
<% int cost=0;
String s[] = request.getParameterValues("s1");
for(int i=0;i<s.length;i++)
{
if(s[i].equals("1"))
cost += 200;
else if(s[i].equals("2"))
cost += 300;
else if(s[i].equals("3"))
cost += 350;
else if(s[i].equals("4"))
cost += 300;
}
%>](https://image.slidesharecdn.com/webtechnologylab2015final-151216164333/85/Web-technology-lab-manual-40-320.jpg)
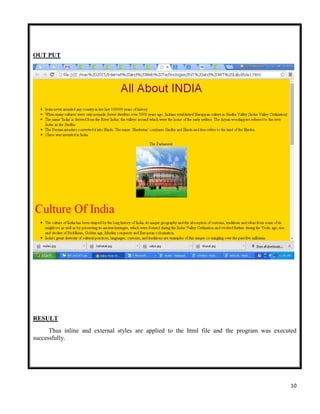
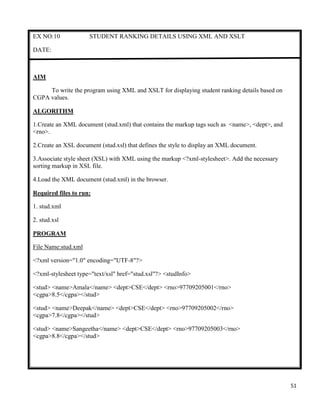
![41
<h3> You have selected <%= s.length %> Books. <br>
The cost is <%= cost %></h3>
<form method="post" action="sports.jsp">
<input type="hidden" name="h1" value='<%=cost%>'> <br>
Select the sports items: <br>
<select name="s1" multiple>
<option value="1">Ball
<option value="2">Bat
<option value="3">Carrom Board
<option value="4">Chess Board
</select> <br> <input type="submit" value="OK"> </form> </body></html>
sports.jsp
<html> <head> <title>Onlien Shopping - Final Cost </title> </head>
<body>
<% String s = request.getParameter("h1");
String s1[] = request.getParameterValues("s1");
int cost = Integer.parseInt(s);
%>
<h3> You have selected <%=s1.length%> Sport items. <br>
<%
for(int i=0;i<s1.length;i++)
{
if(s1[i].equals("1"))
cost += 100;
else if(s1[i].equals("2"))
cost += 300;
else if(s1[i].equals("3"))](https://image.slidesharecdn.com/webtechnologylab2015final-151216164333/85/Web-technology-lab-manual-41-320.jpg)
![42
cost += 1500;
else if(s1[i].equals("4"))
cost += 500;
}
%>
The total cost of purchase is: <%=cost%> </h3> </body> </html>
OUTPUT](https://image.slidesharecdn.com/webtechnologylab2015final-151216164333/85/Web-technology-lab-manual-42-320.jpg)
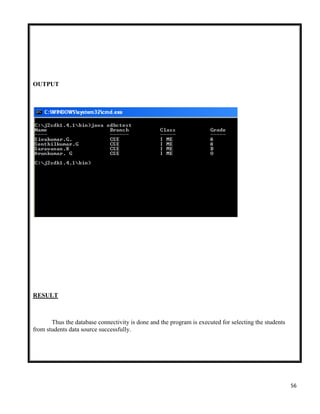
![55
public static void main(String a[])
{
try
{
Class.forName("sun.jdbc.odbc.JdbcOdbcDriver");
Connection c=DriverManager.getConnection(
"jdbc:odbc: students”);
Statement s=c.createStatement();
ResultSet rs;
String q="select * from stud";
rs=s.executeQuery(q);
System.out.println("NametttBranchttClassttGrade ");
System.out.println("----ttt------ tt-----tt-----");
while(rs.next())
{
System.out.print(rs.getString(1)+"tt");
System.out.print(rs.getString(2)+"tt");
System.out.print(rs.getString(3)+"tt");
System.out.println(rs.getString(4)+"tt");
}
}catch(Exception e)
{ System.out.println("Error"+e); }
}
}](https://image.slidesharecdn.com/webtechnologylab2015final-151216164333/85/Web-technology-lab-manual-55-320.jpg)

The document describes a Java program to create a color palette applet with the following features: 1. Create a matrix of buttons to display a color palette. 2. Allow the user to select a color from the palette to set the background or foreground of a text area control. 3. Use a checkbox control as radio buttons to select whether the selected color sets the background or foreground. The algorithm defines the necessary classes and objects, adds the controls to the applet using init(), arranges the controls with setBounds(), sets button backgrounds with setBackground(), adds listeners, and conditionally sets the text area background or foreground based on the checkbox selection.