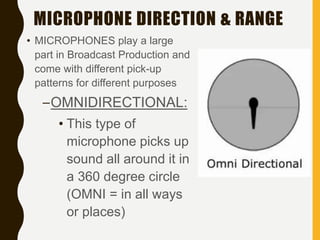
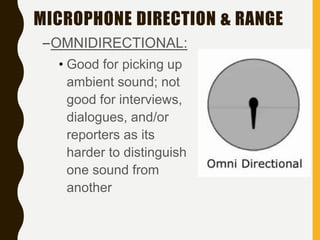
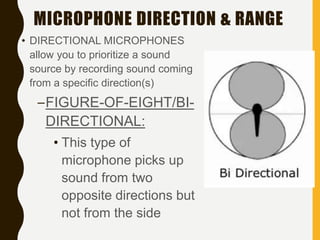
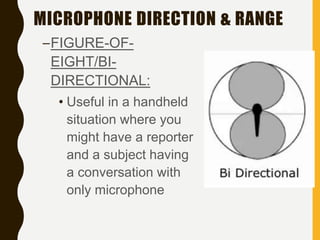
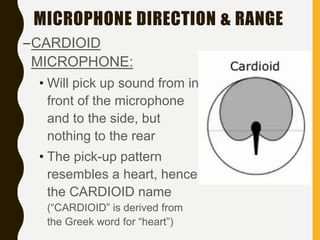
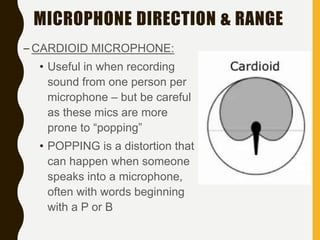
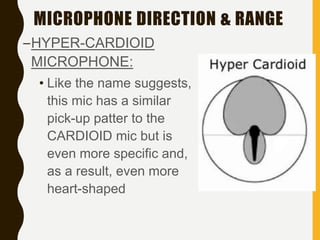
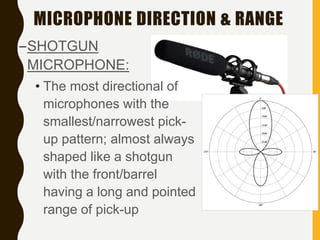
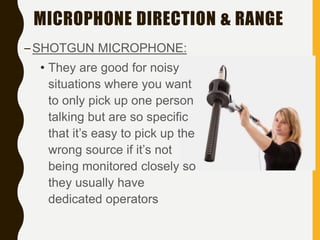
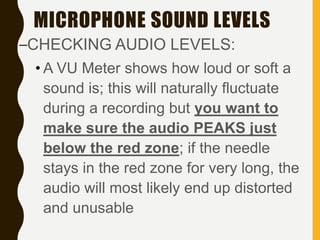
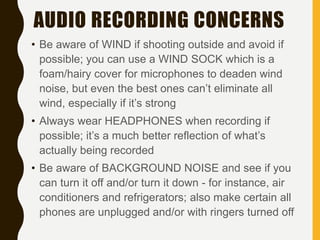
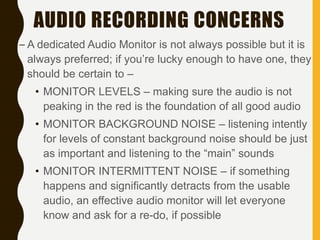
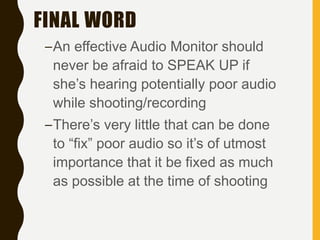
CHAPTER 13:
RECORDING
SOUND
C O M M 1 1 9 : B R O A D C A S T P R O D U C T I O N
RECORDING SOUND
• AUDIO quality is obviously important when
working on a radio/audio-only production, but
AUDIO is just as important when shooting a video
project
• Bad AUDIO can ruin a video shoot just as easily
as having bad VISUALS
• Shooting on location is especially tricky when it
comes to getting good AUDIO because you will
have far less control than you would in a studio
environment
WILD TRACK-ROOM TONE
• For our purposes, a WILD TRACK is simply a minute or so
in which you recording nothing but the ambient sound –
that is just the sounds around on the location - THERE
SHOULD BE NO TALKING RECORDED!
• If you’re shooting inside, this practice is referred to as
ROOM TONE and is based on the fact that no shoot is
100% quiet and there are always sounds that are unique
to that space/location
• Because you’ll never be able to cut out all the noise, a
WILD TRACK/ROOM TONE is recorded so you can use it
to smooth over any sharp sound edits when you edit your
production together later
• SEE PAGE 124 IN YOUR BOOK FOR MORE ABOUT THE “WILD TRACK”
MICROPHONE DIRECTION & RANGE
• MICROPHONES play a large
part in Broadcast Production and
come with different pick-up
patterns for different purposes
–OMNIDIRECTIONAL:
• This type of
microphone picks up
sound all around it in
a 360 degree circle
(OMNI = in all ways
or places)
MICROPHONE DIRECTION & RANGE
–OMNIDIRECTIONAL:
• Good for picking up
ambient sound; not
good for interviews,
dialogues, and/or
reporters as its
harder to distinguish
one sound from
another
MICROPHONE DIRECTION & RANGE
• DIRECTIONAL MICROPHONES
allow you to prioritize a sound
source by recording sound coming
from a specific direction(s)
–FIGURE-OF-EIGHT/BI-
DIRECTIONAL:
• This type of
microphone picks up
sound from two
opposite directions but
not from the side
MICROPHONE DIRECTION & RANGE
–FIGURE-OF-
EIGHT/BI-
DIRECTIONAL:
• Useful in a handheld
situation where you
might have a reporter
and a subject having
a conversation with
only microphone
MICROPHONE DIRECTION & RANGE
–CARDIOID
MICROPHONE:
• Will pick up sound from in
front of the microphone
and to the side, but
nothing to the rear
• The pick-up pattern
resembles a heart, hence
the CARDIOID name
(“CARDIOID” is derived from
the Greek word for “heart”)
MICROPHONE DIRECTION & RANGE
– CARDIOID MICROPHONE:
• Useful in when recording
sound from one person per
microphone – but be careful
as these mics are more
prone to “popping”
• POPPING is a distortion that
can happen when someone
speaks into a microphone,
often with words beginning
with a P or B
MICROPHONE DIRECTION & RANGE
–HYPER-CARDIOID
MICROPHONE:
• Like the name suggests,
this mic has a similar
pick-up patter to the
CARDIOID mic but is
even more specific and,
as a result, even more
heart-shaped
MICROPHONE DIRECTION & RANGE
–SHOTGUN
MICROPHONE:
• The most directional of
microphones with the
smallest/narrowest pick-
up pattern; almost always
shaped like a shotgun
with the front/barrel
having a long and pointed
range of pick-up
MICROPHONE DIRECTION & RANGE
–SHOTGUN MICROPHONE:
• They are good for noisy
situations where you want
to only pick up one person
talking but are so specific
that it’s easy to pick up the
wrong source if it’s not
being monitored closely so
they usually have
dedicated operators
TYPES OF MICROPHONES
–CAMERA MICROPHONE:
• These are built into or onto the camera itself
• While suitable for personal use, they are the
least effective microphone to use for
professional shoots as they are usually only
good for ambient sound, not for interviews or
dialogue
• Using them will result in ambient sound and
dialogue/interview sound all mixed together
• Most cameras will have an input for an external
microphone suitable for interview/dialogue
recording
TYPES OF MICROPHONES
–HANDHELD MICROPHONE:
• These are what you typically see reporters using
and is connected to the camera by a cable
• They tend to be DIRECTIONAL and should be held
below chin height
TYPES OF MICROPHONES
–HANDHELD MICROPHONE:
• You should talk across the TOP of the microphone
as opposed to direction INTO the microphone as
that will help cut out distortion and popping
• Be careful not to shove it into someone’s face; not
only is it rude, it’s more likely to result in poor audio
quality
DON’T DO THIS!
TYPES OF MICROPHONES
–LAPEL MICROPHONE:
• Also called LAVALIERS or
NECK microphones
• They are clipped onto a
person’s clothing and are
sometimes even turned
inside and not easily
visible
• Be careful as they can also
easily pick up rustling of
clothes and sometimes
even a beating heart!
MICROPHONE MOUNTS
–TABLE MOUNT:
• Mini–tripod or base-centered mount that sits
on a table, typically for single speaker use
MICROPHONE MOUNTS
–LARGE STAND:
• Similar to the table
mount but much bigger
and designed for floor
us; you can adjust the
height and angle but
they are not easy to use
outside and are easily
knocked over
MICROPHONE MOUNTS
–BOOM:
• Type of stand or pole typically held by an operator and
is held above the intended recording, following it as it
moves; can be tiring and requires stamina and
strength to hold
MICROPHONE SOUND LEVELS
–CHECKING AUDIO LEVELS:
• Have your subject speak in a normal
voice before you start recording so you
can make sure you’re ready to get the
best quality
• VU METERS are often used to make
sure your subject is in appropriate range
• A VU Meter may be all lights or work of a
gauge system that resembles a car’s
speedometer
MICROPHONE SOUND LEVELS
–CHECKING AUDIO LEVELS:
• A VU Meter shows how loud or soft a
sound is; this will naturally fluctuate
during a recording but you want to
make sure the audio PEAKS just
below the red zone; if the needle
stays in the red zone for very long, the
audio will most likely end up distorted
and unusable
MICROPHONE SOUND LEVELS
–VU METERS TOO FAR IN THE RED
AUDIO RECORDING CONCERNS
• Be aware of WIND if shooting outside and avoid if
possible; you can use a WIND SOCK which is a
foam/hairy cover for microphones to deaden wind
noise, but even the best ones can’t eliminate all
wind, especially if it’s strong
• Always wear HEADPHONES when recording if
possible; it’s a much better reflection of what’s
actually being recorded
• Be aware of BACKGROUND NOISE and see if you
can turn it off and/or turn it down - for instance, air
conditioners and refrigerators; also make certain all
phones are unplugged and/or with ringers turned off
AUDIO RECORDING CONCERNS
– A dedicated Audio Monitor is not always possible but it is
always preferred; if you’re lucky enough to have one, they
should be certain to –
• MONITOR LEVELS – making sure the audio is not
peaking in the red is the foundation of all good audio
• MONITOR BACKGROUND NOISE – listening intently
for levels of constant background noise should be just
as important and listening to the “main” sounds
• MONITOR INTERMITTENT NOISE – if something
happens and significantly detracts from the usable
audio, an effective audio monitor will let everyone
know and ask for a re-do, if possible
FINAL WORD
–An effective Audio Monitor should
never be afraid to SPEAK UP if
she’s hearing potentially poor audio
while shooting/recording
–There’s very little that can be done
to “fix” poor audio so it’s of utmost
importance that it be fixed as much
as possible at the time of shooting
RECORDING SOUND QUIZ & BOARD
DISCUSSION
•Take the RECORDING
SOUND QUIZ
•Participate in the assigned
discussion

WCC COMM 119-Recording Sound

  • 1.
    CHAPTER 13: RECORDING SOUND C OM M 1 1 9 : B R O A D C A S T P R O D U C T I O N
  • 2.
    RECORDING SOUND • AUDIOquality is obviously important when working on a radio/audio-only production, but AUDIO is just as important when shooting a video project • Bad AUDIO can ruin a video shoot just as easily as having bad VISUALS • Shooting on location is especially tricky when it comes to getting good AUDIO because you will have far less control than you would in a studio environment
  • 3.
    WILD TRACK-ROOM TONE •For our purposes, a WILD TRACK is simply a minute or so in which you recording nothing but the ambient sound – that is just the sounds around on the location - THERE SHOULD BE NO TALKING RECORDED! • If you’re shooting inside, this practice is referred to as ROOM TONE and is based on the fact that no shoot is 100% quiet and there are always sounds that are unique to that space/location • Because you’ll never be able to cut out all the noise, a WILD TRACK/ROOM TONE is recorded so you can use it to smooth over any sharp sound edits when you edit your production together later • SEE PAGE 124 IN YOUR BOOK FOR MORE ABOUT THE “WILD TRACK”
  • 4.
    MICROPHONE DIRECTION &RANGE • MICROPHONES play a large part in Broadcast Production and come with different pick-up patterns for different purposes –OMNIDIRECTIONAL: • This type of microphone picks up sound all around it in a 360 degree circle (OMNI = in all ways or places)
  • 5.
    MICROPHONE DIRECTION &RANGE –OMNIDIRECTIONAL: • Good for picking up ambient sound; not good for interviews, dialogues, and/or reporters as its harder to distinguish one sound from another
  • 6.
    MICROPHONE DIRECTION &RANGE • DIRECTIONAL MICROPHONES allow you to prioritize a sound source by recording sound coming from a specific direction(s) –FIGURE-OF-EIGHT/BI- DIRECTIONAL: • This type of microphone picks up sound from two opposite directions but not from the side
  • 7.
    MICROPHONE DIRECTION &RANGE –FIGURE-OF- EIGHT/BI- DIRECTIONAL: • Useful in a handheld situation where you might have a reporter and a subject having a conversation with only microphone
  • 8.
    MICROPHONE DIRECTION &RANGE –CARDIOID MICROPHONE: • Will pick up sound from in front of the microphone and to the side, but nothing to the rear • The pick-up pattern resembles a heart, hence the CARDIOID name (“CARDIOID” is derived from the Greek word for “heart”)
  • 9.
    MICROPHONE DIRECTION &RANGE – CARDIOID MICROPHONE: • Useful in when recording sound from one person per microphone – but be careful as these mics are more prone to “popping” • POPPING is a distortion that can happen when someone speaks into a microphone, often with words beginning with a P or B
  • 10.
    MICROPHONE DIRECTION &RANGE –HYPER-CARDIOID MICROPHONE: • Like the name suggests, this mic has a similar pick-up patter to the CARDIOID mic but is even more specific and, as a result, even more heart-shaped
  • 11.
    MICROPHONE DIRECTION &RANGE –SHOTGUN MICROPHONE: • The most directional of microphones with the smallest/narrowest pick- up pattern; almost always shaped like a shotgun with the front/barrel having a long and pointed range of pick-up
  • 12.
    MICROPHONE DIRECTION &RANGE –SHOTGUN MICROPHONE: • They are good for noisy situations where you want to only pick up one person talking but are so specific that it’s easy to pick up the wrong source if it’s not being monitored closely so they usually have dedicated operators
  • 13.
    TYPES OF MICROPHONES –CAMERAMICROPHONE: • These are built into or onto the camera itself • While suitable for personal use, they are the least effective microphone to use for professional shoots as they are usually only good for ambient sound, not for interviews or dialogue • Using them will result in ambient sound and dialogue/interview sound all mixed together • Most cameras will have an input for an external microphone suitable for interview/dialogue recording
  • 14.
    TYPES OF MICROPHONES –HANDHELDMICROPHONE: • These are what you typically see reporters using and is connected to the camera by a cable • They tend to be DIRECTIONAL and should be held below chin height
  • 15.
    TYPES OF MICROPHONES –HANDHELDMICROPHONE: • You should talk across the TOP of the microphone as opposed to direction INTO the microphone as that will help cut out distortion and popping • Be careful not to shove it into someone’s face; not only is it rude, it’s more likely to result in poor audio quality DON’T DO THIS!
  • 16.
    TYPES OF MICROPHONES –LAPELMICROPHONE: • Also called LAVALIERS or NECK microphones • They are clipped onto a person’s clothing and are sometimes even turned inside and not easily visible • Be careful as they can also easily pick up rustling of clothes and sometimes even a beating heart!
  • 17.
    MICROPHONE MOUNTS –TABLE MOUNT: •Mini–tripod or base-centered mount that sits on a table, typically for single speaker use
  • 18.
    MICROPHONE MOUNTS –LARGE STAND: •Similar to the table mount but much bigger and designed for floor us; you can adjust the height and angle but they are not easy to use outside and are easily knocked over
  • 19.
    MICROPHONE MOUNTS –BOOM: • Typeof stand or pole typically held by an operator and is held above the intended recording, following it as it moves; can be tiring and requires stamina and strength to hold
  • 20.
    MICROPHONE SOUND LEVELS –CHECKINGAUDIO LEVELS: • Have your subject speak in a normal voice before you start recording so you can make sure you’re ready to get the best quality • VU METERS are often used to make sure your subject is in appropriate range • A VU Meter may be all lights or work of a gauge system that resembles a car’s speedometer
  • 21.
    MICROPHONE SOUND LEVELS –CHECKINGAUDIO LEVELS: • A VU Meter shows how loud or soft a sound is; this will naturally fluctuate during a recording but you want to make sure the audio PEAKS just below the red zone; if the needle stays in the red zone for very long, the audio will most likely end up distorted and unusable
  • 22.
    MICROPHONE SOUND LEVELS –VUMETERS TOO FAR IN THE RED
  • 23.
    AUDIO RECORDING CONCERNS •Be aware of WIND if shooting outside and avoid if possible; you can use a WIND SOCK which is a foam/hairy cover for microphones to deaden wind noise, but even the best ones can’t eliminate all wind, especially if it’s strong • Always wear HEADPHONES when recording if possible; it’s a much better reflection of what’s actually being recorded • Be aware of BACKGROUND NOISE and see if you can turn it off and/or turn it down - for instance, air conditioners and refrigerators; also make certain all phones are unplugged and/or with ringers turned off
  • 24.
    AUDIO RECORDING CONCERNS –A dedicated Audio Monitor is not always possible but it is always preferred; if you’re lucky enough to have one, they should be certain to – • MONITOR LEVELS – making sure the audio is not peaking in the red is the foundation of all good audio • MONITOR BACKGROUND NOISE – listening intently for levels of constant background noise should be just as important and listening to the “main” sounds • MONITOR INTERMITTENT NOISE – if something happens and significantly detracts from the usable audio, an effective audio monitor will let everyone know and ask for a re-do, if possible
  • 25.
    FINAL WORD –An effectiveAudio Monitor should never be afraid to SPEAK UP if she’s hearing potentially poor audio while shooting/recording –There’s very little that can be done to “fix” poor audio so it’s of utmost importance that it be fixed as much as possible at the time of shooting
  • 26.
    RECORDING SOUND QUIZ& BOARD DISCUSSION •Take the RECORDING SOUND QUIZ •Participate in the assigned discussion