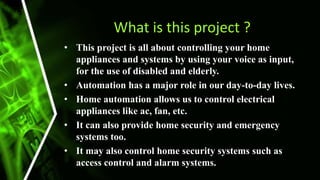
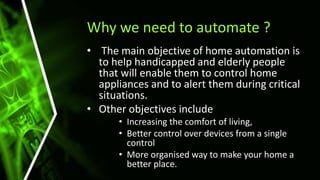
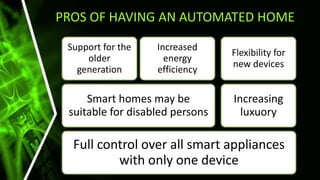
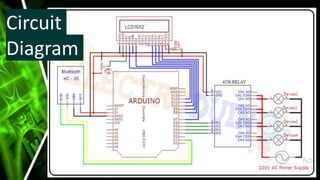
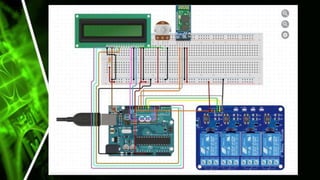
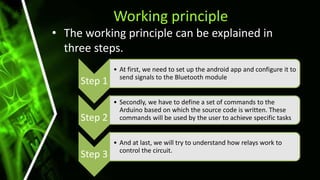
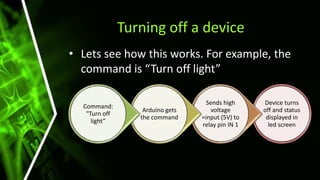
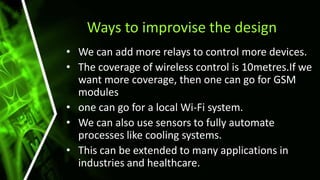
Voice Controlled
Home Automation
What is this project ?
• This project is all about controlling your home
appliances and systems by using your voice as input,
for the use of disabled and elderly.
• Automation has a major role in our day-to-day lives.
• Home automation allows us to control electrical
appliances like ac, fan, etc.
• It can also provide home security and emergency
systems too.
• It may also control home security systems such as
access control and alarm systems.
Why we need to automate ?
• The main objective of home automation is
to help handicapped and elderly people
that will enable them to control home
appliances and to alert them during critical
situations.
• Other objectives include
• Increasing the comfort of living,
• Better control over devices from a single
control
• More organised way to make your home a
better place.
PROS OF HAVING AN AUTOMATED HOME
Full control over all smart appliances
with only one device
Smart homes may be
suitable for disabled persons
Support for the
older
generation
Increased
energy
efficiency
Increasing
luxuory
Flexibility for
new devices
What we will be doing?
• In this project, we try to implement home
automation system using a
microprocessor(Arduino) and a smart phone.
• Here we will be controlling four different home
appliances by voice Command.
• One can also use IR remotes, local Wi-Fi to control
these devices.
• The key components of this project are Arduino,
Bluetooth module, Relay module, LCD display, a
smartphone, and Android App.
Steps involved
At first, we need to install a app on our smartphone, which will be
available in the play store. This app receives our Voice command and
sends it to the Bluetooth module wirelessly.
The Arduino decodes this command from the Bluetooth module.
Then Arduino sends a command to the Relays to control the home
appliances.
These four home appliances are switched on/off by eight different voice
commands. The LCD module will display the status of the home
appliances on or off.
Block Diagram
Components Required
• Arduino UNO/Nano – Microcontroller
• HC-05 Bluetooth module – For
communication between mobile and
microcontroller
• 4-Channel relay module- to turn on/off
devices using a low input signal
• LCD Display Module- displays the status of
the device
• PCB prototyping board- to connect the wires.
Components Required
• 12V DC power supply- power source of
the system
• 220V Ac power supply- source for the
devices to run
• Connecting wires
• A mobile phone – to give voice inputs
• “Bluetooth voice control for the
Arduino” app to send data to the
module HC-05
Bluetooth module HC-05
• HC-05 module is Bluetooth SPP (Serial Port Protocol) module,
• It is used for wireless communication between Arduino Uno
and smartphone.
• HC-05 can operates at power 3.6 to 6 volts.
• It has 6 pins: State, RXD,
TX, GND, VCC and EN.
Why Bluetooth…
• We prefer Bluetooth over others because everyone
has a smartphone with them all the time and they
have built-in Bluetooth facilities
• Hence, it is better to use Bluetooth instead of
carrying any separate remote controls.
• Their advantages are:
*Security
*Easy to use
*Works in short range
*We can find free Bluetooth apps
4 Channel relay module
• A relay is an electromagnetic switch which can be turned on
and off by using low power signals
• When activated, the electromagnet pulls to either open or
close an electrical circuit.
• We will be using a 4Channel 5V relay module in this project
• The board is both 3.3V and 5V
logic compatible and uses 4
digital outputs to control 4
individual relays..
Relays
Circuit
Diagram
Working principle
• The working principle can be explained in
three steps.
Step 1
• At first, we need to set up the android app and configure it to
send signals to the Bluetooth module
Step 2
• Secondly, we have to define a set of commands to the
Arduino based on which the source code is written. These
commands will be used by the user to achieve specific tasks
Step 3
• And at last, we will try to understand how relays work to
control the circuit.
Setting up the commands
• At first, we need to choose 8 different types of
Voice Commands to control 4 devices.
• Particularly two voice commands are used to
control a device.
• For example, the “turn on light ” command is
used to Turn ON the Light, and the “turn off
light ” command is used to turn OFF the Light.
• These Voice commands will be used in Arduino
code.
• The commands we will be using are:
Command Function Pin
turn on light Light On Relay-1 (IN1)
turn off light Light Off
turn on fan Fan On Relay-2 (IN2)
Turn off fan Fan Off
turn on TV TV On Relay-3 (IN3)
turn off TV TV Off
turn on pump Pump On Relay-4 (IN4)
turn off pump Pump Off
turn on all All Device On Relay-1, Relay-2
Relay-3, Relay-4 (IN1,
IN2, IN3, IN4)
turn off all All Device Off
Working of relays
• When we send a voice command through the App,
then the Bluetooth module receives that command
and passes it to the Arduino.
• Now Arduino compares this command with the
predefine Commands (which are defined in
Arduino code). If this command matches then
Arduino sends a command to operate the relay
module.
• We can see the Device status (on or off) on the
16×2 LCD Display Module.
Device turns
on and status
displayed in
led screen
Sends low
voltage input
(0V) to relay
pin IN 1
Arduino gets
the command
Command:
"Turn on
light”
Turning on a device
• Lets see how this works. For example, the
command is “Turn on light”
Turning off a device
• Lets see how this works. For example, the
command is “Turn off light”
Device turns
off and status
displayed in
led screen
Sends high
voltage
=input (5V) to
relay pin IN 1
Arduino gets
the command
Command:
"Turn off
light”
Cons of having voice automation
Extreme installation
cost when fully
automated
Technological problems
in connected homes
Some initial learning
efforts are necessary
You may lock yourself
out of your own house
Helplessness if
technology fails
Reliable internet
connection is crucial
Helplessness if
technology fails
Maintenance and repair
issues
Ways to improvise the design
• We can add more relays to control more devices.
• The coverage of wireless control is 10metres.If we
want more coverage, then one can go for GSM
modules
• one can go for a local Wi-Fi system.
• We can also use sensors to fully automate
processes like cooling systems.
• This can be extended to many applications in
industries and healthcare.
Conclusion
• In this presentation, we have introduced design and
implementation of a low cost, flexible and wireless
solution to the home automation.
• The system is secured for access from any user or
intruder.
• Passwords can be changed by the user at any point,
and this adds a additional layer of protection from
unauthorized users.
• This system can be used as a test bed for any
appliances that requires on-off switching
applications without any internet connection.
THANK YOU
Prepared by,
Thoushick Ram P
Tamilkumaran S
Subikshwar K
Srivarsan S
Subasurya R
Thulasiraman E

Voice controlled home automation.pptx

  • 1.
  • 2.
    What is thisproject ? • This project is all about controlling your home appliances and systems by using your voice as input, for the use of disabled and elderly. • Automation has a major role in our day-to-day lives. • Home automation allows us to control electrical appliances like ac, fan, etc. • It can also provide home security and emergency systems too. • It may also control home security systems such as access control and alarm systems.
  • 3.
    Why we needto automate ? • The main objective of home automation is to help handicapped and elderly people that will enable them to control home appliances and to alert them during critical situations. • Other objectives include • Increasing the comfort of living, • Better control over devices from a single control • More organised way to make your home a better place.
  • 4.
    PROS OF HAVINGAN AUTOMATED HOME Full control over all smart appliances with only one device Smart homes may be suitable for disabled persons Support for the older generation Increased energy efficiency Increasing luxuory Flexibility for new devices
  • 5.
    What we willbe doing? • In this project, we try to implement home automation system using a microprocessor(Arduino) and a smart phone. • Here we will be controlling four different home appliances by voice Command. • One can also use IR remotes, local Wi-Fi to control these devices. • The key components of this project are Arduino, Bluetooth module, Relay module, LCD display, a smartphone, and Android App.
  • 6.
    Steps involved At first,we need to install a app on our smartphone, which will be available in the play store. This app receives our Voice command and sends it to the Bluetooth module wirelessly. The Arduino decodes this command from the Bluetooth module. Then Arduino sends a command to the Relays to control the home appliances. These four home appliances are switched on/off by eight different voice commands. The LCD module will display the status of the home appliances on or off.
  • 7.
  • 8.
    Components Required • ArduinoUNO/Nano – Microcontroller • HC-05 Bluetooth module – For communication between mobile and microcontroller • 4-Channel relay module- to turn on/off devices using a low input signal • LCD Display Module- displays the status of the device • PCB prototyping board- to connect the wires.
  • 9.
    Components Required • 12VDC power supply- power source of the system • 220V Ac power supply- source for the devices to run • Connecting wires • A mobile phone – to give voice inputs • “Bluetooth voice control for the Arduino” app to send data to the module HC-05
  • 10.
    Bluetooth module HC-05 •HC-05 module is Bluetooth SPP (Serial Port Protocol) module, • It is used for wireless communication between Arduino Uno and smartphone. • HC-05 can operates at power 3.6 to 6 volts. • It has 6 pins: State, RXD, TX, GND, VCC and EN.
  • 11.
    Why Bluetooth… • Weprefer Bluetooth over others because everyone has a smartphone with them all the time and they have built-in Bluetooth facilities • Hence, it is better to use Bluetooth instead of carrying any separate remote controls. • Their advantages are: *Security *Easy to use *Works in short range *We can find free Bluetooth apps
  • 12.
    4 Channel relaymodule • A relay is an electromagnetic switch which can be turned on and off by using low power signals • When activated, the electromagnet pulls to either open or close an electrical circuit. • We will be using a 4Channel 5V relay module in this project • The board is both 3.3V and 5V logic compatible and uses 4 digital outputs to control 4 individual relays..
  • 13.
  • 14.
  • 16.
    Working principle • Theworking principle can be explained in three steps. Step 1 • At first, we need to set up the android app and configure it to send signals to the Bluetooth module Step 2 • Secondly, we have to define a set of commands to the Arduino based on which the source code is written. These commands will be used by the user to achieve specific tasks Step 3 • And at last, we will try to understand how relays work to control the circuit.
  • 17.
    Setting up thecommands • At first, we need to choose 8 different types of Voice Commands to control 4 devices. • Particularly two voice commands are used to control a device. • For example, the “turn on light ” command is used to Turn ON the Light, and the “turn off light ” command is used to turn OFF the Light. • These Voice commands will be used in Arduino code.
  • 18.
    • The commandswe will be using are: Command Function Pin turn on light Light On Relay-1 (IN1) turn off light Light Off turn on fan Fan On Relay-2 (IN2) Turn off fan Fan Off turn on TV TV On Relay-3 (IN3) turn off TV TV Off turn on pump Pump On Relay-4 (IN4) turn off pump Pump Off turn on all All Device On Relay-1, Relay-2 Relay-3, Relay-4 (IN1, IN2, IN3, IN4) turn off all All Device Off
  • 19.
    Working of relays •When we send a voice command through the App, then the Bluetooth module receives that command and passes it to the Arduino. • Now Arduino compares this command with the predefine Commands (which are defined in Arduino code). If this command matches then Arduino sends a command to operate the relay module. • We can see the Device status (on or off) on the 16×2 LCD Display Module.
  • 20.
    Device turns on andstatus displayed in led screen Sends low voltage input (0V) to relay pin IN 1 Arduino gets the command Command: "Turn on light” Turning on a device • Lets see how this works. For example, the command is “Turn on light”
  • 21.
    Turning off adevice • Lets see how this works. For example, the command is “Turn off light” Device turns off and status displayed in led screen Sends high voltage =input (5V) to relay pin IN 1 Arduino gets the command Command: "Turn off light”
  • 22.
    Cons of havingvoice automation Extreme installation cost when fully automated Technological problems in connected homes Some initial learning efforts are necessary You may lock yourself out of your own house Helplessness if technology fails Reliable internet connection is crucial Helplessness if technology fails Maintenance and repair issues
  • 23.
    Ways to improvisethe design • We can add more relays to control more devices. • The coverage of wireless control is 10metres.If we want more coverage, then one can go for GSM modules • one can go for a local Wi-Fi system. • We can also use sensors to fully automate processes like cooling systems. • This can be extended to many applications in industries and healthcare.
  • 24.
    Conclusion • In thispresentation, we have introduced design and implementation of a low cost, flexible and wireless solution to the home automation. • The system is secured for access from any user or intruder. • Passwords can be changed by the user at any point, and this adds a additional layer of protection from unauthorized users. • This system can be used as a test bed for any appliances that requires on-off switching applications without any internet connection.
  • 25.
    THANK YOU Prepared by, ThoushickRam P Tamilkumaran S Subikshwar K Srivarsan S Subasurya R Thulasiraman E