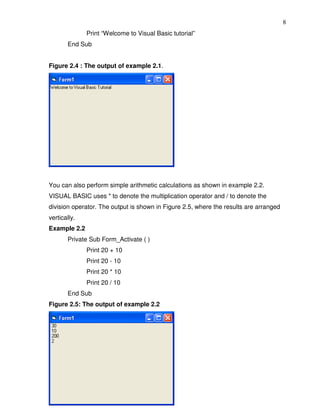
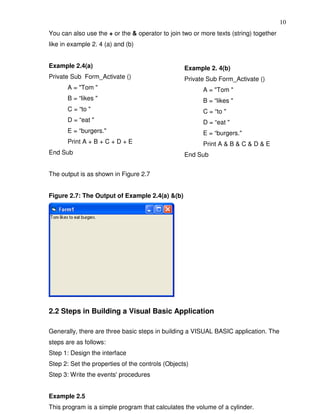
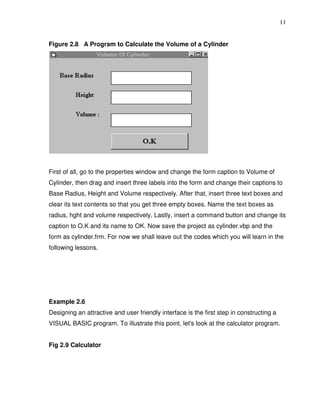
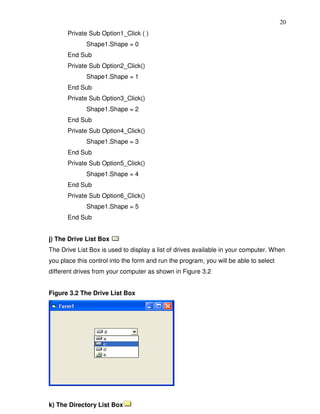
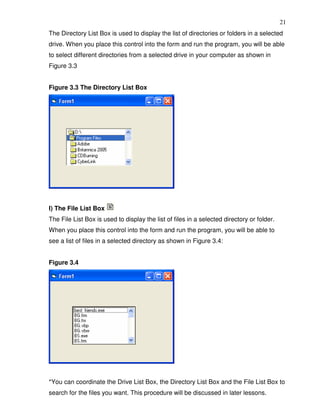
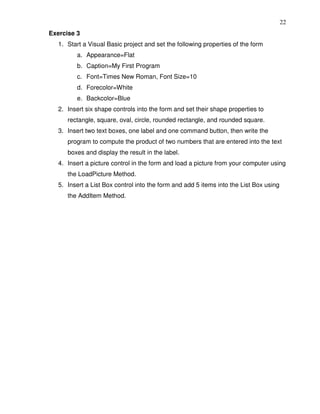
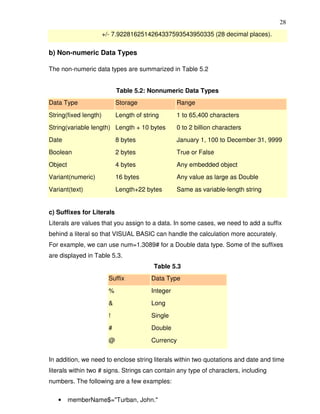
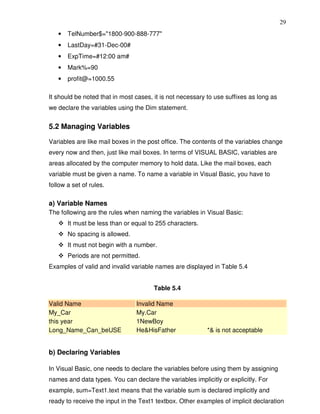
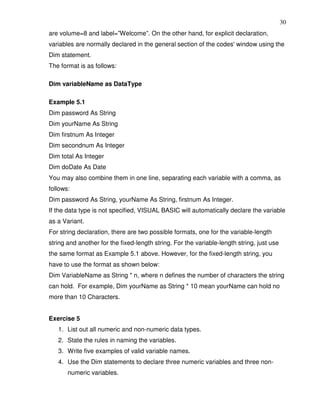
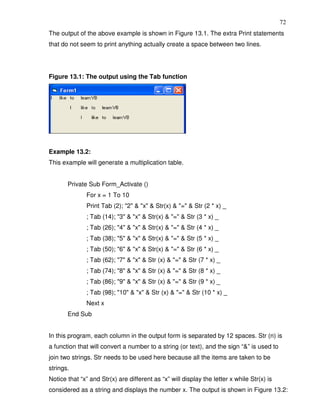
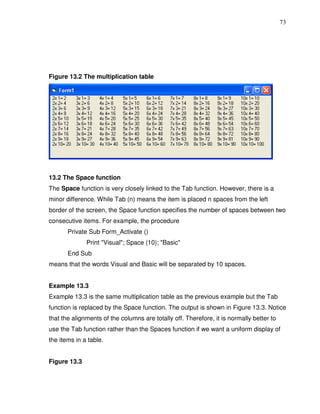
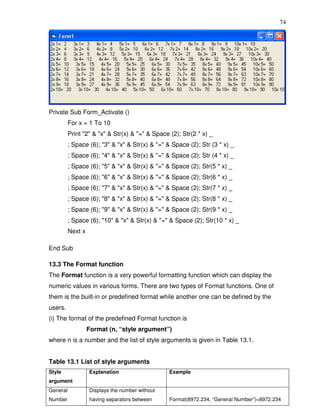
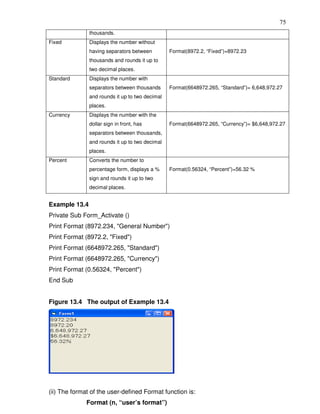
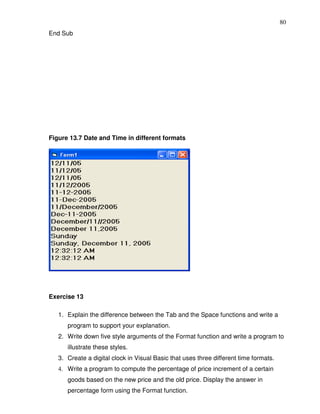
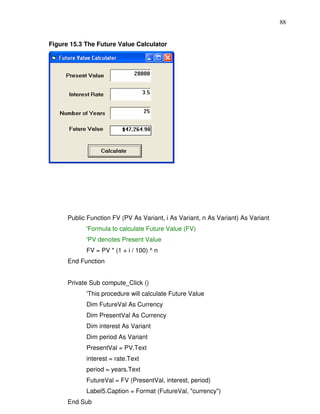
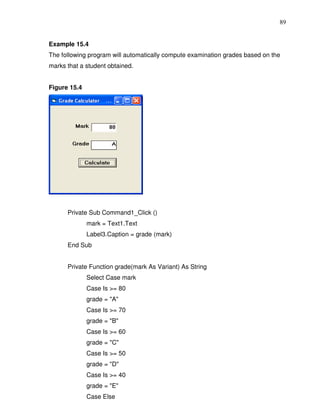
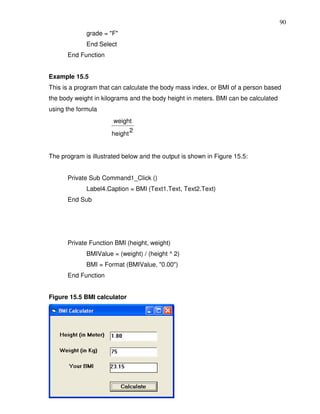
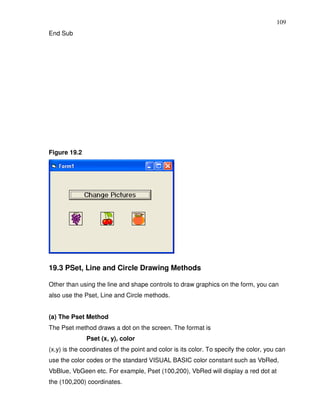
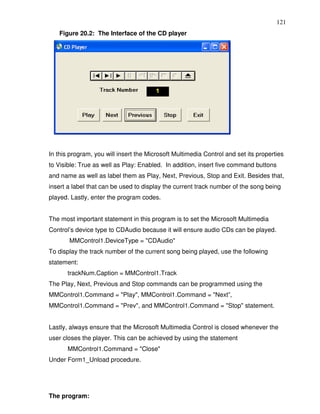
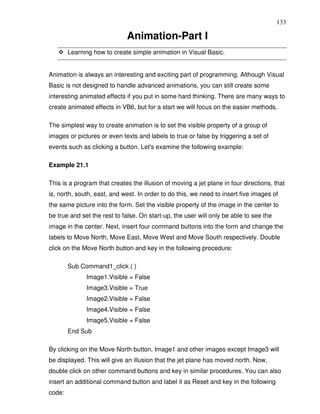
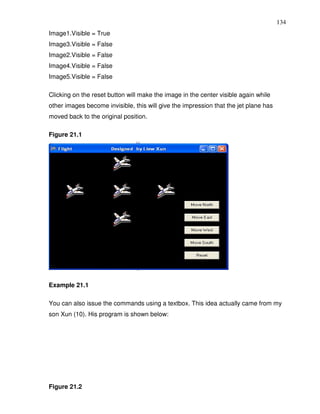
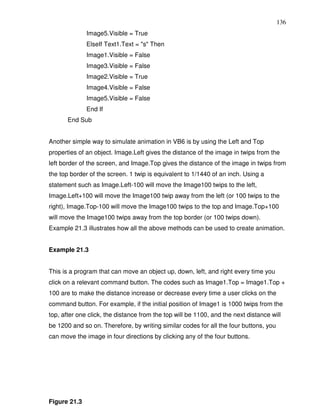
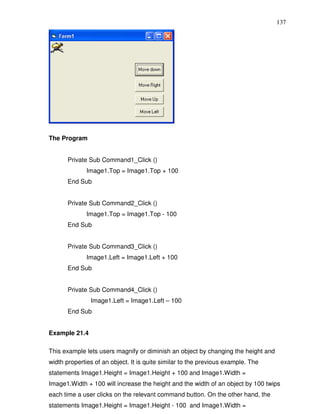
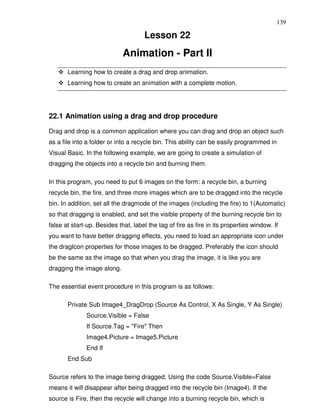
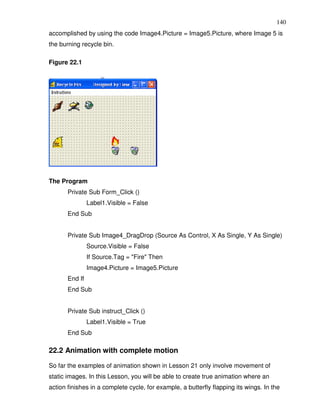
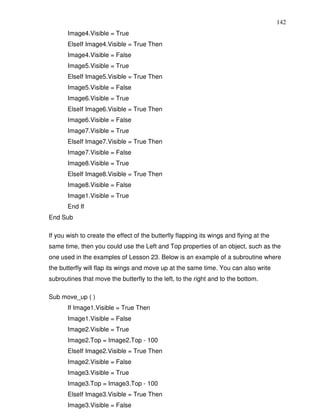
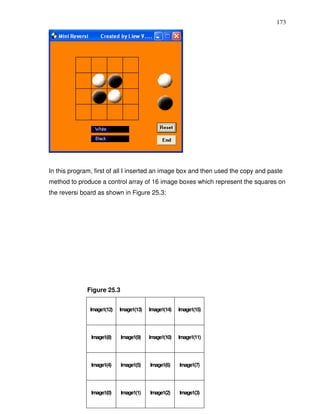
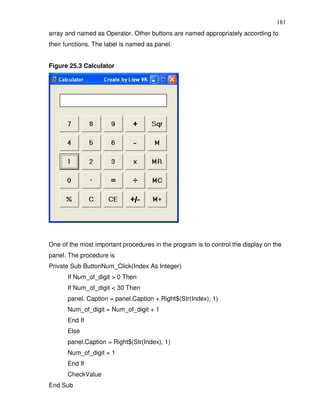
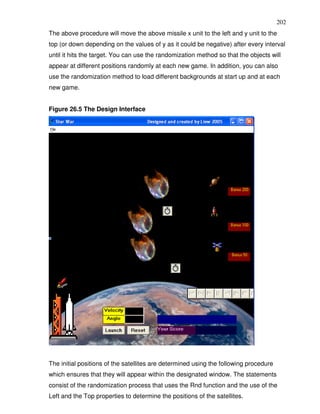
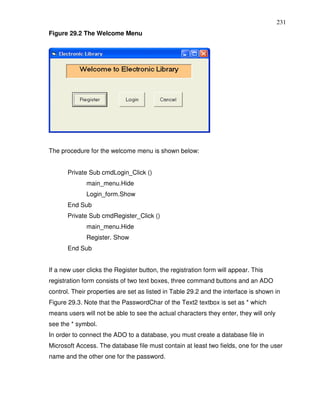
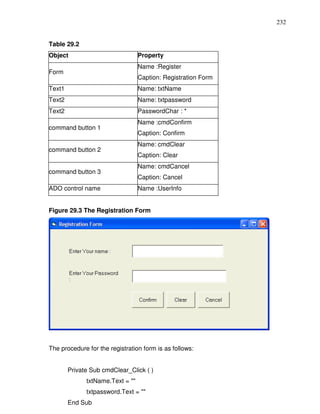
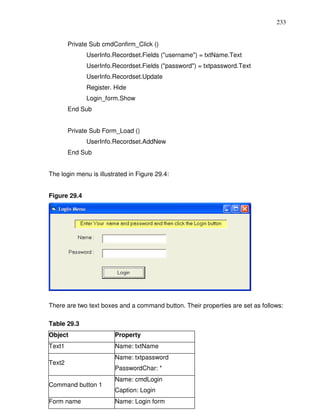
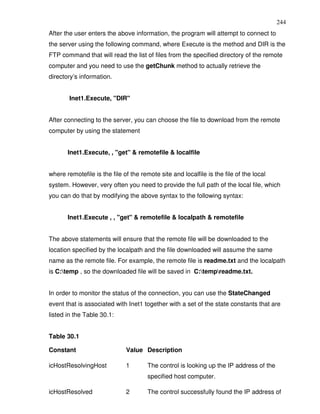
II
Disclaimer


Visual Basic ® Made Easy- A complete tutorial for beginners is an independent
publication and is not affiliated with, nor has it been authorized, sponsored, or
otherwise approved by Microsoft Corporation.


Trademarks

Microsoft, Visual Basic, Excel, Acess and Windows are either registered trademarks
or trademarks of Microsoft Corporation in the United States and/or other countries. All
other trademarks belong to their respective owners.


Liability
The purpose of this book is to provide a basic guide for people interested in Visual
Basic® programming. Although every effort and care has been taken to make the
information as accurate as possible, the author shall not be liable for any error, harm
or damage arising from using the instructions given in this book.


Copyright © 2006 Liew Voon Kiong
All rights reserved. No Part of this e-book may be reproduced, in any form or by any
means,without permission in writing from the author.


ISBN: 141962895X
I


                              Acknowledgement
I would like to express my sincere gratitude to many people who have made their
contributions in one way or another to the successful publication of this book.
My special thanks go to my children Xiang, Yi and Xun. My daughter Xiang edited
this book while my sons Yi and Xun contributed their ideas and even wrote some of
the sample programs for this book. I would also like to appreciate the support
provided by my beloved wife Kim Huang and my youngest daughter Yuan. I would
also like to thank the million of visitors to my Visual Basic ® Tutorial website at
www.vbtutor.net, especially those who contributed their comments, for their support
and encouragement. Finally, I would like to thank my publisher BookSurge for the
guidance and assistance in producing this book.


                               About the Author

Dr. Liew Voon Kiong holds a bachelor degree in Mathematics, a master degree in
Management and a doctoral degree in Business Administration. He has been
involved in programming for more than 15 years. He created the popular online
Visual Basic Tutorial at www.vbtutor.net in 1996 and since then the web site has
attracted millions of visitors and it is one of the top searched Visual Basic® Tutorial
websites in many search engines including Google. In order to provide more support
for the Visual Basic hobbyists, he has written this book based on the Visual Basic
tutorial.
II

CONTENTS

ACKNOWLEDGEMENT ...........................................................................................................................I
ABOUT THE AUTHOR .............................................................................................................................I
LESSON 1 INTRODUCTION TO VISUAL BASIC ................................................................................1
           1.1 A Brief Description of Visual Basic ..................................................................................................................1
           1.2 The Visual Basic Environment .........................................................................................................................2
LESSON 2 BUILDING THE VISUAL BASIC APPLICATIONS ............................................................5
           2.1 Creating Simple Visual Basic Applications.....................................................................................................5
           2.2 Steps in Building a Visual Basic Application ................................................................................................10
LESSON 3 WORKING WITH CONTROLS .........................................................................................13
           3.1 The Properties of the Controls .......................................................................................................................14
LESSON 4 WRITING THE CODES .....................................................................................................23
LESSON 5 VISUAL BASIC DATA ......................................................................................................27
           5.1 Types of Visual Basic Data.............................................................................................................................27
LESSON 6 MANAGING VISUAL BASIC DATA .................................................................................31
           6.1 Assigning Values to the Variables .................................................................................................................31
           6.2 Arithmetic Operators in Visual Basic.............................................................................................................31
LESSON 7 CONTROLLING PROGRAM FLOW – PART I..................................................................35
           7.1 Conditional Operators .....................................................................................................................................35
           7.2 Logical Operators.............................................................................................................................................35
           7.3 Using If.....Then.....Elseif….Else Statements with Operators ....................................................................36
LESSON 8 CONTROLLING PROGRAM FLOW – PART II................................................................41
           8.1 The Select Case …. End Select Statement .................................................................................................41
LESSON 9 LOOPING PART I .............................................................................................................46
           9.1 Do….. Loop......................................................................................................................................................46
           9.2: Exiting the Do Loop ........................................................................................................................................49
           9.3 The While….Wend Loop.................................................................................................................................50
LESSON 10 LOOPING PART II ...........................................................................................................52
           10.1 The For....Next Loop .....................................................................................................................................52
           10.2 Exiting the For….Next Loop .........................................................................................................................54
           10.3 The Nested Loop ...........................................................................................................................................55
LESSON 11 VISUAL BASIC FUNCTIONS- PART I ............................................................................58
           11.1 Introduction to Visual Basic Functions........................................................................................................58
           11.2 The MsgBox ( ) Function ..............................................................................................................................58
           11.3 The InputBox( ) Function ..............................................................................................................................62
LESSON 12 VISUAL BASIC FUNCTIONS- PART II ...........................................................................64
           12.1 The Rnd Function ..........................................................................................................................................64
           12.2 The Numeric Functions.................................................................................................................................67
           12.3 Trigonometric Functions ...............................................................................................................................69
LESSON13 VISUAL BASIC FUNCTIONS PART III- FORMATTING OUTPUT                                                                                                                 71
           13.1 The Tab Function..........................................................................................................................................71
           13.2 The Space Function ......................................................................................................................................73
           13.3 The Format Function...................................................................................................................................74
           13.4 Formatting Date and Time............................................................................................................................77
LESSON14 VISUAL BASIC FUNCTIONS PART IV- MANIPULATING STRINGS                                                                                                               80
           14.1 The Len Function..........................................................................................................................................81
           14.2 The Right Function .......................................................................................................................................82
           14.3 The Left Function...........................................................................................................................................82
           14.4 The Ltrim Function.........................................................................................................................................82
III
          14.5 The Rtrim Function ........................................................................................................................................82
          14.6 The Trim function...........................................................................................................................................82
          14.7 The Mid Function ...........................................................................................................................................83
          14.8 The InStr function ..........................................................................................................................................83
          14.9 The Ucase and the Lcase functions............................................................................................................83
          14.10 The Str and Val functions ...........................................................................................................................83
          14.11 The Chr and the Asc functions ..................................................................................................................83
LESSON 15 VISUAL BASIC FUNCTIONS PART V- CREATING YOUR OWN FUNCTIONS                                                                                                          81
LESSON 16 CREATING VISUAL BASIC FUNCTIONS FOR MS EXCEL ..........................................91
          16.1 The Needs to Create User-Defined Functions in MS-Excel ....................................................................91
          16.2 Using Microsoft Excel Visual Basic Editor.................................................................................................92
LESSON 17 ARRAYS PART I..............................................................................................................96
          17.1 Introduction to Array ......................................................................................................................................96
          17.2 Declaring Arrays ............................................................................................................................................96
          17.3 The Control Array ..........................................................................................................................................99
LESSON 18 ARRAYS PART II- TWO DIMENSIONAL ARRAYS .......................................................96
LESSON 19 GRAPHICS.....................................................................................................................104
          19.1 The line and Shape controls ......................................................................................................................104
          19.2 The Image Box and the Picture Box .........................................................................................................107
          19.3 PSet, Line and Circle Drawing Methods...................................................................................................109
LESSON 20 CREATING MULTIMEDIA APPLICATIONS .................................................................120
          20.1 Creating a CD Player ..................................................................................................................................120
          20.2 Creating an Audio Player............................................................................................................................123
          20.3 Creating a Multimedia Player .....................................................................................................................128
LESSON 21 ANIMATION - PART I ....................................................................................................139
LESSON 22 ANIMATION - PART II ...................................................................................................139
          22.1 Animation using a drag and drop procedure............................................................................................139
          22.2 Animation with complete motion................................................................................................................140
LESSON 23 ANIMATION - PART III ..................................................................................................144
          23.1 Animation using timers................................................................................................................................144
          23.2 Animation using the Move Method ............................................................................................................147
LESSON 24 FUN AND GAMES PROGRAMMING- PART I..............................................................170
          24.1 Snake Chess ................................................................................................................................................148
          24.2 The Slot Machine.........................................................................................................................................148
LESSON 25 FUN AND GAMES PROGRAMMING- PART II.............................................................170
          25.1 Boggle ...........................................................................................................................................................170
          25.2 Reversi ..........................................................................................................................................................172
          25.3 Calculator......................................................................................................................................................180
LESSON 27 WORKING WITH FILES ................................................................................................212
          27.1 Introduction ...................................................................................................................................................212
          27.2 Creating a Text File .....................................................................................................................................212
          27.3 Reading a File ..............................................................................................................................................213
LESSON 28 CREATING BASIC DATABASE APPLICATIONS IN VISUAL BASIC ........................219
LESSON 29 CREATING DATABASE APPLICATIONS USING ADO CONTROL ...........................223
LESSON 30 INTERNET AND WEB APPLICATIONS .......................................................................238
          30.1 The Web Browser ........................................................................................................................................242
          30.2 The FTP program ........................................................................................................................................242
1


                                    Lesson 1
                  Introduction to Visual Basic
      A brief description of Visual Basic
      Getting to know the Visual Basic environment


1.1 A brief description of Visual Basic
VISUAL BASIC® is a high level programming language evolved from the earlier DOS
version called BASIC. BASIC stands for Beginners' All-purpose Symbolic Instruction
Code. The program codes in Visual Basic resemble the English language. Different
software companies produce different versions of BASIC, such as Microsoft®
QBASIC, QUICKBASIC, GWBASIC, and IBM BASICA and so on.


Visual Basic is a fairly easy programming language and it is for anybody who is
interested in programming but lacks professional training in software engineering.
Learning VISUAL BASIC will help young children to improve their logical thinking
skills and develop their minds. You can choose to program in VISUAL BASIC purely
for fun and enjoyment or create more advanced applications such as educational
courseware and commercial software.


VISUAL BASIC is a visual and events driven programming Language. These are the
main divergences from the old BASIC. In BASIC, programming is done in a text-
based environment and the program is executed sequentially. In VISUAL BASIC,
programming is done in a graphical environment. In old BASIC, you have to write a
text-based procedure to design the interface, but Visual Basic enables you to design
the interface by dragging and resizing the objects as well as changing their colors,
just like any windows®-based programs.


Visual Basic is event-driven because users may click on a certain object randomly,
so each object has to be programmed independently to be able to response to those
actions (events). Examples of events are clicking a command button, entering text
into a text box, selecting an item in a list box etc. Therefore, a VISUAL BASIC
Program is made up of many subprograms, each with its own program code which
2
can be executed independently and at the same time can be linked together in one
way or another.

1.2 The Visual Basic Environment
Upon start up, Visual Basic 6.0 will display the dialog box as shown in Figure 1.1.
You can choose to start a new project, open an existing project or select a list of
recently opened programs. A project is a collection of files that make up your
application. There are various types of applications that can be created; however, we
shall concentrate on creating Standard EXE programs (EXE means executable
program). Now, click on the Standard EXE icon to go into the VISUAL BASIC
programming environment.


Figure 1.1 The Visual Basic Start-up Dialog Box
3
Figure 1.2: The Visual Basic Environment


In Figure 1.2, the Visual Basic Environment consists of
   •   A blank form for you to design your application's interface.
   •   The project window which displays the files that are created in your application.
   •   The properties window which displays the properties of various controls and
       objects that are created in your application.


It also has a Toolbox that consists of all the controls essential for developing a
VISUAL BASIC Application. The controls include text boxes, command buttons,
labels, combo boxes, picture boxes, image boxes, timers and other objects that can
be dragged to and drawn on the form to perform certain tasks according to the events
assigned to them. You may also add additional objects. First, click on the project item
on the menu, then on the components item on the drop-down list, and lastly select
the controls you want to use in your program. The controls for Standard.EXE window
are shown in Figure 1.3.
4
Figure 1.3: The controls available for a Standard.exe project


                                                               PictureBox
               Label
                                                                 TextBox
               Frame
                                                           CommandButton
               CheckBox
                                                             OptionButton
               ComboBox
                                                                ListBox
               HScrollBar
                                                              VScrollBar
               Timer
                                                              DriveListBox
               DirListBox
                                                              FileListBox
               Shape
                                                                 Line
               Image
                                                                 Data
               OLE


Exercise 1
   1. Write down the meaning of BASIC.
   2. Briefly explain the difference between VISUAL BASIC and the old BASIC.
   3. List out all the controls in a Standard.exe Visual Basic project.
5

                                     Lesson 2
         Building the Visual Basic Applications
        Creating simple Visual Basic Applications.
        Getting to know the steps in building a Visual Basic Application.


2.1 Creating Simple Visual Basic Applications

In this section, we are not going into the technical aspects of VISUAL BASIC
programming. The main purpose of this section is to let you get a feel for it. Now, you
can try out a few examples in this lesson. Example 2.1 is a simple program. First of
all, you have to launch Microsoft Visual Basic. Normally, a default form Form1 will be
available for you to start your new project. Double click on Form1, and the source
code window as shown in Figure 2.1 will appear. The top of the source code window
consists of a list of objects (on the left) and their associated events or procedures (on
the right). In Figure 2.1, the object displayed is Form and the associated procedure is
Load.


Figure 2.1 The Source Code Window
6


When you click on the object box, the drop-down list will display a list of objects you
have inserted into your form as shown in Figure 2.2. Here, you can see the form, the
command button with the name Command1, the Label with the name Label1 and the
PictureBox with the name Picture1. Similarly, when you click on the procedure box, a
list of procedures associated with the object will be displayed as shown in Figure 2.3.
Some of the procedures associated with the object Form are Activate, Click, DblClick
(Double-Click), DragDrop, keyPress etc. Each object has its own set of procedures.
You can select an object and write codes for any of its procedures in order to perform
certain tasks.


Figure 2.2: List of Objects
7


Figure 2.3: List of Procedures


You do not have to worry about the beginning and the end statements (i.e. Private
Sub Form_Load.......End Sub). Just key in the codes between the above two
statements exactly as shown here. When you run the program, don’t be surprised
that nothing shows up. In order to display the output of the program, you have to add
the Form1.show statement like in Example 2.1 or you can just use the
Form_Activate ( ) event procedure as shown in example 2.2. The command Print
does not mean printing using a printer. Instead, it means displaying the output on the
computer screen. Now, press F5 or click on the run button to run the program and
you will get the output as shown in Figure 2.4.


Example 2.1
      Private Sub Form_Load ( )
              Form1.show
8
              Print “Welcome to Visual Basic tutorial”
       End Sub


Figure 2.4 : The output of example 2.1.


You can also perform simple arithmetic calculations as shown in example 2.2.
VISUAL BASIC uses * to denote the multiplication operator and / to denote the
division operator. The output is shown in Figure 2.5, where the results are arranged
vertically.
Example 2.2
       Private Sub Form_Activate ( )
              Print 20 + 10
              Print 20 - 10
              Print 20 * 10
              Print 20 / 10
       End Sub
Figure 2.5: The output of example 2.2
9


Example 2.2 can also be written as
Private Sub Form_Activate ( )
      Print 20 + 10, 20 – 10, 20 * 10, 20 / 10
End Sub
The numbers will be arranged in a horizontal line separated by spaces as shown in
Figure 2.6:


Figure 2.6: Output in a horizontal line


Example 2.3 is an improved version of example 2.2 as it employs two variables, x
and y, and assigns initial values of 20 and 10 to them respectively. When you need to
change the values of x and y, just change the initial values rather than changing
every individual value which is more time consuming.


Example 2.3
      Private Sub Form_Activate ( )
              x = 20
              y = 10
              Print x + y
              Print x - y
              Print x * y
              Print x / y
      End Sub
10
You can also use the + or the & operator to join two or more texts (string) together
like in example 2. 4 (a) and (b)


Example 2.4(a)                                    Example 2. 4(b)
Private Sub Form_Activate ()                      Private Sub Form_Activate ()
       A = "Tom "                                       A = "Tom "
       B = “likes "                                     B = “likes "
       C = “to "                                        C = “to "
       D = “eat "                                       D = “eat "
       E = “burgers."                                   E = “burgers."
       Print A + B + C + D + E                          Print A & B & C & D & E
End Sub                                           End Sub


The output is as shown in Figure 2.7


Figure 2.7: The Output of Example 2.4(a) &(b)


2.2 Steps in Building a Visual Basic Application

Generally, there are three basic steps in building a VISUAL BASIC application. The
steps are as follows:
Step 1: Design the interface
Step 2: Set the properties of the controls (Objects)
Step 3: Write the events' procedures


Example 2.5
This program is a simple program that calculates the volume of a cylinder.
11


Figure 2.8 A Program to Calculate the Volume of a Cylinder


First of all, go to the properties window and change the form caption to Volume of
Cylinder, then drag and insert three labels into the form and change their captions to
Base Radius, Height and Volume respectively. After that, insert three text boxes and
clear its text contents so that you get three empty boxes. Name the text boxes as
radius, hght and volume respectively. Lastly, insert a command button and change its
caption to O.K and its name to OK. Now save the project as cylinder.vbp and the
form as cylinder.frm. For now we shall leave out the codes which you will learn in the
following lessons.


Example 2.6
Designing an attractive and user friendly interface is the first step in constructing a
VISUAL BASIC program. To illustrate this point, let's look at the calculator program.


Fig 2.9 Calculator
12


Follow the steps below to design the calculator interface:
   •   Resize the form until you get the size you are satisfied with.
   •   Go to the properties window and change the default caption of the form to the
       caption you like, such as Calculator.
   •   Change the other properties of the form, such as background color,
       foreground color, and border style. For this particular program, I recommend
       you set the following properties for Form1:
   •
       BorderStyle        Fixed Single
       MaxButton          False
       minButton          True


       These properties will ensure that the users cannot resize or maximize your
       calculator window, but will be able to minimize the window.
   •   Draw the Display Panel by clicking on the Label button and place your mouse
       on the form. Start drawing by pressing down your mouse button and dragging
       it.
   •   Click on the panel and the corresponding properties window will appear. Clear
       the default label so that the caption is blank. It is better to set the background
13
       color to a brighter color while the foreground color should be of a darker color
       like black (for easy viewing). Change the name to ‘display’ as I am going to
       use it later to write codes for the calculator.
   •   Now draw the command buttons that are necessary to operate a calculator. I
       suggest you follow exactly what is shown in the image above.
Now run the project by pressing F5. If you are satisfied with the appearance, go
ahead and save the project.


Exercise 2
   1. Write down the list of procedures which are associated with the Form object.
   2. Write a program to display the sentence “I like Visual Basic”.
   3. Write a program to compute the value of 1500+1000-450x10+300÷5
   4. Assigning a value of 9 to X and a value of 13 to y, write a program to compute
       the values of 2x+y, (x+y)÷2 and x2y


                                      Lesson 3
                        Working with Controls
       Setting the properties of the controls
14
       Learning how to work with the controls


3.1 The Properties of the Controls

Before writing an event procedure for the control to respond to a user's input, you
have to set certain properties for the control to determine its appearance and how it
will work with the event procedure. You can set the properties of the controls in the
properties window or at runtime.                             Figure 3.1
Figure 3.1 on the right is a typical properties window for
a form. You can rename the form caption to any name
you like. In the properties window, the item which
appears at the top part is the object currently selected
(in Figure 3.1, the object selected is Form1). At the
bottom part, the items listed in the left column represent
the names of various properties associated with the
selected object while the items listed in the right column
represent the states of the properties. Properties can
be set by highlighting the items in the right column and
then changing them by typing or selecting the options
available. For example, in order to change the caption,
just highlight Form1 under the name Caption and
change it to another name. You may also alter the
appearance of the form by setting it to 3D or flat. And
you can do other things like changing the foreground
and background color, changing the font type and font
size, enabling or disabling the minimize and maximize
buttons etc.
You can also change the properties at runtime to
produce special effects such as changing of colors,
shape, animation effects and so on. For example the
following code will change the form color to red every
time the form is loaded. VISUAL BASIC uses the
hexadecimal system to represent colors. You can
check the color codes in the properties window which
are shown under ForeColor and BackColor .
15


       Private Sub Form_Load()
              Form1.Show
              Form1.BackColor = &H000000FF&
       End Sub

Another example is to change the control Shape to a particular shape at runtime by
writing the following code. This code will change the shape to a circle at runtime.
Later you will learn how to change the shapes randomly by using the RND function.

       Private Sub Form_Load()
              Shape1.Shape = 3
       End Sub
I would like to stress that learning how and when to set the objects' properties is very
important as it can help you to write a good program. So, I advise you to spend a lot
of time playing with the objects' properties. I am not going into the details on how to
set the properties, however, I would like to stress a few important points:
   •   You should set the Caption Property of a control clearly so that the user knows
       what to do with that command. For example, in the calculator program, as all
       the captions of the command buttons such as +, - , MC, MR are commonly
       found in an ordinary calculator, the user should have no problems in
       manipulating the buttons.
   •   A lot of programmers like to use a meaningful name for the Name Property
       because it is easier for them to write and read the event procedure and easier
       to debug or modify the programs later. However, it is not a must to do that as
       long as you label your objects clearly and use comments in the program
       whenever you feel necessary.
   •   One more important property is whether the control is being enabled or not.
   •   Finally, you must also consider making the control visible or invisible at
       runtime, or when should it become visible or invisible.


3.2 Handling some of the common controls

a) The Text Box
16
The text box is the standard control that is used to receive input from the user as well
as to display the output. It can handle string (text) and numeric data but not images
or pictures. Strings in a text box can be converted to numeric data by using the
function Val(text). The following example illustrates a simple program that processes
input from the user.


Example 3.1
In this program, two text boxes are inserted into the form together with a few labels.
The two text boxes are used to accept input from the user and one of the labels will
be used to display the sum of two numbers that are entered into the two text boxes. A
command button is also programmed to calculate the sum of the two numbers using
the plus operator. The program creates a variable, ‘sum’, to accept the summation of
values from the Text1 textbox and the Text2 textbox.The procedure to calculate and
display the output on the label is shown below. The output is shown in Figure 3.1.
       Private Sub Command1_Click()
               ‘To add the values in The Text1 textbox and the Text2 textbox
               Sum = Val(Text1.Text) + Val(Text2.Text)
               ‘To display the answer on label 1
               Label1.Caption = Sum
       End Sub


Figure 3.1


b) The Label
17
The label is a very useful control for Visual Basic, as it is not only used to provide
instructions and guides to the users, it can also be used to display output. One of its
most important properties is Caption. Using the syntax label.Caption, it can display
text and numeric data. You can change its caption in the properties window and also
at runtime. Please refer to Example 3.1 and Figure 3.1 for the usage of labels.


c) The Command Button
The command button is a very important control as it is used to execute commands.
It displays an illusion that the button is pressed when the user clicks on it. The most
common event associated with the command button is the Click event, and the
syntax for the procedure is:
       Private Sub Command1_Click ()
              Statements
       End Sub


d) The Picture Box
The Picture Box is one of the controls that used to handle graphics. You can load a
picture during the designing phase by clicking on the picture item in the properties
window and selecting the picture from the selected folder. You can also load the
picture at runtime using the LoadPicture method. For example, this statement will
load the picture grape.gif into the picture box.
       Picture1.Picture=LoadPicture ("C:VISUAL BASIC programImagesgrape.gif")
You will learn more about the picture box in future lessons. The image in the picture
box is not resizable.


e) The Image Box
The Image Box is another control that handles images and pictures. It functions
almost identically to the picture box. However, there is one major difference. The
image in an Image Box is stretchable, which means it can be resized. This feature is
not available in the Picture Box. Similar to the Picture Box, the LoadPicture method
can also be used. For example, this statement loads the picture grape.gif into the
image box.
       Image1.Picture=LoadPicture ("C:VISUAL BASIC programImagesgrape.gif")


f) The List Box
18
The function of the List Box is to present a list of items. The user can click and select
items from this list. In order to add items to it, use the AddItem method. For example,
if you wish to add a number of items to List box 1, you can key in the following
statements
Example 3.2
       Private Sub Form_Load ( )
              List1.AddItem “Lesson1”
              List1.AddItem “Lesson2”
              List1.AddItem “Lesson3”
              List1.AddItem “Lesson4”
       End Sub

The items in the list box can be identified by the ListIndex property, the value of the
ListIndex for the first item is 0, the second item has a ListIndex 1, and the second
item has a ListIndex 2 and so on.


g) The Combo Box
The function of the Combo Box is also to present a list of items. However, the user
needs to click on the small arrowhead on the right of the combo box to see the items
which are presented in a drop-down list. In order to add items to the list, you can also
use the AddItem method. For example, if you wish to add a number of items to
Combo Box 1, you can key in the following statements
Example 3.3
       Private Sub Form_Load ( )
              Combo1.AddItem “Item1”
              Combo1.AddItem “Item2”
              Combo1.AddItem “Item3”
              Combo1.AddItem “Item4”
       End Sub


h) The Check Box
19
The Check Box control lets the user select or unselect an option. When the Check
Box is checked, its value is set to 1 and when it is unchecked, the value is set to 0.
You can include the statements Check1.Value=1 to mark the Check Box and
Check1.Value=0 to unmark the Check Box, and use them to initiate certain actions.
For example, the program will change the background color of the form to red when
the check box is unchecked and it will change to blue when the check box is checked.
You will learn about the conditional statement If….Then….Elseif in later lessons.
VbRed and vbBlue are color constants and BackColor is the background color
property of the form.


Example 3.4
       Private Sub Check1_Click ()
              If Check1.Value = 0 Then
              Form1.BackColor = vbRed
              ElseIf Check1.Value = 1 Then
              Form1.BackColor = vbBlue
              End If
       End Sub


i) The Option Button


The Option Button also lets the user select one of the choices. However, two or more
Option Buttons must work together because if one of the Option Buttons is selected,
the other Option Buttons will be unselected. In fact, only one Option Button can be
selected at one time. When an option button is selected, its value is set to “True”, and
when it is unselected, its value is set to “False”. In the following example, the shape
control is placed in the form together with six Option Buttons. When the user clicks on
different option buttons, different shapes will appear. The values of the shape control
are 0, 1, 2, 3, 4, and 5 which will make it appear as a rectangle, a square, an oval
shape, a rounded rectangle and a rounded square respectively.


Example 3.5
20
       Private Sub Option1_Click ( )
              Shape1.Shape = 0
       End Sub
       Private Sub Option2_Click()
              Shape1.Shape = 1
       End Sub
       Private Sub Option3_Click()
              Shape1.Shape = 2
       End Sub
       Private Sub Option4_Click()
              Shape1.Shape = 3
       End Sub
       Private Sub Option5_Click()
              Shape1.Shape = 4
       End Sub
       Private Sub Option6_Click()
              Shape1.Shape = 5
       End Sub


j) The Drive List Box
The Drive List Box is used to display a list of drives available in your computer. When
you place this control into the form and run the program, you will be able to select
different drives from your computer as shown in Figure 3.2


Figure 3.2 The Drive List Box


k) The Directory List Box
21
The Directory List Box is used to display the list of directories or folders in a selected
drive. When you place this control into the form and run the program, you will be able
to select different directories from a selected drive in your computer as shown in
Figure 3.3


Figure 3.3 The Directory List Box


l) The File List Box
The File List Box is used to display the list of files in a selected directory or folder.
When you place this control into the form and run the program, you will be able to
see a list of files in a selected directory as shown in Figure 3.4:


Figure 3.4


*You can coordinate the Drive List Box, the Directory List Box and the File List Box to
search for the files you want. This procedure will be discussed in later lessons.
22
Exercise 3
   1. Start a Visual Basic project and set the following properties of the form
         a. Appearance=Flat
         b. Caption=My First Program
         c. Font=Times New Roman, Font Size=10
         d. Forecolor=White
         e. Backcolor=Blue
   2. Insert six shape controls into the form and set their shape properties to
      rectangle, square, oval, circle, rounded rectangle, and rounded square.
   3. Insert two text boxes, one label and one command button, then write the
      program to compute the product of two numbers that are entered into the text
      boxes and display the result in the label.
   4. Insert a picture control in the form and load a picture from your computer using
      the LoadPicture Method.
   5. Insert a List Box control into the form and add 5 items into the List Box using
      the AddItem Method.
23

                                    Lesson 4

                           Writing the Codes
      Learning about the Visual Basic program structure.
      Setting the properties of the controls at runtime.
      Getting to know some basic syntax.


In lesson 2 and lesson 3, you have learned how to enter program code and run
sample VISUAL BASIC programs but without much understanding of the logics of
VISUAL BASIC programming. Therefore in this lesson we will tackle a few basic rules
about writing VISUAL BASIC program codes.


Each control or object in VISUAL BASIC can usually run many kinds of events or
procedures. These events are listed in the dropdown list in the code window which is
displayed when you click on the procedures’ box after double-clicking on an object
(refer to Figure 2.3). Among the events are loading a form, clicking of a command
button, pressing a key on the keyboard or dragging an object etc. For each event,
you need to write an event procedure so that an action or a series of actions can be
performed.


To start writing an event procedure, you need to double-click an object. For example,
when you double-click on the command button, the code window will appear showing
an event procedure:


      Private Sub Command1_Click
      (Key in your program code here)
      End Sub


You then need to key in the procedure in the space between Private Sub
Command1_Click............. End Sub. The program code is made up of a number of
statements that set certain properties or trigger some actions. The syntax of Visual
Basic’s program code is almost like English though not exactly the same, so it is very
easy to learn.
24
The syntax to set the property of an object or to assign certain values to it where
Object and Property are separated by a period is:
                  Object.Property
For example, the statement Form1.Show means to show the form with the name
Form1, Iabel1.Visible=true means Label1 is set to be visible, Text1.text= “VISUAL
BASIC” is to assign the text VISUAL BASIC to the text box with the name Text1,
Text2.text=100 is to assign a value of 100 to the text box with the name Text2,
Timer1.Enabled=False is to disable the timer with the name Timer1 and so on. Let’s
examine a few examples below:


Example 4.1
Private Sub Command1_click
       Label1.Visible=False
       Label2.Visible=True
       Text1.Text=”You are correct!”
End sub


Example 4.2
Private Sub Command1_click
       Label1.Caption=” Welcome”
       Image1.visible=True
End sub


Example 4.3
Private Sub Command1_click
       Pictuire1.Show=true
       Timer1.Enabled=True
       Lable1.Caption=”Start Counting
End sub


In example 4.1, clicking on the command button will make Label1 become invisible
and Label2 become visible, and the text ”You are correct” will appear in the Text1
textbox. In example 4.2, clicking on the command button will make the caption of
Label1 change to “Welcome” and Image1 will become visible. For example, clicking
25
on the command button will make Picture1 show up, the timer start running and the
caption of Label1 change to “Start Counting”.
Syntaxes that do not involve the setting of properties are also English-like. Some of
the commands are Print, If…Then….Else….End If, For…Next, Select Case…..End
Select, End and Exit Sub. For example, Print “Visual Basic” is to display the text
Visual Basic on screen and End is to end the program. Other commands will be
explained in details in the coming lessons.


Program codes which involve calculations are very easy to write, as they are similar
to mathematics. However, in order to write an event procedure that involves
calculations, you need to know the basic arithmetic operators in VISUAL BASIC as
they are not exactly the same as the normal operators that we use, except for + and -
. For multiplication, we use *, for division we use /, for raising a number x to the
power of n, we use x ^n and for square root, we use Sqr(x). There are also more
advanced mathematical functions such as Sin, Cos, Tan, Log etc. Besides that,
there are also two important functions that are related to arithmetic operations, i.e.
the functions Val and Str where Val is to convert text into a numeric and Str is to
convert a numeric into a string. While the function Str is not as vital because VISUAL
BASIC can display numeric values as a string implicitly, failure to use Val will result in
wrong calculation. Let’s examine example 4.4 and example 4.5.


Example 4.4
Private Sub Form_Activate()
 Text3.text=Text1.text+Text2.text
End Sub


Example 4.5
Private Sub Form_Activate()
 Text3.text=val(Text1.text)+val(Text2.text)
End Sub


When you run the program in example 4.4 and enter 12 in the Text1 textbox and 3 in
the Text2 textbox, it will give you a result of 123, which is wrong. It is because
VISUAL BASIC treats the numbers as strings and so it just joins up the two strings.
On the other hand, running example 4.5 will give you the correct result, i.e., 15.
26
Now we shall write the codes for the cylinder program (the interface is shown in
Figure 2.8). First of all, name the text boxes as radius, hght, and volume. To get the
values of the various text boxes, use Val(radius.text), Val(hght.Text) and assign them
to the variables r and h. In addition, assign the value 22/7 to the variable pi. After that,
write the equation v = pi * (r ^ 2) * h to compute the value of the cylinder’s volume
and then assign it to the variable v. Finally, display the value in the volume textbox
using the function Str.


Private Sub OK_Click( )
       r = Val(radius.Text)
       h = Val(hght.Text)
       pi = 22 / 7
       v = pi * (r ^ 2) * h
       volume.Text= Str(v)
End Sub


When you run the program, you should be able to see the interface as shown in
Figure 2.8. Enter values in the radius box and the height box, and then click OK. The
value of the Volume will be displayed in the volume box.


I shall attempt to explain the above source program to newcomers in Visual Basic (If
you are a veteran, you can skip this part). The program can be explained using
pseudo codes as follows:
   •   procedure for clicking the OK button to calculate the volume of cylinder
   •   get the value of r from the radius text box
   •   get the value of h from the height text box
   •   assign a constant value 22/7 to pi
   •   calculate the volume using the formula
   •   output the results to the Volume text box
   •   End of Procedure


Exercise 4


   1. Write a program to compute the area of a triangle.
   2. Write a program to calculate the circumference and area of a circle.
27

                                        Lesson 5
                                Visual Basic Data
         Getting to know different types of Visual Basic data.
         Rules in naming the Visual Basic variables.
         Declaring variables using the Dim statements.


There are many types of data that we come across in our daily life. For example, we
need to handle data such as names, addresses, money, date, stock quotes, statistics
etc everyday. Similarly in Visual Basic, we are also going to deal with these kinds of
data. However, to be more systematic, VISUAL BASIC divides data into different
types.

5.1 Types of Visual Basic Data
a) Numeric Data
Numeric data are data that consist of numbers, which can be computed
mathematically with various standard operators such as add, minus, multiply, divide
and so on. In Visual Basic, the numeric data are divided into 7 types, which are
summarized in Table 5.1:
                                Table 5.1: Numeric Data Types
Type        Storage Range of Values
Byte        1 byte    0 to 255
Integer     2 bytes -32,768 to 32,767
Long        4 bytes -2,147,483,648 to 2,147,483,648
                      -3.402823E+38 to -1.401298E-45 for negative values
Single      4 bytes
                      1.401298E-45 to 3.402823E+38 for positive values.
                      -1.79769313486232e+308 to -4.94065645841247E-324 for
                      negative values
Double      8 bytes
                      4.94065645841247E-324 to 1.79769313486232e+308 for positive
                      values.
Currency 8 bytes -922,337,203,685,477.5808 to 922,337,203,685,477.5807
                      +/- 79,228,162,514,264,337,593,543,950,335 if no decimal is
Decimal 12 bytes
                      used
28
                       +/- 7.9228162514264337593543950335 (28 decimal places).

b) Non-numeric Data Types

The non-numeric data types are summarized in Table 5.2


                             Table 5.2: Nonnumeric Data Types
Data Type                    Storage                Range
String(fixed length)         Length of string       1 to 65,400 characters
String(variable length) Length + 10 bytes           0 to 2 billion characters
Date                         8 bytes                January 1, 100 to December 31, 9999
Boolean                      2 bytes                True or False
Object                       4 bytes                Any embedded object
Variant(numeric)             16 bytes               Any value as large as Double
Variant(text)                Length+22 bytes        Same as variable-length string


c) Suffixes for Literals
Literals are values that you assign to a data. In some cases, we need to add a suffix
behind a literal so that VISUAL BASIC can handle the calculation more accurately.
For example, we can use num=1.3089# for a Double data type. Some of the suffixes
are displayed in Table 5.3.
                                           Table 5.3
                         Suffix           Data Type
                         %                Integer
                         &                Long
                         !                Single
                         #                Double
                         @                Currency


In addition, we need to enclose string literals within two quotations and date and time
literals within two # signs. Strings can contain any type of characters, including
numbers. The following are a few examples:

   •     memberName$="Turban, John."
29
   •   TelNumber$="1800-900-888-777"
   •   LastDay=#31-Dec-00#
   •   ExpTime=#12:00 am#
   •   Mark%=90
   •   profit@=1000.55

It should be noted that in most cases, it is not necessary to use suffixes as long as
we declare the variables using the Dim statement.


5.2 Managing Variables

Variables are like mail boxes in the post office. The contents of the variables change
every now and then, just like mail boxes. In terms of VISUAL BASIC, variables are
areas allocated by the computer memory to hold data. Like the mail boxes, each
variable must be given a name. To name a variable in Visual Basic, you have to
follow a set of rules.

a) Variable Names
The following are the rules when naming the variables in Visual Basic:
       It must be less than or equal to 255 characters.
       No spacing is allowed.
       It must not begin with a number.
       Periods are not permitted.
Examples of valid and invalid variable names are displayed in Table 5.4


                                       Table 5.4

Valid Name                      Invalid Name
My_Car                          My.Car
this year                       1NewBoy
Long_Name_Can_beUSE             He&HisFather               *& is not acceptable


b) Declaring Variables

In Visual Basic, one needs to declare the variables before using them by assigning
names and data types. You can declare the variables implicitly or explicitly. For
example, sum=Text1.text means that the variable sum is declared implicitly and
ready to receive the input in the Text1 textbox. Other examples of implicit declaration
30
are volume=8 and label=”Welcome”. On the other hand, for explicit declaration,
variables are normally declared in the general section of the codes' window using the
Dim statement.
The format is as follows:

Dim variableName as DataType

Example 5.1
Dim password As String
Dim yourName As String
Dim firstnum As Integer
Dim secondnum As Integer
Dim total As Integer
Dim doDate As Date
You may also combine them in one line, separating each variable with a comma, as
follows:
Dim password As String, yourName As String, firstnum As Integer.
If the data type is not specified, VISUAL BASIC will automatically declare the variable
as a Variant.
For string declaration, there are two possible formats, one for the variable-length
string and another for the fixed-length string. For the variable-length string, just use
the same format as Example 5.1 above. However, for the fixed-length string, you
have to use the format as shown below:
Dim VariableName as String * n, where n defines the number of characters the string
can hold. For example, Dim yourName as String * 10 mean yourName can hold no
more than 10 Characters.


Exercise 5
   1. List out all numeric and non-numeric data types.
   2. State the rules in naming the variables.
   3. Write five examples of valid variable names.
   4. Use the Dim statements to declare three numeric variables and three non-
       numeric variables.
31

                                   Lesson 6
                 Managing Visual Basic Data
      Assigning values to the variables.
      Getting to know various arithmetic operators in Visual Basic.


6.1 Assigning Values to the Variables

After declaring various variables using the Dim statements, we can assign values to
those variables. The general format of an assignment is:
      Variable=Expression
The variable can be a declared variable or a control property value. The expression
could be a mathematical expression, a number, a string, a Boolean value (true or
false) and etc. The following are some examples:
      firstNumber=100
      secondNumber=firstNumber-99
      userName="John Lyan"
      userpass.Text = password
      Label1.Visible = True
      Command1.Visible = false
      Label4.Caption = Text1 textbox.Text
      ThirdNumber = Val(usernum1.Text)
      total = firstNumber + secondNumber+ThirdNumber

6.2 Arithmetic Operators in Visual Basic

In order to compute input from users and to generate results, we need to use various
mathematical operators. In Visual Basic, except for + and -, the symbols for the
operators are different from normal mathematical operators, as shown in Table 6.1.
32
Table 6.1: Arithmetic Operators
Operator Mathematical function                           Example
    ^     Exponential                                    2^4=16
    *     Multiplication                                 4*3=12
    /     Division                                       12/4=3
          Modulus (returns the remainder from an
  Mod                                                    15 Mod 4=3
          integer division)
         Integer Division (discards the decimal places) 194=4
                                                         "Visual"&"Basic"="Visual
 + or & String concatenation
                                                         Basic"


Example 6.1
Dim firstName As String
Dim secondName As String
Dim yourName As String


Private Sub Command1_Click()
        firstName = Text1.Text
        secondName = Text2.Text
        yourName = secondName + " " + firstName
        Label1.Caption = yourName
End Sub


In this example, three variables are declared as string. Variables firstName and
secondName will receive their data from the user’s input into the Text1 textbox and
the Text2 textbox, and the variable yourName will be assigned the data by combining
the first two variables. Finally, yourName is displayed on Label1.


Example 6.2
Dim number1, number2, number3 as Integer
Dim total, average as variant
Private sub Form_Click
33
       number1=val(Text1.Text)
       number2=val(Text2.Text)
       number3= val(Text3.Text)
       Total=number1+number2+number3
       Average=Total/5
       Label1.Caption=Total
       Label2.Caption=Average
End Sub


In example 6.2, three variables are declared as integers and another two variables
are declared as variants. Variant means the variable can hold any numeric data type.
The program computes the total and average of the three numbers that are entered
into three text boxes.

Example 6.3

       Dim sellPrice As Currency
       Dim costPrice As Currency
       Dim profit As Currency


       Private Sub Command1_Click ()
              sellPrice = Text1.Text
              costPrice = Text2.Text
              profit = sellPrice - costPrice
              Text3.Text = Format (profit, "Currency")
       End Sub

In example 6.3, three variables namely sellprice, costPrice and Profit are formatted
as currency because we are dealing with financial calculations. The output is
formatted using the function Format (profit, “Currency”) which will display Profit in
the Text3 textbox in the currency form, i.e. a $ sign and a number with two decimal
places as shown in Figure 6.1. We will deal with the function Format again in a later
lesson under formatting outputs.
34

Figure 6.1 Calculation involving currency


In the coming lessons, we will see how to write more complex VISUAL BASIC
programs using mathematical operators and equations.


Exercise 6
   1. Write down the arithmetic operators in Visual Basic.
   2. Write a program to calculate the values of the following arithmetic operations if
      the users input two numbers M and N into two separate text boxes.
         a) M^N
         b) M/N
         c) MN
         d) M Mod N
35

                                      Lesson 7
              Controlling Program Flow – Part I
       Getting to know the conditional operators.
       Getting to know the logical operators.
       Using the If…..Then…Else …Elseif statements.
       Using timers and the Rnd function.


7.1 Conditional Operators
To control the VISUAL BASIC program flow, we can use various conditional
operators. Basically, they resemble mathematical operators. Conditional operators
are very powerful tools which let the VISUAL BASIC program compare data values
and then decide what action to take, whether to execute or terminate the program etc.
These operators are shown in Table 7.1.
                          Table 7.1: Conditional Operators
                          Operator          Meaning
                                =           Equal to
                                >           More than
                                <           Less than
                                >=          More than and equal to
                                <=          Less than and equal to
                                <>          Not equal to


* You can also compare strings with the above operators. However, there are certain
rules to follow:
a. Upper case letters are lesser than lowercase letters
b. "A"<"B"<"C"<"D".......<"Z"
c. Numbers are lesser than letters.

7.2 Logical Operators
In addition to conditional operators, there are a few logical operators that offer added
power to the VISUAL BASIC programs. They are shown in Table 7.2.
36
                                       Table 7.2
               Operator     Meaning
               And          Both sides must be true
               Or           One side or other must be true
               Xor          One side or other must be true but not both
               Not          Negates truth


7.3 Using If.....Then.....Elseif….Else Statements with Operators

To effectively control the VISUAL BASIC program flow, use the If...Then...Else
statement together with the conditional operators and logical operators.
The general format for the If...Then...Elseif….Else statement is as follows:


      If conditions Then
               VISUAL BASIC expressions
               Elseif
               VISUAL BASIC expressions
               Else
               VISUAL BASIC expressions
      End If


* Any If...Then...Else statements must end with End If. Sometime it is not necessary
to use Else.


Example 7.1
      Private Sub Command1_Click ()
               firstnum = Val(Text1.Text)
               secondnum = Val(Text2.Text)
               total = firstnum + secondnum
               If total = Val(Text3.Text) And Val(Text3.Text) <> 0 Then
               Label1.Caption=”Yes, you are Correct”
               Else
               Label1.Caption=” Sorry, you’re wrong”
               End If
      End Sub
37
In Example 7.1, the program adds the values entered in the Text1 textbox and the
Text2 textbox and compares the answer with the answer entered by the user in the
Text3 textbox. If both values are equal, Label1 will display the caption “Yes, you are
Correct”, otherwise it will show the caption “Sorry, you’re wrong”.


Example 7.2
       Dim password As String


       Private Sub Command1_Click()
              If Text1.Text = password Then
              Text1.Visible = False
              Label1.Visible = True
              Label1.Caption = "Login Successful"
              Else
              Label1.Visible = True
              Label1.Caption = "Login Fail! Please enter your password again"
              Text1.Text = ""
              End If
       End Sub


       Private Sub Form_Load()
              password = "1234"
       End Sub


       Private Sub Text1_Click()
              Label1.Visible = False
       End Sub


In Example 7.2, the program will check whether the password entered by the user
matches the password assigned by the Form_Load procedure. If the two passwords
match, then the textbox will disappear and the label will display “Login Successful”;
otherwise the label will display "Login Fail! Please enter your password again" and
the user has to key in the password again. One more thing that you need to do is set
the PasswordChar of the Text1 textbox to the character you like (I prefer using * as it
is commonly used) in the properties window so that the password entered will be
38
hidden. This program can be used as a login procedure for a database management
program as the user needs to enter the password to search for the information stored
in a database. The details of how to combine this procedure with the database
management program will be discussed later.


Example 7.3
'Guess a Number
Dim realNumber As Integer
Dim userNumber As Integer


Private Sub Form_Load()
realNumber = 99
End Sub


Private Sub OK_Click()
       userNumber = entry.Text
       If userNumber > realNumber Then
       hint.Caption = "Your number is too big"
       entry.Text = ""
       ElseIf userNumber < realNumber Then
       hint.Caption = "Your number is too small"
       entry.Text = ""
       Else
       hint.Caption = "Congratulations, your number is correct"
       End If
End Sub


Example 7.3 is a ‘Guess a Number’ program. The user enters a number and the
program gives hints whether the number entered is too big or too small. Once the
answer is correct, the program will display a congratulatory message. The program
uses the If…Then…ElseIf and Else statements together with the conditional
operators >, < and = to control the program flow. In this program, the name of the
Text1 textbox is renamed as entry and the caption is renamed to display the hint as
hint. The statement entry.Text=”” is to clear the textbox if the number entered is
incorrect so that the user can key in a number again without having to erase the
39
number manually. Notice that the condition userNumber=realNumber is not
necessary as the Else statement will handle this condition implicitly.


Example 7.4
This program is a password cracker where it can generate possible passwords and
compare each of them with the actual password; and if the generated password is
found to be equal to the actual password, login will be successful.


In this program, a timer is inserted into the form and it is used to do a repetitive job of
generating the passwords. The password generating procedure is put under the
timer1_Timer () event so that the procedure is repeated after every interval. The
interval of the timer can be set in its properties window where a value of 1 is 1
millisecond, so a value of 1000 is 1 second. The smaller the value, the shorter the
interval. However, do not set the timer to zero because if you do that, the timer will
not start. The Timer1.Enabled property is set to false so that the program will only
start generating the passwords after you click on the command button.


Rnd is a VISUAL BASIC function that generates a random number between 0 and 1.
Multiplying Rnd by 100 will obtain a number between 0 and 100. Int is a VISUAL
BASIC function that returns an integer by ignoring the decimal part of that number.
Therefore, Int(Rnd*100) will produce a number between 0 and 99, and the value of
Int(Rnd*100)+100 will produce a number between 100 and 199. Randomize timer is
an essential statement which ensures that the generated numbers are truly random.
Finally, the program uses If…Then…Else to check whether the generated password
is equal to the actual password or not; and if they are equal, the password generating
process will be terminated by setting the Timer1.Enabled property to false.


The Program
Dim password As Integer
Dim crackpass As Integer


Private Sub Command1_Click()
       Timer1.Enabled = True
End Sub
40
Private Sub Form_Load()
password = 123
End Sub


Private Sub Timer1_Timer()
Randomize Timer
crackpass = Int(Rnd * 100) + 100
If crackpass = password Then
Timer1.Enabled = False
Text1.Text = crackpass
Label1.Visible = True
Label1.Caption = "Password Cracked! Login Successful!"


Else
Text1.Text = crackpass
Label1.Visible = True
Label1.Caption = "Please wait..."
End If
End Sub


Exercise 7
   1. Write down all the conditional operators.
   2. Write down all the logical operators.
   3. Create a simple interactive children word game so that if the answer is correct,
         the program will display a congratulatory message and when the answer is
         wrong, the program will ask the child to try again.
   4. Write a program to display a person’s socio economical status based on his
         income. For example, if the person’s income is less than $1000 per month, his
         socio economic status may be called poor, if his income is more than $1000
         but less than $3000 per month, his socio economic status may be labeled as
         low income and so on.
41

                                    Lesson 8
            Controlling Program Flow – Part II
      Using the Select Case …. End Select Statement
      Learning more about the usage of the Select Case …. End Select Statement
      through examples.


8.1 The Select Case …. End Select Statement

In lesson 7, you have learned how to use the conditional statements
If…..Then…ElseIf and Else to control the program flow. However, if you have a lot of
conditional statements, using If..Then..Else statements could become very messy.
For multiple conditional statements, it is always better to use the Select Case
statement. The structure is shown as follows:
      Select Case expression
              Case value1
                      Block of one or more VISUAL BASIC statements
              Case value2
                      Block of one or more VISUAL BASIC Statements
              Case value3
                      Block of one or more VISUAL BASIC statements
              Case Else
                      Block of one or more VISUAL BASIC Statements
      End Select


 Example 8.1
‘To compute examination grades
Dim grade As String
Private Sub txtgrade_Change()
      grade = txtgrade.Text
      Select Case grade
        Case "A"
          result. Caption = "Distinction"
        Case "B"
42
             result.Caption = "Credit"
          Case "C"
             result.Caption = "Pass"
          Case Else
             result.Caption = "Fail"
          End Select
End Sub


In example 8.1, note that the grade is declared as a string, so all the case values
such as "A" must be of the String data type. Also note that every select case
statement must end with the End Select statement. When the program is run and the
user keys in the grade into the text box named as txtgrade, it will look for the case
value that matches the input and then display the result on the label named as result.
The last statement Case Else means any case other than A, B, C will get the “fail”
result.


However, there are a couple of problems in the above program. If the user enters the
lower case letters a, b or c and the result will be “fail” because the case values are
the uppercase letters A, B, C. In addition, if the user keys in numeric values or other
characters other than A, B, C, D, E, F (assuming these are the designated grades),
the results will also be “fail”.


In order to avoid the above problems, first of all you need to use the function Ucase
to handle the first problem. The format is Ucase (txtgrade.Text). This will convert the
lower case letters to the upper case letters. Secondly, you have to add two additional
statements to handle grades D, E, F that are considered as fail and another
statement to handle other kinds of inputs that are deemed as invalid data. The
statement Case Is= “D”, “E”, “F” will include cases when the grade is D, E or F.
The keyword to use here is Is and the cases are separated by commas. The last
statement which uses the Case Else syntax will deem all other inputs as invalid. It is
important for the cases to be exhaustive; i.e. we should take all possible cases into
consideration so that no ambiguous results will occur. Example 8.1(b) is the
corrected version.
43
Example 8.2
      Dim grade As String
      Private Sub txtgrade_Change()
      grade = UCase(txtgrade.Text)
      Select Case grade
              Case "A"
                 result.Caption = "Distinction"
              Case "B"
                  result.Caption = "Credit"
              Case "C"
                  result.Caption = "Pass"
              Case Is = "D", "E", "F"
                  result.Caption = "Fail"
                Case Else
                  result.Caption = "invalid data"
              End Select
      End Sub


Example 8.3


Dim mark As Single
Private Sub Compute_Click ()
'Examination Marks
Private Sub mrk_Change()
      mark = mrk.Text
      Select Case mark
      Case 85 To 100
          comment.Caption = "Excellent"
      Case 70 To 84
         comment.Caption = "Good"
      Case 60 To 69
        comment.Caption = "Above Average"
      Case 50 To 59
        comment.Caption = "Average"
      Case 0 To 49
44
         comment.Caption = "Needs to work harder"
       Case Else
         comment.Caption = "Values out of range"
       End Select
End Sub


Example 8.3 is similar to the two preceding examples except that now it handles the
numeric data rather than the string. This program uses the keyword to in order to
specify the range of values. You can also use Case Is>=n or Case is<n to specify the
range of numeric values.


Example 8.4
This example will demonstrate a more complex mathematical application, a simple
calculator that can perform four basic arithmetic calculations. In this program, the
user just needs to enter two numbers and then select one of the four basic operators
from the combo box and obtain the result. The user can perform the four basic
calculations at one go for the same pair of numbers just by changing the operators.
The program uses two text boxes and a combo box. A combo box is a control that
allows the user to select an item from a group of items that are listed in the drop-
down list. In order to add a list of items to the combo box, use the following
statements and place them under the Private Sub Form_Load procedure:
       Combo1.AddItem "+"
       Combo1.AddItem "-"
       Combo1.AddItem "x"
       Combo1.AddItem "÷"
Combo1 is the name of the combo box and AddItem is the method that adds items to
the list in the combo box. To identify the items in the list, you can use the ListIndex
property of the combo box. The first item will have a ListIndex of 0, the second item
will have a ListIndex of 1 and so on. By employing the Select Case…. End Select
statements and adding the necessary procedures that perform one of the four basic
calculations under each item, the program fulfills its function as a simple calculator.


Private Sub Combo1_Click ()
       Select Case Combo1.ListIndex
       Case 0
45
      Label1 = Val(Text1.Text) + Val (Text2.Text)
      Case 1
      Label1 = Val(Text1.Text) - Val (Text2.Text)
      Case 2
      Label1 = Val (Text1.Text) * Val(Text2.Text)
      Case 3
      Label1 = Val (Text1.Text) / Val (Text2.Text)
      End Select
End Sub
Private Sub Form_Load ()
      Combo1.AddItem "+"
      Combo1.AddItem "-"
      Combo1.AddItem "x"
      Combo1.AddItem "÷"
End Sub


Exercise 8
      1. Write a program using the Select Case statement to inform a person about
      his/her weight status based on the body mass index (BMI) where BMI=body
      weight in kilograms divided by the square of the height in meters. The weight
      status is usually shown in the table below:

                           BMI              Weight Status

                           Below 18.5       Underweight

                           18.5 – 24.9      Normal

                           25.0 – 29.9      Overweight

                           30.0 and Above Obese


      2. Write a program to classify people based on the color they like.
46

                                     Lesson 9
                                Looping Part I
       Understanding and using the Do…Loop
       Understanding and using the While…Wend Loop


Very often we need to perform a task repeatedly in order to achieve our objective.
This repetitive process is called looping in programming language. Visual Basic
allows a procedure to be repeated many times until a condition is met. There are
three kinds of loops in VISUAL BASIC, which are Do…. Loop , While… Wend and
For…Next.

9.1 Do….. Loop

The structure of a Do Loop command can be written in four different formats as
shown below:
a) Do While condition
          Block of one or more VISUAL BASIC statements
     Loop
b) Do
          Block of one or more VISUAL BASIC statements
     Loop While condition
c)   Do Until condition
            Block of one or more VISUAL BASIC statements
     Loop
d)   Do
          Block of one or more VISUAL BASIC statements
     Loop Until condition


Example 9.1
       Private Sub Form_Activate
       Do while counter <10
                counter =counter+1
                Print Counter
              Loop
47
      End Sub
In the above example, the value of counter will increase by 1 after each loop and it
will keep on adding until counter = 10. The values are displayed Figure 9.1


Figure 9.1: Printout of example 9.1


Example 9.2, Example 9.3 and Example 9.4 produce the same result as above.


Example 9.2
      Private Sub Form_Activate()
              Do
                     Counter = Counter + 1
                     Print Counter
              Loop Until Counter = 10
      End Sub

Example 9.3
      Private Sub Form_Activate()
      Do Until Counter = 10
              Counter = Counter + 1
              Print Counter
      Loop
      End Sub
Example 9.4
      Private Sub Form_Activate()
      Do
              Counter = Counter + 1
              Print Counter
      Loop While Counter < 10
48
End Sub
Example 9.4
The following example uses the Do…Loop procedure to find the summation of a
sequence of numbers, or in mathematical terms, the summation of an arithmetic
progression. In this example, we will attempt to find the summation of
1+2+3+4+……+100. In the design stage, you need to insert a list box into the form
for displaying the output, named List1. The program uses the AddItem method to
populate the list box. The statement List1.AddItem "n" & vbTab & "sum" will display
the headings in the list box, where it uses the vbTab function to create a space
between the headings n and sum.


Two variables are declared here, where n acts as a counter and sum is the
summation of the numbers. The mathematical logic is very simple. Initially, n and
sum are set to 0. After the first loop, n=1 and sum=1. After the second loop, n will be
equal to 2 (n=1+1) and sum will be equal to 3(sum=1+2); and the next loop will
produce the result n=3 and sum=6 (sum=1+2+3). Using Do Until n=100, the program
will obtain the summation of 1 to 100. In fact, this program produces the summation
at every stage, where the output is displayed in a table form, as shown in Figure 9.2.


       Dim n, sum As Integer


       Private Sub Form_Activate()
              List1.AddItem "n" & vbTab & "sum"
              Do Until n = 100
              n=n+1
               sum = sum + n
              List1.AddItem n & vbTab & sum
                  Loop
              End Sub


       Private Sub Form_Load ()
               n=0
               sum = 0
        End Sub
49


 Figure 9.2: The summation of 1 to 100


9.2: Exiting the Do Loop

In section 9.1, we have seen that how a Do loop is terminated when a certain
condition is met with one of the four structures i.e. Do Until, Loop Until, Do While and
Loop While. Without using the above four controlling statements, the loop will
become infinite and it might cause the computer to hang. However, there is yet
another way to terminate the loop, that is by using the statements If….Then and Exit
Do. This means that when a condition is met, the program will exit from the loop.


To demonstrate, let’s examine example 9.5. You will notice that instead of using the
Do Until statement, I have replaced them with the If….Then… and Exit Do
statements; and it produces the same result as in example 9.4.


Example 9.5
Dim sum, n As Integer


Private Sub Form_Activate()
List1.AddItem "n" & vbTab & "sum"
Do
 n=n+1
50
 Sum = Sum + n
              List1.AddItem n & vbTab & Sum
              If n = 100 Then
              Exit Do
              End If
               Loop
      End Sub


      Private Sub Form_Load ()
               n=0
               Sum = 0


      End Sub

9.3 The While….Wend Loop

The structure of a While….Wend Loop is very similar to the Do Loop. It takes the
following format:


      While condition
            Statements
      Wend


The above loop means that while the condition is not met, the loop will go on. The
loop will end when the condition is met. Let’s examine the program listed in example
9.6 where it produces the same result as example 9.4 and example 9.5.


Example 9.6
      Dim sum, n As Integer
              Private Sub Form_Activate ()
              List1.AddItem "n" & vbTab & "sum"
              While n <> 100
              n=n+1
              Sum = Sum + n
              List1.AddItem n & vbTab & Sum
              Wend
51
     End Sub


     Private Sub Form_Load()
            n=0
            Sum = 0
     End Sub


Exercise 9


1. Write a program to add the all the even integers between 101 and 999 using
      a. The Do loop
      b. The While…… Wend Loop
2. Write a program to generate random integers between 1 and 1000 and if the
   integer 8 appears, the looping will stop and the program will prompt the user to
   try again.
3. Write a program to print the sentence “I like Visual Basic” twenty times using the
   While…Wend loop.
4. Write a program to show the geometrical progression in a list box as shown
   below:
52


                                   Lesson 10
                               Looping Part II
       Understanding and using the For…Next Loop
       Understanding the nested Loop


10.1 The For....Next Loop

The For….Next loop is a very useful loop if we intend to have a fixed number of
repetitions. It also allows the step increment. If you do not add the step increment,
the default increment is 1. The structure of a For….Next loop is:


For counter=startNumber to endNumber (Step increment)
  One or more VISUAL BASIC statements
Next counter


* You can actually omit the variable counter and just put in the Next command, but it
makes the procedure clearer when you include the variable.
Here are a few examples:


Example 10.1
This program will generate a column of 10 numbers, starting from 1 and ending at 10.
The output is shown in Figure 10.1.


       Private Sub Form_Activate()
       For counter = 1 To 10
               Print Counter
       Next counter
       End Sub
53


Figure 10.1


Example 10.2
Private Sub Form_Activate ()
        For counter=0 to 100 step 10
            Print counter
        Next counter
 End Sub
This program is similar to the previous example but now the number increases by 10
after every repetition until 100.


Example 10.3
In this example, the number will decrease by 5 after every repetition until it reaches 5.


       Private Sub Form_Activate
              For counter=1000 to 5 step -5
                       Print counter
              Next counter
       End Sub


Example 10.4
In this example, the program will print the sentence “Hello, Welcome to VISUAL
BASIC Tutorial” five times. The output is shown in Figure 10.2
        Private Sub Form_Activate
              For i=1 to 5
              print "Hello, Welcome to VISUAL BASIC Tutorial"
              next i
54
       End Sub
Figure 10.2


10.2 Exiting the For….Next Loop

Sometimes the user might want to get out from the loop before the whole repetitive
process is executed. The command to use in this case is Exit For. To exit a
For….Next Loop, you can place the Exit For statement within the loop. This is
normally used together with the If…..Then… statement. Let’s examine the following
example:


Example 10.5


       Private Sub Form_Activate ( )
              For n=1 to 10
              If n>6 then
              Exit For
              End If
              Else
              Print n
              End If
       End Sub


When you run the above program, it will produce the output as shown in Figure 10.3.
The procedure will display the number n until 6. It will not print 7, 8, 9, and 10
because it will exit the loop the moment it reaches 7, as 7 has fulfilled the Exit For
condition of n>6. The Exit For command is indeed same as the Exit Do command;
they play the same role for exiting a loop.
55


Figure 10.3: The output of Example 10.5


10.3 The Nested Loop

When you have a loop within a loop, then you have created a nested loop. You can
actually have as many loops as you want in a nested loop provided the loops are not
the never-ending type. For a nested loop that consists of two loops, the first cycle of
the outer loop will be processed first, then it will process the whole repetitive process
of the inner loop, then the second cycle of the outer loop will be processed and again
the whole repetitive process of the inner loop will be processed. The program will end
when the whole cycle of the outer loop is processed.


The Structure of a nested loop is


       For counter1=startNumber to endNumber (Step increment)
              For counter2=startNumber to endNumber (Step increment)
                 One or more VISUAL BASIC statements
              Next counter2
       Next counter1


The outer loop is For….Next counter 1 and the inner loop is For….Next counter 2,
and notice that the inner loop must be enclosed within the outer loop. Let’s take a
look at example 10.6:


Example 10.6
Private Sub Form_Activate ( )
       For firstCounter= 1to 5
       Print “Hello”
56
       For secondCounter=1 to 4
       Print “Welcome to the VISUAL BASIC tutorial”
       Next secondCounter
       Next firstCounter
       Print” Thank you”
End Sub


The output of the above program is shown in Figure 10.6. As the outer loop has five
repetitions, it will print the word “Hello” five times. Each time after it prints the word
“Hello”, it will print four lines of the “Welcome to the VISUAL BASIC tutorial”
sentences as the inner loop has four repetitions.


Figure 10.4: The output of example 10.6
57


Exercise 10
  1. Write a program using the For….Next loop to find the sum of all the numbers
     from 1 to 100.
  2. Write a program using the For….Next loop to find the sum of all the even
     numbers between 101 and 999.
  3. Write a program using the For….Next loop to display the following sequence
     of numbers 50, 45, 40, 35, 30, 25, 20, 15, 10, 5, 0.
  4. Write a program using the For….Next loop to display the following output:
              I like
              Visual Basic
              Visual Basic
              Visual Basic
              I like
              Visual Basic
              Visual Basic
              Visual Basic
58


                                    Lesson 11
                Visual Basic Functions - Part I
       Understanding the concept of the Visual Basic function
       Learning how to use the MsgBox function
       Learning how to use the InputBox function


11.1 Introduction to Visual Basic Functions

Functions are similar to the normal procedures but the main purpose of the functions
is to accept certain input and return a value which is passed on to the main program
to finish the execution. There are two types of functions, the built-in functions (or
internal functions) and the functions created by the programmers.

The general format of a function is:
         FunctionName (arguments)
The arguments are values that are passed on to the functions.

In this lesson, we are going to learn two very basic but useful internal functions of
Visual Basic, the MsgBox ( ) and the InputBox ( ) functions.


11.2 The MsgBox ( ) Function

The objective of the MsgBox function is to produce a pop-up message box and
prompt the user to click on a command button before he /she can continue. This
message box format is as follows:

      yourMsg=MsgBox (Prompt, Style Value, Title)

The first argument, Prompt, will display the message in the message box. The Style
Value determines what type of command button will appear in the message box.
Table 10.1 lists the command buttons that can be displayed. The Title argument will
display the title of the message board.
59


                   Table 11.1: Style Values and Command Buttons
        Style Value Named Constant             Button Displayed
               0           vbOkOnly            Ok button
               1           vbOkCancel          Ok and Cancel buttons
               2           vbAbortRetryIgnore Abort, Retry and Ignore buttons.
               3           vbYesNoCancel       Yes, No and Cancel buttons
               4           vbYesNo             Yes and No buttons
               5           vbRetryCancel       Retry and Cancel buttons


We can use the named constant in place of an integer for the second argument to
make the programs more readable. In fact, VB6 will automatically show a list of
named constants which can be selected. For example, yourMsg=MsgBox (“Click
OK to Proceed", 1, "Startup Menu") and yourMsg=Msg ("Click OK to Proceed",
vbOkCancel,"Startup Menu") are the same. YourMsg is a variable that holds values
that are returned by the MsgBox ( ) function. The values are determined by the type
of buttons being clicked by the users. It has to be declared as Integer data type in the
procedure or in the general declaration section. Table 10.2 shows the values, the
corresponding named constants and the buttons.

                   Table 11.2: Return Values and Command Buttons


                   Value     Named Constant          Button Clicked
                    1        vbOk                    Ok button
                    2        vbCancel                Cancel button
                    3        vbAbort                 Abort button
                    4        vbRetry                 Retry button
                    5        vbIgnore                Ignore button
                    6        vbYes                   Yes button
                    7        vbNo                    No button
60


Example 11.1
In the example, draw three command buttons and a label as shown in Figure 11.1:

Figure 11.1


The procedure for the test button is shown below:
       Private Sub Test_Click ()
               Dim testmsg As Integer
               testmsg = MsgBox ("Click to test", 1, "Test message")
               If testmsg = 1 Then
               Display.Caption = "Testing successful"
               Else
               Display.Caption = "Testing fail"
               End If
       End Sub


Clicking on the test button will make a message box like the one shown in Figure
10.2 appear. As the user clicks on the OK button, the message "Testing successful"
will be displayed and when he/she clicks on the Cancel button, the message "Testing
fail" will be displayed.


Figure 11.2
61
 To make the message box looks more sophisticated, you can add an icon besides
  the message. There are four types of icons available in VISUAL BASIC as shown
                                     in Table 11.3


                                        Table 11.3
           Value       Named Constant                           Icon

           16          vbCritical


           32          vbQuestion


           48          vbExclamation


           64          vbInformation


Example 11.2

In this example, the following message box will be displayed:

                                       Figure 11.3


You can draw the same Interface as in example 10.1, modifying the codes as
follows:
Private Sub test2_Click ()
Dim testMsg2 As Integer
testMsg2 = MsgBox ("Click to Test", vbYesNoCancel + vbExclamation, "Test
Message")
If testMsg2 = 6 Then
display2.Caption = "Testing successful"
ElseIf testMsg2 = 7 Then
display2.Caption = "Are you sure?"
62
Else
display2.Caption = "Testing fail"
End If
End Sub


11.3 The InputBox ( ) Function

An InputBox ( ) function will display a message box where the user can enter a value
or a message in the form of text. The format is
 myMessage=InputBox (Prompt, Title, default_text, x-position, y-position)

MyMessage is a variant data type but typically it is declared as a string, which
accepts message input by the users. The arguments are explained as follows:


   •     Prompt      - The message displayed in the input box.
   •     Title        - The title of the input box.
   •     Default-text - The default text that appears in the input field where users can
         use it as his intended input or he may change to another message.
   •     X-position and y-position - the position or the coordinate of the input box.

Example 11.3

The interface of example 11.3 is shown in Figure 11.4:

Figure 11.4
63


The procedure for the OK button:

      Private Sub OK_Click ()
      Dim userMsg As String
      userMsg = InputBox ("What is your message?", "Message Entry Form", "Enter
      your message here", 500, 700)
      If userMsg <> "" Then
      message.Caption = userMsg
      Else
      message.Caption = "No Message"
      End If

      End Sub

When the user clicks the OK button, the input box as shown in Figure 11.5 will
appear. After the user enters the message and clicks OK, the message will be
displayed on the caption, but if he clicks Cancel, "No message" will be displayed.


                                     Figure 11.5


Exercise 11
1. Write down the four arguments of the MsgBox function.
2. Write down the six named constants of the MsgBox function.
3. Write down the arguments of the InputBox function.
4. Write a program to verify the password entered into an InputBox by the user.
64

                                   Lesson12
                Visual Basic Functions- Part II
      Getting to know all the mathematical functions in Visual Basic
      Learning how to compute the values of the mathematical functions.


Mathematical functions are very useful and important in programming because very
often we need to deal with mathematical concepts in programming such as chance
and probability, variables, mathematical logics, calculations, coordinates, time
intervals etc. The common mathematical functions in Visual Basic are Rnd, Sqr, Int,
Abs, Exp, Log, Sin, Cos, Tan , Atn, Fix and Round.

12.1 The Rnd Function

Rnd is very useful when we deal with the concept of chance and probability. The Rnd
function returns a random value between 0 and 1. In Example 12.1, when you run the
program, you will get an output of 10 random numbers between 0 and 1.
Randomize Timer is a vital statement here as it will randomize the process.


Example 12.1
      Private Sub Form_Activate
             Randomize Timer
             For x=1 to 10
             Print Rnd
             Next x
      End Sub


Figure 12.1: The Random Numbers
65
Random numbers in their original form are not very useful in programming until we
convert them to integers. For example, if we need to obtain a random output of 6
integers ranging from 1 to 6, which makes the program behave as a virtual die, we
need to convert the random numbers using the format Int(Rnd*6)+1. Let’s study the
following example:


Example 12.2


In this example, Int(Rnd*6) will generate a random integer between 0 and 5 because
the function Int truncates the decimal part of the random number and returns an
integer. After adding 1, you will get a random number between 1 and 6 every time
you click the command button. For example, Let’s say the random number generated
is 0.98. Ater multiplying it by 6, it becomes 5.88, and using the integer function
Int(5.88) will convert the number to 5, and after adding 1 you will get 6.


In this example, you place a command button and change its caption to ‘roll die’. You
also need to insert a label into the form and clear its caption at the designing phase
and make its font bigger and bold. Then set the border value to 1 so that it displays a
border, and after that set the alignment to center. The statement
Label1.Caption=Num means the integer generated will be displayed as the caption of
the label. Now, run the program and then click on the roll die button, you will get an
output like Figure 12.2.


       Dim num as integer
       Private Sub Command1_Click ( )
              Randomize Timer
              Num=Int (Rnd*6) +1
              Label1.Caption=Num
       End Sub
66
Figure 12.2: A virtual die


Example12.3: A password generator
This is a program that can generate four-digit passwords from 1000 to 9999. The key
statement is crackpass = Int (Rnd * 9000) + 1000. For example, when Rnd returns a
value of 0, the value of crackpass is 1000; and when Rnd returns 0.9999, the value
of Rnd*9000 is 8999.1 and Int (8999.1) will be 8999 and so crackpass will return a
value of 9999.
The program is shown below:


      'Password Cracker

      Dim password As Integer
      Dim crackpass As Integer
      Dim x As Integer
      Private Sub Command1_Click ()
             Timer1.Enabled = True
      End Sub


      Private Sub Form_Load ()
             password = 5689
             crackpass = 0
      End Sub


      Private Sub Timer1_Timer()
             x=x+1
67
              If x < 100 Then
              Label1.Visible = True
              Label1.Caption = "Please wait..."
              Randomize Timer
              crackpass = Int (Rnd * 9000) + 1000
              Text1.Text = crackpass
              Else
              generate
              End If


       End Sub


       Private Sub generate ()
              While crackpass <> password
              Randomize Timer
              crackpass = Int(Rnd * 9000) + 1000
              Text1.Text = crackpass
              Wend
              Timer1.Enabled = False
              Text1.Text = crackpass
              Label1.Visible = True
              Label1.Caption = "Password Cracked! Login Successful!"
              Timer1.Enabled = False


       End Sub

12.2 The Numeric Functions

The numeric functions are Int, Sqr, Abs, Exp, Fix, Round and Log.
a) Int is the function that converts a number into an integer by truncating its decimal
part and the resulting integer is the largest integer that is smaller than the number.
For example, Int(2.4)=2, Int(4.8)=4, Int(-4.6)= -5, Int(0.032)=0 and so on.
b) Sqr is the function that computes the square root of a number. For example, Sqr
(4)=2, Sqr(9)=2 and etc.
c) Abs is the function that returns the absolute value of a number. So Abs (-8) = 8
and Abs (8)= 8.
68
d) Exp of a number x is the value of ex. For example, Exp (1)=e1 = 2.7182818284590
e) Fix and Int are the same if the number is a positive number as both truncate the
decimal part of the number and return an integer. However, when the number is
negative, it will return the smallest integer that is larger than the number. For example,
Fix (-6.34) = -6 while Int (-6.34) = -7.
f) Round is the function that rounds up a number to a certain number of decimal
places. The Format is Round (n, m) which means to round a number n to m decimal
places. For example, Round (7.2567, 2) =7.26
g) Log is the function that returns the natural Logarithm of a number. For example,
Log 10= 2.302585.

Example 12.4
This example computes the values of Int(x), Fix(x) and Round(x, n) in a table form. It
uses the Do Loop statement and the Rnd function to generate 10 numbers. The
statement x = Round (Rnd * 7, 7) rounds a random number between 0 and 7 to 7
decimal places. Using commas in between items will create spaces between them
and hence a table of values can be created. The program is shown below and
the output is displayed in Figure 12.3.


       Private Sub Form_Activate ()
              n=1
              Print " n", "    x", "Int(x)", "Fix(x)", "Round(x, 4)"
              Do While n < 11
              Randomize Timer
              x = Round (Rnd * 7, 7)
              Print n, x, Int(x), Fix(x), Round(x, 4)
              n=n+1
              Loop
       End Sub
69
Figure 12.3: The output of Example 12.4


12.3 Trigonometric Functions

The common trigonometric functions are Sin, Cos, Tan and Atn.
a) Sin is the function that computes the value of sine of an angle in radian.
b) Cos is the function that computes the value of cosine of an angle in radian.
c) Tan is the function that computes the value of tangent of an angle in radian.
d) Atn is the function that computes the value of arc tangent of an angle in radian.


An angle in degree has to be converted to radian before it can be calculated by the
above trigonometric functions. From high school mathematics, we know that π radian
is equivalent to 180°; which means 1 radian is equivalent to π divided by 180.
Therefore, in order to convert an angle x from degree to radian, we have to multiply x
by (π/180). However, there is a small problem because it is rather difficult to obtain
the precise value of π, but fortunately, there is a way to do it in VISUAL BASIC. First
of all, we know that an arc tangent of 1 will return the value of 45° which is π/4 radian.
So, to obtain the value of π, just multiply the arc tangent of 1 with 4. Let’s examine
how all the above calculations can be done in the following examples:


Example 12.5
In this example, the program will display the values of sine, cosine and tangent for
various angles in degree between 0° and 360° in a table form. The value of π is
obtained using the equation pi=4*Atn (1). The angle in degree is converted to radian
by multiplying the angle by (π/180). Different angles are obtained through the use of
For...Next Loop. The program is shown below and the output is shown in Figure 12.4.
70
Private Sub Form_Activate ()
pi = 4 * Atn (1)
Print "angle", "Sin x", "Cos x", "Tan x"
For degree = 0 To 360 Step 30
angle = degree * (pi / 180)
Print degree, Round (Sin (angle), 4), Round (Cos (angle), 4), Round (Tan (angle), 4)
Next degree
End Sub


Figure 12.4


Exercise 12
   1. Write a program to produce random integers ranging from 20 to 40.
   2. Write a program to compute the logarithm of a number and round it up to three
       decimal places.
   3. Write a program to compute the values of sin θ, cos θ and tan θ.
   4. Design a simple scientific calculator that can handle various mathematical
       functions including Log, Abs, Exp, sine, cosine, tangent, Arc tangent, square
       root and etc.
71

                                    Lesson13
                Visual Basic Functions Part III
                           Formatting Output
       Understanding the usage of the Tab function.
       Understanding the usage of the Space function.
       Understanding the usage of the Format function.


Formatting output is a very important part of programming so that the data can be
presented systematically and clearly to the users. Data in Figure 12.3 and Figure
12.4 were presented fairly systematically through the use of commas and some of
the functions like Int, Fix and Round. However, to have better control of the output
format, we can use a number of formatting functions in Visual Basic.
The four important formatting functions in VISUAL BASIC are Tab, Space, and
Format.


13.1 The Tab function
The format of the Tab function is
Tab (n); x
The item x will be displayed at a position that is n spaces from the left border of the
output form. There must be a semicolon in between Tab and the items you intend to
display (VISUAL BASIC will actually do it for you automatically).


Example 13.1
.Private Sub Form_Activate
     Print "I"; Tab (5); "like"; Tab (10); "to"; Tab (15); "learn"; Tab (20); "VISUAL
BASIC"
     Print
     Print Tab (10); "I"; Tab (15); "like"; Tab(20); "to"; Tab(25); "learn"; Tab(20);
"VISUAL BASIC"
     Print
     Print Tab(15); "I"; Tab(20); "like"; Tab(25); "to"; Tab(30); "learn"; Tab(35);
“VISUAL BASIC"
End sub
72
The output of the above example is shown in Figure 13.1. The extra Print statements
that do not seem to print anything actually create a space between two lines.


Figure 13.1: The output using the Tab function


Example 13.2:
This example will generate a multiplication table.


       Private Sub Form_Activate ()
               For x = 1 To 10
               Print Tab (2); "2" & "x" & Str(x) & "=" & Str (2 * x) _
               ; Tab (14); "3" & "x" & Str(x) & "=" & Str (3 * x) _
               ; Tab (26); "4" & "x" & Str(x) & "=" & Str (4 * x) _
               ; Tab (38); "5" & "x" & Str(x) & "=" & Str (5 * x) _
               ; Tab (50); "6" & "x" & Str(x) & "=" & Str (6 * x) _
               ; Tab (62); "7" & "x" & Str (x) & "=" & Str (7 * x) _
               ; Tab (74); "8" & "x" & Str (x) & "=" & Str (8 * x) _
               ; Tab (86); "9" & "x" & Str (x) & "=" & Str (9 * x) _
               ; Tab (98); "10" & "x" & Str (x) & "=" & Str (10 * x) _
               Next x
       End Sub


In this program, each column in the output form is separated by 12 spaces. Str (n) is
a function that will convert a number to a string (or text), and the sign “&” is used to
join two strings. Str needs to be used here because all the items are taken to be
strings.
Notice that “x” and Str(x) are different as “x” will display the letter x while Str(x) is
considered as a string and displays the number x. The output is shown in Figure 13.2:
73


Figure 13.2 The multiplication table


13.2 The Space function
The Space function is very closely linked to the Tab function. However, there is a
minor difference. While Tab (n) means the item is placed n spaces from the left
border of the screen, the Space function specifies the number of spaces between two
consecutive items. For example, the procedure
       Private Sub Form_Activate ()
              Print "Visual"; Space (10); "Basic"
       End Sub
means that the words Visual and Basic will be separated by 10 spaces.


Example 13.3
Example 13.3 is the same multiplication table as the previous example but the Tab
function is replaced by the Space function. The output is shown in Figure 13.3. Notice
that the alignments of the columns are totally off. Therefore, it is normally better to
use the Tab function rather than the Spaces function if we want a uniform display of
the items in a table.


Figure 13.3
74


Private Sub Form_Activate ()
          For x = 1 To 10
          Print "2" & "x" & Str(x) & "=" & Space (2); Str(2 * x) _
          ; Space (6); "3" & "x" & Str(x) & "=" & Space (2); Str (3 * x) _
          ; Space (6); "4" & "x" & Str(x) & "=" & Space (2); Str (4 * x) _
          ; Space (6); "5" & "x" & Str(x) & "=" & Space (2); Str(5 * x) _
          ; Space (6); "6" & "x" & Str(x) & "=" & Space (2); Str(6 * x) _
          ; Space (6); "7" & "x" & Str(x) & "=" & Space (2); Str(7 * x) _
          ; Space (6); "8" & "x" & Str(x) & "=" & Space (2); Str(8 * x) _
          ; Space (6); "9" & "x" & Str(x) & "=" & Space (2); Str(9 * x) _
          ; Space (6); "10" & "x" & Str(x) & "=" & Space (2); Str(10 * x) _
          Next x

End Sub

13.3 The Format function
The Format function is a very powerful formatting function which can display the
numeric values in various forms. There are two types of Format functions. One of
them is the built-in or predefined format while another one can be defined by the
users.
(i) The format of the predefined Format function is
                   Format (n, “style argument”)
where n is a number and the list of style arguments is given in Table 13.1.


Table 13.1 List of style arguments
Style              Explanation                   Example
argument
General            Displays the number without
Number             having separators between     Format(8972.234, “General Number”)=8972.234
75
               thousands.
Fixed          Displays the number without
               having separators between         Format(8972.2, “Fixed”)=8972.23
               thousands and rounds it up to
               two decimal places.
Standard       Displays the number with
               separators between thousands      Format(6648972.265, “Standard”)= 6,648,972.27
               and rounds it up to two decimal
               places.
Currency       Displays the number with the
               dollar sign in front, has         Format(6648972.265, “Currency”)= $6,648,972.27
               separators between thousands,
               and rounds it up to two decimal
               places.
Percent        Converts the number to
               percentage form, displays a %     Format(0.56324, “Percent”)=56.32 %
               sign and rounds it up to two
               decimal places.


Example 13.4
Private Sub Form_Activate ()
Print Format (8972.234, "General Number")
Print Format (8972.2, "Fixed")
Print Format (6648972.265, "Standard")
Print Format (6648972.265, "Currency")
Print Format (0.56324, "Percent")
End Sub


Figure 13.4 The output of Example 13.4


(ii) The format of the user-defined Format function is:
              Format (n, “user’s format”)
76
Although it is known as user-defined format, we still need to follow certain formatting
styles. Examples of user-defined formatting style are listed in Table 13.2:


Table13.2: User-Defined format
Example                             Explanation                           Output
Format(781234.57,”0”)               Rounds to a whole number without      781235
                                    separators between thousands.
Format(781234.57,”0.0”)             Rounds to 1 decimal place without     781234.6
                                    separators between thousands.
Format(781234.576,”0.00”)           Rounds to 2 decimal places            781234.58
                                    without separators between
                                    thousands.
Format(781234.576,”#,##0.00”)       Rounds to 2 decimal places with       781,234.58
                                    separators between thousands.
Format(781234.576,”$#,##0.00”) Shows dollar sign and rounds to 2          $781,234.58
                                    decimal places with separators
                                    between thousands.
Format(0.576,”0%”)                  Converts to percentage form           58%
                                    without decimal places.
Format(0.5768,”0.00%”)              Converts to percentage form with 2 57.68%
                                    decimal places.


Example 13.5
Private Sub Form_Activate ()
Print Format (781234.57, "0")
Print Format (781234.57, "0.0")
Print Format (781234.576, "0.00")
Print Format (781234.576, "#,##0.00")
Print Format (781234.576, "$#,##0.00")
Print Format (0.576, "0 %")
Print Format (0.5768, "0.00 %")
End Sub


Example 13.5 demonstrates some of the user-defined formatting. The output is
shown in Figure 13.4:
77


Figure 13.5: The output of user-defined formatting


13.4 Formatting date and time
Date and time can be formatted using predefined formats and also user-defined
formats. The predefined formats of date and time are shown in Table 13.3:


Table 13.3 Predefined formats of date and time
Format                            Explanation
Format (Now, “General date”)      Formats the current date and time.
Format (Now, “Long Date”)         Displays the current date in long format.
Format (Now, “Medium Date”)       Displays the current date in medium format
Format (Now, “Short date”)        Displays the current date in short format
Format (Now, “Long Time”)         Display the current time in long format.
Format (Now, “Medium Time”)       Display the current time in medium format.
Format (Now, “Short Time”)        Display the current time in short format.


Example 13.6
This program will create a magic clock that can display the date and time in different
formats. In order to make the clock actually work according to real time, you need to
insert the timer control into the form and enter the formatting procedure in the timer
subprogram. In addition, you must set the time interval in the timer’s properties
78
window to 1000 so that it is equal to 1 second. You will also need to insert a few
labels to display the date and time in different formats. The general method to display
data or time on a label is Label1.Caption=date and Label1.Caption=Time. However,
in order to format the output, you need to use the formats shown in this example.


      Private Sub Timer1_Timer()
             Label3.Caption = Format (Now, "General Date")
             Label5.Caption = Format (Now, "Long Date")
             Label8.Caption = Format (Now, "Medium Date")
             Label1.Caption = Format (Now, "Long Time")
             Label9.Caption = Format (Now, "Short Time")
             Label12.Caption = Format (Now, "Medium Time")
      End Sub

The output is displayed in Figure 13.6:

Figure 13.6: Date and Time in different formats


You can also format date and time according to user-defined formats. The user-
defined formats for the date involve the use of the d, m and y letters while time format
use Hh: Nn: Ss AM/PM and “ttttt”. Some of the formats are shown in Table 13.4:


Table 13.4 Date and Time Formats
Format                              Explanation
79
Format (Now, “m/d/yy”)             Displays a single digit month followed by a single
                                   digit day and two-digit year separated by slashes.
Format(Now, "dd/mm/yyyy")          Displays a two-digit day followed by a two-digit
                                   month and four-digit year separated by slashes.
Format(Now, "dd-mmm-yyyy")         Displays a two-digit day followed by an
                                   abbreviated month name and a four-digit year
                                   separated by dashes.
Format(Now, "dd-mmmm-yyyy")        Displays a two-digit day followed by the month
                                   name and a four-digit year separated by dashes.
Format(Now, "Hh:Nn:Ss              Displays the current time in a two-digit hour, two-
AM/PM")                            digit minute and two-digit second. It also includes
                                   the AM/PM indicator.
Format(Now, "ttttt")               Displays the current time in a two-digit hour, two-
                                   digit minute and two-digit second. It also includes
                                   the AM/PM indicator.
Format(Now, "dddd")                Displays the current day name.
Format(Now, "dddddd")              Displays the current day name and date.


Example 13.7
This example displays various formats of Date and Time. The output is shown in
Figure 13.7.


Private Sub Form_Activate ()
Print Format (Now, "m/d/yy")
Print Format (Now, "d/m/yy")
Print Format (Now, "dd-mm-yyyy")
Print Format (Now, "dd-mmm-yyyy")
Print Format (Now, "dd/mmmm/yyyy")
Print Format (Now, "mmm-dd-yyyy")
Print Format (Now, "mmmm/dd//yyyy")
Print Format (Now, "mmmm dd, yyyy")
Print Format (Now, "dddd")
Print Format (Now, "dddddd")
Print Format (Now, "Hh: Nn: Ss AM/PM")
Print Format (Now, "ttttt")
80
End Sub


Figure 13.7 Date and Time in different formats


Exercise 13

   1. Explain the difference between the Tab and the Space functions and write a
      program to support your explanation.
   2. Write down five style arguments of the Format function and write a program to
      illustrate these styles.
   3. Create a digital clock in Visual Basic that uses three different time formats.
   4. Write a program to compute the percentage of price increment of a certain
      goods based on the new price and the old price. Display the answer in
      percentage form using the Format function.
81


                                    Lesson 14
                 Visual Basic Functions Part IV
                         Manipulating Strings


      Learning the usage of various strings manipulating functions such as Len,
      Right, Left, Mid, Trim, Ltrim, Rtrim, Ucase, Lcase, Instr, Val, Str etc, Chr and
      Asc.


14.1 The Len Function

The Len function returns an integer value which is the length of a phrase or a
sentence, including the empty spaces. The format is:
               Len (“Phrase”)
For example:
               Len (VisualBasic) = 11 and Len (welcome to VISUAL BASIC tutorial) =
               22
The Len function can also return the number of digits or memory locations of a
number that is stored in the computer. For example,
               Private sub Form_Activate ( )
               X=sqr (16)
               Y=1234
               Z#=10#
               Print Len(x), Len(y), and Len (z)
82
              End Sub
will produce the output 1, 4, 8. The reason why the last value is 8 is because z# is a
double precision number and so it is allocated more memory spaces.

14.2 The Right Function
The Right function extracts the right portion of a phrase. The format is
              Right (“Phrase”, n)
where n is the starting position from the right of the phase where the portion of the
phrase is going to be extracted. For example:
                Right (“Visual Basic”, 4) = asic

14.3 The Left Function

The Left function extracts the left portion of a phrase. The format is
              Left (“Phrase”, n)
where n is the starting position from the left of the phase where the portion of the
phrase is going to be extracted. For example:
                Left (“Visual Basic”, 4) = Visu

14.4 The Ltrim Function
The Ltrim function trims the empty spaces of the left portion of the phrase. The format
is
              Ltrim(“Phrase”)
.For example:
                Ltrim (“ Visual Basic”, 4) = Visual Basic

14.5 The Rtrim Function
The Rtrim function trims the empty spaces of the right portion of the phrase. The
format is
              Rtrim(“Phrase”)
.For example:
              Rtrim (“Visual Basic      ”, 4) = Visual Basic

14.6 The Trim function

The Ttrim function trims the empty spaces on both sides of the phrase. The format is
              Trim (“Phrase”)
.For example:
83
               Trim (“ Visual Basic      ”) = Visual Basic

14.7 The Mid Function

The Mid function extracts a substring from the original phrase or string. The format is
               Mid (phrase, position, n)
where position is the starting position of the phrase from which the extraction process
will start and n is the number of characters to be extracted. For example:
               Mid (“Visual Basic”, 3, 6) = ual Bas

14.8 The InStr function

The InStr function looks for a phrase that is embedded within the original phrase and
returns the starting position of the embedded phrase. The format is
               Instr (n, original phase, embedded phrase)
where n is the position where the Instr function will begin to look for the embedded
phrase. For example
               Instr (1, “Visual Basic”,” Basic”) =8

14.9 The Ucase and the Lcase functions

The Ucase function converts all the characters of a string to capital letters. On the
other hand, the Lcase function converts all the characters of a string to small letters.
For example,
               Ucase (“Visual Basic”) =Visual Basic
               Lcase (“Visual Basic”) =Visual Basic

14.10 The Str and Val functions

The Str is the function that converts a number to a string while the Val function
converts a string to a number. These two functions are important when we need to
perform mathematical operations.

14.11 The Chr and the Asc functions

The Chr function returns the string that corresponds to an ASCII code while the Asc
function converts an ASCII character or symbol to the corresponding ASCII code.
ASCII stands for “American Standard Code for Information Interchange”. Altogether
there are 255 ASCII codes and as many ASCII characters. Some of the characters
84
may not be displayed as they may represent some actions such as the pressing of a
key or beeping. The format of the Chr function is
              Chr(charcode)
and the format of the Asc function is
              Asc (Character)
The following are some examples:
Chr(65)=A, Chr(122)=z, Chr(37)=% , Asc(“B”)=66, Asc(“&”)=38


Example 14.1
This is a program that utilizes some of the functions mentioned in this lesson.
The output is shown in Figure 14.1.


      Private Sub Form_Activate ()
              Print Len ("Visual Basic")
              Print Right ("Visual Basic", 4)
              Print Left ("Visual Basic", 4)
              Print LTrim(" Visual Basic")
              Print LTrim("Visual Basic        ")
              Print Trim(" Visual Basic ")
              Print InStr (5, " Visual ", " ")
              Print InStr (6, Trim$(" Visual Basic "), " ")
              Print Mid ("Visual Basic", 3, 6)
              Print InStr (1, "Visual Basic", "Basic")
      End Sub


Figure 14.1
85


Exercise 14
   1. List the functions which can be used to manipulate strings and write a program
       to illustrate these functions.
   2. Write a program to compute the ASCII codes that correspond to the
       characters a - z and A - Z using the Chr function.


                                        Lesson15
  Visual Basic Functions Part V- Creating Your
                               Own Functions
       Learning how to create your own functions.


The general format of a function is as follows:


Function functionName (Arg As dataType,..........) As dataType
  Statements
End Function


You can place the word Public or Private in front of Function. Public indicates that the
function is applicable to the whole program while private indicates that the function is
only applicable to a certain module or procedure.


Example 15.1
86
The example shows a function that can be used to calculate the area of a triangle
based on the length of its base and its height. The function is:


        Private Function area (base As Variant, height As Variant) As Variant
              area = (base * height) / 2
        End Function


After you have created the function, you can call it under a procedure such as


        Private Sub Command1_Click ()
              Label4.Caption = area (Text1.Text, Text2.Text)
        End Sub
When the user enters the values into the text boxes and clicks the command button,
the area of the triangle will be displayed in Label4. The output is shown in Figure
15.1:


Figure 15.1


Example 15.2
This example illustrates a function that can be used to calculate the profit margin
based on the formula
                  Selling Price - Cost Price
Profit Margin =
                        Selling Price
87


The function to compute the profit margin and present it in the percentage form is


       Private Function PM (SP As Variant, CP As Variant)
              PM = Format ((SP - CP) / SP, "Percent")
       End Function


and the procedure to call the function is
       Private Sub Command1_Click ()
              SP = SPTxt
              CP = CPTxt
              PMLbl = PM (SP, CP)
       End Sub
The program will read the values from text boxes and display the result on the label
with the name PMLbl. The output is shown in Figure 15.2:


Figure 15.2 The Profit Margin Calculator


Example 15.3


In this example, a user can calculate the future value of a certain amount of money
he has today based on the interest rate and the number of years from now
(supposing he will invest this amount of money in a bank). The calculation is based
on the compound interest rate.
88


Figure 15.3 The Future Value Calculator


      Public Function FV (PV As Variant, i As Variant, n As Variant) As Variant
            'Formula to calculate Future Value (FV)
            'PV denotes Present Value
            FV = PV * (1 + i / 100) ^ n
      End Function


      Private Sub compute_Click ()
            'This procedure will calculate Future Value
            Dim FutureVal As Currency
            Dim PresentVal As Currency
            Dim interest As Variant
            Dim period As Variant
            PresentVal = PV.Text
            interest = rate.Text
            period = years.Text
            FutureVal = FV (PresentVal, interest, period)
            Label5.Caption = Format (FutureVal, "currency")
      End Sub
89


Example 15.4
The following program will automatically compute examination grades based on the
marks that a student obtained.


Figure 15.4


      Private Sub Command1_Click ()
              mark = Text1.Text
              Label3.Caption = grade (mark)
      End Sub


      Private Function grade(mark As Variant) As String
              Select Case mark
              Case Is >= 80
              grade = "A"
              Case Is >= 70
              grade = "B"
              Case Is >= 60
              grade = "C"
              Case Is >= 50
              grade = "D"
              Case Is >= 40
              grade = "E"
              Case Else
90
             grade = "F"
             End Select
      End Function


Example 15.5
This is a program that can calculate the body mass index, or BMI of a person based
the body weight in kilograms and the body height in meters. BMI can be calculated
using the formula
                       weight
                             2
                      height


The program is illustrated below and the output is shown in Figure 15.5:


      Private Sub Command1_Click ()
             Label4.Caption = BMI (Text1.Text, Text2.Text)
      End Sub


      Private Function BMI (height, weight)
             BMIValue = (weight) / (height ^ 2)
             BMI = Format (BMIValue, "0.00")
      End Function


Figure 15.5 BMI calculator
91
Exercise 15
   1. Write a program to compute the area of a rectangle using a user-defined
       function.
   2. Write a program to compute the volume of a cylinder using a user-defined
       function.
   3. Create a user-defined function to calculate the average speed of a car using
       the formula
                          Total Distance Travelled
       Average Speed =
                              Total Time Taken
   4. Create a user-defined function to calculate the present value that needs to be
       invested in order to obtain a certain sum of money after a certain number of
       years based on a certain interest rate per annum.


                                    Lesson 16
         Creating VISUAL BASIC Functions for
                    Microsoft Excel
       Learning how to create user-defined functions in Microsoft Excel using the
       Microsoft Excel Visual Basic Editor.


16.1 The Needs to Create User-Defined Functions in Excel

You can create your own functions to supplement the built-in functions in Microsoft
Excel spreadsheet which are quite limited. These functions could be very useful and
powerful if you know how to program them properly. One of the main reasons we
need to create user-defined functions is to customize the spreadsheet environment
for individual needs. For example, the user might need a function that could calculate
commissions based on the sales volume, which is quite difficult if not impossible by
using the built-in functions alone. Let’s look at the table below:
92


                       Table 16.1: Commissions Payment Table
                      Sales Volume($)                  Commissions
                           <500                              3%
                          <1000                              6%
                          <2000                              9%
                          <5000                              12%
                          >5000                              15%


In the above table, if a salesman attains a sale volume of $6000, he will be paid
$6000x12%=$720.00. A Visual Basic function to calculate the commissions could be
written as follows:

       Function Comm (Sales_V As Variant) as Variant
       If Sales_V <500 Then
       Comm=Sales_V*0.03
       Elseif Sales_V>=500 and Sales_V<1000 Then
       Comm=Sales_V*0.06
       Elseif Sales_V>=1000 and Sales_V<2000 Then
       Comm=Sales_V*0.09
       Elseif Sales_V>=200 and Sales_V<5000 Then
       Comm=Sales_V*0.12
       Elseif Sales_V>=5000 Then
       Comm=Sales_V*0.15
       End If
       End Function


16.2 Using Microsoft Excel Visual Basic Editor

To create User Defined functions in Microsoft Excel, click on tools, select macro and
then click on Visual Basic Editor as shown in Figure 11.1:
93
                  Figure 11.1: Inserting Excel Visual Basic Editor


Upon clicking the Visual Basic Editor, the Visual Basic Editor window will appear as
shown in Figure 11.2. To create a function, type in the function as illustrated in
section 11.1 above after typing, save the file and then return to the Excel window.

                       Figure 16.2: The VISUAL BASIC Editor
94


In the Excel window, type in the titles Sales Volume and Commissions in any two
cells. By referring to Figure 16.2, key in the Comm function at cell C4 and by
referencing the value in cell B4, using the format Comm (B4). Any value which
appears in cell B4 will pass the value to the Comm function in cell C4. For the rest of
the rows, just copy the formula by dragging the bottom-right corner of cell C4 to the
required cells and a nice and neat table that shows the commissions will
automatically appear. It can also be updated at any time.
95
Figure 16.3


 Exercise 16
   1. Write a function in Excel that computes the grades of the examination scores.
   2. Write a function in Excel to compute the health status of the patients based on
      their blood pressures.
   3. Write a function in Excel to compute the performance of the staff based the
      monthly sales quotas achieved.
96

                                   Lesson 17
                                Arrays Part I
       Understanding the concept of an array.
       Learning how to declare an array.
       Learning how to create a control array.


17.1 Introduction to Array

When we work with a single item, we only need to use one variable. However, if we
have a list of items which are of similar type to deal with, we need to declare an array
of variables instead of using a variable for each item. For example, if we need to
enter one hundred names, instead of declaring one hundred different variables, we
need to declare only one array. By definition, an array is a group of variables with the
same data type and name. We differentiate each item in the array by using subscript,
the index value of each item, for example name (1), name (2), name (3) .......etc.


17.2 Declaring Arrays

We can use Public or Dim statements to declare an array like the way we declare a
single variable. The Public statement declares an array that can be used throughout
an application while the Dim statement declares an array that can be used only in a
local procedure.

The general format to declare an array is as follows:

       i)     Dim arrayName(subs) as dataType
       ii)    Public arrayName(subs) as dataType

‘Subs’ indicates the subscript of the last element in the array, instead of the number
of elements in the array. This is because VISUAL BASIC assigns a subscript of 0 to
the first element rather than 1. For example, Dim book (9) will declare an array which
consists of 10 elements, i.e. book(0), book(1), book(2), book(3), book(4), book(5),
book(6), book(7), book(8) and book(9).
97
In order to assign 1 to the subscript of the first element in an array, you need to
include the statement Option Base 1 in the declaration area. With Option Base 1,
Dim CusName (10) as String will declare an array that consists of 10 elements,
starting from CusName (1) to CusName (10). Otherwise, there will be 11 elements in
the array starting from CusName (0) through to CusName (10). In addition, using Dim
Count (100 to 500) as Integer will declare an array that consists of elements starting
from Count (100) and ending at Count (500).


Example 17.1

Figure 17.1


Dim studentName(10) As String
Dim num As Integer
Private Sub addName ()
       For num = 1 To 10
       studentName (num) = InputBox ("Enter the student name", "Enter Name", "",
       1500, 4500)
       If studentName (num) <> "" Then
       Form1.Print studentName (num)
98
       Else
       End
       End If
       Next
End Sub


Private Sub Start_Click ()
       Form1.Cls
       addName
End Sub

The above program accepts data entries through an input box and displays the
entries in the form itself. As you can see, this program will only allow a user to enter
10 names each time he clicks on the start button.

Example 17.2


Figure 17.2


Dim studentName (10) As String
Dim num As Integer
Private Sub addName ( )
For num = 1 To 10
studentName (num) = InputBox ("Enter the student name")
99
List1.AddItem studentName (num)
Next
End Sub
Private Sub Start_Click ()
addName
End Sub
The above program accepts data entries through an InputBox and displays the items
in a list box.


17.3 The Control Array

Sometimes we need a group of controls that are of the same type or perform similar
tasks, for example the buttons on a calculator or a group of images boxes. Then we
have to create an array of the controls. These controls will carry the same name but
with different suffixes or indices.


It is very easy to create a control array in Visual Basic. Let’s say you want to create a
control array of a group of image boxes. The first step is to insert an image box in the
form. Secondly, right-click on the image box, then click copy and paste. VISUAL
BASIC will ask you whether you want to create a control array or not. Click Yes to
create a control array. Otherwise, another individual image box will be created. You
can keep on clicking the paste button to obtain the number of controls you desire.


For example, a control array of a group of image boxes will comprise Image1 (0),
Image1 (1), Image1 (2), Image1 (3) and so on, which can be identified by their index
values (or the values of the suffixes).


Exercise 17
   1. Write a program to enter the item number and item unit price of 20 products
       using an input box.
   2. Create an array of 6 shape controls and display them as different shapes.
100

                                       Lesson 18
        Arrays Part II -Two Dimensional Arrays
       Understanding the concept of a two dimensional array.
       Learning how to create a two dimensional array.


Multidimensional arrays are often needed when we are dealing with more complex
programs, especially those that handle large amount of data. Data are usually
organized and arranged in table form, this is where the multidimensional array comes
into play. However, we are dealing only with two dimensional arrays, i.e. a table that
consists of rows and columns.


The format to declare a two dimensional array is
              Dim arrayName (num1, num2) as datatype


where num1 is the suffix of the first dimension of the last element and num2 is the
suffix of the second dimension of the last element in the array. The suffixes of the
element in the array will start with (0, 0) unless you set the Option Base to 1. In the
case when the Option Base is set to 1, then the suffixes of the element in the array
will start with (1, 1). For example,
              Dim Score (5, 5) as Integer
will create a two dimension array consists of 36 elements. These elements can be
organized in a table form as shown in Table 18.1:
Table 18.1 A two dimensional array
Score(0,0) Score(0,1) Score(0,2) Score(0,3) Score(0,4) Score(0,5)

Score(1,0) Score(1,1) Score(1,2) Score(1,3) Score(1,4) Score(1,5)

Score(2,0) Score(2,1) Score(2,2) Score(2,3) Score(2,4) Score(2,5)

Score(3,0) Score(3,1) Score(3,2) Score(3,3) Score(3,4) Score(3,5)

Score(4,0) Score(4,1) Score(4,2) Score(4,3) Score(4,4) Score(4,5)

Score(5,0) Score(5,1) Score(5,2) Score(5,3) Score(5,4) Score(5,5)
101
If you set the Option Base to 1, then the elements will start with (1,1) and end at (6,6)
as shown in the following example.


Dim Score (6, 6) as Integer
Option Base 1


Table 18.2 A two dimensional array with Option Base 1
Score(1,1) Score(1,2) Score(1,3) Score(1,4) Score(1,5) Score(1,6

Score(2,1) Score(2,2) Score(2,3) Score(2,4) Score(2,5) Score(2,6)

Score(3,1) Score(3,2) Score(3,3) Score(3,4          Score(3,5) Score(3,6)

Score(4,1) Score(4,2) Score(4,3) Score(4,4) Score(4,5) Score(4,6)

Score(5,1) Score(5,2) Score(5,3) Score(5,4) Score(5,5) Score(5,6)

Score(6,1) Score(6,2) Score(6,3) Score(6,4) Score(6,5) Score(6,6)


The above concepts are illustrated in a sample program in Example 18.1:


Example 18.1


Option Base 1
Dim score (6, 6) As Integer
Dim x As Integer
Dim sum As Integer


Private Sub Command1_Click ()
x=0
For i = 1 To 6
For j = 1 To 6
sum = i + j
score (i, j) = sum
Label1(x).Caption = "Score (" & i & "," & j & ")" & "=" & sum
x=x+1
102
Next j
Next i
End Sub


In Example 18.1, a two dimensional array that comprises 36 elements is created as
the Option Base is set to 1. In order to display the elements, a nested For…Next loop
is used to assign values which are equal to the sums of the suffixes, i and j, to all of
the elements in the array. The values are displayed through a control array made up
of 36 labels. The index is initially assigned a value of 0 using the variable x, which
then increases by 1 after every loop. In this way the indices will be assigned the
values ranging from 0 to 35, hence every label will be able to display the
corresponding scores of the two dimensional array using the statement (The
ampersand sign ‘&’ is used to combine string and numeric data, and it is very useful
for presenting an output that is easy to understand): Label1(x).Caption = "Score ("
& i & "," & j & ")" & "=" & sum


Figure 18.1


                                  Columns
     Rows
103


Exercise 18
1. Write a program using a two-dimensional array to display the quarterly sales
   target achieved by 10 salesmen in a year. The sample output is shown below:


                 Quarter 1     Quarter 2      Quarter 3     Quarter 4
      Abraham        100           150            200           180
      Ben             50            80            90            100
      Chris          150           100            170           200
      Dan            200           100            150           190
      Elvis           80            80            90            100
      Francis         90            70            50             80
      Graham         110           120            130           160
      Hans           160           170            180           190
      Irwin          130           140            150           140
      Jenkin          90            80            60             70


2. Write a program to input the marks of five subjects for 10 students and compute
the total and average marks.
104

                                    Lesson 19
                                    Graphics
       Learning how to manipulate the line and shape controls.
       Learning how to use the image box and the picture box.
       Learning how to use PSet, Line and Circle Drawing methods.
       Learning how to create a picture viewer.


Graphics are a very important part of Visual Basic programming as an attractive
interface will be appealing to the users. In old BASIC, drawing and designing
graphics are considered as difficult jobs, as they have to be programmed line by line
in a text-based environment. However, in Visual Basic, these jobs have been made
easy. There are four basic controls in VISUAL BASIC that you can use to draw
graphics on your form: the line control, the shape control, the image box and the
picture box.

19.1 The line and Shape controls

To draw a straight line, just click on the line control and then use your mouse to draw
the line on the form. After drawing the line, you can then change its color, width and
style using the BorderColor, BorderWidth and BorderStyle properties.


Similarly, to draw a shape, just click on the shape control and draw the shape on the
form. The default shape is a rectangle, with the shape property set at 0. You can
change the shape to square, oval, circle and rounded rectangle by changing the
shape property’s value to 1, 2, 3, 4, and 5 respectively. In addition, you can change
its background color using the BackColor property, its border style using the
BorderStyle property, its border color using the BorderColor property as well its
border width using the BorderWidth property.


Example 19.1
The program in this example allows the user to change the shape by selecting a
particular shape from a list of options from a list box, as well as changing its color
through a common dialog box.
105
The objects to be inserted in the form are a list box, a command button, a shape
control and a common dialog box. The common dialog box can be inserted by
clicking on ‘project’ on the menu and then selecting the Microsoft Common Dialog
Control 6.0 by clicking the check box. After that, the Microsoft Common Dialog
Control 6.0 will appear in the toolbox and you can drag it into the form.


The list of items can be added to the list box through the AddItem method. The
procedure for the common dialog box to present the standard colors is as follows:
              CommonDialog1.Flags = &H1&
              CommonDialog1.ShowColor
              Shape1.BackColor = CommonDialog1.Color
The last line will change the background color of the shape by clicking on a particular
color on the common dialog box as shown in Figure 19.2.


       Private Sub Form_Load ()
              List1.AddItem "Rectangle"
              List1.AddItem "Square"
              List1.AddItem "Oval"
              List1.AddItem "Circle"
              List1.AddItem "Rounded Rectangle"
              List1.AddItem "Rounded Square"
       End Sub


       Private Sub List1_Click ()
              Select Case List1.ListIndex
              Case 0
              Shape1.Shape = 0
              Case 1
              Shape1.Shape = 1
              Case 2
              Shape1.Shape = 2
              Case 3
              Shape1.Shape = 3
              Case 4
              Shape1.Shape = 4
106
            Case 5
            Shape1.Shape = 5
            End Select
      End Sub


      Private Sub Command1_Click()
            CommonDialog1.Flags = &H1&
            CommonDialog1.ShowColor
            Shape1.BackColor = CommonDialog1.Color
      End Sub


Figure 19.1 The output of Example 19.1


Figure 19.2 The Standard Colors
107
19.2 The Image Box and the Picture Box

Using the line and shape controls to draw graphics will only enable you to create a
simple design. In order to improve the look of the interface, you need to put in images
and pictures of your own. Fortunately, there are two very powerful graphics tools you
can use in Visual Basic which are the image box and the picture box.


To load a picture or image into an image box or a picture box, you can click on the
picture property in the properties window and a dialog box will appear which will
prompt the user to select a certain picture file. You can also load a picture at runtime
by using the LoadPictrure ( ) method. The syntax is
       Image1.Picture= LoadPicture ("C:path namepicture file name") or
       picture1.Picture= LoadPicture ("C:path namepicture name")


For example, the following statement will load the grape.gif picture into the image box.
       Image1.Picture= LoadPicture ("C:My FolderVISUAL BASIC
       programImagesgrape.gif")


Example 19.2
In this example, each time you click on the ‘change pictures’ button as shown in
Figure 19.2, you will be able to see three images loaded into the image boxes. This
program uses the Rnd function to generate random integers and then uses the
LoadPicture method to load different pictures into the image boxes using the
If…Then…Statements based on the random numbers generated. The output is
shown in Figure 19.2.


Dim a, b, c As Integer
Private Sub Command1_Click ()
Randomize Timer
a = 3 + Int (Rnd * 3)
b = 3 + Int (Rnd * 3)
c = 3 + Int (Rnd * 3)


If a = 3 Then
108
Image1 (0).Picture = LoadPicture ("C:My FolderVISUAL BASIC
programImagesgrape.gif")
End If
If a = 4 Then
Image1 (0).Picture = LoadPicture ("C:My FolderVISUAL BASIC
programImagescherry.gif")
End If
If a = 5 Then
Image1 (0).Picture = LoadPicture ("C:My FolderVISUAL BASIC
programImagesorange.gif")
End If
If b = 3 Then
Image1 (1).Picture = LoadPicture ("C:My FolderVISUAL BASIC
programImagesgrape.gif")
End If
If b = 4 Then
Image1 (1).Picture = LoadPicture ("C:My FolderVISUAL BASIC
programImagescherry.gif")
End If
If b = 5 Then
Image1 (1).Picture = LoadPicture ("C:My FolderVISUAL BASIC
programImagesorange.gif")
End If
If c = 3 Then
Image1 (2).Picture = LoadPicture ("C:My FolderVISUAL BASIC
programImagesgrape.gif")
End If
If c = 4 Then
Image1 (2).Picture = LoadPicture ("C:My FolderVISUAL BASIC
programImagescherry.gif")
End If
If c = 5 Then
Image1 (2).Picture = LoadPicture ("C:My FolderVISUAL BASIC
programImagesorange.gif")
End If
109
End Sub


Figure 19.2


19.3 PSet, Line and Circle Drawing Methods

Other than using the line and shape controls to draw graphics on the form, you can
also use the Pset, Line and Circle methods.


(a) The Pset Method
The Pset method draws a dot on the screen. The format is
              Pset (x, y), color
(x,y) is the coordinates of the point and color is its color. To specify the color, you can
use the color codes or the standard VISUAL BASIC color constant such as VbRed,
VbBlue, VbGeen etc. For example, Pset (100,200), VbRed will display a red dot at
the (100,200) coordinates.
110
The Pset method can also be used to draw a straight line on the form. The procedure
is
                For x= a to b
                Pset(x, x)
                Next x

This procedure will draw a line starting from the point (a, a) and to the point (b, b).
For example, the following procedure will draw a magenta line from the point (0, 0) to
the point (1000, 1000).
                For x= 0 to 100
                Pset(x, x), vbMagenta
                Next x
(b) The Line Method
Although the Pset method can be used to draw a straight line on the form, it is a little
slow. It is better to use the Line method if you want to draw a straight line faster. The
format of the Line command is shown below. It draws a line from the point (x1, y1) to
the point (x2, y2) and the color constant will determine the color of the line.
       Line (x1, y1)-(x2, y2), color
For example, the following command will draw a red line from the point (0, 0) to the
point (1000, 2000).
       Line (0, 0)-(1000, 2000), VbRed
The Line method can also be used to draw a rectangle. The format is
       Line (x1-y1)-(x2, y2), color, B
The four corners of the rectangle are (x1-y1), (x2-y1), (x1-y2) and (x2, y2)
Another variation of the Line method is to fill the rectangle with a certain color. The
format is
       Line (x1, y1)-(x2, y2), color, BF
If you wish to draw the graphics in a picture box, you can use the following formats
            •   Picture1.Line (x1, y1)-(x2, y2), color
            •   Picture1.Line (x1-y1)-(x2, y2), color, B
            •   Picture1.Line (x1-y1)-(x2, y2), color, BF
            •   Picture1.Circle (x1, y1), radius, color


(c) The Circle Method
The circle method takes the following format
111
       Circle (x1, y1), radius, color
This draws a circle centered at (x1, y1), with a certain radius and a certain border
color. For example, the procedure
       Circle (400, 400), 500, VbRed
draws a circle centered at (400, 400) with a radius of 500 twips and a red border.


Example 19.3
This example is a program that can draw various shapes with different colors in a
picture box. The program uses a common dialog box to select the color for the
graphics. The output is shown in Figure 19.3.

       Dim x1 As Integer
       Dim y1 As Integer
       Dim x2 As Integer
       Dim y2 As Integer
       Dim x3 As Integer
       Dim y3 As Integer
       Dim color As String
       Dim r As Integer


       Private Sub Command1_Click ()
              On Error GoTo AddCoordinate
              x1 = Text1.Text
              y1 = Text2.Text
              x2 = Text3.Text
              y2 = Text4.Text
              On Error GoTo addcolor
              Picture1.Line (x1, y1)-(x2, y2), color
              Exit Sub
112
      AddCoordinate:
      MsgBox ("Please fill in the coordinates")
      Exit Sub
      addcolor:
      MsgBox ("Please choose a color")
      Exit Sub
End Sub
Private Sub Command2_Click ()
      x1 = Text1.Text
      y1 = Text2.Text
      x2 = Text3.Text
      y2 = Text4.Text
      Picture1.Line (x1, y1)-(x2, y2), color, B
End Sub


Private Sub Command3_Click ()
      CommonDialog1.Flags = &H1&
      CommonDialog1.ShowColor
      color = CommonDialog1.color
End Sub


Private Sub Command4_Click ()
      On Error GoTo addvalues
      x3 = Text5.Text
      y3 = Text6.Text
      r = Text7.Text
      Picture1.Circle (x3, y3), r, color
      Exit Sub
      addvalues:
      MsgBox ("Please fill in the coordinates, the radius and the color")
End Sub


Private Sub Command5_Click ()
      Picture1.Cls
End Sub
113
      Private Sub Command6_Click ()
              x1 = Text1.Text
              y1 = Text2.Text
              x2 = Text3.Text
              y2 = Text4.Text
              Picture1.Line (x1, y1)-(x2, y2), color, BF
      End Sub


Figure 19.3


Example 19.4 The Picture Viewer
114
Let’s create a program that enables the users to open and choose files from the
folders in their PC. This can be done easily using a picture box and a common dialog
box. In this program, you need to insert a picture box, a common dialog box and an
image. In the image properties window, click on the picture property and select a
picture that resembles an open file icon. The procedure to open the common dialog
box to browse the picture files as well as to load the selected picture into the picture
box is
CommonDialog1.Filter = "Bitmaps (*.BMP)|*.BMP|Metafiles (*.WMF)|*.WMF|Jpeg
Files (*.jpg)|*.jpg|GIF Files (*.gif)|*.gif|Icon Files (*.ico)|*.ico|All Files (*.*)|*.*"
CommonDialog1.ShowOpen
Picture1.Picture = LoadPicture (CommonDialog1.FileName)


The filter property of the common dialog box uses the format as shown below
         Bitmaps (*.BMP)|*.BMP
to specify the file type, and uses the pipe line | to separate different file types.
Visual Basic supports most of the picture formats namely bmp, wmf, jpg, gif, ico (icon)
and cur (cursor) files. The command
         CommonDialog1.ShowOpen
is to open the common dialog box and the command
         Picture1.Picture = LoadPicture (CommonDialog1.FileName)
is to load the selected picture file into the picture box.


The whole program is shown below and the output is shown in Figure 19.4.


Private Sub Image1_Click ()
         CommonDialog1.Filter = "Bitmaps (*.BMP)|*.BMP|Metafiles
         (*.WMF)|*.WMF|Jpeg Files (*.jpg)|*.jpg|GIF Files (*.gif)|*.gif|Icon Files
         (*.ico)|*.ico|All Files (*.*)|*.*"
         CommonDialog1.ShowOpen
         Picture1.Picture = LoadPicture (CommonDialog1.FileName)
End Sub


Figure 19.4: The Picture Viewer
115


Example 19.5 An Advanced Picture Viewer


We will create a picture viewer in such a way that it can search for all types of
graphics in your drives and display them.

Similar to the previous project, in this project, you need to insert a ComboBox, a
DriveListBox, a DirListBox, a TextBox and a FileListBox into your form. I shall briefly
explain again the function of each of the above controls.

a) ComboBox
The ComboBox displays and enables the selection of different types of files.
b) DriveListBox
The DriveListBox allows the selection of different drives available in your PC.
c) DirListBox
The DirListBox displays the directories of a selected drive in your PC.
d) TextBox
The TextBox displays the selected files.
e) FileListBox
The FileListBox displays files that are available

Relevant codes must be written to coordinate all the above controls so that the
application can work properly. The program should flow in the following logical way:
116
Step 1: User chooses the type of files he wants to display.

Step2: User selects the drive that might contain the relevant graphic files.

Step 3: User looks into directories and subdirectories for the files specified in step1.
The files should be displayed in the FileListBox.

Step 4: User selects the files from the FileListBox and click the Show button.

Step 5: User clicks on the Exit button to end the application.


Figure 19.5: The Picture Viewer Interface


The Code
       Private Sub Form_Load ()
              Left = (Screen. Width - Width)  2
              Top = (Screen. Height - Height)  2
117
     Combo1.Text = "All graphic files"
     Combo1.AddItem "All graphic files"
     Combo1.AddItem "All files"
End Sub


Private Sub Combo1_Change ()
     If ListIndex = 0 Then
     File1.Pattern = ("*.bmp;*.wmf;*.jpg;*.gif")
     Else
     Fiel1.Pattern = ("*.*")
     End If
End Sub


     Private Sub Dir1_Change ()
              File1.Path = Dir1.Path
              File1.Pattern = ("*.bmp;*.wmf;*.jpg;*.gif")
     End Sub


     Private Sub Drive1_Change ()
              Dir1.Path = Drive1.Drive
     End Sub


     Private Sub File1_Click ()
              If Combo1.ListIndex = 0 Then
              File1.Pattern = ("*.bmp;*.wmf;*.jpg;*.gif")
              Else
              File1.Pattern = ("*.*")
              End If


              If Right (File1.Path, 1) <> "" Then
              filenam = File1.Path + "" + File1.FileName
              Else
              filenam = File1.Path + File1.FileName
118
                    End If
                    Text1.Text = filenam
              End Sub


              Private Sub show_Click ()
                    If Right (File1.Path, 1) <> "" Then
                    filenam = File1.Path + "" + File1.FileName
                    Else
                    filenam = File1.Path + File1.FileName
                    End If
                    picture1.Picture = LoadPicture (filenam)
              End Sub


Exercise 19
  1. Write down the formats of the Pset method, the Line method and the Circle
     method.
  2. Write a program to draw a circle which color can be changed using the colors
     specified in a list box.
  3. Write a program to load pictures of various formats into an image box using
     the common dialog box.
  4. Write a program that can load a set of pictures randomly into a picture box.
119


                           Lesson 20
     Creating Multimedia Applications

Learning how to create a CD player.
Learning how to create Audio player.
Learning how to create Multimedia player.
120
In Visual Basic, you can create various multimedia applications that can play audio
CD, various audio files including mp3, wav and midi files; and different types of video
files such as avi, mpeg files and etc. To be able to play multimedia files or multimedia
devices, you have to insert the Microsoft Multimedia Control into your VISUAL BASIC
applications that you are going to create. However, Microsoft Multimedia Control is
not normally included in the startup toolbox. Therefore, you need to add the Microsoft
Multimedia control by pressing Ctrl+T and checking the box beside the Microsoft
Multimedia control 6.0 from the components that are displayed in the dialog box as
shown in Figure 20.1. Then, press the OK button. When you close the dialog box,
you will notice that the Microsoft Multimedia Control will be available in the toolbox
and you can drag it into the form.


Figure 20.1 The Components Dialog Box


20.1 Creating a CD Player
121
   Figure 20.2: The Interface of the CD player


In this program, you will insert the Microsoft Multimedia Control and set its properties
to Visible: True as well as Play: Enabled. In addition, insert five command buttons
and name as well as label them as Play, Next, Previous, Stop and Exit. Besides that,
insert a label that can be used to display the current track number of the song being
played. Lastly, enter the program codes.


The most important statement in this program is to set the Microsoft Multimedia
Control’s device type to CDAudio because it will ensure audio CDs can be played.
       MMControl1.DeviceType = "CDAudio"
To display the track number of the current song being played, use the following
statement:
       trackNum.Caption = MMControl1.Track
The Play, Next, Previous and Stop commands can be programmed using the
MMControl1.Command = "Play", MMControl1.Command = "Next”,
MMControl1.Command = "Prev", and MMControl1.Command = "Stop" statement.


Lastly, always ensure that the Microsoft Multimedia Control is closed whenever the
user closes the player. This can be achieved by using the statement
       MMControl1.Command = "Close"
Under Form1_Unload procedure.


The program:
122
Private Sub Form_Load ()
      'To position the page at the center
      Left = (Screen.Width - Width)  2
      Top = (Screen.Height - Height)  2
End Sub


Private Sub Form_Activate ()
      'Load the CDPlayer
      MMControl1.Notify = False
      MMControl1.Wait = True
      MMControl1.DeviceType = "CDAudio"
      MMControl1.Command = "Open"
End Sub
Private Sub MMControl1_StatusUpdate ()
      'Update the track number
      trackNum.Caption = MMControl1.Track
End Sub


Private Sub Next_Click ()
      MMControl1.Command = "Next"
      End Sub


Private Sub Play_Click ()
      MMControl1.Command = "Play"
End Sub


Private Sub Previous_Click ()
      MMControl1.Command = "Prev"
End Sub


Private Sub Stop_Click ()
      MMControl1.Command = "Stop"
End Sub
Private Sub Exit_Click ()
      MMControl1.Command = "Stop"
123
         MMControl1.Command = "Close"
End


End Sub
         Private Sub Form1_unload ()
         ‘Unload the CDPlayer
         MMControl1.Command = "Close"
End Sub

20.2 Creating an Audio Player

In section 20.1, we have programmed a CD player. Now, with some minor
modifications, we will transform the CD player into an audio player. This player will be
created in such a way that it can search for wave and midi files in your drives and
play them. In this project, you need to insert a ComboBox, a DriveListBox, a
DirListBox, a TextBox and a FileListBox into your form. I shall briefly discuss the
function of each of the above controls. Besides that, you must also insert Microsoft
Multimedia Control (MMControl) in your form. You may make it visible or invisible. In
this program, I choose to make it invisible so that I can use the command buttons
created to control the player. The functions of the various controls are explained
below:


a) The ComboBox
Displays and enables the selection of different types of files. To add items to the
Combo Box, you can use the AddItem method. The items here are the extensions of
different audio files.
b) The DriveListBox
The DriveListBox allows the selection of different drives in your computer.
c) The DirListBox
The DirListBox displays different directories that are available in your computer.
d) The Textbox
The Textbox displays the selected files.
e) The FileListBox
The FileListBox displays files that are available in your computer.
Relevant codes must be written to coordinate all the above controls so that the
application can work properly. The program should flow in the following logical steps:
124
Step 1: User chooses the type of files he wants to play.
Step2: User selects the drive that might contain the relevant audio files.
Step 3: User looks into directories and subdirectories for the files specified in step1.
The files should be displayed in the FileListBox.
Step 4: User selects the files from the FileListBox and clicks the Play button.
Step 5: User clicks on the Stop button to stop playing and the Exit button to end the
application.


To coordinate the DriveListBox and the DirListBox, you can use the statement below,
so that any change of the drives will be reflected in the directory list box.
       Dir1.Path = Drive1.Drive
To coordinate the FileListBox and the DirListBox, you can use the statement below
so that any change of the directories will be reflected in the File List Box.
       File1.Path = Dir1.Path
To select the target file, you can use the following statements where File1.Path
determines the path of the file and File1.FileName determines the file name. The file
name is then assigned to the variable filename and displayed in the text box.


       If Right (File1.Path, 1) <> "" Then
       filenam = File1.Path + "" + File1.FileName
       Else
       filenam = File1.Path + File1.FileName
       End If
       Text1.Text = filenam


To select the file types, you can use the statement File1.Pattern = ("*.wav") to choose
the wave audio files and the statement File1.Pattern = ("*.mid") to choose the
sequencer files.


To play the selected file, use the following procedure:

Private Sub play_Click ()

       'To play WaveAudio file or Midi File
       If Combo1.ListIndex = 0 Then
       MMControl1.DeviceType = "WaveAudio"
125
       ElseIf Combo1.ListIndex = 1 Then
       MMControl1.DeviceType = "Sequencer"
       End If
       MMControl1.FileName = Text1.Text
       MMControl1.Command = "Open"
       MMControl1.Command = "Play"
End Sub


The statement MMControl1.DeviceType = "WaveAudio" enables the Microsoft
Multimedia Control to play Wave Audio files and the statement
MMControl1.DeviceType = "Sequencer" enables the Microsoft Multimedia Control
to play the midi files. In fact, the Microsoft Multimedia Control can play many other
types of multimedia files, including Mpeg, Mp3 and Avi video files.


The statement MMControl1.FileName = Text1.Text plays the multimedia file
displayed in the Text1 textbox. The statement MMControl1.Command = "Open"
initiates the Microsoft Multimedia Control and the statement MMControl1.Command
= "Play” plays the multimedia file. The statement MMControl1.Command = "stop"
stops the Microsoft Multimedia Control from playing and finally the statement
MMControl1.Command = "Close” closes the Microsoft Multimedia Control.


The Program

       Private Sub Form_Load ()
                'To center the Audioplayer
                Left = (Screen.Width - Width)  2
                Top = (Screen.Height - Height)  2
                Combo1.Text = "*.wav"
                Combo1.AddItem "*.wav"
                Combo1.AddItem "*.mid"
                Combo1.AddItem "All files"
       End Sub


       Private Sub Combo1_Change ()
                ‘To determine file type
126
      If ListIndex = 0 Then
      File1.Pattern = ("*.wav")
      ElseIf ListIndex = 1 Then
      File1.Pattern = ("*.mid")
      Else
      Fiel1.Pattern = ("*.*")
      End If
End Sub


Private Sub Dir1_Change ()
      'To change directories and subdirectories (or folders and subfolders)
      File1.Path = Dir1.Path
      If Combo1.ListIndex = 0 Then
      File1.Pattern = ("*.wav")
      ElseIf Combo1.ListIndex = 1 Then
      File1.Pattern = ("*.mid")
      Else
      File1.Pattern = ("*.*")
      End If
End Sub


Private Sub Drive1_Change ()
      'To change drives
      Dir1.Path = Drive1.Drive
End Sub


Private Sub File1_Click ()
      If Combo1.ListIndex = 0 Then
      File1.Pattern = ("*.wav")
      ElseIf Combo1.ListIndex = 1 Then
      File1.Pattern = ("*.mid")
      Else
      File1.Pattern = ("*.*")
      End If
127
            If Right(File1.Path, 1) <> "" Then
            filenam = File1.Path + "" + File1.FileName
            Else
            filenam = File1.Path + File1.FileName
            End If
            Text1.Text = filenam
      End Sub
      Private Sub play_Click ()
            'To play WaveAudio file or Midi file
            If Combo1.ListIndex = 0 Then
            MMControl1.DeviceType = "WaveAudio"
            ElseIf Combo1.ListIndex = 1 Then
            MMControl1.DeviceType = "Sequencer"
            End If
            MMControl1.FileName = Text1.Text
            MMControl1.Command = "Open"
            MMControl1.Command = "Play"
      End Sub
      Private Sub stop_Click ()
            MMControl1.Command = "Stop"
      End Sub


      Private Sub Exit_Click ()
            MMControl1.Command = "Close"
            End
      End Sub


Figure 20.2 The Audio Player
128


20.3 Creating a Multimedia Player

In section 20.2, we have created an audio player. Now, with some modifications, we
will transform the audio player into a multimedia player that can play all kinds of
movie files besides audio files. This player will be created in such a way that it can
search for all types of media files in your computer drives and play them.
In this project, you need to insert a ComboBox, a DriveListBox, a DirListBox, a
TextBox, a FileListBox, and a picture box (for playing movies) into your form. I shall
briefly discuss the function of each of the above controls. You must also insert
Microsoft Multimedia Control (MMControl) in your form; you may make it visible or
invisible. In my program, I choose to make it invisible so that I can use the command
buttons created to control the player.
The program is almost similar to the audio player, but you need to add a few extra
statements so that you can play the video files and also the mp3 files. First of all, you
have to add two more file types with the statements File1.Pattern = ("*.avi") and
File1.Pattern = ("*.mpeg;*.mpg;*.mp3")
so that the Avi and Mpeg movie files as well as the mp3 files will show up in the file
list box . Secondly, you have to add the statement MMControl1.DeviceType =
"AVIVideo" so that the Microsoft Multimedia Control can play the Avi video files and
MMControl1.DeviceType = " " so that the player can play other media files including
the mp3 files.

Figure 21.1: The Multimedia Player
129


The Program

     Private Sub Form_Load ()
           Left = (Screen.Width - Width)  2
           Top = (Screen.Height - Height)  2
           Combo1.Text = "*.wav"
           Combo1.AddItem "*.wav"
           Combo1.AddItem "*.mid"
           Combo1.AddItem "*.avi"
           Combo1.AddItem "*.mpeg;*.mpg;*.mp3"
           Combo1.AddItem "All files"
     End Sub


     Private Sub Combo1_Change ()
           If ListIndex = 0 Then
           File1.Pattern = ("*.wav")
           ElseIf ListIndex = 1 Then
130
      File1.Pattern = ("*.mid")
      ElseIf ListIndex = 2 Then
      File1.Pattern = ("*.avi")
      ElseIf ListIndex = 3 Then
      File1.Pattern = ("*.mpeg;*.mpg;*.mp3")
      Else
      Fiel1.Pattern = ("*.*")
      End If
End Sub


Private Sub Dir1_Change ()
      File1.Path = Dir1.Path
      If Combo1.ListIndex = 0 Then
      File1.Pattern = ("*.wav")
      ElseIf Combo1.ListIndex = 1 Then
      File1.Pattern = ("*.mid")
      ElseIf Combo1.ListIndex = 2 Then
      File1.Pattern = ("*.avi")
      ElseIf Combo1.ListIndex = 3 Then
      File1.Pattern = ("*.mpeg;*.mpg;*.mp3")
      Else
      File1.Pattern = ("*.*")
      End If
End Sub


Private Sub Drive1_Change ()
      Dir1.Path = Drive1.Drive
End Sub


Private Sub File1_Click ()
      If Combo1.ListIndex = 0 Then
      File1.Pattern = ("*.wav")
      ElseIf Combo1.ListIndex = 1 Then
      File1.Pattern = ("*.mid")
      ElseIf Combo1.ListIndex = 2 Then
131
      File1.Pattern = ("*.avi")
      ElseIf Combo1.ListIndex = 3 Then
      File1.Pattern = ("*.mpeg;*.mpg;*.mp3")
      Else
      File1.Pattern = ("*.*")
      End If
      If Right (File1.Path, 1) <> "" Then
      filenam = File1.Path + "" + File1.FileName
      Else
      filenam = File1.Path + File1.FileName
      End If
      Text1.Text = filenam
End Sub


Private Sub Exit_Click ()
      MMControl1.Command = "Close"
      End
End Sub
Private Sub Open_Click ()
      If Combo1.ListIndex = 0 Then
      MMControl1.DeviceType = "WaveAudio"
      End If
      If Combo1.ListIndex = 1 Then
      MMControl1.DeviceType = "Sequencer"
      End If
      If Combo1.ListIndex = 2 Then
      MMControl1.DeviceType = "AVIVideo"
      End If
      If Combo1.ListIndex = 3 Then
      MMControl1.DeviceType = ""
      End If
      MMControl1.FileName = Text1.Text
      MMControl1.Command = "Open"
End Sub
132
     Private Sub play_Click ()
              Timer1.Enabled = True
              MMControl1.Command = "Play"
              MMControl1.hWndDisplay = Picture1.hWnd
     End Sub


     Private Sub stop_Click ()
              If MMControl1.Mode = 524 Then Exit Sub
              If MMControl1.Mode <> 525 Then
              MMControl1.Wait = True
              MMControl1.Command = "Stop"
              End If
              MMControl1.Wait = True
              MMControl1.Command = "Close"
     End Sub


Exercise 20
  1. Write a program that can play different sound files using a common dialog box.
  2. Write a program that can play different video files using a common dialog box.
  3. Create a player that can play audio CDs as well as different sound files.


                                 Lesson 21
133

                             Animation-Part I
        Learning how to create simple animation in Visual Basic.


Animation is always an interesting and exciting part of programming. Although Visual
Basic is not designed to handle advanced animations, you can still create some
interesting animated effects if you put in some hard thinking. There are many ways to
create animated effects in VB6, but for a start we will focus on the easier methods.

The simplest way to create animation is to set the visible property of a group of
images or pictures or even texts and labels to true or false by triggering a set of
events such as clicking a button. Let's examine the following example:

Example 21.1

This is a program that creates the illusion of moving a jet plane in four directions, that
is, north, south, east, and west. In order to do this, we need to insert five images of
the same picture into the form. Set the visible property of the image in the center to
be true and set the rest to false. On start-up, the user will only be able to see the
image in the center. Next, insert four command buttons into the form and change the
labels to Move North, Move East, Move West and Move South respectively. Double
click on the Move North button and key in the following procedure:

        Sub Command1_click ( )
              Image1.Visible = False
              Image3.Visible = True
              Image2.Visible = False
              Image4.Visible = False
              Image5.Visible = False
        End Sub

By clicking on the Move North button, Image1 and other images except Image3 will
be displayed. This will give an illusion that the jet plane has moved north. Now,
double click on other command buttons and key in similar procedures. You can also
insert an additional command button and label it as Reset and key in the following
code:
134
Image1.Visible = True
Image3.Visible = False
Image2.Visible = False
Image4.Visible = False
Image5.Visible = False

Clicking on the reset button will make the image in the center visible again while
other images become invisible, this will give the impression that the jet plane has
moved back to the original position.

Figure 21.1


Example 21.1

You can also issue the commands using a textbox. This idea actually came from my
son Xun (10). His program is shown below:


Figure 21.2
135


In the textbox, when you key in the letter n, the plane will move north, move west
when you key in w, move south when you key in s and move east when you key in
the letter e. The codes are as follows


      Private Sub Command1_Click()
             If Text1.Text = "n" Then
             Image1.Visible = False
             Image3.Visible = True
             Image2.Visible = False
             Image4.Visible = False
             Image5.Visible = False
             ElseIf Text1.Text = "e" Then
             Image1.Visible = False
             Image4.Visible = True
             Image2.Visible = False
             Image3.Visible = False
             Image5.Visible = False
             ElseIf Text1.Text = "w" Then
             Image1.Visible = False
             Image3.Visible = False
             Image2.Visible = False
             Image4.Visible = False
136
              Image5.Visible = True
              ElseIf Text1.Text = "s" Then
              Image1.Visible = False
              Image3.Visible = False
              Image2.Visible = True
              Image4.Visible = False
              Image5.Visible = False
              End If
       End Sub


Another simple way to simulate animation in VB6 is by using the Left and Top
properties of an object. Image.Left gives the distance of the image in twips from the
left border of the screen, and Image.Top gives the distance of the image in twips from
the top border of the screen. 1 twip is equivalent to 1/1440 of an inch. Using a
statement such as Image.Left-100 will move the Image100 twips to the left,
Image.Left+100 will move the Image100 twip away from the left (or 100 twips to the
right), Image.Top-100 will move the Image100 twips to the top and Image.Top+100
will move the Image100 twips away from the top border (or 100 twips down).
Example 21.3 illustrates how all the above methods can be used to create animation.


Example 21.3


This is a program that can move an object up, down, left, and right every time you
click on a relevant command button. The codes such as Image1.Top = Image1.Top +
100 are to make the distance increase or decrease every time a user clicks on the
command button. For example, if the initial position of Image1 is 1000 twips from the
top, after one click, the distance from the top will be 1100, and the next distance will
be 1200 and so on. Therefore, by writing similar codes for all the four buttons, you
can move the image in four directions by clicking any of the four buttons.


Figure 21.3
137


The Program


       Private Sub Command1_Click ()
              Image1.Top = Image1.Top + 100
       End Sub


       Private Sub Command2_Click ()
              Image1.Top = Image1.Top - 100
       End Sub


       Private Sub Command3_Click ()
              Image1.Left = Image1.Left + 100
       End Sub


       Private Sub Command4_Click ()
               Image1.Left = Image1.Left – 100
       End Sub


Example 21.4

This example lets users magnify or diminish an object by changing the height and
width properties of an object. It is quite similar to the previous example. The
statements Image1.Height = Image1.Height + 100 and Image1.Width =
Image1.Width + 100 will increase the height and the width of an object by 100 twips
each time a user clicks on the relevant command button. On the other hand, the
statements Image1.Height = Image1.Height - 100 and Image1.Width =
138
Image1.Width -100 will decrease the height and the width of an object by 100 twips
each time a user clicks on the relevant command button.

Figure 21.4


The Program
Private Sub Command1_Click ()
      Image1.Height = Image1.Height + 100
      Image1.Width = Image1.Width + 100
End Sub


Private Sub Command2_Click ()
      Image1.Height = Image1.Height - 100
      Image1.Width = Image1.Width - 100
End Sub


You can try to combine both of the programs and make an object move and increase
or decrease in size each time a user clicks a command button.


Exercise 21
   1. Create a simple animation by setting the visible property of a group of objects
      to false and true.
   2. Create an animation program by varying an image’s Left, Top, Width and
      Height properties.
139

                                     Lesson 22
                             Animation - Part II
       Learning how to create a drag and drop animation.
       Learning how to create an animation with a complete motion.


22.1 Animation using a drag and drop procedure

Drag and drop is a common application where you can drag and drop an object such
as a file into a folder or into a recycle bin. This ability can be easily programmed in
Visual Basic. In the following example, we are going to create a simulation of
dragging the objects into a recycle bin and burning them.

In this program, you need to put 6 images on the form: a recycle bin, a burning
recycle bin, the fire, and three more images which are to be dragged into the recycle
bin. In addition, set all the dragmode of the images (including the fire) to 1(Automatic)
so that dragging is enabled, and set the visible property of the burning recycle bin to
false at start-up. Besides that, label the tag of fire as fire in its properties window. If
you want to have better dragging effects, you need to load an appropriate icon under
the dragIcon properties for those images to be dragged. Preferably the icon should
be the same as the image so that when you drag the image, it is like you are
dragging the image along.

The essential event procedure in this program is as follows:

       Private Sub Image4_DragDrop (Source As Control, X As Single, Y As Single)
              Source.Visible = False
              If Source.Tag = "Fire" Then
              Image4.Picture = Image5.Picture
              End If
       End Sub

Source refers to the image being dragged. Using the code Source.Visible=False
means it will disappear after being dragged into the recycle bin (Image4). If the
source is Fire, then the recycle will change into a burning recycle bin, which is
140
accomplished by using the code Image4.Picture = Image5.Picture, where Image 5 is
the burning recycle bin.

Figure 22.1


The Program
       Private Sub Form_Click ()
                Label1.Visible = False
       End Sub


       Private Sub Image4_DragDrop (Source As Control, X As Single, Y As Single)
                Source.Visible = False
                If Source.Tag = "Fire" Then
                Image4.Picture = Image5.Picture
       End If
       End Sub


       Private Sub instruct_Click ()
                Label1.Visible = True
       End Sub

22.2 Animation with complete motion

So far the examples of animation shown in Lesson 21 only involve movement of
static images. In this Lesson, you will be able to create true animation where an
action finishes in a complete cycle, for example, a butterfly flapping its wings. In the
141
following example, you need to use eight picture frames of a butterfly which display a
butterfly flapping its wings at different stages.


You need to put all the above images overlapping one another, make Image1 visible
while all other images invisible at start-up. Next, insert a command button and label it
as Animate. Click on the command button and key in the statements that make the
images appear and disappear successively by using the properties
image.visible=true and image.visible=false. You can use If..... Then and Elseif to
control the program flow. When you run the program, you should be able to get the
following animation.

Figure 22.2


The Program
Private Sub Command1_Click ()
       If Image1.Visible = True Then
       Image1.Visible = False
        Image2.Visible = True
       ElseIf Image2.Visible = True Then
       Image2.Visible = False
       Image3.Visible = True
       ElseIf Image3.Visible = True Then
       Image3.Visible = False
142
       Image4.Visible = True
       ElseIf Image4.Visible = True Then
       Image4.Visible = False
       Image5.Visible = True
       ElseIf Image5.Visible = True Then
       Image5.Visible = False
       Image6.Visible = True
       ElseIf Image6.Visible = True Then
       Image6.Visible = False
       Image7.Visible = True
       ElseIf Image7.Visible = True Then
       Image7.Visible = False
       Image8.Visible = True
       ElseIf Image8.Visible = True Then
       Image8.Visible = False
       Image1.Visible = True
       End If
End Sub

If you wish to create the effect of the butterfly flapping its wings and flying at the
same time, then you could use the Left and Top properties of an object, such as the
one used in the examples of Lesson 23. Below is an example of a subroutine where
the butterfly will flap its wings and move up at the same time. You can also write
subroutines that move the butterfly to the left, to the right and to the bottom.

Sub move_up ( )
       If Image1.Visible = True Then
       Image1.Visible = False
       Image2.Visible = True
       Image2.Top = Image2.Top - 100
       ElseIf Image2.Visible = True Then
       Image2.Visible = False
       Image3.Visible = True
       Image3.Top = Image3.Top - 100
       ElseIf Image3.Visible = True Then
       Image3.Visible = False
143
      Image4.Visible = True
      Image4.Top = Image4.Top - 100
      ElseIf Image4.Visible = True Then
      Image4.Visible = False
      Image5.Visible = True
      Image5.Top = Image5.Top - 100
      ElseIf Image5.Visible = True Then
      Image5.Visible = False
      Image6.Visible = True
      Image6.Top = Image6.Top - 100
      ElseIf Image6.Visible = True Then
      Image6.Visible = False
      Image7.Visible = True
      Image7.Top = Image7.Top - 100
      ElseIf Image7.Visible = True Then
      Image7.Visible = False
      Image8.Visible = True
      Image8.Top = Image8.Top - 100
      ElseIf Image8.Visible = True Then
      Image8.Visible = False
      Image1.Visible = True
      Image1.Top = Image1.Top - 100
      End If
End Sub


Exercise 22
1. Write a program that drags and drops a group of items into a box and plays a
   sound at the same time.
2. Create a program that simulates a running man using the images below or use
   your own images, or those downloaded from the Internet.
144

                                    Lesson 23
                           Animation - Part III
       Learning how to create animation using timers.
       Learning how to create animation using the Move method.


23.1 Animation using timers

All preceding examples of animation that you have learnt in Lesson 23 and Lesson
24 only involve manual animation, which means you need to keep on clicking a
certain command button or pressing a key to make an object animate. In order to
make it move automatically, you need to use a timer. The first step in creating
automatic animation is to drag the timer from the toolbox into the form and set its
interval to a certain value other than 0. A value of 1 is equivalent to 1 milli-second
which means a value of 1000 represents 1 second. The value of the timer interval will
determine the speed of an animation.

Example 23.1

This program uses a very simple technique to create an animation by setting the
properties Visible=False and Visible=True to show and hide two images alternately.
When you click on the program, you should see the animation that shows Image1
and Image2 interchangeably.

The Program
       Private Sub Timer1_Timer ()
              If Image1.Visible = True Then
              Image1.Visible = False
              Image2.Visible = True
              ElseIf Image2.Visible = True Then
              Image2.Visible = False
              Image1.Visible = True
              End If
       End Sub
145
Example 23.2


This example shows a complete cycle of a motion such as the butterfly flapping its
wings. Previous examples show only manual animation while this example will
display an automatic animation once you start the program or by clicking a command
button. Similar to the example under Lesson 24.2, you need to insert a group of eight
images of a butterfly flapping its wings at different stages. Next, insert a timer into the
form and set the interval to 10 or any value you like. Remember to make Image1
visible and the other images invisible at start-up. Finally, insert a command button,
rename its caption as Animate, and key in the following statements by double clicking
on this button.


It is important to bear in mind that you should enter the statements for hiding and
showing the images under the timer1_timer subroutine otherwise the animation will
not work. Clicking on the Animate button will make the timer start ticking and the
event will run after every interval of 10 milliseconds or whatever interval you have set.
In future lessons, I will show you how to adjust the interval at runtime by using a
slider bar or a scroll bar.

Figure 23.1


The Program
       Private Sub Form_Load ()
               Image1.Visible = True
               x=0
       End Sub
146
Private Sub Command1_Click ()
      Timer1.Enabled = True
End Sub


Private Sub Timer1_Timer ()
      If Image1.Visible = True Then
      Image1.Visible = False
      Image2.Visible = True


      ElseIf Image2.Visible = True Then
      Image2.Visible = False
      Image3.Visible = True
      ElseIf Image3.Visible = True Then
      Image3.Visible = False
      Image4.Visible = True
      ElseIf Image4.Visible = True Then
      Image4.Visible = False
      Image5.Visible = True
      ElseIf Image5.Visible = True Then
      Image5.Visible = False
      Image6.Visible = True
      ElseIf Image6.Visible = True Then
      Image6.Visible = False
      Image7.Visible = True
      ElseIf Image7.Visible = True Then
      Image7.Visible = False
      Image8.Visible = True
      ElseIf Image8.Visible = True Then
      Image8.Visible = False
      Image1.Visible = True
      End If
End Sub
147
23.2 Animation using the Move Method

The most powerful method to enable animation in Visual Basic is the Move method.
The syntax is shown below where the object moves to the point (x, y)
              Object.Move x, y
where x is the distance from the left border of the screen and y is the distance from
the top border of the screen. For example, the statement Image1.Move 1000, 1000
will move Image1 to the location 1000 twips from the left border and 1000 twips from
the top border.


Example 23.3
This program will move Image1 to the location with coordinates (1000,1000) at the
first click and subsequently every click will move Image1 100 twips away from the left
border and 100 twips from the top border.


       Private Sub Image1_Click()
              Image1.Move 1000 + x, 1000 + x
              x = x + 100
       End Sub


Example 24.2
This example uses the timer to initiate a motion that is automatic. In order to do that,
you need to insert a timer and set its interval to a certain value. The procedure is
shown below. When you run this program, the image moves 50 twips closer to the
left and the top of the screen respectively after every interval.
       Private Sub Image1_Click ()
              Image1.Move Image1.Left-50, Image1.Top-50
       End Sub


Exercise 23
   1. Write down and explain the syntax of the Move method.
   2. Create an animation that shows and hides a group of 5 images
       interchangeably.
   3. Write a program using the Move method that shows an object moving
       vertically up and down.
148

                                   Lesson 24
         Fun and Games Programming –Part I

      Learning how to create simple games.


A lot of people might think that VISUAL BASIC is not a suitable programming
language for games. Actually, though there might be some limitations in VISUAL
BASIC involving game programming and animation, you can actually construct some
good games in VISUAL BASIC if you put in a lot of thought and time. To design a
game, you need to come up with an idea first, and then sit back and think over it.
Ideas can be obtained through the Internet, other media sources, from gamers
themselves etc. After that, you need to write out a draft program and try it out. You
should always start with one small component of the program and if that works, you
can proceed to program other components and then combine them. You should
always have a VISUAL BASIC book in hand for referencing.


Game programming can be very satisfying if your programs work. Furthermore, you
can learn a great deal of programming logics by doing game programming because
the procedures are often very complex, and you need to look up for references every
now and then.


Here are some of the programs that I have thought out myself. These programs
make use of everything you have learnt so far and you need to read through all the
procedures carefully so that you can better understand the programming logics
behind them. Later, you might want to modify the programs or even come out with
your own games.


24.1 Snake Chess

Snake chess is a popular board game for young children. This game usually involves
two or more players and they take turns to move by rolling a die. On the way to the
finishing point, the players will meet with some hurdles in the form of snakes and
some opportunities in the form of ladders. Whenever the player encounters a snake
(or more accurately, the snake’s head), he or she will be thrown back to an earlier
149
box (which is at the snake’s tail). On the other hand, whenever the player encounters
a ladder, he or she can climb up the ladder to a higher box. The player who reaches
the finishing point first wins the game. Figure 24.1 illustrates the interface.


Figure 24.1 Snake Chess


The first step in creating the game is to design the interface. Here, the labels used to
design the chess board are numbered from 1 to 100. These labels are filled with
different colors to give it a more appealing look. Next, insert various pictures of
snakes using the image box and then draw the ladders using the line tool. In addition,
you need to draw the die with the shape control, and add in the command buttons for
rolling the die, starting a new game as well as exiting the game. Besides that, you
need to insert two images to denote the players and then put in the label for the
declaration of the winner. Lastly, insert two timers for animation purposes.
150
The initial part of the program is to declare various variables. The two most important
variables are the arrays c (10) and r (10). The array r (10) is used to denote the row
numbers , where r(1)=row 1, r(2)=row 2 until r(10)=row 10. Similarly, c (10) is used
to denote the column numbers, where c (1) =column 1, c (2) =column 2 until c (10)
=column 10. After declaring the variables, you need to assign the coordinates of the
center of all the boxes which can be denoted by (column, row) or (c (i), r (i)), using
the procedure below:


       Private Sub Form_Load ()
              c (1) = 600
              r(1) = 8200
              For i = 1 To 9
              c (i + 1) = c (i) + 800
              Next
              For j = 1 To 9
              r (j + 1) = r (j) - 800
              Next
       End Sub


You have to determine the initial position of the center of the first box (label) by
looking at its distance from the left as well as from the top, and also its width, in the
properties window. In this program, the distance of the first box from the left is 400
twips, and its width is 800 twips, therefore its center is 600 twips from the left. Using
the statement c (i + 1) = c (i) + 800 within a For…Next loop, the distance between
successive columns will be fixed at 800 twips. Similarly, the distance between rows
can be determined using the same logic.


The next most important step is to control the movement of the chess pieces. In order
to do this, you have to use the variables totalnum and totalnum1 to denote the
accumulated scores of the die for player 1 and player 2 respectively. For example, if
the first score of the die is 3 and the second score of the die is 6 for player 1, then
totalnum=9. You need to write the procedure for every row individually so that
motion will be in a zigzag manner as shown in Figure 24.2
151
Figure 24.2 The movement of the chess pieces


For the first row and for player 1, you can use the following procedure:


       If player = 1 Then
                totalnum = totalnum + num
                If totalnum < 11 Then
                Image1 (0).Move c (totalnum), r (1)
       End If


Num is the score which appears on the die and the totalnum is added to num to get
the accumulated scores. In the first row, the number on the rightmost square is 10,
which is equal to the number of columns across the first row. The statement
Image1 (0).Move c (totalnum), r (1) uses the Move method to move chess piece 1
(Image1(0)) across the column from left to right . For the movement in the second
row, the direction is from right to left, so we need to use the following procedure:


       If totalnum > 10 And totalnum < 21 Then
                Image1 (0).Move c (21 - totalnum), r (2)
       End If
152
The statement Image1 (0).Move c(21 - totalnum), r(2) will move Image1(0) from the
position c(10),r(2) to c(1), r(2), i.e. from the square with number 11 to the square with
number 20. The movement of the chess pieces for other positions follows the same
logics. The procedure to move the chess pieces has to be placed under the Private
Sub Timer1_Timer procedure (set the Timer1’s interval to a certain value).


Before the program can work, you will need to program the die, which will determine
how many steps the chess pieces will move. The interface of the die consists of 7
round shapes that are placed in a rounded square as shown in Figure 24.3. The
seven round shapes are inserted as a control array with names starting with shape1
(0) to shape1 (6). The shape in the center is shape1 (3). The appearance of the
round shapes are controlled by a randomization process that produce six random
numbers using the statement num = Int(1 + Rnd * 6). For example, when num=1,
only the round shape in the center appears while other round shapes are made
invisible. Other combinations use the same logic. Putting all the procedures together,
we have created a game of snake chess.


Figure 24.3 The Die


The Program

Option Base 1
Dim c (10) As Variant
Dim r (10) As Variant


Dim x As Integer
Dim m As Integer
Dim n As Integer
Dim num As Integer
Dim totalnum As Single
Dim totalnum1 As Single
153
Dim player As Integer
Dim t As Integer


Private Sub Command2_Click()
'To move the chess pieces to the original position
       Image1 (0).Move 10200, 5520
       Image1 (1).Move 10200, 6480
       Totalnum = 0
       totalnum1 = 0
       Label2.Caption = ""
       MMControl1.Command = "close"
End Sub


Private Sub Command3_Click ()
       End
End Sub


Private Sub Form_Load ()
'To assign the column and row coordinates to all the boxes
       c (1) = 600
       r (1) = 8200
       For i = 1 To 9
       c (i + 1) = c (i) + 800


       Next
       For j = 1 To 9
       r (j + 1) = r (j) - 800
       Next
End Sub


'To roll the die
Private Sub roll ()
       x = x + 10
       Randomize Timer
       num = Int(1 + Rnd * 6)
154
For i = 0 To 6
  Shape1 (i).Visible = False
Next
If num = 1 Then
  Shape1 (3).Visible = True
  Shape2.FillColor = &HC0C0C0


End If
If num = 2 Then
  Shape1 (2).Visible = True
  Shape1 (4).Visible = True
  Shape2.FillColor = &H8080FF
End If
If num = 3 Then
  Shape1 (2).Visible = True
  Shape1 (3).Visible = True
  Shape1 (4).Visible = True
  Shape2.FillColor = &H80FF&
End If
If num = 4 Then
  Shape1 (0).Visible = True
  Shape1 (2).Visible = True
  Shape1 (4).Visible = True
  Shape1 (6).Visible = True
  Shape2.FillColor = &HFFFF00
End If
If num = 5 Then
  Shape1 (0).Visible = True
  Shape1 (2).Visible = True
  Shape1 (3).Visible = True
  Shape1 (4).Visible = True
  Shape1 (6).Visible = True
  Shape2.FillColor = &HFFFF&
End If
If num = 6 Then
155
          Shape1 (0).Visible = True
          Shape1 (1).Visible = True
          Shape1 (2).Visible = True
          Shape1 (4).Visible = True
          Shape1 (5).Visible = True
          Shape1 (6).Visible = True
          Shape2.FillColor = &HFF00FF
       End If
End Sub


Private Sub Command1_Click (Index As Integer)
'To identify which player is clicking the roll die command
       If Index = 0 Then
       player = 1
       End If
       If Index = 1 Then
       player = 2
       End If


       Timer1.Enabled = True
       x=0
End Sub


Private Sub Timer1_Timer ()
       If x < 100 Then
       Call roll
       Else
       Timer1.Enabled = False


       'To move player 1 according to the total score of the die
       'Movement across column 1 to column 10 and row 1 to row 10


       If player = 1 Then


       totalnum = totalnum + num
156
If totalnum < 11 Then
Image1 (0).Move c (totalnum), r (1)
If totalnum = 10 Then
Image1 (0).Move c (8), r (3)
totalnum = 28
End If
End If


If totalnum > 10 And totalnum < 21 Then
Image1 (0).Move c (21 - totalnum), r (2)
If totalnum = 17 Then
Image1 (0).Move c (4), r (4)
Totalnum = 37
End If
End If
If totalnum > 20 And totalnum < 31 Then
Image1 (0).Move c (totalnum - 20), r(3)
End If
If totalnum > 30 And totalnum < 41 Then
Image1 (0).Move c (41 - totalnum), r(4)
If totalnum = 34 Then
Image1 (0).Move c(5), r(2)
totalnum = 16
End If
If totalnum = 31 Then
Image1 (0).Move c (10), r (7)
totalnum = 70
End If
End If


If totalnum > 40 And totalnum < 51 Then
Image1 (0).Move c (totalnum - 40), r (5)
If totalnum = 45 Then
Image1 (0).Move c (4), r (9)
totalnum = 84
157
End If
If totalnum = 44 Then
Image1 (0).Move c(1), r(3)
totalnum = 21
End If
End If


If totalnum > 50 And totalnum < 61 Then
Image1 (0).Move c (61 - totalnum), r (6)
End If
If totalnum > 60 And totalnum < 71 Then
Image1 (0).Move c (totalnum - 60), r (7)
If totalnum = 68 Then
Image1 (0).Move c (8), r (5)
totalnum = 48
End If
End If


If totalnum > 70 And totalnum < 81 Then
Image1 (0).Move c (81 - totalnum), r (8)
If totalnum = 79 Then
Image1 (0).Move c (2), r (6)
totalnum = 59
End If
If totalnum = 78 Then
Image1 (0).Move c (4), r (10)
totalnum = 97
End If
End If


If totalnum > 80 And totalnum < 91 Then
Image1 (0).Move c (totalnum - 80), r (9)
End If
If totalnum > 90 And totalnum < 101 Then
Image1 (0).Move c (101 - totalnum), r (10)
158
If totalnum = 95 Then
Image1 (0).Move c(8), r(8)
totalnum = 73
End If
End If


If totalnum > 100 Or totalnum = 100 Then
Image1 (0).Move c (1), r(10)
End If
End If


'To move player 2 according to the total score of the die


If player = 2 Then
totalnum1 = totalnum1 + num
If totalnum1 < 11 Then
Image1 (1).Move c (totalnum1), r(1)
If totalnum1 = 10 Then
Image1 (1).Move c (8), r(3)
totalnum1 = 28
End If
End If
If totalnum1 > 10 And totalnum1 < 21 Then
Image1 (1).Move c (21 - totalnum1), r (2)
If totalnum1 = 17 Then
Image1 (1).Move c (4), r (4)
totalnum1 = 37
End If
End If
If totalnum1 > 20 And totalnum1 < 31 Then
Image1 (1).Move c (totalnum1 - 20), r(3)
End If
If totalnum1 > 30 And totalnum1 < 41 Then
Image1 (1).Move c (41 - totalnum1), r(4)
If totalnum1 = 34 Then
159
Image1 (1).Move c (5), r(2)
totalnum1 = 16
End If
If totalnum1 = 31 Then
Image1(1).Move c (10), r(7)
totalnum1 = 70
End If
End If


If totalnum1 > 40 And totalnum1 < 51 Then
Image1(1).Move c(totalnum1 - 40), r(5)
If totalnum1 = 45 Then
Image1(1).Move c(4), r(9)
totalnum1 = 84
End If
If totalnum1 = 44 Then
Image1(1).Move c(1), r(3)
totalnum1 = 21
End If
End If


If totalnum1 > 50 And totalnum1 < 61 Then
Image1 (1).Move c (61 - totalnum1), r (6)
End If
If totalnum1 > 60 And totalnum1 < 71 Then
Image1 (1).Move c (totalnum1 - 60), r (7)
If totalnum1 = 68 Then
Image1 (1).Move c (8), r(5)
totalnum1 = 48
End If
End If
If totalnum1 > 70 And totalnum1 < 81 Then
Image1 (1).Move c (81 - totalnum1), r(8)
If totalnum1 = 79 Then
160
Image1 (1).Move c(2), r(6)
totalnum1 = 59
End If
If totalnum1 = 78 Then
Image1 (1).Move c (4), r (10)
totalnum1 = 97
End If
End If
If totalnum1 > 80 And totalnum1 < 91 Then
Image1 (1).Move c (totalnum1 - 80), r(9)
End If
If totalnum1 > 90 And totalnum1 < 101 Then
Image1 (1).Move c (101 - totalnum1), r (10)
If totalnum1 = 95 Then
Image1 (1).Move c (8), r (8)
totalnum1 = 73
End If
End If
If totalnum1 > 100 Or totalnum1 = 100 Then
Image1 (1).Move c (1), r (10)
End If
End If


'To play the applause sound when any one player reaches 100
If (totalnum > 100 Or totalnum = 100) And totalnum1 < 100 Then
Label2.Caption = "Player 1 Wins"
MMControl1.Notify = False
MMControl1.Wait = True
MMControl1.Shareable = False
MMControl1.DeviceType = "WaveAudio"
MMControl1.FileName = "D:Liew FolderVISUAL BASIC
programaudioapplause.wav"
MMControl1.Command = "Open"
MMControl1.Command = "Play"
161
       End If
       If (totalnum1 > 100 Or totalnum1 = 100) And totalnum < 100 Then
       Label2.Caption = "Player 2 Wins"
       MMControl1.Notify = False
       MMControl1.Wait = True
       MMControl1.Shareable = False
       MMControl1.DeviceType = "WaveAudio"
       MMControl1.FileName = "D:Liew FolderVISUAL BASIC
       programaudioapplause.wav"
       MMControl1.Command = "Open"
       MMControl1.Command = "Play"
       End If
       End If
End Sub


24.2 Slot Machine
This a professional-looking slot machine which resembles the real machines played
in the casinos in Las Vegas! In this program, the most important part of the program
is inserting three image boxes into the form and programming them so that they will
display a set of three different pictures randomly when the user presses on the spin
button. Therefore, it involves a randomization process. Next, a timer needs to be
incorporated into the procedures so that the programs can produce animated effects.
In addition, you can also insert the Microsoft Multimedia Control so that it can play
sounds in synchronization with the spinning of the slot machine as well as when the
player hits the jackpot.
162


Figure 24.4 The Slot Machine


The most important part of the program is the spin procedure, which is
a = 1 + Int(Rnd * 3)
b = 1 + Int(Rnd * 3)
c = 1 + Int(Rnd * 3)


If a = 1 Then
         Image1 (0).Picture = LoadPicture ("C:VISUAL BASIC
         programImagesgrape.gif")
End If
If a = 2 Then
         Image1(0).Picture = LoadPicture("C: VISUAL BASIC
         programImagescherry.gif")
163
End If
If a = 3 Then
         Image1(0).Picture = LoadPicture("C:VISUAL BASIC
         programImagesorange.gif")
End If
If b = 1 Then
         Image1(1).Picture = LoadPicture("C:VISUAL BASIC
         programImagesgrape.gif")
End If
If b = 2 Then
         Image1(1).Picture = LoadPicture("C:VISUAL BASIC
         programImagescherry.gif")
End If
If b = 3 Then
         Image1(1).Picture = LoadPicture("C:VISUAL BASIC
         programImagesorange.gif")
End If


If c = 1 Then
         Image1(2).Picture = LoadPicture("C:VISUAL BASIC
         programImagesgrape.gif")
End If
If c = 2 Then
         Image1(2).Picture = LoadPicture("C:VISUAL BASIC
         programImagescherry.gif")
End If
If c = 3 Then
         Image1(2).Picture = LoadPicture("C:VISUAL BASIC
         programImagesorange.gif")
End If
End Sub


The three random variables a, b and c will be randomly assigned the values 1, 2 and
3 through the Rnd function. Based on these three random numbers, three different
pictures will be loaded into the three image boxes randomly using the LoadPicture
164
method. Animated effects are created by putting the above procedure under the
control of Timer1, which will call the spin procedure after every interval until it fulfills a
certain condition. Sounds are also added using the Microsoft Multimedia Control to
make the game more realistic and interesting. The amount won is controlled by the
If….Then statements. For example, if two grapes appear in any two image boxes,
the amount won is $20. The statements for this are:
       If (a = 1 And b = 1 And c <> 1) Or (a = 1 And c = 1 And b <> 1) Or
       (b = 1 And c = 1 And a <> 1) Then
                Label1.Caption = “You win 20 dollars"
                amount = amount + 20
       End If
Whenever the value of a, b or c is 1, the picture grape.gif will be loaded under the
spin procedure. The above If….Then statement will check whether two grapes are
loaded in any two of the three image boxes randomly; if so then the program will
declare that the player has won 20 dollars. Besides that, 20 dollars will be added to
the variable amount.


The Program
Dim x As Integer
Dim amount As Variant
Dim balance As Variant
Dim a, b, c As Integer


Private Sub Command2_Click()
       End
End Sub


Private Sub betbal_Click()
       Label13.Caption = Str(Val(Label6.Caption) + Val(Label13.Caption))
       Label6.Caption = ""
End Sub


Private Sub Cashout_Click()
       If Val(Label13.Caption) > 0 Then
       balance = Val(Label6.Caption) + Val(Label13.Caption)
165
       Label13.Caption = ""
       Label6.Caption = Str(balance)
       Label1.Caption = "Please bet again"
       Else
       Label1.Caption = "Sorry, you have no money to cash out."
       End If
End Sub


Private Sub Form_Click()
       Label3.Visible = False
End Sub


Private Sub Form_Load()
       Label1.Caption = " Welcome to Play"
       Label3.Visible = False
       Image1(0).Picture = LoadPicture("C:VISUAL BASIC
       programImagesgrape.gif")
       Image1(1).Picture = LoadPicture("C:VISUAL BASIC
       programImagescherry.gif")
       Image1(2).Picture = LoadPicture("C:VISUAL BASIC
       programImagesorange.gif")
End Sub


Private Sub Image23_Click()
       End
End Sub


Private Sub instruct_click()
       Label3.Visible = True
End Sub


Private Sub Label12_Click()
       Label13.Caption = Str(Val(Label13.Caption) + Val(Text2.Text))
       Text2.Text = ""
End Sub
166


Private Sub spin_Click()
       Timer1.Enabled = True
       MMControl1.Command = "Close"
       MMControl2.Command = "Close"


       x=0
       amount = Val(Text1)
       balance = Val(Label6)
End Sub


Private Sub spining_Click()
       If Val(Label13.Caption) > 0 Then
       Timer1.Enabled = True
       MMControl1.Command = "Close"
       MMControl2.Command = "close"
       x=0
       amount = Val(Label13.Caption)
       balance = Val(Label6)
       Else
       Label1.Caption = "Sorry, you have no money to spin, add cash."
       End If
End Sub


Private Sub Timer1_Timer()
If x < 500 Then
spin
Else
Timer1.Enabled = False
MMControl1.Command = "Stop"
Label1.Alignment = 2
If (a = 1 And b = 1 And c <> 1) Or (a = 1 And c = 1 And b <> 1) Or (b = 1 And c = 1
And a <> 1) Then
Label1.Caption = " You win 20 dollars"
amount = amount + 20
167
End If


If (a = 2 And b = 2 And c <> 2) Or (a = 2 And c = 2 And b <> 2) Or (b = 2 And c = 2
And a <> 2) Then
Label1.Caption = “You win 30 dollars"
amount = amount + 30
End If


If (a = 3 And b = 3 And c <> 3) Or (a = 3 And c = 3 And b <> 3) Or (b = 3 And c = 3
And a <> 3) Then
Label1.Caption = " You win 40 dollars"
amount = amount + 40
End If


If (a = 1 And b = 1 And c = 1) Or (a = 2 And b = 2 And c = 2) Or (a = 3 And b = 3 And
c = 3) Then


MMControl2.Notify = False
MMControl2.Wait = True
MMControl2.Shareable = False
MMControl2.DeviceType = "WaveAudio"
MMControl2.FileName = "D:Liew FolderVISUAL BASIC
programaudioendgame.wav"
MMControl2.Command = "Open"
MMControl2.Command = "Play"
Label1.Caption = “Congratulation! Jackpot!!! You win 200 dollars!"
amount = amount + 200
End If


If (a = 1 And b = 2 And c = 3) Or (a = 1 And b = 3 And c = 2) Or (a = 2 And b = 1 And
c = 3) Or (a = 2 And b = 3 And c = 1) Or (a = 3 And b = 2 And c = 1) Or (a = 3 And b
= 1 And c = 2) Then
         Label1.Caption = “Too bad, you lost 100 dollars"
         amount = amount - 100
End If
168


If amount < 0 Then
         Label1.Caption = "Oh! You're bankrupt! Add cash to play!"
         End If
         Label13.Caption = Str(amount)
End If
End Sub


Private Sub spin()
x = x + 10
Randomize Timer
a = 1 + Int(Rnd * 3)
b = 1 + Int(Rnd * 3)
c = 1 + Int(Rnd * 3)


MMControl1.Notify = False
MMControl1.Wait = True
MMControl1.Shareable = False
MMControl1.DeviceType = "WaveAudio"
MMControl1.FileName = "C:VISUAL BASIC programaudioslot2.wav"
MMControl1.Command = "Open"
MMControl1.Command = "Play"


Label1.Caption = "Good Luck!"
Label1.Alignment = a - 1


If a = 1 Then
         Image1(0).Picture = LoadPicture("C:VISUAL BASIC
         programImagesgrape.gif")
End If
If a = 2 Then
         Image1(0).Picture = LoadPicture("C: VISUAL BASIC
         programImagescherry.gif")
End If
If a = 3 Then
169
         Image1(0).Picture = LoadPicture("C:VISUAL BASIC
         programImagesorange.gif")


End If
If b = 1 Then
         Image1(1).Picture = LoadPicture("C:VISUAL BASIC
         programImagesgrape.gif")
End If
If b = 2 Then
         Image1(1).Picture = LoadPicture("C:VISUAL BASIC
         programImagescherry.gif")
End If
If b = 3 Then
         Image1(1).Picture = LoadPicture("C:VISUAL BASIC
         programImagesorange.gif")
End If


If c = 1 Then
         Image1(2).Picture = LoadPicture("C:VISUAL BASIC
         programImagesgrape.gif")
End If
If c = 2 Then
         Image1(2).Picture = LoadPicture("C:VISUAL BASIC
         programImagescherry.gif")
End If
If c = 3 Then
         Image1(2).Picture = LoadPicture("C:VISUAL BASIC
         programImagesorange.gif")
End If
End Sub


Exercise 24
   1. Create a simple version of the popular monopoly game.
   2. Create a slot machine that displays two rows of images.
170


                                     Lesson 25
          Fun and Games Programming- Part II
       Learning how to create simple games.


25.1 Boggle

This is a type of word game where players can form as many words as possible from
the characters displayed on an nxn square. Words can be formed in many ways,
from left to right, from right to left, top to bottom, bottom to top, diagonal, in a zigzag
manner etc. as long as the letters are connected. This example is a 5x5 boggle which
means it comprises 5 rows and 5 columns. Each time a player presses the shake
button, a different set of characters will appear. In order to do this, I used the
171
randomize concept. So, I created an array of characters and displayed them on an
array of 25 labels. Then, I use a For...Next loop to generate the characters.
                                     Figure 25.1


The Program


      Dim char(26) As String
      Dim I As Integer
      Dim J As Integer


      Private Sub Command1_Click()
      char(0) = "A"
      char(1) = "B"
      char(2) = "C"
      char(3) = "D"
      char(4) = "E"
      char(5) = "E"
172
        char(6) = "G"
        char(7) = "H"
        char(8) = "I"
        char(9) = "J"
        char(10) = "K"
        char(11) = "L"
        char(12) = "M"
        char(13) = "N"
        char(14) = "O"
        char(15) = "P"
        char(16) = "Qu"
        char(17) = "R"
        char(18) = "S"
        char(19) = "T"
        char(20) = "U"
        char(21) = "V"
        char(22) = "W"
        char(23) = "X"
        char(24) = "Y"
        char(25) = "Z"
        Randomize Timer
        For I = 0 To 24
        J = Int((Rnd * 26))
        Label1(I).Caption = char(J)
        Next
        End Sub

25.2 Reversi


This is the mini version of the typical reversi game. The interface is shown in Figure
25.2:


Figure 25.2 Mini Reversi
173


In this program, first of all I inserted an image box and then used the copy and paste
method to produce a control array of 16 image boxes which represent the squares on
the reversi board as shown in Figure 25.3:


              Figure 25.3


               Image1(12)   Image1(13)   Image1(14)   Image1(15)


               Image1(8)    Image1(9)    Image1(10)   Image1(11)


               Image1(4)    Image1(5)    Image1(6)    Image1(7)


               Image1(0)    Image1(1)    Image1(2)    Image1(3)
174


Secondly, I created two sets of two dimensional arrays and declared them as
Boolean, with one representing the white pieces and the other one representing the
black pieces. If the white piece or the black piece occupies a square, the variable
becomes true or false. Using this concept, the program can check how many white
and black pieces have appeared on the board and which positions they occupy. On
top of that, I inserted two images, one representing the white piece (Image 17) with
its tag set as “white”, and the other one representing the black piece (Image 18) with
its tag set as “black”. On start up, two white pieces and two black pieces are loaded
in the center positions.


In order to check the status of the reversi board, i.e. to know how many white pieces
and how many black pieces are currently occupying the board and which positions
they are occupying, I used a sub procedure which I named as checkstatus. In this
sub procedure, I used the statements


       If Image1 (k).Picture = Image17.Picture Then
                white (row, col) = True
       Else
              white (row, col) = False
       End If
       If Image1 (k).Picture = Image18.Picture Then
                black (row, col) = True
       Else
                black (row, col) = False
       End If


to check whether a certain image box is occupied by the white piece or the black
piece. If a particular position is being occupied by the white piece, then the variable
white (row, col) is declared as true or else it is declared as false. The same
commands are used for the black piece. Putting the preceding statements into a
nested For Loop will ensure all the positions are being checked. The positions of the
175
reversi board can be illustrated in Figure 25.3, where (i, j) means row i and column j.
The whole procedure of checkstatus is shown on the following page.


              Figure 25.3

               (4,1)       (4,2)   (4,3)   (4,4)


               (3,1)       (3,2)   (3,3)   (3,4)


               (2,1)       (2,2)   (2,3)   (2,4)


               (1,1)       (1,2)   (1,3)   (1,4)


Private Sub checkstatus ()
k=0
For row = 1 To 4
For col = 1 To 4
If Image1 (k).Picture = Image17.Picture Then
 white (row, col) = True
Else
  white (row, col) = False
End If
If Image1 (k).Picture = Image18.Picture Then
   black (row, col) = True
Else
black (row, col) = False
 End If
k=k+1
Next col
Next row


For example, let’s say we have the situation as shown in Figure 25.4, then
white(1,1)=true, black(1,1)=false, white(1,2)=true, black(1,2)=false, white(1,3)=true,
black(1,3)=false, white(3,2)=true, black(3,2)=false, black(2,3)=true, white(2,3)=false,
176
black(3,3)=true, white(3,3)=false, black(4,1)=true, white(4,1)=false, black(4,4)=true
and white(4,4)=false. For the blank squares, both white (i, j) and black (i, j) are false.


               Figure 25.4


The images of the black pieces and the white pieces are loaded using the commands
Image (k).Picture=Image17.Picture and Image (k).Picture=Image18.Picture.


As the reversi game involves dragging the white or black piece into a certain position,
therefore a procedure is needed for the drag and drop event. To write the procedure,
we need to consider a few possibilities for each and every position. For example, let’s
say we want to drag the white piece into square (1, 1). First of all we have to make
sure that square (1, 1) is empty. Secondly we need to check that square (1, 2) is not
empty or occupied by a white piece. On top of that, if square
(1, 2) is occupied by a black piece, then square (1, 3) must be occupied by a white
piece for the move to be legal. Another possibility of a legal move along the first row
is when square (1, 2) and square (1, 3) are occupied by black pieces while square (1,
4) is occupied by a white piece. Besides that, we also need to consider the positions
along the column as well as along the diagonal. This can be figured out using the
same logics.
Under the DragDrop event, I used the indices of the image1 control array to identify
which position the piece is being dragged into. For example, if the index is 0, then the
piece is dropped into square (1,1) and if the index is 1 then the piece is dropped into
square (1,2) and so on. In order to identify whether the white piece or the black piece
is being dragged and dropped, I use the
177
imgtag = Source.Tag statement, where Tag is set as “white” for the white piece
(Image 17) and “black” for the black piece (Image18).


In addition, I used If...Then and Select Case.... End Select commands to check
whether a white or black piece can be dragged and dropped into a certain position so
that the pieces trapped in between will change color. The full drag and drop
procedure for position (1, 1) is shown below:


Private Sub Image1_DragDrop (Index As Integer, Source As Control, X As Single, Y
As Single)
imgtag = Source.Tag
checkstatus
‘To check whether position(1,1) is the destination of the DragDrop procedure and to
make sure it is empty
If Index = 0 And black (1, 1) = False And white (1, 1) = False Then
Select Case imgtag
Case "white"
'Check the row positions
If black (1, 2) = True And white(1, 3) = True Then
         Image1 (0).Picture = Image17.Picture
         Image1 (1).Picture = Image17.Picture
End If
If black (1, 2) = True And black (1, 3) = True And white (1, 4) = True Then
         Image1 (0).Picture = Image17.Picture
         Image1 (1).Picture = Image17.Picture
         Image1 (2).Picture = Image17.Picture
End If
'Check the diagonal posiitons


If black(2, 2) = True And white(3, 3) = True Then
         Image1(0).Picture = Image17.Picture
         Image1(5).Picture = Image17.Picture
End If


If black(2, 2) = True And black(3, 3) = True And white(4, 4) = True Then
178
         Image1(0).Picture = Image17.Picture
         Image1(5).Picture = Image17.Picture
         Image1(10).Picture = Image17.Picture
End If
'Check column positions
If black(2, 1) = True And white(3, 1) = True Then
         Image1(0).Picture = Image17.Picture
         Image1(4).Picture = Image17.Picture
End If
If black(2, 1) = True And black(3, 1) = True And white(4, 1) = True Then
         Image1(0).Picture = Image17.Picture
         Image1(4).Picture = Image17.Picture
         Image1(8).Picture = Image17.Picture
End If


Case "black"
If white(1, 2) = True And black(1, 3) = True Then
         Image1(0).Picture = Image18.Picture
         Image1(1).Picture = Image18.Picture
End If
If white(1, 2) = True And white(1, 3) = True And black(1, 4) = True Then
         Image1(0).Picture = Image18.Picture
         Image1(1).Picture = Image18.Picture
         Image1(2).Picture = Image18.Picture
End If


If white(2, 2) = True And black(3, 3) = True Then
         Image1(0).Picture = Image18.Picture
         Image1(5).Picture = Image18.Picture
End If


If white(2, 2) = True And white(3, 3) = True And black(4, 4) = True Then
         Image1(0).Picture = Image18.Picture
         Image1(5).Picture = Image18.Picture
179
         Image1(10).Picture = Image18.Picture
End If
'Check column
If white(2, 1) = True And black(3, 1) = True Then
         Image1(0).Picture = Image17.Picture
         Image1(4).Picture = Image17.Picture
End If
If white(2, 1) = True And white(3, 1) = True And black(1, 4) = True Then
         Image1(0).Picture = Image17.Picture
         Image1(4).Picture = Image17.Picture
         Image1(8).Picture = Image17.Picture
End If
End Select
End If
End Sub


For other positions, you can use similar logics. In fact, you can put everything into the
above DragDrop procedure instead of writing separate procedures.


Lastly I also added the countcolor sub procedure to display the number of white and
black pieces at any one time and the CheckWinner sub procedure to show who the
winner is. The two sub procedures are shown below:
Private Sub countcolor ()
k=0
w=0
b=0
For row = 1 To 4
For col = 1 To 4
If Image1 (k).Picture = Image17.Picture Then
         white (row, col) = True
         w=w+1
Else
         white (row, col) = False
End If
If Image1(k).Picture = Image18.Picture Then
180
          black(row, col) = True
          b=b+1
Else
          black(row, col) = False
End If
k=k+1
Print n
Next col
Next row
Label3.Caption = Str(w)
Label4.Caption = Str(b)
End Sub


Private Sub CheckWinner ( )
Call countcolor
If w + b = 16 Or b = 0 Or w = 0 Then
If w > b Then
          Label5.Visible = True
          Label5.Caption = “White Wins"
          Else
          Label5.Visible = True
          Label5.Caption = "Black Wins"
End If
End If
End Sub


25.3 Calculator


This is a typical calculator that consists of the number buttons, the operator buttons
and some additional buttons such as the memory button and the clear button.
To design the interface, you need to insert 25 command buttons, and one label that
functions as the display panel. The number buttons from 1 to 9 are grouped together
as a control array and named as ButtonNum while 0 is a standalone command and
named as Bzero. The four basic operators are also grouped together as a control
181
array and named as Operator. Other buttons are named appropriately according to
their functions. The label is named as panel.


Figure 25.3 Calculator


One of the most important procedures in the program is to control the display on the
panel. The procedure is
Private Sub ButtonNum_Click(Index As Integer)
      If Num_of_digit > 0 Then
      If Num_of_digit < 30 Then
      panel. Caption = panel.Caption + Right$(Str(Index), 1)
      Num_of_digit = Num_of_digit + 1
      End If
      Else
      panel.Caption = Right$(Str(Index), 1)
      Num_of_digit = 1
      End If
      CheckValue
End Sub
182
The Num_of_digit is a variable that is used to check the number of digits that appear
on the display panel. The procedure will ensure that if the number of digits is more
than one, the preceding digit will be pushed to the left and the succeeding digit will
remain on the right. However, if the number of digits is zero, the digit clicked will just
appear on the rightmost position of the panel.


Another important procedure is the procedure to perform the calculations. This can
be achieved through the Operator and the Equal sub procedures. The Operator sub
procedure is shown below:


       Private Sub Operator_Click(Index As Integer)
              CheckValue
              If Index = 11 Then
              a = displayValue
              key = 1
              ElseIf Index = 12 Then
              b = displayValue
              key = 2
              ElseIf Index = 13 Then
              c = displayValue
              key = 3
              ElseIf Index = 14 Then
              d = displayValue
              key = 4
              ElseIf Index = 15 Then
              f = displayValue
              key = 5
              End If
              Num_of_digit = 0
              newNumber = True
       End Sub


This procedure ensures that when a particular operator button is pressed, the
variable key is assigned a number so that the program knows which operator is being
183
pressed. The calculation is then executed using the Equal sub procedure which is
shown below:


      Private Sub Equal_Click()
                CheckValue
      If newNumber = True Then


      If key = 1 Then
                e = displayValue + a
                ElseIf key = 2 Then
                e = b - displayValue
                ElseIf key = 3 Then
                e = displayValue * c
                ElseIf key = 5 Then
                e = (f * displayValue) / 100
                ElseIf key = 4 And displayValue <> 0 Then
                e = d / displayValue
      Else
                GoTo error
      End If
      If Abs(e) < 1 Then
                panel.Caption = Format(e, "General Number")
      Else
                panel.Caption = Str(e)
      End If
      Else
                panel.Caption = displayValue
      End If
      GoTo finish
      error: panel.Caption = "E"
      finish:
      Num_of_digit = 0
      newNumber = False
End Sub
184
The displayValue is the value that is displayed on the panel and this value is checked
through the CheckValue sub procedure. The statements
         If Abs(e) < 1 Then
                  panel.Caption = Format(e, "General Number")
         Else
                  panel.Caption = Str(e)
         End If
are to ensure that when the absolute value is less than 0, the zero appears in front of
the decimal point, for example, 0.5 instead of just .5. The whole program is shown
below:


The Program


         Option Explicit
         Dim Num_of_digit As Integer
         Dim key As Integer
         Dim displayValue As Variant
         Dim a, b, c, d, e, f, g As Variant
         Dim memo As Variant
         Dim newNumber As Boolean


         Private Sub BZero_Click(Index As Integer)
                  If Num_of_digit > 0 Then
                  panel.Caption = panel.Caption + "0"
                  Else
                  panel.Caption = "0"
                  Num_of_digit = Num_of_digit + 1
                  End If
                  CheckValue
         End Sub


         Sub CheckValue()
                  displayValue = Val(panel.Caption)
         End Sub
185
Private Sub ButtonNum_Click(Index As Integer)
      If Num_of_digit > 0 Then
      If Num_of_digit < 30 Then
      panel.Caption = panel.Caption + Right$(Str(Index), 1)
      Num_of_digit = Num_of_digit + 1
      End If
      Else
      panel.Caption = Right$(Str(Index), 1)
      Num_of_digit = 1
      End If
      CheckValue
End Sub


Private Sub Clear_Click()
      panel.Caption = "0"
      displayValue = "0"
      Num_of_digit = 0
End Sub


Private Sub ClearAll_Click()
      panel.Caption = "0"
      displayValue = "0"
      memo = 0
      End Sub
      Private Sub Equal_Click()
      CheckValue
      If newNumber = True Then
      If key = 1 Then
      e = displayValue + a
      ElseIf key = 2 Then
      e = b - displayValue
      ElseIf key = 3 Then
      e = displayValue * c
      ElseIf key = 5 Then
      e = (f * displayValue) / 100
186
      ElseIf key = 4 And displayValue <> 0 Then
      e = d / displayValue
      Else
      GoTo error
      End If
      If Abs(e) < 1 Then
      panel.Caption = Format(e, "General Number")
      Else
      panel.Caption = Str(e)
      End If
      Else
      panel.Caption = displayValue
      End If
      GoTo finish
      error: panel.Caption = "E"
      finish:
      Num_of_digit = 0
      newNumber = False
End Sub


Private Sub MemoCancel_Click()
      memo = 0
End Sub


Private Sub Memory_Click()
      CheckValue
      memo = displayValue
      Num_of_digit = 0
End Sub


Private Sub Operator_Click(Index As Integer)
      CheckValue
      If Index = 11 Then
      a = displayValue
      key = 1
187
      ElseIf Index = 12 Then
      b = displayValue
      key = 2
      ElseIf Index = 13 Then
      c = displayValue
      key = 3
      ElseIf Index = 14 Then
      d = displayValue
      key = 4


      ElseIf Index = 15 Then
      f = displayValue
      key = 5
      End If
      Num_of_digit = 0
      newNumber = True
End Sub


Private Sub Plus_minus_Click()
      CheckValue
      g = -1 * displayValue
      displayValue = g
      panel.Caption = Str(displayValue)
      CheckValue
End Sub


Private Sub Poin_Click()
      Static point_lock As Integer
      If point_lock = 0 And Num_of_digit < 20 Then
      panel.Caption = panel.Caption + "."
      Num_of_digit = Num_of_digit + 1
      End If
      CheckValue
End Sub
188
      Private Sub Recall_Click()
              panel.Caption = Str(memo)
      End Sub


      Private Sub SqRoot_Click()
              CheckValue
              If displayValue >= 0 Then
              panel.Caption = Str(Sqr(displayValue))
              Else
              panel.Caption = "E"
              End If
              Num_of_digit = 0
              End Sub
              Private Sub Summation_Click()
              CheckValue
              memo = memo + displayValue
              Num_of_digit = 0
      End Sub


Exercise 25
   1. Create a calculator that can function as a normal calculator as well as a
      scientific calculator.
   2. Create an 8x8 reversi game.


                                    Lesson 26
               Creating Educational Programs
      Learning how to create educational programs.


26.1 Kid’s Math
189
This is a simple arithmetic educational game for children. The child who attempts the
test can choose three different levels and perform three different arithmetic
calculations. The performance can be evaluated by three measurements namely the
total of questions attempted, the total of answers that are correct and the total score
which is the percentage of right answers. The design interface is shown in Figure
26.1 and the runtime interface is shown in Figure 26.2:


Figure 26.1 The Design Interface


Figure 26.2 The Runtime Interface
190


In this program, we need to insert the following controls:
   •   Three option buttons
   •   Three text boxes
   •   A few labels
   •   Two images


The procedure to choose three different arithmetic calculations is


Private Sub Option1_Click(Index As Integer)
       Select Case Index
       Case 0
       Label4.Caption = "+"
       Action = "Plus"
       Case 1
       Label4.Caption = "-"
       Action = "Minus"
       Case 2
191
       Label4.Caption = "x"
       Action = "Multiply"
       End Select
End Sub


The option buttons are grouped together as a control array and can be identified by
their indices. Using the Select Case….End Select statements, the caption of Label4
which displays the operators will change according to the selection. In addition, the
variable Action will be assigned different values namely “Plus”, “Minus” and “Multiply”.
These values will be passed to the OK procedure and appropriate calculations will be
performed.


A menu item “Level” for the user to choose the levels is added using the menu editor.
To start the menu editor, you have to click on the tools item on the menu bar. The
menu editor is shown in Figure 26.3. At the menu editor, you key in the word “Level”
in the caption box and its name “level” (this can be any appropriate name) in the
Name box. This is the first level menu item. To type in the second menu items, you
need to click on the Next button and the right arrow key. Here you key in the words
Beginner, Intermediate and Advanced. The ampersand sign ‘&’ is used in front of all
the captions (it can be in any position) so that the user can use the shortcut key to
access the items. For example, to access the Level item, the user can press Alt+L.
You will notice that all the menu items will appear in the code window and you can
write the event procedure for each of them. The event procedure for each of the
second level menu items is very simple. It simply assigns a value to the variable n,
which is n=1 for beginner, n=2 for intermediate and n=3 for advanced.


The procedure to randomize the process of displaying different numbers after each
click of the command button “Start” or “Next” (The Start button changes to Next after
the first Click) is shown below. The select Case …..End Select statements allow the
generation of numbers for the three different levels.


       Randomize Timer
       Select Case n
       Case 1
       num1 = Int(Rnd * 10)
192
       num2 = Int(Rnd * 10)
       Case 2
       num1 = Int(Rnd * 90) + 10
       num2 = Int(Rnd * 90) + 10
       Case 3
       num1 = Int(Rnd * 900) + 100
       num2 = Int(Rnd * 900) + 100
       End Select


Figure 26.3


There are some minor things to be considered before the actual calculation is done.
First of all, for subtraction, we need to make sure that the value of the first number is
more than the second number as this is arithmetic for kids. This is taken care of using
the statement
       Case "Minus"
       If num1 > num2 Then
       number1.Caption = num1
       number2.Caption = num2
       Else
       number1.Caption = num2
193
      number2.Caption = num1
      End If


The above statements ensure that when the second number is larger than the first
number, the second number will appear in the first text box and the first number will
appear in the second text box. Secondly, to make sure that the multiplication is not
too complicated, the second number will be restricted to values between 0 and 10.
This can be achieved using the Right function as shown in the following statements:
      Case "Multiply"
      number1.Caption = num1
      number2.Caption = Right(num2, 1)


The actual calculation is performed under the OK procedure or the KeyPress
procedure so that the user has a choice to click the OK button or press the enter key
to perform the calculation. The overall program is shown below:


The Program
Dim num1 As Integer
Dim num2 As Integer
Dim intNumber As Integer
Dim totalQ As Integer
Dim n As Integer
Dim Action As String
Dim answer As Integer
Dim done As Boolean
Dim score As Integer


Private Sub beginner_Click()
n=1
End Sub


Private Sub Inter_Click()
n=2
End Sub
194


Private Sub advance_Click()
n=3
End Sub


Private Sub Command3_Click ()
‘To calculate the score in percentage
Label10.Caption = Format ((intNumber / totalQ), "Percent")
End Sub


Private Sub Command4_Click()
      total.Caption = ""
      Label8.Caption = ""
      intNumber = 0
      totalQ = 0
      Label10.Caption = ""
      Command1.Caption = "Start"
End Sub


Private Sub Form_Load()
      Option1(0).Value = True
      Label4.Caption = "+"
      Image1.Visible = False
      Image2.Visible = False
      Label6.Visible = False
      Label5.Visible = False
End Sub


Private Sub Option1_Click(Index As Integer)
      Select Case Index
      Case 0
      Label4.Caption = "+"
      Action = "Plus"
      Case 1
      Label4.Caption = "-"
195
      Action = "Minus"
      Case 2
      Label4.Caption = "x"
      Action = "Multiply"
      End Select
End Sub


Private Sub Text3_keypress(keyAscii As Integer)
      Select Case Action
      Case "Plus"
      answer = Val(number1.Caption) + Val(number2.Caption)
      Case "Minus"
      answer = Val(number1.Caption) - Val(number2.Caption)
      Case "Multiply"
      answer = Val(number1.Caption) * Val(number2.Caption)
      End Select
      If (keyAscii = 13) And answer = Val(Text3.Text) Then
      Image1.Visible = True
      Image2.Visible = False
      Label5.Visible = True
      Label6.Visible = False
      If done = True Then
      intNumber = intNumber + 1
      total.Caption = Str(intNumber)
      End If
      Text3.Enabled = False
      ElseIf (keyAscii = 13) And answer <> Val(Text3.Text) Then
      Image1.Visible = False
      Image2.Visible = True
      Label5.Visible = False
      Label6.Visible = True
      Text3.Enabled = False
      End If
End Sub
196
Private Sub Command1_Click()
     Image1.Visible = False
     Image2.Visible = False
     Label6.Visible = False
     Label5.Visible = False
     done = True


     Text3.Enabled = True
     Text3.Text = ""
     x=x+1
     If x > 0 Then
     Command1.Caption = "Next"
     End If


     Randomize Timer
     Select Case n
     Case 1
     num1 = Int(Rnd * 10)
     num2 = Int(Rnd * 10)
     Case 2
     num1 = Int(Rnd * 90) + 10
     num2 = Int(Rnd * 90) + 10
     Case 3
     num1 = Int(Rnd * 900) + 100
     num2 = Int(Rnd * 900) + 100
     End Select
     Select Case Action
     Case "Plus"
     number1.Caption = num1
     number2.Caption = num2
     Case "Minus"
     If num1 > num2 Then
     number1.Caption = num1
     number2.Caption = num2
     Else
197
      number1.Caption = num2
      number2.Caption = num1
      End If
      Case "Multiply"
      number1.Caption = num1
      number2.Caption = Right(num2, 1)
      End Select
      Text3.SetFocus
      totalQ = totalQ + 1
      Label8.Caption = Str(totalQ)
End Sub


Private Sub OK_Click()
      Select Case Action
      Case "Plus"
      answer = Val(number1.Caption) + Val(number2.Caption)
      Case "Minus"
      answer = Val(number1.Caption) - Val(number2.Caption)
      Case "Multiply"
      answer = Val(number1.Caption) * Val(number2.Caption)
      End Select


      If Val(Text3.Text) = answer Then
      Image1.Visible = True
      Image2.Visible = False
      Label5.Visible = True
      Label6.Visible = False
      If done = True Then
      intNumber = intNumber + 1
      total.Caption = Str(intNumber)
      End If
      Else
      Image1.Visible = False
      Image2.Visible = True
      Label5.Visible = False
198
       Label6.Visible = True
       End If
       Text3.Enabled = False
       done = False
End Sub


26.2 The Memory Game


This is a typical memory game for children. The objective of the game is to reveal the
pictures that are hidden under the squares. These pictures exist in pairs. When the
user clicks on the square, the pictures will be revealed. If the user clicks on the
squares with the same pictures successively, the squares together with the pictures
will be removed. When all the squares and the pictures are removed, the background
picture will show up.


Figure 26.4
199
In this program, I use the images’ tags to pair up the images which are hidden under
the picture boxes, that is, the same images will have the same tags. The pictures and
the images are both set as control arrays so that they can be manipulated using the
For…..Next Loop. To check whether the images are the same or not, you can use the
following procedure:
         For i = 0 To 11
         If Picture1(i).Visible = False Then
         For j = 0 To 11
         If Picture1(j).Visible = False Then
         If i <> j And Image1(i).Tag = Image1(j).Tag Then
         Image1(j).Visible = False
         Image1(i).Visible = False
         Picture1(j).Visible = False
         Picture1(i).Visible = False
         End If
The statement If i <> j And Image1 (i).Tag = Image1 (j).Tag checks whether the
images in different positions are the same or not, and if they are the same, they will
be made to disappear using the Image.Visible= False statements. A timer is used to
control the program so that there is a short delay before the images disappear. The
whole program is shown below:


The Program


Sub check()
'Check whether the images are the same or not
For i = 0 To 11
If Picture1(i).Visible = False Then
For j = 0 To 11
If Picture1(j).Visible = False Then
If i <> j And Image1(i).Tag = Image1(j).Tag Then
Image1(j).Visible = False
Image1(i).Visible = False
Picture1(j).Visible = False
Picture1(i).Visible = False
End If
200


If i <> j And Image1(i).Tag <> Image1(j).Tag And Image1(i).Visible = True And
Image1(j).Visible = True Then
Picture1(j).Visible = True
Picture1(i).Visible = True
End If
End If
Next j
End If
Next i


Timer1.Enabled = False
If Picture1(0).Visible = False _
And Picture1(1).Visible = False _
And Picture1(2).Visible = False _
And Picture1(3).Visible = False _
And Picture1(4).Visible = False _
And Picture1(5).Visible = False _
And Picture1(6).Visible = False _
And Picture1(7).Visible = False _
And Picture1(8).Visible = False _
And Picture1(9).Visible = False _
And Picture1(10).Visible = False _
And Picture1(11).Visible = False _
Then
MMControl1.Notify = False
MMControl1.Wait = True
MMControl1.Shareable = False
MMControl1.DeviceType = "WaveAudio"
MMControl1.FileName = "D:Liew FolderVISUAL BASIC
programaudioapplause.wav"
MMControl1.Command = "Open"
MMControl1.Command = "Play"
End If
End Sub
201


Private Sub picture1_Click(Index As Integer)
Picture1(Index).Visible = False
Timer1.Enabled = True
End Sub
Private Sub Timer1_Timer()
check
End Sub


26.3 The Star War
This is a program that can demonstrate the principle of projectile in physics. At a
certain angle and a certain launch velocity, the projectile can reach a certain range.
The maximum range is at the angle of 45 degrees. This principle can be applied in
the military field where it can simulate the launching of the missile at a certain velocity
and angle in order to hit a remote target. It can also be applied in the scientific and
technological fields. This game provides a good training for students in their ability to
make estimations.


During the designing phase, you need to insert three images which resemble the
satellites, three explosion images, the labels to display the bonus points, two text
boxes for entering the values of the velocity and the angle, the image of a rocket, two
timers for animation purposes and the Microsoft Multimedia Control for playing the
sound of the explosion.


In this program, you can use the formulae v sin θ-½ gt2 as the vertical component of
the displacement and v cos θ as the horizontal component of the displacement
(where g is the gravitational acceleration, v the launch velocity and θ the launch
angle). To enable the missile to fly, you can use the combination of the Object.Move
method and the object coordinate system, i.e. object. left and object.Top. In Visual
Basic language, the procedure is


        y = v * Sin (a * 3.141592654 / 180) * t - 4.9 * (t ^ 2)
        x = v * Cos (a * 3.141592654 / 180) * t
        Image1.Move Image1.Left + x, Image1.Top – y
202
The above procedure will move the above missile x unit to the left and y unit to the
top (or down depending on the values of y as it could be negative) after every interval
until it hits the target. You can use the randomization method so that the objects will
appear at different positions randomly at each new game. In addition, you can also
use the randomization method to load different backgrounds at start up and at each
new game.


Figure 26.5 The Design Interface


The initial positions of the satellites are determined using the following procedure
which ensures that they will appear within the designated window. The statements
consist of the randomization process that uses the Rnd function and the use of the
Left and the Top properties to determine the positions of the satellites.
203


      left1 = Int(Rnd * 7000) + 1000
      left2 = Int(Rnd * 7000) + 1000
      left3 = Int(Rnd * 7000) + 1000
      top1 = Int(Rnd * 5000) + 100
      top2 = Int(Rnd * 5000) + 100
      top3 = Int(Rnd * 5000) + 100
      Image2.Left = left1
      Image3.Left = left2
      Image4.Left = left3
      Image2.Top = top1
      Image3.Top = top2
      Image4.Top = top3


The procedure to show that the rocket hits the target when it moves within 240 twips
right of the leftmost border of Image1(satellite) and 240 twips below the top border of
Image1 ( which means the rocket hits the center of Image1) is shown below.
      If Image4.Visible = True And (Image1.Left < left3 + 240 And Image1.Left >
      left3 - 240) And (Image1.Top < top3 + 240 And Image1.Top > top3 - 240)
      Timer1.Enabled = False
      Call showfire
The showfire sub procedure is to start timer2 and to show the image of the explosion
momentarily.


Private Sub Timer2_Timer()
      'To delay the appearance of fire and the bonus image
      w=w+1
      If w < 30 Then
      Image5(i).Visible = True
      Label4(i).Visible = True
      Else
      Image5(i).Visible = False
      Label4(i).Visible = False
      Timer2.Enabled = False
      End If
204
End Sub
Figure 26.5 The Runtime Interface


The Program
Dim x As Variant
Dim a As Variant
Dim t As Variant
Dim y As Variant
Dim w As Variant
Dim i As Variant
205
Dim score As Integer
Dim left1, left2, left3, top1, top2, top3 As Variant
Dim backgr As Integer


Private Sub showfire()
       Timer2.Enabled = True
End Sub


Private Sub Command1_Click()
       Timer1.Enabled = True
End Sub


Private Sub Command2_Click()
       w=0
       Image1.Visible = True
       Timer1.Enabled = False
       Label4(0).Visible = False
       Label4(1).Visible = False
       Label4(2).Visible = False
       Label3.Caption = ""
       Image1.Move 360, 6360
       t=0
End Sub


Private Sub Form_Click()
       Label5.Visible = False
End Sub


Private Sub Form_Load()
       Randomize Timer
       'To choose different backgrounds at startup
       backgr = Int(Rnd * 8) + 1
       Select Case backgr
       Case 1
       Image7.Picture = LoadPicture("D:Liew FolderAstronomyandromeda.jpg")
206
       Case 2
       Image7.Picture = LoadPicture("D:Liew FolderAstronomycomet.jpg")
       Case 3
       Image7.Picture = LoadPicture("D:Liew FolderAstronomycrabnebula.jpg")
       Case 4
       Image7.Picture = LoadPicture("D:Liew FolderAstronomynova.jpg")
       Case 5
       Image7.Picture = LoadPicture("D:Liew FolderAstronomyeclipse.jpg")
       Case 6
       Image7.Picture = LoadPicture("D:Liew FolderAstronomyhorse.jpg")
       Case 7
       Image7.Picture = LoadPicture("D:Liew FolderAstronomyorion.jpg")
       Case Else
       Image7.Picture = LoadPicture("D:Liew FolderAstronomymilkyway.jpg")
       End Select


'To randomly set the initial positions of the objects
       left1 = Int(Rnd * 7000) + 1000
       left2 = Int(Rnd * 7000) + 1000
       left3 = Int(Rnd * 7000) + 1000
       top1 = Int(Rnd * 5000) + 100
       top2 = Int(Rnd * 5000) + 100
       top3 = Int(Rnd * 5000) + 100
       Image2.Left = left1
       Image3.Left = left2
       Image4.Left = left3
       Image2.Top = top1
       Image3.Top = top2
       Image4.Top = top3
       w=0
       score = 0
       Label7.Caption = Str(score)
End Sub
207


Private Sub mnuExit_Click()
      End
End Sub


Private Sub mnunew_Click()
      w=0
      Randomize Timer
      'To choose different backgrounds at startup
      backgr = Int(Rnd * 8) + 1
      Select Case backgr
      Case 1
      Image7.Picture = LoadPicture("D:Liew FolderAstronomyandromeda.jpg")
      Case 2
      Image7.Picture = LoadPicture("D:Liew FolderAstronomycomet.jpg")
      Case 3
      Image7.Picture = LoadPicture("D:Liew FolderAstronomycrabnebula.jpg")
      Case 4
      Image7.Picture = LoadPicture("D:Liew FolderAstronomynova.jpg")
      Case 5
      Image7.Picture = LoadPicture("D:Liew FolderAstronomyeclipse.jpg")
      Case 6
      Image7.Picture = LoadPicture("D:Liew FolderAstronomyhorse.jpg")
      Case 7
      Image7.Picture = LoadPicture("D:Liew FolderAstronomyorion.jpg")
      Case Else
      Image7.Picture = LoadPicture("D:Liew FolderAstronomymilkyway.jpg")


      End Select
      'To display all the objects again


      left1 = Int(Rnd * 7000) + 1000
      left2 = Int(Rnd * 7000) + 1000
      left3 = Int(Rnd * 7000) + 1000
      top1 = Int(Rnd * 5000) + 100
208
      top2 = Int(Rnd * 5000) + 100
      top3 = Int(Rnd * 5000) + 100
      Image2.Left = left1
      Image3.Left = left2
      Image4.Left = left3
      Image2.Top = top1
      Image3.Top = top2
      Image4.Top = top3
      Image2.Visible = True
      Image3.Visible = True
      Image4.Visible = True
      Image1.Visible = True
      Timer1.Enabled = False
      Label4(0).Visible = False
      Label4(1).Visible = False
      Label4(0).Visible = False
      Label3.Caption = ""
      Image1.Move 360, 6360
      t=0
End Sub


Private Sub Timer1_Timer()
      MMControl1.Command = "close"
      If Image1.Left < 15000 And Image1.Top < 9000 Then
      v = Val(Text1.Text)
      a = Val(Text2.Text)
      t=t+1
      ‘To use the formulae vertical displacement=vsina- (1/2)gt 2 and horizontal
      ‘displacement=vcosa*t so that it follows a parabolic trajectory


      y = v * Sin(a * 3.141592654 / 180) * t - 4.9 * (t ^ 2)
      x = v * Cos(a * 3.141592654 / 180) * t
      Image1.Move Image1.Left + x, Image1.Top - y
209
If Image4.Visible = True And (Image1.Left < left3 + 240 And Image1.Left >
left3 - 240) And (Image1.Top < top3 + 240 And Image1.Top > top3 - 240)
Then
i=2
'To stop the motion of the rocket and show the image of fire and bonus score
Timer1.Enabled = False
Call showfire
Image4.Visible = False
Image1.Visible = False
MMControl1.Notify = False
MMControl1.Wait = True
MMControl1.Shareable = False
MMControl1.DeviceType = "WaveAudio"
MMControl1.FileName = "D:Liew FolderVISUAL BASIC
programaudioexplosion.wav"
MMControl1.Command = "Open"
MMControl1.Command = "Play"
Label3.Caption = "You strike the satellite!"
Label4(2).Left = left3 + 240
Label4(2).Top = top3 + 240
Label4(2).Visible = True
Image5(2).Left = left3 + 240
Image5(2).Top = top3 + 240
score = score + 50
ElseIf Image3.Visible = True And (Image1.Left < left2 + 240 And Image1.Left >
left2 - 240) And (Image1.Top < top2 + 240 And Image1.Top > top2 - 240)
Then
Timer1.Enabled = False
i=1
Call showfire
Image3.Visible = False
Image1.Visible = False
MMControl1.Notify = False
MMControl1.Wait = True
MMControl1.Shareable = False
210
MMControl1.DeviceType = "WaveAudio"
MMControl1.FileName = "D:Liew FolderVISUAL BASIC
programaudioexplosion.wav"
MMControl1.Command = "Open"
MMControl1.Command = "Play"
Label3.Caption = "You strike the rocket!"
Label4(1).Left = left2 + 240
Label4(1).Top = top2 + 240
Label4(1).Visible = True
Image5(1).Left = left2 + 240
Image5(1).Top = top2 + 240
score = score + 100


ElseIf Image2.Visible = True And (Image1.Left < left1 + 240 And Image1.Left >
left1 - 240) And (Image1.Top < top1 + 240 And Image1.Top > top1 - 240)
Then
Timer1.Enabled = False
i=0
Call showfire
Image2.Visible = False
Image1.Visible = False
MMControl1.Notify = False
MMControl1.Wait = True
MMControl1.Shareable = False
MMControl1.DeviceType = "WaveAudio"
MMControl1.FileName = "D:Liew FolderVISUAL BASIC
programaudioexplosion.wav"
MMControl1.Command = "Open"
MMControl1.Command = "Play"
Label3.Caption = "You strike the Saturn!"
Label4(0).Left = left1 + 240
Label4(0).Top = top1 + 240
Label4(0).Visible = True
Image5(0).Left = left1 + 240
Image5(0).Top = top1 + 240
211
      score = score + 200


      End If
      Else
      Label3.Caption = "You miss the target!"
      Timer1.Enabled = False
      End If
      Label7.Caption = Str(score)
End Sub


Private Sub Timer2_Timer()
      'To delay the appearance of fire and the bonus image
      w=w+1
      If w < 30 Then
      Image5(i).Visible = True
      Label4(i).Visible = True
      Else
      Image5(i).Visible = False
      Label4(i).Visible = False
      Timer2.Enabled = False
      End If
End Sub


Exercise 26
   1. Create an educational game that requires the user to add four numbers within
      a certain time limit.
   2. Create an educational game that requires the user to identify the sound made
      by an animal.
   3. Create a memory game that loads the hidden images randomly.
   4. Create a star war program that requires the rocket to hit randomly moving
      targets.
212


                                    Lesson 27
                           Working with Files
       Learning how to create a text file.
       Learning how to create a simple database management system.


27.1 Introduction

Up until Lesson 26 the programs created only accept data at runtime. When a
program is terminated, the data also disappears. Is it possible to save data accepted
by a VISUAL BASIC program into a storage device, such as a hard disk or a diskette,
or even a CDRW? The answer is yes. In this Lesson, we will learn how to create files
by writing them into a storage device and then retrieve the data by reading the
contents of the files using customized VISUAL BASIC programs.


27.2 Creating a Text File
To create a text file, you can use the following command:
       Open "fileName" For Output As #fileNumber
Each text file created must have a file name and a file number for identification. As
for the file name, you must also specify the path where the file will reside.
For example:
Open "c:My Documentssample.txt" For Output As #1
will create a text file by the name of sample.txt in the My Document folder. The
accompanying file number is 1. If you wish to create and save the file in drive A,
simply change the path, as follows"
Open "A:sample.txt" For Output As #1
If you wish to create a HTML file, simple change the extension to .html
Open "c:My Documentssample.html" For Output As # 2

Example 27.1 Creating a text file

Private Sub create_Click ()
213
       Dim intMsg As String
       Dim StudentName as String
       Open "c:My Documentssample.txt" For Output As #1
       intMsg = MsgBox ("File sample.txt opened")
       StudentName = InputBox ("Enter the student Name")
       Print #1, StudentName
       intMsg = MsgBox ("Writing a" & StudentName & “to sample.txt ")
       Close #1
      intMsg = MsgBox ("File sample.txt closed")
End Sub

The above program will create a file sample.txt in the My Documents' folder which is
ready to receive input from users. Any data input by users will be saved in this text
file. Instead of print, you can also use write to save the file. After opening the file, you
must always close it with the command close.


27.3 Reading a File
To read a file created in section 13.2, you can use the input # statement. The syntax
is shown below:
       Open "fileName" For Input As #1
You have to open the file according to its file number and the variable that holds the
data. You also need to declare the variable using the DIM command.


Example 27.2 Reading a text file
Private Sub Reading_Click ()
Dim variable1 As String
Open "c:My Documentssample.txt" For Input As #1
Input #1, variable1
Text1.Text = variable1
Close #1
End Sub


This program will open the sample.txt file and display its contents in the Text1 textbox.


Example 27.3 A simple database management system
214


This is a simple database management system using a text file. First of all, the
program will check whether the text file is open or not and if the file does not exist,
the program prompts the user to create the file by displaying the create button.
However, if the file is already there, the program will change the caption of the create
button to open file. The program uses Append in the place of Output so that new data
will be added to the end of the file instead of overwriting the old data. The program
will also show the input box repeatedly so that the user can enter data continuously
until he or she enters the word “finish”.
The program also introduces the error handler to handle errors while reading the file
or deleting the file because the program cannot read or delete the file when the file
has not been created. The syntax for error handler is
    On Error Goto Label
where the label is an error handling sub procedure. For example, when the program
is trying to read the file when the file does not exist, it will go the label file_error and
the error handling object ‘err’ will display an error message with its description
property which takes the format err.description.


The program uses the vbCrLf constant when reading the data so that the data will
appear line by line instead of a continuous line. The vbCrLf constant is equivalent to
the pressing of the Enter key (or return key) so that the next data will go to the new
line. The program is uses the Do…Loop to read all the data until it reaches the end of
the file by issuing the command Loop While Not EOF(1). Below is the whole program:


       Dim studentname As String
       Dim intMsg As String


       Private Sub Command1_Click()
       ‘To read the file
               Text1.Text = ""
               Dim variable1 As String
               On Error GoTo file_error
               Open "D:Liew Foldersample.txt" For Input As #1
               Do
215
       Input #1, variable1
       Text1.Text = Text1.Text & variable1 & vbCrLf
       Loop While Not EOF(1)
       Close #1
       Exit Sub
       file_error:
       MsgBox (Err.Description)
End Sub


Private Sub Command2_Click()
‘To delete the file
       On Error GoTo delete_error
       Kill "D:Liew Foldersample.txt"
       Exit Sub
       delete_error:
       MsgBox (Err.Description)
End Sub


Private Sub Command3_Click()
       End
End Sub


Private Sub create_Click()
‘To create the file or open the file for new data entry
       Open "D:Liew Foldersample.txt" For Append As #1
       intMsg = MsgBox("File sample.txt opened")
       Do
       studentname = InputBox("Enter the student Name or type finish to end")
       If studentname = "finish" Then
       Exit Do
       End If
       Write #1, studentname & vbCrLf
        intMsg = MsgBox("Writing " & studentname & " to sample.txt ")
       Loop
       Close #1
216
             intMsg = MsgBox("File sample.txt closed")
      End Sub


      Private Sub Form_Load()
             On Error GoTo Openfile_error
             Open "D:Liew Foldersample.txt" For Input As #1
             Close #1
             Exit Sub
             Openfile_error:
             MsgBox (Err.Description), , "Please create a new file"
             create.Caption = "Create File"
      End Sub


Figure 27.1 The Interface


Example 27.4
This example uses the common dialog box to create and read the text file, which is
much easier than the previous examples as many operations are handled by the
common dialog box. The following is the program:
217
       Dim linetext As String
       Private Sub open_Click()
              CommonDialog1.Filter = "Text files{*.txt)|*.txt"
              CommonDialog1.ShowOpen
              If CommonDialog1.FileName <> "" Then
              Open CommonDialog1.FileName For Input As #1
              Do
              Input #1, linetext
              Text1.Text = Text1.Text & linetext
              Loop Until EOF(1)
              End If
              Close #1
       End Sub
       Private Sub save_Click()
              CommonDialog1.Filter = "Text files{*.txt)|*.txt"
              CommonDialog1.ShowSave
              If CommonDialog1.FileName <> "" Then
              Open CommonDialog1.FileName For Output As #1
              Print #1, Text1.Text
              Close #1
              End If
       End Sub


The syntax CommonDialog1.Filter = "Text files{*.txt)|*.txt" ensures that only the text
file is read or saved .The statement CommonDialog1.ShowOpen is to display the
open file dialog box and the statement CommonDialog1.ShowSave is to display the
save file dialog box. Text1.Text = Text1.Text & linetext is to read the data and display
them in the Text1 textbox. The interface is shown in Figure 27.2:
218


Figure 27.2


Exercise 27
   1. Create a text file of your own using the commands you have learnt in this
      lesson and read the file using a text box.
   2. Create a text file of your own using a common dialog box in which you can
      update and save the file.
219


                                    Lesson 28
       Creating basic database applications in
                               VISUAL BASIC
       Learning how to create a basic database application using data control.


Visual Basic allows us to manage databases created with different database
programs such as MS Access, Dbase, Paradox and etc. In this Lesson, we will not
attempt to create database files but we will see how we can access database files in
the VISUAL BASIC environment.


Example 28.1
In this example, you will create a simple database application which enables the user
to browse customers' names. To create this application, insert the data control into
the new form. Place the data control somewhere at the bottom of the form. Name the
data control as data_navigator.To be able to use the data control, you need to
connect it to any database. You can create a database file using any database
application but I suggest you use the database files that come with VB6. Let’s select
NWIND.MDB as the database file. To connect the data control to this database,
double-click the DatabaseName property in the properties window and select the
above file. Next, double-click on the RecordSource property to select the customers’
table from the database. You can also change the caption of the data control to
anything but I use "Click to browse Customers" here. After that, insert a label and
change its caption to Customer Name.
Finally, insert another label and name it as cus_name and leave the label empty as
customers' names will appear here when the user clicks the arrows on the data
control. You need to bind this label to the data control for the application to work. To
do this, open the label's DataSource and select data_navigator, which will appear
automatically. One more thing that you need to do is to bind the label to the correct
field so that data in the field will appear on the label. To do this, open the DataField
220
property and select ContactName. Now, press F5 and run the program. You should
be able to browse all the customers' names by clicking the arrows on the data control.


Figure 28.1


You can also add other fields using exactly the same method. For example, you can
add address, city and telephone number to the database browser.


Figure 28.2
221


Example 28.1

Previously, you have learned how to create a simple database application using data
control. In this section, you will work on the same application using slightly more
advanced commands. The data control supports some methods that are useful in
manipulating the database, for example, moving the pointer to a certain location. The
following are some of the commands that you can use to move the pointer around.

data_navigator.RecordSet.MoveFirst                   ' Move to the first record

data_navigator.RecordSet.MoveLast                    ' Move to the last record

data_navigator.RecordSet.MoveNext                   ' Move to the next record

data_navigator.RecordSet.Previous                   ' Move to the first record

*note: data_navigator is the name of the data control

In the following example, insert four command buttons and label them as First
Record, Next Record, Previous Record and Last Record. They will be used to
222
navigate around the database without using the data control. You still need to retain
the same data control (from example in lesson 19) but set the property Visible to
False so that users will not see the data control but use the buttons to browse
through the database instead. Now, double-click on the command button and key in
the codes according to the labels.


Private Sub Command2_Click ()
      dtaBooks.Recordset.MoveFirst
End Sub


Private Sub Command1_Click ()
          dtaBooks.Recordset.MoveNext
 End Sub
Private Sub Command3_Click ()
      dtaBooks.Recordset.MovePrevious
End Sub


Private Sub Command4_Click ()
      dtaBooks.Recordset.MoveLast
End Sub


Run the application and you will obtain the interface below and you will be able to
browse the database using the four command buttons.


Figure 28.1
223


Exercise 28
1. Create a database system that can store students’ information, including name,
student ID, address, birthday, sex and telephone number.


                                  Lesson 29
               Creating Database Applications
                          Using ADO Control
       Learning how to create database applications using ADO control.

In Lesson 28, we have learned how to build VISUAL BASIC database applications
using data control. However, data control is not a very flexible tool as it works only
with limited kinds of data and must work strictly in the Visual Basic environment. To
overcome these limitations, we can use a much more powerful data control in
VISUAL BASIC known as ADO control. ADO stands for ActiveX data object. As ADO
is ActiveX-based, it can work in different platforms (different computer systems) and
224
different programming languages. Moreover, it can access many different kinds of
data such as data displayed in Internet browsers, email text and even graphics other
than the usual relational and non-relational database information. To be able to use
ADO data control, you need to insert it into the toolbox. To do this, simply press
Ctrl+T to open the components dialog box and select Microsoft ActiveX Data Control
6. After this, you can proceed to build your ADO-based VISUAL BASIC database
applications.

Example 29.1
This example will illustrate how to build a relatively powerful database application, a
library management system, using ADO data control. First of all, name the new form
as frmBookTitle and change its caption to Book Titles- ADO Application. Secondly,
insert the ADO data control and name it as adoBooks and change its caption to book.
Next, insert the necessary labels, text boxes and command buttons. The runtime
interface of this program is shown in the diagram below; it allows adding and deleting
as well as updating and browsing of data.


Figure 29.1 A Library Management System
225


 The properties of all the controls are listed in Table 31.1:


Table 29.1
Object                     Property
                           Name : FormLibrary
Form
                           Caption: Book Titles -Library Management System
ADO                        Name :adoLibrary
                           Name : Titlelbl
Label1
                           Caption: Book Title
                           Name: Subjectlbl
Label2
                           Caption : Subject :Year Published:
                           Name: Yearlbl
Label3
                           Caption : Year Published
                           Name : ISBNlbl
Label 4
                           Caption :ISBN
                           Name : PubIDlbl
Labe5
                           Caption :Publisher's ID:
                           Name : Titletxt
Text1                      DataField :Title
                           DataSource :AdoLibrary
                           Name: YearTxt
Text3
                           DataField :Year Published
226
                          DataSource: AdoLibrary
                          Name : ISBNTxt
Text3                     DataField :ISBN
                          DataSource : AdoLibrary
                          Name: Pubtxt
Text4                     DataField : PubID
                          DataSource: AdoLibrary
                          Name : Subject Txt
Text2                     DataField : Subject
                          DataSource: AdoLibrary
                          Name :save
Command Button1
                          Caption :Save
                          Name : add
Command Button2
                          Caption: Add
                          Name: delete
Command Button3
                          Caption: Delete
                          Name : cancel
Command Button4
                          Caption :&Cancel
                          Name: exit
Command Button5
                          Caption :Exit


To be able to access and manage a database, you need to connect the ADO data
control to a database file. We are going to use the access database file BIBLIO.MDB
that comes with VB6. To connect ADO to this database file, follow the steps below:
a) Click on the ADO control on the form and open up the properties window.
b) Click on the ConnectionString property and the following dialog box will appear.


Figure 29.2
227


When the dialog box appears, select Use Connection String. Next, click build and at
the Data Link dialog box, double-click the option labeled Microsoft Jet 3.51 OLE DB
provider.

Figure 29.3
228
After that, click the Next button to select the file BIBLO.MDB. You can click on the
Text Connection to ensure proper connection of the database file. Click OK to finish
the connection. Finally, click on the RecordSource property and set the command
type to adCmd Table and Table name to Titles.


Figure 29.4


Now, you need to write codes for all the command buttons, after which you can make
the ADO control invisible.
For the Save button, the procedure is as follows:


      Private Sub save_Click()
              On Error GoTo errSave
              AdoLibrary.Recordset.Fields("Title") = TitleTxt.Text
              AdoLibrary.Recordset.Fields("Year Published") = YearTxt.Text
              AdoLibrary.Recordset.Fields("ISBN") = ISBNTxt.Text
              AdoLibrary.Recordset.Fields("PubID") = PubTxt.Text
              AdoLibrary.Recordset.Fields("Subject") = SubjectTxt.Text
              AdoLibrary.Recordset.Update
              Exit Sub
              errSave:
              MsgBox (Err.Description)
      End Sub
For the Add button, the procedure is as follows:
229


      Private Sub Add_Click()
               On Error GoTo addErr
               AdoLibrary.Recordset.AddNew
               Exit Sub
               addErr:
               MsgBox (Err.Description)
      End Sub
      Private Sub delete_Click()
      Confirm = MsgBox("Are you sure you want to delete this record?", vbYesNo,
      "Deletion Confirmation")
      If Confirm = vbYes Then
      On Error GoTo deleteErr


      AdoLibrary.Recordset.delete
      MsgBox "Record Deleted!",, "Message"
      Else
      MsgBox "Record Not Deleted!", , "Message"
      End If
      Exit Sub


      deleteErr:
      MsgBox (Err.Description), , "Empty record, please enter all the info"


      End Sub


For the Cancel button, the procedure is as follows:


      Private Sub cancel_Click()
      TitleTxt.Text = ""
      YearTxt.Text = ""
      PubTxt.Text = ""
      ISBNTxt.Text = ""
      SubjectTxt.Text = ""
230
Example 29.2
In the previous example, you have learned to design a database application using
the ADO control. In this example, you will learn to create a more advanced database
application by adding more features to the previous example. The electronic library
you are going to create will be able to accept users' registrationsas well as handle a
login command that requires the user to enter a password, thus enhancing the
security aspect of the database management system. Basically, the application will
constitute a welcome menu, a registration menu, a login menu and the main
database menu. The sequence of the menus is illustrated in the flowchart below:


Figure 29.1 The Flowchart


             Welcome


                                    Registered
             Registration
                                      Users


                Login


               Database


In this program, you need insert a form and design it as the Welcome menu as
shown in Figure 29.2. In this form, insert three command buttons and set their
properties as listed in Table 29.1. The interface is shown in Figure 29.2.


Table 29.1
Object                       Name            Caption
Form name                    main_menu       Electronic Library
command button 1             cmdRegister     Register
command button 2             cmdLogin        Login
command button 3             cmdCancel       Cancel
231
Figure 29.2 The Welcome Menu


The procedure for the welcome menu is shown below:


       Private Sub cmdLogin_Click ()
              main_menu.Hide
              Login_form.Show
       End Sub
       Private Sub cmdRegister_Click ()
              main_menu.Hide
              Register. Show
       End Sub


If a new user clicks the Register button, the registration form will appear. This
registration form consists of two text boxes, three command buttons and an ADO
control. Their properties are set as listed in Table 29.2 and the interface is shown in
Figure 29.3. Note that the PasswordChar of the Text2 textbox is set as * which
means users will not be able to see the actual characters they enter, they will only
see the * symbol.
In order to connect the ADO to a database, you must create a database file in
Microsoft Access. The database file must contain at least two fields, one for the user
name and the other one for the password.
232


Table 29.2
Object                            Property
                                  Name :Register
Form
                                  Caption: Registration Form
Text1                             Name: txtName
Text2                             Name: txtpassword
Text2                             PasswordChar : *
                                  Name :cmdConfirm
command button 1
                                  Caption: Confirm
                                  Name: cmdClear
command button 2
                                  Caption: Clear
                                  Name: cmdCancel
command button 3
                                  Caption: Cancel
ADO control name                  Name :UserInfo


Figure 29.3 The Registration Form


The procedure for the registration form is as follows:


        Private Sub cmdClear_Click ( )
              txtName.Text = ""
              txtpassword.Text = ""
        End Sub
233


        Private Sub cmdConfirm_Click ()
              UserInfo.Recordset.Fields ("username") = txtName.Text
              UserInfo.Recordset.Fields ("password") = txtpassword.Text
              UserInfo.Recordset.Update
              Register. Hide
              Login_form.Show
        End Sub


        Private Sub Form_Load ()
              UserInfo.Recordset.AddNew
        End Sub


The login menu is illustrated in Figure 29.4:


Figure 29.4


There are two text boxes and a command button. Their properties are set as follows:

Table 29.3
Object                  Property
Text1                   Name: txtName
                        Name: txtpassword
Text2
                        PasswordChar: *
                        Name: cmdLogin
Command button 1
                        Caption: Login
Form name               Name: Login form
234
                         Caption: Login Menu


The procedure is as follows:
      Private Sub cmdLogin_Click()
      Dim usrname As String
      Dim psword As String
      Dim usernam As String
      Dim pssword As String
      Dim Msg As String


      Register.UserInfo.Refresh
      usrname = txtName.Text
      psword = txtpassword.Text


      Do Until Register.UserInfo.Recordset.EOF
      If Register.UserInfo.Recordset.Fields ("username").Value = usrname And
      Register.UserInfo.Recordset.Fields ("password").Value = psword Then
      Login_form.Hide
      frmLibrary.Show
      Exit Sub
      Else
      Register.UserInfo.Recordset.MoveNext
      End If
      Loop
      Msg = MsgBox ("Invalid password, try again!", vbOKCancel)
      If (Msg = 1) Then
      Login_form.Show
      txtName.Text = ""
      txtpassword = ""
      Else
      End
       End If
      End Sub
235
The main database interface is illustrated in Figure 29.5. Before you are able to run
the program, you need to create the MS Access database file that contains a number
of fields, i.e. title, author, publisher, year and category and save them as library.mdb.

After that, connect the ADO control to this database file as you have done it in the
previous example. The properties of all the controls for this program are listed in
Table 29.4 and the interface is shown in Example 29.5.

Table 29.4
Object                          Property
Form                            Name : frmLibrary
                                Name : adoLibrary
ADO control
                                visible : False
The Text1 textbox               Name: txtTitleA
The Text2 textbox               Name: txtAuthor
The Text3 textbox               Name: txtPublisher
The Text4 textbox               Name: txtYear
The Text5 textbox               Name: txtCategory
                                Name: cmdSave
Command button 1
                                Caption: &Save
                                Name: cmdNew
Command button 2
                                Caption: &New
                                Name: cmdDelete
Command button 3
                                Caption: &Delete
                                Name: cmdCancel
Command button 4 name
                                Caption: &Cancel
                                Name: cmdNext
Command button 5 name
                                Caption: N&ext
                                Name: cmdPrevious
Command button 6 name
                                Caption: &Previous
                                Name: cmdExit
Command button 7 name
                                Caption: E&xit
236
The procedure is as follows:

      Private Sub cmdCancel_Click()
             txtTitle.Text = ""
             txtAuthor.Text = ""
             txtPublisher.Text = ""
             txtYear.Text = ""
             txtCategory.Text = ""
      End Sub


      Private Sub cmdDelete_Click ()
             Confirm = MsgBox ("Are you sure you want to delete this record?",
             vbYesNo, "Deletion Confirmation")
             If Confirm = vbYes Then
             adoLibrary.Recordset.Delete
             MsgBox "Record Deleted!", , "Message"
             Else
             MsgBox "Record Not Deleted!", , "Message"
             End If
      End Sub


      Private Sub cmdNew_Click ()
             adoLibrary.Recordset.AddNew
      End Sub


      Private Sub cmdNext_Click ()
             If Not adoLibrary.Recordset.EOF Then
             adoLibrary.Recordset.MoveNext
             If adoLibrary.Recordset.EOF Then
             adoLibrary.Recordset.MovePrevious
             End If
             End If
      End Sub


      Private Sub cmdPrevious_Click ()
237
              If Not adoLibrary.Recordset.BOF Then
              adoLibrary.Recordset.MovePrevious
              If adoLibrary.Recordset.BOF Then
              adoLibrary.Recordset.MoveNext
              End If
              End If
       End Sub


       Private Sub cmdSave_Click ()
              adoLibrary.Recordset.Fields ("Title").Value = txtTitle.Text
              adoLibrary.Recordset.Fields ("Author").Value = txtAuthor.Text
              adoLibrary.Recordset.Update
       End Sub

Figure 29.5 The Library System


Exercise 29
1. Create an Inventory Management System using the ADO control. Your system
should include information such as product ID, product name, cost per unit, quantity
etc.
238


                                    Lesson 30
                Internet and Web Applications
       Learning how to create a web browser.
       Learning how to create a FTP program.


In Visual Basic, you can create Internet and web applications. For example, you can
create your own customized web browser, FTP as well as an email program. All
these applications are relatively easy to build.


30.1 The Web Browser
In order to create the web browser, you have to press Ctrl+T to open up the
components window and select Microsoft Internet Control. After you have selected
the control, you will see the control appear in the toolbox as a small globe. To insert
the Microsoft Internet Control into the form, just drag the globe into the form and a
white rectangle will appear in the form. You can resize this control as you wish. This
control is given the default name WebBrowser1.


To design the interface, you need to insert one combo box which will be used to
display the URLs. In addition, you need to insert a few images which will function as
command buttons for the user to navigate the Internet; they are the Go command,
the Back command, the Forward command, the Refresh command and the Home
command. You can actually put in the command buttons instead of the images, but
using images will definitely improve the look of the browser.


The procedures for all the commands are relatively easy to write. There are many
methods, events, and properties associated with the web browser but you need to
239
know just a few of them to come up with a functional Internet browser. They are listed
in Table 30.1:


Table 30.1
Method              Description

GoBack              To navigate backward one page in the history list.

GoForward           To navigate forward one page in the history list.

GoHome              To navigate to the default start page.

GoSearch            To navigate to the current search page.

Navigate            To navigate to the URL or to the file identified by a full path.

Refresh             To reload the file that is currently loaded.

Stop                To cancel the current web page loading operation.

Properties

Busy                To indicate whether the web browser is engaged in navigation or
                    downloading operations.

LocationName        To retrieve the name of the document that Internet Explorer is
                    currently displaying.

LocationURL         To retrieve the URL of the web page that Internet Explorer is
                    currently displaying.

Event

DocumentComplete Executed when a document has been completely loaded.

DownloadBegin       Executed when a navigation operation begins.

DownloadComplete Executed when a navigation operation finishes.

FileDownload        Executed to indicate that a file download is about to occur.

NavigateComplete Executed after navigation to a link is completed.
240
The method navigate is to go the website specified by its Uniform Resource
Locator(URL). The syntax is WebBrowser1.Navigate (“URL”). In this program, I want
to load the www.vbtutor.net web page at start-up, so I type in its URL.


Private Sub Form_Load()
WebBrowser1.Navigate ("http://www.vbtutor.net")
End Sub


In order to show the URL in the combo box and also to display the page title at the
form caption after the page is completely downloaded, I use the following statements:
       Private Sub WebBrowser1_DocumentComplete (ByVal pDisp As Object, URL
       As Variant)
       Combo1.Text = URL
       Form1.Caption = WebBrowser1.LocationName
       Combo1.AddItem URL
       End Sub
The following procedure will tell the user to wait while the page is loading.
       Private Sub WebBrowser1_DownloadBegin ()
       Combo1.Text = "Page loading, please wait"
       End Sub


Figure 30.1 The Web Browser
241


The program
Private Sub Form_Load ()
WebBrowser1.Navigate ("http://www.vbtutor.net")
End Sub


Private Sub Image1_Click ()
WebBrowser1.GoHome
End Sub


Private Sub Image2_Click ()
On Error Resume Next


WebBrowser1.GoForward
End Sub


Private Sub Image3_Click ()
On Error Resume Next
WebBrowser1.GoBack
242
End Sub


Private Sub Image4_Click ()
WebBrowser1.Refresh
End Sub


Private Sub Image5_Click ()
WebBrowser1.Stop
End Sub


Private Sub Label2_Click ()
WebBrowser1.Navigate (Combo1.Text)
End Sub


Private Sub Label4_Click ()
WebBrowser1.GoSearch
End Sub


Private Sub WebBrowser1_DocumentComplete(ByVal pDisp As Object, URL As
Variant)
Combo1.Text = URL
Form1.Caption = WebBrowser1.LocationName
Combo1.AddItem URL
End Sub


Private Sub WebBrowser1_DownloadBegin()
Combo1.Text = "Page loading, please wait"
End Sub


30.2 The FTP program
The File Transfer Protocol is a system for transferring files between two computers
over the Internet where one of the computers is normally known as server and the
other one as the client. The FTP program is very useful for website management as
the webmaster can update the web pages by uploading the local files to the web
243
server easily and normally at a much faster speed than the web browser. For normal
PC users, the FTP program can also be used to download files from many FTP sites
that offer a lot of useful stuffs such as free software, free games, product information,
applications, tools, utilities, drivers, fixes and etc.


The FTP program usually comprises an interface that shows the directories of the
local computer and the remote server. Files can normally be transferred just by
clicking the relevant arrows. To log into the FTP site, we normally have to key in the
user name and the password; however, for public domains, we just need to type the
word anonymous as the user name and you can leave out the password. The FTP
host name takes the form ftp.servername.com, for example, the Microsoft FTP site’s
host name is ftp.microsoft.com while the Netscape FTP site is ftp.netscape.com.
The FTP program usually provides a set of commands such as ChgDir (changing
directory), MkDir (Changing directory), Rename (renaming a file), view (to view a file),
delete (to delete a file) etc.


If you need to use a FTP program, you can purchase one or you can download a
couple of the programs that are available free of charge over the Internet. However,
you can also create your very own FTP program with Visual Basic. Visual Basic
allows you to build a fully functionally FTP program which may be just as good as the
commercial FTP programs. The engine behind it is the Microsoft Internet Transfer
Control 6.0 in which you need to insert your form before you can create the FTP
program. The name of the Microsoft Internet Transfer Control 6.0.is Inet and if you
only put in one control, its name will be Inet1.


Inet1 comprises three important properties namely Inet1.URL which is used to
identify the FTP hostname, Inet1.UserName which is used to accept the username
and the Inet1.Password which is used to accept the user’s passwords. The
statements for the program to read the hostname of the server, the username and
the password entered into the Text1 textbox, the Text2 textbox and the Text3 textbox
by the user are shown below:
       Inet1.URL=Text1.Text
       Inet1.UserName=Text2.Text
       Inet1.Passoword=Text3.Text
244
After the user enters the above information, the program will attempt to connect to
the server using the following command, where Execute is the method and DIR is the
FTP command that will read the list of files from the specified directory of the remote
computer and you need to use the getChunk method to actually retrieve the
directory’s information.


        Inet1.Execute, "DIR"


After connecting to the server, you can choose the file to download from the remote
computer by using the statement


       Inet1.Execute, , "get" & remotefile & localfile


where remotefile is the file of the remote site and localfile is the file of the local
system. However, very often you need to provide the full path of the local file, which
you can do that by modifying the above syntax to the following syntax:


       Inet1.Execute , , "get" & remotefile & localpath & remotefile


The above statements will ensure that the remote file will be downloaded to the
location specified by the localpath and the file downloaded will assume the same
name as the remote file. For example, the remote file is readme.txt and the localpath
is C:temp , so the downloaded file will be saved in C:tempreadme.txt.


In order to monitor the status of the connection, you can use the StateChanged
event that is associated with Inet1 together with a set of the state constants that are
listed in the Table 30.1:


Table 30.1

Constant                      Value Description

icHostResolvingHost           1        The control is looking up the IP address of the
                                       specified host computer.

icHostResolved                2        The control successfully found the IP address of
245

                                      the specified host computer.

icConnecting                   3      The control is connecting to the host computer.

icConnected                    4      The control successfully connected to the host
                                      computer.

icRequesting                   5      The control is sending a request to the host
                                      computer.

icRequestSent                  6      The control successfully sent the request.

icReceivingResponse            7      The control is receiving a response from the host
                                      computer.

icResponseReceived             8      The control successfully received a response
                                      from the host computer.

icDisconnecting                9      The control is disconnecting from the host
                                      computer.

icDisconnected                 10     The control successfully disconnected from the
                                      host computer.

icError                        11     An error occurred in communicating with the host
                                      computer.

icResponseCompleted            12     The request has been completed and all data has
                                      been received.


Under the StateChanged event, you use the Select Case…End Select statements to
notify the users regarding the various states of the connection. The procedure is
shown below:


          Private Sub Inet1_StateChanged(ByVal State As Integer)
                Select Case State
                Case icError
                MsgBox Inet1.ResponseInfo, , "File failed to transfer"
                Case icResolvingHost
246
              Label6.Caption = "Resolving Host"
              Case icHostResolved
              Label6.Caption = "Host Resolved"
              Case icConnecting
              Label6.Caption = "Connecting Host"
              Case icConnected
              Label6.Caption = "Host connected"
              Case icReceivingResponse
              Label6.Caption = "Receiving Response"
              Case icResponseReceived
              Label6.Caption = "Got Response"
              Case icResponseCompleted
              Dim data1 As String
              Dim data2 As String
              MsgBox "Download Completed"
              End Select
       End Sub


The states of the connection will be displayed in Label6.


The FTP program that I have created contains a form and a dialog box. The dialog
box can be added by clicking on the Project item on the menu bar and then selecting
the Add Form item on the drop-down list. You can either choose a normal dialog box
or a login dialog box. The function of the dialog box is to accept the FTP address, the
username and the password and then connect to the server. After a successful login,
the dialog box will be hidden and the main form will be presented for the user to
browse the remote directory and to choose certain files to download.
The interface of the login dialog is shown in Figure 30.2:
247
Figure 30.2 The FTP Login Form


The states of the connection will be displayed in the label at the bottom. The program
for the login dialog is:


       Option Explicit


       Private Sub OKButton_Click()
       Inet1.URL = Text1.Text
       Inet1.UserName = Text2.Text
       Inet1.Password = Text3.Text
       Inet1.Execute , "DIR"
       Form1.Show
       Dialog.Hide
       End Sub


       Private Sub Inet1_StateChanged(ByVal State As Integer)
       Select Case State
               Case icError
                      MsgBox Inet1.ResponseInfo, , "File failed to transfer"
               Case icResolvingHost
                      Label6.Caption = "Resolving Host"
               Case icHostResolved
                      Label6.Caption = "Host Resolved"
               Case icConnecting
248
                     Label6.Caption = "Connecting Host"
              Case icConnected
                     Label6.Caption = "Host connected"
              Case icReceivingResponse
                     Label6.Caption = "Receiving Response"
              Case icResponseReceived
                     Label6.Caption = "Got Response"
              Case icResponseCompleted
                     Dim data As String
                     Dim data1 As String


                     MsgBox "Transfer Completed"
                     Do
                             data1 = Inet1.GetChunk(1024, icString)
                             data = data & data1


                             Loop While Len(data1) <> 0
                             Form1.Text6.Text = data
       End Select
       End Sub
       Private Sub CancelButton_Click()
              Text1.Text = ""
              Text2.Text = ""
              Text3.Text = ""
       End Sub


The statement data1 = Inet1.GetChunk (1024, icString) is to use the getChunk
method to grab information of the remote directory and then display the files of the
directory in the Text6 textbox.


After logging in, the main form will be presented as shown in Figure 30.3:
249
Figure 30.3


The program to download the file is:


      Dim remotefile As String
      Dim mypath As String
      Dim cmd As String


      Private Sub Command1_Click ()
              remotefile = Text4.Text
              mypath = Text5.Text
              cmd = "GET " & remotefile & " " & mypath & remotefile
              Inet1.Execute , cmd
      End Sub


      Private Sub Command2_Click()
              Inet1.Cancel
              End
      End Sub
250
          Private Sub Form_Load()
                    Dialog.Show
                    Form1.Hide
          End Sub


          Private Sub Inet1_StateChanged (ByVal State As Integer)
          Select Case State
                    Case icError
                    MsgBox Inet1.ResponseInfo, , "File failed to transfer"
                    Case icResponseCompleted
                    MsgBox "Download Completed"
          End Select
          End Sub


Exercise 30
     1. Create your own customized web browser.
     2. Create your own customized FTP program.


INDEX
                                                              arithmetic operators, 24, 30, 33
                                                              array, 94 -95, 97-101, 147, 149, 167, 177, 187
 A                                                            Asc, 80, 82
Abs, 63, 66, 69, 179, 180, 182                                ASCII, 82, 83
Activate, 6-9, 24, 45-49, 51-54, 63, 67, 69-75, 78, 80, 83,   Atn, 63, 68, 69
   119                                                        Audio player, 117
ActiveX data object, 219                                      avi, 117, 125-128
AddItem method, 17, 47, 103
ADO control, 219, 221, 223, 225-227, 230, 232                  B
Animation, 130, 136, 137, 141, 144
arc tangent, 68                                               Back command, 233
2
BackColor, 13, 18, 102-104                                   Drive List Box, 19
background color, 11-13, 18, 102-103                         DriveListBox, 113, 120-121, 125
boggle, 167                                                  dropdown list, 22
Boolean, 27, 30, 170, 180, 189
border style, 11, 102
BorderColor, 102                                               E
BorderWidth, 102                                             educational game, 185, 207
Byte, 26                                                     End Select, 24, 40-44, 88, 104, 173, 175, 187-188, 191-
                                                                193, 202-203, 240, 242, 244
 C                                                           event-driven, 1
                                                             Exit For, 53
calculator, 11-12, 14, 43, 69, 89, 97, 177, 184              Exit Sub, 24, 109-110, 129, 211-212, 223-224, 229
caption, 10-13, 16, 23, 36-37, 62, 64, 142, 187, 210, 215,   Exp, 63, 66, 69
    219, 235                                                 explicit declaration, 28
Caption Property, 14                                         Exponential, 31
CD player, 117-118, 120
Check Box, 18
Chr, III, 80, 82-83                                            F
circle, 14, 21, 25, 102, 108, 116                            File List Box, 20
circle method, 108                                           FileDownload, 234
Click event, 16                                              FileListBox, 113, 120-121, 125
code window, 5, 22, 187                                      Fix, 63, 66, 67, 70
color constants, 18                                          For…Next, 24, 45, 51, 100, 147
combo box, 17, 43, 233, 235                                  foreground color, 11, 12
Combo Box, 17, 120                                           form, 3, 5, 6, 10-13, 15, 18-23, 32, 38, 47, 61, 64 - 68, 70,
command button, 1, 6, 10, 15-16, 21-23, 38, 57, 64, 84,         71, 74 -76, 79, 85, 96-98, 102-103, 107-108, 113, 117,
    103, 131, 133, 135, 138, 141-142, 187, 217, 225, 227-       120, 125, 130, 136, 141-142, 145, 158, 167, 215, 219,
    228                                                         221, 225- 229, 233, 235, 237-238, 241, 243
comments, 14                                                 Format function, 73
common dialog box, 103, 111, 212                             Formatting output, 70
components, 3, 117, 145, 219, 233                            Forward command, 233
computer screen, 7                                           FTP, 233, 237-238, 241, 244
conditional operators, 34, 35, 37, 39                        function, 15, 17, 24, 25, 31-32, 34, 38, 41, 43, 47, 57-58,
conditional statement, 18                                       61- 64, 66-68, 70-74, 79- 85, 89-93, 105, 113, 120,
ConnectionString, 221                                           125, 160, 184, 189, 198, 233, 241
controls, III, 4, 10, 13, 15-16, 21-22, 97, 102, 105, 107,
    113, 120 -121, 125, 186, 220, 230
Cos, 24, 63, 68-69, 197, 204                                   G
cosine, 68-69
                                                             getChunk method, 238, 243
Currency, 26-27, 32, 74, 87
                                                             Go command, 233
                                                             graphics, 16, 102, 105, 107-108, 109, 113, 219
 D                                                           Graphics, 102
                                                             GWBASIC, 1
data control, 215, 217, 219, 221
database, 37, 208-209, 215- 219, 221, 223, 225-226, 229-
   230                                                         H
DataField, 215, 220-221
                                                             Home command, 233
DataSource, 215, 220-221
Date, II, 27, 29, 76-79
Decimal, 26                                                    I
degree, 68, 69
designing phase, 16, 64, 197                                 IBM BASICA, 1
dialog box, 2, 102-103, 105, 109, 111-112, 116-117, 129,     icConnected, 239, 240, 242
   212-214, 219, 221-222, 241                                icConnecting, 239, 240, 242
Dim statement, 28, 29, 94, See Dim                           icDisconnected, 239
Directory List Box, 20                                       icDisconnecting, 239
DirListBox, 113, 120 -121, 125                               icError, 239, 240, 242, 244
division operator, 7                                         icHostResolved, 239, 240, 242
Do Until, 45-48, 229                                         icHostResolvingHost, 239
Do While, 45, 48, 67                                         icReceivingResponse, 239, 240, 242
Do…. Loop, 45                                                icRequesting, 239
DocumentComplete, 234 - 236                                  icRequestSent, 239
Double, 5, 6, 26-27, 130                                     icResponseCompleted, 240, 242, 244
DownloadBegin, 234 -235, 237                                 icResponseReceived, 239, 240, 242
DownloadComplete, 234                                        If….Then….Elseif, 18
DragDrop, 6, 136-137, 173                                    Image Box, III, 16, 105
dragIcon, 136                                                implicit declaration, 28
dragmode, 136                                                input, 13, 15, 28, 31, 33, 41, 61, 62, 96-97, 101, 209, 210
drawing, 12, 102                                             InputBox ( ), 57
3
InStr function, 82
Int, 38, 39, 63-67, 70, 105, 149, 150, 159, 164, 169, 188,
                                                               N
   192, 199, 201-204                                         NavigateComplete, 234
Integer, 26-27, 29, 31, 37-38, 47-49, 58-60, 65, 95- 96,     nested loop, 54
   98-99, 105, 109, 149, 150, 152, 161, 168, 173, 177,       numeric data, 15, 16, 26, 29, 32, 43, 100
   178, 180-183, 186, 189- 191, 197, 201, 240, 242, 244
Integer Division, 31
interface, 1, 3, 10, 11, 25, 102, 105, 146, 149, 177, 185,     O
   213, 218-219, 225-226, 229-230, 233, 237, 241             Option Base, 95, 98, 99-100, 149
                                                             Option Box, 18
 K                                                           option buttons, 186, 187
                                                             output, 7, 8, 9, 15, 25, 32, 47, 51-56, 63, 64, 67-72, 74,
keyPress, 6                                                     76-78, 80, 83 - 85, 88, 100-101, 104-105, 109, 112

 L                                                             P
Label, 6, 12, 16, 210, 220                                   password, 29-30, 36, 38-39, 62, 65-66, 225-226, 228,
Lcase function, 82                                              229, 237, 238, 241
Left function, 81                                            PasswordChar, 36, 226-228
Len function, 80                                             Picture Box, 16, 105
line control, 102                                            predefined formats, 76
Line method, 108, 116                                        Print, 7-9, 24, 45-46, 51-55, 63, 67, 69, 70-75, 78, 80, 83,
list box, 1, 17, 50, 97, 102, 103, 116, 121, 125                95, 176, 209, 213
List Box, 17, 19- 21, 121                                    project window, 3
ListIndex, 17, 43, 103, 114 -115, 122-124, 126-128           properties, 3, 10-14, 16, 21-22, 24, 37-38, 76, 102, 105,
Literals, 27                                                    111, 118, 133-136, 138-139, 141, 147, 198, 215, 220,
LoadPicture, 16, 21, 105-106, 111-112, 115, 159-160,            221, 225-226, 228, 230, 233, 238
    162, 165-166, 201-203                                    properties window, 13, 16
LoadPicture method, 16, 105, 160                             Pset method, 107, 108, 116
LocationName, 234 -235, 237                                  Public, 84, 87, 94
LocationURL, 234                                             Public statement, 94
Log, 24, 63, 66-67, 69
logical operators, 34, 35, 39
Long, 26                                                       Q
Loop Until, 45-46, 48, 213                                   QBASIC, 1
Loop While, 45-46, 48, 210, 242                              QUICKBASIC, 1
Ltrim function, 81


 M                                                             R
                                                             radian, 68
mathematical functions, 24, 63, 69                           random integer, 64
MaxButton, 11                                                randomization process, 149, 158, 198
maximize, 11, 13                                             randomize, 63, 167, 187
memory game, 194, 207                                        Reading a text file, 209
message box, 57, 59-61                                       RecordSource, 215, 223
Microsoft ActiveX Data Control 6, 219                        Refresh command, 233
Microsoft Common Dialog Control 6.0, 103                     reversi, 169, 184
Microsoft Excel, III, 90, 91                                 Right function, 80
Microsoft Internet Control, 233                              RND function, 14
Microsoft Internet Transfer Control 6.0, 238                 Round, 63, 66, 67, 69, 70
Microsoft Multimedia Control, 117, 118, 120, 122, 125,       rounded rectangle, 18, 21, 102
   158, 160, 197                                             rounded square, 18, 21, 149
Mid function, 81                                             Rtrim function, 81
midi files, 117, 120, 122                                    runtime, 13, 14, 16, 22, 105, 142, 185, 208, 219
minButton, 11
minimize, 11, 13
Mod, 31, 33                                                    S
Modulus, 31
Move Method, 144                                             scroll bar, 142
mp3, 117, 125-128                                            Select Case, 24, 40, 42- 44, 88, 103, 173, 186, 187,
mpeg, 117, 125-128                                              190-193, 201, 203, 240, 242, 244
MS Access, 215, 229                                          Shape, 14, 19, 102-104
MsgBox( ), 57                                                shape control, 18, 102-103, 146
multimedia files, 117, 122                                   Sin, 24, 63, 68-69, 197, 204
Multimedia player, 117                                       sine, 68-69
multiplication operator, 7                                   Single, 11, 26-27, 42, 136-137, 149, 173
                                                             slot machine, 158, 166
                                                             source code window, 5
                                                             Space function, 72
4
Sqr, 24, 63, 66, 184
Standard EXE, 2
                                                               V
statements, 6, 17, 18, 22, 26, 29, 30, 34, 37, 40-41, 43,    Val, III, 15, 24 -25, 30, 35, 44, 80, 82, 161-163, 181, 191,
    45, 48, 51, 54, 70, 121, 125, 134, 138, 142, 160, 180,      193, 204
    187, 189, 195, 198, 235, 238, 240                        variables, 8, 25-26, 28-32, 47, 63, 94, 147, 160
step increment, 51                                           Variant, 27, 29, 32, 84-85, 87-88, 90, 149, 161, 180, 200,
Str, 24-25, 71, 73, 80, 82, 161-162, 164, 176-184, 191,         201, 235, 236
    193, 202, 207                                            vbAbort, 58
string, 9, 15, 24, 27, 29-31, 41, 43, 61, 71, 81, 82, 100    vbAbortRetryIgnore, 58
String concatenation, 31                                     vbBlue, 18
subroutine, 139, 142                                         vbCancel, 58
subscript, 94, 95                                            vbCritical, 60
suffix, 27, 98                                               vbExclamation, 60
summation, 15, 47, 48                                        vbIgnore, 58
syntax, 16, 22-23, 41, 105, 144, 209, 210, 213, 234, 238     vbInformation, 60
                                                             vbNo, 58
                                                             vbOk, 58
 T                                                           vbOkCancel, 58
Tan, 24, 63, 68, 69                                          vbOkOnly, 58
tangent, 68, 69                                              vbQuestion, 60
Text Box, 15                                                 VbRed, 18, 107, 108
text file, 208-209, 212-213, 214                             vbRetry, 58
timer, 23, 38, 76, 141-142, 144, 158, 195                    vbRetryCancel, 58
Toolbox, 3                                                   vbTab, 47, 48, 49
trigonometric functions, 68                                  vbYes, 58, 224, 231
Ttrim function, 81                                           vbYesNo, 58, 224, 231
twips, 108, 133-134, 144, 147, 199                           vbYesNoCancel, 58, 60
two dimension array, 98                                      video files, 117, 122, 125, 129
                                                             Visual Basic Editor, 90, 91

 U
                                                               W
Ucase, III, 41, 80, 82
Uniform Resource Locator, 234                                wav, 117, 121-123, 126-127, 157-158, 164-165, 196, 205,
URL, 234 -238, 241                                             206
user-defined Format, 74                                      wave audio files, 121
                                                             web browser, 233-234, 237, 244
                                                             While… Wend, 45

Visual Basic 6.0

  • 2.
    II Disclaimer Visual Basic ®Made Easy- A complete tutorial for beginners is an independent publication and is not affiliated with, nor has it been authorized, sponsored, or otherwise approved by Microsoft Corporation. Trademarks Microsoft, Visual Basic, Excel, Acess and Windows are either registered trademarks or trademarks of Microsoft Corporation in the United States and/or other countries. All other trademarks belong to their respective owners. Liability The purpose of this book is to provide a basic guide for people interested in Visual Basic® programming. Although every effort and care has been taken to make the information as accurate as possible, the author shall not be liable for any error, harm or damage arising from using the instructions given in this book. Copyright © 2006 Liew Voon Kiong All rights reserved. No Part of this e-book may be reproduced, in any form or by any means,without permission in writing from the author. ISBN: 141962895X
  • 3.
    I Acknowledgement I would like to express my sincere gratitude to many people who have made their contributions in one way or another to the successful publication of this book. My special thanks go to my children Xiang, Yi and Xun. My daughter Xiang edited this book while my sons Yi and Xun contributed their ideas and even wrote some of the sample programs for this book. I would also like to appreciate the support provided by my beloved wife Kim Huang and my youngest daughter Yuan. I would also like to thank the million of visitors to my Visual Basic ® Tutorial website at www.vbtutor.net, especially those who contributed their comments, for their support and encouragement. Finally, I would like to thank my publisher BookSurge for the guidance and assistance in producing this book. About the Author Dr. Liew Voon Kiong holds a bachelor degree in Mathematics, a master degree in Management and a doctoral degree in Business Administration. He has been involved in programming for more than 15 years. He created the popular online Visual Basic Tutorial at www.vbtutor.net in 1996 and since then the web site has attracted millions of visitors and it is one of the top searched Visual Basic® Tutorial websites in many search engines including Google. In order to provide more support for the Visual Basic hobbyists, he has written this book based on the Visual Basic tutorial.
  • 4.
    II CONTENTS ACKNOWLEDGEMENT ...........................................................................................................................I ABOUT THEAUTHOR .............................................................................................................................I LESSON 1 INTRODUCTION TO VISUAL BASIC ................................................................................1 1.1 A Brief Description of Visual Basic ..................................................................................................................1 1.2 The Visual Basic Environment .........................................................................................................................2 LESSON 2 BUILDING THE VISUAL BASIC APPLICATIONS ............................................................5 2.1 Creating Simple Visual Basic Applications.....................................................................................................5 2.2 Steps in Building a Visual Basic Application ................................................................................................10 LESSON 3 WORKING WITH CONTROLS .........................................................................................13 3.1 The Properties of the Controls .......................................................................................................................14 LESSON 4 WRITING THE CODES .....................................................................................................23 LESSON 5 VISUAL BASIC DATA ......................................................................................................27 5.1 Types of Visual Basic Data.............................................................................................................................27 LESSON 6 MANAGING VISUAL BASIC DATA .................................................................................31 6.1 Assigning Values to the Variables .................................................................................................................31 6.2 Arithmetic Operators in Visual Basic.............................................................................................................31 LESSON 7 CONTROLLING PROGRAM FLOW – PART I..................................................................35 7.1 Conditional Operators .....................................................................................................................................35 7.2 Logical Operators.............................................................................................................................................35 7.3 Using If.....Then.....Elseif….Else Statements with Operators ....................................................................36 LESSON 8 CONTROLLING PROGRAM FLOW – PART II................................................................41 8.1 The Select Case …. End Select Statement .................................................................................................41 LESSON 9 LOOPING PART I .............................................................................................................46 9.1 Do….. Loop......................................................................................................................................................46 9.2: Exiting the Do Loop ........................................................................................................................................49 9.3 The While….Wend Loop.................................................................................................................................50 LESSON 10 LOOPING PART II ...........................................................................................................52 10.1 The For....Next Loop .....................................................................................................................................52 10.2 Exiting the For….Next Loop .........................................................................................................................54 10.3 The Nested Loop ...........................................................................................................................................55 LESSON 11 VISUAL BASIC FUNCTIONS- PART I ............................................................................58 11.1 Introduction to Visual Basic Functions........................................................................................................58 11.2 The MsgBox ( ) Function ..............................................................................................................................58 11.3 The InputBox( ) Function ..............................................................................................................................62 LESSON 12 VISUAL BASIC FUNCTIONS- PART II ...........................................................................64 12.1 The Rnd Function ..........................................................................................................................................64 12.2 The Numeric Functions.................................................................................................................................67 12.3 Trigonometric Functions ...............................................................................................................................69 LESSON13 VISUAL BASIC FUNCTIONS PART III- FORMATTING OUTPUT 71 13.1 The Tab Function..........................................................................................................................................71 13.2 The Space Function ......................................................................................................................................73 13.3 The Format Function...................................................................................................................................74 13.4 Formatting Date and Time............................................................................................................................77 LESSON14 VISUAL BASIC FUNCTIONS PART IV- MANIPULATING STRINGS 80 14.1 The Len Function..........................................................................................................................................81 14.2 The Right Function .......................................................................................................................................82 14.3 The Left Function...........................................................................................................................................82 14.4 The Ltrim Function.........................................................................................................................................82
  • 5.
    III 14.5 The Rtrim Function ........................................................................................................................................82 14.6 The Trim function...........................................................................................................................................82 14.7 The Mid Function ...........................................................................................................................................83 14.8 The InStr function ..........................................................................................................................................83 14.9 The Ucase and the Lcase functions............................................................................................................83 14.10 The Str and Val functions ...........................................................................................................................83 14.11 The Chr and the Asc functions ..................................................................................................................83 LESSON 15 VISUAL BASIC FUNCTIONS PART V- CREATING YOUR OWN FUNCTIONS 81 LESSON 16 CREATING VISUAL BASIC FUNCTIONS FOR MS EXCEL ..........................................91 16.1 The Needs to Create User-Defined Functions in MS-Excel ....................................................................91 16.2 Using Microsoft Excel Visual Basic Editor.................................................................................................92 LESSON 17 ARRAYS PART I..............................................................................................................96 17.1 Introduction to Array ......................................................................................................................................96 17.2 Declaring Arrays ............................................................................................................................................96 17.3 The Control Array ..........................................................................................................................................99 LESSON 18 ARRAYS PART II- TWO DIMENSIONAL ARRAYS .......................................................96 LESSON 19 GRAPHICS.....................................................................................................................104 19.1 The line and Shape controls ......................................................................................................................104 19.2 The Image Box and the Picture Box .........................................................................................................107 19.3 PSet, Line and Circle Drawing Methods...................................................................................................109 LESSON 20 CREATING MULTIMEDIA APPLICATIONS .................................................................120 20.1 Creating a CD Player ..................................................................................................................................120 20.2 Creating an Audio Player............................................................................................................................123 20.3 Creating a Multimedia Player .....................................................................................................................128 LESSON 21 ANIMATION - PART I ....................................................................................................139 LESSON 22 ANIMATION - PART II ...................................................................................................139 22.1 Animation using a drag and drop procedure............................................................................................139 22.2 Animation with complete motion................................................................................................................140 LESSON 23 ANIMATION - PART III ..................................................................................................144 23.1 Animation using timers................................................................................................................................144 23.2 Animation using the Move Method ............................................................................................................147 LESSON 24 FUN AND GAMES PROGRAMMING- PART I..............................................................170 24.1 Snake Chess ................................................................................................................................................148 24.2 The Slot Machine.........................................................................................................................................148 LESSON 25 FUN AND GAMES PROGRAMMING- PART II.............................................................170 25.1 Boggle ...........................................................................................................................................................170 25.2 Reversi ..........................................................................................................................................................172 25.3 Calculator......................................................................................................................................................180 LESSON 27 WORKING WITH FILES ................................................................................................212 27.1 Introduction ...................................................................................................................................................212 27.2 Creating a Text File .....................................................................................................................................212 27.3 Reading a File ..............................................................................................................................................213 LESSON 28 CREATING BASIC DATABASE APPLICATIONS IN VISUAL BASIC ........................219 LESSON 29 CREATING DATABASE APPLICATIONS USING ADO CONTROL ...........................223 LESSON 30 INTERNET AND WEB APPLICATIONS .......................................................................238 30.1 The Web Browser ........................................................................................................................................242 30.2 The FTP program ........................................................................................................................................242
  • 6.
    1 Lesson 1 Introduction to Visual Basic A brief description of Visual Basic Getting to know the Visual Basic environment 1.1 A brief description of Visual Basic VISUAL BASIC® is a high level programming language evolved from the earlier DOS version called BASIC. BASIC stands for Beginners' All-purpose Symbolic Instruction Code. The program codes in Visual Basic resemble the English language. Different software companies produce different versions of BASIC, such as Microsoft® QBASIC, QUICKBASIC, GWBASIC, and IBM BASICA and so on. Visual Basic is a fairly easy programming language and it is for anybody who is interested in programming but lacks professional training in software engineering. Learning VISUAL BASIC will help young children to improve their logical thinking skills and develop their minds. You can choose to program in VISUAL BASIC purely for fun and enjoyment or create more advanced applications such as educational courseware and commercial software. VISUAL BASIC is a visual and events driven programming Language. These are the main divergences from the old BASIC. In BASIC, programming is done in a text- based environment and the program is executed sequentially. In VISUAL BASIC, programming is done in a graphical environment. In old BASIC, you have to write a text-based procedure to design the interface, but Visual Basic enables you to design the interface by dragging and resizing the objects as well as changing their colors, just like any windows®-based programs. Visual Basic is event-driven because users may click on a certain object randomly, so each object has to be programmed independently to be able to response to those actions (events). Examples of events are clicking a command button, entering text into a text box, selecting an item in a list box etc. Therefore, a VISUAL BASIC Program is made up of many subprograms, each with its own program code which
  • 7.
    2 can be executedindependently and at the same time can be linked together in one way or another. 1.2 The Visual Basic Environment Upon start up, Visual Basic 6.0 will display the dialog box as shown in Figure 1.1. You can choose to start a new project, open an existing project or select a list of recently opened programs. A project is a collection of files that make up your application. There are various types of applications that can be created; however, we shall concentrate on creating Standard EXE programs (EXE means executable program). Now, click on the Standard EXE icon to go into the VISUAL BASIC programming environment. Figure 1.1 The Visual Basic Start-up Dialog Box
  • 8.
    3 Figure 1.2: TheVisual Basic Environment In Figure 1.2, the Visual Basic Environment consists of • A blank form for you to design your application's interface. • The project window which displays the files that are created in your application. • The properties window which displays the properties of various controls and objects that are created in your application. It also has a Toolbox that consists of all the controls essential for developing a VISUAL BASIC Application. The controls include text boxes, command buttons, labels, combo boxes, picture boxes, image boxes, timers and other objects that can be dragged to and drawn on the form to perform certain tasks according to the events assigned to them. You may also add additional objects. First, click on the project item on the menu, then on the components item on the drop-down list, and lastly select the controls you want to use in your program. The controls for Standard.EXE window are shown in Figure 1.3.
  • 9.
    4 Figure 1.3: Thecontrols available for a Standard.exe project PictureBox Label TextBox Frame CommandButton CheckBox OptionButton ComboBox ListBox HScrollBar VScrollBar Timer DriveListBox DirListBox FileListBox Shape Line Image Data OLE Exercise 1 1. Write down the meaning of BASIC. 2. Briefly explain the difference between VISUAL BASIC and the old BASIC. 3. List out all the controls in a Standard.exe Visual Basic project.
  • 10.
    5 Lesson 2 Building the Visual Basic Applications Creating simple Visual Basic Applications. Getting to know the steps in building a Visual Basic Application. 2.1 Creating Simple Visual Basic Applications In this section, we are not going into the technical aspects of VISUAL BASIC programming. The main purpose of this section is to let you get a feel for it. Now, you can try out a few examples in this lesson. Example 2.1 is a simple program. First of all, you have to launch Microsoft Visual Basic. Normally, a default form Form1 will be available for you to start your new project. Double click on Form1, and the source code window as shown in Figure 2.1 will appear. The top of the source code window consists of a list of objects (on the left) and their associated events or procedures (on the right). In Figure 2.1, the object displayed is Form and the associated procedure is Load. Figure 2.1 The Source Code Window
  • 11.
    6 When you clickon the object box, the drop-down list will display a list of objects you have inserted into your form as shown in Figure 2.2. Here, you can see the form, the command button with the name Command1, the Label with the name Label1 and the PictureBox with the name Picture1. Similarly, when you click on the procedure box, a list of procedures associated with the object will be displayed as shown in Figure 2.3. Some of the procedures associated with the object Form are Activate, Click, DblClick (Double-Click), DragDrop, keyPress etc. Each object has its own set of procedures. You can select an object and write codes for any of its procedures in order to perform certain tasks. Figure 2.2: List of Objects
  • 12.
    7 Figure 2.3: Listof Procedures You do not have to worry about the beginning and the end statements (i.e. Private Sub Form_Load.......End Sub). Just key in the codes between the above two statements exactly as shown here. When you run the program, don’t be surprised that nothing shows up. In order to display the output of the program, you have to add the Form1.show statement like in Example 2.1 or you can just use the Form_Activate ( ) event procedure as shown in example 2.2. The command Print does not mean printing using a printer. Instead, it means displaying the output on the computer screen. Now, press F5 or click on the run button to run the program and you will get the output as shown in Figure 2.4. Example 2.1 Private Sub Form_Load ( ) Form1.show
  • 13.
    8 Print “Welcome to Visual Basic tutorial” End Sub Figure 2.4 : The output of example 2.1. You can also perform simple arithmetic calculations as shown in example 2.2. VISUAL BASIC uses * to denote the multiplication operator and / to denote the division operator. The output is shown in Figure 2.5, where the results are arranged vertically. Example 2.2 Private Sub Form_Activate ( ) Print 20 + 10 Print 20 - 10 Print 20 * 10 Print 20 / 10 End Sub Figure 2.5: The output of example 2.2
  • 14.
    9 Example 2.2 canalso be written as Private Sub Form_Activate ( ) Print 20 + 10, 20 – 10, 20 * 10, 20 / 10 End Sub The numbers will be arranged in a horizontal line separated by spaces as shown in Figure 2.6: Figure 2.6: Output in a horizontal line Example 2.3 is an improved version of example 2.2 as it employs two variables, x and y, and assigns initial values of 20 and 10 to them respectively. When you need to change the values of x and y, just change the initial values rather than changing every individual value which is more time consuming. Example 2.3 Private Sub Form_Activate ( ) x = 20 y = 10 Print x + y Print x - y Print x * y Print x / y End Sub
  • 15.
    10 You can alsouse the + or the & operator to join two or more texts (string) together like in example 2. 4 (a) and (b) Example 2.4(a) Example 2. 4(b) Private Sub Form_Activate () Private Sub Form_Activate () A = "Tom " A = "Tom " B = “likes " B = “likes " C = “to " C = “to " D = “eat " D = “eat " E = “burgers." E = “burgers." Print A + B + C + D + E Print A & B & C & D & E End Sub End Sub The output is as shown in Figure 2.7 Figure 2.7: The Output of Example 2.4(a) &(b) 2.2 Steps in Building a Visual Basic Application Generally, there are three basic steps in building a VISUAL BASIC application. The steps are as follows: Step 1: Design the interface Step 2: Set the properties of the controls (Objects) Step 3: Write the events' procedures Example 2.5 This program is a simple program that calculates the volume of a cylinder.
  • 16.
    11 Figure 2.8 AProgram to Calculate the Volume of a Cylinder First of all, go to the properties window and change the form caption to Volume of Cylinder, then drag and insert three labels into the form and change their captions to Base Radius, Height and Volume respectively. After that, insert three text boxes and clear its text contents so that you get three empty boxes. Name the text boxes as radius, hght and volume respectively. Lastly, insert a command button and change its caption to O.K and its name to OK. Now save the project as cylinder.vbp and the form as cylinder.frm. For now we shall leave out the codes which you will learn in the following lessons. Example 2.6 Designing an attractive and user friendly interface is the first step in constructing a VISUAL BASIC program. To illustrate this point, let's look at the calculator program. Fig 2.9 Calculator
  • 17.
    12 Follow the stepsbelow to design the calculator interface: • Resize the form until you get the size you are satisfied with. • Go to the properties window and change the default caption of the form to the caption you like, such as Calculator. • Change the other properties of the form, such as background color, foreground color, and border style. For this particular program, I recommend you set the following properties for Form1: • BorderStyle Fixed Single MaxButton False minButton True These properties will ensure that the users cannot resize or maximize your calculator window, but will be able to minimize the window. • Draw the Display Panel by clicking on the Label button and place your mouse on the form. Start drawing by pressing down your mouse button and dragging it. • Click on the panel and the corresponding properties window will appear. Clear the default label so that the caption is blank. It is better to set the background
  • 18.
    13 color to a brighter color while the foreground color should be of a darker color like black (for easy viewing). Change the name to ‘display’ as I am going to use it later to write codes for the calculator. • Now draw the command buttons that are necessary to operate a calculator. I suggest you follow exactly what is shown in the image above. Now run the project by pressing F5. If you are satisfied with the appearance, go ahead and save the project. Exercise 2 1. Write down the list of procedures which are associated with the Form object. 2. Write a program to display the sentence “I like Visual Basic”. 3. Write a program to compute the value of 1500+1000-450x10+300÷5 4. Assigning a value of 9 to X and a value of 13 to y, write a program to compute the values of 2x+y, (x+y)÷2 and x2y Lesson 3 Working with Controls Setting the properties of the controls
  • 19.
    14 Learning how to work with the controls 3.1 The Properties of the Controls Before writing an event procedure for the control to respond to a user's input, you have to set certain properties for the control to determine its appearance and how it will work with the event procedure. You can set the properties of the controls in the properties window or at runtime. Figure 3.1 Figure 3.1 on the right is a typical properties window for a form. You can rename the form caption to any name you like. In the properties window, the item which appears at the top part is the object currently selected (in Figure 3.1, the object selected is Form1). At the bottom part, the items listed in the left column represent the names of various properties associated with the selected object while the items listed in the right column represent the states of the properties. Properties can be set by highlighting the items in the right column and then changing them by typing or selecting the options available. For example, in order to change the caption, just highlight Form1 under the name Caption and change it to another name. You may also alter the appearance of the form by setting it to 3D or flat. And you can do other things like changing the foreground and background color, changing the font type and font size, enabling or disabling the minimize and maximize buttons etc. You can also change the properties at runtime to produce special effects such as changing of colors, shape, animation effects and so on. For example the following code will change the form color to red every time the form is loaded. VISUAL BASIC uses the hexadecimal system to represent colors. You can check the color codes in the properties window which are shown under ForeColor and BackColor .
  • 20.
    15 Private Sub Form_Load() Form1.Show Form1.BackColor = &H000000FF& End Sub Another example is to change the control Shape to a particular shape at runtime by writing the following code. This code will change the shape to a circle at runtime. Later you will learn how to change the shapes randomly by using the RND function. Private Sub Form_Load() Shape1.Shape = 3 End Sub I would like to stress that learning how and when to set the objects' properties is very important as it can help you to write a good program. So, I advise you to spend a lot of time playing with the objects' properties. I am not going into the details on how to set the properties, however, I would like to stress a few important points: • You should set the Caption Property of a control clearly so that the user knows what to do with that command. For example, in the calculator program, as all the captions of the command buttons such as +, - , MC, MR are commonly found in an ordinary calculator, the user should have no problems in manipulating the buttons. • A lot of programmers like to use a meaningful name for the Name Property because it is easier for them to write and read the event procedure and easier to debug or modify the programs later. However, it is not a must to do that as long as you label your objects clearly and use comments in the program whenever you feel necessary. • One more important property is whether the control is being enabled or not. • Finally, you must also consider making the control visible or invisible at runtime, or when should it become visible or invisible. 3.2 Handling some of the common controls a) The Text Box
  • 21.
    16 The text boxis the standard control that is used to receive input from the user as well as to display the output. It can handle string (text) and numeric data but not images or pictures. Strings in a text box can be converted to numeric data by using the function Val(text). The following example illustrates a simple program that processes input from the user. Example 3.1 In this program, two text boxes are inserted into the form together with a few labels. The two text boxes are used to accept input from the user and one of the labels will be used to display the sum of two numbers that are entered into the two text boxes. A command button is also programmed to calculate the sum of the two numbers using the plus operator. The program creates a variable, ‘sum’, to accept the summation of values from the Text1 textbox and the Text2 textbox.The procedure to calculate and display the output on the label is shown below. The output is shown in Figure 3.1. Private Sub Command1_Click() ‘To add the values in The Text1 textbox and the Text2 textbox Sum = Val(Text1.Text) + Val(Text2.Text) ‘To display the answer on label 1 Label1.Caption = Sum End Sub Figure 3.1 b) The Label
  • 22.
    17 The label isa very useful control for Visual Basic, as it is not only used to provide instructions and guides to the users, it can also be used to display output. One of its most important properties is Caption. Using the syntax label.Caption, it can display text and numeric data. You can change its caption in the properties window and also at runtime. Please refer to Example 3.1 and Figure 3.1 for the usage of labels. c) The Command Button The command button is a very important control as it is used to execute commands. It displays an illusion that the button is pressed when the user clicks on it. The most common event associated with the command button is the Click event, and the syntax for the procedure is: Private Sub Command1_Click () Statements End Sub d) The Picture Box The Picture Box is one of the controls that used to handle graphics. You can load a picture during the designing phase by clicking on the picture item in the properties window and selecting the picture from the selected folder. You can also load the picture at runtime using the LoadPicture method. For example, this statement will load the picture grape.gif into the picture box. Picture1.Picture=LoadPicture ("C:VISUAL BASIC programImagesgrape.gif") You will learn more about the picture box in future lessons. The image in the picture box is not resizable. e) The Image Box The Image Box is another control that handles images and pictures. It functions almost identically to the picture box. However, there is one major difference. The image in an Image Box is stretchable, which means it can be resized. This feature is not available in the Picture Box. Similar to the Picture Box, the LoadPicture method can also be used. For example, this statement loads the picture grape.gif into the image box. Image1.Picture=LoadPicture ("C:VISUAL BASIC programImagesgrape.gif") f) The List Box
  • 23.
    18 The function ofthe List Box is to present a list of items. The user can click and select items from this list. In order to add items to it, use the AddItem method. For example, if you wish to add a number of items to List box 1, you can key in the following statements Example 3.2 Private Sub Form_Load ( ) List1.AddItem “Lesson1” List1.AddItem “Lesson2” List1.AddItem “Lesson3” List1.AddItem “Lesson4” End Sub The items in the list box can be identified by the ListIndex property, the value of the ListIndex for the first item is 0, the second item has a ListIndex 1, and the second item has a ListIndex 2 and so on. g) The Combo Box The function of the Combo Box is also to present a list of items. However, the user needs to click on the small arrowhead on the right of the combo box to see the items which are presented in a drop-down list. In order to add items to the list, you can also use the AddItem method. For example, if you wish to add a number of items to Combo Box 1, you can key in the following statements Example 3.3 Private Sub Form_Load ( ) Combo1.AddItem “Item1” Combo1.AddItem “Item2” Combo1.AddItem “Item3” Combo1.AddItem “Item4” End Sub h) The Check Box
  • 24.
    19 The Check Boxcontrol lets the user select or unselect an option. When the Check Box is checked, its value is set to 1 and when it is unchecked, the value is set to 0. You can include the statements Check1.Value=1 to mark the Check Box and Check1.Value=0 to unmark the Check Box, and use them to initiate certain actions. For example, the program will change the background color of the form to red when the check box is unchecked and it will change to blue when the check box is checked. You will learn about the conditional statement If….Then….Elseif in later lessons. VbRed and vbBlue are color constants and BackColor is the background color property of the form. Example 3.4 Private Sub Check1_Click () If Check1.Value = 0 Then Form1.BackColor = vbRed ElseIf Check1.Value = 1 Then Form1.BackColor = vbBlue End If End Sub i) The Option Button The Option Button also lets the user select one of the choices. However, two or more Option Buttons must work together because if one of the Option Buttons is selected, the other Option Buttons will be unselected. In fact, only one Option Button can be selected at one time. When an option button is selected, its value is set to “True”, and when it is unselected, its value is set to “False”. In the following example, the shape control is placed in the form together with six Option Buttons. When the user clicks on different option buttons, different shapes will appear. The values of the shape control are 0, 1, 2, 3, 4, and 5 which will make it appear as a rectangle, a square, an oval shape, a rounded rectangle and a rounded square respectively. Example 3.5
  • 25.
    20 Private Sub Option1_Click ( ) Shape1.Shape = 0 End Sub Private Sub Option2_Click() Shape1.Shape = 1 End Sub Private Sub Option3_Click() Shape1.Shape = 2 End Sub Private Sub Option4_Click() Shape1.Shape = 3 End Sub Private Sub Option5_Click() Shape1.Shape = 4 End Sub Private Sub Option6_Click() Shape1.Shape = 5 End Sub j) The Drive List Box The Drive List Box is used to display a list of drives available in your computer. When you place this control into the form and run the program, you will be able to select different drives from your computer as shown in Figure 3.2 Figure 3.2 The Drive List Box k) The Directory List Box
  • 26.
    21 The Directory ListBox is used to display the list of directories or folders in a selected drive. When you place this control into the form and run the program, you will be able to select different directories from a selected drive in your computer as shown in Figure 3.3 Figure 3.3 The Directory List Box l) The File List Box The File List Box is used to display the list of files in a selected directory or folder. When you place this control into the form and run the program, you will be able to see a list of files in a selected directory as shown in Figure 3.4: Figure 3.4 *You can coordinate the Drive List Box, the Directory List Box and the File List Box to search for the files you want. This procedure will be discussed in later lessons.
  • 27.
    22 Exercise 3 1. Start a Visual Basic project and set the following properties of the form a. Appearance=Flat b. Caption=My First Program c. Font=Times New Roman, Font Size=10 d. Forecolor=White e. Backcolor=Blue 2. Insert six shape controls into the form and set their shape properties to rectangle, square, oval, circle, rounded rectangle, and rounded square. 3. Insert two text boxes, one label and one command button, then write the program to compute the product of two numbers that are entered into the text boxes and display the result in the label. 4. Insert a picture control in the form and load a picture from your computer using the LoadPicture Method. 5. Insert a List Box control into the form and add 5 items into the List Box using the AddItem Method.
  • 28.
    23 Lesson 4 Writing the Codes Learning about the Visual Basic program structure. Setting the properties of the controls at runtime. Getting to know some basic syntax. In lesson 2 and lesson 3, you have learned how to enter program code and run sample VISUAL BASIC programs but without much understanding of the logics of VISUAL BASIC programming. Therefore in this lesson we will tackle a few basic rules about writing VISUAL BASIC program codes. Each control or object in VISUAL BASIC can usually run many kinds of events or procedures. These events are listed in the dropdown list in the code window which is displayed when you click on the procedures’ box after double-clicking on an object (refer to Figure 2.3). Among the events are loading a form, clicking of a command button, pressing a key on the keyboard or dragging an object etc. For each event, you need to write an event procedure so that an action or a series of actions can be performed. To start writing an event procedure, you need to double-click an object. For example, when you double-click on the command button, the code window will appear showing an event procedure: Private Sub Command1_Click (Key in your program code here) End Sub You then need to key in the procedure in the space between Private Sub Command1_Click............. End Sub. The program code is made up of a number of statements that set certain properties or trigger some actions. The syntax of Visual Basic’s program code is almost like English though not exactly the same, so it is very easy to learn.
  • 29.
    24 The syntax toset the property of an object or to assign certain values to it where Object and Property are separated by a period is: Object.Property For example, the statement Form1.Show means to show the form with the name Form1, Iabel1.Visible=true means Label1 is set to be visible, Text1.text= “VISUAL BASIC” is to assign the text VISUAL BASIC to the text box with the name Text1, Text2.text=100 is to assign a value of 100 to the text box with the name Text2, Timer1.Enabled=False is to disable the timer with the name Timer1 and so on. Let’s examine a few examples below: Example 4.1 Private Sub Command1_click Label1.Visible=False Label2.Visible=True Text1.Text=”You are correct!” End sub Example 4.2 Private Sub Command1_click Label1.Caption=” Welcome” Image1.visible=True End sub Example 4.3 Private Sub Command1_click Pictuire1.Show=true Timer1.Enabled=True Lable1.Caption=”Start Counting End sub In example 4.1, clicking on the command button will make Label1 become invisible and Label2 become visible, and the text ”You are correct” will appear in the Text1 textbox. In example 4.2, clicking on the command button will make the caption of Label1 change to “Welcome” and Image1 will become visible. For example, clicking
  • 30.
    25 on the commandbutton will make Picture1 show up, the timer start running and the caption of Label1 change to “Start Counting”. Syntaxes that do not involve the setting of properties are also English-like. Some of the commands are Print, If…Then….Else….End If, For…Next, Select Case…..End Select, End and Exit Sub. For example, Print “Visual Basic” is to display the text Visual Basic on screen and End is to end the program. Other commands will be explained in details in the coming lessons. Program codes which involve calculations are very easy to write, as they are similar to mathematics. However, in order to write an event procedure that involves calculations, you need to know the basic arithmetic operators in VISUAL BASIC as they are not exactly the same as the normal operators that we use, except for + and - . For multiplication, we use *, for division we use /, for raising a number x to the power of n, we use x ^n and for square root, we use Sqr(x). There are also more advanced mathematical functions such as Sin, Cos, Tan, Log etc. Besides that, there are also two important functions that are related to arithmetic operations, i.e. the functions Val and Str where Val is to convert text into a numeric and Str is to convert a numeric into a string. While the function Str is not as vital because VISUAL BASIC can display numeric values as a string implicitly, failure to use Val will result in wrong calculation. Let’s examine example 4.4 and example 4.5. Example 4.4 Private Sub Form_Activate() Text3.text=Text1.text+Text2.text End Sub Example 4.5 Private Sub Form_Activate() Text3.text=val(Text1.text)+val(Text2.text) End Sub When you run the program in example 4.4 and enter 12 in the Text1 textbox and 3 in the Text2 textbox, it will give you a result of 123, which is wrong. It is because VISUAL BASIC treats the numbers as strings and so it just joins up the two strings. On the other hand, running example 4.5 will give you the correct result, i.e., 15.
  • 31.
    26 Now we shallwrite the codes for the cylinder program (the interface is shown in Figure 2.8). First of all, name the text boxes as radius, hght, and volume. To get the values of the various text boxes, use Val(radius.text), Val(hght.Text) and assign them to the variables r and h. In addition, assign the value 22/7 to the variable pi. After that, write the equation v = pi * (r ^ 2) * h to compute the value of the cylinder’s volume and then assign it to the variable v. Finally, display the value in the volume textbox using the function Str. Private Sub OK_Click( ) r = Val(radius.Text) h = Val(hght.Text) pi = 22 / 7 v = pi * (r ^ 2) * h volume.Text= Str(v) End Sub When you run the program, you should be able to see the interface as shown in Figure 2.8. Enter values in the radius box and the height box, and then click OK. The value of the Volume will be displayed in the volume box. I shall attempt to explain the above source program to newcomers in Visual Basic (If you are a veteran, you can skip this part). The program can be explained using pseudo codes as follows: • procedure for clicking the OK button to calculate the volume of cylinder • get the value of r from the radius text box • get the value of h from the height text box • assign a constant value 22/7 to pi • calculate the volume using the formula • output the results to the Volume text box • End of Procedure Exercise 4 1. Write a program to compute the area of a triangle. 2. Write a program to calculate the circumference and area of a circle.
  • 32.
    27 Lesson 5 Visual Basic Data Getting to know different types of Visual Basic data. Rules in naming the Visual Basic variables. Declaring variables using the Dim statements. There are many types of data that we come across in our daily life. For example, we need to handle data such as names, addresses, money, date, stock quotes, statistics etc everyday. Similarly in Visual Basic, we are also going to deal with these kinds of data. However, to be more systematic, VISUAL BASIC divides data into different types. 5.1 Types of Visual Basic Data a) Numeric Data Numeric data are data that consist of numbers, which can be computed mathematically with various standard operators such as add, minus, multiply, divide and so on. In Visual Basic, the numeric data are divided into 7 types, which are summarized in Table 5.1: Table 5.1: Numeric Data Types Type Storage Range of Values Byte 1 byte 0 to 255 Integer 2 bytes -32,768 to 32,767 Long 4 bytes -2,147,483,648 to 2,147,483,648 -3.402823E+38 to -1.401298E-45 for negative values Single 4 bytes 1.401298E-45 to 3.402823E+38 for positive values. -1.79769313486232e+308 to -4.94065645841247E-324 for negative values Double 8 bytes 4.94065645841247E-324 to 1.79769313486232e+308 for positive values. Currency 8 bytes -922,337,203,685,477.5808 to 922,337,203,685,477.5807 +/- 79,228,162,514,264,337,593,543,950,335 if no decimal is Decimal 12 bytes used
  • 33.
    28 +/- 7.9228162514264337593543950335 (28 decimal places). b) Non-numeric Data Types The non-numeric data types are summarized in Table 5.2 Table 5.2: Nonnumeric Data Types Data Type Storage Range String(fixed length) Length of string 1 to 65,400 characters String(variable length) Length + 10 bytes 0 to 2 billion characters Date 8 bytes January 1, 100 to December 31, 9999 Boolean 2 bytes True or False Object 4 bytes Any embedded object Variant(numeric) 16 bytes Any value as large as Double Variant(text) Length+22 bytes Same as variable-length string c) Suffixes for Literals Literals are values that you assign to a data. In some cases, we need to add a suffix behind a literal so that VISUAL BASIC can handle the calculation more accurately. For example, we can use num=1.3089# for a Double data type. Some of the suffixes are displayed in Table 5.3. Table 5.3 Suffix Data Type % Integer & Long ! Single # Double @ Currency In addition, we need to enclose string literals within two quotations and date and time literals within two # signs. Strings can contain any type of characters, including numbers. The following are a few examples: • memberName$="Turban, John."
  • 34.
    29 • TelNumber$="1800-900-888-777" • LastDay=#31-Dec-00# • ExpTime=#12:00 am# • Mark%=90 • profit@=1000.55 It should be noted that in most cases, it is not necessary to use suffixes as long as we declare the variables using the Dim statement. 5.2 Managing Variables Variables are like mail boxes in the post office. The contents of the variables change every now and then, just like mail boxes. In terms of VISUAL BASIC, variables are areas allocated by the computer memory to hold data. Like the mail boxes, each variable must be given a name. To name a variable in Visual Basic, you have to follow a set of rules. a) Variable Names The following are the rules when naming the variables in Visual Basic: It must be less than or equal to 255 characters. No spacing is allowed. It must not begin with a number. Periods are not permitted. Examples of valid and invalid variable names are displayed in Table 5.4 Table 5.4 Valid Name Invalid Name My_Car My.Car this year 1NewBoy Long_Name_Can_beUSE He&HisFather *& is not acceptable b) Declaring Variables In Visual Basic, one needs to declare the variables before using them by assigning names and data types. You can declare the variables implicitly or explicitly. For example, sum=Text1.text means that the variable sum is declared implicitly and ready to receive the input in the Text1 textbox. Other examples of implicit declaration
  • 35.
    30 are volume=8 andlabel=”Welcome”. On the other hand, for explicit declaration, variables are normally declared in the general section of the codes' window using the Dim statement. The format is as follows: Dim variableName as DataType Example 5.1 Dim password As String Dim yourName As String Dim firstnum As Integer Dim secondnum As Integer Dim total As Integer Dim doDate As Date You may also combine them in one line, separating each variable with a comma, as follows: Dim password As String, yourName As String, firstnum As Integer. If the data type is not specified, VISUAL BASIC will automatically declare the variable as a Variant. For string declaration, there are two possible formats, one for the variable-length string and another for the fixed-length string. For the variable-length string, just use the same format as Example 5.1 above. However, for the fixed-length string, you have to use the format as shown below: Dim VariableName as String * n, where n defines the number of characters the string can hold. For example, Dim yourName as String * 10 mean yourName can hold no more than 10 Characters. Exercise 5 1. List out all numeric and non-numeric data types. 2. State the rules in naming the variables. 3. Write five examples of valid variable names. 4. Use the Dim statements to declare three numeric variables and three non- numeric variables.
  • 36.
    31 Lesson 6 Managing Visual Basic Data Assigning values to the variables. Getting to know various arithmetic operators in Visual Basic. 6.1 Assigning Values to the Variables After declaring various variables using the Dim statements, we can assign values to those variables. The general format of an assignment is: Variable=Expression The variable can be a declared variable or a control property value. The expression could be a mathematical expression, a number, a string, a Boolean value (true or false) and etc. The following are some examples: firstNumber=100 secondNumber=firstNumber-99 userName="John Lyan" userpass.Text = password Label1.Visible = True Command1.Visible = false Label4.Caption = Text1 textbox.Text ThirdNumber = Val(usernum1.Text) total = firstNumber + secondNumber+ThirdNumber 6.2 Arithmetic Operators in Visual Basic In order to compute input from users and to generate results, we need to use various mathematical operators. In Visual Basic, except for + and -, the symbols for the operators are different from normal mathematical operators, as shown in Table 6.1.
  • 37.
    32 Table 6.1: ArithmeticOperators Operator Mathematical function Example ^ Exponential 2^4=16 * Multiplication 4*3=12 / Division 12/4=3 Modulus (returns the remainder from an Mod 15 Mod 4=3 integer division) Integer Division (discards the decimal places) 194=4 "Visual"&"Basic"="Visual + or & String concatenation Basic" Example 6.1 Dim firstName As String Dim secondName As String Dim yourName As String Private Sub Command1_Click() firstName = Text1.Text secondName = Text2.Text yourName = secondName + " " + firstName Label1.Caption = yourName End Sub In this example, three variables are declared as string. Variables firstName and secondName will receive their data from the user’s input into the Text1 textbox and the Text2 textbox, and the variable yourName will be assigned the data by combining the first two variables. Finally, yourName is displayed on Label1. Example 6.2 Dim number1, number2, number3 as Integer Dim total, average as variant Private sub Form_Click
  • 38.
    33 number1=val(Text1.Text) number2=val(Text2.Text) number3= val(Text3.Text) Total=number1+number2+number3 Average=Total/5 Label1.Caption=Total Label2.Caption=Average End Sub In example 6.2, three variables are declared as integers and another two variables are declared as variants. Variant means the variable can hold any numeric data type. The program computes the total and average of the three numbers that are entered into three text boxes. Example 6.3 Dim sellPrice As Currency Dim costPrice As Currency Dim profit As Currency Private Sub Command1_Click () sellPrice = Text1.Text costPrice = Text2.Text profit = sellPrice - costPrice Text3.Text = Format (profit, "Currency") End Sub In example 6.3, three variables namely sellprice, costPrice and Profit are formatted as currency because we are dealing with financial calculations. The output is formatted using the function Format (profit, “Currency”) which will display Profit in the Text3 textbox in the currency form, i.e. a $ sign and a number with two decimal places as shown in Figure 6.1. We will deal with the function Format again in a later lesson under formatting outputs.
  • 39.
    34 Figure 6.1 Calculationinvolving currency In the coming lessons, we will see how to write more complex VISUAL BASIC programs using mathematical operators and equations. Exercise 6 1. Write down the arithmetic operators in Visual Basic. 2. Write a program to calculate the values of the following arithmetic operations if the users input two numbers M and N into two separate text boxes. a) M^N b) M/N c) MN d) M Mod N
  • 40.
    35 Lesson 7 Controlling Program Flow – Part I Getting to know the conditional operators. Getting to know the logical operators. Using the If…..Then…Else …Elseif statements. Using timers and the Rnd function. 7.1 Conditional Operators To control the VISUAL BASIC program flow, we can use various conditional operators. Basically, they resemble mathematical operators. Conditional operators are very powerful tools which let the VISUAL BASIC program compare data values and then decide what action to take, whether to execute or terminate the program etc. These operators are shown in Table 7.1. Table 7.1: Conditional Operators Operator Meaning = Equal to > More than < Less than >= More than and equal to <= Less than and equal to <> Not equal to * You can also compare strings with the above operators. However, there are certain rules to follow: a. Upper case letters are lesser than lowercase letters b. "A"<"B"<"C"<"D".......<"Z" c. Numbers are lesser than letters. 7.2 Logical Operators In addition to conditional operators, there are a few logical operators that offer added power to the VISUAL BASIC programs. They are shown in Table 7.2.
  • 41.
    36 Table 7.2 Operator Meaning And Both sides must be true Or One side or other must be true Xor One side or other must be true but not both Not Negates truth 7.3 Using If.....Then.....Elseif….Else Statements with Operators To effectively control the VISUAL BASIC program flow, use the If...Then...Else statement together with the conditional operators and logical operators. The general format for the If...Then...Elseif….Else statement is as follows: If conditions Then VISUAL BASIC expressions Elseif VISUAL BASIC expressions Else VISUAL BASIC expressions End If * Any If...Then...Else statements must end with End If. Sometime it is not necessary to use Else. Example 7.1 Private Sub Command1_Click () firstnum = Val(Text1.Text) secondnum = Val(Text2.Text) total = firstnum + secondnum If total = Val(Text3.Text) And Val(Text3.Text) <> 0 Then Label1.Caption=”Yes, you are Correct” Else Label1.Caption=” Sorry, you’re wrong” End If End Sub
  • 42.
    37 In Example 7.1,the program adds the values entered in the Text1 textbox and the Text2 textbox and compares the answer with the answer entered by the user in the Text3 textbox. If both values are equal, Label1 will display the caption “Yes, you are Correct”, otherwise it will show the caption “Sorry, you’re wrong”. Example 7.2 Dim password As String Private Sub Command1_Click() If Text1.Text = password Then Text1.Visible = False Label1.Visible = True Label1.Caption = "Login Successful" Else Label1.Visible = True Label1.Caption = "Login Fail! Please enter your password again" Text1.Text = "" End If End Sub Private Sub Form_Load() password = "1234" End Sub Private Sub Text1_Click() Label1.Visible = False End Sub In Example 7.2, the program will check whether the password entered by the user matches the password assigned by the Form_Load procedure. If the two passwords match, then the textbox will disappear and the label will display “Login Successful”; otherwise the label will display "Login Fail! Please enter your password again" and the user has to key in the password again. One more thing that you need to do is set the PasswordChar of the Text1 textbox to the character you like (I prefer using * as it is commonly used) in the properties window so that the password entered will be
  • 43.
    38 hidden. This programcan be used as a login procedure for a database management program as the user needs to enter the password to search for the information stored in a database. The details of how to combine this procedure with the database management program will be discussed later. Example 7.3 'Guess a Number Dim realNumber As Integer Dim userNumber As Integer Private Sub Form_Load() realNumber = 99 End Sub Private Sub OK_Click() userNumber = entry.Text If userNumber > realNumber Then hint.Caption = "Your number is too big" entry.Text = "" ElseIf userNumber < realNumber Then hint.Caption = "Your number is too small" entry.Text = "" Else hint.Caption = "Congratulations, your number is correct" End If End Sub Example 7.3 is a ‘Guess a Number’ program. The user enters a number and the program gives hints whether the number entered is too big or too small. Once the answer is correct, the program will display a congratulatory message. The program uses the If…Then…ElseIf and Else statements together with the conditional operators >, < and = to control the program flow. In this program, the name of the Text1 textbox is renamed as entry and the caption is renamed to display the hint as hint. The statement entry.Text=”” is to clear the textbox if the number entered is incorrect so that the user can key in a number again without having to erase the
  • 44.
    39 number manually. Noticethat the condition userNumber=realNumber is not necessary as the Else statement will handle this condition implicitly. Example 7.4 This program is a password cracker where it can generate possible passwords and compare each of them with the actual password; and if the generated password is found to be equal to the actual password, login will be successful. In this program, a timer is inserted into the form and it is used to do a repetitive job of generating the passwords. The password generating procedure is put under the timer1_Timer () event so that the procedure is repeated after every interval. The interval of the timer can be set in its properties window where a value of 1 is 1 millisecond, so a value of 1000 is 1 second. The smaller the value, the shorter the interval. However, do not set the timer to zero because if you do that, the timer will not start. The Timer1.Enabled property is set to false so that the program will only start generating the passwords after you click on the command button. Rnd is a VISUAL BASIC function that generates a random number between 0 and 1. Multiplying Rnd by 100 will obtain a number between 0 and 100. Int is a VISUAL BASIC function that returns an integer by ignoring the decimal part of that number. Therefore, Int(Rnd*100) will produce a number between 0 and 99, and the value of Int(Rnd*100)+100 will produce a number between 100 and 199. Randomize timer is an essential statement which ensures that the generated numbers are truly random. Finally, the program uses If…Then…Else to check whether the generated password is equal to the actual password or not; and if they are equal, the password generating process will be terminated by setting the Timer1.Enabled property to false. The Program Dim password As Integer Dim crackpass As Integer Private Sub Command1_Click() Timer1.Enabled = True End Sub
  • 45.
    40 Private Sub Form_Load() password= 123 End Sub Private Sub Timer1_Timer() Randomize Timer crackpass = Int(Rnd * 100) + 100 If crackpass = password Then Timer1.Enabled = False Text1.Text = crackpass Label1.Visible = True Label1.Caption = "Password Cracked! Login Successful!" Else Text1.Text = crackpass Label1.Visible = True Label1.Caption = "Please wait..." End If End Sub Exercise 7 1. Write down all the conditional operators. 2. Write down all the logical operators. 3. Create a simple interactive children word game so that if the answer is correct, the program will display a congratulatory message and when the answer is wrong, the program will ask the child to try again. 4. Write a program to display a person’s socio economical status based on his income. For example, if the person’s income is less than $1000 per month, his socio economic status may be called poor, if his income is more than $1000 but less than $3000 per month, his socio economic status may be labeled as low income and so on.
  • 46.
    41 Lesson 8 Controlling Program Flow – Part II Using the Select Case …. End Select Statement Learning more about the usage of the Select Case …. End Select Statement through examples. 8.1 The Select Case …. End Select Statement In lesson 7, you have learned how to use the conditional statements If…..Then…ElseIf and Else to control the program flow. However, if you have a lot of conditional statements, using If..Then..Else statements could become very messy. For multiple conditional statements, it is always better to use the Select Case statement. The structure is shown as follows: Select Case expression Case value1 Block of one or more VISUAL BASIC statements Case value2 Block of one or more VISUAL BASIC Statements Case value3 Block of one or more VISUAL BASIC statements Case Else Block of one or more VISUAL BASIC Statements End Select Example 8.1 ‘To compute examination grades Dim grade As String Private Sub txtgrade_Change() grade = txtgrade.Text Select Case grade Case "A" result. Caption = "Distinction" Case "B"
  • 47.
    42 result.Caption = "Credit" Case "C" result.Caption = "Pass" Case Else result.Caption = "Fail" End Select End Sub In example 8.1, note that the grade is declared as a string, so all the case values such as "A" must be of the String data type. Also note that every select case statement must end with the End Select statement. When the program is run and the user keys in the grade into the text box named as txtgrade, it will look for the case value that matches the input and then display the result on the label named as result. The last statement Case Else means any case other than A, B, C will get the “fail” result. However, there are a couple of problems in the above program. If the user enters the lower case letters a, b or c and the result will be “fail” because the case values are the uppercase letters A, B, C. In addition, if the user keys in numeric values or other characters other than A, B, C, D, E, F (assuming these are the designated grades), the results will also be “fail”. In order to avoid the above problems, first of all you need to use the function Ucase to handle the first problem. The format is Ucase (txtgrade.Text). This will convert the lower case letters to the upper case letters. Secondly, you have to add two additional statements to handle grades D, E, F that are considered as fail and another statement to handle other kinds of inputs that are deemed as invalid data. The statement Case Is= “D”, “E”, “F” will include cases when the grade is D, E or F. The keyword to use here is Is and the cases are separated by commas. The last statement which uses the Case Else syntax will deem all other inputs as invalid. It is important for the cases to be exhaustive; i.e. we should take all possible cases into consideration so that no ambiguous results will occur. Example 8.1(b) is the corrected version.
  • 48.
    43 Example 8.2 Dim grade As String Private Sub txtgrade_Change() grade = UCase(txtgrade.Text) Select Case grade Case "A" result.Caption = "Distinction" Case "B" result.Caption = "Credit" Case "C" result.Caption = "Pass" Case Is = "D", "E", "F" result.Caption = "Fail" Case Else result.Caption = "invalid data" End Select End Sub Example 8.3 Dim mark As Single Private Sub Compute_Click () 'Examination Marks Private Sub mrk_Change() mark = mrk.Text Select Case mark Case 85 To 100 comment.Caption = "Excellent" Case 70 To 84 comment.Caption = "Good" Case 60 To 69 comment.Caption = "Above Average" Case 50 To 59 comment.Caption = "Average" Case 0 To 49
  • 49.
    44 comment.Caption = "Needs to work harder" Case Else comment.Caption = "Values out of range" End Select End Sub Example 8.3 is similar to the two preceding examples except that now it handles the numeric data rather than the string. This program uses the keyword to in order to specify the range of values. You can also use Case Is>=n or Case is<n to specify the range of numeric values. Example 8.4 This example will demonstrate a more complex mathematical application, a simple calculator that can perform four basic arithmetic calculations. In this program, the user just needs to enter two numbers and then select one of the four basic operators from the combo box and obtain the result. The user can perform the four basic calculations at one go for the same pair of numbers just by changing the operators. The program uses two text boxes and a combo box. A combo box is a control that allows the user to select an item from a group of items that are listed in the drop- down list. In order to add a list of items to the combo box, use the following statements and place them under the Private Sub Form_Load procedure: Combo1.AddItem "+" Combo1.AddItem "-" Combo1.AddItem "x" Combo1.AddItem "÷" Combo1 is the name of the combo box and AddItem is the method that adds items to the list in the combo box. To identify the items in the list, you can use the ListIndex property of the combo box. The first item will have a ListIndex of 0, the second item will have a ListIndex of 1 and so on. By employing the Select Case…. End Select statements and adding the necessary procedures that perform one of the four basic calculations under each item, the program fulfills its function as a simple calculator. Private Sub Combo1_Click () Select Case Combo1.ListIndex Case 0
  • 50.
    45 Label1 = Val(Text1.Text) + Val (Text2.Text) Case 1 Label1 = Val(Text1.Text) - Val (Text2.Text) Case 2 Label1 = Val (Text1.Text) * Val(Text2.Text) Case 3 Label1 = Val (Text1.Text) / Val (Text2.Text) End Select End Sub Private Sub Form_Load () Combo1.AddItem "+" Combo1.AddItem "-" Combo1.AddItem "x" Combo1.AddItem "÷" End Sub Exercise 8 1. Write a program using the Select Case statement to inform a person about his/her weight status based on the body mass index (BMI) where BMI=body weight in kilograms divided by the square of the height in meters. The weight status is usually shown in the table below: BMI Weight Status Below 18.5 Underweight 18.5 – 24.9 Normal 25.0 – 29.9 Overweight 30.0 and Above Obese 2. Write a program to classify people based on the color they like.
  • 51.
    46 Lesson 9 Looping Part I Understanding and using the Do…Loop Understanding and using the While…Wend Loop Very often we need to perform a task repeatedly in order to achieve our objective. This repetitive process is called looping in programming language. Visual Basic allows a procedure to be repeated many times until a condition is met. There are three kinds of loops in VISUAL BASIC, which are Do…. Loop , While… Wend and For…Next. 9.1 Do….. Loop The structure of a Do Loop command can be written in four different formats as shown below: a) Do While condition Block of one or more VISUAL BASIC statements Loop b) Do Block of one or more VISUAL BASIC statements Loop While condition c) Do Until condition Block of one or more VISUAL BASIC statements Loop d) Do Block of one or more VISUAL BASIC statements Loop Until condition Example 9.1 Private Sub Form_Activate Do while counter <10 counter =counter+1 Print Counter Loop
  • 52.
    47 End Sub In the above example, the value of counter will increase by 1 after each loop and it will keep on adding until counter = 10. The values are displayed Figure 9.1 Figure 9.1: Printout of example 9.1 Example 9.2, Example 9.3 and Example 9.4 produce the same result as above. Example 9.2 Private Sub Form_Activate() Do Counter = Counter + 1 Print Counter Loop Until Counter = 10 End Sub Example 9.3 Private Sub Form_Activate() Do Until Counter = 10 Counter = Counter + 1 Print Counter Loop End Sub Example 9.4 Private Sub Form_Activate() Do Counter = Counter + 1 Print Counter Loop While Counter < 10
  • 53.
    48 End Sub Example 9.4 Thefollowing example uses the Do…Loop procedure to find the summation of a sequence of numbers, or in mathematical terms, the summation of an arithmetic progression. In this example, we will attempt to find the summation of 1+2+3+4+……+100. In the design stage, you need to insert a list box into the form for displaying the output, named List1. The program uses the AddItem method to populate the list box. The statement List1.AddItem "n" & vbTab & "sum" will display the headings in the list box, where it uses the vbTab function to create a space between the headings n and sum. Two variables are declared here, where n acts as a counter and sum is the summation of the numbers. The mathematical logic is very simple. Initially, n and sum are set to 0. After the first loop, n=1 and sum=1. After the second loop, n will be equal to 2 (n=1+1) and sum will be equal to 3(sum=1+2); and the next loop will produce the result n=3 and sum=6 (sum=1+2+3). Using Do Until n=100, the program will obtain the summation of 1 to 100. In fact, this program produces the summation at every stage, where the output is displayed in a table form, as shown in Figure 9.2. Dim n, sum As Integer Private Sub Form_Activate() List1.AddItem "n" & vbTab & "sum" Do Until n = 100 n=n+1 sum = sum + n List1.AddItem n & vbTab & sum Loop End Sub Private Sub Form_Load () n=0 sum = 0 End Sub
  • 54.
    49 Figure 9.2:The summation of 1 to 100 9.2: Exiting the Do Loop In section 9.1, we have seen that how a Do loop is terminated when a certain condition is met with one of the four structures i.e. Do Until, Loop Until, Do While and Loop While. Without using the above four controlling statements, the loop will become infinite and it might cause the computer to hang. However, there is yet another way to terminate the loop, that is by using the statements If….Then and Exit Do. This means that when a condition is met, the program will exit from the loop. To demonstrate, let’s examine example 9.5. You will notice that instead of using the Do Until statement, I have replaced them with the If….Then… and Exit Do statements; and it produces the same result as in example 9.4. Example 9.5 Dim sum, n As Integer Private Sub Form_Activate() List1.AddItem "n" & vbTab & "sum" Do n=n+1
  • 55.
    50 Sum =Sum + n List1.AddItem n & vbTab & Sum If n = 100 Then Exit Do End If Loop End Sub Private Sub Form_Load () n=0 Sum = 0 End Sub 9.3 The While….Wend Loop The structure of a While….Wend Loop is very similar to the Do Loop. It takes the following format: While condition Statements Wend The above loop means that while the condition is not met, the loop will go on. The loop will end when the condition is met. Let’s examine the program listed in example 9.6 where it produces the same result as example 9.4 and example 9.5. Example 9.6 Dim sum, n As Integer Private Sub Form_Activate () List1.AddItem "n" & vbTab & "sum" While n <> 100 n=n+1 Sum = Sum + n List1.AddItem n & vbTab & Sum Wend
  • 56.
    51 End Sub Private Sub Form_Load() n=0 Sum = 0 End Sub Exercise 9 1. Write a program to add the all the even integers between 101 and 999 using a. The Do loop b. The While…… Wend Loop 2. Write a program to generate random integers between 1 and 1000 and if the integer 8 appears, the looping will stop and the program will prompt the user to try again. 3. Write a program to print the sentence “I like Visual Basic” twenty times using the While…Wend loop. 4. Write a program to show the geometrical progression in a list box as shown below:
  • 57.
    52 Lesson 10 Looping Part II Understanding and using the For…Next Loop Understanding the nested Loop 10.1 The For....Next Loop The For….Next loop is a very useful loop if we intend to have a fixed number of repetitions. It also allows the step increment. If you do not add the step increment, the default increment is 1. The structure of a For….Next loop is: For counter=startNumber to endNumber (Step increment) One or more VISUAL BASIC statements Next counter * You can actually omit the variable counter and just put in the Next command, but it makes the procedure clearer when you include the variable. Here are a few examples: Example 10.1 This program will generate a column of 10 numbers, starting from 1 and ending at 10. The output is shown in Figure 10.1. Private Sub Form_Activate() For counter = 1 To 10 Print Counter Next counter End Sub
  • 58.
    53 Figure 10.1 Example 10.2 PrivateSub Form_Activate () For counter=0 to 100 step 10 Print counter Next counter End Sub This program is similar to the previous example but now the number increases by 10 after every repetition until 100. Example 10.3 In this example, the number will decrease by 5 after every repetition until it reaches 5. Private Sub Form_Activate For counter=1000 to 5 step -5 Print counter Next counter End Sub Example 10.4 In this example, the program will print the sentence “Hello, Welcome to VISUAL BASIC Tutorial” five times. The output is shown in Figure 10.2 Private Sub Form_Activate For i=1 to 5 print "Hello, Welcome to VISUAL BASIC Tutorial" next i
  • 59.
    54 End Sub Figure 10.2 10.2 Exiting the For….Next Loop Sometimes the user might want to get out from the loop before the whole repetitive process is executed. The command to use in this case is Exit For. To exit a For….Next Loop, you can place the Exit For statement within the loop. This is normally used together with the If…..Then… statement. Let’s examine the following example: Example 10.5 Private Sub Form_Activate ( ) For n=1 to 10 If n>6 then Exit For End If Else Print n End If End Sub When you run the above program, it will produce the output as shown in Figure 10.3. The procedure will display the number n until 6. It will not print 7, 8, 9, and 10 because it will exit the loop the moment it reaches 7, as 7 has fulfilled the Exit For condition of n>6. The Exit For command is indeed same as the Exit Do command; they play the same role for exiting a loop.
  • 60.
    55 Figure 10.3: Theoutput of Example 10.5 10.3 The Nested Loop When you have a loop within a loop, then you have created a nested loop. You can actually have as many loops as you want in a nested loop provided the loops are not the never-ending type. For a nested loop that consists of two loops, the first cycle of the outer loop will be processed first, then it will process the whole repetitive process of the inner loop, then the second cycle of the outer loop will be processed and again the whole repetitive process of the inner loop will be processed. The program will end when the whole cycle of the outer loop is processed. The Structure of a nested loop is For counter1=startNumber to endNumber (Step increment) For counter2=startNumber to endNumber (Step increment) One or more VISUAL BASIC statements Next counter2 Next counter1 The outer loop is For….Next counter 1 and the inner loop is For….Next counter 2, and notice that the inner loop must be enclosed within the outer loop. Let’s take a look at example 10.6: Example 10.6 Private Sub Form_Activate ( ) For firstCounter= 1to 5 Print “Hello”
  • 61.
    56 For secondCounter=1 to 4 Print “Welcome to the VISUAL BASIC tutorial” Next secondCounter Next firstCounter Print” Thank you” End Sub The output of the above program is shown in Figure 10.6. As the outer loop has five repetitions, it will print the word “Hello” five times. Each time after it prints the word “Hello”, it will print four lines of the “Welcome to the VISUAL BASIC tutorial” sentences as the inner loop has four repetitions. Figure 10.4: The output of example 10.6
  • 62.
    57 Exercise 10 1. Write a program using the For….Next loop to find the sum of all the numbers from 1 to 100. 2. Write a program using the For….Next loop to find the sum of all the even numbers between 101 and 999. 3. Write a program using the For….Next loop to display the following sequence of numbers 50, 45, 40, 35, 30, 25, 20, 15, 10, 5, 0. 4. Write a program using the For….Next loop to display the following output: I like Visual Basic Visual Basic Visual Basic I like Visual Basic Visual Basic Visual Basic
  • 63.
    58 Lesson 11 Visual Basic Functions - Part I Understanding the concept of the Visual Basic function Learning how to use the MsgBox function Learning how to use the InputBox function 11.1 Introduction to Visual Basic Functions Functions are similar to the normal procedures but the main purpose of the functions is to accept certain input and return a value which is passed on to the main program to finish the execution. There are two types of functions, the built-in functions (or internal functions) and the functions created by the programmers. The general format of a function is: FunctionName (arguments) The arguments are values that are passed on to the functions. In this lesson, we are going to learn two very basic but useful internal functions of Visual Basic, the MsgBox ( ) and the InputBox ( ) functions. 11.2 The MsgBox ( ) Function The objective of the MsgBox function is to produce a pop-up message box and prompt the user to click on a command button before he /she can continue. This message box format is as follows: yourMsg=MsgBox (Prompt, Style Value, Title) The first argument, Prompt, will display the message in the message box. The Style Value determines what type of command button will appear in the message box. Table 10.1 lists the command buttons that can be displayed. The Title argument will display the title of the message board.
  • 64.
    59 Table 11.1: Style Values and Command Buttons Style Value Named Constant Button Displayed 0 vbOkOnly Ok button 1 vbOkCancel Ok and Cancel buttons 2 vbAbortRetryIgnore Abort, Retry and Ignore buttons. 3 vbYesNoCancel Yes, No and Cancel buttons 4 vbYesNo Yes and No buttons 5 vbRetryCancel Retry and Cancel buttons We can use the named constant in place of an integer for the second argument to make the programs more readable. In fact, VB6 will automatically show a list of named constants which can be selected. For example, yourMsg=MsgBox (“Click OK to Proceed", 1, "Startup Menu") and yourMsg=Msg ("Click OK to Proceed", vbOkCancel,"Startup Menu") are the same. YourMsg is a variable that holds values that are returned by the MsgBox ( ) function. The values are determined by the type of buttons being clicked by the users. It has to be declared as Integer data type in the procedure or in the general declaration section. Table 10.2 shows the values, the corresponding named constants and the buttons. Table 11.2: Return Values and Command Buttons Value Named Constant Button Clicked 1 vbOk Ok button 2 vbCancel Cancel button 3 vbAbort Abort button 4 vbRetry Retry button 5 vbIgnore Ignore button 6 vbYes Yes button 7 vbNo No button
  • 65.
    60 Example 11.1 In theexample, draw three command buttons and a label as shown in Figure 11.1: Figure 11.1 The procedure for the test button is shown below: Private Sub Test_Click () Dim testmsg As Integer testmsg = MsgBox ("Click to test", 1, "Test message") If testmsg = 1 Then Display.Caption = "Testing successful" Else Display.Caption = "Testing fail" End If End Sub Clicking on the test button will make a message box like the one shown in Figure 10.2 appear. As the user clicks on the OK button, the message "Testing successful" will be displayed and when he/she clicks on the Cancel button, the message "Testing fail" will be displayed. Figure 11.2
  • 66.
    61 To makethe message box looks more sophisticated, you can add an icon besides the message. There are four types of icons available in VISUAL BASIC as shown in Table 11.3 Table 11.3 Value Named Constant Icon 16 vbCritical 32 vbQuestion 48 vbExclamation 64 vbInformation Example 11.2 In this example, the following message box will be displayed: Figure 11.3 You can draw the same Interface as in example 10.1, modifying the codes as follows: Private Sub test2_Click () Dim testMsg2 As Integer testMsg2 = MsgBox ("Click to Test", vbYesNoCancel + vbExclamation, "Test Message") If testMsg2 = 6 Then display2.Caption = "Testing successful" ElseIf testMsg2 = 7 Then display2.Caption = "Are you sure?"
  • 67.
    62 Else display2.Caption = "Testingfail" End If End Sub 11.3 The InputBox ( ) Function An InputBox ( ) function will display a message box where the user can enter a value or a message in the form of text. The format is myMessage=InputBox (Prompt, Title, default_text, x-position, y-position) MyMessage is a variant data type but typically it is declared as a string, which accepts message input by the users. The arguments are explained as follows: • Prompt - The message displayed in the input box. • Title - The title of the input box. • Default-text - The default text that appears in the input field where users can use it as his intended input or he may change to another message. • X-position and y-position - the position or the coordinate of the input box. Example 11.3 The interface of example 11.3 is shown in Figure 11.4: Figure 11.4
  • 68.
    63 The procedure forthe OK button: Private Sub OK_Click () Dim userMsg As String userMsg = InputBox ("What is your message?", "Message Entry Form", "Enter your message here", 500, 700) If userMsg <> "" Then message.Caption = userMsg Else message.Caption = "No Message" End If End Sub When the user clicks the OK button, the input box as shown in Figure 11.5 will appear. After the user enters the message and clicks OK, the message will be displayed on the caption, but if he clicks Cancel, "No message" will be displayed. Figure 11.5 Exercise 11 1. Write down the four arguments of the MsgBox function. 2. Write down the six named constants of the MsgBox function. 3. Write down the arguments of the InputBox function. 4. Write a program to verify the password entered into an InputBox by the user.
  • 69.
    64 Lesson12 Visual Basic Functions- Part II Getting to know all the mathematical functions in Visual Basic Learning how to compute the values of the mathematical functions. Mathematical functions are very useful and important in programming because very often we need to deal with mathematical concepts in programming such as chance and probability, variables, mathematical logics, calculations, coordinates, time intervals etc. The common mathematical functions in Visual Basic are Rnd, Sqr, Int, Abs, Exp, Log, Sin, Cos, Tan , Atn, Fix and Round. 12.1 The Rnd Function Rnd is very useful when we deal with the concept of chance and probability. The Rnd function returns a random value between 0 and 1. In Example 12.1, when you run the program, you will get an output of 10 random numbers between 0 and 1. Randomize Timer is a vital statement here as it will randomize the process. Example 12.1 Private Sub Form_Activate Randomize Timer For x=1 to 10 Print Rnd Next x End Sub Figure 12.1: The Random Numbers
  • 70.
    65 Random numbers intheir original form are not very useful in programming until we convert them to integers. For example, if we need to obtain a random output of 6 integers ranging from 1 to 6, which makes the program behave as a virtual die, we need to convert the random numbers using the format Int(Rnd*6)+1. Let’s study the following example: Example 12.2 In this example, Int(Rnd*6) will generate a random integer between 0 and 5 because the function Int truncates the decimal part of the random number and returns an integer. After adding 1, you will get a random number between 1 and 6 every time you click the command button. For example, Let’s say the random number generated is 0.98. Ater multiplying it by 6, it becomes 5.88, and using the integer function Int(5.88) will convert the number to 5, and after adding 1 you will get 6. In this example, you place a command button and change its caption to ‘roll die’. You also need to insert a label into the form and clear its caption at the designing phase and make its font bigger and bold. Then set the border value to 1 so that it displays a border, and after that set the alignment to center. The statement Label1.Caption=Num means the integer generated will be displayed as the caption of the label. Now, run the program and then click on the roll die button, you will get an output like Figure 12.2. Dim num as integer Private Sub Command1_Click ( ) Randomize Timer Num=Int (Rnd*6) +1 Label1.Caption=Num End Sub
  • 71.
    66 Figure 12.2: Avirtual die Example12.3: A password generator This is a program that can generate four-digit passwords from 1000 to 9999. The key statement is crackpass = Int (Rnd * 9000) + 1000. For example, when Rnd returns a value of 0, the value of crackpass is 1000; and when Rnd returns 0.9999, the value of Rnd*9000 is 8999.1 and Int (8999.1) will be 8999 and so crackpass will return a value of 9999. The program is shown below: 'Password Cracker Dim password As Integer Dim crackpass As Integer Dim x As Integer Private Sub Command1_Click () Timer1.Enabled = True End Sub Private Sub Form_Load () password = 5689 crackpass = 0 End Sub Private Sub Timer1_Timer() x=x+1
  • 72.
    67 If x < 100 Then Label1.Visible = True Label1.Caption = "Please wait..." Randomize Timer crackpass = Int (Rnd * 9000) + 1000 Text1.Text = crackpass Else generate End If End Sub Private Sub generate () While crackpass <> password Randomize Timer crackpass = Int(Rnd * 9000) + 1000 Text1.Text = crackpass Wend Timer1.Enabled = False Text1.Text = crackpass Label1.Visible = True Label1.Caption = "Password Cracked! Login Successful!" Timer1.Enabled = False End Sub 12.2 The Numeric Functions The numeric functions are Int, Sqr, Abs, Exp, Fix, Round and Log. a) Int is the function that converts a number into an integer by truncating its decimal part and the resulting integer is the largest integer that is smaller than the number. For example, Int(2.4)=2, Int(4.8)=4, Int(-4.6)= -5, Int(0.032)=0 and so on. b) Sqr is the function that computes the square root of a number. For example, Sqr (4)=2, Sqr(9)=2 and etc. c) Abs is the function that returns the absolute value of a number. So Abs (-8) = 8 and Abs (8)= 8.
  • 73.
    68 d) Exp ofa number x is the value of ex. For example, Exp (1)=e1 = 2.7182818284590 e) Fix and Int are the same if the number is a positive number as both truncate the decimal part of the number and return an integer. However, when the number is negative, it will return the smallest integer that is larger than the number. For example, Fix (-6.34) = -6 while Int (-6.34) = -7. f) Round is the function that rounds up a number to a certain number of decimal places. The Format is Round (n, m) which means to round a number n to m decimal places. For example, Round (7.2567, 2) =7.26 g) Log is the function that returns the natural Logarithm of a number. For example, Log 10= 2.302585. Example 12.4 This example computes the values of Int(x), Fix(x) and Round(x, n) in a table form. It uses the Do Loop statement and the Rnd function to generate 10 numbers. The statement x = Round (Rnd * 7, 7) rounds a random number between 0 and 7 to 7 decimal places. Using commas in between items will create spaces between them and hence a table of values can be created. The program is shown below and the output is displayed in Figure 12.3. Private Sub Form_Activate () n=1 Print " n", " x", "Int(x)", "Fix(x)", "Round(x, 4)" Do While n < 11 Randomize Timer x = Round (Rnd * 7, 7) Print n, x, Int(x), Fix(x), Round(x, 4) n=n+1 Loop End Sub
  • 74.
    69 Figure 12.3: Theoutput of Example 12.4 12.3 Trigonometric Functions The common trigonometric functions are Sin, Cos, Tan and Atn. a) Sin is the function that computes the value of sine of an angle in radian. b) Cos is the function that computes the value of cosine of an angle in radian. c) Tan is the function that computes the value of tangent of an angle in radian. d) Atn is the function that computes the value of arc tangent of an angle in radian. An angle in degree has to be converted to radian before it can be calculated by the above trigonometric functions. From high school mathematics, we know that π radian is equivalent to 180°; which means 1 radian is equivalent to π divided by 180. Therefore, in order to convert an angle x from degree to radian, we have to multiply x by (π/180). However, there is a small problem because it is rather difficult to obtain the precise value of π, but fortunately, there is a way to do it in VISUAL BASIC. First of all, we know that an arc tangent of 1 will return the value of 45° which is π/4 radian. So, to obtain the value of π, just multiply the arc tangent of 1 with 4. Let’s examine how all the above calculations can be done in the following examples: Example 12.5 In this example, the program will display the values of sine, cosine and tangent for various angles in degree between 0° and 360° in a table form. The value of π is obtained using the equation pi=4*Atn (1). The angle in degree is converted to radian by multiplying the angle by (π/180). Different angles are obtained through the use of For...Next Loop. The program is shown below and the output is shown in Figure 12.4.
  • 75.
    70 Private Sub Form_Activate() pi = 4 * Atn (1) Print "angle", "Sin x", "Cos x", "Tan x" For degree = 0 To 360 Step 30 angle = degree * (pi / 180) Print degree, Round (Sin (angle), 4), Round (Cos (angle), 4), Round (Tan (angle), 4) Next degree End Sub Figure 12.4 Exercise 12 1. Write a program to produce random integers ranging from 20 to 40. 2. Write a program to compute the logarithm of a number and round it up to three decimal places. 3. Write a program to compute the values of sin θ, cos θ and tan θ. 4. Design a simple scientific calculator that can handle various mathematical functions including Log, Abs, Exp, sine, cosine, tangent, Arc tangent, square root and etc.
  • 76.
    71 Lesson13 Visual Basic Functions Part III Formatting Output Understanding the usage of the Tab function. Understanding the usage of the Space function. Understanding the usage of the Format function. Formatting output is a very important part of programming so that the data can be presented systematically and clearly to the users. Data in Figure 12.3 and Figure 12.4 were presented fairly systematically through the use of commas and some of the functions like Int, Fix and Round. However, to have better control of the output format, we can use a number of formatting functions in Visual Basic. The four important formatting functions in VISUAL BASIC are Tab, Space, and Format. 13.1 The Tab function The format of the Tab function is Tab (n); x The item x will be displayed at a position that is n spaces from the left border of the output form. There must be a semicolon in between Tab and the items you intend to display (VISUAL BASIC will actually do it for you automatically). Example 13.1 .Private Sub Form_Activate Print "I"; Tab (5); "like"; Tab (10); "to"; Tab (15); "learn"; Tab (20); "VISUAL BASIC" Print Print Tab (10); "I"; Tab (15); "like"; Tab(20); "to"; Tab(25); "learn"; Tab(20); "VISUAL BASIC" Print Print Tab(15); "I"; Tab(20); "like"; Tab(25); "to"; Tab(30); "learn"; Tab(35); “VISUAL BASIC" End sub
  • 77.
    72 The output ofthe above example is shown in Figure 13.1. The extra Print statements that do not seem to print anything actually create a space between two lines. Figure 13.1: The output using the Tab function Example 13.2: This example will generate a multiplication table. Private Sub Form_Activate () For x = 1 To 10 Print Tab (2); "2" & "x" & Str(x) & "=" & Str (2 * x) _ ; Tab (14); "3" & "x" & Str(x) & "=" & Str (3 * x) _ ; Tab (26); "4" & "x" & Str(x) & "=" & Str (4 * x) _ ; Tab (38); "5" & "x" & Str(x) & "=" & Str (5 * x) _ ; Tab (50); "6" & "x" & Str(x) & "=" & Str (6 * x) _ ; Tab (62); "7" & "x" & Str (x) & "=" & Str (7 * x) _ ; Tab (74); "8" & "x" & Str (x) & "=" & Str (8 * x) _ ; Tab (86); "9" & "x" & Str (x) & "=" & Str (9 * x) _ ; Tab (98); "10" & "x" & Str (x) & "=" & Str (10 * x) _ Next x End Sub In this program, each column in the output form is separated by 12 spaces. Str (n) is a function that will convert a number to a string (or text), and the sign “&” is used to join two strings. Str needs to be used here because all the items are taken to be strings. Notice that “x” and Str(x) are different as “x” will display the letter x while Str(x) is considered as a string and displays the number x. The output is shown in Figure 13.2:
  • 78.
    73 Figure 13.2 Themultiplication table 13.2 The Space function The Space function is very closely linked to the Tab function. However, there is a minor difference. While Tab (n) means the item is placed n spaces from the left border of the screen, the Space function specifies the number of spaces between two consecutive items. For example, the procedure Private Sub Form_Activate () Print "Visual"; Space (10); "Basic" End Sub means that the words Visual and Basic will be separated by 10 spaces. Example 13.3 Example 13.3 is the same multiplication table as the previous example but the Tab function is replaced by the Space function. The output is shown in Figure 13.3. Notice that the alignments of the columns are totally off. Therefore, it is normally better to use the Tab function rather than the Spaces function if we want a uniform display of the items in a table. Figure 13.3
  • 79.
    74 Private Sub Form_Activate() For x = 1 To 10 Print "2" & "x" & Str(x) & "=" & Space (2); Str(2 * x) _ ; Space (6); "3" & "x" & Str(x) & "=" & Space (2); Str (3 * x) _ ; Space (6); "4" & "x" & Str(x) & "=" & Space (2); Str (4 * x) _ ; Space (6); "5" & "x" & Str(x) & "=" & Space (2); Str(5 * x) _ ; Space (6); "6" & "x" & Str(x) & "=" & Space (2); Str(6 * x) _ ; Space (6); "7" & "x" & Str(x) & "=" & Space (2); Str(7 * x) _ ; Space (6); "8" & "x" & Str(x) & "=" & Space (2); Str(8 * x) _ ; Space (6); "9" & "x" & Str(x) & "=" & Space (2); Str(9 * x) _ ; Space (6); "10" & "x" & Str(x) & "=" & Space (2); Str(10 * x) _ Next x End Sub 13.3 The Format function The Format function is a very powerful formatting function which can display the numeric values in various forms. There are two types of Format functions. One of them is the built-in or predefined format while another one can be defined by the users. (i) The format of the predefined Format function is Format (n, “style argument”) where n is a number and the list of style arguments is given in Table 13.1. Table 13.1 List of style arguments Style Explanation Example argument General Displays the number without Number having separators between Format(8972.234, “General Number”)=8972.234
  • 80.
    75 thousands. Fixed Displays the number without having separators between Format(8972.2, “Fixed”)=8972.23 thousands and rounds it up to two decimal places. Standard Displays the number with separators between thousands Format(6648972.265, “Standard”)= 6,648,972.27 and rounds it up to two decimal places. Currency Displays the number with the dollar sign in front, has Format(6648972.265, “Currency”)= $6,648,972.27 separators between thousands, and rounds it up to two decimal places. Percent Converts the number to percentage form, displays a % Format(0.56324, “Percent”)=56.32 % sign and rounds it up to two decimal places. Example 13.4 Private Sub Form_Activate () Print Format (8972.234, "General Number") Print Format (8972.2, "Fixed") Print Format (6648972.265, "Standard") Print Format (6648972.265, "Currency") Print Format (0.56324, "Percent") End Sub Figure 13.4 The output of Example 13.4 (ii) The format of the user-defined Format function is: Format (n, “user’s format”)
  • 81.
    76 Although it isknown as user-defined format, we still need to follow certain formatting styles. Examples of user-defined formatting style are listed in Table 13.2: Table13.2: User-Defined format Example Explanation Output Format(781234.57,”0”) Rounds to a whole number without 781235 separators between thousands. Format(781234.57,”0.0”) Rounds to 1 decimal place without 781234.6 separators between thousands. Format(781234.576,”0.00”) Rounds to 2 decimal places 781234.58 without separators between thousands. Format(781234.576,”#,##0.00”) Rounds to 2 decimal places with 781,234.58 separators between thousands. Format(781234.576,”$#,##0.00”) Shows dollar sign and rounds to 2 $781,234.58 decimal places with separators between thousands. Format(0.576,”0%”) Converts to percentage form 58% without decimal places. Format(0.5768,”0.00%”) Converts to percentage form with 2 57.68% decimal places. Example 13.5 Private Sub Form_Activate () Print Format (781234.57, "0") Print Format (781234.57, "0.0") Print Format (781234.576, "0.00") Print Format (781234.576, "#,##0.00") Print Format (781234.576, "$#,##0.00") Print Format (0.576, "0 %") Print Format (0.5768, "0.00 %") End Sub Example 13.5 demonstrates some of the user-defined formatting. The output is shown in Figure 13.4:
  • 82.
    77 Figure 13.5: Theoutput of user-defined formatting 13.4 Formatting date and time Date and time can be formatted using predefined formats and also user-defined formats. The predefined formats of date and time are shown in Table 13.3: Table 13.3 Predefined formats of date and time Format Explanation Format (Now, “General date”) Formats the current date and time. Format (Now, “Long Date”) Displays the current date in long format. Format (Now, “Medium Date”) Displays the current date in medium format Format (Now, “Short date”) Displays the current date in short format Format (Now, “Long Time”) Display the current time in long format. Format (Now, “Medium Time”) Display the current time in medium format. Format (Now, “Short Time”) Display the current time in short format. Example 13.6 This program will create a magic clock that can display the date and time in different formats. In order to make the clock actually work according to real time, you need to insert the timer control into the form and enter the formatting procedure in the timer subprogram. In addition, you must set the time interval in the timer’s properties
  • 83.
    78 window to 1000so that it is equal to 1 second. You will also need to insert a few labels to display the date and time in different formats. The general method to display data or time on a label is Label1.Caption=date and Label1.Caption=Time. However, in order to format the output, you need to use the formats shown in this example. Private Sub Timer1_Timer() Label3.Caption = Format (Now, "General Date") Label5.Caption = Format (Now, "Long Date") Label8.Caption = Format (Now, "Medium Date") Label1.Caption = Format (Now, "Long Time") Label9.Caption = Format (Now, "Short Time") Label12.Caption = Format (Now, "Medium Time") End Sub The output is displayed in Figure 13.6: Figure 13.6: Date and Time in different formats You can also format date and time according to user-defined formats. The user- defined formats for the date involve the use of the d, m and y letters while time format use Hh: Nn: Ss AM/PM and “ttttt”. Some of the formats are shown in Table 13.4: Table 13.4 Date and Time Formats Format Explanation
  • 84.
    79 Format (Now, “m/d/yy”) Displays a single digit month followed by a single digit day and two-digit year separated by slashes. Format(Now, "dd/mm/yyyy") Displays a two-digit day followed by a two-digit month and four-digit year separated by slashes. Format(Now, "dd-mmm-yyyy") Displays a two-digit day followed by an abbreviated month name and a four-digit year separated by dashes. Format(Now, "dd-mmmm-yyyy") Displays a two-digit day followed by the month name and a four-digit year separated by dashes. Format(Now, "Hh:Nn:Ss Displays the current time in a two-digit hour, two- AM/PM") digit minute and two-digit second. It also includes the AM/PM indicator. Format(Now, "ttttt") Displays the current time in a two-digit hour, two- digit minute and two-digit second. It also includes the AM/PM indicator. Format(Now, "dddd") Displays the current day name. Format(Now, "dddddd") Displays the current day name and date. Example 13.7 This example displays various formats of Date and Time. The output is shown in Figure 13.7. Private Sub Form_Activate () Print Format (Now, "m/d/yy") Print Format (Now, "d/m/yy") Print Format (Now, "dd-mm-yyyy") Print Format (Now, "dd-mmm-yyyy") Print Format (Now, "dd/mmmm/yyyy") Print Format (Now, "mmm-dd-yyyy") Print Format (Now, "mmmm/dd//yyyy") Print Format (Now, "mmmm dd, yyyy") Print Format (Now, "dddd") Print Format (Now, "dddddd") Print Format (Now, "Hh: Nn: Ss AM/PM") Print Format (Now, "ttttt")
  • 85.
    80 End Sub Figure 13.7Date and Time in different formats Exercise 13 1. Explain the difference between the Tab and the Space functions and write a program to support your explanation. 2. Write down five style arguments of the Format function and write a program to illustrate these styles. 3. Create a digital clock in Visual Basic that uses three different time formats. 4. Write a program to compute the percentage of price increment of a certain goods based on the new price and the old price. Display the answer in percentage form using the Format function.
  • 86.
    81 Lesson 14 Visual Basic Functions Part IV Manipulating Strings Learning the usage of various strings manipulating functions such as Len, Right, Left, Mid, Trim, Ltrim, Rtrim, Ucase, Lcase, Instr, Val, Str etc, Chr and Asc. 14.1 The Len Function The Len function returns an integer value which is the length of a phrase or a sentence, including the empty spaces. The format is: Len (“Phrase”) For example: Len (VisualBasic) = 11 and Len (welcome to VISUAL BASIC tutorial) = 22 The Len function can also return the number of digits or memory locations of a number that is stored in the computer. For example, Private sub Form_Activate ( ) X=sqr (16) Y=1234 Z#=10# Print Len(x), Len(y), and Len (z)
  • 87.
    82 End Sub will produce the output 1, 4, 8. The reason why the last value is 8 is because z# is a double precision number and so it is allocated more memory spaces. 14.2 The Right Function The Right function extracts the right portion of a phrase. The format is Right (“Phrase”, n) where n is the starting position from the right of the phase where the portion of the phrase is going to be extracted. For example: Right (“Visual Basic”, 4) = asic 14.3 The Left Function The Left function extracts the left portion of a phrase. The format is Left (“Phrase”, n) where n is the starting position from the left of the phase where the portion of the phrase is going to be extracted. For example: Left (“Visual Basic”, 4) = Visu 14.4 The Ltrim Function The Ltrim function trims the empty spaces of the left portion of the phrase. The format is Ltrim(“Phrase”) .For example: Ltrim (“ Visual Basic”, 4) = Visual Basic 14.5 The Rtrim Function The Rtrim function trims the empty spaces of the right portion of the phrase. The format is Rtrim(“Phrase”) .For example: Rtrim (“Visual Basic ”, 4) = Visual Basic 14.6 The Trim function The Ttrim function trims the empty spaces on both sides of the phrase. The format is Trim (“Phrase”) .For example:
  • 88.
    83 Trim (“ Visual Basic ”) = Visual Basic 14.7 The Mid Function The Mid function extracts a substring from the original phrase or string. The format is Mid (phrase, position, n) where position is the starting position of the phrase from which the extraction process will start and n is the number of characters to be extracted. For example: Mid (“Visual Basic”, 3, 6) = ual Bas 14.8 The InStr function The InStr function looks for a phrase that is embedded within the original phrase and returns the starting position of the embedded phrase. The format is Instr (n, original phase, embedded phrase) where n is the position where the Instr function will begin to look for the embedded phrase. For example Instr (1, “Visual Basic”,” Basic”) =8 14.9 The Ucase and the Lcase functions The Ucase function converts all the characters of a string to capital letters. On the other hand, the Lcase function converts all the characters of a string to small letters. For example, Ucase (“Visual Basic”) =Visual Basic Lcase (“Visual Basic”) =Visual Basic 14.10 The Str and Val functions The Str is the function that converts a number to a string while the Val function converts a string to a number. These two functions are important when we need to perform mathematical operations. 14.11 The Chr and the Asc functions The Chr function returns the string that corresponds to an ASCII code while the Asc function converts an ASCII character or symbol to the corresponding ASCII code. ASCII stands for “American Standard Code for Information Interchange”. Altogether there are 255 ASCII codes and as many ASCII characters. Some of the characters
  • 89.
    84 may not bedisplayed as they may represent some actions such as the pressing of a key or beeping. The format of the Chr function is Chr(charcode) and the format of the Asc function is Asc (Character) The following are some examples: Chr(65)=A, Chr(122)=z, Chr(37)=% , Asc(“B”)=66, Asc(“&”)=38 Example 14.1 This is a program that utilizes some of the functions mentioned in this lesson. The output is shown in Figure 14.1. Private Sub Form_Activate () Print Len ("Visual Basic") Print Right ("Visual Basic", 4) Print Left ("Visual Basic", 4) Print LTrim(" Visual Basic") Print LTrim("Visual Basic ") Print Trim(" Visual Basic ") Print InStr (5, " Visual ", " ") Print InStr (6, Trim$(" Visual Basic "), " ") Print Mid ("Visual Basic", 3, 6) Print InStr (1, "Visual Basic", "Basic") End Sub Figure 14.1
  • 90.
    85 Exercise 14 1. List the functions which can be used to manipulate strings and write a program to illustrate these functions. 2. Write a program to compute the ASCII codes that correspond to the characters a - z and A - Z using the Chr function. Lesson15 Visual Basic Functions Part V- Creating Your Own Functions Learning how to create your own functions. The general format of a function is as follows: Function functionName (Arg As dataType,..........) As dataType Statements End Function You can place the word Public or Private in front of Function. Public indicates that the function is applicable to the whole program while private indicates that the function is only applicable to a certain module or procedure. Example 15.1
  • 91.
    86 The example showsa function that can be used to calculate the area of a triangle based on the length of its base and its height. The function is: Private Function area (base As Variant, height As Variant) As Variant area = (base * height) / 2 End Function After you have created the function, you can call it under a procedure such as Private Sub Command1_Click () Label4.Caption = area (Text1.Text, Text2.Text) End Sub When the user enters the values into the text boxes and clicks the command button, the area of the triangle will be displayed in Label4. The output is shown in Figure 15.1: Figure 15.1 Example 15.2 This example illustrates a function that can be used to calculate the profit margin based on the formula Selling Price - Cost Price Profit Margin = Selling Price
  • 92.
    87 The function tocompute the profit margin and present it in the percentage form is Private Function PM (SP As Variant, CP As Variant) PM = Format ((SP - CP) / SP, "Percent") End Function and the procedure to call the function is Private Sub Command1_Click () SP = SPTxt CP = CPTxt PMLbl = PM (SP, CP) End Sub The program will read the values from text boxes and display the result on the label with the name PMLbl. The output is shown in Figure 15.2: Figure 15.2 The Profit Margin Calculator Example 15.3 In this example, a user can calculate the future value of a certain amount of money he has today based on the interest rate and the number of years from now (supposing he will invest this amount of money in a bank). The calculation is based on the compound interest rate.
  • 93.
    88 Figure 15.3 TheFuture Value Calculator Public Function FV (PV As Variant, i As Variant, n As Variant) As Variant 'Formula to calculate Future Value (FV) 'PV denotes Present Value FV = PV * (1 + i / 100) ^ n End Function Private Sub compute_Click () 'This procedure will calculate Future Value Dim FutureVal As Currency Dim PresentVal As Currency Dim interest As Variant Dim period As Variant PresentVal = PV.Text interest = rate.Text period = years.Text FutureVal = FV (PresentVal, interest, period) Label5.Caption = Format (FutureVal, "currency") End Sub
  • 94.
    89 Example 15.4 The followingprogram will automatically compute examination grades based on the marks that a student obtained. Figure 15.4 Private Sub Command1_Click () mark = Text1.Text Label3.Caption = grade (mark) End Sub Private Function grade(mark As Variant) As String Select Case mark Case Is >= 80 grade = "A" Case Is >= 70 grade = "B" Case Is >= 60 grade = "C" Case Is >= 50 grade = "D" Case Is >= 40 grade = "E" Case Else
  • 95.
    90 grade = "F" End Select End Function Example 15.5 This is a program that can calculate the body mass index, or BMI of a person based the body weight in kilograms and the body height in meters. BMI can be calculated using the formula weight 2 height The program is illustrated below and the output is shown in Figure 15.5: Private Sub Command1_Click () Label4.Caption = BMI (Text1.Text, Text2.Text) End Sub Private Function BMI (height, weight) BMIValue = (weight) / (height ^ 2) BMI = Format (BMIValue, "0.00") End Function Figure 15.5 BMI calculator
  • 96.
    91 Exercise 15 1. Write a program to compute the area of a rectangle using a user-defined function. 2. Write a program to compute the volume of a cylinder using a user-defined function. 3. Create a user-defined function to calculate the average speed of a car using the formula Total Distance Travelled Average Speed = Total Time Taken 4. Create a user-defined function to calculate the present value that needs to be invested in order to obtain a certain sum of money after a certain number of years based on a certain interest rate per annum. Lesson 16 Creating VISUAL BASIC Functions for Microsoft Excel Learning how to create user-defined functions in Microsoft Excel using the Microsoft Excel Visual Basic Editor. 16.1 The Needs to Create User-Defined Functions in Excel You can create your own functions to supplement the built-in functions in Microsoft Excel spreadsheet which are quite limited. These functions could be very useful and powerful if you know how to program them properly. One of the main reasons we need to create user-defined functions is to customize the spreadsheet environment for individual needs. For example, the user might need a function that could calculate commissions based on the sales volume, which is quite difficult if not impossible by using the built-in functions alone. Let’s look at the table below:
  • 97.
    92 Table 16.1: Commissions Payment Table Sales Volume($) Commissions <500 3% <1000 6% <2000 9% <5000 12% >5000 15% In the above table, if a salesman attains a sale volume of $6000, he will be paid $6000x12%=$720.00. A Visual Basic function to calculate the commissions could be written as follows: Function Comm (Sales_V As Variant) as Variant If Sales_V <500 Then Comm=Sales_V*0.03 Elseif Sales_V>=500 and Sales_V<1000 Then Comm=Sales_V*0.06 Elseif Sales_V>=1000 and Sales_V<2000 Then Comm=Sales_V*0.09 Elseif Sales_V>=200 and Sales_V<5000 Then Comm=Sales_V*0.12 Elseif Sales_V>=5000 Then Comm=Sales_V*0.15 End If End Function 16.2 Using Microsoft Excel Visual Basic Editor To create User Defined functions in Microsoft Excel, click on tools, select macro and then click on Visual Basic Editor as shown in Figure 11.1:
  • 98.
    93 Figure 11.1: Inserting Excel Visual Basic Editor Upon clicking the Visual Basic Editor, the Visual Basic Editor window will appear as shown in Figure 11.2. To create a function, type in the function as illustrated in section 11.1 above after typing, save the file and then return to the Excel window. Figure 16.2: The VISUAL BASIC Editor
  • 99.
    94 In the Excelwindow, type in the titles Sales Volume and Commissions in any two cells. By referring to Figure 16.2, key in the Comm function at cell C4 and by referencing the value in cell B4, using the format Comm (B4). Any value which appears in cell B4 will pass the value to the Comm function in cell C4. For the rest of the rows, just copy the formula by dragging the bottom-right corner of cell C4 to the required cells and a nice and neat table that shows the commissions will automatically appear. It can also be updated at any time.
  • 100.
    95 Figure 16.3 Exercise16 1. Write a function in Excel that computes the grades of the examination scores. 2. Write a function in Excel to compute the health status of the patients based on their blood pressures. 3. Write a function in Excel to compute the performance of the staff based the monthly sales quotas achieved.
  • 101.
    96 Lesson 17 Arrays Part I Understanding the concept of an array. Learning how to declare an array. Learning how to create a control array. 17.1 Introduction to Array When we work with a single item, we only need to use one variable. However, if we have a list of items which are of similar type to deal with, we need to declare an array of variables instead of using a variable for each item. For example, if we need to enter one hundred names, instead of declaring one hundred different variables, we need to declare only one array. By definition, an array is a group of variables with the same data type and name. We differentiate each item in the array by using subscript, the index value of each item, for example name (1), name (2), name (3) .......etc. 17.2 Declaring Arrays We can use Public or Dim statements to declare an array like the way we declare a single variable. The Public statement declares an array that can be used throughout an application while the Dim statement declares an array that can be used only in a local procedure. The general format to declare an array is as follows: i) Dim arrayName(subs) as dataType ii) Public arrayName(subs) as dataType ‘Subs’ indicates the subscript of the last element in the array, instead of the number of elements in the array. This is because VISUAL BASIC assigns a subscript of 0 to the first element rather than 1. For example, Dim book (9) will declare an array which consists of 10 elements, i.e. book(0), book(1), book(2), book(3), book(4), book(5), book(6), book(7), book(8) and book(9).
  • 102.
    97 In order toassign 1 to the subscript of the first element in an array, you need to include the statement Option Base 1 in the declaration area. With Option Base 1, Dim CusName (10) as String will declare an array that consists of 10 elements, starting from CusName (1) to CusName (10). Otherwise, there will be 11 elements in the array starting from CusName (0) through to CusName (10). In addition, using Dim Count (100 to 500) as Integer will declare an array that consists of elements starting from Count (100) and ending at Count (500). Example 17.1 Figure 17.1 Dim studentName(10) As String Dim num As Integer Private Sub addName () For num = 1 To 10 studentName (num) = InputBox ("Enter the student name", "Enter Name", "", 1500, 4500) If studentName (num) <> "" Then Form1.Print studentName (num)
  • 103.
    98 Else End End If Next End Sub Private Sub Start_Click () Form1.Cls addName End Sub The above program accepts data entries through an input box and displays the entries in the form itself. As you can see, this program will only allow a user to enter 10 names each time he clicks on the start button. Example 17.2 Figure 17.2 Dim studentName (10) As String Dim num As Integer Private Sub addName ( ) For num = 1 To 10 studentName (num) = InputBox ("Enter the student name")
  • 104.
    99 List1.AddItem studentName (num) Next EndSub Private Sub Start_Click () addName End Sub The above program accepts data entries through an InputBox and displays the items in a list box. 17.3 The Control Array Sometimes we need a group of controls that are of the same type or perform similar tasks, for example the buttons on a calculator or a group of images boxes. Then we have to create an array of the controls. These controls will carry the same name but with different suffixes or indices. It is very easy to create a control array in Visual Basic. Let’s say you want to create a control array of a group of image boxes. The first step is to insert an image box in the form. Secondly, right-click on the image box, then click copy and paste. VISUAL BASIC will ask you whether you want to create a control array or not. Click Yes to create a control array. Otherwise, another individual image box will be created. You can keep on clicking the paste button to obtain the number of controls you desire. For example, a control array of a group of image boxes will comprise Image1 (0), Image1 (1), Image1 (2), Image1 (3) and so on, which can be identified by their index values (or the values of the suffixes). Exercise 17 1. Write a program to enter the item number and item unit price of 20 products using an input box. 2. Create an array of 6 shape controls and display them as different shapes.
  • 105.
    100 Lesson 18 Arrays Part II -Two Dimensional Arrays Understanding the concept of a two dimensional array. Learning how to create a two dimensional array. Multidimensional arrays are often needed when we are dealing with more complex programs, especially those that handle large amount of data. Data are usually organized and arranged in table form, this is where the multidimensional array comes into play. However, we are dealing only with two dimensional arrays, i.e. a table that consists of rows and columns. The format to declare a two dimensional array is Dim arrayName (num1, num2) as datatype where num1 is the suffix of the first dimension of the last element and num2 is the suffix of the second dimension of the last element in the array. The suffixes of the element in the array will start with (0, 0) unless you set the Option Base to 1. In the case when the Option Base is set to 1, then the suffixes of the element in the array will start with (1, 1). For example, Dim Score (5, 5) as Integer will create a two dimension array consists of 36 elements. These elements can be organized in a table form as shown in Table 18.1: Table 18.1 A two dimensional array Score(0,0) Score(0,1) Score(0,2) Score(0,3) Score(0,4) Score(0,5) Score(1,0) Score(1,1) Score(1,2) Score(1,3) Score(1,4) Score(1,5) Score(2,0) Score(2,1) Score(2,2) Score(2,3) Score(2,4) Score(2,5) Score(3,0) Score(3,1) Score(3,2) Score(3,3) Score(3,4) Score(3,5) Score(4,0) Score(4,1) Score(4,2) Score(4,3) Score(4,4) Score(4,5) Score(5,0) Score(5,1) Score(5,2) Score(5,3) Score(5,4) Score(5,5)
  • 106.
    101 If you setthe Option Base to 1, then the elements will start with (1,1) and end at (6,6) as shown in the following example. Dim Score (6, 6) as Integer Option Base 1 Table 18.2 A two dimensional array with Option Base 1 Score(1,1) Score(1,2) Score(1,3) Score(1,4) Score(1,5) Score(1,6 Score(2,1) Score(2,2) Score(2,3) Score(2,4) Score(2,5) Score(2,6) Score(3,1) Score(3,2) Score(3,3) Score(3,4 Score(3,5) Score(3,6) Score(4,1) Score(4,2) Score(4,3) Score(4,4) Score(4,5) Score(4,6) Score(5,1) Score(5,2) Score(5,3) Score(5,4) Score(5,5) Score(5,6) Score(6,1) Score(6,2) Score(6,3) Score(6,4) Score(6,5) Score(6,6) The above concepts are illustrated in a sample program in Example 18.1: Example 18.1 Option Base 1 Dim score (6, 6) As Integer Dim x As Integer Dim sum As Integer Private Sub Command1_Click () x=0 For i = 1 To 6 For j = 1 To 6 sum = i + j score (i, j) = sum Label1(x).Caption = "Score (" & i & "," & j & ")" & "=" & sum x=x+1
  • 107.
    102 Next j Next i EndSub In Example 18.1, a two dimensional array that comprises 36 elements is created as the Option Base is set to 1. In order to display the elements, a nested For…Next loop is used to assign values which are equal to the sums of the suffixes, i and j, to all of the elements in the array. The values are displayed through a control array made up of 36 labels. The index is initially assigned a value of 0 using the variable x, which then increases by 1 after every loop. In this way the indices will be assigned the values ranging from 0 to 35, hence every label will be able to display the corresponding scores of the two dimensional array using the statement (The ampersand sign ‘&’ is used to combine string and numeric data, and it is very useful for presenting an output that is easy to understand): Label1(x).Caption = "Score (" & i & "," & j & ")" & "=" & sum Figure 18.1 Columns Rows
  • 108.
    103 Exercise 18 1. Writea program using a two-dimensional array to display the quarterly sales target achieved by 10 salesmen in a year. The sample output is shown below: Quarter 1 Quarter 2 Quarter 3 Quarter 4 Abraham 100 150 200 180 Ben 50 80 90 100 Chris 150 100 170 200 Dan 200 100 150 190 Elvis 80 80 90 100 Francis 90 70 50 80 Graham 110 120 130 160 Hans 160 170 180 190 Irwin 130 140 150 140 Jenkin 90 80 60 70 2. Write a program to input the marks of five subjects for 10 students and compute the total and average marks.
  • 109.
    104 Lesson 19 Graphics Learning how to manipulate the line and shape controls. Learning how to use the image box and the picture box. Learning how to use PSet, Line and Circle Drawing methods. Learning how to create a picture viewer. Graphics are a very important part of Visual Basic programming as an attractive interface will be appealing to the users. In old BASIC, drawing and designing graphics are considered as difficult jobs, as they have to be programmed line by line in a text-based environment. However, in Visual Basic, these jobs have been made easy. There are four basic controls in VISUAL BASIC that you can use to draw graphics on your form: the line control, the shape control, the image box and the picture box. 19.1 The line and Shape controls To draw a straight line, just click on the line control and then use your mouse to draw the line on the form. After drawing the line, you can then change its color, width and style using the BorderColor, BorderWidth and BorderStyle properties. Similarly, to draw a shape, just click on the shape control and draw the shape on the form. The default shape is a rectangle, with the shape property set at 0. You can change the shape to square, oval, circle and rounded rectangle by changing the shape property’s value to 1, 2, 3, 4, and 5 respectively. In addition, you can change its background color using the BackColor property, its border style using the BorderStyle property, its border color using the BorderColor property as well its border width using the BorderWidth property. Example 19.1 The program in this example allows the user to change the shape by selecting a particular shape from a list of options from a list box, as well as changing its color through a common dialog box.
  • 110.
    105 The objects tobe inserted in the form are a list box, a command button, a shape control and a common dialog box. The common dialog box can be inserted by clicking on ‘project’ on the menu and then selecting the Microsoft Common Dialog Control 6.0 by clicking the check box. After that, the Microsoft Common Dialog Control 6.0 will appear in the toolbox and you can drag it into the form. The list of items can be added to the list box through the AddItem method. The procedure for the common dialog box to present the standard colors is as follows: CommonDialog1.Flags = &H1& CommonDialog1.ShowColor Shape1.BackColor = CommonDialog1.Color The last line will change the background color of the shape by clicking on a particular color on the common dialog box as shown in Figure 19.2. Private Sub Form_Load () List1.AddItem "Rectangle" List1.AddItem "Square" List1.AddItem "Oval" List1.AddItem "Circle" List1.AddItem "Rounded Rectangle" List1.AddItem "Rounded Square" End Sub Private Sub List1_Click () Select Case List1.ListIndex Case 0 Shape1.Shape = 0 Case 1 Shape1.Shape = 1 Case 2 Shape1.Shape = 2 Case 3 Shape1.Shape = 3 Case 4 Shape1.Shape = 4
  • 111.
    106 Case 5 Shape1.Shape = 5 End Select End Sub Private Sub Command1_Click() CommonDialog1.Flags = &H1& CommonDialog1.ShowColor Shape1.BackColor = CommonDialog1.Color End Sub Figure 19.1 The output of Example 19.1 Figure 19.2 The Standard Colors
  • 112.
    107 19.2 The ImageBox and the Picture Box Using the line and shape controls to draw graphics will only enable you to create a simple design. In order to improve the look of the interface, you need to put in images and pictures of your own. Fortunately, there are two very powerful graphics tools you can use in Visual Basic which are the image box and the picture box. To load a picture or image into an image box or a picture box, you can click on the picture property in the properties window and a dialog box will appear which will prompt the user to select a certain picture file. You can also load a picture at runtime by using the LoadPictrure ( ) method. The syntax is Image1.Picture= LoadPicture ("C:path namepicture file name") or picture1.Picture= LoadPicture ("C:path namepicture name") For example, the following statement will load the grape.gif picture into the image box. Image1.Picture= LoadPicture ("C:My FolderVISUAL BASIC programImagesgrape.gif") Example 19.2 In this example, each time you click on the ‘change pictures’ button as shown in Figure 19.2, you will be able to see three images loaded into the image boxes. This program uses the Rnd function to generate random integers and then uses the LoadPicture method to load different pictures into the image boxes using the If…Then…Statements based on the random numbers generated. The output is shown in Figure 19.2. Dim a, b, c As Integer Private Sub Command1_Click () Randomize Timer a = 3 + Int (Rnd * 3) b = 3 + Int (Rnd * 3) c = 3 + Int (Rnd * 3) If a = 3 Then
  • 113.
    108 Image1 (0).Picture =LoadPicture ("C:My FolderVISUAL BASIC programImagesgrape.gif") End If If a = 4 Then Image1 (0).Picture = LoadPicture ("C:My FolderVISUAL BASIC programImagescherry.gif") End If If a = 5 Then Image1 (0).Picture = LoadPicture ("C:My FolderVISUAL BASIC programImagesorange.gif") End If If b = 3 Then Image1 (1).Picture = LoadPicture ("C:My FolderVISUAL BASIC programImagesgrape.gif") End If If b = 4 Then Image1 (1).Picture = LoadPicture ("C:My FolderVISUAL BASIC programImagescherry.gif") End If If b = 5 Then Image1 (1).Picture = LoadPicture ("C:My FolderVISUAL BASIC programImagesorange.gif") End If If c = 3 Then Image1 (2).Picture = LoadPicture ("C:My FolderVISUAL BASIC programImagesgrape.gif") End If If c = 4 Then Image1 (2).Picture = LoadPicture ("C:My FolderVISUAL BASIC programImagescherry.gif") End If If c = 5 Then Image1 (2).Picture = LoadPicture ("C:My FolderVISUAL BASIC programImagesorange.gif") End If
  • 114.
    109 End Sub Figure 19.2 19.3PSet, Line and Circle Drawing Methods Other than using the line and shape controls to draw graphics on the form, you can also use the Pset, Line and Circle methods. (a) The Pset Method The Pset method draws a dot on the screen. The format is Pset (x, y), color (x,y) is the coordinates of the point and color is its color. To specify the color, you can use the color codes or the standard VISUAL BASIC color constant such as VbRed, VbBlue, VbGeen etc. For example, Pset (100,200), VbRed will display a red dot at the (100,200) coordinates.
  • 115.
    110 The Pset methodcan also be used to draw a straight line on the form. The procedure is For x= a to b Pset(x, x) Next x This procedure will draw a line starting from the point (a, a) and to the point (b, b). For example, the following procedure will draw a magenta line from the point (0, 0) to the point (1000, 1000). For x= 0 to 100 Pset(x, x), vbMagenta Next x (b) The Line Method Although the Pset method can be used to draw a straight line on the form, it is a little slow. It is better to use the Line method if you want to draw a straight line faster. The format of the Line command is shown below. It draws a line from the point (x1, y1) to the point (x2, y2) and the color constant will determine the color of the line. Line (x1, y1)-(x2, y2), color For example, the following command will draw a red line from the point (0, 0) to the point (1000, 2000). Line (0, 0)-(1000, 2000), VbRed The Line method can also be used to draw a rectangle. The format is Line (x1-y1)-(x2, y2), color, B The four corners of the rectangle are (x1-y1), (x2-y1), (x1-y2) and (x2, y2) Another variation of the Line method is to fill the rectangle with a certain color. The format is Line (x1, y1)-(x2, y2), color, BF If you wish to draw the graphics in a picture box, you can use the following formats • Picture1.Line (x1, y1)-(x2, y2), color • Picture1.Line (x1-y1)-(x2, y2), color, B • Picture1.Line (x1-y1)-(x2, y2), color, BF • Picture1.Circle (x1, y1), radius, color (c) The Circle Method The circle method takes the following format
  • 116.
    111 Circle (x1, y1), radius, color This draws a circle centered at (x1, y1), with a certain radius and a certain border color. For example, the procedure Circle (400, 400), 500, VbRed draws a circle centered at (400, 400) with a radius of 500 twips and a red border. Example 19.3 This example is a program that can draw various shapes with different colors in a picture box. The program uses a common dialog box to select the color for the graphics. The output is shown in Figure 19.3. Dim x1 As Integer Dim y1 As Integer Dim x2 As Integer Dim y2 As Integer Dim x3 As Integer Dim y3 As Integer Dim color As String Dim r As Integer Private Sub Command1_Click () On Error GoTo AddCoordinate x1 = Text1.Text y1 = Text2.Text x2 = Text3.Text y2 = Text4.Text On Error GoTo addcolor Picture1.Line (x1, y1)-(x2, y2), color Exit Sub
  • 117.
    112 AddCoordinate: MsgBox ("Please fill in the coordinates") Exit Sub addcolor: MsgBox ("Please choose a color") Exit Sub End Sub Private Sub Command2_Click () x1 = Text1.Text y1 = Text2.Text x2 = Text3.Text y2 = Text4.Text Picture1.Line (x1, y1)-(x2, y2), color, B End Sub Private Sub Command3_Click () CommonDialog1.Flags = &H1& CommonDialog1.ShowColor color = CommonDialog1.color End Sub Private Sub Command4_Click () On Error GoTo addvalues x3 = Text5.Text y3 = Text6.Text r = Text7.Text Picture1.Circle (x3, y3), r, color Exit Sub addvalues: MsgBox ("Please fill in the coordinates, the radius and the color") End Sub Private Sub Command5_Click () Picture1.Cls End Sub
  • 118.
    113 Private Sub Command6_Click () x1 = Text1.Text y1 = Text2.Text x2 = Text3.Text y2 = Text4.Text Picture1.Line (x1, y1)-(x2, y2), color, BF End Sub Figure 19.3 Example 19.4 The Picture Viewer
  • 119.
    114 Let’s create aprogram that enables the users to open and choose files from the folders in their PC. This can be done easily using a picture box and a common dialog box. In this program, you need to insert a picture box, a common dialog box and an image. In the image properties window, click on the picture property and select a picture that resembles an open file icon. The procedure to open the common dialog box to browse the picture files as well as to load the selected picture into the picture box is CommonDialog1.Filter = "Bitmaps (*.BMP)|*.BMP|Metafiles (*.WMF)|*.WMF|Jpeg Files (*.jpg)|*.jpg|GIF Files (*.gif)|*.gif|Icon Files (*.ico)|*.ico|All Files (*.*)|*.*" CommonDialog1.ShowOpen Picture1.Picture = LoadPicture (CommonDialog1.FileName) The filter property of the common dialog box uses the format as shown below Bitmaps (*.BMP)|*.BMP to specify the file type, and uses the pipe line | to separate different file types. Visual Basic supports most of the picture formats namely bmp, wmf, jpg, gif, ico (icon) and cur (cursor) files. The command CommonDialog1.ShowOpen is to open the common dialog box and the command Picture1.Picture = LoadPicture (CommonDialog1.FileName) is to load the selected picture file into the picture box. The whole program is shown below and the output is shown in Figure 19.4. Private Sub Image1_Click () CommonDialog1.Filter = "Bitmaps (*.BMP)|*.BMP|Metafiles (*.WMF)|*.WMF|Jpeg Files (*.jpg)|*.jpg|GIF Files (*.gif)|*.gif|Icon Files (*.ico)|*.ico|All Files (*.*)|*.*" CommonDialog1.ShowOpen Picture1.Picture = LoadPicture (CommonDialog1.FileName) End Sub Figure 19.4: The Picture Viewer
  • 120.
    115 Example 19.5 AnAdvanced Picture Viewer We will create a picture viewer in such a way that it can search for all types of graphics in your drives and display them. Similar to the previous project, in this project, you need to insert a ComboBox, a DriveListBox, a DirListBox, a TextBox and a FileListBox into your form. I shall briefly explain again the function of each of the above controls. a) ComboBox The ComboBox displays and enables the selection of different types of files. b) DriveListBox The DriveListBox allows the selection of different drives available in your PC. c) DirListBox The DirListBox displays the directories of a selected drive in your PC. d) TextBox The TextBox displays the selected files. e) FileListBox The FileListBox displays files that are available Relevant codes must be written to coordinate all the above controls so that the application can work properly. The program should flow in the following logical way:
  • 121.
    116 Step 1: Userchooses the type of files he wants to display. Step2: User selects the drive that might contain the relevant graphic files. Step 3: User looks into directories and subdirectories for the files specified in step1. The files should be displayed in the FileListBox. Step 4: User selects the files from the FileListBox and click the Show button. Step 5: User clicks on the Exit button to end the application. Figure 19.5: The Picture Viewer Interface The Code Private Sub Form_Load () Left = (Screen. Width - Width) 2 Top = (Screen. Height - Height) 2
  • 122.
    117 Combo1.Text = "All graphic files" Combo1.AddItem "All graphic files" Combo1.AddItem "All files" End Sub Private Sub Combo1_Change () If ListIndex = 0 Then File1.Pattern = ("*.bmp;*.wmf;*.jpg;*.gif") Else Fiel1.Pattern = ("*.*") End If End Sub Private Sub Dir1_Change () File1.Path = Dir1.Path File1.Pattern = ("*.bmp;*.wmf;*.jpg;*.gif") End Sub Private Sub Drive1_Change () Dir1.Path = Drive1.Drive End Sub Private Sub File1_Click () If Combo1.ListIndex = 0 Then File1.Pattern = ("*.bmp;*.wmf;*.jpg;*.gif") Else File1.Pattern = ("*.*") End If If Right (File1.Path, 1) <> "" Then filenam = File1.Path + "" + File1.FileName Else filenam = File1.Path + File1.FileName
  • 123.
    118 End If Text1.Text = filenam End Sub Private Sub show_Click () If Right (File1.Path, 1) <> "" Then filenam = File1.Path + "" + File1.FileName Else filenam = File1.Path + File1.FileName End If picture1.Picture = LoadPicture (filenam) End Sub Exercise 19 1. Write down the formats of the Pset method, the Line method and the Circle method. 2. Write a program to draw a circle which color can be changed using the colors specified in a list box. 3. Write a program to load pictures of various formats into an image box using the common dialog box. 4. Write a program that can load a set of pictures randomly into a picture box.
  • 124.
    119 Lesson 20 Creating Multimedia Applications Learning how to create a CD player. Learning how to create Audio player. Learning how to create Multimedia player.
  • 125.
    120 In Visual Basic,you can create various multimedia applications that can play audio CD, various audio files including mp3, wav and midi files; and different types of video files such as avi, mpeg files and etc. To be able to play multimedia files or multimedia devices, you have to insert the Microsoft Multimedia Control into your VISUAL BASIC applications that you are going to create. However, Microsoft Multimedia Control is not normally included in the startup toolbox. Therefore, you need to add the Microsoft Multimedia control by pressing Ctrl+T and checking the box beside the Microsoft Multimedia control 6.0 from the components that are displayed in the dialog box as shown in Figure 20.1. Then, press the OK button. When you close the dialog box, you will notice that the Microsoft Multimedia Control will be available in the toolbox and you can drag it into the form. Figure 20.1 The Components Dialog Box 20.1 Creating a CD Player
  • 126.
    121 Figure 20.2: The Interface of the CD player In this program, you will insert the Microsoft Multimedia Control and set its properties to Visible: True as well as Play: Enabled. In addition, insert five command buttons and name as well as label them as Play, Next, Previous, Stop and Exit. Besides that, insert a label that can be used to display the current track number of the song being played. Lastly, enter the program codes. The most important statement in this program is to set the Microsoft Multimedia Control’s device type to CDAudio because it will ensure audio CDs can be played. MMControl1.DeviceType = "CDAudio" To display the track number of the current song being played, use the following statement: trackNum.Caption = MMControl1.Track The Play, Next, Previous and Stop commands can be programmed using the MMControl1.Command = "Play", MMControl1.Command = "Next”, MMControl1.Command = "Prev", and MMControl1.Command = "Stop" statement. Lastly, always ensure that the Microsoft Multimedia Control is closed whenever the user closes the player. This can be achieved by using the statement MMControl1.Command = "Close" Under Form1_Unload procedure. The program:
  • 127.
    122 Private Sub Form_Load() 'To position the page at the center Left = (Screen.Width - Width) 2 Top = (Screen.Height - Height) 2 End Sub Private Sub Form_Activate () 'Load the CDPlayer MMControl1.Notify = False MMControl1.Wait = True MMControl1.DeviceType = "CDAudio" MMControl1.Command = "Open" End Sub Private Sub MMControl1_StatusUpdate () 'Update the track number trackNum.Caption = MMControl1.Track End Sub Private Sub Next_Click () MMControl1.Command = "Next" End Sub Private Sub Play_Click () MMControl1.Command = "Play" End Sub Private Sub Previous_Click () MMControl1.Command = "Prev" End Sub Private Sub Stop_Click () MMControl1.Command = "Stop" End Sub Private Sub Exit_Click () MMControl1.Command = "Stop"
  • 128.
    123 MMControl1.Command = "Close" End End Sub Private Sub Form1_unload () ‘Unload the CDPlayer MMControl1.Command = "Close" End Sub 20.2 Creating an Audio Player In section 20.1, we have programmed a CD player. Now, with some minor modifications, we will transform the CD player into an audio player. This player will be created in such a way that it can search for wave and midi files in your drives and play them. In this project, you need to insert a ComboBox, a DriveListBox, a DirListBox, a TextBox and a FileListBox into your form. I shall briefly discuss the function of each of the above controls. Besides that, you must also insert Microsoft Multimedia Control (MMControl) in your form. You may make it visible or invisible. In this program, I choose to make it invisible so that I can use the command buttons created to control the player. The functions of the various controls are explained below: a) The ComboBox Displays and enables the selection of different types of files. To add items to the Combo Box, you can use the AddItem method. The items here are the extensions of different audio files. b) The DriveListBox The DriveListBox allows the selection of different drives in your computer. c) The DirListBox The DirListBox displays different directories that are available in your computer. d) The Textbox The Textbox displays the selected files. e) The FileListBox The FileListBox displays files that are available in your computer. Relevant codes must be written to coordinate all the above controls so that the application can work properly. The program should flow in the following logical steps:
  • 129.
    124 Step 1: Userchooses the type of files he wants to play. Step2: User selects the drive that might contain the relevant audio files. Step 3: User looks into directories and subdirectories for the files specified in step1. The files should be displayed in the FileListBox. Step 4: User selects the files from the FileListBox and clicks the Play button. Step 5: User clicks on the Stop button to stop playing and the Exit button to end the application. To coordinate the DriveListBox and the DirListBox, you can use the statement below, so that any change of the drives will be reflected in the directory list box. Dir1.Path = Drive1.Drive To coordinate the FileListBox and the DirListBox, you can use the statement below so that any change of the directories will be reflected in the File List Box. File1.Path = Dir1.Path To select the target file, you can use the following statements where File1.Path determines the path of the file and File1.FileName determines the file name. The file name is then assigned to the variable filename and displayed in the text box. If Right (File1.Path, 1) <> "" Then filenam = File1.Path + "" + File1.FileName Else filenam = File1.Path + File1.FileName End If Text1.Text = filenam To select the file types, you can use the statement File1.Pattern = ("*.wav") to choose the wave audio files and the statement File1.Pattern = ("*.mid") to choose the sequencer files. To play the selected file, use the following procedure: Private Sub play_Click () 'To play WaveAudio file or Midi File If Combo1.ListIndex = 0 Then MMControl1.DeviceType = "WaveAudio"
  • 130.
    125 ElseIf Combo1.ListIndex = 1 Then MMControl1.DeviceType = "Sequencer" End If MMControl1.FileName = Text1.Text MMControl1.Command = "Open" MMControl1.Command = "Play" End Sub The statement MMControl1.DeviceType = "WaveAudio" enables the Microsoft Multimedia Control to play Wave Audio files and the statement MMControl1.DeviceType = "Sequencer" enables the Microsoft Multimedia Control to play the midi files. In fact, the Microsoft Multimedia Control can play many other types of multimedia files, including Mpeg, Mp3 and Avi video files. The statement MMControl1.FileName = Text1.Text plays the multimedia file displayed in the Text1 textbox. The statement MMControl1.Command = "Open" initiates the Microsoft Multimedia Control and the statement MMControl1.Command = "Play” plays the multimedia file. The statement MMControl1.Command = "stop" stops the Microsoft Multimedia Control from playing and finally the statement MMControl1.Command = "Close” closes the Microsoft Multimedia Control. The Program Private Sub Form_Load () 'To center the Audioplayer Left = (Screen.Width - Width) 2 Top = (Screen.Height - Height) 2 Combo1.Text = "*.wav" Combo1.AddItem "*.wav" Combo1.AddItem "*.mid" Combo1.AddItem "All files" End Sub Private Sub Combo1_Change () ‘To determine file type
  • 131.
    126 If ListIndex = 0 Then File1.Pattern = ("*.wav") ElseIf ListIndex = 1 Then File1.Pattern = ("*.mid") Else Fiel1.Pattern = ("*.*") End If End Sub Private Sub Dir1_Change () 'To change directories and subdirectories (or folders and subfolders) File1.Path = Dir1.Path If Combo1.ListIndex = 0 Then File1.Pattern = ("*.wav") ElseIf Combo1.ListIndex = 1 Then File1.Pattern = ("*.mid") Else File1.Pattern = ("*.*") End If End Sub Private Sub Drive1_Change () 'To change drives Dir1.Path = Drive1.Drive End Sub Private Sub File1_Click () If Combo1.ListIndex = 0 Then File1.Pattern = ("*.wav") ElseIf Combo1.ListIndex = 1 Then File1.Pattern = ("*.mid") Else File1.Pattern = ("*.*") End If
  • 132.
    127 If Right(File1.Path, 1) <> "" Then filenam = File1.Path + "" + File1.FileName Else filenam = File1.Path + File1.FileName End If Text1.Text = filenam End Sub Private Sub play_Click () 'To play WaveAudio file or Midi file If Combo1.ListIndex = 0 Then MMControl1.DeviceType = "WaveAudio" ElseIf Combo1.ListIndex = 1 Then MMControl1.DeviceType = "Sequencer" End If MMControl1.FileName = Text1.Text MMControl1.Command = "Open" MMControl1.Command = "Play" End Sub Private Sub stop_Click () MMControl1.Command = "Stop" End Sub Private Sub Exit_Click () MMControl1.Command = "Close" End End Sub Figure 20.2 The Audio Player
  • 133.
    128 20.3 Creating aMultimedia Player In section 20.2, we have created an audio player. Now, with some modifications, we will transform the audio player into a multimedia player that can play all kinds of movie files besides audio files. This player will be created in such a way that it can search for all types of media files in your computer drives and play them. In this project, you need to insert a ComboBox, a DriveListBox, a DirListBox, a TextBox, a FileListBox, and a picture box (for playing movies) into your form. I shall briefly discuss the function of each of the above controls. You must also insert Microsoft Multimedia Control (MMControl) in your form; you may make it visible or invisible. In my program, I choose to make it invisible so that I can use the command buttons created to control the player. The program is almost similar to the audio player, but you need to add a few extra statements so that you can play the video files and also the mp3 files. First of all, you have to add two more file types with the statements File1.Pattern = ("*.avi") and File1.Pattern = ("*.mpeg;*.mpg;*.mp3") so that the Avi and Mpeg movie files as well as the mp3 files will show up in the file list box . Secondly, you have to add the statement MMControl1.DeviceType = "AVIVideo" so that the Microsoft Multimedia Control can play the Avi video files and MMControl1.DeviceType = " " so that the player can play other media files including the mp3 files. Figure 21.1: The Multimedia Player
  • 134.
    129 The Program Private Sub Form_Load () Left = (Screen.Width - Width) 2 Top = (Screen.Height - Height) 2 Combo1.Text = "*.wav" Combo1.AddItem "*.wav" Combo1.AddItem "*.mid" Combo1.AddItem "*.avi" Combo1.AddItem "*.mpeg;*.mpg;*.mp3" Combo1.AddItem "All files" End Sub Private Sub Combo1_Change () If ListIndex = 0 Then File1.Pattern = ("*.wav") ElseIf ListIndex = 1 Then
  • 135.
    130 File1.Pattern = ("*.mid") ElseIf ListIndex = 2 Then File1.Pattern = ("*.avi") ElseIf ListIndex = 3 Then File1.Pattern = ("*.mpeg;*.mpg;*.mp3") Else Fiel1.Pattern = ("*.*") End If End Sub Private Sub Dir1_Change () File1.Path = Dir1.Path If Combo1.ListIndex = 0 Then File1.Pattern = ("*.wav") ElseIf Combo1.ListIndex = 1 Then File1.Pattern = ("*.mid") ElseIf Combo1.ListIndex = 2 Then File1.Pattern = ("*.avi") ElseIf Combo1.ListIndex = 3 Then File1.Pattern = ("*.mpeg;*.mpg;*.mp3") Else File1.Pattern = ("*.*") End If End Sub Private Sub Drive1_Change () Dir1.Path = Drive1.Drive End Sub Private Sub File1_Click () If Combo1.ListIndex = 0 Then File1.Pattern = ("*.wav") ElseIf Combo1.ListIndex = 1 Then File1.Pattern = ("*.mid") ElseIf Combo1.ListIndex = 2 Then
  • 136.
    131 File1.Pattern = ("*.avi") ElseIf Combo1.ListIndex = 3 Then File1.Pattern = ("*.mpeg;*.mpg;*.mp3") Else File1.Pattern = ("*.*") End If If Right (File1.Path, 1) <> "" Then filenam = File1.Path + "" + File1.FileName Else filenam = File1.Path + File1.FileName End If Text1.Text = filenam End Sub Private Sub Exit_Click () MMControl1.Command = "Close" End End Sub Private Sub Open_Click () If Combo1.ListIndex = 0 Then MMControl1.DeviceType = "WaveAudio" End If If Combo1.ListIndex = 1 Then MMControl1.DeviceType = "Sequencer" End If If Combo1.ListIndex = 2 Then MMControl1.DeviceType = "AVIVideo" End If If Combo1.ListIndex = 3 Then MMControl1.DeviceType = "" End If MMControl1.FileName = Text1.Text MMControl1.Command = "Open" End Sub
  • 137.
    132 Private Sub play_Click () Timer1.Enabled = True MMControl1.Command = "Play" MMControl1.hWndDisplay = Picture1.hWnd End Sub Private Sub stop_Click () If MMControl1.Mode = 524 Then Exit Sub If MMControl1.Mode <> 525 Then MMControl1.Wait = True MMControl1.Command = "Stop" End If MMControl1.Wait = True MMControl1.Command = "Close" End Sub Exercise 20 1. Write a program that can play different sound files using a common dialog box. 2. Write a program that can play different video files using a common dialog box. 3. Create a player that can play audio CDs as well as different sound files. Lesson 21
  • 138.
    133 Animation-Part I Learning how to create simple animation in Visual Basic. Animation is always an interesting and exciting part of programming. Although Visual Basic is not designed to handle advanced animations, you can still create some interesting animated effects if you put in some hard thinking. There are many ways to create animated effects in VB6, but for a start we will focus on the easier methods. The simplest way to create animation is to set the visible property of a group of images or pictures or even texts and labels to true or false by triggering a set of events such as clicking a button. Let's examine the following example: Example 21.1 This is a program that creates the illusion of moving a jet plane in four directions, that is, north, south, east, and west. In order to do this, we need to insert five images of the same picture into the form. Set the visible property of the image in the center to be true and set the rest to false. On start-up, the user will only be able to see the image in the center. Next, insert four command buttons into the form and change the labels to Move North, Move East, Move West and Move South respectively. Double click on the Move North button and key in the following procedure: Sub Command1_click ( ) Image1.Visible = False Image3.Visible = True Image2.Visible = False Image4.Visible = False Image5.Visible = False End Sub By clicking on the Move North button, Image1 and other images except Image3 will be displayed. This will give an illusion that the jet plane has moved north. Now, double click on other command buttons and key in similar procedures. You can also insert an additional command button and label it as Reset and key in the following code:
  • 139.
    134 Image1.Visible = True Image3.Visible= False Image2.Visible = False Image4.Visible = False Image5.Visible = False Clicking on the reset button will make the image in the center visible again while other images become invisible, this will give the impression that the jet plane has moved back to the original position. Figure 21.1 Example 21.1 You can also issue the commands using a textbox. This idea actually came from my son Xun (10). His program is shown below: Figure 21.2
  • 140.
    135 In the textbox,when you key in the letter n, the plane will move north, move west when you key in w, move south when you key in s and move east when you key in the letter e. The codes are as follows Private Sub Command1_Click() If Text1.Text = "n" Then Image1.Visible = False Image3.Visible = True Image2.Visible = False Image4.Visible = False Image5.Visible = False ElseIf Text1.Text = "e" Then Image1.Visible = False Image4.Visible = True Image2.Visible = False Image3.Visible = False Image5.Visible = False ElseIf Text1.Text = "w" Then Image1.Visible = False Image3.Visible = False Image2.Visible = False Image4.Visible = False
  • 141.
    136 Image5.Visible = True ElseIf Text1.Text = "s" Then Image1.Visible = False Image3.Visible = False Image2.Visible = True Image4.Visible = False Image5.Visible = False End If End Sub Another simple way to simulate animation in VB6 is by using the Left and Top properties of an object. Image.Left gives the distance of the image in twips from the left border of the screen, and Image.Top gives the distance of the image in twips from the top border of the screen. 1 twip is equivalent to 1/1440 of an inch. Using a statement such as Image.Left-100 will move the Image100 twips to the left, Image.Left+100 will move the Image100 twip away from the left (or 100 twips to the right), Image.Top-100 will move the Image100 twips to the top and Image.Top+100 will move the Image100 twips away from the top border (or 100 twips down). Example 21.3 illustrates how all the above methods can be used to create animation. Example 21.3 This is a program that can move an object up, down, left, and right every time you click on a relevant command button. The codes such as Image1.Top = Image1.Top + 100 are to make the distance increase or decrease every time a user clicks on the command button. For example, if the initial position of Image1 is 1000 twips from the top, after one click, the distance from the top will be 1100, and the next distance will be 1200 and so on. Therefore, by writing similar codes for all the four buttons, you can move the image in four directions by clicking any of the four buttons. Figure 21.3
  • 142.
    137 The Program Private Sub Command1_Click () Image1.Top = Image1.Top + 100 End Sub Private Sub Command2_Click () Image1.Top = Image1.Top - 100 End Sub Private Sub Command3_Click () Image1.Left = Image1.Left + 100 End Sub Private Sub Command4_Click () Image1.Left = Image1.Left – 100 End Sub Example 21.4 This example lets users magnify or diminish an object by changing the height and width properties of an object. It is quite similar to the previous example. The statements Image1.Height = Image1.Height + 100 and Image1.Width = Image1.Width + 100 will increase the height and the width of an object by 100 twips each time a user clicks on the relevant command button. On the other hand, the statements Image1.Height = Image1.Height - 100 and Image1.Width =
  • 143.
    138 Image1.Width -100 willdecrease the height and the width of an object by 100 twips each time a user clicks on the relevant command button. Figure 21.4 The Program Private Sub Command1_Click () Image1.Height = Image1.Height + 100 Image1.Width = Image1.Width + 100 End Sub Private Sub Command2_Click () Image1.Height = Image1.Height - 100 Image1.Width = Image1.Width - 100 End Sub You can try to combine both of the programs and make an object move and increase or decrease in size each time a user clicks a command button. Exercise 21 1. Create a simple animation by setting the visible property of a group of objects to false and true. 2. Create an animation program by varying an image’s Left, Top, Width and Height properties.
  • 144.
    139 Lesson 22 Animation - Part II Learning how to create a drag and drop animation. Learning how to create an animation with a complete motion. 22.1 Animation using a drag and drop procedure Drag and drop is a common application where you can drag and drop an object such as a file into a folder or into a recycle bin. This ability can be easily programmed in Visual Basic. In the following example, we are going to create a simulation of dragging the objects into a recycle bin and burning them. In this program, you need to put 6 images on the form: a recycle bin, a burning recycle bin, the fire, and three more images which are to be dragged into the recycle bin. In addition, set all the dragmode of the images (including the fire) to 1(Automatic) so that dragging is enabled, and set the visible property of the burning recycle bin to false at start-up. Besides that, label the tag of fire as fire in its properties window. If you want to have better dragging effects, you need to load an appropriate icon under the dragIcon properties for those images to be dragged. Preferably the icon should be the same as the image so that when you drag the image, it is like you are dragging the image along. The essential event procedure in this program is as follows: Private Sub Image4_DragDrop (Source As Control, X As Single, Y As Single) Source.Visible = False If Source.Tag = "Fire" Then Image4.Picture = Image5.Picture End If End Sub Source refers to the image being dragged. Using the code Source.Visible=False means it will disappear after being dragged into the recycle bin (Image4). If the source is Fire, then the recycle will change into a burning recycle bin, which is
  • 145.
    140 accomplished by usingthe code Image4.Picture = Image5.Picture, where Image 5 is the burning recycle bin. Figure 22.1 The Program Private Sub Form_Click () Label1.Visible = False End Sub Private Sub Image4_DragDrop (Source As Control, X As Single, Y As Single) Source.Visible = False If Source.Tag = "Fire" Then Image4.Picture = Image5.Picture End If End Sub Private Sub instruct_Click () Label1.Visible = True End Sub 22.2 Animation with complete motion So far the examples of animation shown in Lesson 21 only involve movement of static images. In this Lesson, you will be able to create true animation where an action finishes in a complete cycle, for example, a butterfly flapping its wings. In the
  • 146.
    141 following example, youneed to use eight picture frames of a butterfly which display a butterfly flapping its wings at different stages. You need to put all the above images overlapping one another, make Image1 visible while all other images invisible at start-up. Next, insert a command button and label it as Animate. Click on the command button and key in the statements that make the images appear and disappear successively by using the properties image.visible=true and image.visible=false. You can use If..... Then and Elseif to control the program flow. When you run the program, you should be able to get the following animation. Figure 22.2 The Program Private Sub Command1_Click () If Image1.Visible = True Then Image1.Visible = False Image2.Visible = True ElseIf Image2.Visible = True Then Image2.Visible = False Image3.Visible = True ElseIf Image3.Visible = True Then Image3.Visible = False
  • 147.
    142 Image4.Visible = True ElseIf Image4.Visible = True Then Image4.Visible = False Image5.Visible = True ElseIf Image5.Visible = True Then Image5.Visible = False Image6.Visible = True ElseIf Image6.Visible = True Then Image6.Visible = False Image7.Visible = True ElseIf Image7.Visible = True Then Image7.Visible = False Image8.Visible = True ElseIf Image8.Visible = True Then Image8.Visible = False Image1.Visible = True End If End Sub If you wish to create the effect of the butterfly flapping its wings and flying at the same time, then you could use the Left and Top properties of an object, such as the one used in the examples of Lesson 23. Below is an example of a subroutine where the butterfly will flap its wings and move up at the same time. You can also write subroutines that move the butterfly to the left, to the right and to the bottom. Sub move_up ( ) If Image1.Visible = True Then Image1.Visible = False Image2.Visible = True Image2.Top = Image2.Top - 100 ElseIf Image2.Visible = True Then Image2.Visible = False Image3.Visible = True Image3.Top = Image3.Top - 100 ElseIf Image3.Visible = True Then Image3.Visible = False
  • 148.
    143 Image4.Visible = True Image4.Top = Image4.Top - 100 ElseIf Image4.Visible = True Then Image4.Visible = False Image5.Visible = True Image5.Top = Image5.Top - 100 ElseIf Image5.Visible = True Then Image5.Visible = False Image6.Visible = True Image6.Top = Image6.Top - 100 ElseIf Image6.Visible = True Then Image6.Visible = False Image7.Visible = True Image7.Top = Image7.Top - 100 ElseIf Image7.Visible = True Then Image7.Visible = False Image8.Visible = True Image8.Top = Image8.Top - 100 ElseIf Image8.Visible = True Then Image8.Visible = False Image1.Visible = True Image1.Top = Image1.Top - 100 End If End Sub Exercise 22 1. Write a program that drags and drops a group of items into a box and plays a sound at the same time. 2. Create a program that simulates a running man using the images below or use your own images, or those downloaded from the Internet.
  • 149.
    144 Lesson 23 Animation - Part III Learning how to create animation using timers. Learning how to create animation using the Move method. 23.1 Animation using timers All preceding examples of animation that you have learnt in Lesson 23 and Lesson 24 only involve manual animation, which means you need to keep on clicking a certain command button or pressing a key to make an object animate. In order to make it move automatically, you need to use a timer. The first step in creating automatic animation is to drag the timer from the toolbox into the form and set its interval to a certain value other than 0. A value of 1 is equivalent to 1 milli-second which means a value of 1000 represents 1 second. The value of the timer interval will determine the speed of an animation. Example 23.1 This program uses a very simple technique to create an animation by setting the properties Visible=False and Visible=True to show and hide two images alternately. When you click on the program, you should see the animation that shows Image1 and Image2 interchangeably. The Program Private Sub Timer1_Timer () If Image1.Visible = True Then Image1.Visible = False Image2.Visible = True ElseIf Image2.Visible = True Then Image2.Visible = False Image1.Visible = True End If End Sub
  • 150.
    145 Example 23.2 This exampleshows a complete cycle of a motion such as the butterfly flapping its wings. Previous examples show only manual animation while this example will display an automatic animation once you start the program or by clicking a command button. Similar to the example under Lesson 24.2, you need to insert a group of eight images of a butterfly flapping its wings at different stages. Next, insert a timer into the form and set the interval to 10 or any value you like. Remember to make Image1 visible and the other images invisible at start-up. Finally, insert a command button, rename its caption as Animate, and key in the following statements by double clicking on this button. It is important to bear in mind that you should enter the statements for hiding and showing the images under the timer1_timer subroutine otherwise the animation will not work. Clicking on the Animate button will make the timer start ticking and the event will run after every interval of 10 milliseconds or whatever interval you have set. In future lessons, I will show you how to adjust the interval at runtime by using a slider bar or a scroll bar. Figure 23.1 The Program Private Sub Form_Load () Image1.Visible = True x=0 End Sub
  • 151.
    146 Private Sub Command1_Click() Timer1.Enabled = True End Sub Private Sub Timer1_Timer () If Image1.Visible = True Then Image1.Visible = False Image2.Visible = True ElseIf Image2.Visible = True Then Image2.Visible = False Image3.Visible = True ElseIf Image3.Visible = True Then Image3.Visible = False Image4.Visible = True ElseIf Image4.Visible = True Then Image4.Visible = False Image5.Visible = True ElseIf Image5.Visible = True Then Image5.Visible = False Image6.Visible = True ElseIf Image6.Visible = True Then Image6.Visible = False Image7.Visible = True ElseIf Image7.Visible = True Then Image7.Visible = False Image8.Visible = True ElseIf Image8.Visible = True Then Image8.Visible = False Image1.Visible = True End If End Sub
  • 152.
    147 23.2 Animation usingthe Move Method The most powerful method to enable animation in Visual Basic is the Move method. The syntax is shown below where the object moves to the point (x, y) Object.Move x, y where x is the distance from the left border of the screen and y is the distance from the top border of the screen. For example, the statement Image1.Move 1000, 1000 will move Image1 to the location 1000 twips from the left border and 1000 twips from the top border. Example 23.3 This program will move Image1 to the location with coordinates (1000,1000) at the first click and subsequently every click will move Image1 100 twips away from the left border and 100 twips from the top border. Private Sub Image1_Click() Image1.Move 1000 + x, 1000 + x x = x + 100 End Sub Example 24.2 This example uses the timer to initiate a motion that is automatic. In order to do that, you need to insert a timer and set its interval to a certain value. The procedure is shown below. When you run this program, the image moves 50 twips closer to the left and the top of the screen respectively after every interval. Private Sub Image1_Click () Image1.Move Image1.Left-50, Image1.Top-50 End Sub Exercise 23 1. Write down and explain the syntax of the Move method. 2. Create an animation that shows and hides a group of 5 images interchangeably. 3. Write a program using the Move method that shows an object moving vertically up and down.
  • 153.
    148 Lesson 24 Fun and Games Programming –Part I Learning how to create simple games. A lot of people might think that VISUAL BASIC is not a suitable programming language for games. Actually, though there might be some limitations in VISUAL BASIC involving game programming and animation, you can actually construct some good games in VISUAL BASIC if you put in a lot of thought and time. To design a game, you need to come up with an idea first, and then sit back and think over it. Ideas can be obtained through the Internet, other media sources, from gamers themselves etc. After that, you need to write out a draft program and try it out. You should always start with one small component of the program and if that works, you can proceed to program other components and then combine them. You should always have a VISUAL BASIC book in hand for referencing. Game programming can be very satisfying if your programs work. Furthermore, you can learn a great deal of programming logics by doing game programming because the procedures are often very complex, and you need to look up for references every now and then. Here are some of the programs that I have thought out myself. These programs make use of everything you have learnt so far and you need to read through all the procedures carefully so that you can better understand the programming logics behind them. Later, you might want to modify the programs or even come out with your own games. 24.1 Snake Chess Snake chess is a popular board game for young children. This game usually involves two or more players and they take turns to move by rolling a die. On the way to the finishing point, the players will meet with some hurdles in the form of snakes and some opportunities in the form of ladders. Whenever the player encounters a snake (or more accurately, the snake’s head), he or she will be thrown back to an earlier
  • 154.
    149 box (which isat the snake’s tail). On the other hand, whenever the player encounters a ladder, he or she can climb up the ladder to a higher box. The player who reaches the finishing point first wins the game. Figure 24.1 illustrates the interface. Figure 24.1 Snake Chess The first step in creating the game is to design the interface. Here, the labels used to design the chess board are numbered from 1 to 100. These labels are filled with different colors to give it a more appealing look. Next, insert various pictures of snakes using the image box and then draw the ladders using the line tool. In addition, you need to draw the die with the shape control, and add in the command buttons for rolling the die, starting a new game as well as exiting the game. Besides that, you need to insert two images to denote the players and then put in the label for the declaration of the winner. Lastly, insert two timers for animation purposes.
  • 155.
    150 The initial partof the program is to declare various variables. The two most important variables are the arrays c (10) and r (10). The array r (10) is used to denote the row numbers , where r(1)=row 1, r(2)=row 2 until r(10)=row 10. Similarly, c (10) is used to denote the column numbers, where c (1) =column 1, c (2) =column 2 until c (10) =column 10. After declaring the variables, you need to assign the coordinates of the center of all the boxes which can be denoted by (column, row) or (c (i), r (i)), using the procedure below: Private Sub Form_Load () c (1) = 600 r(1) = 8200 For i = 1 To 9 c (i + 1) = c (i) + 800 Next For j = 1 To 9 r (j + 1) = r (j) - 800 Next End Sub You have to determine the initial position of the center of the first box (label) by looking at its distance from the left as well as from the top, and also its width, in the properties window. In this program, the distance of the first box from the left is 400 twips, and its width is 800 twips, therefore its center is 600 twips from the left. Using the statement c (i + 1) = c (i) + 800 within a For…Next loop, the distance between successive columns will be fixed at 800 twips. Similarly, the distance between rows can be determined using the same logic. The next most important step is to control the movement of the chess pieces. In order to do this, you have to use the variables totalnum and totalnum1 to denote the accumulated scores of the die for player 1 and player 2 respectively. For example, if the first score of the die is 3 and the second score of the die is 6 for player 1, then totalnum=9. You need to write the procedure for every row individually so that motion will be in a zigzag manner as shown in Figure 24.2
  • 156.
    151 Figure 24.2 Themovement of the chess pieces For the first row and for player 1, you can use the following procedure: If player = 1 Then totalnum = totalnum + num If totalnum < 11 Then Image1 (0).Move c (totalnum), r (1) End If Num is the score which appears on the die and the totalnum is added to num to get the accumulated scores. In the first row, the number on the rightmost square is 10, which is equal to the number of columns across the first row. The statement Image1 (0).Move c (totalnum), r (1) uses the Move method to move chess piece 1 (Image1(0)) across the column from left to right . For the movement in the second row, the direction is from right to left, so we need to use the following procedure: If totalnum > 10 And totalnum < 21 Then Image1 (0).Move c (21 - totalnum), r (2) End If
  • 157.
    152 The statement Image1(0).Move c(21 - totalnum), r(2) will move Image1(0) from the position c(10),r(2) to c(1), r(2), i.e. from the square with number 11 to the square with number 20. The movement of the chess pieces for other positions follows the same logics. The procedure to move the chess pieces has to be placed under the Private Sub Timer1_Timer procedure (set the Timer1’s interval to a certain value). Before the program can work, you will need to program the die, which will determine how many steps the chess pieces will move. The interface of the die consists of 7 round shapes that are placed in a rounded square as shown in Figure 24.3. The seven round shapes are inserted as a control array with names starting with shape1 (0) to shape1 (6). The shape in the center is shape1 (3). The appearance of the round shapes are controlled by a randomization process that produce six random numbers using the statement num = Int(1 + Rnd * 6). For example, when num=1, only the round shape in the center appears while other round shapes are made invisible. Other combinations use the same logic. Putting all the procedures together, we have created a game of snake chess. Figure 24.3 The Die The Program Option Base 1 Dim c (10) As Variant Dim r (10) As Variant Dim x As Integer Dim m As Integer Dim n As Integer Dim num As Integer Dim totalnum As Single Dim totalnum1 As Single
  • 158.
    153 Dim player AsInteger Dim t As Integer Private Sub Command2_Click() 'To move the chess pieces to the original position Image1 (0).Move 10200, 5520 Image1 (1).Move 10200, 6480 Totalnum = 0 totalnum1 = 0 Label2.Caption = "" MMControl1.Command = "close" End Sub Private Sub Command3_Click () End End Sub Private Sub Form_Load () 'To assign the column and row coordinates to all the boxes c (1) = 600 r (1) = 8200 For i = 1 To 9 c (i + 1) = c (i) + 800 Next For j = 1 To 9 r (j + 1) = r (j) - 800 Next End Sub 'To roll the die Private Sub roll () x = x + 10 Randomize Timer num = Int(1 + Rnd * 6)
  • 159.
    154 For i =0 To 6 Shape1 (i).Visible = False Next If num = 1 Then Shape1 (3).Visible = True Shape2.FillColor = &HC0C0C0 End If If num = 2 Then Shape1 (2).Visible = True Shape1 (4).Visible = True Shape2.FillColor = &H8080FF End If If num = 3 Then Shape1 (2).Visible = True Shape1 (3).Visible = True Shape1 (4).Visible = True Shape2.FillColor = &H80FF& End If If num = 4 Then Shape1 (0).Visible = True Shape1 (2).Visible = True Shape1 (4).Visible = True Shape1 (6).Visible = True Shape2.FillColor = &HFFFF00 End If If num = 5 Then Shape1 (0).Visible = True Shape1 (2).Visible = True Shape1 (3).Visible = True Shape1 (4).Visible = True Shape1 (6).Visible = True Shape2.FillColor = &HFFFF& End If If num = 6 Then
  • 160.
    155 Shape1 (0).Visible = True Shape1 (1).Visible = True Shape1 (2).Visible = True Shape1 (4).Visible = True Shape1 (5).Visible = True Shape1 (6).Visible = True Shape2.FillColor = &HFF00FF End If End Sub Private Sub Command1_Click (Index As Integer) 'To identify which player is clicking the roll die command If Index = 0 Then player = 1 End If If Index = 1 Then player = 2 End If Timer1.Enabled = True x=0 End Sub Private Sub Timer1_Timer () If x < 100 Then Call roll Else Timer1.Enabled = False 'To move player 1 according to the total score of the die 'Movement across column 1 to column 10 and row 1 to row 10 If player = 1 Then totalnum = totalnum + num
  • 161.
    156 If totalnum <11 Then Image1 (0).Move c (totalnum), r (1) If totalnum = 10 Then Image1 (0).Move c (8), r (3) totalnum = 28 End If End If If totalnum > 10 And totalnum < 21 Then Image1 (0).Move c (21 - totalnum), r (2) If totalnum = 17 Then Image1 (0).Move c (4), r (4) Totalnum = 37 End If End If If totalnum > 20 And totalnum < 31 Then Image1 (0).Move c (totalnum - 20), r(3) End If If totalnum > 30 And totalnum < 41 Then Image1 (0).Move c (41 - totalnum), r(4) If totalnum = 34 Then Image1 (0).Move c(5), r(2) totalnum = 16 End If If totalnum = 31 Then Image1 (0).Move c (10), r (7) totalnum = 70 End If End If If totalnum > 40 And totalnum < 51 Then Image1 (0).Move c (totalnum - 40), r (5) If totalnum = 45 Then Image1 (0).Move c (4), r (9) totalnum = 84
  • 162.
    157 End If If totalnum= 44 Then Image1 (0).Move c(1), r(3) totalnum = 21 End If End If If totalnum > 50 And totalnum < 61 Then Image1 (0).Move c (61 - totalnum), r (6) End If If totalnum > 60 And totalnum < 71 Then Image1 (0).Move c (totalnum - 60), r (7) If totalnum = 68 Then Image1 (0).Move c (8), r (5) totalnum = 48 End If End If If totalnum > 70 And totalnum < 81 Then Image1 (0).Move c (81 - totalnum), r (8) If totalnum = 79 Then Image1 (0).Move c (2), r (6) totalnum = 59 End If If totalnum = 78 Then Image1 (0).Move c (4), r (10) totalnum = 97 End If End If If totalnum > 80 And totalnum < 91 Then Image1 (0).Move c (totalnum - 80), r (9) End If If totalnum > 90 And totalnum < 101 Then Image1 (0).Move c (101 - totalnum), r (10)
  • 163.
    158 If totalnum =95 Then Image1 (0).Move c(8), r(8) totalnum = 73 End If End If If totalnum > 100 Or totalnum = 100 Then Image1 (0).Move c (1), r(10) End If End If 'To move player 2 according to the total score of the die If player = 2 Then totalnum1 = totalnum1 + num If totalnum1 < 11 Then Image1 (1).Move c (totalnum1), r(1) If totalnum1 = 10 Then Image1 (1).Move c (8), r(3) totalnum1 = 28 End If End If If totalnum1 > 10 And totalnum1 < 21 Then Image1 (1).Move c (21 - totalnum1), r (2) If totalnum1 = 17 Then Image1 (1).Move c (4), r (4) totalnum1 = 37 End If End If If totalnum1 > 20 And totalnum1 < 31 Then Image1 (1).Move c (totalnum1 - 20), r(3) End If If totalnum1 > 30 And totalnum1 < 41 Then Image1 (1).Move c (41 - totalnum1), r(4) If totalnum1 = 34 Then
  • 164.
    159 Image1 (1).Move c(5), r(2) totalnum1 = 16 End If If totalnum1 = 31 Then Image1(1).Move c (10), r(7) totalnum1 = 70 End If End If If totalnum1 > 40 And totalnum1 < 51 Then Image1(1).Move c(totalnum1 - 40), r(5) If totalnum1 = 45 Then Image1(1).Move c(4), r(9) totalnum1 = 84 End If If totalnum1 = 44 Then Image1(1).Move c(1), r(3) totalnum1 = 21 End If End If If totalnum1 > 50 And totalnum1 < 61 Then Image1 (1).Move c (61 - totalnum1), r (6) End If If totalnum1 > 60 And totalnum1 < 71 Then Image1 (1).Move c (totalnum1 - 60), r (7) If totalnum1 = 68 Then Image1 (1).Move c (8), r(5) totalnum1 = 48 End If End If If totalnum1 > 70 And totalnum1 < 81 Then Image1 (1).Move c (81 - totalnum1), r(8) If totalnum1 = 79 Then
  • 165.
    160 Image1 (1).Move c(2),r(6) totalnum1 = 59 End If If totalnum1 = 78 Then Image1 (1).Move c (4), r (10) totalnum1 = 97 End If End If If totalnum1 > 80 And totalnum1 < 91 Then Image1 (1).Move c (totalnum1 - 80), r(9) End If If totalnum1 > 90 And totalnum1 < 101 Then Image1 (1).Move c (101 - totalnum1), r (10) If totalnum1 = 95 Then Image1 (1).Move c (8), r (8) totalnum1 = 73 End If End If If totalnum1 > 100 Or totalnum1 = 100 Then Image1 (1).Move c (1), r (10) End If End If 'To play the applause sound when any one player reaches 100 If (totalnum > 100 Or totalnum = 100) And totalnum1 < 100 Then Label2.Caption = "Player 1 Wins" MMControl1.Notify = False MMControl1.Wait = True MMControl1.Shareable = False MMControl1.DeviceType = "WaveAudio" MMControl1.FileName = "D:Liew FolderVISUAL BASIC programaudioapplause.wav" MMControl1.Command = "Open" MMControl1.Command = "Play"
  • 166.
    161 End If If (totalnum1 > 100 Or totalnum1 = 100) And totalnum < 100 Then Label2.Caption = "Player 2 Wins" MMControl1.Notify = False MMControl1.Wait = True MMControl1.Shareable = False MMControl1.DeviceType = "WaveAudio" MMControl1.FileName = "D:Liew FolderVISUAL BASIC programaudioapplause.wav" MMControl1.Command = "Open" MMControl1.Command = "Play" End If End If End Sub 24.2 Slot Machine This a professional-looking slot machine which resembles the real machines played in the casinos in Las Vegas! In this program, the most important part of the program is inserting three image boxes into the form and programming them so that they will display a set of three different pictures randomly when the user presses on the spin button. Therefore, it involves a randomization process. Next, a timer needs to be incorporated into the procedures so that the programs can produce animated effects. In addition, you can also insert the Microsoft Multimedia Control so that it can play sounds in synchronization with the spinning of the slot machine as well as when the player hits the jackpot.
  • 167.
    162 Figure 24.4 TheSlot Machine The most important part of the program is the spin procedure, which is a = 1 + Int(Rnd * 3) b = 1 + Int(Rnd * 3) c = 1 + Int(Rnd * 3) If a = 1 Then Image1 (0).Picture = LoadPicture ("C:VISUAL BASIC programImagesgrape.gif") End If If a = 2 Then Image1(0).Picture = LoadPicture("C: VISUAL BASIC programImagescherry.gif")
  • 168.
    163 End If If a= 3 Then Image1(0).Picture = LoadPicture("C:VISUAL BASIC programImagesorange.gif") End If If b = 1 Then Image1(1).Picture = LoadPicture("C:VISUAL BASIC programImagesgrape.gif") End If If b = 2 Then Image1(1).Picture = LoadPicture("C:VISUAL BASIC programImagescherry.gif") End If If b = 3 Then Image1(1).Picture = LoadPicture("C:VISUAL BASIC programImagesorange.gif") End If If c = 1 Then Image1(2).Picture = LoadPicture("C:VISUAL BASIC programImagesgrape.gif") End If If c = 2 Then Image1(2).Picture = LoadPicture("C:VISUAL BASIC programImagescherry.gif") End If If c = 3 Then Image1(2).Picture = LoadPicture("C:VISUAL BASIC programImagesorange.gif") End If End Sub The three random variables a, b and c will be randomly assigned the values 1, 2 and 3 through the Rnd function. Based on these three random numbers, three different pictures will be loaded into the three image boxes randomly using the LoadPicture
  • 169.
    164 method. Animated effectsare created by putting the above procedure under the control of Timer1, which will call the spin procedure after every interval until it fulfills a certain condition. Sounds are also added using the Microsoft Multimedia Control to make the game more realistic and interesting. The amount won is controlled by the If….Then statements. For example, if two grapes appear in any two image boxes, the amount won is $20. The statements for this are: If (a = 1 And b = 1 And c <> 1) Or (a = 1 And c = 1 And b <> 1) Or (b = 1 And c = 1 And a <> 1) Then Label1.Caption = “You win 20 dollars" amount = amount + 20 End If Whenever the value of a, b or c is 1, the picture grape.gif will be loaded under the spin procedure. The above If….Then statement will check whether two grapes are loaded in any two of the three image boxes randomly; if so then the program will declare that the player has won 20 dollars. Besides that, 20 dollars will be added to the variable amount. The Program Dim x As Integer Dim amount As Variant Dim balance As Variant Dim a, b, c As Integer Private Sub Command2_Click() End End Sub Private Sub betbal_Click() Label13.Caption = Str(Val(Label6.Caption) + Val(Label13.Caption)) Label6.Caption = "" End Sub Private Sub Cashout_Click() If Val(Label13.Caption) > 0 Then balance = Val(Label6.Caption) + Val(Label13.Caption)
  • 170.
    165 Label13.Caption = "" Label6.Caption = Str(balance) Label1.Caption = "Please bet again" Else Label1.Caption = "Sorry, you have no money to cash out." End If End Sub Private Sub Form_Click() Label3.Visible = False End Sub Private Sub Form_Load() Label1.Caption = " Welcome to Play" Label3.Visible = False Image1(0).Picture = LoadPicture("C:VISUAL BASIC programImagesgrape.gif") Image1(1).Picture = LoadPicture("C:VISUAL BASIC programImagescherry.gif") Image1(2).Picture = LoadPicture("C:VISUAL BASIC programImagesorange.gif") End Sub Private Sub Image23_Click() End End Sub Private Sub instruct_click() Label3.Visible = True End Sub Private Sub Label12_Click() Label13.Caption = Str(Val(Label13.Caption) + Val(Text2.Text)) Text2.Text = "" End Sub
  • 171.
    166 Private Sub spin_Click() Timer1.Enabled = True MMControl1.Command = "Close" MMControl2.Command = "Close" x=0 amount = Val(Text1) balance = Val(Label6) End Sub Private Sub spining_Click() If Val(Label13.Caption) > 0 Then Timer1.Enabled = True MMControl1.Command = "Close" MMControl2.Command = "close" x=0 amount = Val(Label13.Caption) balance = Val(Label6) Else Label1.Caption = "Sorry, you have no money to spin, add cash." End If End Sub Private Sub Timer1_Timer() If x < 500 Then spin Else Timer1.Enabled = False MMControl1.Command = "Stop" Label1.Alignment = 2 If (a = 1 And b = 1 And c <> 1) Or (a = 1 And c = 1 And b <> 1) Or (b = 1 And c = 1 And a <> 1) Then Label1.Caption = " You win 20 dollars" amount = amount + 20
  • 172.
    167 End If If (a= 2 And b = 2 And c <> 2) Or (a = 2 And c = 2 And b <> 2) Or (b = 2 And c = 2 And a <> 2) Then Label1.Caption = “You win 30 dollars" amount = amount + 30 End If If (a = 3 And b = 3 And c <> 3) Or (a = 3 And c = 3 And b <> 3) Or (b = 3 And c = 3 And a <> 3) Then Label1.Caption = " You win 40 dollars" amount = amount + 40 End If If (a = 1 And b = 1 And c = 1) Or (a = 2 And b = 2 And c = 2) Or (a = 3 And b = 3 And c = 3) Then MMControl2.Notify = False MMControl2.Wait = True MMControl2.Shareable = False MMControl2.DeviceType = "WaveAudio" MMControl2.FileName = "D:Liew FolderVISUAL BASIC programaudioendgame.wav" MMControl2.Command = "Open" MMControl2.Command = "Play" Label1.Caption = “Congratulation! Jackpot!!! You win 200 dollars!" amount = amount + 200 End If If (a = 1 And b = 2 And c = 3) Or (a = 1 And b = 3 And c = 2) Or (a = 2 And b = 1 And c = 3) Or (a = 2 And b = 3 And c = 1) Or (a = 3 And b = 2 And c = 1) Or (a = 3 And b = 1 And c = 2) Then Label1.Caption = “Too bad, you lost 100 dollars" amount = amount - 100 End If
  • 173.
    168 If amount <0 Then Label1.Caption = "Oh! You're bankrupt! Add cash to play!" End If Label13.Caption = Str(amount) End If End Sub Private Sub spin() x = x + 10 Randomize Timer a = 1 + Int(Rnd * 3) b = 1 + Int(Rnd * 3) c = 1 + Int(Rnd * 3) MMControl1.Notify = False MMControl1.Wait = True MMControl1.Shareable = False MMControl1.DeviceType = "WaveAudio" MMControl1.FileName = "C:VISUAL BASIC programaudioslot2.wav" MMControl1.Command = "Open" MMControl1.Command = "Play" Label1.Caption = "Good Luck!" Label1.Alignment = a - 1 If a = 1 Then Image1(0).Picture = LoadPicture("C:VISUAL BASIC programImagesgrape.gif") End If If a = 2 Then Image1(0).Picture = LoadPicture("C: VISUAL BASIC programImagescherry.gif") End If If a = 3 Then
  • 174.
    169 Image1(0).Picture = LoadPicture("C:VISUAL BASIC programImagesorange.gif") End If If b = 1 Then Image1(1).Picture = LoadPicture("C:VISUAL BASIC programImagesgrape.gif") End If If b = 2 Then Image1(1).Picture = LoadPicture("C:VISUAL BASIC programImagescherry.gif") End If If b = 3 Then Image1(1).Picture = LoadPicture("C:VISUAL BASIC programImagesorange.gif") End If If c = 1 Then Image1(2).Picture = LoadPicture("C:VISUAL BASIC programImagesgrape.gif") End If If c = 2 Then Image1(2).Picture = LoadPicture("C:VISUAL BASIC programImagescherry.gif") End If If c = 3 Then Image1(2).Picture = LoadPicture("C:VISUAL BASIC programImagesorange.gif") End If End Sub Exercise 24 1. Create a simple version of the popular monopoly game. 2. Create a slot machine that displays two rows of images.
  • 175.
    170 Lesson 25 Fun and Games Programming- Part II Learning how to create simple games. 25.1 Boggle This is a type of word game where players can form as many words as possible from the characters displayed on an nxn square. Words can be formed in many ways, from left to right, from right to left, top to bottom, bottom to top, diagonal, in a zigzag manner etc. as long as the letters are connected. This example is a 5x5 boggle which means it comprises 5 rows and 5 columns. Each time a player presses the shake button, a different set of characters will appear. In order to do this, I used the
  • 176.
    171 randomize concept. So,I created an array of characters and displayed them on an array of 25 labels. Then, I use a For...Next loop to generate the characters. Figure 25.1 The Program Dim char(26) As String Dim I As Integer Dim J As Integer Private Sub Command1_Click() char(0) = "A" char(1) = "B" char(2) = "C" char(3) = "D" char(4) = "E" char(5) = "E"
  • 177.
    172 char(6) = "G" char(7) = "H" char(8) = "I" char(9) = "J" char(10) = "K" char(11) = "L" char(12) = "M" char(13) = "N" char(14) = "O" char(15) = "P" char(16) = "Qu" char(17) = "R" char(18) = "S" char(19) = "T" char(20) = "U" char(21) = "V" char(22) = "W" char(23) = "X" char(24) = "Y" char(25) = "Z" Randomize Timer For I = 0 To 24 J = Int((Rnd * 26)) Label1(I).Caption = char(J) Next End Sub 25.2 Reversi This is the mini version of the typical reversi game. The interface is shown in Figure 25.2: Figure 25.2 Mini Reversi
  • 178.
    173 In this program,first of all I inserted an image box and then used the copy and paste method to produce a control array of 16 image boxes which represent the squares on the reversi board as shown in Figure 25.3: Figure 25.3 Image1(12) Image1(13) Image1(14) Image1(15) Image1(8) Image1(9) Image1(10) Image1(11) Image1(4) Image1(5) Image1(6) Image1(7) Image1(0) Image1(1) Image1(2) Image1(3)
  • 179.
    174 Secondly, I createdtwo sets of two dimensional arrays and declared them as Boolean, with one representing the white pieces and the other one representing the black pieces. If the white piece or the black piece occupies a square, the variable becomes true or false. Using this concept, the program can check how many white and black pieces have appeared on the board and which positions they occupy. On top of that, I inserted two images, one representing the white piece (Image 17) with its tag set as “white”, and the other one representing the black piece (Image 18) with its tag set as “black”. On start up, two white pieces and two black pieces are loaded in the center positions. In order to check the status of the reversi board, i.e. to know how many white pieces and how many black pieces are currently occupying the board and which positions they are occupying, I used a sub procedure which I named as checkstatus. In this sub procedure, I used the statements If Image1 (k).Picture = Image17.Picture Then white (row, col) = True Else white (row, col) = False End If If Image1 (k).Picture = Image18.Picture Then black (row, col) = True Else black (row, col) = False End If to check whether a certain image box is occupied by the white piece or the black piece. If a particular position is being occupied by the white piece, then the variable white (row, col) is declared as true or else it is declared as false. The same commands are used for the black piece. Putting the preceding statements into a nested For Loop will ensure all the positions are being checked. The positions of the
  • 180.
    175 reversi board canbe illustrated in Figure 25.3, where (i, j) means row i and column j. The whole procedure of checkstatus is shown on the following page. Figure 25.3 (4,1) (4,2) (4,3) (4,4) (3,1) (3,2) (3,3) (3,4) (2,1) (2,2) (2,3) (2,4) (1,1) (1,2) (1,3) (1,4) Private Sub checkstatus () k=0 For row = 1 To 4 For col = 1 To 4 If Image1 (k).Picture = Image17.Picture Then white (row, col) = True Else white (row, col) = False End If If Image1 (k).Picture = Image18.Picture Then black (row, col) = True Else black (row, col) = False End If k=k+1 Next col Next row For example, let’s say we have the situation as shown in Figure 25.4, then white(1,1)=true, black(1,1)=false, white(1,2)=true, black(1,2)=false, white(1,3)=true, black(1,3)=false, white(3,2)=true, black(3,2)=false, black(2,3)=true, white(2,3)=false,
  • 181.
    176 black(3,3)=true, white(3,3)=false, black(4,1)=true,white(4,1)=false, black(4,4)=true and white(4,4)=false. For the blank squares, both white (i, j) and black (i, j) are false. Figure 25.4 The images of the black pieces and the white pieces are loaded using the commands Image (k).Picture=Image17.Picture and Image (k).Picture=Image18.Picture. As the reversi game involves dragging the white or black piece into a certain position, therefore a procedure is needed for the drag and drop event. To write the procedure, we need to consider a few possibilities for each and every position. For example, let’s say we want to drag the white piece into square (1, 1). First of all we have to make sure that square (1, 1) is empty. Secondly we need to check that square (1, 2) is not empty or occupied by a white piece. On top of that, if square (1, 2) is occupied by a black piece, then square (1, 3) must be occupied by a white piece for the move to be legal. Another possibility of a legal move along the first row is when square (1, 2) and square (1, 3) are occupied by black pieces while square (1, 4) is occupied by a white piece. Besides that, we also need to consider the positions along the column as well as along the diagonal. This can be figured out using the same logics. Under the DragDrop event, I used the indices of the image1 control array to identify which position the piece is being dragged into. For example, if the index is 0, then the piece is dropped into square (1,1) and if the index is 1 then the piece is dropped into square (1,2) and so on. In order to identify whether the white piece or the black piece is being dragged and dropped, I use the
  • 182.
    177 imgtag = Source.Tagstatement, where Tag is set as “white” for the white piece (Image 17) and “black” for the black piece (Image18). In addition, I used If...Then and Select Case.... End Select commands to check whether a white or black piece can be dragged and dropped into a certain position so that the pieces trapped in between will change color. The full drag and drop procedure for position (1, 1) is shown below: Private Sub Image1_DragDrop (Index As Integer, Source As Control, X As Single, Y As Single) imgtag = Source.Tag checkstatus ‘To check whether position(1,1) is the destination of the DragDrop procedure and to make sure it is empty If Index = 0 And black (1, 1) = False And white (1, 1) = False Then Select Case imgtag Case "white" 'Check the row positions If black (1, 2) = True And white(1, 3) = True Then Image1 (0).Picture = Image17.Picture Image1 (1).Picture = Image17.Picture End If If black (1, 2) = True And black (1, 3) = True And white (1, 4) = True Then Image1 (0).Picture = Image17.Picture Image1 (1).Picture = Image17.Picture Image1 (2).Picture = Image17.Picture End If 'Check the diagonal posiitons If black(2, 2) = True And white(3, 3) = True Then Image1(0).Picture = Image17.Picture Image1(5).Picture = Image17.Picture End If If black(2, 2) = True And black(3, 3) = True And white(4, 4) = True Then
  • 183.
    178 Image1(0).Picture = Image17.Picture Image1(5).Picture = Image17.Picture Image1(10).Picture = Image17.Picture End If 'Check column positions If black(2, 1) = True And white(3, 1) = True Then Image1(0).Picture = Image17.Picture Image1(4).Picture = Image17.Picture End If If black(2, 1) = True And black(3, 1) = True And white(4, 1) = True Then Image1(0).Picture = Image17.Picture Image1(4).Picture = Image17.Picture Image1(8).Picture = Image17.Picture End If Case "black" If white(1, 2) = True And black(1, 3) = True Then Image1(0).Picture = Image18.Picture Image1(1).Picture = Image18.Picture End If If white(1, 2) = True And white(1, 3) = True And black(1, 4) = True Then Image1(0).Picture = Image18.Picture Image1(1).Picture = Image18.Picture Image1(2).Picture = Image18.Picture End If If white(2, 2) = True And black(3, 3) = True Then Image1(0).Picture = Image18.Picture Image1(5).Picture = Image18.Picture End If If white(2, 2) = True And white(3, 3) = True And black(4, 4) = True Then Image1(0).Picture = Image18.Picture Image1(5).Picture = Image18.Picture
  • 184.
    179 Image1(10).Picture = Image18.Picture End If 'Check column If white(2, 1) = True And black(3, 1) = True Then Image1(0).Picture = Image17.Picture Image1(4).Picture = Image17.Picture End If If white(2, 1) = True And white(3, 1) = True And black(1, 4) = True Then Image1(0).Picture = Image17.Picture Image1(4).Picture = Image17.Picture Image1(8).Picture = Image17.Picture End If End Select End If End Sub For other positions, you can use similar logics. In fact, you can put everything into the above DragDrop procedure instead of writing separate procedures. Lastly I also added the countcolor sub procedure to display the number of white and black pieces at any one time and the CheckWinner sub procedure to show who the winner is. The two sub procedures are shown below: Private Sub countcolor () k=0 w=0 b=0 For row = 1 To 4 For col = 1 To 4 If Image1 (k).Picture = Image17.Picture Then white (row, col) = True w=w+1 Else white (row, col) = False End If If Image1(k).Picture = Image18.Picture Then
  • 185.
    180 black(row, col) = True b=b+1 Else black(row, col) = False End If k=k+1 Print n Next col Next row Label3.Caption = Str(w) Label4.Caption = Str(b) End Sub Private Sub CheckWinner ( ) Call countcolor If w + b = 16 Or b = 0 Or w = 0 Then If w > b Then Label5.Visible = True Label5.Caption = “White Wins" Else Label5.Visible = True Label5.Caption = "Black Wins" End If End If End Sub 25.3 Calculator This is a typical calculator that consists of the number buttons, the operator buttons and some additional buttons such as the memory button and the clear button. To design the interface, you need to insert 25 command buttons, and one label that functions as the display panel. The number buttons from 1 to 9 are grouped together as a control array and named as ButtonNum while 0 is a standalone command and named as Bzero. The four basic operators are also grouped together as a control
  • 186.
    181 array and namedas Operator. Other buttons are named appropriately according to their functions. The label is named as panel. Figure 25.3 Calculator One of the most important procedures in the program is to control the display on the panel. The procedure is Private Sub ButtonNum_Click(Index As Integer) If Num_of_digit > 0 Then If Num_of_digit < 30 Then panel. Caption = panel.Caption + Right$(Str(Index), 1) Num_of_digit = Num_of_digit + 1 End If Else panel.Caption = Right$(Str(Index), 1) Num_of_digit = 1 End If CheckValue End Sub
  • 187.
    182 The Num_of_digit isa variable that is used to check the number of digits that appear on the display panel. The procedure will ensure that if the number of digits is more than one, the preceding digit will be pushed to the left and the succeeding digit will remain on the right. However, if the number of digits is zero, the digit clicked will just appear on the rightmost position of the panel. Another important procedure is the procedure to perform the calculations. This can be achieved through the Operator and the Equal sub procedures. The Operator sub procedure is shown below: Private Sub Operator_Click(Index As Integer) CheckValue If Index = 11 Then a = displayValue key = 1 ElseIf Index = 12 Then b = displayValue key = 2 ElseIf Index = 13 Then c = displayValue key = 3 ElseIf Index = 14 Then d = displayValue key = 4 ElseIf Index = 15 Then f = displayValue key = 5 End If Num_of_digit = 0 newNumber = True End Sub This procedure ensures that when a particular operator button is pressed, the variable key is assigned a number so that the program knows which operator is being
  • 188.
    183 pressed. The calculationis then executed using the Equal sub procedure which is shown below: Private Sub Equal_Click() CheckValue If newNumber = True Then If key = 1 Then e = displayValue + a ElseIf key = 2 Then e = b - displayValue ElseIf key = 3 Then e = displayValue * c ElseIf key = 5 Then e = (f * displayValue) / 100 ElseIf key = 4 And displayValue <> 0 Then e = d / displayValue Else GoTo error End If If Abs(e) < 1 Then panel.Caption = Format(e, "General Number") Else panel.Caption = Str(e) End If Else panel.Caption = displayValue End If GoTo finish error: panel.Caption = "E" finish: Num_of_digit = 0 newNumber = False End Sub
  • 189.
    184 The displayValue isthe value that is displayed on the panel and this value is checked through the CheckValue sub procedure. The statements If Abs(e) < 1 Then panel.Caption = Format(e, "General Number") Else panel.Caption = Str(e) End If are to ensure that when the absolute value is less than 0, the zero appears in front of the decimal point, for example, 0.5 instead of just .5. The whole program is shown below: The Program Option Explicit Dim Num_of_digit As Integer Dim key As Integer Dim displayValue As Variant Dim a, b, c, d, e, f, g As Variant Dim memo As Variant Dim newNumber As Boolean Private Sub BZero_Click(Index As Integer) If Num_of_digit > 0 Then panel.Caption = panel.Caption + "0" Else panel.Caption = "0" Num_of_digit = Num_of_digit + 1 End If CheckValue End Sub Sub CheckValue() displayValue = Val(panel.Caption) End Sub
  • 190.
    185 Private Sub ButtonNum_Click(IndexAs Integer) If Num_of_digit > 0 Then If Num_of_digit < 30 Then panel.Caption = panel.Caption + Right$(Str(Index), 1) Num_of_digit = Num_of_digit + 1 End If Else panel.Caption = Right$(Str(Index), 1) Num_of_digit = 1 End If CheckValue End Sub Private Sub Clear_Click() panel.Caption = "0" displayValue = "0" Num_of_digit = 0 End Sub Private Sub ClearAll_Click() panel.Caption = "0" displayValue = "0" memo = 0 End Sub Private Sub Equal_Click() CheckValue If newNumber = True Then If key = 1 Then e = displayValue + a ElseIf key = 2 Then e = b - displayValue ElseIf key = 3 Then e = displayValue * c ElseIf key = 5 Then e = (f * displayValue) / 100
  • 191.
    186 ElseIf key = 4 And displayValue <> 0 Then e = d / displayValue Else GoTo error End If If Abs(e) < 1 Then panel.Caption = Format(e, "General Number") Else panel.Caption = Str(e) End If Else panel.Caption = displayValue End If GoTo finish error: panel.Caption = "E" finish: Num_of_digit = 0 newNumber = False End Sub Private Sub MemoCancel_Click() memo = 0 End Sub Private Sub Memory_Click() CheckValue memo = displayValue Num_of_digit = 0 End Sub Private Sub Operator_Click(Index As Integer) CheckValue If Index = 11 Then a = displayValue key = 1
  • 192.
    187 ElseIf Index = 12 Then b = displayValue key = 2 ElseIf Index = 13 Then c = displayValue key = 3 ElseIf Index = 14 Then d = displayValue key = 4 ElseIf Index = 15 Then f = displayValue key = 5 End If Num_of_digit = 0 newNumber = True End Sub Private Sub Plus_minus_Click() CheckValue g = -1 * displayValue displayValue = g panel.Caption = Str(displayValue) CheckValue End Sub Private Sub Poin_Click() Static point_lock As Integer If point_lock = 0 And Num_of_digit < 20 Then panel.Caption = panel.Caption + "." Num_of_digit = Num_of_digit + 1 End If CheckValue End Sub
  • 193.
    188 Private Sub Recall_Click() panel.Caption = Str(memo) End Sub Private Sub SqRoot_Click() CheckValue If displayValue >= 0 Then panel.Caption = Str(Sqr(displayValue)) Else panel.Caption = "E" End If Num_of_digit = 0 End Sub Private Sub Summation_Click() CheckValue memo = memo + displayValue Num_of_digit = 0 End Sub Exercise 25 1. Create a calculator that can function as a normal calculator as well as a scientific calculator. 2. Create an 8x8 reversi game. Lesson 26 Creating Educational Programs Learning how to create educational programs. 26.1 Kid’s Math
  • 194.
    189 This is asimple arithmetic educational game for children. The child who attempts the test can choose three different levels and perform three different arithmetic calculations. The performance can be evaluated by three measurements namely the total of questions attempted, the total of answers that are correct and the total score which is the percentage of right answers. The design interface is shown in Figure 26.1 and the runtime interface is shown in Figure 26.2: Figure 26.1 The Design Interface Figure 26.2 The Runtime Interface
  • 195.
    190 In this program,we need to insert the following controls: • Three option buttons • Three text boxes • A few labels • Two images The procedure to choose three different arithmetic calculations is Private Sub Option1_Click(Index As Integer) Select Case Index Case 0 Label4.Caption = "+" Action = "Plus" Case 1 Label4.Caption = "-" Action = "Minus" Case 2
  • 196.
    191 Label4.Caption = "x" Action = "Multiply" End Select End Sub The option buttons are grouped together as a control array and can be identified by their indices. Using the Select Case….End Select statements, the caption of Label4 which displays the operators will change according to the selection. In addition, the variable Action will be assigned different values namely “Plus”, “Minus” and “Multiply”. These values will be passed to the OK procedure and appropriate calculations will be performed. A menu item “Level” for the user to choose the levels is added using the menu editor. To start the menu editor, you have to click on the tools item on the menu bar. The menu editor is shown in Figure 26.3. At the menu editor, you key in the word “Level” in the caption box and its name “level” (this can be any appropriate name) in the Name box. This is the first level menu item. To type in the second menu items, you need to click on the Next button and the right arrow key. Here you key in the words Beginner, Intermediate and Advanced. The ampersand sign ‘&’ is used in front of all the captions (it can be in any position) so that the user can use the shortcut key to access the items. For example, to access the Level item, the user can press Alt+L. You will notice that all the menu items will appear in the code window and you can write the event procedure for each of them. The event procedure for each of the second level menu items is very simple. It simply assigns a value to the variable n, which is n=1 for beginner, n=2 for intermediate and n=3 for advanced. The procedure to randomize the process of displaying different numbers after each click of the command button “Start” or “Next” (The Start button changes to Next after the first Click) is shown below. The select Case …..End Select statements allow the generation of numbers for the three different levels. Randomize Timer Select Case n Case 1 num1 = Int(Rnd * 10)
  • 197.
    192 num2 = Int(Rnd * 10) Case 2 num1 = Int(Rnd * 90) + 10 num2 = Int(Rnd * 90) + 10 Case 3 num1 = Int(Rnd * 900) + 100 num2 = Int(Rnd * 900) + 100 End Select Figure 26.3 There are some minor things to be considered before the actual calculation is done. First of all, for subtraction, we need to make sure that the value of the first number is more than the second number as this is arithmetic for kids. This is taken care of using the statement Case "Minus" If num1 > num2 Then number1.Caption = num1 number2.Caption = num2 Else number1.Caption = num2
  • 198.
    193 number2.Caption = num1 End If The above statements ensure that when the second number is larger than the first number, the second number will appear in the first text box and the first number will appear in the second text box. Secondly, to make sure that the multiplication is not too complicated, the second number will be restricted to values between 0 and 10. This can be achieved using the Right function as shown in the following statements: Case "Multiply" number1.Caption = num1 number2.Caption = Right(num2, 1) The actual calculation is performed under the OK procedure or the KeyPress procedure so that the user has a choice to click the OK button or press the enter key to perform the calculation. The overall program is shown below: The Program Dim num1 As Integer Dim num2 As Integer Dim intNumber As Integer Dim totalQ As Integer Dim n As Integer Dim Action As String Dim answer As Integer Dim done As Boolean Dim score As Integer Private Sub beginner_Click() n=1 End Sub Private Sub Inter_Click() n=2 End Sub
  • 199.
    194 Private Sub advance_Click() n=3 EndSub Private Sub Command3_Click () ‘To calculate the score in percentage Label10.Caption = Format ((intNumber / totalQ), "Percent") End Sub Private Sub Command4_Click() total.Caption = "" Label8.Caption = "" intNumber = 0 totalQ = 0 Label10.Caption = "" Command1.Caption = "Start" End Sub Private Sub Form_Load() Option1(0).Value = True Label4.Caption = "+" Image1.Visible = False Image2.Visible = False Label6.Visible = False Label5.Visible = False End Sub Private Sub Option1_Click(Index As Integer) Select Case Index Case 0 Label4.Caption = "+" Action = "Plus" Case 1 Label4.Caption = "-"
  • 200.
    195 Action = "Minus" Case 2 Label4.Caption = "x" Action = "Multiply" End Select End Sub Private Sub Text3_keypress(keyAscii As Integer) Select Case Action Case "Plus" answer = Val(number1.Caption) + Val(number2.Caption) Case "Minus" answer = Val(number1.Caption) - Val(number2.Caption) Case "Multiply" answer = Val(number1.Caption) * Val(number2.Caption) End Select If (keyAscii = 13) And answer = Val(Text3.Text) Then Image1.Visible = True Image2.Visible = False Label5.Visible = True Label6.Visible = False If done = True Then intNumber = intNumber + 1 total.Caption = Str(intNumber) End If Text3.Enabled = False ElseIf (keyAscii = 13) And answer <> Val(Text3.Text) Then Image1.Visible = False Image2.Visible = True Label5.Visible = False Label6.Visible = True Text3.Enabled = False End If End Sub
  • 201.
    196 Private Sub Command1_Click() Image1.Visible = False Image2.Visible = False Label6.Visible = False Label5.Visible = False done = True Text3.Enabled = True Text3.Text = "" x=x+1 If x > 0 Then Command1.Caption = "Next" End If Randomize Timer Select Case n Case 1 num1 = Int(Rnd * 10) num2 = Int(Rnd * 10) Case 2 num1 = Int(Rnd * 90) + 10 num2 = Int(Rnd * 90) + 10 Case 3 num1 = Int(Rnd * 900) + 100 num2 = Int(Rnd * 900) + 100 End Select Select Case Action Case "Plus" number1.Caption = num1 number2.Caption = num2 Case "Minus" If num1 > num2 Then number1.Caption = num1 number2.Caption = num2 Else
  • 202.
    197 number1.Caption = num2 number2.Caption = num1 End If Case "Multiply" number1.Caption = num1 number2.Caption = Right(num2, 1) End Select Text3.SetFocus totalQ = totalQ + 1 Label8.Caption = Str(totalQ) End Sub Private Sub OK_Click() Select Case Action Case "Plus" answer = Val(number1.Caption) + Val(number2.Caption) Case "Minus" answer = Val(number1.Caption) - Val(number2.Caption) Case "Multiply" answer = Val(number1.Caption) * Val(number2.Caption) End Select If Val(Text3.Text) = answer Then Image1.Visible = True Image2.Visible = False Label5.Visible = True Label6.Visible = False If done = True Then intNumber = intNumber + 1 total.Caption = Str(intNumber) End If Else Image1.Visible = False Image2.Visible = True Label5.Visible = False
  • 203.
    198 Label6.Visible = True End If Text3.Enabled = False done = False End Sub 26.2 The Memory Game This is a typical memory game for children. The objective of the game is to reveal the pictures that are hidden under the squares. These pictures exist in pairs. When the user clicks on the square, the pictures will be revealed. If the user clicks on the squares with the same pictures successively, the squares together with the pictures will be removed. When all the squares and the pictures are removed, the background picture will show up. Figure 26.4
  • 204.
    199 In this program,I use the images’ tags to pair up the images which are hidden under the picture boxes, that is, the same images will have the same tags. The pictures and the images are both set as control arrays so that they can be manipulated using the For…..Next Loop. To check whether the images are the same or not, you can use the following procedure: For i = 0 To 11 If Picture1(i).Visible = False Then For j = 0 To 11 If Picture1(j).Visible = False Then If i <> j And Image1(i).Tag = Image1(j).Tag Then Image1(j).Visible = False Image1(i).Visible = False Picture1(j).Visible = False Picture1(i).Visible = False End If The statement If i <> j And Image1 (i).Tag = Image1 (j).Tag checks whether the images in different positions are the same or not, and if they are the same, they will be made to disappear using the Image.Visible= False statements. A timer is used to control the program so that there is a short delay before the images disappear. The whole program is shown below: The Program Sub check() 'Check whether the images are the same or not For i = 0 To 11 If Picture1(i).Visible = False Then For j = 0 To 11 If Picture1(j).Visible = False Then If i <> j And Image1(i).Tag = Image1(j).Tag Then Image1(j).Visible = False Image1(i).Visible = False Picture1(j).Visible = False Picture1(i).Visible = False End If
  • 205.
    200 If i <>j And Image1(i).Tag <> Image1(j).Tag And Image1(i).Visible = True And Image1(j).Visible = True Then Picture1(j).Visible = True Picture1(i).Visible = True End If End If Next j End If Next i Timer1.Enabled = False If Picture1(0).Visible = False _ And Picture1(1).Visible = False _ And Picture1(2).Visible = False _ And Picture1(3).Visible = False _ And Picture1(4).Visible = False _ And Picture1(5).Visible = False _ And Picture1(6).Visible = False _ And Picture1(7).Visible = False _ And Picture1(8).Visible = False _ And Picture1(9).Visible = False _ And Picture1(10).Visible = False _ And Picture1(11).Visible = False _ Then MMControl1.Notify = False MMControl1.Wait = True MMControl1.Shareable = False MMControl1.DeviceType = "WaveAudio" MMControl1.FileName = "D:Liew FolderVISUAL BASIC programaudioapplause.wav" MMControl1.Command = "Open" MMControl1.Command = "Play" End If End Sub
  • 206.
    201 Private Sub picture1_Click(IndexAs Integer) Picture1(Index).Visible = False Timer1.Enabled = True End Sub Private Sub Timer1_Timer() check End Sub 26.3 The Star War This is a program that can demonstrate the principle of projectile in physics. At a certain angle and a certain launch velocity, the projectile can reach a certain range. The maximum range is at the angle of 45 degrees. This principle can be applied in the military field where it can simulate the launching of the missile at a certain velocity and angle in order to hit a remote target. It can also be applied in the scientific and technological fields. This game provides a good training for students in their ability to make estimations. During the designing phase, you need to insert three images which resemble the satellites, three explosion images, the labels to display the bonus points, two text boxes for entering the values of the velocity and the angle, the image of a rocket, two timers for animation purposes and the Microsoft Multimedia Control for playing the sound of the explosion. In this program, you can use the formulae v sin θ-½ gt2 as the vertical component of the displacement and v cos θ as the horizontal component of the displacement (where g is the gravitational acceleration, v the launch velocity and θ the launch angle). To enable the missile to fly, you can use the combination of the Object.Move method and the object coordinate system, i.e. object. left and object.Top. In Visual Basic language, the procedure is y = v * Sin (a * 3.141592654 / 180) * t - 4.9 * (t ^ 2) x = v * Cos (a * 3.141592654 / 180) * t Image1.Move Image1.Left + x, Image1.Top – y
  • 207.
    202 The above procedurewill move the above missile x unit to the left and y unit to the top (or down depending on the values of y as it could be negative) after every interval until it hits the target. You can use the randomization method so that the objects will appear at different positions randomly at each new game. In addition, you can also use the randomization method to load different backgrounds at start up and at each new game. Figure 26.5 The Design Interface The initial positions of the satellites are determined using the following procedure which ensures that they will appear within the designated window. The statements consist of the randomization process that uses the Rnd function and the use of the Left and the Top properties to determine the positions of the satellites.
  • 208.
    203 left1 = Int(Rnd * 7000) + 1000 left2 = Int(Rnd * 7000) + 1000 left3 = Int(Rnd * 7000) + 1000 top1 = Int(Rnd * 5000) + 100 top2 = Int(Rnd * 5000) + 100 top3 = Int(Rnd * 5000) + 100 Image2.Left = left1 Image3.Left = left2 Image4.Left = left3 Image2.Top = top1 Image3.Top = top2 Image4.Top = top3 The procedure to show that the rocket hits the target when it moves within 240 twips right of the leftmost border of Image1(satellite) and 240 twips below the top border of Image1 ( which means the rocket hits the center of Image1) is shown below. If Image4.Visible = True And (Image1.Left < left3 + 240 And Image1.Left > left3 - 240) And (Image1.Top < top3 + 240 And Image1.Top > top3 - 240) Timer1.Enabled = False Call showfire The showfire sub procedure is to start timer2 and to show the image of the explosion momentarily. Private Sub Timer2_Timer() 'To delay the appearance of fire and the bonus image w=w+1 If w < 30 Then Image5(i).Visible = True Label4(i).Visible = True Else Image5(i).Visible = False Label4(i).Visible = False Timer2.Enabled = False End If
  • 209.
    204 End Sub Figure 26.5The Runtime Interface The Program Dim x As Variant Dim a As Variant Dim t As Variant Dim y As Variant Dim w As Variant Dim i As Variant
  • 210.
    205 Dim score AsInteger Dim left1, left2, left3, top1, top2, top3 As Variant Dim backgr As Integer Private Sub showfire() Timer2.Enabled = True End Sub Private Sub Command1_Click() Timer1.Enabled = True End Sub Private Sub Command2_Click() w=0 Image1.Visible = True Timer1.Enabled = False Label4(0).Visible = False Label4(1).Visible = False Label4(2).Visible = False Label3.Caption = "" Image1.Move 360, 6360 t=0 End Sub Private Sub Form_Click() Label5.Visible = False End Sub Private Sub Form_Load() Randomize Timer 'To choose different backgrounds at startup backgr = Int(Rnd * 8) + 1 Select Case backgr Case 1 Image7.Picture = LoadPicture("D:Liew FolderAstronomyandromeda.jpg")
  • 211.
    206 Case 2 Image7.Picture = LoadPicture("D:Liew FolderAstronomycomet.jpg") Case 3 Image7.Picture = LoadPicture("D:Liew FolderAstronomycrabnebula.jpg") Case 4 Image7.Picture = LoadPicture("D:Liew FolderAstronomynova.jpg") Case 5 Image7.Picture = LoadPicture("D:Liew FolderAstronomyeclipse.jpg") Case 6 Image7.Picture = LoadPicture("D:Liew FolderAstronomyhorse.jpg") Case 7 Image7.Picture = LoadPicture("D:Liew FolderAstronomyorion.jpg") Case Else Image7.Picture = LoadPicture("D:Liew FolderAstronomymilkyway.jpg") End Select 'To randomly set the initial positions of the objects left1 = Int(Rnd * 7000) + 1000 left2 = Int(Rnd * 7000) + 1000 left3 = Int(Rnd * 7000) + 1000 top1 = Int(Rnd * 5000) + 100 top2 = Int(Rnd * 5000) + 100 top3 = Int(Rnd * 5000) + 100 Image2.Left = left1 Image3.Left = left2 Image4.Left = left3 Image2.Top = top1 Image3.Top = top2 Image4.Top = top3 w=0 score = 0 Label7.Caption = Str(score) End Sub
  • 212.
    207 Private Sub mnuExit_Click() End End Sub Private Sub mnunew_Click() w=0 Randomize Timer 'To choose different backgrounds at startup backgr = Int(Rnd * 8) + 1 Select Case backgr Case 1 Image7.Picture = LoadPicture("D:Liew FolderAstronomyandromeda.jpg") Case 2 Image7.Picture = LoadPicture("D:Liew FolderAstronomycomet.jpg") Case 3 Image7.Picture = LoadPicture("D:Liew FolderAstronomycrabnebula.jpg") Case 4 Image7.Picture = LoadPicture("D:Liew FolderAstronomynova.jpg") Case 5 Image7.Picture = LoadPicture("D:Liew FolderAstronomyeclipse.jpg") Case 6 Image7.Picture = LoadPicture("D:Liew FolderAstronomyhorse.jpg") Case 7 Image7.Picture = LoadPicture("D:Liew FolderAstronomyorion.jpg") Case Else Image7.Picture = LoadPicture("D:Liew FolderAstronomymilkyway.jpg") End Select 'To display all the objects again left1 = Int(Rnd * 7000) + 1000 left2 = Int(Rnd * 7000) + 1000 left3 = Int(Rnd * 7000) + 1000 top1 = Int(Rnd * 5000) + 100
  • 213.
    208 top2 = Int(Rnd * 5000) + 100 top3 = Int(Rnd * 5000) + 100 Image2.Left = left1 Image3.Left = left2 Image4.Left = left3 Image2.Top = top1 Image3.Top = top2 Image4.Top = top3 Image2.Visible = True Image3.Visible = True Image4.Visible = True Image1.Visible = True Timer1.Enabled = False Label4(0).Visible = False Label4(1).Visible = False Label4(0).Visible = False Label3.Caption = "" Image1.Move 360, 6360 t=0 End Sub Private Sub Timer1_Timer() MMControl1.Command = "close" If Image1.Left < 15000 And Image1.Top < 9000 Then v = Val(Text1.Text) a = Val(Text2.Text) t=t+1 ‘To use the formulae vertical displacement=vsina- (1/2)gt 2 and horizontal ‘displacement=vcosa*t so that it follows a parabolic trajectory y = v * Sin(a * 3.141592654 / 180) * t - 4.9 * (t ^ 2) x = v * Cos(a * 3.141592654 / 180) * t Image1.Move Image1.Left + x, Image1.Top - y
  • 214.
    209 If Image4.Visible =True And (Image1.Left < left3 + 240 And Image1.Left > left3 - 240) And (Image1.Top < top3 + 240 And Image1.Top > top3 - 240) Then i=2 'To stop the motion of the rocket and show the image of fire and bonus score Timer1.Enabled = False Call showfire Image4.Visible = False Image1.Visible = False MMControl1.Notify = False MMControl1.Wait = True MMControl1.Shareable = False MMControl1.DeviceType = "WaveAudio" MMControl1.FileName = "D:Liew FolderVISUAL BASIC programaudioexplosion.wav" MMControl1.Command = "Open" MMControl1.Command = "Play" Label3.Caption = "You strike the satellite!" Label4(2).Left = left3 + 240 Label4(2).Top = top3 + 240 Label4(2).Visible = True Image5(2).Left = left3 + 240 Image5(2).Top = top3 + 240 score = score + 50 ElseIf Image3.Visible = True And (Image1.Left < left2 + 240 And Image1.Left > left2 - 240) And (Image1.Top < top2 + 240 And Image1.Top > top2 - 240) Then Timer1.Enabled = False i=1 Call showfire Image3.Visible = False Image1.Visible = False MMControl1.Notify = False MMControl1.Wait = True MMControl1.Shareable = False
  • 215.
    210 MMControl1.DeviceType = "WaveAudio" MMControl1.FileName= "D:Liew FolderVISUAL BASIC programaudioexplosion.wav" MMControl1.Command = "Open" MMControl1.Command = "Play" Label3.Caption = "You strike the rocket!" Label4(1).Left = left2 + 240 Label4(1).Top = top2 + 240 Label4(1).Visible = True Image5(1).Left = left2 + 240 Image5(1).Top = top2 + 240 score = score + 100 ElseIf Image2.Visible = True And (Image1.Left < left1 + 240 And Image1.Left > left1 - 240) And (Image1.Top < top1 + 240 And Image1.Top > top1 - 240) Then Timer1.Enabled = False i=0 Call showfire Image2.Visible = False Image1.Visible = False MMControl1.Notify = False MMControl1.Wait = True MMControl1.Shareable = False MMControl1.DeviceType = "WaveAudio" MMControl1.FileName = "D:Liew FolderVISUAL BASIC programaudioexplosion.wav" MMControl1.Command = "Open" MMControl1.Command = "Play" Label3.Caption = "You strike the Saturn!" Label4(0).Left = left1 + 240 Label4(0).Top = top1 + 240 Label4(0).Visible = True Image5(0).Left = left1 + 240 Image5(0).Top = top1 + 240
  • 216.
    211 score = score + 200 End If Else Label3.Caption = "You miss the target!" Timer1.Enabled = False End If Label7.Caption = Str(score) End Sub Private Sub Timer2_Timer() 'To delay the appearance of fire and the bonus image w=w+1 If w < 30 Then Image5(i).Visible = True Label4(i).Visible = True Else Image5(i).Visible = False Label4(i).Visible = False Timer2.Enabled = False End If End Sub Exercise 26 1. Create an educational game that requires the user to add four numbers within a certain time limit. 2. Create an educational game that requires the user to identify the sound made by an animal. 3. Create a memory game that loads the hidden images randomly. 4. Create a star war program that requires the rocket to hit randomly moving targets.
  • 217.
    212 Lesson 27 Working with Files Learning how to create a text file. Learning how to create a simple database management system. 27.1 Introduction Up until Lesson 26 the programs created only accept data at runtime. When a program is terminated, the data also disappears. Is it possible to save data accepted by a VISUAL BASIC program into a storage device, such as a hard disk or a diskette, or even a CDRW? The answer is yes. In this Lesson, we will learn how to create files by writing them into a storage device and then retrieve the data by reading the contents of the files using customized VISUAL BASIC programs. 27.2 Creating a Text File To create a text file, you can use the following command: Open "fileName" For Output As #fileNumber Each text file created must have a file name and a file number for identification. As for the file name, you must also specify the path where the file will reside. For example: Open "c:My Documentssample.txt" For Output As #1 will create a text file by the name of sample.txt in the My Document folder. The accompanying file number is 1. If you wish to create and save the file in drive A, simply change the path, as follows" Open "A:sample.txt" For Output As #1 If you wish to create a HTML file, simple change the extension to .html Open "c:My Documentssample.html" For Output As # 2 Example 27.1 Creating a text file Private Sub create_Click ()
  • 218.
    213 Dim intMsg As String Dim StudentName as String Open "c:My Documentssample.txt" For Output As #1 intMsg = MsgBox ("File sample.txt opened") StudentName = InputBox ("Enter the student Name") Print #1, StudentName intMsg = MsgBox ("Writing a" & StudentName & “to sample.txt ") Close #1 intMsg = MsgBox ("File sample.txt closed") End Sub The above program will create a file sample.txt in the My Documents' folder which is ready to receive input from users. Any data input by users will be saved in this text file. Instead of print, you can also use write to save the file. After opening the file, you must always close it with the command close. 27.3 Reading a File To read a file created in section 13.2, you can use the input # statement. The syntax is shown below: Open "fileName" For Input As #1 You have to open the file according to its file number and the variable that holds the data. You also need to declare the variable using the DIM command. Example 27.2 Reading a text file Private Sub Reading_Click () Dim variable1 As String Open "c:My Documentssample.txt" For Input As #1 Input #1, variable1 Text1.Text = variable1 Close #1 End Sub This program will open the sample.txt file and display its contents in the Text1 textbox. Example 27.3 A simple database management system
  • 219.
    214 This is asimple database management system using a text file. First of all, the program will check whether the text file is open or not and if the file does not exist, the program prompts the user to create the file by displaying the create button. However, if the file is already there, the program will change the caption of the create button to open file. The program uses Append in the place of Output so that new data will be added to the end of the file instead of overwriting the old data. The program will also show the input box repeatedly so that the user can enter data continuously until he or she enters the word “finish”. The program also introduces the error handler to handle errors while reading the file or deleting the file because the program cannot read or delete the file when the file has not been created. The syntax for error handler is On Error Goto Label where the label is an error handling sub procedure. For example, when the program is trying to read the file when the file does not exist, it will go the label file_error and the error handling object ‘err’ will display an error message with its description property which takes the format err.description. The program uses the vbCrLf constant when reading the data so that the data will appear line by line instead of a continuous line. The vbCrLf constant is equivalent to the pressing of the Enter key (or return key) so that the next data will go to the new line. The program is uses the Do…Loop to read all the data until it reaches the end of the file by issuing the command Loop While Not EOF(1). Below is the whole program: Dim studentname As String Dim intMsg As String Private Sub Command1_Click() ‘To read the file Text1.Text = "" Dim variable1 As String On Error GoTo file_error Open "D:Liew Foldersample.txt" For Input As #1 Do
  • 220.
    215 Input #1, variable1 Text1.Text = Text1.Text & variable1 & vbCrLf Loop While Not EOF(1) Close #1 Exit Sub file_error: MsgBox (Err.Description) End Sub Private Sub Command2_Click() ‘To delete the file On Error GoTo delete_error Kill "D:Liew Foldersample.txt" Exit Sub delete_error: MsgBox (Err.Description) End Sub Private Sub Command3_Click() End End Sub Private Sub create_Click() ‘To create the file or open the file for new data entry Open "D:Liew Foldersample.txt" For Append As #1 intMsg = MsgBox("File sample.txt opened") Do studentname = InputBox("Enter the student Name or type finish to end") If studentname = "finish" Then Exit Do End If Write #1, studentname & vbCrLf intMsg = MsgBox("Writing " & studentname & " to sample.txt ") Loop Close #1
  • 221.
    216 intMsg = MsgBox("File sample.txt closed") End Sub Private Sub Form_Load() On Error GoTo Openfile_error Open "D:Liew Foldersample.txt" For Input As #1 Close #1 Exit Sub Openfile_error: MsgBox (Err.Description), , "Please create a new file" create.Caption = "Create File" End Sub Figure 27.1 The Interface Example 27.4 This example uses the common dialog box to create and read the text file, which is much easier than the previous examples as many operations are handled by the common dialog box. The following is the program:
  • 222.
    217 Dim linetext As String Private Sub open_Click() CommonDialog1.Filter = "Text files{*.txt)|*.txt" CommonDialog1.ShowOpen If CommonDialog1.FileName <> "" Then Open CommonDialog1.FileName For Input As #1 Do Input #1, linetext Text1.Text = Text1.Text & linetext Loop Until EOF(1) End If Close #1 End Sub Private Sub save_Click() CommonDialog1.Filter = "Text files{*.txt)|*.txt" CommonDialog1.ShowSave If CommonDialog1.FileName <> "" Then Open CommonDialog1.FileName For Output As #1 Print #1, Text1.Text Close #1 End If End Sub The syntax CommonDialog1.Filter = "Text files{*.txt)|*.txt" ensures that only the text file is read or saved .The statement CommonDialog1.ShowOpen is to display the open file dialog box and the statement CommonDialog1.ShowSave is to display the save file dialog box. Text1.Text = Text1.Text & linetext is to read the data and display them in the Text1 textbox. The interface is shown in Figure 27.2:
  • 223.
    218 Figure 27.2 Exercise 27 1. Create a text file of your own using the commands you have learnt in this lesson and read the file using a text box. 2. Create a text file of your own using a common dialog box in which you can update and save the file.
  • 224.
    219 Lesson 28 Creating basic database applications in VISUAL BASIC Learning how to create a basic database application using data control. Visual Basic allows us to manage databases created with different database programs such as MS Access, Dbase, Paradox and etc. In this Lesson, we will not attempt to create database files but we will see how we can access database files in the VISUAL BASIC environment. Example 28.1 In this example, you will create a simple database application which enables the user to browse customers' names. To create this application, insert the data control into the new form. Place the data control somewhere at the bottom of the form. Name the data control as data_navigator.To be able to use the data control, you need to connect it to any database. You can create a database file using any database application but I suggest you use the database files that come with VB6. Let’s select NWIND.MDB as the database file. To connect the data control to this database, double-click the DatabaseName property in the properties window and select the above file. Next, double-click on the RecordSource property to select the customers’ table from the database. You can also change the caption of the data control to anything but I use "Click to browse Customers" here. After that, insert a label and change its caption to Customer Name. Finally, insert another label and name it as cus_name and leave the label empty as customers' names will appear here when the user clicks the arrows on the data control. You need to bind this label to the data control for the application to work. To do this, open the label's DataSource and select data_navigator, which will appear automatically. One more thing that you need to do is to bind the label to the correct field so that data in the field will appear on the label. To do this, open the DataField
  • 225.
    220 property and selectContactName. Now, press F5 and run the program. You should be able to browse all the customers' names by clicking the arrows on the data control. Figure 28.1 You can also add other fields using exactly the same method. For example, you can add address, city and telephone number to the database browser. Figure 28.2
  • 226.
    221 Example 28.1 Previously, youhave learned how to create a simple database application using data control. In this section, you will work on the same application using slightly more advanced commands. The data control supports some methods that are useful in manipulating the database, for example, moving the pointer to a certain location. The following are some of the commands that you can use to move the pointer around. data_navigator.RecordSet.MoveFirst ' Move to the first record data_navigator.RecordSet.MoveLast ' Move to the last record data_navigator.RecordSet.MoveNext ' Move to the next record data_navigator.RecordSet.Previous ' Move to the first record *note: data_navigator is the name of the data control In the following example, insert four command buttons and label them as First Record, Next Record, Previous Record and Last Record. They will be used to
  • 227.
    222 navigate around thedatabase without using the data control. You still need to retain the same data control (from example in lesson 19) but set the property Visible to False so that users will not see the data control but use the buttons to browse through the database instead. Now, double-click on the command button and key in the codes according to the labels. Private Sub Command2_Click () dtaBooks.Recordset.MoveFirst End Sub Private Sub Command1_Click () dtaBooks.Recordset.MoveNext End Sub Private Sub Command3_Click () dtaBooks.Recordset.MovePrevious End Sub Private Sub Command4_Click () dtaBooks.Recordset.MoveLast End Sub Run the application and you will obtain the interface below and you will be able to browse the database using the four command buttons. Figure 28.1
  • 228.
    223 Exercise 28 1. Createa database system that can store students’ information, including name, student ID, address, birthday, sex and telephone number. Lesson 29 Creating Database Applications Using ADO Control Learning how to create database applications using ADO control. In Lesson 28, we have learned how to build VISUAL BASIC database applications using data control. However, data control is not a very flexible tool as it works only with limited kinds of data and must work strictly in the Visual Basic environment. To overcome these limitations, we can use a much more powerful data control in VISUAL BASIC known as ADO control. ADO stands for ActiveX data object. As ADO is ActiveX-based, it can work in different platforms (different computer systems) and
  • 229.
    224 different programming languages.Moreover, it can access many different kinds of data such as data displayed in Internet browsers, email text and even graphics other than the usual relational and non-relational database information. To be able to use ADO data control, you need to insert it into the toolbox. To do this, simply press Ctrl+T to open the components dialog box and select Microsoft ActiveX Data Control 6. After this, you can proceed to build your ADO-based VISUAL BASIC database applications. Example 29.1 This example will illustrate how to build a relatively powerful database application, a library management system, using ADO data control. First of all, name the new form as frmBookTitle and change its caption to Book Titles- ADO Application. Secondly, insert the ADO data control and name it as adoBooks and change its caption to book. Next, insert the necessary labels, text boxes and command buttons. The runtime interface of this program is shown in the diagram below; it allows adding and deleting as well as updating and browsing of data. Figure 29.1 A Library Management System
  • 230.
    225 The propertiesof all the controls are listed in Table 31.1: Table 29.1 Object Property Name : FormLibrary Form Caption: Book Titles -Library Management System ADO Name :adoLibrary Name : Titlelbl Label1 Caption: Book Title Name: Subjectlbl Label2 Caption : Subject :Year Published: Name: Yearlbl Label3 Caption : Year Published Name : ISBNlbl Label 4 Caption :ISBN Name : PubIDlbl Labe5 Caption :Publisher's ID: Name : Titletxt Text1 DataField :Title DataSource :AdoLibrary Name: YearTxt Text3 DataField :Year Published
  • 231.
    226 DataSource: AdoLibrary Name : ISBNTxt Text3 DataField :ISBN DataSource : AdoLibrary Name: Pubtxt Text4 DataField : PubID DataSource: AdoLibrary Name : Subject Txt Text2 DataField : Subject DataSource: AdoLibrary Name :save Command Button1 Caption :Save Name : add Command Button2 Caption: Add Name: delete Command Button3 Caption: Delete Name : cancel Command Button4 Caption :&Cancel Name: exit Command Button5 Caption :Exit To be able to access and manage a database, you need to connect the ADO data control to a database file. We are going to use the access database file BIBLIO.MDB that comes with VB6. To connect ADO to this database file, follow the steps below: a) Click on the ADO control on the form and open up the properties window. b) Click on the ConnectionString property and the following dialog box will appear. Figure 29.2
  • 232.
    227 When the dialogbox appears, select Use Connection String. Next, click build and at the Data Link dialog box, double-click the option labeled Microsoft Jet 3.51 OLE DB provider. Figure 29.3
  • 233.
    228 After that, clickthe Next button to select the file BIBLO.MDB. You can click on the Text Connection to ensure proper connection of the database file. Click OK to finish the connection. Finally, click on the RecordSource property and set the command type to adCmd Table and Table name to Titles. Figure 29.4 Now, you need to write codes for all the command buttons, after which you can make the ADO control invisible. For the Save button, the procedure is as follows: Private Sub save_Click() On Error GoTo errSave AdoLibrary.Recordset.Fields("Title") = TitleTxt.Text AdoLibrary.Recordset.Fields("Year Published") = YearTxt.Text AdoLibrary.Recordset.Fields("ISBN") = ISBNTxt.Text AdoLibrary.Recordset.Fields("PubID") = PubTxt.Text AdoLibrary.Recordset.Fields("Subject") = SubjectTxt.Text AdoLibrary.Recordset.Update Exit Sub errSave: MsgBox (Err.Description) End Sub For the Add button, the procedure is as follows:
  • 234.
    229 Private Sub Add_Click() On Error GoTo addErr AdoLibrary.Recordset.AddNew Exit Sub addErr: MsgBox (Err.Description) End Sub Private Sub delete_Click() Confirm = MsgBox("Are you sure you want to delete this record?", vbYesNo, "Deletion Confirmation") If Confirm = vbYes Then On Error GoTo deleteErr AdoLibrary.Recordset.delete MsgBox "Record Deleted!",, "Message" Else MsgBox "Record Not Deleted!", , "Message" End If Exit Sub deleteErr: MsgBox (Err.Description), , "Empty record, please enter all the info" End Sub For the Cancel button, the procedure is as follows: Private Sub cancel_Click() TitleTxt.Text = "" YearTxt.Text = "" PubTxt.Text = "" ISBNTxt.Text = "" SubjectTxt.Text = ""
  • 235.
    230 Example 29.2 In theprevious example, you have learned to design a database application using the ADO control. In this example, you will learn to create a more advanced database application by adding more features to the previous example. The electronic library you are going to create will be able to accept users' registrationsas well as handle a login command that requires the user to enter a password, thus enhancing the security aspect of the database management system. Basically, the application will constitute a welcome menu, a registration menu, a login menu and the main database menu. The sequence of the menus is illustrated in the flowchart below: Figure 29.1 The Flowchart Welcome Registered Registration Users Login Database In this program, you need insert a form and design it as the Welcome menu as shown in Figure 29.2. In this form, insert three command buttons and set their properties as listed in Table 29.1. The interface is shown in Figure 29.2. Table 29.1 Object Name Caption Form name main_menu Electronic Library command button 1 cmdRegister Register command button 2 cmdLogin Login command button 3 cmdCancel Cancel
  • 236.
    231 Figure 29.2 TheWelcome Menu The procedure for the welcome menu is shown below: Private Sub cmdLogin_Click () main_menu.Hide Login_form.Show End Sub Private Sub cmdRegister_Click () main_menu.Hide Register. Show End Sub If a new user clicks the Register button, the registration form will appear. This registration form consists of two text boxes, three command buttons and an ADO control. Their properties are set as listed in Table 29.2 and the interface is shown in Figure 29.3. Note that the PasswordChar of the Text2 textbox is set as * which means users will not be able to see the actual characters they enter, they will only see the * symbol. In order to connect the ADO to a database, you must create a database file in Microsoft Access. The database file must contain at least two fields, one for the user name and the other one for the password.
  • 237.
    232 Table 29.2 Object Property Name :Register Form Caption: Registration Form Text1 Name: txtName Text2 Name: txtpassword Text2 PasswordChar : * Name :cmdConfirm command button 1 Caption: Confirm Name: cmdClear command button 2 Caption: Clear Name: cmdCancel command button 3 Caption: Cancel ADO control name Name :UserInfo Figure 29.3 The Registration Form The procedure for the registration form is as follows: Private Sub cmdClear_Click ( ) txtName.Text = "" txtpassword.Text = "" End Sub
  • 238.
    233 Private Sub cmdConfirm_Click () UserInfo.Recordset.Fields ("username") = txtName.Text UserInfo.Recordset.Fields ("password") = txtpassword.Text UserInfo.Recordset.Update Register. Hide Login_form.Show End Sub Private Sub Form_Load () UserInfo.Recordset.AddNew End Sub The login menu is illustrated in Figure 29.4: Figure 29.4 There are two text boxes and a command button. Their properties are set as follows: Table 29.3 Object Property Text1 Name: txtName Name: txtpassword Text2 PasswordChar: * Name: cmdLogin Command button 1 Caption: Login Form name Name: Login form
  • 239.
    234 Caption: Login Menu The procedure is as follows: Private Sub cmdLogin_Click() Dim usrname As String Dim psword As String Dim usernam As String Dim pssword As String Dim Msg As String Register.UserInfo.Refresh usrname = txtName.Text psword = txtpassword.Text Do Until Register.UserInfo.Recordset.EOF If Register.UserInfo.Recordset.Fields ("username").Value = usrname And Register.UserInfo.Recordset.Fields ("password").Value = psword Then Login_form.Hide frmLibrary.Show Exit Sub Else Register.UserInfo.Recordset.MoveNext End If Loop Msg = MsgBox ("Invalid password, try again!", vbOKCancel) If (Msg = 1) Then Login_form.Show txtName.Text = "" txtpassword = "" Else End End If End Sub
  • 240.
    235 The main databaseinterface is illustrated in Figure 29.5. Before you are able to run the program, you need to create the MS Access database file that contains a number of fields, i.e. title, author, publisher, year and category and save them as library.mdb. After that, connect the ADO control to this database file as you have done it in the previous example. The properties of all the controls for this program are listed in Table 29.4 and the interface is shown in Example 29.5. Table 29.4 Object Property Form Name : frmLibrary Name : adoLibrary ADO control visible : False The Text1 textbox Name: txtTitleA The Text2 textbox Name: txtAuthor The Text3 textbox Name: txtPublisher The Text4 textbox Name: txtYear The Text5 textbox Name: txtCategory Name: cmdSave Command button 1 Caption: &Save Name: cmdNew Command button 2 Caption: &New Name: cmdDelete Command button 3 Caption: &Delete Name: cmdCancel Command button 4 name Caption: &Cancel Name: cmdNext Command button 5 name Caption: N&ext Name: cmdPrevious Command button 6 name Caption: &Previous Name: cmdExit Command button 7 name Caption: E&xit
  • 241.
    236 The procedure isas follows: Private Sub cmdCancel_Click() txtTitle.Text = "" txtAuthor.Text = "" txtPublisher.Text = "" txtYear.Text = "" txtCategory.Text = "" End Sub Private Sub cmdDelete_Click () Confirm = MsgBox ("Are you sure you want to delete this record?", vbYesNo, "Deletion Confirmation") If Confirm = vbYes Then adoLibrary.Recordset.Delete MsgBox "Record Deleted!", , "Message" Else MsgBox "Record Not Deleted!", , "Message" End If End Sub Private Sub cmdNew_Click () adoLibrary.Recordset.AddNew End Sub Private Sub cmdNext_Click () If Not adoLibrary.Recordset.EOF Then adoLibrary.Recordset.MoveNext If adoLibrary.Recordset.EOF Then adoLibrary.Recordset.MovePrevious End If End If End Sub Private Sub cmdPrevious_Click ()
  • 242.
    237 If Not adoLibrary.Recordset.BOF Then adoLibrary.Recordset.MovePrevious If adoLibrary.Recordset.BOF Then adoLibrary.Recordset.MoveNext End If End If End Sub Private Sub cmdSave_Click () adoLibrary.Recordset.Fields ("Title").Value = txtTitle.Text adoLibrary.Recordset.Fields ("Author").Value = txtAuthor.Text adoLibrary.Recordset.Update End Sub Figure 29.5 The Library System Exercise 29 1. Create an Inventory Management System using the ADO control. Your system should include information such as product ID, product name, cost per unit, quantity etc.
  • 243.
    238 Lesson 30 Internet and Web Applications Learning how to create a web browser. Learning how to create a FTP program. In Visual Basic, you can create Internet and web applications. For example, you can create your own customized web browser, FTP as well as an email program. All these applications are relatively easy to build. 30.1 The Web Browser In order to create the web browser, you have to press Ctrl+T to open up the components window and select Microsoft Internet Control. After you have selected the control, you will see the control appear in the toolbox as a small globe. To insert the Microsoft Internet Control into the form, just drag the globe into the form and a white rectangle will appear in the form. You can resize this control as you wish. This control is given the default name WebBrowser1. To design the interface, you need to insert one combo box which will be used to display the URLs. In addition, you need to insert a few images which will function as command buttons for the user to navigate the Internet; they are the Go command, the Back command, the Forward command, the Refresh command and the Home command. You can actually put in the command buttons instead of the images, but using images will definitely improve the look of the browser. The procedures for all the commands are relatively easy to write. There are many methods, events, and properties associated with the web browser but you need to
  • 244.
    239 know just afew of them to come up with a functional Internet browser. They are listed in Table 30.1: Table 30.1 Method Description GoBack To navigate backward one page in the history list. GoForward To navigate forward one page in the history list. GoHome To navigate to the default start page. GoSearch To navigate to the current search page. Navigate To navigate to the URL or to the file identified by a full path. Refresh To reload the file that is currently loaded. Stop To cancel the current web page loading operation. Properties Busy To indicate whether the web browser is engaged in navigation or downloading operations. LocationName To retrieve the name of the document that Internet Explorer is currently displaying. LocationURL To retrieve the URL of the web page that Internet Explorer is currently displaying. Event DocumentComplete Executed when a document has been completely loaded. DownloadBegin Executed when a navigation operation begins. DownloadComplete Executed when a navigation operation finishes. FileDownload Executed to indicate that a file download is about to occur. NavigateComplete Executed after navigation to a link is completed.
  • 245.
    240 The method navigateis to go the website specified by its Uniform Resource Locator(URL). The syntax is WebBrowser1.Navigate (“URL”). In this program, I want to load the www.vbtutor.net web page at start-up, so I type in its URL. Private Sub Form_Load() WebBrowser1.Navigate ("http://www.vbtutor.net") End Sub In order to show the URL in the combo box and also to display the page title at the form caption after the page is completely downloaded, I use the following statements: Private Sub WebBrowser1_DocumentComplete (ByVal pDisp As Object, URL As Variant) Combo1.Text = URL Form1.Caption = WebBrowser1.LocationName Combo1.AddItem URL End Sub The following procedure will tell the user to wait while the page is loading. Private Sub WebBrowser1_DownloadBegin () Combo1.Text = "Page loading, please wait" End Sub Figure 30.1 The Web Browser
  • 246.
    241 The program Private SubForm_Load () WebBrowser1.Navigate ("http://www.vbtutor.net") End Sub Private Sub Image1_Click () WebBrowser1.GoHome End Sub Private Sub Image2_Click () On Error Resume Next WebBrowser1.GoForward End Sub Private Sub Image3_Click () On Error Resume Next WebBrowser1.GoBack
  • 247.
    242 End Sub Private SubImage4_Click () WebBrowser1.Refresh End Sub Private Sub Image5_Click () WebBrowser1.Stop End Sub Private Sub Label2_Click () WebBrowser1.Navigate (Combo1.Text) End Sub Private Sub Label4_Click () WebBrowser1.GoSearch End Sub Private Sub WebBrowser1_DocumentComplete(ByVal pDisp As Object, URL As Variant) Combo1.Text = URL Form1.Caption = WebBrowser1.LocationName Combo1.AddItem URL End Sub Private Sub WebBrowser1_DownloadBegin() Combo1.Text = "Page loading, please wait" End Sub 30.2 The FTP program The File Transfer Protocol is a system for transferring files between two computers over the Internet where one of the computers is normally known as server and the other one as the client. The FTP program is very useful for website management as the webmaster can update the web pages by uploading the local files to the web
  • 248.
    243 server easily andnormally at a much faster speed than the web browser. For normal PC users, the FTP program can also be used to download files from many FTP sites that offer a lot of useful stuffs such as free software, free games, product information, applications, tools, utilities, drivers, fixes and etc. The FTP program usually comprises an interface that shows the directories of the local computer and the remote server. Files can normally be transferred just by clicking the relevant arrows. To log into the FTP site, we normally have to key in the user name and the password; however, for public domains, we just need to type the word anonymous as the user name and you can leave out the password. The FTP host name takes the form ftp.servername.com, for example, the Microsoft FTP site’s host name is ftp.microsoft.com while the Netscape FTP site is ftp.netscape.com. The FTP program usually provides a set of commands such as ChgDir (changing directory), MkDir (Changing directory), Rename (renaming a file), view (to view a file), delete (to delete a file) etc. If you need to use a FTP program, you can purchase one or you can download a couple of the programs that are available free of charge over the Internet. However, you can also create your very own FTP program with Visual Basic. Visual Basic allows you to build a fully functionally FTP program which may be just as good as the commercial FTP programs. The engine behind it is the Microsoft Internet Transfer Control 6.0 in which you need to insert your form before you can create the FTP program. The name of the Microsoft Internet Transfer Control 6.0.is Inet and if you only put in one control, its name will be Inet1. Inet1 comprises three important properties namely Inet1.URL which is used to identify the FTP hostname, Inet1.UserName which is used to accept the username and the Inet1.Password which is used to accept the user’s passwords. The statements for the program to read the hostname of the server, the username and the password entered into the Text1 textbox, the Text2 textbox and the Text3 textbox by the user are shown below: Inet1.URL=Text1.Text Inet1.UserName=Text2.Text Inet1.Passoword=Text3.Text
  • 249.
    244 After the userenters the above information, the program will attempt to connect to the server using the following command, where Execute is the method and DIR is the FTP command that will read the list of files from the specified directory of the remote computer and you need to use the getChunk method to actually retrieve the directory’s information. Inet1.Execute, "DIR" After connecting to the server, you can choose the file to download from the remote computer by using the statement Inet1.Execute, , "get" & remotefile & localfile where remotefile is the file of the remote site and localfile is the file of the local system. However, very often you need to provide the full path of the local file, which you can do that by modifying the above syntax to the following syntax: Inet1.Execute , , "get" & remotefile & localpath & remotefile The above statements will ensure that the remote file will be downloaded to the location specified by the localpath and the file downloaded will assume the same name as the remote file. For example, the remote file is readme.txt and the localpath is C:temp , so the downloaded file will be saved in C:tempreadme.txt. In order to monitor the status of the connection, you can use the StateChanged event that is associated with Inet1 together with a set of the state constants that are listed in the Table 30.1: Table 30.1 Constant Value Description icHostResolvingHost 1 The control is looking up the IP address of the specified host computer. icHostResolved 2 The control successfully found the IP address of
  • 250.
    245 the specified host computer. icConnecting 3 The control is connecting to the host computer. icConnected 4 The control successfully connected to the host computer. icRequesting 5 The control is sending a request to the host computer. icRequestSent 6 The control successfully sent the request. icReceivingResponse 7 The control is receiving a response from the host computer. icResponseReceived 8 The control successfully received a response from the host computer. icDisconnecting 9 The control is disconnecting from the host computer. icDisconnected 10 The control successfully disconnected from the host computer. icError 11 An error occurred in communicating with the host computer. icResponseCompleted 12 The request has been completed and all data has been received. Under the StateChanged event, you use the Select Case…End Select statements to notify the users regarding the various states of the connection. The procedure is shown below: Private Sub Inet1_StateChanged(ByVal State As Integer) Select Case State Case icError MsgBox Inet1.ResponseInfo, , "File failed to transfer" Case icResolvingHost
  • 251.
    246 Label6.Caption = "Resolving Host" Case icHostResolved Label6.Caption = "Host Resolved" Case icConnecting Label6.Caption = "Connecting Host" Case icConnected Label6.Caption = "Host connected" Case icReceivingResponse Label6.Caption = "Receiving Response" Case icResponseReceived Label6.Caption = "Got Response" Case icResponseCompleted Dim data1 As String Dim data2 As String MsgBox "Download Completed" End Select End Sub The states of the connection will be displayed in Label6. The FTP program that I have created contains a form and a dialog box. The dialog box can be added by clicking on the Project item on the menu bar and then selecting the Add Form item on the drop-down list. You can either choose a normal dialog box or a login dialog box. The function of the dialog box is to accept the FTP address, the username and the password and then connect to the server. After a successful login, the dialog box will be hidden and the main form will be presented for the user to browse the remote directory and to choose certain files to download. The interface of the login dialog is shown in Figure 30.2:
  • 252.
    247 Figure 30.2 TheFTP Login Form The states of the connection will be displayed in the label at the bottom. The program for the login dialog is: Option Explicit Private Sub OKButton_Click() Inet1.URL = Text1.Text Inet1.UserName = Text2.Text Inet1.Password = Text3.Text Inet1.Execute , "DIR" Form1.Show Dialog.Hide End Sub Private Sub Inet1_StateChanged(ByVal State As Integer) Select Case State Case icError MsgBox Inet1.ResponseInfo, , "File failed to transfer" Case icResolvingHost Label6.Caption = "Resolving Host" Case icHostResolved Label6.Caption = "Host Resolved" Case icConnecting
  • 253.
    248 Label6.Caption = "Connecting Host" Case icConnected Label6.Caption = "Host connected" Case icReceivingResponse Label6.Caption = "Receiving Response" Case icResponseReceived Label6.Caption = "Got Response" Case icResponseCompleted Dim data As String Dim data1 As String MsgBox "Transfer Completed" Do data1 = Inet1.GetChunk(1024, icString) data = data & data1 Loop While Len(data1) <> 0 Form1.Text6.Text = data End Select End Sub Private Sub CancelButton_Click() Text1.Text = "" Text2.Text = "" Text3.Text = "" End Sub The statement data1 = Inet1.GetChunk (1024, icString) is to use the getChunk method to grab information of the remote directory and then display the files of the directory in the Text6 textbox. After logging in, the main form will be presented as shown in Figure 30.3:
  • 254.
    249 Figure 30.3 The programto download the file is: Dim remotefile As String Dim mypath As String Dim cmd As String Private Sub Command1_Click () remotefile = Text4.Text mypath = Text5.Text cmd = "GET " & remotefile & " " & mypath & remotefile Inet1.Execute , cmd End Sub Private Sub Command2_Click() Inet1.Cancel End End Sub
  • 255.
    250 Private Sub Form_Load() Dialog.Show Form1.Hide End Sub Private Sub Inet1_StateChanged (ByVal State As Integer) Select Case State Case icError MsgBox Inet1.ResponseInfo, , "File failed to transfer" Case icResponseCompleted MsgBox "Download Completed" End Select End Sub Exercise 30 1. Create your own customized web browser. 2. Create your own customized FTP program. INDEX arithmetic operators, 24, 30, 33 array, 94 -95, 97-101, 147, 149, 167, 177, 187 A Asc, 80, 82 Abs, 63, 66, 69, 179, 180, 182 ASCII, 82, 83 Activate, 6-9, 24, 45-49, 51-54, 63, 67, 69-75, 78, 80, 83, Atn, 63, 68, 69 119 Audio player, 117 ActiveX data object, 219 avi, 117, 125-128 AddItem method, 17, 47, 103 ADO control, 219, 221, 223, 225-227, 230, 232 B Animation, 130, 136, 137, 141, 144 arc tangent, 68 Back command, 233
  • 256.
    2 BackColor, 13, 18,102-104 Drive List Box, 19 background color, 11-13, 18, 102-103 DriveListBox, 113, 120-121, 125 boggle, 167 dropdown list, 22 Boolean, 27, 30, 170, 180, 189 border style, 11, 102 BorderColor, 102 E BorderWidth, 102 educational game, 185, 207 Byte, 26 End Select, 24, 40-44, 88, 104, 173, 175, 187-188, 191- 193, 202-203, 240, 242, 244 C event-driven, 1 Exit For, 53 calculator, 11-12, 14, 43, 69, 89, 97, 177, 184 Exit Sub, 24, 109-110, 129, 211-212, 223-224, 229 caption, 10-13, 16, 23, 36-37, 62, 64, 142, 187, 210, 215, Exp, 63, 66, 69 219, 235 explicit declaration, 28 Caption Property, 14 Exponential, 31 CD player, 117-118, 120 Check Box, 18 Chr, III, 80, 82-83 F circle, 14, 21, 25, 102, 108, 116 File List Box, 20 circle method, 108 FileDownload, 234 Click event, 16 FileListBox, 113, 120-121, 125 code window, 5, 22, 187 Fix, 63, 66, 67, 70 color constants, 18 For…Next, 24, 45, 51, 100, 147 combo box, 17, 43, 233, 235 foreground color, 11, 12 Combo Box, 17, 120 form, 3, 5, 6, 10-13, 15, 18-23, 32, 38, 47, 61, 64 - 68, 70, command button, 1, 6, 10, 15-16, 21-23, 38, 57, 64, 84, 71, 74 -76, 79, 85, 96-98, 102-103, 107-108, 113, 117, 103, 131, 133, 135, 138, 141-142, 187, 217, 225, 227- 120, 125, 130, 136, 141-142, 145, 158, 167, 215, 219, 228 221, 225- 229, 233, 235, 237-238, 241, 243 comments, 14 Format function, 73 common dialog box, 103, 111, 212 Formatting output, 70 components, 3, 117, 145, 219, 233 Forward command, 233 computer screen, 7 FTP, 233, 237-238, 241, 244 conditional operators, 34, 35, 37, 39 function, 15, 17, 24, 25, 31-32, 34, 38, 41, 43, 47, 57-58, conditional statement, 18 61- 64, 66-68, 70-74, 79- 85, 89-93, 105, 113, 120, ConnectionString, 221 125, 160, 184, 189, 198, 233, 241 controls, III, 4, 10, 13, 15-16, 21-22, 97, 102, 105, 107, 113, 120 -121, 125, 186, 220, 230 Cos, 24, 63, 68-69, 197, 204 G cosine, 68-69 getChunk method, 238, 243 Currency, 26-27, 32, 74, 87 Go command, 233 graphics, 16, 102, 105, 107-108, 109, 113, 219 D Graphics, 102 GWBASIC, 1 data control, 215, 217, 219, 221 database, 37, 208-209, 215- 219, 221, 223, 225-226, 229- 230 H DataField, 215, 220-221 Home command, 233 DataSource, 215, 220-221 Date, II, 27, 29, 76-79 Decimal, 26 I degree, 68, 69 designing phase, 16, 64, 197 IBM BASICA, 1 dialog box, 2, 102-103, 105, 109, 111-112, 116-117, 129, icConnected, 239, 240, 242 212-214, 219, 221-222, 241 icConnecting, 239, 240, 242 Dim statement, 28, 29, 94, See Dim icDisconnected, 239 Directory List Box, 20 icDisconnecting, 239 DirListBox, 113, 120 -121, 125 icError, 239, 240, 242, 244 division operator, 7 icHostResolved, 239, 240, 242 Do Until, 45-48, 229 icHostResolvingHost, 239 Do While, 45, 48, 67 icReceivingResponse, 239, 240, 242 Do…. Loop, 45 icRequesting, 239 DocumentComplete, 234 - 236 icRequestSent, 239 Double, 5, 6, 26-27, 130 icResponseCompleted, 240, 242, 244 DownloadBegin, 234 -235, 237 icResponseReceived, 239, 240, 242 DownloadComplete, 234 If….Then….Elseif, 18 DragDrop, 6, 136-137, 173 Image Box, III, 16, 105 dragIcon, 136 implicit declaration, 28 dragmode, 136 input, 13, 15, 28, 31, 33, 41, 61, 62, 96-97, 101, 209, 210 drawing, 12, 102 InputBox ( ), 57
  • 257.
    3 InStr function, 82 Int,38, 39, 63-67, 70, 105, 149, 150, 159, 164, 169, 188, N 192, 199, 201-204 NavigateComplete, 234 Integer, 26-27, 29, 31, 37-38, 47-49, 58-60, 65, 95- 96, nested loop, 54 98-99, 105, 109, 149, 150, 152, 161, 168, 173, 177, numeric data, 15, 16, 26, 29, 32, 43, 100 178, 180-183, 186, 189- 191, 197, 201, 240, 242, 244 Integer Division, 31 interface, 1, 3, 10, 11, 25, 102, 105, 146, 149, 177, 185, O 213, 218-219, 225-226, 229-230, 233, 237, 241 Option Base, 95, 98, 99-100, 149 Option Box, 18 K option buttons, 186, 187 output, 7, 8, 9, 15, 25, 32, 47, 51-56, 63, 64, 67-72, 74, keyPress, 6 76-78, 80, 83 - 85, 88, 100-101, 104-105, 109, 112 L P Label, 6, 12, 16, 210, 220 password, 29-30, 36, 38-39, 62, 65-66, 225-226, 228, Lcase function, 82 229, 237, 238, 241 Left function, 81 PasswordChar, 36, 226-228 Len function, 80 Picture Box, 16, 105 line control, 102 predefined formats, 76 Line method, 108, 116 Print, 7-9, 24, 45-46, 51-55, 63, 67, 69, 70-75, 78, 80, 83, list box, 1, 17, 50, 97, 102, 103, 116, 121, 125 95, 176, 209, 213 List Box, 17, 19- 21, 121 project window, 3 ListIndex, 17, 43, 103, 114 -115, 122-124, 126-128 properties, 3, 10-14, 16, 21-22, 24, 37-38, 76, 102, 105, Literals, 27 111, 118, 133-136, 138-139, 141, 147, 198, 215, 220, LoadPicture, 16, 21, 105-106, 111-112, 115, 159-160, 221, 225-226, 228, 230, 233, 238 162, 165-166, 201-203 properties window, 13, 16 LoadPicture method, 16, 105, 160 Pset method, 107, 108, 116 LocationName, 234 -235, 237 Public, 84, 87, 94 LocationURL, 234 Public statement, 94 Log, 24, 63, 66-67, 69 logical operators, 34, 35, 39 Long, 26 Q Loop Until, 45-46, 48, 213 QBASIC, 1 Loop While, 45-46, 48, 210, 242 QUICKBASIC, 1 Ltrim function, 81 M R radian, 68 mathematical functions, 24, 63, 69 random integer, 64 MaxButton, 11 randomization process, 149, 158, 198 maximize, 11, 13 randomize, 63, 167, 187 memory game, 194, 207 Reading a text file, 209 message box, 57, 59-61 RecordSource, 215, 223 Microsoft ActiveX Data Control 6, 219 Refresh command, 233 Microsoft Common Dialog Control 6.0, 103 reversi, 169, 184 Microsoft Excel, III, 90, 91 Right function, 80 Microsoft Internet Control, 233 RND function, 14 Microsoft Internet Transfer Control 6.0, 238 Round, 63, 66, 67, 69, 70 Microsoft Multimedia Control, 117, 118, 120, 122, 125, rounded rectangle, 18, 21, 102 158, 160, 197 rounded square, 18, 21, 149 Mid function, 81 Rtrim function, 81 midi files, 117, 120, 122 runtime, 13, 14, 16, 22, 105, 142, 185, 208, 219 minButton, 11 minimize, 11, 13 Mod, 31, 33 S Modulus, 31 Move Method, 144 scroll bar, 142 mp3, 117, 125-128 Select Case, 24, 40, 42- 44, 88, 103, 173, 186, 187, mpeg, 117, 125-128 190-193, 201, 203, 240, 242, 244 MS Access, 215, 229 Shape, 14, 19, 102-104 MsgBox( ), 57 shape control, 18, 102-103, 146 multimedia files, 117, 122 Sin, 24, 63, 68-69, 197, 204 Multimedia player, 117 sine, 68-69 multiplication operator, 7 Single, 11, 26-27, 42, 136-137, 149, 173 slot machine, 158, 166 source code window, 5 Space function, 72
  • 258.
    4 Sqr, 24, 63,66, 184 Standard EXE, 2 V statements, 6, 17, 18, 22, 26, 29, 30, 34, 37, 40-41, 43, Val, III, 15, 24 -25, 30, 35, 44, 80, 82, 161-163, 181, 191, 45, 48, 51, 54, 70, 121, 125, 134, 138, 142, 160, 180, 193, 204 187, 189, 195, 198, 235, 238, 240 variables, 8, 25-26, 28-32, 47, 63, 94, 147, 160 step increment, 51 Variant, 27, 29, 32, 84-85, 87-88, 90, 149, 161, 180, 200, Str, 24-25, 71, 73, 80, 82, 161-162, 164, 176-184, 191, 201, 235, 236 193, 202, 207 vbAbort, 58 string, 9, 15, 24, 27, 29-31, 41, 43, 61, 71, 81, 82, 100 vbAbortRetryIgnore, 58 String concatenation, 31 vbBlue, 18 subroutine, 139, 142 vbCancel, 58 subscript, 94, 95 vbCritical, 60 suffix, 27, 98 vbExclamation, 60 summation, 15, 47, 48 vbIgnore, 58 syntax, 16, 22-23, 41, 105, 144, 209, 210, 213, 234, 238 vbInformation, 60 vbNo, 58 vbOk, 58 T vbOkCancel, 58 Tan, 24, 63, 68, 69 vbOkOnly, 58 tangent, 68, 69 vbQuestion, 60 Text Box, 15 VbRed, 18, 107, 108 text file, 208-209, 212-213, 214 vbRetry, 58 timer, 23, 38, 76, 141-142, 144, 158, 195 vbRetryCancel, 58 Toolbox, 3 vbTab, 47, 48, 49 trigonometric functions, 68 vbYes, 58, 224, 231 Ttrim function, 81 vbYesNo, 58, 224, 231 twips, 108, 133-134, 144, 147, 199 vbYesNoCancel, 58, 60 two dimension array, 98 video files, 117, 122, 125, 129 Visual Basic Editor, 90, 91 U W Ucase, III, 41, 80, 82 Uniform Resource Locator, 234 wav, 117, 121-123, 126-127, 157-158, 164-165, 196, 205, URL, 234 -238, 241 206 user-defined Format, 74 wave audio files, 121 web browser, 233-234, 237, 244 While… Wend, 45