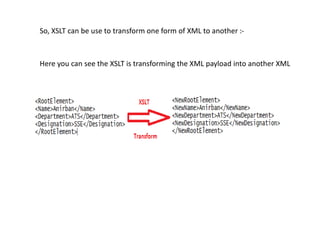
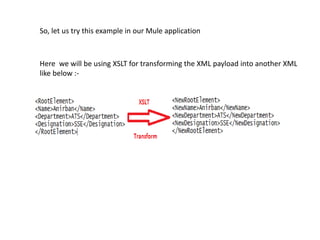
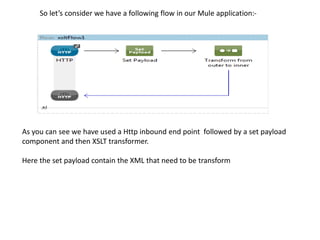
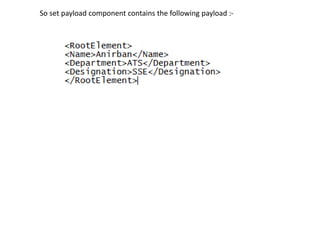
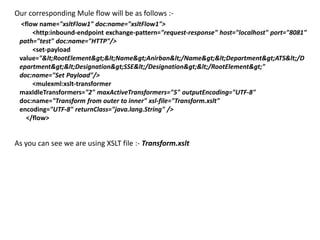
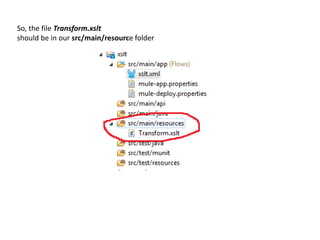
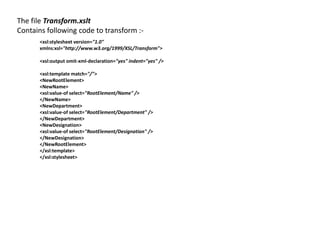
Using XSLT in Mule (For beginner )
We often use XSLT in our application to transform XML
payload from one form to another . Mule also supports XSLT
in it’s application with XSLT-Transformer component.
So, How can we use XSLT in Mule application??
.
Here I will show you how ……
Before we start we must see what an XSLT actually is :-
As per XSLT definition :-
XSLT (Extensible Stylesheet Language Transformations) is a language
for transforming XML documents into other XML documents, or other
formats such as HTML for web pages, plain text or into XSL Formatting
Objects, which may subsequently be converted to other formats, such
as PDF PostScript and PNG.
Source :- http://en.wikipedia.org/wiki/XSLT
So, XSLT can be use to transform one form of XML to another :-
Here you can see the XSLT is transforming the XML payload into another XML
So, let us try this example in our Mule application
Here we will be using XSLT for transforming the XML payload into another XML
like below :-
So let’s consider we have a following flow in our Mule application:-
As you can see we have used a Http inbound end point followed by a set payload
component and then XSLT transformer.
Here the set payload contain the XML that need to be transform
So set payload component contains the following payload :-
Our corresponding Mule flow will be as follows :-
<flow name="xsltFlow1" doc:name="xsltFlow1">
<http:inbound-endpoint exchange-pattern="request-response" host="localhost" port="8081"
path="test" doc:name="HTTP"/>
<set-payload
value="&lt;RootElement&gt;&lt;Name&gt;Anirban&lt;/Name&gt;&lt;Department&gt;ATS&lt;/D
epartment&gt;&lt;Designation&gt;SSE&lt;/Designation&gt;&lt;/RootElement&gt;"
doc:name="Set Payload"/>
<mulexml:xslt-transformer
maxIdleTransformers="2" maxActiveTransformers="5" outputEncoding="UTF-8"
doc:name="Transform from outer to inner" xsl-file="Transform.xslt"
encoding="UTF-8" returnClass="java.lang.String" />
</flow>
As you can see we are using XSLT file :- Transform.xslt
So, the file Transform.xslt
should be in our src/main/resource folder
The file Transform.xslt
Contains following code to transform :-
<xsl:stylesheet version="1.0"
xmlns:xsl="http://www.w3.org/1999/XSL/Transform">
<xsl:output omit-xml-declaration="yes" indent="yes" />
<xsl:template match="/">
<NewRootElement>
<NewName>
<xsl:value-of select="RootElement/Name" />
</NewName>
<NewDepartment>
<xsl:value-of select="RootElement/Department" />
</NewDepartment>
<NewDesignation>
<xsl:value-of select="RootElement/Designation" />
</NewDesignation>
</NewRootElement>
</xsl:template>
</xsl:stylesheet>
To test the application we hit the url http://localhost:8081/test in our
browser and we get the following :-
And you can see the XML payload has been transferred to this new XML
Hope you enjoyed the simple yet an amazing trick in Mule
Using xslt in mule

Using xslt in mule

  • 1.
    Using XSLT inMule (For beginner )
  • 2.
    We often useXSLT in our application to transform XML payload from one form to another . Mule also supports XSLT in it’s application with XSLT-Transformer component.
  • 3.
    So, How canwe use XSLT in Mule application?? .
  • 4.
    Here I willshow you how ……
  • 5.
    Before we startwe must see what an XSLT actually is :- As per XSLT definition :- XSLT (Extensible Stylesheet Language Transformations) is a language for transforming XML documents into other XML documents, or other formats such as HTML for web pages, plain text or into XSL Formatting Objects, which may subsequently be converted to other formats, such as PDF PostScript and PNG. Source :- http://en.wikipedia.org/wiki/XSLT
  • 6.
    So, XSLT canbe use to transform one form of XML to another :- Here you can see the XSLT is transforming the XML payload into another XML
  • 7.
    So, let ustry this example in our Mule application Here we will be using XSLT for transforming the XML payload into another XML like below :-
  • 8.
    So let’s considerwe have a following flow in our Mule application:- As you can see we have used a Http inbound end point followed by a set payload component and then XSLT transformer. Here the set payload contain the XML that need to be transform
  • 9.
    So set payloadcomponent contains the following payload :-
  • 10.
    Our corresponding Muleflow will be as follows :- <flow name="xsltFlow1" doc:name="xsltFlow1"> <http:inbound-endpoint exchange-pattern="request-response" host="localhost" port="8081" path="test" doc:name="HTTP"/> <set-payload value="&lt;RootElement&gt;&lt;Name&gt;Anirban&lt;/Name&gt;&lt;Department&gt;ATS&lt;/D epartment&gt;&lt;Designation&gt;SSE&lt;/Designation&gt;&lt;/RootElement&gt;" doc:name="Set Payload"/> <mulexml:xslt-transformer maxIdleTransformers="2" maxActiveTransformers="5" outputEncoding="UTF-8" doc:name="Transform from outer to inner" xsl-file="Transform.xslt" encoding="UTF-8" returnClass="java.lang.String" /> </flow> As you can see we are using XSLT file :- Transform.xslt
  • 11.
    So, the fileTransform.xslt should be in our src/main/resource folder
  • 12.
    The file Transform.xslt Containsfollowing code to transform :- <xsl:stylesheet version="1.0" xmlns:xsl="http://www.w3.org/1999/XSL/Transform"> <xsl:output omit-xml-declaration="yes" indent="yes" /> <xsl:template match="/"> <NewRootElement> <NewName> <xsl:value-of select="RootElement/Name" /> </NewName> <NewDepartment> <xsl:value-of select="RootElement/Department" /> </NewDepartment> <NewDesignation> <xsl:value-of select="RootElement/Designation" /> </NewDesignation> </NewRootElement> </xsl:template> </xsl:stylesheet>
  • 13.
    To test theapplication we hit the url http://localhost:8081/test in our browser and we get the following :- And you can see the XML payload has been transferred to this new XML
  • 14.
    Hope you enjoyedthe simple yet an amazing trick in Mule