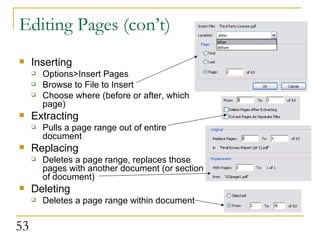
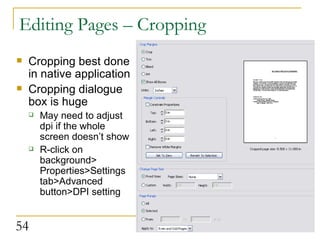
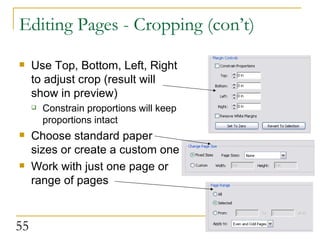
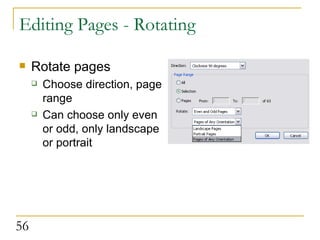
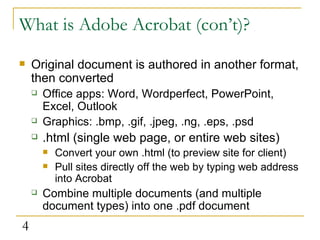
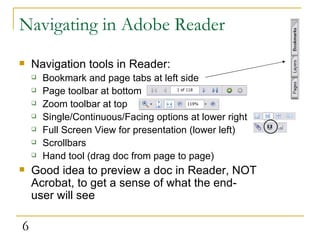
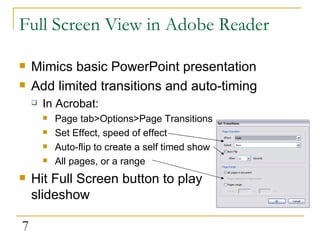
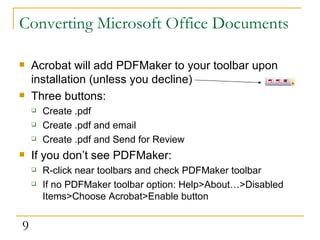
Using Adobe Acrobat 7.0 Colorado State University Cooperative Extension Technology Unit
Basics What is Adobe Acrobat?, Navigating in Adobe Reader, Using Full Screen mode in Adobe Reader
What is Adobe Acrobat? Creates .pdf files pdf = Portable Document Format Used to distribute forms and documents in a standardized format Can be read by free (and widely distributed) Adobe reader Security tools: Restrict who can see the document Digitally sign/certify documents Restrict printing (no printing, or low resolution only) Restrict text/images from editing, copying and pasting Particularly useful for web and email
What is Adobe Acrobat (con’t)? Original document is authored in another format, then converted Office apps: Word, Wordperfect, PowerPoint, Excel, Outlook Graphics: .bmp, .gif, .jpeg, .ng, .eps, .psd .html (single web page, or entire web sites) Convert your own .html (to preview site for client)  Pull sites directly off the web by typing web address into Acrobat  Combine multiple documents (and multiple document types) into one .pdf document
3 types of Acrobat Adobe Reader Formerly called Acrobat Reader Free, widely distributed Can read .pdfs, but not create If you offer .pdfs, always offer the link to the free reader as well ( www.adobe.com  – logo found there as well for an image link)  Adobe Acrobat (standard) Converts most office applications and graphics to .pdf Supports some multimedia, downloads websites About $45 at CSU Software Cellar Adobe Acrobat Pro Interactive forms (buttons, checkboxes, text fields) Supports more multimedia  MS Visio, MS Project, AutoCAD, Mac pict format  About $69 at CSU Software Cellar
Navigating in Adobe Reader Navigation tools in Reader: Bookmark and page tabs at left side Page toolbar at bottom Zoom toolbar at top Single/Continuous/Facing options at lower right Full Screen View for presentation (lower left) Scrollbars Hand tool (drag doc from page to page)  Good idea to preview a doc in Reader, NOT Acrobat, to get a sense of what the end-user will see
Full Screen View in Adobe Reader Mimics basic PowerPoint presentation Add limited transitions and auto-timing In Acrobat: Page tab>Options>Page Transitions Set Effect, speed of effect Auto-flip to create a self timed show All pages, or a range Hit Full Screen button to play slideshow
Creating a .pdf Converting Microsoft Office documents, non-Office documents, images, multiple documents, websites
Converting Microsoft Office Documents Acrobat will add PDFMaker to your toolbar upon installation (unless you decline) Three buttons: Create .pdf Create .pdf and email Create .pdf and Send for Review If you don’t see PDFMaker: R-click near toolbars and check PDFMaker toolbar If no PDFMaker toolbar option: Help>About…>Disabled Items>Choose Acrobat>Enable button
PDF Conversion Settings After install, should see “Adobe PDF” menu listed Same 3 options as toolbar, and a fourth: “Change Conversion Settings” Each MS Office Application has similar - not identical - set of Conversion Settings
PDF Conversion Settings (con’t) These 4 are common to most MS Office Apps Attach Source File to PDF Adds source file (e.g. Word, Excel) to .pdf as an attachment Nice option, but obviously increases file size Add Bookmarks to PDF Good option for PPoint and Excel Adds bookmark for each slide/sheet in document Can seem a little haphazard in Word Creates a bookmark for each Heading and/or Style Often easier to create Word bookmarks in Acrobat Add Links to PDF Links in native app. a better “look and feel” than adding them in Acrobat Enable Accessibility and Reflow with Tagged PDF Allows re-flowed text for PDAs, text-to-speech, etc. Only downside is a larger file size
Converting Word to PDF Conversion settings specific to Word Word Tab Convert displayed comments to notes Convert cross-references, TOC to links Convert footnote/endnote links Bookmarks tab Choose which headings and styles convert to bookmarks A good choice IF your are already working with styles and headings to denote sections Otherwise, do it in Acrobat
Creating Bookmarks in Word Assign a heading to every section in doc that require a bookmark You can convert text to a heading quickly using the Format painter  Apply style to text once, select text, click Format Painter TWICE Go through document selecting text – it will convert to that heading
Converting PowerPoint to PDF Conversion settings specific to PowerPoint Save Slide Transitions Only saves simple ones – best to add after the fact Only need them in Full Screen mode Save Animations Only saves simple ones – best to add after the fact Only need them in Full Screen mode Convert multimedia to PDF multimedia Applies to video, sound, images Make sure and test!  Lots of tweaking required for this! Convert hidden slides Slide-sorter view – you can “hide” slides to avoid deleting them PDF Layout based on PowerPoint printer settings Important for printing Notes page, Handouts After settings set, set printer to Adobe PDF
Converting Excel to PDF Conversion settings specific to Excel: Convert Entire Workbook is an option in the Adobe PDF menu Each worksheet has a bookmark Convert comments to notes Fit worksheet to single page (grayed out if Convert Entire Workbook is selected) Good option if doc is likely to be printed (as Excel worksheets can be hard to print and show all rows/columns)
Converting Publisher to PDF Specific to Publisher Preserve Spot Color All black and white except for chosen spot colors  Print Crop Marks Where paper is cut Allow Bleeds Color extending beyond edge to allow for variations in cutting  Preserve Transparency For .gif, .png, .tiff These are options for high-end printers If you are using a professional printer, call and ask them what they require
Converting Access to PDF Specific to Access Only 2 options in Conversion Settings: Attach source file Create bookmarks Tables can only be converted one at a time Multiple reports can be converted simultaneously Adobe PDF menu>Convert multiple reports to single PDF
Combining Multiple Access Reports Pretty simple – add reports from left column to right column, arrange, Convert to PDF
Converting Outlook to PDF Good way to archive emails Includes attachments 4 bookmarks created, sorting emails by date, sender, subject, folders Can also combine emails with other documents Include email exchanges discussing document along with document itself  Select messages or folders to archive, then convert
Converting non-MS Office documents  Two methods: Open document in native application File>Print>Choose Adobe PDF as printer It won’t print the file, merely convert Good for Photoshop, Wordperfect, etc. Works for Office Apps too Open Adobe Acrobat Create PDF>From File Browse to the file
Combining documents Open Acrobat Create PDF>From Multiple Documents Can be a mix of document formats (VERY handy) Browse to files, select, arrange, click OK
Converting Images .jpeg, .gif, .png, .tiff, .bmp, .eps  Don’t need a native application, because there is none Open Acrobat Create PDF>From File>Browse to image Create PDF>From Multiple Files>Browse to images and create a montage that can work as a slideshow in Full Screen Mode
Converting websites to PDF  Convert either existing website, or html Second option a good way to preview a website for client without actually publishing the site to a server  Open Acrobat Create PDF>From Website Type in URL or browse to .html file
The Convert Website Dialogue Box Get entire site Rarely a good idea unless it is small and self contained (i.e. no links to other sites) 3 ways to limit download Get only 1 or 2 levels Stay on same path (will remain within root folder) Stay on same server (will go outside root folder but only convert links to sites on same server)
Converting Websites: Helpful Hints If you need to capture large sections of a sprawling site or one that links to many other places, capture small sections or individual pages and pull them together with Create PDF>Multiple files Use the Settings button, Page Layout tab to size and scale large web pages Links in document still active for downloaded pages
Converting a website: 3 examples Create PDF>From Website http://www.ext.colostate.edu Good example of a large, sprawling site – “Get Entire Site” would be downloading for days 1 level gets you only the current page 2 levels pull ALL the links from this page, including navigation buttons at top (65 pages total) Stay On Same Path/Server not very useful as most links are ON this path (SOSP gives a 47 page doc) http://www.radon.org/ Good example of a “Get Entire Site” candidate Only links are to meaningful docs related to Radon Includes slideshow downloaded intact Browse to  kiddos/kiddos.htm Converted from local site, not from server
Adding Navigation Aids Creating Bookmarks, Links, and Hotspots
Adding bookmarks Often easier to add Bookmarks in Acrobat rather than native application Not just a navigation tool – also shows structure of document at a glance Use Table of Contents as guide  Go to page you want to bookmark Choose view (width, height, zoom in to specific object) Bookmarks pane>New Bookmark icon Name bookmark Drag up or down in order Drag under and to the right to nest it within a larger bookmark
Adding Bookmarks (con’t) Set view of page for bookmark - Fit Width or Height, zoom in to a specific feature Often looks nice to have first page at fit width, ret of doc at fir height  Drag bookmarks around after creation to set order Nest bookmarks within other bookmarks by dragging child under and just to the right of parent
Bookmark Options Options button allows: Change text size Wrap long bookmarks Use Properties to change color and style (bold, italics, bold and italics)
Adding text links Unlike bookmarks, MS Office does better looking links than Acrobat If possible, create links in native application If not: Bring up document in Acrobat Choose Select tool and select text R-Click (away from markup options icon) and choose Create Link
Adding text links (con’t) Type: visible rectangle Style: underline Highlight style will add a basic behavior Action: open a web page (though you can link to other docs, or spots in this doc) “ Next” takes you to URL box For email,  mailto:  followed by address
Hotspot and Image links Same process, just use the Snapshot tool instead of select A visible rectangle and some type of link behavior is wise, to let the end user know there is a link
Adding attachments, comments and mark-up, touching up text Attachments, Attaching a File as Comment, Adding Comments and Mark-up, Sending Documents for Review, Touching Up Text
Attachments Most basic attachment is the source file Add automatically in Conversion Settings To add any other docs as an attachment, click the paper clip and browse to the file To view, click the Attachments tab, doc will appear in the Attachments pane
Attach a File As Comment Helps the end-user know there is an attachment, and allows you to comment on the attachment Click the pulldown arrow to the right of the paper clip icon, and choose the paper clip with comment balloon Cursor will become crosshair Click where you want comment to appear Dialogue box will appear
Attach a File as Comment (con’t) Choose graph, paperclip, pushpin, comment balloon Choose color and opacity General tab allows you to add author’s name and a description Rollover shows author and description Click the icon, or use attachment tab to open attachment
Adding Comments - Notes Click “Comments and Markup”, Commenting Toolbar will appear Note tool to add a text comment Click-and-drag to define size of text box Type in your text, Close box Select, then Options>Properties will allow you to choose icon, color, author’s name, etc. Rollover of icon reveals comment
Adding Comments – Text Edits Click Text Edit button To Insert text: Click between where you want to insert, start typing Carat appears, rollover reveals inserted text To Delete text: Select text, hit Delete Text is crossed out To Replace text: Select text, start typing Text is crossed-out, carat appears, rollover reveals replacement text
Adding Comments – Stamp Tool Click Stamp tool You’ll be prompted for identity info (which you can skip) Cursor turns into a little stamp icon (first time) or the last stamp used Pull-down at right allows you to choose a stamp in several categories: Dynamic (date, time, author), Sign here, Standard business, Custom Custom requires an image – Acrobat will size it Click where you want stamp to appear on document
Adding Comments – Highlighting and Attach File as Comment tools Highlighting tool Highlights text Click highlight button, Select text to highlight Pulldown allows underline and cross-out highlight options Attach File as Comment tool Previously discussed in slide 41 Pull-down allows Record Audio Comment Click it, Click on Document, Sound recorder appears Click Red circular button to record, black Rectangle to stop Choose icon, add author and description (will show in rollover)
Adding Comments – Show Comments Tool If there a lot of comments, you can sort (or hide) using the Show button  Hide all, or sort by: Type, Reviewer, Status, Checked state All comments will be shown by clicking the Comments tab at the left
Markup Toolbar – Callout Tool Click Comments and Mark-up Pulldown, choose Show Drawing Markup Toolbar Click callout tool, click where in document you want arrow to END (in the example, just below picture) Type text into text box You can resize textbox, end point and “elbow” of arrow after the fact using sizing boxes
Markup Toolbar – Cloud Tool Click Cloud tool Draw a polygon by selecting multiple points in document Make sure you finish the polygon by returning to your starting point Acrobat will draw a cloud around polygon R-Click, choose properties, Add note to add a comment inside Best use is for highlighting a section of a graphic
Markup Toolbar – Arrow and Drawing Tools Arrow tool is default tool, but pulldown gives you rectangles, ovals, lines, polygons, freehand pencil and pencil eraser Work similarly to standard Microsoft Office drawing tools Good for graphics, so you can circle, point to, and outline areas for review (and comment with notes tool)  Right-click>Open Pop-Up Note to add comment
Markup Toolbar –  Dimensioning Tool, Text Box Tool Dimensioning tool Good for graphics Click and drag for arrow endpoints Type text next Text box tool Click-and-Drag to define box, then type in text Right-click>Properties to change fill color, line size, opacity, etc.
Sending Documents for Review Third button over on PDFMaker suite of buttons In Acrobat menu, use the Send For Review button Allows you to email a PDF to multiple recipients for review If they have Adobe Reader 7 or later, it will temporarily turn on Commenting and Markup for them to comment on that doc alone They don’t have to buy Acrobat
Sending Documents for Review (con’t) Choose document for Review Invite reviewers Type in email addresses or use Address Book button if you have Outlook
Sending Documents for Review (con’t) Customize review options button allows: Choose reply email address(es) Turn on Markup By default, allows Adobe Reader to participate in review Auto-generated email subject and message Use this window to customize subject and message
Editing PDF Documents  Touching Up Text and Objects, Working with Pages, Working with Thumbnails
Touch-Up Text and Objects Tools VERY COOL! You can change text in PDF after the fact Tools>Advanced Editing>Touch Up Text Tool Click where in doc you want to edit text Make text changes, save document You can move and edit graphics after the fact Tools>Advanced Editing>Touch Up Objects Tool Click and Drag to define object Drag to move Right-click>Edit Object to bring it up in Photoshop or other Image editor Must first choose Image editor in Acrobat Edit>Preferences>Touch-Up>Browse to Image Editor
Editing Pages Use Pages tab at left Options button at top allows: Inserting, extracting, replacing, deleting Cropping, rotating, transitions Page numbering Printing Embedding, reducing, enlarging thumbnails Properties: tab order, actions
Editing Pages (con’t) Inserting Options>Insert Pages Browse to File to Insert Choose where (before or after, which page) Extracting Pulls a page range out of entire document Replacing Deletes a page range, replaces those pages with another document (or section of document) Deleting Deletes a page range within document
Editing Pages – Cropping Cropping best done in native application  Cropping dialogue box is huge May need to adjust dpi if the whole screen doesn’t show R-click on background> Properties>Settings tab>Advanced button>DPI setting
Editing Pages - Cropping (con’t) Use Top, Bottom, Left, Right to adjust crop (result will show in preview) Constrain proportions will keep proportions intact Choose standard paper sizes or create a custom one Work with just one page or range of pages
Editing Pages - Rotating Rotate pages Choose direction, page range Can choose only even or odd, only landscape or portrait
Editing Pages - Numbering Page Numbering Important to make sure Acrobat’s page numbering matches page numbering in original document Combining docs, replacing pages can mess with numbering Choose range, numbering style, prefix before number, starting number Can extend numbering from previous section
Editing pages - Thumbnails Embedding thumbnails increases file size (2K per thumbnail), but they don’t have to load every time you bring up the doc Large documents will take several seconds to dynamically load thumbnail images on the fly every time doc is opened Embed, Remove, Reduce, Enlarge from Options menu
Optimizing documents For web, print, CD, email
Optimizing for Print and CD For documents disseminated via print and CD (where file size is not an issue) set Image Quality to High or Maximum Adobe PDF>Change Conversion Settings> Settings tab>Advanced Settings button Choose Image at left Set all 3 Image Quality pulldowns to high or maximum Turn off Downsampling and Compression  For high-end commercial printers Call and ask them (2400 dpi is common)  Adobe PDF>Change Conversion Settings> Settings tab>Advanced Settings button Choose General at left, set DPI to recommended level
Optimizing for the Web and email For web or email, file size IS an issue Several ways to lower file size In MS app, Adobe PDF>Change Conversion Settings> Settings tab>Advanced Settings button Choose Image at left Set image quality pulldowns to low In Acrobat, File>Reduce File size Choose compatibility: the later versions of Acrobat will allow greater file reduction
Optimizing for the Web and email (con’t) In MS Office apps For graphic intensive docs Bring up Picture toolbar R-click in toolbar area, choose Picture Choose Compress Choose All pictures, Web/screen Check Compress pictures, Delete cropped pictures (if applicable) A handy tip, Acrobat or not Particularly useful for PPoints on the web
Creating Acrobat forms and gathering data Using Adobe Designer to create forms, Gathering and compiling data
Acrobat Forms Pro version only EASY no-database way to post a form on the web and gather data from it Post form They have option of printing/mailing or emailing Emailed data can be compiled automatically by Acrobat Saved in Excel format Mailed data can be added by hand  Tutorial is available on the web: http://www.ext.colostate.edu/acrobat_forms/
Creating the Form Open Acrobat Advanced>Forms>Create New Form or Forms button>Create New Form  Acrobat Designer (which is bundled with Acrobat Pro) opens, New Form assistant opens Step 1 – choose base document You can import an existing Word .doc or PDF, choose a Adobe template, or build it from scratch Lots of text? Create it in Word, import it If you have problems with Word, convert it into a PDF and import that When importing PDF, “Maintain Editability” is a good choice
Creating the Form (con’t) Step 2 - Choose page size, orientation Step 3 - Choose Return method 1 – Fill, then submit via email 2 – Fill, then submit via mail, or print and mail in Gives end user most options 3 – Filled electronically, then printed and mailed 4 – Printed, filled manually, mailed  Step 4 – Give return email address for data
Using Designer Document pane Preview tab Library Object palette Print and Submit by Email buttons
Using Designer (con’t) Document pane Text is inside blue boxes – click inside to work with text Drag field types from Library into Document pane to create answers for each question Library Field types: Text only (question text, answer text) Radio buttons (single answer questions) Checkboxes (multiple answer questions) Text fields (open end questions) Numeric fields (dates, phone numbers) Each field has a space to type in answer text Or, do answer text with Text only field
Using Designer (con’t) Preview tab Check on your work periodically by clicking the preview tab and seeing what final result will look like Objects palette Click on objects (radio boxes, text fields, submit buttons) in document pane to manipulate properties Give questions descriptive names (e.g. “q1”, “fname”) rather than default name (e.g. “radiobuttonlist”) Give each answer choice distinct values (yes=1, no=2, 9=don’t know)
Using Designer (con’t) Radio buttons (single choice) should have same name (e.g. q3) and different values (e.g. 1=dolphin, 2=flounder) Checkboxes (multiple choices allowed) should have different names (e.g. q4-1, q4-2), with an on value of 1, an off value of 0 Designer is pretty good about recognizing when answer choices are part of the same question, and assigning values automatically
Collecting the Data When “Submit by Email”button is clicked, data will be sent in an email as an .xml attachment (poll.xml) Save all attachments in the same folder RENAME FILE each time (e.g. poll1.xml, poll2.xml, etc.) so you aren’t overwriting files Save mailed forms to be hand entered after emailed data is compiled
Compiling the Data Open Acrobat File>Form Data>Create Spreadsheet From Data Files Browse to folder containing .xml files from emails Use Shift button to pull in multiple files Click Export Results will show up in MS Excel Format
Security Document security settings, Digital IDs, Digital signatures, Digital certification
Security Settings – Simple password Password to open Can be set before or after In native application (Word, PowerPoint): Adobe PDF>Change Conversion Settings>Security tab Check checkbox, type in the password WRITE IT DOWN! Make sure ALL end-users have Reader 5.0 or higher, as well as the password
Security Settings – Simple password (con’t) Can also be done in Acrobat File>Document Properties>Security tab Choose “Password Security” as Security Method Check “Require a Password…” checkbox, type in password
Security Settings – Password for permissions You can password restrict changes to document, printing of document, cutting and pasting In native application: Adobe PDF>Change Conversion Settings >Security tab
Security Settings – Password for permissions (con’t) Pulldown options for printing: Pulldown options for editing: Copy-and-pasting content can be restricted by keeping option “Enable copying...” Unchecked “ Enable Text access for screen readers…” should always be checked to be compliant with accessibility regulations
Security Settings – Password for permissions (con’t) As with a simple password, password for permissions can also be done in Acrobat File>Document Properties>Security tab Choose “Password Security” as Security Method Check “Restrict Editing…” Permissions checkbox, type in password Remaining steps same as in MS Office application
Certificate Security and Digital IDs Certifies you approve of the document and that no changes have occurred since your approval Encrypts content It can be a self-signed Certificate or a third party Certificate Third party more secure You’ll have to pay  Two steps: Create a Digital ID Create Security Certificate
Creating a Digital ID In Acrobat Advanced>Security Settings>Digital IDs>Add ID Wizard will take you through process Choose kind of certificate In most cases, self-signed will suffice
Creating a Digital ID (con’t) Choose ID storage 1 st  option more friendly to non-MS apps Enter profile info
Creating a Digital ID (con’t) Choose file location and password
Signing a document Confirms you have reviewed the document and it has not been changed since signing Two types: Simple signing Certified signature Simple signing Sign button>Sign this document Choose “Invisible” or “Create Sign field” If “Create Sign field” click-and-drag to define space where signature goes
Signing a document (con’t) Choose which ID (if more than one) Confirm password Give reason for signing from dropdown A good idea to click “View Digital ID” to preview appearance “ Show Options” button will allow you to manipulate appearance A good idea, particularly if you have a graphic or logo
Signing a document (con’t) After clicking Show Options, click New or Edit Choose Imported graphic, use File button to browse to logo Use Configure Text checkboxes to add and remove signature components (date, reason, etc.)
Signing a document (con’t) Click Sign and Save or Sign and Save As for different file name Signature appears on document Click Signature tab at left Signature data appears in Signature pane
Certified Signature Same process (Sign button>Sign this document), except choose “Certify Document” on first screen of wizard Choose Allowed actions (no changes, fill-in forms only, comments and fill in forms only) Option of showing certification on document If yes, you’ll click-and-drag to define box for certified signature
Certified Signature (con’t) Certified Signature will show on document (if you chose that option) Will show in Signature pane upon clicking Signature tab at left
Certified Documents  File>Save as Certified Document Wizard steps same as Certified Signature Result:
Certificate Security Allows you to create a list of “trusted identities” to send document to  Only they can open the document Can vary security setting for different people on the list First step: swap Digital IDs Advanced>Security Settings Highlight your digital ID, click Export Certificate Choose “Email the data to someone” and follow the steps
Certificate Security (con’t) Click Secure button>Secure This Document Choose which policy Restrict document to only be read by people on trusted identities list Restrict opening and editing only
Choose to encrypt all, all but metadata (will allow search engines to know general content), or attachments only  Certificate Security (con’t)
Certificate Security (con’t) Choose which people on your trusted identities list are to see the document Browse to folder where you saved other people’s Digital IDs Select specific identities and click Permissions to specify different security settings for different people

Using Adobe Acrobat 7 2

  • 1.
    Using Adobe Acrobat7.0 Colorado State University Cooperative Extension Technology Unit
  • 2.
    Basics What isAdobe Acrobat?, Navigating in Adobe Reader, Using Full Screen mode in Adobe Reader
  • 3.
    What is AdobeAcrobat? Creates .pdf files pdf = Portable Document Format Used to distribute forms and documents in a standardized format Can be read by free (and widely distributed) Adobe reader Security tools: Restrict who can see the document Digitally sign/certify documents Restrict printing (no printing, or low resolution only) Restrict text/images from editing, copying and pasting Particularly useful for web and email
  • 4.
    What is AdobeAcrobat (con’t)? Original document is authored in another format, then converted Office apps: Word, Wordperfect, PowerPoint, Excel, Outlook Graphics: .bmp, .gif, .jpeg, .ng, .eps, .psd .html (single web page, or entire web sites) Convert your own .html (to preview site for client) Pull sites directly off the web by typing web address into Acrobat Combine multiple documents (and multiple document types) into one .pdf document
  • 5.
    3 types ofAcrobat Adobe Reader Formerly called Acrobat Reader Free, widely distributed Can read .pdfs, but not create If you offer .pdfs, always offer the link to the free reader as well ( www.adobe.com – logo found there as well for an image link) Adobe Acrobat (standard) Converts most office applications and graphics to .pdf Supports some multimedia, downloads websites About $45 at CSU Software Cellar Adobe Acrobat Pro Interactive forms (buttons, checkboxes, text fields) Supports more multimedia MS Visio, MS Project, AutoCAD, Mac pict format About $69 at CSU Software Cellar
  • 6.
    Navigating in AdobeReader Navigation tools in Reader: Bookmark and page tabs at left side Page toolbar at bottom Zoom toolbar at top Single/Continuous/Facing options at lower right Full Screen View for presentation (lower left) Scrollbars Hand tool (drag doc from page to page) Good idea to preview a doc in Reader, NOT Acrobat, to get a sense of what the end-user will see
  • 7.
    Full Screen Viewin Adobe Reader Mimics basic PowerPoint presentation Add limited transitions and auto-timing In Acrobat: Page tab>Options>Page Transitions Set Effect, speed of effect Auto-flip to create a self timed show All pages, or a range Hit Full Screen button to play slideshow
  • 8.
    Creating a .pdfConverting Microsoft Office documents, non-Office documents, images, multiple documents, websites
  • 9.
    Converting Microsoft OfficeDocuments Acrobat will add PDFMaker to your toolbar upon installation (unless you decline) Three buttons: Create .pdf Create .pdf and email Create .pdf and Send for Review If you don’t see PDFMaker: R-click near toolbars and check PDFMaker toolbar If no PDFMaker toolbar option: Help>About…>Disabled Items>Choose Acrobat>Enable button
  • 10.
    PDF Conversion SettingsAfter install, should see “Adobe PDF” menu listed Same 3 options as toolbar, and a fourth: “Change Conversion Settings” Each MS Office Application has similar - not identical - set of Conversion Settings
  • 11.
    PDF Conversion Settings(con’t) These 4 are common to most MS Office Apps Attach Source File to PDF Adds source file (e.g. Word, Excel) to .pdf as an attachment Nice option, but obviously increases file size Add Bookmarks to PDF Good option for PPoint and Excel Adds bookmark for each slide/sheet in document Can seem a little haphazard in Word Creates a bookmark for each Heading and/or Style Often easier to create Word bookmarks in Acrobat Add Links to PDF Links in native app. a better “look and feel” than adding them in Acrobat Enable Accessibility and Reflow with Tagged PDF Allows re-flowed text for PDAs, text-to-speech, etc. Only downside is a larger file size
  • 12.
    Converting Word toPDF Conversion settings specific to Word Word Tab Convert displayed comments to notes Convert cross-references, TOC to links Convert footnote/endnote links Bookmarks tab Choose which headings and styles convert to bookmarks A good choice IF your are already working with styles and headings to denote sections Otherwise, do it in Acrobat
  • 13.
    Creating Bookmarks inWord Assign a heading to every section in doc that require a bookmark You can convert text to a heading quickly using the Format painter Apply style to text once, select text, click Format Painter TWICE Go through document selecting text – it will convert to that heading
  • 14.
    Converting PowerPoint toPDF Conversion settings specific to PowerPoint Save Slide Transitions Only saves simple ones – best to add after the fact Only need them in Full Screen mode Save Animations Only saves simple ones – best to add after the fact Only need them in Full Screen mode Convert multimedia to PDF multimedia Applies to video, sound, images Make sure and test! Lots of tweaking required for this! Convert hidden slides Slide-sorter view – you can “hide” slides to avoid deleting them PDF Layout based on PowerPoint printer settings Important for printing Notes page, Handouts After settings set, set printer to Adobe PDF
  • 15.
    Converting Excel toPDF Conversion settings specific to Excel: Convert Entire Workbook is an option in the Adobe PDF menu Each worksheet has a bookmark Convert comments to notes Fit worksheet to single page (grayed out if Convert Entire Workbook is selected) Good option if doc is likely to be printed (as Excel worksheets can be hard to print and show all rows/columns)
  • 16.
    Converting Publisher toPDF Specific to Publisher Preserve Spot Color All black and white except for chosen spot colors Print Crop Marks Where paper is cut Allow Bleeds Color extending beyond edge to allow for variations in cutting Preserve Transparency For .gif, .png, .tiff These are options for high-end printers If you are using a professional printer, call and ask them what they require
  • 17.
    Converting Access toPDF Specific to Access Only 2 options in Conversion Settings: Attach source file Create bookmarks Tables can only be converted one at a time Multiple reports can be converted simultaneously Adobe PDF menu>Convert multiple reports to single PDF
  • 18.
    Combining Multiple AccessReports Pretty simple – add reports from left column to right column, arrange, Convert to PDF
  • 19.
    Converting Outlook toPDF Good way to archive emails Includes attachments 4 bookmarks created, sorting emails by date, sender, subject, folders Can also combine emails with other documents Include email exchanges discussing document along with document itself Select messages or folders to archive, then convert
  • 20.
    Converting non-MS Officedocuments Two methods: Open document in native application File>Print>Choose Adobe PDF as printer It won’t print the file, merely convert Good for Photoshop, Wordperfect, etc. Works for Office Apps too Open Adobe Acrobat Create PDF>From File Browse to the file
  • 21.
    Combining documents OpenAcrobat Create PDF>From Multiple Documents Can be a mix of document formats (VERY handy) Browse to files, select, arrange, click OK
  • 22.
    Converting Images .jpeg,.gif, .png, .tiff, .bmp, .eps Don’t need a native application, because there is none Open Acrobat Create PDF>From File>Browse to image Create PDF>From Multiple Files>Browse to images and create a montage that can work as a slideshow in Full Screen Mode
  • 23.
    Converting websites toPDF Convert either existing website, or html Second option a good way to preview a website for client without actually publishing the site to a server Open Acrobat Create PDF>From Website Type in URL or browse to .html file
  • 24.
    The Convert WebsiteDialogue Box Get entire site Rarely a good idea unless it is small and self contained (i.e. no links to other sites) 3 ways to limit download Get only 1 or 2 levels Stay on same path (will remain within root folder) Stay on same server (will go outside root folder but only convert links to sites on same server)
  • 25.
    Converting Websites: HelpfulHints If you need to capture large sections of a sprawling site or one that links to many other places, capture small sections or individual pages and pull them together with Create PDF>Multiple files Use the Settings button, Page Layout tab to size and scale large web pages Links in document still active for downloaded pages
  • 26.
    Converting a website:3 examples Create PDF>From Website http://www.ext.colostate.edu Good example of a large, sprawling site – “Get Entire Site” would be downloading for days 1 level gets you only the current page 2 levels pull ALL the links from this page, including navigation buttons at top (65 pages total) Stay On Same Path/Server not very useful as most links are ON this path (SOSP gives a 47 page doc) http://www.radon.org/ Good example of a “Get Entire Site” candidate Only links are to meaningful docs related to Radon Includes slideshow downloaded intact Browse to kiddos/kiddos.htm Converted from local site, not from server
  • 27.
    Adding Navigation AidsCreating Bookmarks, Links, and Hotspots
  • 28.
    Adding bookmarks Ofteneasier to add Bookmarks in Acrobat rather than native application Not just a navigation tool – also shows structure of document at a glance Use Table of Contents as guide Go to page you want to bookmark Choose view (width, height, zoom in to specific object) Bookmarks pane>New Bookmark icon Name bookmark Drag up or down in order Drag under and to the right to nest it within a larger bookmark
  • 29.
    Adding Bookmarks (con’t)Set view of page for bookmark - Fit Width or Height, zoom in to a specific feature Often looks nice to have first page at fit width, ret of doc at fir height Drag bookmarks around after creation to set order Nest bookmarks within other bookmarks by dragging child under and just to the right of parent
  • 30.
    Bookmark Options Optionsbutton allows: Change text size Wrap long bookmarks Use Properties to change color and style (bold, italics, bold and italics)
  • 31.
    Adding text linksUnlike bookmarks, MS Office does better looking links than Acrobat If possible, create links in native application If not: Bring up document in Acrobat Choose Select tool and select text R-Click (away from markup options icon) and choose Create Link
  • 32.
    Adding text links(con’t) Type: visible rectangle Style: underline Highlight style will add a basic behavior Action: open a web page (though you can link to other docs, or spots in this doc) “ Next” takes you to URL box For email, mailto: followed by address
  • 33.
    Hotspot and Imagelinks Same process, just use the Snapshot tool instead of select A visible rectangle and some type of link behavior is wise, to let the end user know there is a link
  • 34.
    Adding attachments, commentsand mark-up, touching up text Attachments, Attaching a File as Comment, Adding Comments and Mark-up, Sending Documents for Review, Touching Up Text
  • 35.
    Attachments Most basicattachment is the source file Add automatically in Conversion Settings To add any other docs as an attachment, click the paper clip and browse to the file To view, click the Attachments tab, doc will appear in the Attachments pane
  • 36.
    Attach a FileAs Comment Helps the end-user know there is an attachment, and allows you to comment on the attachment Click the pulldown arrow to the right of the paper clip icon, and choose the paper clip with comment balloon Cursor will become crosshair Click where you want comment to appear Dialogue box will appear
  • 37.
    Attach a Fileas Comment (con’t) Choose graph, paperclip, pushpin, comment balloon Choose color and opacity General tab allows you to add author’s name and a description Rollover shows author and description Click the icon, or use attachment tab to open attachment
  • 38.
    Adding Comments -Notes Click “Comments and Markup”, Commenting Toolbar will appear Note tool to add a text comment Click-and-drag to define size of text box Type in your text, Close box Select, then Options>Properties will allow you to choose icon, color, author’s name, etc. Rollover of icon reveals comment
  • 39.
    Adding Comments –Text Edits Click Text Edit button To Insert text: Click between where you want to insert, start typing Carat appears, rollover reveals inserted text To Delete text: Select text, hit Delete Text is crossed out To Replace text: Select text, start typing Text is crossed-out, carat appears, rollover reveals replacement text
  • 40.
    Adding Comments –Stamp Tool Click Stamp tool You’ll be prompted for identity info (which you can skip) Cursor turns into a little stamp icon (first time) or the last stamp used Pull-down at right allows you to choose a stamp in several categories: Dynamic (date, time, author), Sign here, Standard business, Custom Custom requires an image – Acrobat will size it Click where you want stamp to appear on document
  • 41.
    Adding Comments –Highlighting and Attach File as Comment tools Highlighting tool Highlights text Click highlight button, Select text to highlight Pulldown allows underline and cross-out highlight options Attach File as Comment tool Previously discussed in slide 41 Pull-down allows Record Audio Comment Click it, Click on Document, Sound recorder appears Click Red circular button to record, black Rectangle to stop Choose icon, add author and description (will show in rollover)
  • 42.
    Adding Comments –Show Comments Tool If there a lot of comments, you can sort (or hide) using the Show button Hide all, or sort by: Type, Reviewer, Status, Checked state All comments will be shown by clicking the Comments tab at the left
  • 43.
    Markup Toolbar –Callout Tool Click Comments and Mark-up Pulldown, choose Show Drawing Markup Toolbar Click callout tool, click where in document you want arrow to END (in the example, just below picture) Type text into text box You can resize textbox, end point and “elbow” of arrow after the fact using sizing boxes
  • 44.
    Markup Toolbar –Cloud Tool Click Cloud tool Draw a polygon by selecting multiple points in document Make sure you finish the polygon by returning to your starting point Acrobat will draw a cloud around polygon R-Click, choose properties, Add note to add a comment inside Best use is for highlighting a section of a graphic
  • 45.
    Markup Toolbar –Arrow and Drawing Tools Arrow tool is default tool, but pulldown gives you rectangles, ovals, lines, polygons, freehand pencil and pencil eraser Work similarly to standard Microsoft Office drawing tools Good for graphics, so you can circle, point to, and outline areas for review (and comment with notes tool) Right-click>Open Pop-Up Note to add comment
  • 46.
    Markup Toolbar – Dimensioning Tool, Text Box Tool Dimensioning tool Good for graphics Click and drag for arrow endpoints Type text next Text box tool Click-and-Drag to define box, then type in text Right-click>Properties to change fill color, line size, opacity, etc.
  • 47.
    Sending Documents forReview Third button over on PDFMaker suite of buttons In Acrobat menu, use the Send For Review button Allows you to email a PDF to multiple recipients for review If they have Adobe Reader 7 or later, it will temporarily turn on Commenting and Markup for them to comment on that doc alone They don’t have to buy Acrobat
  • 48.
    Sending Documents forReview (con’t) Choose document for Review Invite reviewers Type in email addresses or use Address Book button if you have Outlook
  • 49.
    Sending Documents forReview (con’t) Customize review options button allows: Choose reply email address(es) Turn on Markup By default, allows Adobe Reader to participate in review Auto-generated email subject and message Use this window to customize subject and message
  • 50.
    Editing PDF Documents Touching Up Text and Objects, Working with Pages, Working with Thumbnails
  • 51.
    Touch-Up Text andObjects Tools VERY COOL! You can change text in PDF after the fact Tools>Advanced Editing>Touch Up Text Tool Click where in doc you want to edit text Make text changes, save document You can move and edit graphics after the fact Tools>Advanced Editing>Touch Up Objects Tool Click and Drag to define object Drag to move Right-click>Edit Object to bring it up in Photoshop or other Image editor Must first choose Image editor in Acrobat Edit>Preferences>Touch-Up>Browse to Image Editor
  • 52.
    Editing Pages UsePages tab at left Options button at top allows: Inserting, extracting, replacing, deleting Cropping, rotating, transitions Page numbering Printing Embedding, reducing, enlarging thumbnails Properties: tab order, actions
  • 53.
    Editing Pages (con’t)Inserting Options>Insert Pages Browse to File to Insert Choose where (before or after, which page) Extracting Pulls a page range out of entire document Replacing Deletes a page range, replaces those pages with another document (or section of document) Deleting Deletes a page range within document
  • 54.
    Editing Pages –Cropping Cropping best done in native application Cropping dialogue box is huge May need to adjust dpi if the whole screen doesn’t show R-click on background> Properties>Settings tab>Advanced button>DPI setting
  • 55.
    Editing Pages -Cropping (con’t) Use Top, Bottom, Left, Right to adjust crop (result will show in preview) Constrain proportions will keep proportions intact Choose standard paper sizes or create a custom one Work with just one page or range of pages
  • 56.
    Editing Pages -Rotating Rotate pages Choose direction, page range Can choose only even or odd, only landscape or portrait
  • 57.
    Editing Pages -Numbering Page Numbering Important to make sure Acrobat’s page numbering matches page numbering in original document Combining docs, replacing pages can mess with numbering Choose range, numbering style, prefix before number, starting number Can extend numbering from previous section
  • 58.
    Editing pages -Thumbnails Embedding thumbnails increases file size (2K per thumbnail), but they don’t have to load every time you bring up the doc Large documents will take several seconds to dynamically load thumbnail images on the fly every time doc is opened Embed, Remove, Reduce, Enlarge from Options menu
  • 59.
    Optimizing documents Forweb, print, CD, email
  • 60.
    Optimizing for Printand CD For documents disseminated via print and CD (where file size is not an issue) set Image Quality to High or Maximum Adobe PDF>Change Conversion Settings> Settings tab>Advanced Settings button Choose Image at left Set all 3 Image Quality pulldowns to high or maximum Turn off Downsampling and Compression For high-end commercial printers Call and ask them (2400 dpi is common) Adobe PDF>Change Conversion Settings> Settings tab>Advanced Settings button Choose General at left, set DPI to recommended level
  • 61.
    Optimizing for theWeb and email For web or email, file size IS an issue Several ways to lower file size In MS app, Adobe PDF>Change Conversion Settings> Settings tab>Advanced Settings button Choose Image at left Set image quality pulldowns to low In Acrobat, File>Reduce File size Choose compatibility: the later versions of Acrobat will allow greater file reduction
  • 62.
    Optimizing for theWeb and email (con’t) In MS Office apps For graphic intensive docs Bring up Picture toolbar R-click in toolbar area, choose Picture Choose Compress Choose All pictures, Web/screen Check Compress pictures, Delete cropped pictures (if applicable) A handy tip, Acrobat or not Particularly useful for PPoints on the web
  • 63.
    Creating Acrobat formsand gathering data Using Adobe Designer to create forms, Gathering and compiling data
  • 64.
    Acrobat Forms Proversion only EASY no-database way to post a form on the web and gather data from it Post form They have option of printing/mailing or emailing Emailed data can be compiled automatically by Acrobat Saved in Excel format Mailed data can be added by hand Tutorial is available on the web: http://www.ext.colostate.edu/acrobat_forms/
  • 65.
    Creating the FormOpen Acrobat Advanced>Forms>Create New Form or Forms button>Create New Form Acrobat Designer (which is bundled with Acrobat Pro) opens, New Form assistant opens Step 1 – choose base document You can import an existing Word .doc or PDF, choose a Adobe template, or build it from scratch Lots of text? Create it in Word, import it If you have problems with Word, convert it into a PDF and import that When importing PDF, “Maintain Editability” is a good choice
  • 66.
    Creating the Form(con’t) Step 2 - Choose page size, orientation Step 3 - Choose Return method 1 – Fill, then submit via email 2 – Fill, then submit via mail, or print and mail in Gives end user most options 3 – Filled electronically, then printed and mailed 4 – Printed, filled manually, mailed Step 4 – Give return email address for data
  • 67.
    Using Designer Documentpane Preview tab Library Object palette Print and Submit by Email buttons
  • 68.
    Using Designer (con’t)Document pane Text is inside blue boxes – click inside to work with text Drag field types from Library into Document pane to create answers for each question Library Field types: Text only (question text, answer text) Radio buttons (single answer questions) Checkboxes (multiple answer questions) Text fields (open end questions) Numeric fields (dates, phone numbers) Each field has a space to type in answer text Or, do answer text with Text only field
  • 69.
    Using Designer (con’t)Preview tab Check on your work periodically by clicking the preview tab and seeing what final result will look like Objects palette Click on objects (radio boxes, text fields, submit buttons) in document pane to manipulate properties Give questions descriptive names (e.g. “q1”, “fname”) rather than default name (e.g. “radiobuttonlist”) Give each answer choice distinct values (yes=1, no=2, 9=don’t know)
  • 70.
    Using Designer (con’t)Radio buttons (single choice) should have same name (e.g. q3) and different values (e.g. 1=dolphin, 2=flounder) Checkboxes (multiple choices allowed) should have different names (e.g. q4-1, q4-2), with an on value of 1, an off value of 0 Designer is pretty good about recognizing when answer choices are part of the same question, and assigning values automatically
  • 71.
    Collecting the DataWhen “Submit by Email”button is clicked, data will be sent in an email as an .xml attachment (poll.xml) Save all attachments in the same folder RENAME FILE each time (e.g. poll1.xml, poll2.xml, etc.) so you aren’t overwriting files Save mailed forms to be hand entered after emailed data is compiled
  • 72.
    Compiling the DataOpen Acrobat File>Form Data>Create Spreadsheet From Data Files Browse to folder containing .xml files from emails Use Shift button to pull in multiple files Click Export Results will show up in MS Excel Format
  • 73.
    Security Document securitysettings, Digital IDs, Digital signatures, Digital certification
  • 74.
    Security Settings –Simple password Password to open Can be set before or after In native application (Word, PowerPoint): Adobe PDF>Change Conversion Settings>Security tab Check checkbox, type in the password WRITE IT DOWN! Make sure ALL end-users have Reader 5.0 or higher, as well as the password
  • 75.
    Security Settings –Simple password (con’t) Can also be done in Acrobat File>Document Properties>Security tab Choose “Password Security” as Security Method Check “Require a Password…” checkbox, type in password
  • 76.
    Security Settings –Password for permissions You can password restrict changes to document, printing of document, cutting and pasting In native application: Adobe PDF>Change Conversion Settings >Security tab
  • 77.
    Security Settings –Password for permissions (con’t) Pulldown options for printing: Pulldown options for editing: Copy-and-pasting content can be restricted by keeping option “Enable copying...” Unchecked “ Enable Text access for screen readers…” should always be checked to be compliant with accessibility regulations
  • 78.
    Security Settings –Password for permissions (con’t) As with a simple password, password for permissions can also be done in Acrobat File>Document Properties>Security tab Choose “Password Security” as Security Method Check “Restrict Editing…” Permissions checkbox, type in password Remaining steps same as in MS Office application
  • 79.
    Certificate Security andDigital IDs Certifies you approve of the document and that no changes have occurred since your approval Encrypts content It can be a self-signed Certificate or a third party Certificate Third party more secure You’ll have to pay Two steps: Create a Digital ID Create Security Certificate
  • 80.
    Creating a DigitalID In Acrobat Advanced>Security Settings>Digital IDs>Add ID Wizard will take you through process Choose kind of certificate In most cases, self-signed will suffice
  • 81.
    Creating a DigitalID (con’t) Choose ID storage 1 st option more friendly to non-MS apps Enter profile info
  • 82.
    Creating a DigitalID (con’t) Choose file location and password
  • 83.
    Signing a documentConfirms you have reviewed the document and it has not been changed since signing Two types: Simple signing Certified signature Simple signing Sign button>Sign this document Choose “Invisible” or “Create Sign field” If “Create Sign field” click-and-drag to define space where signature goes
  • 84.
    Signing a document(con’t) Choose which ID (if more than one) Confirm password Give reason for signing from dropdown A good idea to click “View Digital ID” to preview appearance “ Show Options” button will allow you to manipulate appearance A good idea, particularly if you have a graphic or logo
  • 85.
    Signing a document(con’t) After clicking Show Options, click New or Edit Choose Imported graphic, use File button to browse to logo Use Configure Text checkboxes to add and remove signature components (date, reason, etc.)
  • 86.
    Signing a document(con’t) Click Sign and Save or Sign and Save As for different file name Signature appears on document Click Signature tab at left Signature data appears in Signature pane
  • 87.
    Certified Signature Sameprocess (Sign button>Sign this document), except choose “Certify Document” on first screen of wizard Choose Allowed actions (no changes, fill-in forms only, comments and fill in forms only) Option of showing certification on document If yes, you’ll click-and-drag to define box for certified signature
  • 88.
    Certified Signature (con’t)Certified Signature will show on document (if you chose that option) Will show in Signature pane upon clicking Signature tab at left
  • 89.
    Certified Documents File>Save as Certified Document Wizard steps same as Certified Signature Result:
  • 90.
    Certificate Security Allowsyou to create a list of “trusted identities” to send document to Only they can open the document Can vary security setting for different people on the list First step: swap Digital IDs Advanced>Security Settings Highlight your digital ID, click Export Certificate Choose “Email the data to someone” and follow the steps
  • 91.
    Certificate Security (con’t)Click Secure button>Secure This Document Choose which policy Restrict document to only be read by people on trusted identities list Restrict opening and editing only
  • 92.
    Choose to encryptall, all but metadata (will allow search engines to know general content), or attachments only Certificate Security (con’t)
  • 93.
    Certificate Security (con’t)Choose which people on your trusted identities list are to see the document Browse to folder where you saved other people’s Digital IDs Select specific identities and click Permissions to specify different security settings for different people