MS PowerPoint Features and Views
•
0 likes•66 views

Thiruvalluvar university III BBA Computer Application in Business

Recommended
More Related Content
Similar to MS PowerPoint Features and Views
Similar to MS PowerPoint Features and Views (20)
More from Chandrapriya Rediex
Recently uploaded
Recently uploaded (20)
MS PowerPoint Features and Views
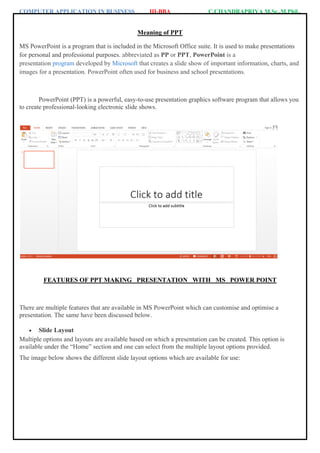
- 1. COMPUTER APPLICATION IN BUSINESS III-BBA C.CHANDRAPRIYA M.Sc.,M.Phil., Meaning of PPT MS PowerPoint is a program that is included in the Microsoft Office suite. It is used to make presentations for personal and professional purposes. abbreviated as PP or PPT, PowerPoint is a presentation program developed by Microsoft that creates a slide show of important information, charts, and images for a presentation. PowerPoint often used for business and school presentations. PowerPoint (PPT) is a powerful, easy-to-use presentation graphics software program that allows you to create professional-looking electronic slide shows. FEATURES OF PPT MAKING PRESENTATION WITH MS POWER POINT There are multiple features that are available in MS PowerPoint which can customise and optimise a presentation. The same have been discussed below. Slide Layout Multiple options and layouts are available based on which a presentation can be created. This option is available under the “Home” section and one can select from the multiple layout options provided. The image below shows the different slide layout options which are available for use:
- 2. COMPUTER APPLICATION IN BUSINESS III-BBA C.CHANDRAPRIYA M.Sc.,M.Phil., Insert – Clipart, Video, Audio, etc. Under the “Insert” category, multiple options are available where one can choose what feature they want to insert in their presentation. This may include images, audio, video, header, footer, symbols, shapes, etc. The image below shows the features which can be inserted: Slide Design MS PowerPoint has various themes using which background colour and designs or textures can be added to a slide. This makes the presentation more colourful and attracts the attention of the people looking at it. This feature can be added using the “Design” category mentioned on the homepage of MS PowerPoint. Although there are existing design templates available, in case someone wants to add some new texture or colour, the option to customise the design is also available. Apart from this, slide designs can also be downloaded online. Refer to the below for slide design:
- 3. COMPUTER APPLICATION IN BUSINESS III-BBA C.CHANDRAPRIYA M.Sc.,M.Phil., Animations During the slide show, the slides appear on the screen one after the other. In case, one wants to add some animations to the way in which a slide presents itself, they can refer to the “Animations” category. The different animation styles available on PowerPoint are: Apart from all these options; font size, font style, font colour, word art, date and time, etc. can also be added to a PPT. uses of power point PowerPoint presentations are useful for both personal and professional usage. Given below are a few of the major fields where PPT is extremely useful: Education – With e-learning and smart classes being chosen as a common mode of education today, PowerPoint presentations can help in making education more interactive and attract students towards the modified version of studying Marketing – In the field of marketing, PowerPoint presentations can be extremely important. Using graphs and charts, numbers can be shown more evidently and clearly which may be ignored by the viewer if being read Business – To invite investors or to show the increase or decrease in profits, MS PowerPoint can be used Creating Resumes – Digital resumes can be formed using MS PowerPoint. Different patterns, photograph, etc. can be added to the resume Depicting Growth – Since both graphics and text can be added in a presentation, depicting the growth of a company, business, student‟s marks, etc. is easier using PPT starting Ms power point To open MS PowerPoint on a personal computer: 1. Click on the start button 2. Then choose “All Programs” 3. Next step is to select “MS Office” 4. Under MS Office, click on the “MS PowerPoint” A blank presentation is open on the screen. According to the requirement, a person can modify the template for a presentation and start using the program. Ms power point environment When you open PowerPoint, a new presentation is created, and a blank slide appears in the PowerPoint window. The slide has placeholders for you to add a title and subtitle. The tabbed Ribbon menu system is how you access the various PowerPoint commands. If you've used previous versions of PowerPoint, the Ribbon system replaces the traditional menus. Above the Ribbon in the upper-left corner is the Microsoft Office button. From here, you can access important options such as New, Save, Save As, and Print. By default, the Quick Access Toolbar is pinned next to the Microsoft Office
- 4. COMPUTER APPLICATION IN BUSINESS III-BBA C.CHANDRAPRIYA M.Sc.,M.Phil., button and includes commands like Undo and Redo. On the left side of the window, you will see a task pane with slides and outline tabs, which appears by default. On the bottom-right of the screen, you'll find view commands (Normal, Slide Sorter, and Slide Show), as well as the zoom tool. To zoom in and out: Locate the zoom bar in the bottom-right corner. Click the slider and drag it to the right to zoom in and to the left to zoom out. To change views: Locate the View options in the bottom-right corner. The view options are Normal, Slide Sorter, and Slide Show. Click an option to select it.
- 5. COMPUTER APPLICATION IN BUSINESS III-BBA C.CHANDRAPRIYA M.Sc.,M.Phil., The default is Normal view. working with power point & PPT Tools A theme is a slide design that contains matching colors, fonts, and special effects like shadows, reflections, and more. 1. On the File tab of the Ribbon, select New, and then choose a theme. PowerPoint shows you a preview of the theme, with four color variations to choose from on the right side. 2. Click Create, or pick a color variation and then click Create. Read more: Use or create themes in PowerPoint Insert a new slide On the Home tab, click the bottom half of New Slide, and pick a slide layout. Read more: Add, rearrange, and delete slides. Save your presentation 1. On the File tab, choose Save. 2. Pick or browse to a folder. 3. In the File name box, type a name for your presentation, and then choose Save.
- 6. COMPUTER APPLICATION IN BUSINESS III-BBA C.CHANDRAPRIYA M.Sc.,M.Phil., Note: If you frequently save files to a certain folder, you can „pin‟ the path so that it is always available (as shown below). Tip: Save your work as you go. Press Ctrl+S often Add text Select a text placeholder, and begin typing. Format your text 1. Select the text. 2. Under Drawing Tools, choose Format. 3. Do one of the following: To change the color of your text, choose Text Fill, and then choose a color. To change the outline color of your text, choose Text Outline, and then choose a color.
- 7. COMPUTER APPLICATION IN BUSINESS III-BBA C.CHANDRAPRIYA M.Sc.,M.Phil., To apply a shadow, reflection, glow, bevel, 3-D rotation, a transform, choose Text Effects, and then choose the effect you want. Working with Different Views The many views of PowerPoint will help you prepare for your big presentation. Here are the most popular views in PowerPoint: Normal View. The default PowerPoint workspace, which includes thumbnails for each slide and a larger view of a single slide in the center. Outline View. Shows your presentation in an outline style, which is great for reviewing content. Slide Sorter View. Perfect for reviewing the order of your slides and re-sequencing them. Reading View. An in-window preview of how your presentation will appear, including transitions and animations. What is a Normal view in PowerPoint? The Normal view is the default view in PowerPoint. It‟s the way you see all presentations when creating or opening them unless you changed your PowerPoint configuration to use a different view as default. It is by far the most frequently used view. Although it‟s best for creating and editing presentation slides, PowerPoint users often perform all other operations using the Normal view, including arranging the slides, reviewing slide content and speaker‟s notes and presenting in front of an audience. It may seem faster and more practical, but I definitely recommend learning about all available views and at the very minimum switching to Slideshow view for presenting. When dealing with longer and more complex ones it‟s best to use multiple or even all views. To access the Normal view go to View in the main menu and select Normal, which should show as the first option on the ribbon from the left.
- 8. COMPUTER APPLICATION IN BUSINESS III-BBA C.CHANDRAPRIYA M.Sc.,M.Phil., On Mac with Office 365, you can access the Normal view by pressing a keyboard shortcut Command + 1. Slide Sorter view The Slide Sorter view allows you to see your presentation as a whole and organise your slides. Each slide is represented by a thumbnail which you can drag and drop to, move between sections, delete, hide etc. To access the Slide Sorter view go to View in the main menu and select Slide Sorter on the left side of the ribbon.
- 9. COMPUTER APPLICATION IN BUSINESS III-BBA C.CHANDRAPRIYA M.Sc.,M.Phil., On Mac with Office 365, you can access the Slide Sorter view by pressing a keyboard shortcut Command + 2. Notes Page view It‟s a great view to try for anybody frequently using slide notes (also called speaker‟s notes). It enables you to see each of your slides on a separate page with all its notes underneath. Speaker‟s notes may be your private hints or key information you want to add verbally when presenting, questions you want to ask your audience etc. Or, you can use notes to provide additional information or reference for the audience in which case you may want to have them published together with the slides as PDF and distributed before or after your presentation. To access the Notes Page view go to View in the main menu and select Notes Page on the left side of the ribbon.
- 10. COMPUTER APPLICATION IN BUSINESS III-BBA C.CHANDRAPRIYA M.Sc.,M.Phil., On Mac with Office 365, you can access the Notes Page view by pressing a keyboard shortcut Command + 3. Outline view The Outline view focuses on presentation text, removing any other distractions such as formatting, graphics, multimedia or animations. To access the Outline view go to View in the main menu and select Slide Sorter on the left side of the ribbon.
- 11. COMPUTER APPLICATION IN BUSINESS III-BBA C.CHANDRAPRIYA M.Sc.,M.Phil., On Mac with Office 365, you can access the Outline view by pressing a keyboard shortcut Command + 4. Slide Show view This view allows you to see your presentation as it will look to the audience when you run it. To access the Slide Show view go to Slide Show in the main menu and select Play from Start or Play from Current Slide. The Slide Show view can also be accessed via the toolbar at the bottom of the screen. On Mac with Office 365, you can access the Slide Show view by pressing a keyboard shortcut Shift + Command + Enter. Presenter view The Presenter view is an extension of the Slide Show view described above. It allows you to view your presentation in Slide Show mode (as in the Slide Show view) with additional support elements such as the
- 12. COMPUTER APPLICATION IN BUSINESS III-BBA C.CHANDRAPRIYA M.Sc.,M.Phil., presenter‟s notes on your screen. The audience looking at a different screen than you, through a projector or an online videoconference system (eg. Teams) can only see the presentation slides without these elements. On Windows, to access the Presenter view go to Slide Show in the main menu and make sure the checkbox Use Presenter View is checked and start the slide show. On Mac, to access the Presenter view go to Slide Show in the main menu and select Presenter View. You may also check the Set Up Slide Show option on the same ribbon. Make sure that the Presenter View is enabled (set “Show type” to “Presented by a speaker”). Designing presentation Themes 1. Select the Design tab.
- 13. COMPUTER APPLICATION IN BUSINESS III-BBA C.CHANDRAPRIYA M.Sc.,M.Phil., 2. Select one of the Themes. 3. Select one of the Variants. Designer 1. Insert one or more pictures, a list of items, or a list of dates. 2. The Designer panel will open. Select the design you want. You can also bring up Designer by selecting a picture, and then selecting Design > Design Ideas. Add a transition between slides 1. Select the slide you want to add a transition to. 2. Select the Transitions tab and the transition your want. 3. Some transitions have Effect Options you can choose. You can also set the Duration of the transition and select Apply To All to apply the same transition to all slides. Add Animations 1. Select the object or text you want to add a transition to. 2. Select the Animations tab and the animation your want. 3. Some animations have Effect Options you can choose. Need the full set of PowerPoint features?
- 14. COMPUTER APPLICATION IN BUSINESS III-BBA C.CHANDRAPRIYA M.Sc.,M.Phil., Open your file in the PowerPoint desktop app: In PowerPoint for the web, select Open in Desktop App. Note: Changes are automatically saved in PowerPoint for the web, but in the PowerPoint desktop app, you need to save changes. Animation Options of PPT animations to text, pictures, shapes, and more in your presentation 1. Select the object or text you want to animate. 2. Select Animations and choose an animation. 3. Select Effect Options and choose an effect. Manage animations and effects There are different ways to start animations in your presentation: On Click: Start an animation when you click a slide. With Previous: Play an animation at the same time as the previous animation in your sequence. After Previous: Start an animation immediately after the previous one happens. Duration: Lengthen or shorten an effect. Delay: Add time before an effect runs. Add more effects to an animation 1. Select an object or text with an animation. 2. Select Add Animation and choose one. Change the order of animations 1. Select an animation marker. 2. Choose the option you want: Move Earlier: Make an animation appear earlier in the sequence. Move Later: Make an animation occur later in the sequence.
- 15. COMPUTER APPLICATION IN BUSINESS III-BBA C.CHANDRAPRIYA M.Sc.,M.Phil., Add animation to grouped objects You can add an animation to grouped objects, text, and more. 1. Press Ctrl and select the objects you want. 2. Select Format > Group > Group to group the objects together. 3. Select Animations and choose an animation. Preview and Printing in Power Point Click Print Preview button on classic style toolbar. Only one click is enough! Figure 1 After click the Print Preview button, the PowerPoint 2007, 2010, 2013, 2016, 2019 and 365 interface will jump to the backstage view under File tab automatically. At right side you will view the preview area.
- 16. COMPUTER APPLICATION IN BUSINESS III-BBA C.CHANDRAPRIYA M.Sc.,M.Phil., 1. Select the File drop down menu in main menus; 2. Secondly select the Print Preview item; 3. Then PowerPoint 2007, 2010, 2013, 2016, 2019 and 365 interface will jump to the backstage view,
- 17. COMPUTER APPLICATION IN BUSINESS III-BBA C.CHANDRAPRIYA M.Sc.,M.Phil.,