
Recommended
More Related Content
What's hot
What's hot (20)
Similar to Pranavi verma-class-9-digital-presentation
Similar to Pranavi verma-class-9-digital-presentation (20)
More from PranaviVerma
More from PranaviVerma (20)
Recently uploaded
Recently uploaded (20)
Pranavi verma-class-9-digital-presentation
- 2. This Unit Covers: Define a Presentation Create a Presentation Explore Different Views of Slides Save a Presentation Edit and Format Slides Insert Images and Shapes Add Themes and Designs Print a Presentation Learning Objectives
- 3. Digital presentation is a process of presenting information to a group of people and audience using presentation software like Microsoft PowerPoint, OpenOffice Impress, etc. It is a sequential collection of slides in which each slide displays information in the form of text or graphics. Presentation software is a computer application that helps in creating a presentation, such as explaining the new topic to the students in a class, presenting a plan to the employees or clients of a company. In the current technology-driven world, activities, such as training, explaining concept and representing product have become an integral part of our day- today business. These tasks can be easily done using presentation. Introduction
- 4. A presentation is a sequential collection of slides in which each slide displays some information in the form of text or graphics. A slide is an electronic page that contains information in the form of text, images and audio/video clips. You can make your presentation more attractive, appealing an eye catching by adding animation and other effects to the slides. To properly understand the information provided through a slide, you must get familiar with its elements. Session 1: Introduction to Digital Presentation
- 5. To create a good slide, you must first understand its structure. A slide contains various elements, such as title, subtitle, drawing object, clipart, picture and graph. These elements are explained as follows: Title: It refers to the heading of the slide. The title element provides a basic idea about the topic and content of the presentation. Subtitle: It refers to the description of the slide data. It also gives emphasis to the central idea of the slide. Drawing objects: These refer to the various built-in shapes provided by the MS PowerPoint. These include shapes, such as curves, lines and flowcharts. Clip art and pictures: These refer to the graphical objects that help in enhancing the appearance of a slide. Graph: It refers to the graphical object that allows you to draw relationship between the objects in a slide. Basic Elements of a Slide
- 6. Several people make use of the presentation software while giving presentations. Some examples are as follows: Salespersons need to give presentation to their customers, clients and managers. Using the presentation software, they can better convey their ideas and details of products to customers as well as performance-related facts and figures to managers. Human Resource departments of the organizations also make use of the presentation software to provide training to their new employees or the existing staff. The following are some examples where presentation software is used as a training tool: Teachers can better explain the concepts with the help of presentations. During conferences, the presentation software helps the presenter (speaker) easily project his/her key points on a large screen while simultaneously explaining the concepts. Uses of the Presentation Software
- 7. The components of the MS PowerPoint user interface is given in following Table: User Interface of MS PowerPoint 2010 Components Description Quick Access Toolbar It contains commands which are used more frequently in the presentation. Title bar It helps in identifying the presentation. It contains the name of the presentation and also the name of the application. Slide pane It displays the thumbnails of the slides of a presentation. Slide It contains information about the presentation topic. Tabs Tabs are used to organize the commands. Ribbon It displays commands, features and tools available in MS PowerPoint 2010. The commands are logically grouped under different tabs on the Ribbon. Notes pane It allows the user to add notes regarding a specific slide in a presentation. Status bar It contains information related to the presentation. It displays the number of slides in the presentation. Minimize, Maximize and Close Buttons The Minimize button is used to minimize the MS PowerPoint window over the Task bar, whereas the Maximize button restores or maximizes the MS PowerPoint window. The Close button is used to close the window.
- 8. MS PowerPoint helps you create attractive, eye-catching and professional-looking visual aids for the users. These visual aids help you communicate ideas, messages and other information in an easy and effective manner. You can start MS PowerPoint 2010 application by click the Start button on the Task bar and then select the All Programs Microsoft Office Microsoft PowerPoint 2010 from the Start menu, as shown in the given figure. Starting Microsoft PowerPoint 2010
- 9. The MS PowerPoint 2010 window opens, as shown in the following figure: Starting Microsoft PowerPoint 2010
- 10. Every presentation in MS PowerPoint 2010 is based on a template. A template is the basic model that provides the basic structure to create a presentation easily and quickly. Templates offer sets of different predefined visual elements that you can later customize according to your requirements. Session 2: Creating, Saving and Closing Presentation
- 11. When you start MS PowerPoint 2010, a blank presentation is automatically created and opened. This blank presentation is based on the blank template with no formatting applied to slides. The blank template offers you the flexibility to create and edit presentation according to your requirements and preferences. Creating a Blank Presentation To create a blank presentation, you need to first click the File tab and then select the New option in the Backstage view. Now, select the Blank presentation template under Available Templates and Themes category in the Backstage view and click the Create button, as shown in the given figure.
- 12. Now, a new blank presentation gets created, as shown in the following figure: Creating a Blank Presentation
- 13. By default, an MS PowerPoint 2010 presentation is saved as a file with the .pptx extension. Saving the Presentation You can to save a presentation, by specifying the name and the location where you want to save your presentation and then clicking the Save button in the Save as dialog box, as shown in the given figure. You can access this dialog box by first clicking the File tab and then selecting the Save As option in the Backstage view.
- 14. After you have finished working with the MS PowerPoint presentation, you can close the presentation. You can close a presentation by clicking the Close button at the top right corner of the presentation window. Alternatively, you can also close the currently open presentation by clicking the File tab and then selecting the Close option in the Backstage view, as shown in the following figure: Closing the Presentation
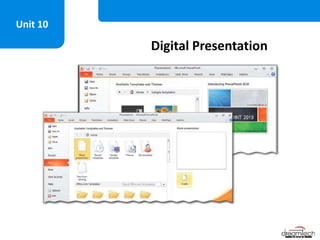
- 15. In MS PowerPoint, you can also create a presentation by using Sample templates option available in the Available Templates and Themes category in the Backstage view. Templates are built-in design files that contain different predefined styles, such as font face and size, background and colour scheme. You can create a simple presentation by clicking the File tab and then selecting the New option in the Backstage view. Now, select the Sample templates template under Available Templates and Themes category in the Backstage view, as shown in the following figure: Session 3: Creating a Simple Presentation
- 16. Now, select the desired template under Available Templates and Themes category in the Backstage view and click the Create button, as shown in the following figure: Session 3: Creating a Simple Presentation
- 17. The new presentation gets created with the selected template, as shown in the following figure: Now, modify the presentation according to your requirement. Session 3: Creating a Simple Presentation
- 18. By default, PowerPoint provides only one slide in a blank presentation. In a presentation, you need to click the Click to add title box and add title in it and click the Click to add subtitle box to add subtitle in it. Now, the title and subtitle is added in the presentation, as shown in the following figure: Adding Titles/Subtitles
- 19. Views refer to the mode of viewing presentations. In MS PowerPoint, there are various views, such as Normal, Slide Sorter, Reading and Slide Show. Each of these views displays a distinct picture of the presentation, enabling you to focus on different aspects of the presentation at different times. You can access these views from the Presentation Views group of the View tab, as shown in the following figure: Session 4: Viewing a Presentation
- 20. The presentation views that are available in MS PowerPoint are as follows: Normal View: It allows you to format design and add text, graphics and animation effects to the slide. The normal view is the default view for creating slides. Slide Sorter View: It displays all the slides of a presentation. In this way, you can verify the order of slides and also verify whether the presentation has been completed or not. Reading View: It allows you to see each slide of your presentation as a slide show that fits within the window. Notes Page View: It allows you to add or edit notes in the slides. It is a special view of the presentation which is suitable to be printed and distributed to the audience. Slide Show View: It allows you to see each slide of your presentation in full screen on your computer. The Slide Show refers to the process of running a presentation. Session 4: Viewing a Presentation
- 21. You can change the font size, style and colour of the text in MS PowerPoint presentations through a few mouse clicks. To change the font style of the text, you need to first select the text whose font style you want to change and then click the down-arrow button of the Font combo box under the Font group of the Home tab. Now, select the desired font face from the drop-down list, as shown in the following figure: Session 5: Editing Text—Font Size, Style and Colour
- 22. To change the font size of the text, you need to first select the text whose font size you want to change and then click the down-arrow button of the Font Size combo box under the Font group of the Home tab. Now, select the desired font size from the drop-down list, as shown in the following figure: Session 5: Editing Text—Font Size, Style and Colour
- 23. To change the font color of the text, you need to first select the text whose font color you want to change and then click the down-arrow button of the Font Color button under the Font group of the Home tab. Now, select the desired color for the text from the list of colors, as shown in the following figure: Session 5: Editing Text—Font Size, Style and Colour
- 24. The presentation created in the MS PowerPoint application is editable. It means you can edit the presentation according to your requirements. To edit text in a presentation, you need to click the text box whose content you want to edit, as shown in the following figure: Now, edit the text according to your requirement, as shown in the following figure: Session 6: Editing Text in a Presentation
- 25. MS PowerPoint allows you to modify or change the appearance of the text by changing the background colour of the text. To change the background colour of the text in a presentation, you need to first select the text box and then click the Shape Fill button under the Drawing group of the Format tab. Now, select the desired color that you want for the background of the text from the drop-down list, as shown in the following figure: Changing Background Colour of the Text
- 26. In MS PowerPoint, you can easily insert images in your slides and increase the effectiveness of your presentation to attract and hold the attention of the audience. Session 7: Inserting Image in a Presentation To insert an image in a slide, you need to first select the desired image and then click the Insert button in the Insert Picture dialog box, as shown in the given figure. You can access this dialog box by clicking the Picture button under the Images group of the Insert tab.
- 27. In MS PowerPoint 2010 presentation, you can add shapes in your presentation to make it attractive and more productive. There are numerous predefined shapes that you can choose to add in a presentation, such as basic shapes, symbol shapes, block shapes and flowcharts. Session 8: Adding Shapes in a Presentation To add a shape in a presentation, you need to first click the Shapes button under the Illustrations group of the Insert tab and then select the desired shape from the drop-down list. Now, click and drag the mouse pointer on the slide to draw the shape.
- 28. Session 8: Adding Shapes in a Presentation To add the text in a shape, you need to right click the shape and then select the Edit Text option from the context menu, as shown in the following figure: Now, type some text in the shape. The text gets entered in the shape.
- 29. Session 8: Adding Shapes in a Presentation To change the colour of a shape, you need to first select the shape and then click the Shape Fill button under the Shape Styles group of the Format tab. Now, select the desired colour from the drop-down list of colours, as shown in the following figure:
- 30. MS PowerPoint 2010 presentations have no theme by default. However, you can add theme to the slides of a presentation to attract the audience by making it more attractive, eye-catching and appealing. To add theme in a presentation, you need to select the desired theme in the Themes group of the Design tab. Now, the selected theme gets applied to the presentation, as shown in the following figure: Session 9: Presentation Themes
- 31. In MS PowerPoint, you can change the design in individual slides or all the slides of a presentation. To change a design of the slides, you need to first click the down-arrow of the Background Styles button under the Background group of the Design tab and then select the Format Background option from the drop-down list, as shown in the following figure: Now, select the Fill category in the Format Background dialog box and then select any of the radio button (in our case Solid fill). Session 10: Changing the Design of a Presentation
- 32. Session 10: Changing the Design of a Presentation Now, click the down-arrow of the Color button and then select the desired colour in the drop-down list of colours. Now, click the Apply to All button in the Format Background dialog box to apply the color to all slides, as shown in the given figure. Now, the selected colour gets applied to the slide, as shown in the following figure:
- 33. You can change the background colour and shading of your current slide or all the slides in a presentation. To change the background colour of the slides, you need to click the down- arrow of the Background Styles button in the Background group of the Design tab. Changing the Background Colour of a Presentation Now, select the desired background style from the drop-down list, as shown in the given figure. The background style gets applied to the slide.
- 34. In MS PowerPoint, the Slide Sorter view refers to a view that shows thumbnail versions of all your slides arranged in horizontal rows. This view is useful to make global changes to several slides simultaneously. Using the Slide Sorter view, you can easily arrange the order of slides, add slides and also delete them. You can easily switch to the Slide Sorter view by clicking the Slide Sorter button under the Presentation Views group of the View tab. Session 11: Arranging, Deleting and Adding Slides
- 35. To rearrange slides, you first need to change the view of your presentation to the Slide Sorter view. To arrange the order of the slides, you need to select the desired slide whose position you want to change, as shown in the given figure. Now, drag the slide to a position where you want to place, as shown in the given figure. Arranging Slides Selecting slide Displaying slide with changed position
- 36. By default, MS PowerPoint 2010 provides only one slide in a blank presentation. However, you can add any number of slides in a presentation. To insert a new slide, you need to right-clicking in blank space after the existing slide where you want to add a new slide and then select the New slide option from the context menu, as shown in the following figure: Adding a New Slide
- 37. Now, the slide gets added in the presentation, as shown in the following figure: Adding a New Slide
- 38. To delete a slide in MS PowerPoint, you need to right-click the slide that you want to delete on a Navigation pane and then select the Delete Slide option from the context menu, as shown in the following figure: Now, the selected slide gets deleted in the presentation. Deleting a Slide
- 39. Header refers to the portion of the page that appears just below the top margin of the slide, while footer refers to the portion that appears just above the bottom margin of the slide. Note that, slides do not have a Header area. Therefore, to add header on all slides, you can move the Footer area to the top of the slide in the Master view. To add text to the footer in all slides, click the Slide Master button under the Master Layout group of the View tab. Now, click the Header & Footer button under the Text group of the Insert tab. Now, specify the desired option the Header and Footer dialog box and click the Session 12: Adding Header and Footer Using Slide Master
- 40. Now, specify the desired option the Header and Footer dialog box and click the Apply to All button to apply the specified settings to all the slides in your presentation, as shown in the following figure: Now, the footer is applied to all the slides in your presentation. Session 12: Adding Header and Footer Using Slide Master
- 41. Printing is one of the most important feature of MS PowerPoint application. The need for printing arises whenever you need to create a hard copy of any presentation to target the audience. You can print a presentation, clicking the File tab and then selecting the Print option in the Backstage view. Session 13: Printing a Presentation The print-related options appear in the Backstage view. Now, specify the printer and number of copies you want to print, and finally click the Print button in the Backstage view, as shown in the given figure.
- 42. Thank You