Downloaded 47 times


![STEP 1: INSTALL ZEN
Automatic
Go to the Zen project Home page, and
'copy' the URL link location for the
Drupal-7Zen-7.x version that you want
to install.
Visit your site page:
[your-drupal-7-
root]/admin/appearance/install
'Paste' the download locationURL into
the field-box "Install from a URL".
Click the button "Install".](https://image.slidesharecdn.com/themingwithzen-140427181154-phpapp02/85/Drupal-Camp-Manila-2014-Theming-with-Zen-21-320.jpg)


![STEP 2: CREATE A SUBTHEME
Copy the STARTERKIT folder at:
[drupal7-root]/sites/all/themes/zen/STARTERKIT
and put the copy one-level up at:
[drupal7-root]/sites/all/themes/STARTERKIT
Rename your new STARTERKIT folder to be your new sub-theme.
For example, rename the STARTERKIT folder to "foo", so that it resides at:
[drupal7-root]/sites/all/themes/foo
IMPORTANT:The name of your sub-theme folder must start with an
alphabetic character and can only contain lowercase letters, numbers
and underscores.
Why? Each theme should reside in its own folder.To make it easier to
upgrade Zen, sub-themes should reside in a folder separate from the
base theme.](https://image.slidesharecdn.com/themingwithzen-140427181154-phpapp02/85/Drupal-Camp-Manila-2014-Theming-with-Zen-25-320.jpg)
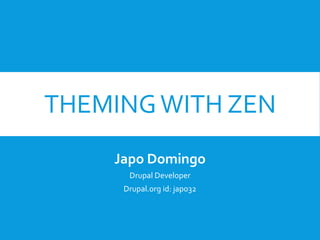
![STEP 2: CREATE A SUBTHEME
Rename the "STARTERKIT.info.txt" file, in your new
sub-theme folder, to include the name of your new
sub-theme; and remove the ".txt" extension.
For example, rename the file:
[drupal7-root]/sites/all/themes/foo/STARTERKIT.info.txt
to:
[drupal7-root]/sites/all/themes/foo/foo.info](https://image.slidesharecdn.com/themingwithzen-140427181154-phpapp02/85/Drupal-Camp-Manila-2014-Theming-with-Zen-26-320.jpg)


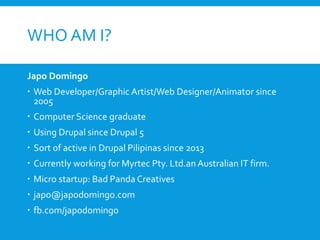
![STEP 2: CREATE A SUBTHEME
Set your new sub-theme as your website's
default theme.
Log in as an administrator on your Drupal site.
Go to the "Appearance" page at
admin/appearance, and click the link "Enable
and set default" for your new sub-theme.
NOTE:When you change any files in your subtheme (template.php or
template files), Drupal 7 might be caching them. To apply any new changes
to any of those files, simply visit your site's "Appearance" page at [dupal7-
root]/admin/appearance.](https://image.slidesharecdn.com/themingwithzen-140427181154-phpapp02/85/Drupal-Camp-Manila-2014-Theming-with-Zen-30-320.jpg)
![SASS & SCSS
Sass is a scripting language that is interpreted into Cascading Style
Sheets (CSS). SassScript is the scripting language itself.
Sass consists of two syntaxes.The original syntax, called "the indented
syntax", uses a syntax similar to Haml.[3] It uses indentation to
separate code blocks and newline characters to separate rules.
The newer syntax, "SCSS", uses block formatting like that of CSS. It
uses braces to denote code blocks and semicolons to separate lines
within a block.The indented syntax and SCSS files are traditionally
given the extensions .sass and .scss respectively.
http://en.wikipedia.org/wiki/.scss](https://image.slidesharecdn.com/themingwithzen-140427181154-phpapp02/85/Drupal-Camp-Manila-2014-Theming-with-Zen-31-320.jpg)


![STEP 6: ADD CUSTOM CSS AND JS
Create a new stylesheet
[drupal7-root]/sites/all/themes/foo/css/newlook.css
Add it to your .info file
Optionally also add javascript:
Make sure to clear your caches after editing the .info
file](https://image.slidesharecdn.com/themingwithzen-140427181154-phpapp02/85/Drupal-Camp-Manila-2014-Theming-with-Zen-49-320.jpg)


Japo Domingo, an experienced web developer and graphic artist, provides a detailed guide on theming with Zen, a popular Drupal starter theme. The document outlines the installation process, sub-theme creation, layout adjustments, and customization options for styling, including the use of SCSS. It emphasizes essential steps and best practices, alongside practical tips for using browser development tools for effective styling.