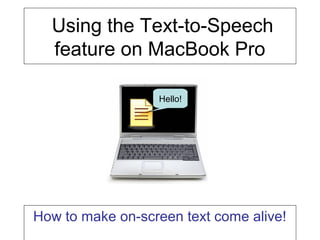
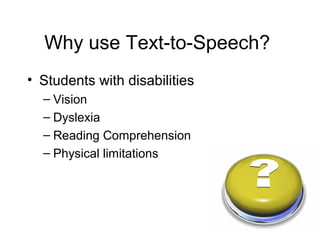
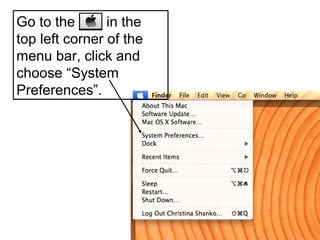
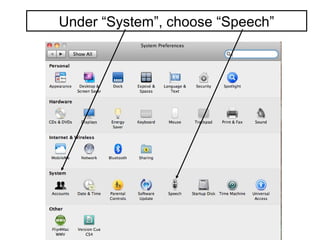
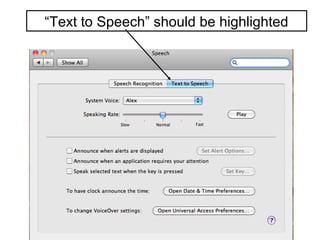
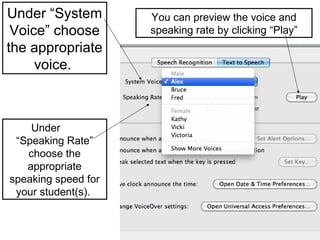
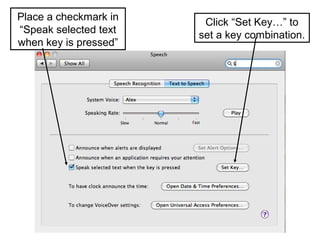
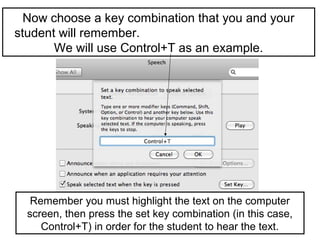
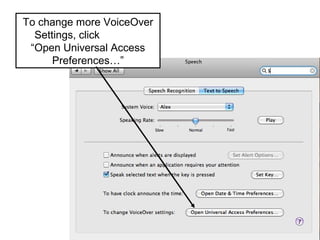
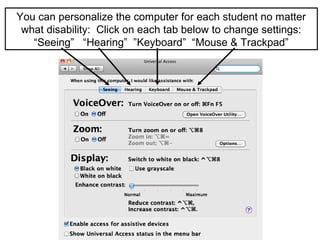
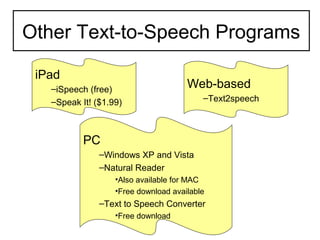
Using the Text-to-Speech
  feature on MacBook Pro

                  Hello!


How to make on-screen text come alive!
Why use Text-to-Speech?
• Students with disabilities
  – Vision
  – Dyslexia
  – Reading Comprehension
  – Physical limitations
Go to the       in the
top left corner of the
menu bar, click and
choose “System
Preferences”.
Under “System”, choose “Speech”
“Text to Speech” should be highlighted
Under “System        You can preview the voice and
 Voice” choose       speaking rate by clicking “Play”
the appropriate
     voice.


    Under
 “Speaking Rate”
   choose the
   appropriate
speaking speed for
 your student(s).
Next we are going to set the
text-to-speech feature to speak to the
  student when the text is highlighted
  and a key combination is pressed.
Place a checkmark in    Click “Set Key…” to
“Speak selected text   set a key combination.
when key is pressed”
Now choose a key combination that you and your
student will remember.
       We will use Control+T as an example.


   Remember you must highlight the text on the computer
  screen, then press the set key combination (in this case,
     Control+T) in order for the student to hear the text.
To change more VoiceOver
  Settings, click
 “Open Universal Access
      Preferences…”
You can personalize the computer for each student no matter
 what disability: Click on each tab below to change settings:
   “Seeing” “Hearing” ”Keyboard” “Mouse & Trackpad”
Click the following link to see example
    of the Text-to-Speech feature:

 http://teachertube.com/viewVideo.php?
             video_id=270954

     Note: Video may not play in Firefox;
  utilize Safari, Chrome, or Internet Explorer
Other Text-to-Speech Programs

 iPad
   –iSpeech (free)                    Web-based
   –Speak It! ($1.99)                     –Text2speech


           PC
               –Windows XP and Vista
               –Natural Reader
                   •Also available for MAC
                   •Free download available
               –Text to Speech Converter
                   •Free download
If you have any questions or
comments about the tutorial,
  please see C. Shanko in
         room 120!

Text-to-Speech

  • 1.
    Using the Text-to-Speech feature on MacBook Pro Hello! How to make on-screen text come alive!
  • 2.
    Why use Text-to-Speech? •Students with disabilities – Vision – Dyslexia – Reading Comprehension – Physical limitations
  • 3.
    Go to the in the top left corner of the menu bar, click and choose “System Preferences”.
  • 4.
  • 5.
    “Text to Speech”should be highlighted
  • 6.
    Under “System You can preview the voice and Voice” choose speaking rate by clicking “Play” the appropriate voice. Under “Speaking Rate” choose the appropriate speaking speed for your student(s).
  • 7.
    Next we aregoing to set the text-to-speech feature to speak to the student when the text is highlighted and a key combination is pressed.
  • 8.
    Place a checkmarkin Click “Set Key…” to “Speak selected text set a key combination. when key is pressed”
  • 9.
    Now choose akey combination that you and your student will remember. We will use Control+T as an example. Remember you must highlight the text on the computer screen, then press the set key combination (in this case, Control+T) in order for the student to hear the text.
  • 10.
    To change moreVoiceOver Settings, click “Open Universal Access Preferences…”
  • 11.
    You can personalizethe computer for each student no matter what disability: Click on each tab below to change settings: “Seeing” “Hearing” ”Keyboard” “Mouse & Trackpad”
  • 12.
    Click the followinglink to see example of the Text-to-Speech feature: http://teachertube.com/viewVideo.php? video_id=270954 Note: Video may not play in Firefox; utilize Safari, Chrome, or Internet Explorer
  • 13.
    Other Text-to-Speech Programs iPad –iSpeech (free) Web-based –Speak It! ($1.99) –Text2speech PC –Windows XP and Vista –Natural Reader •Also available for MAC •Free download available –Text to Speech Converter •Free download
  • 14.
    If you haveany questions or comments about the tutorial, please see C. Shanko in room 120!