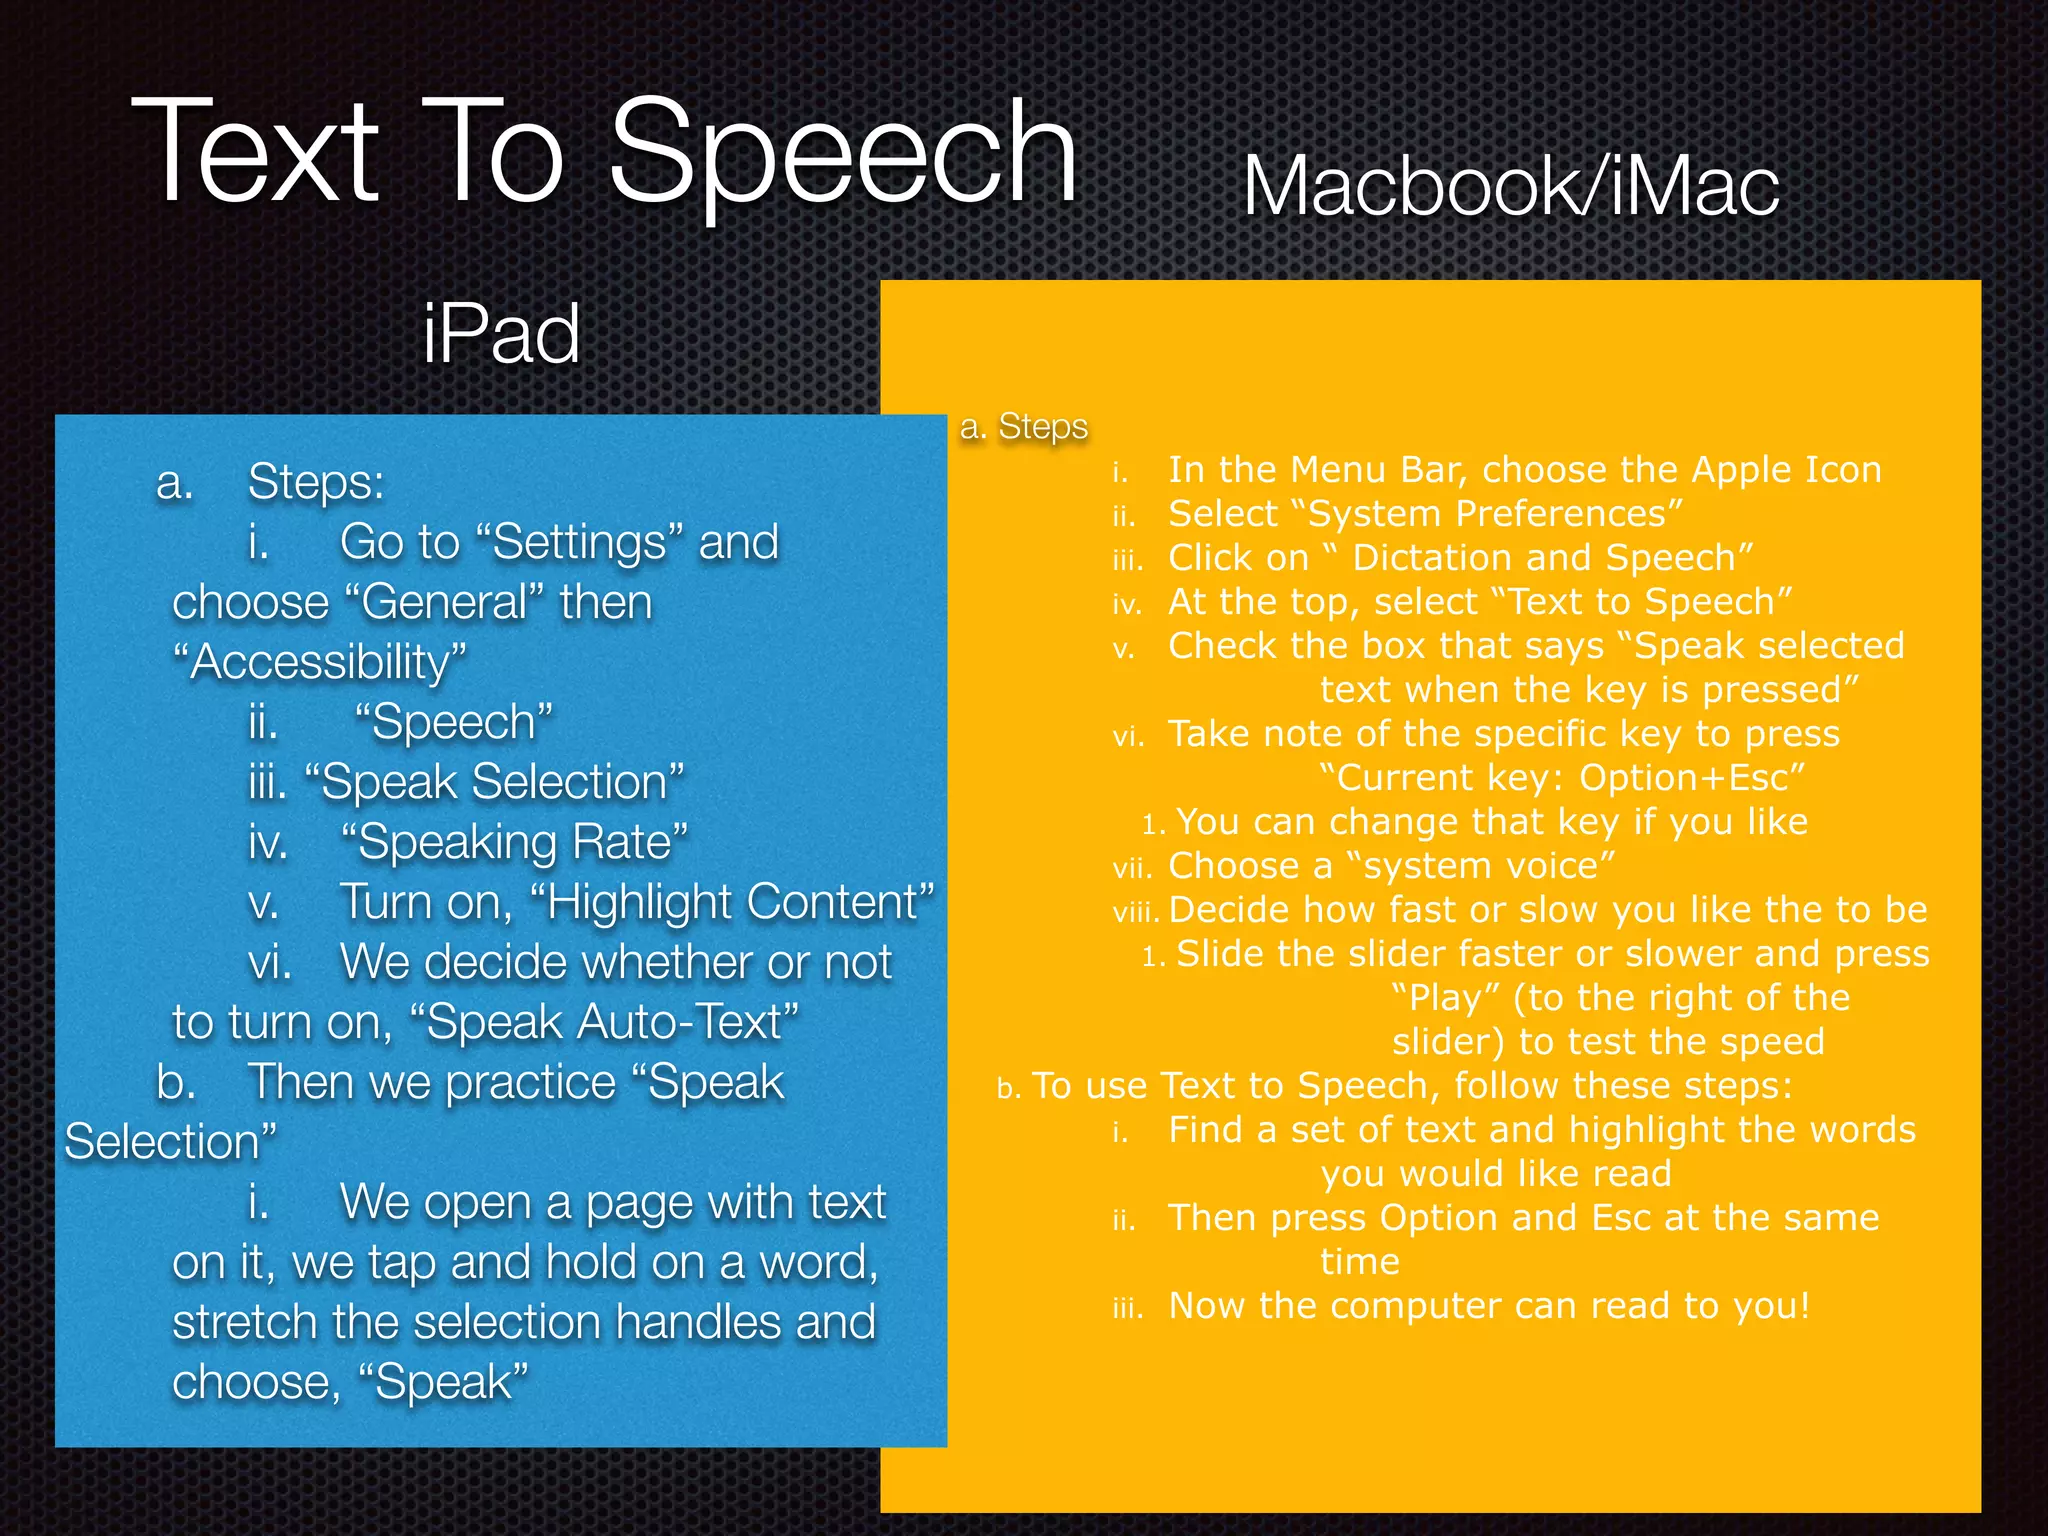
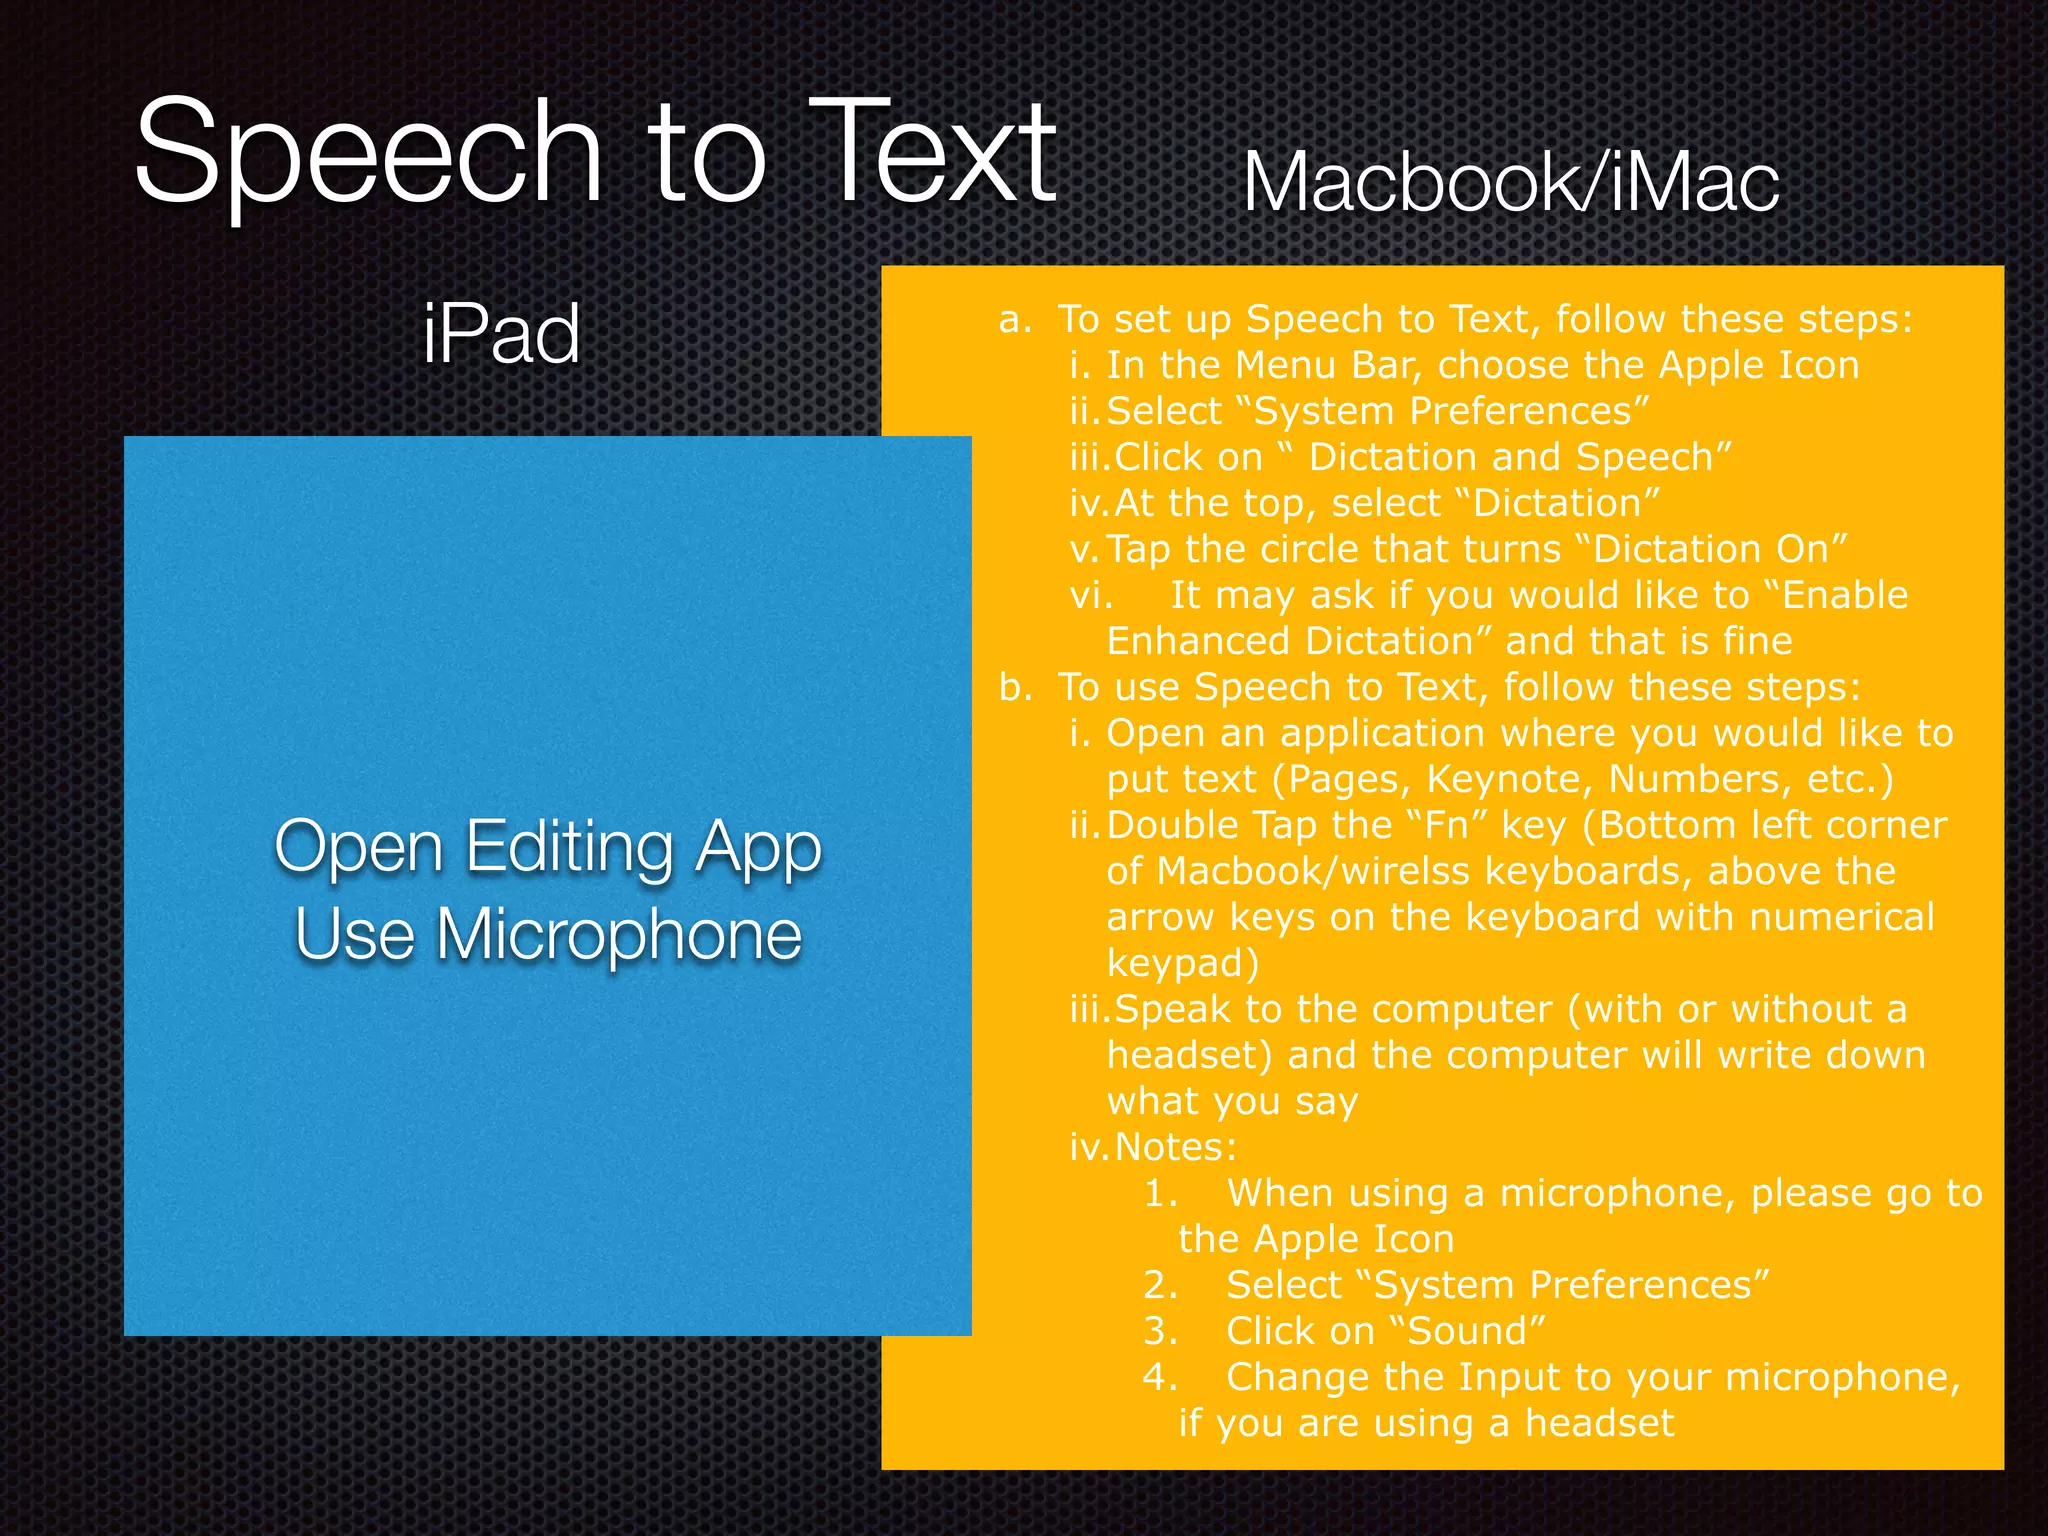
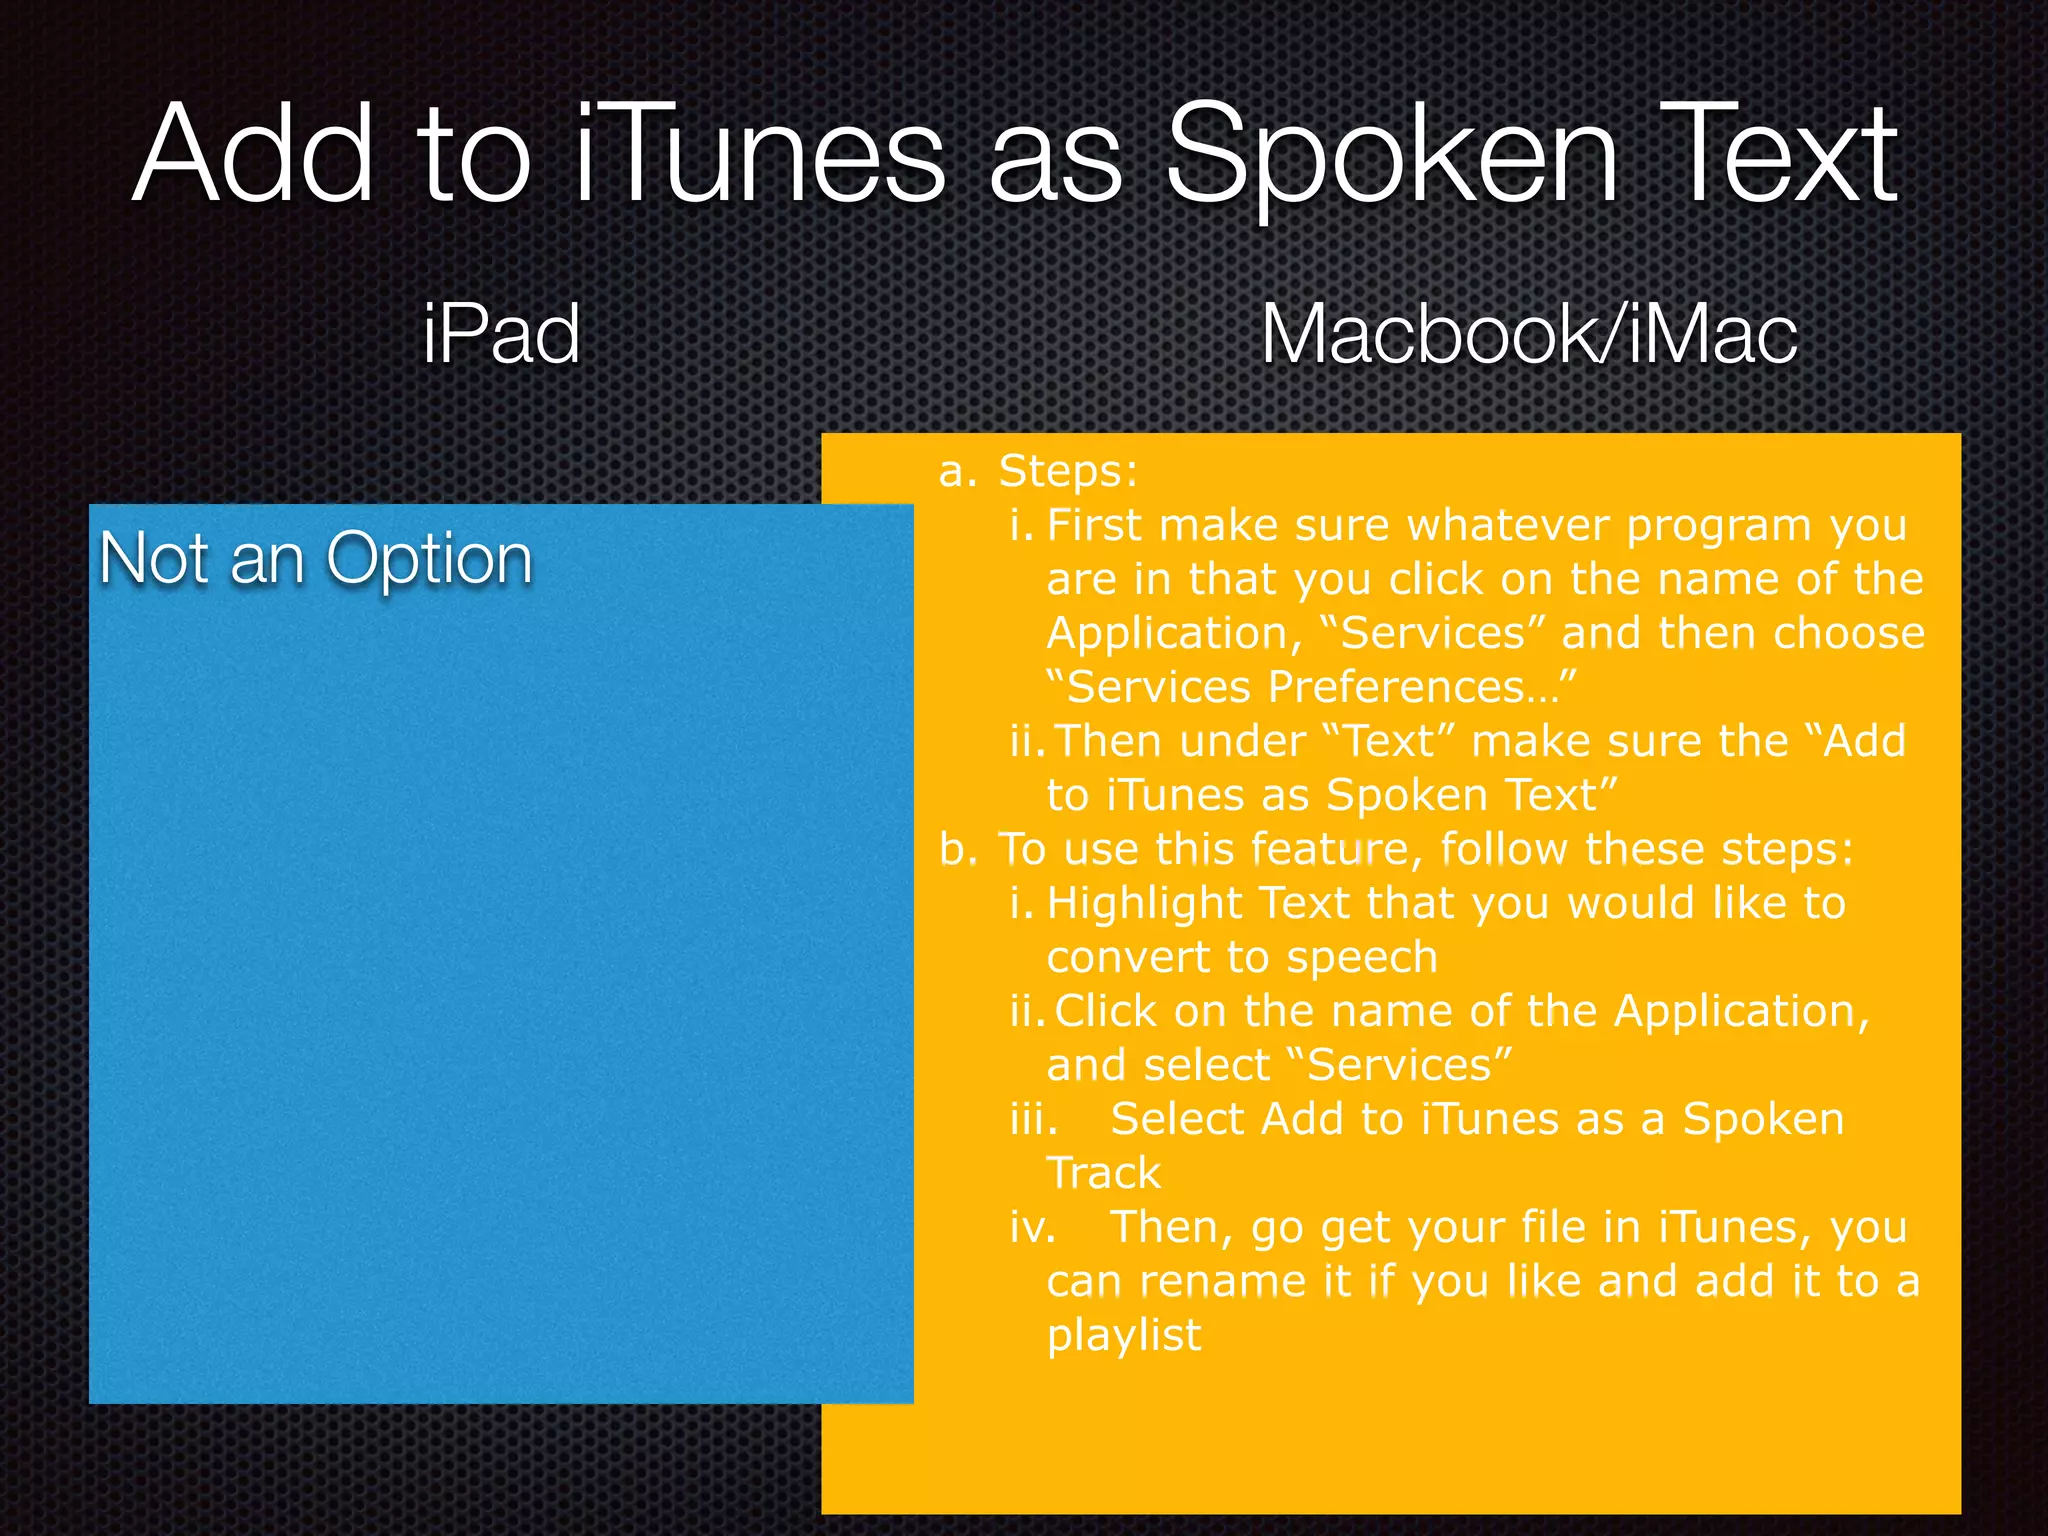
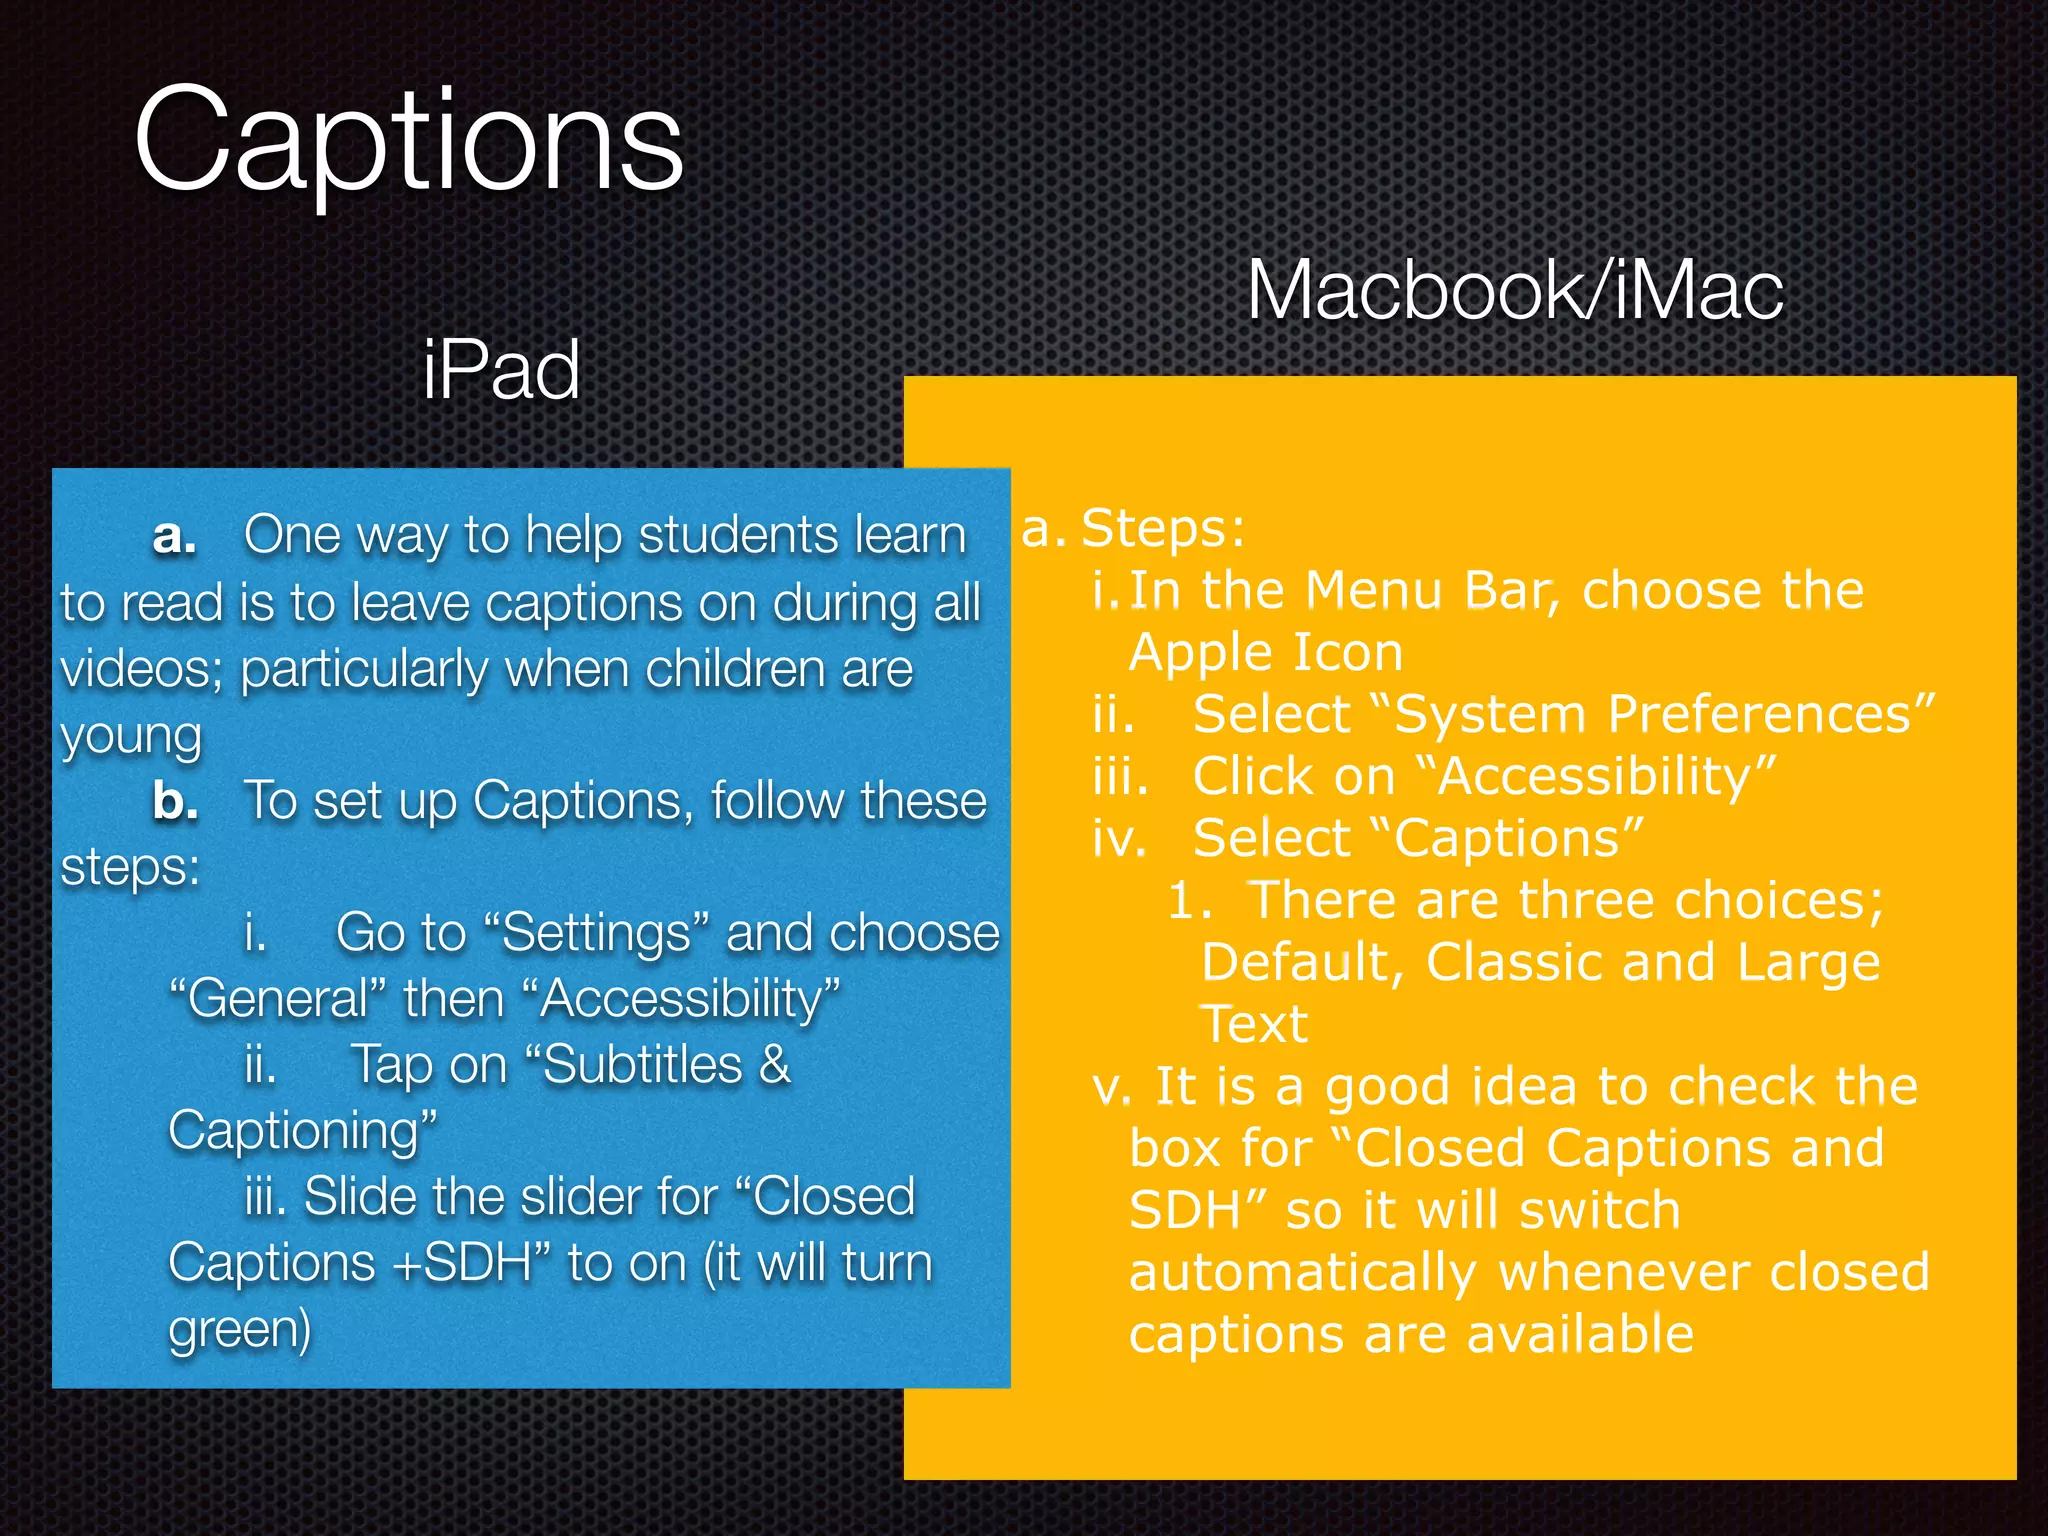
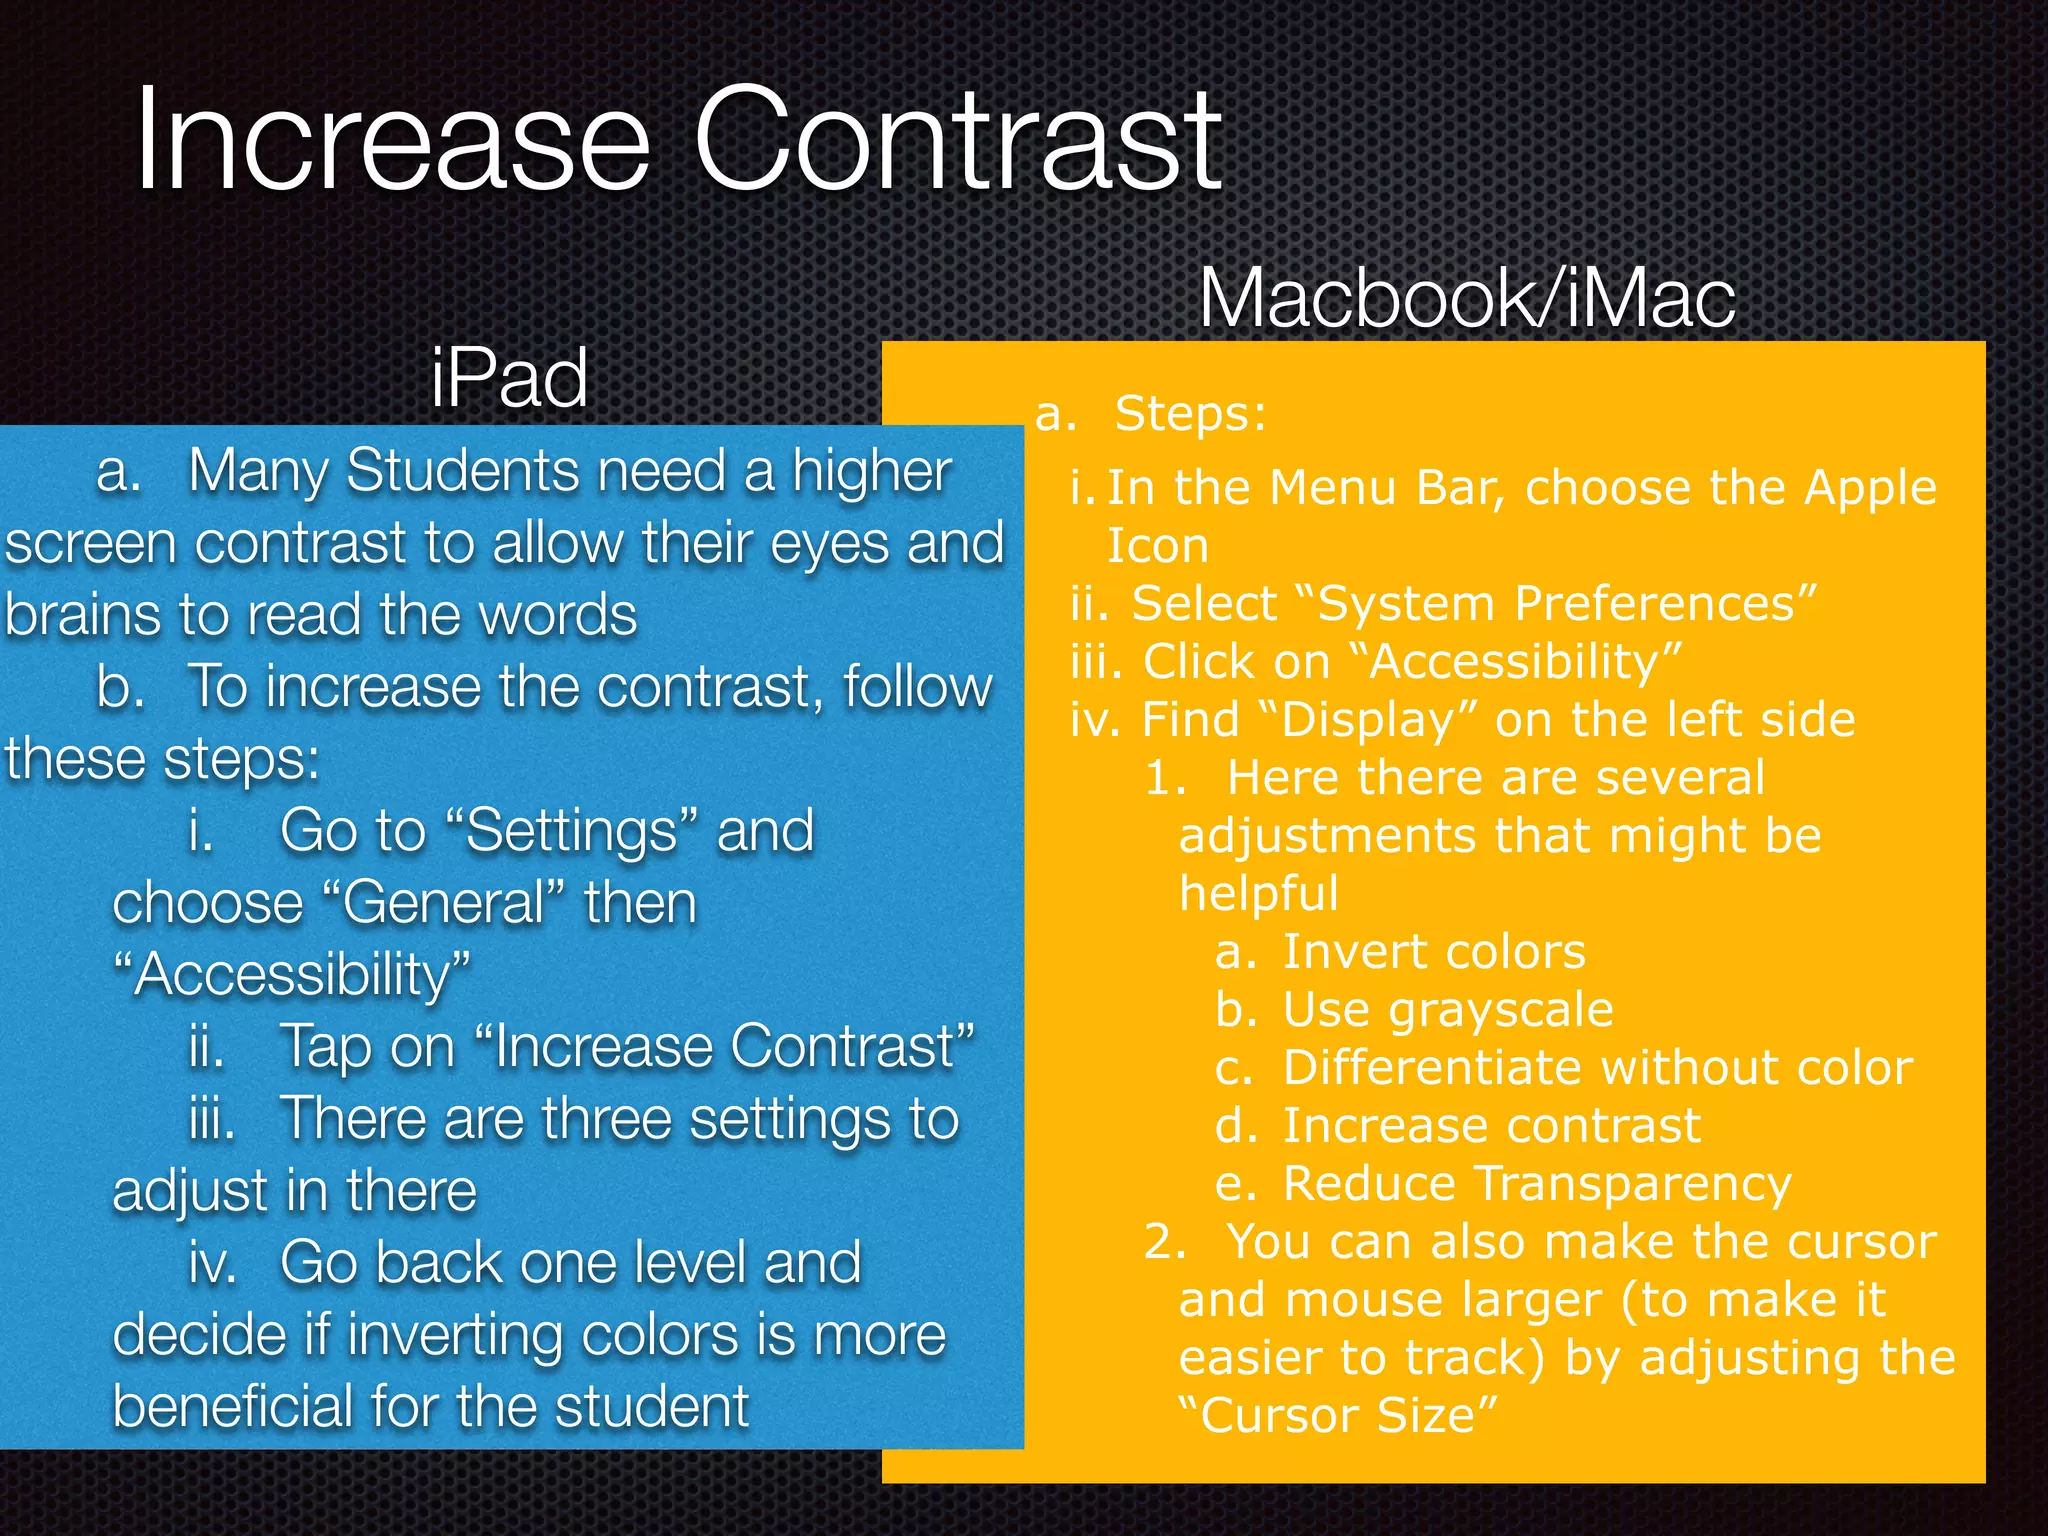
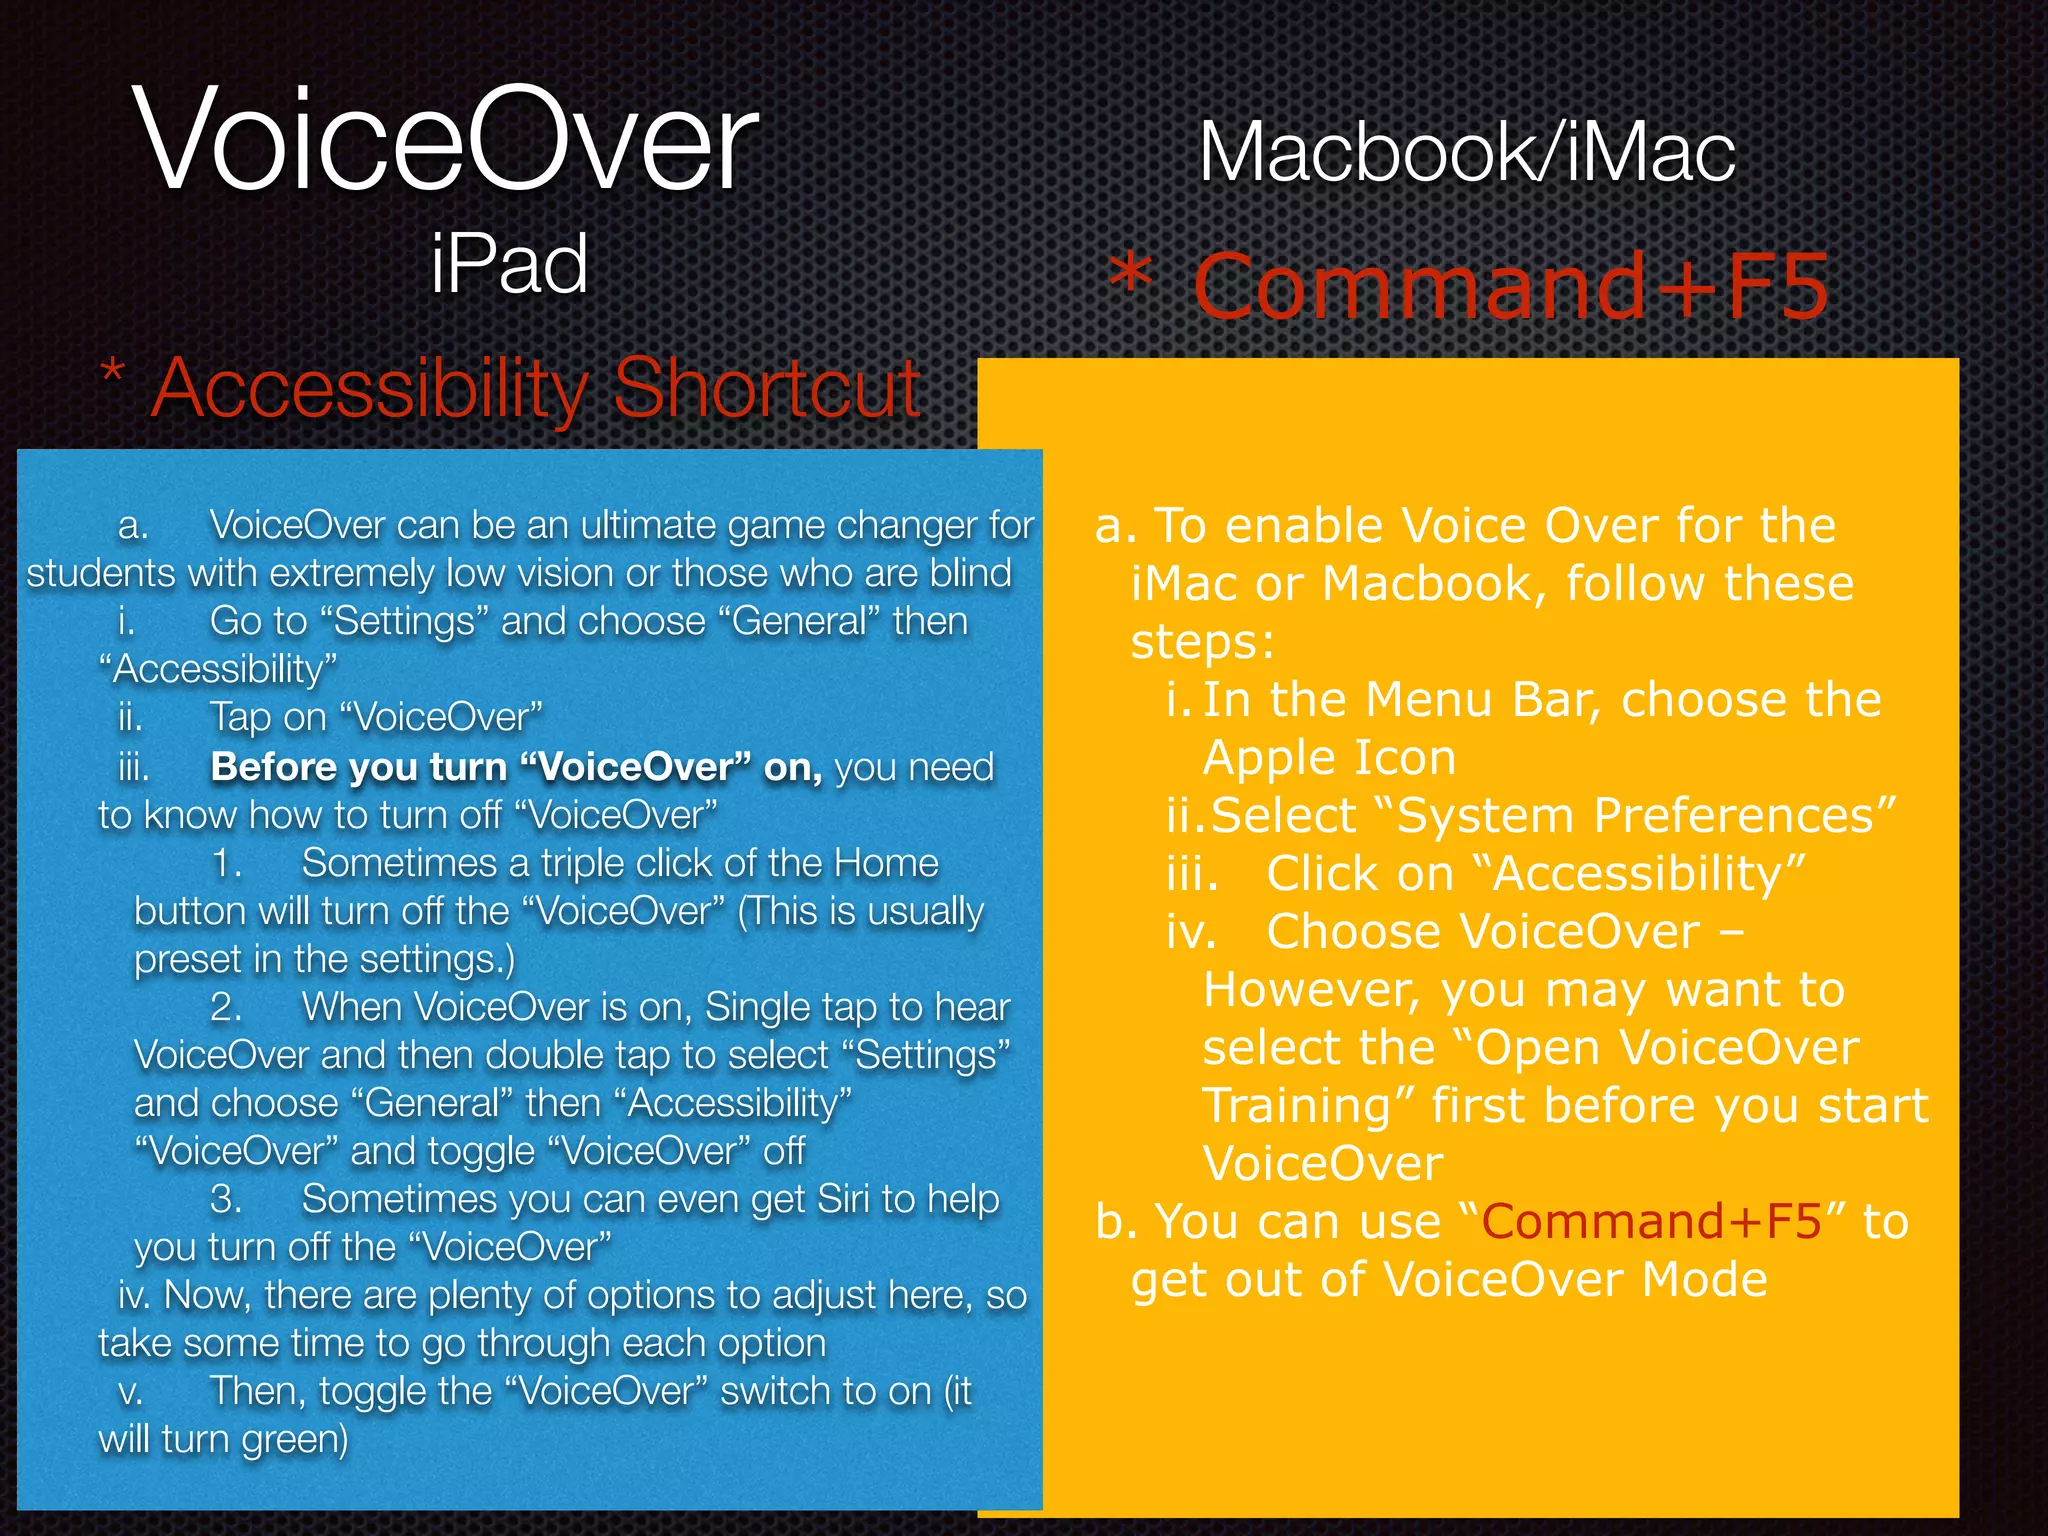
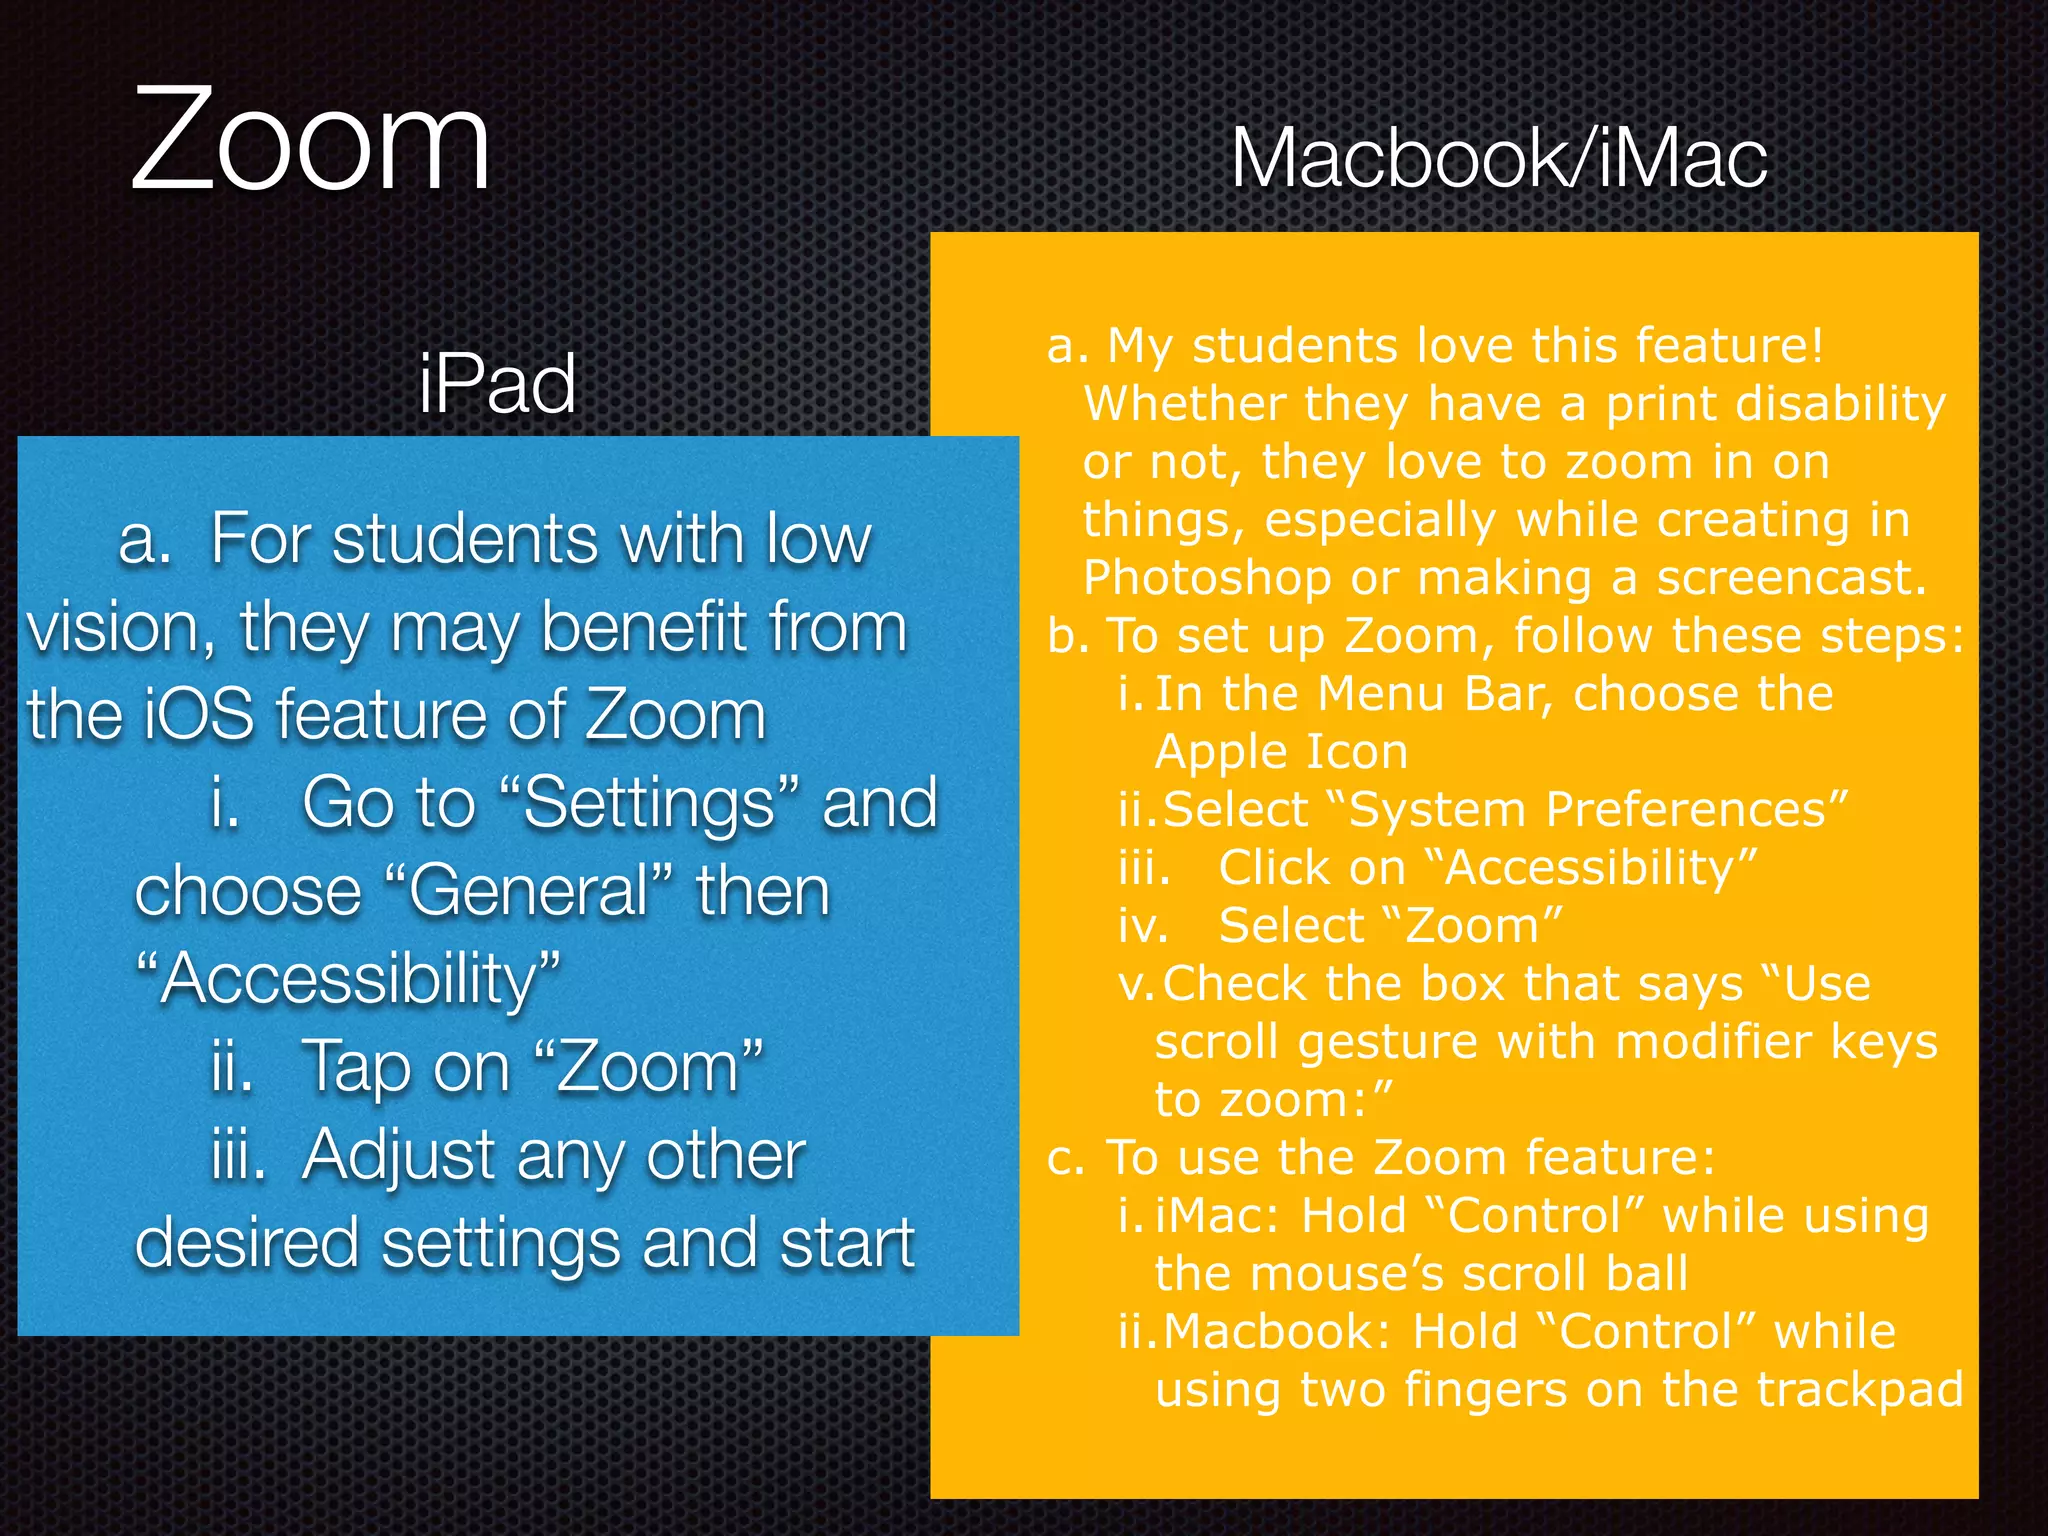
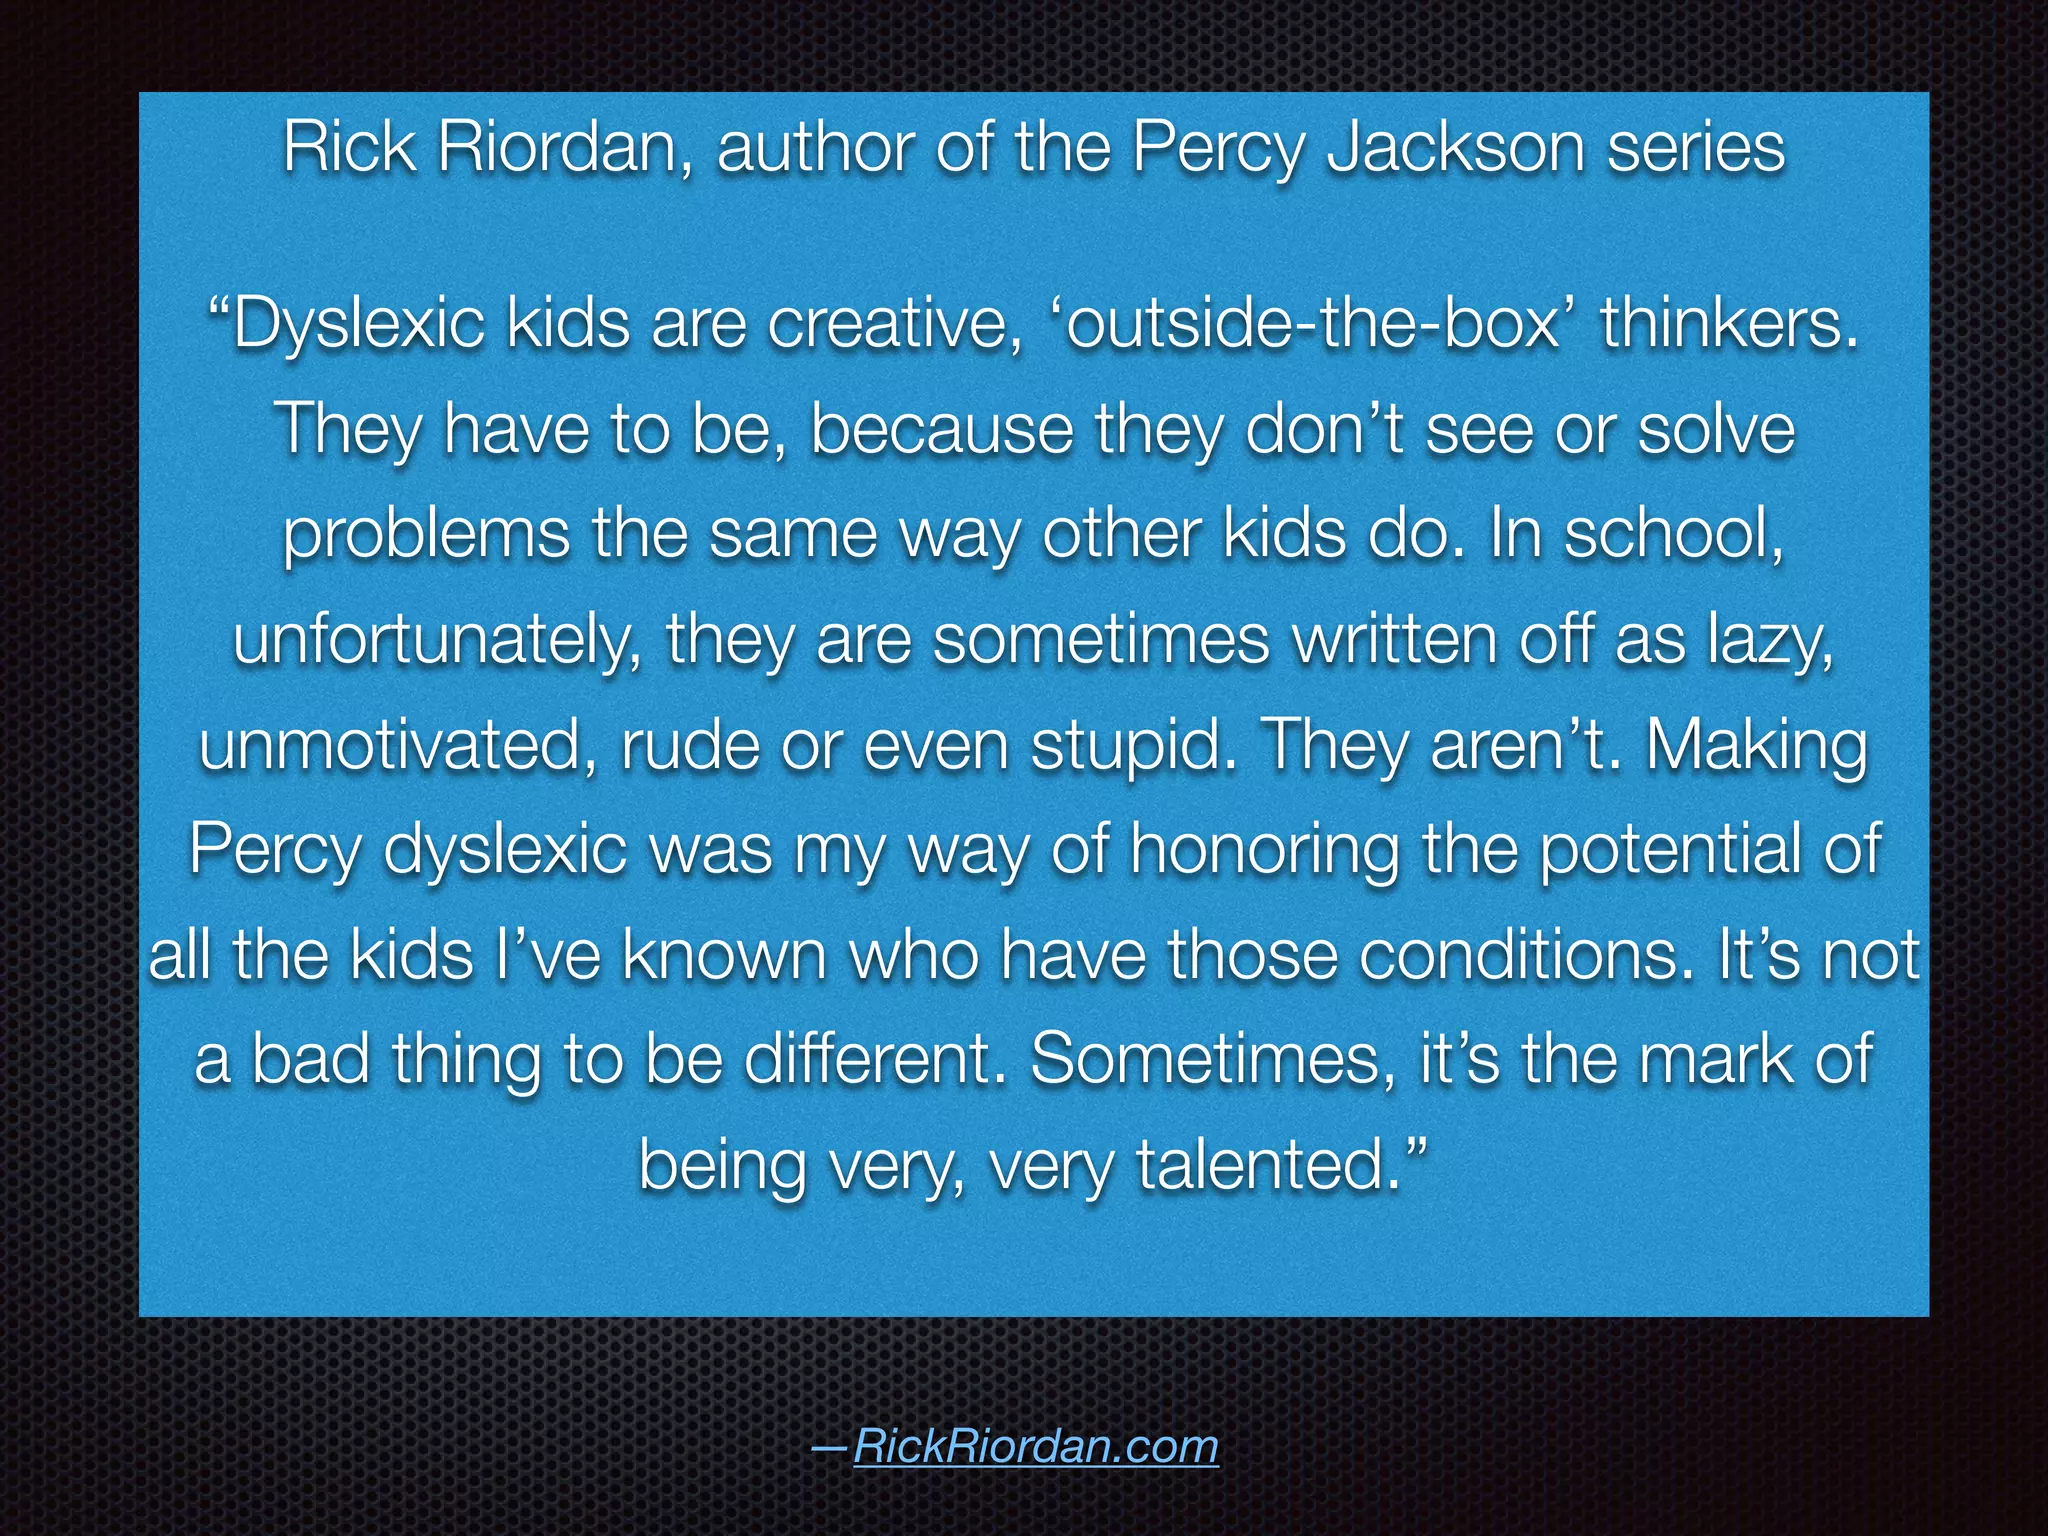
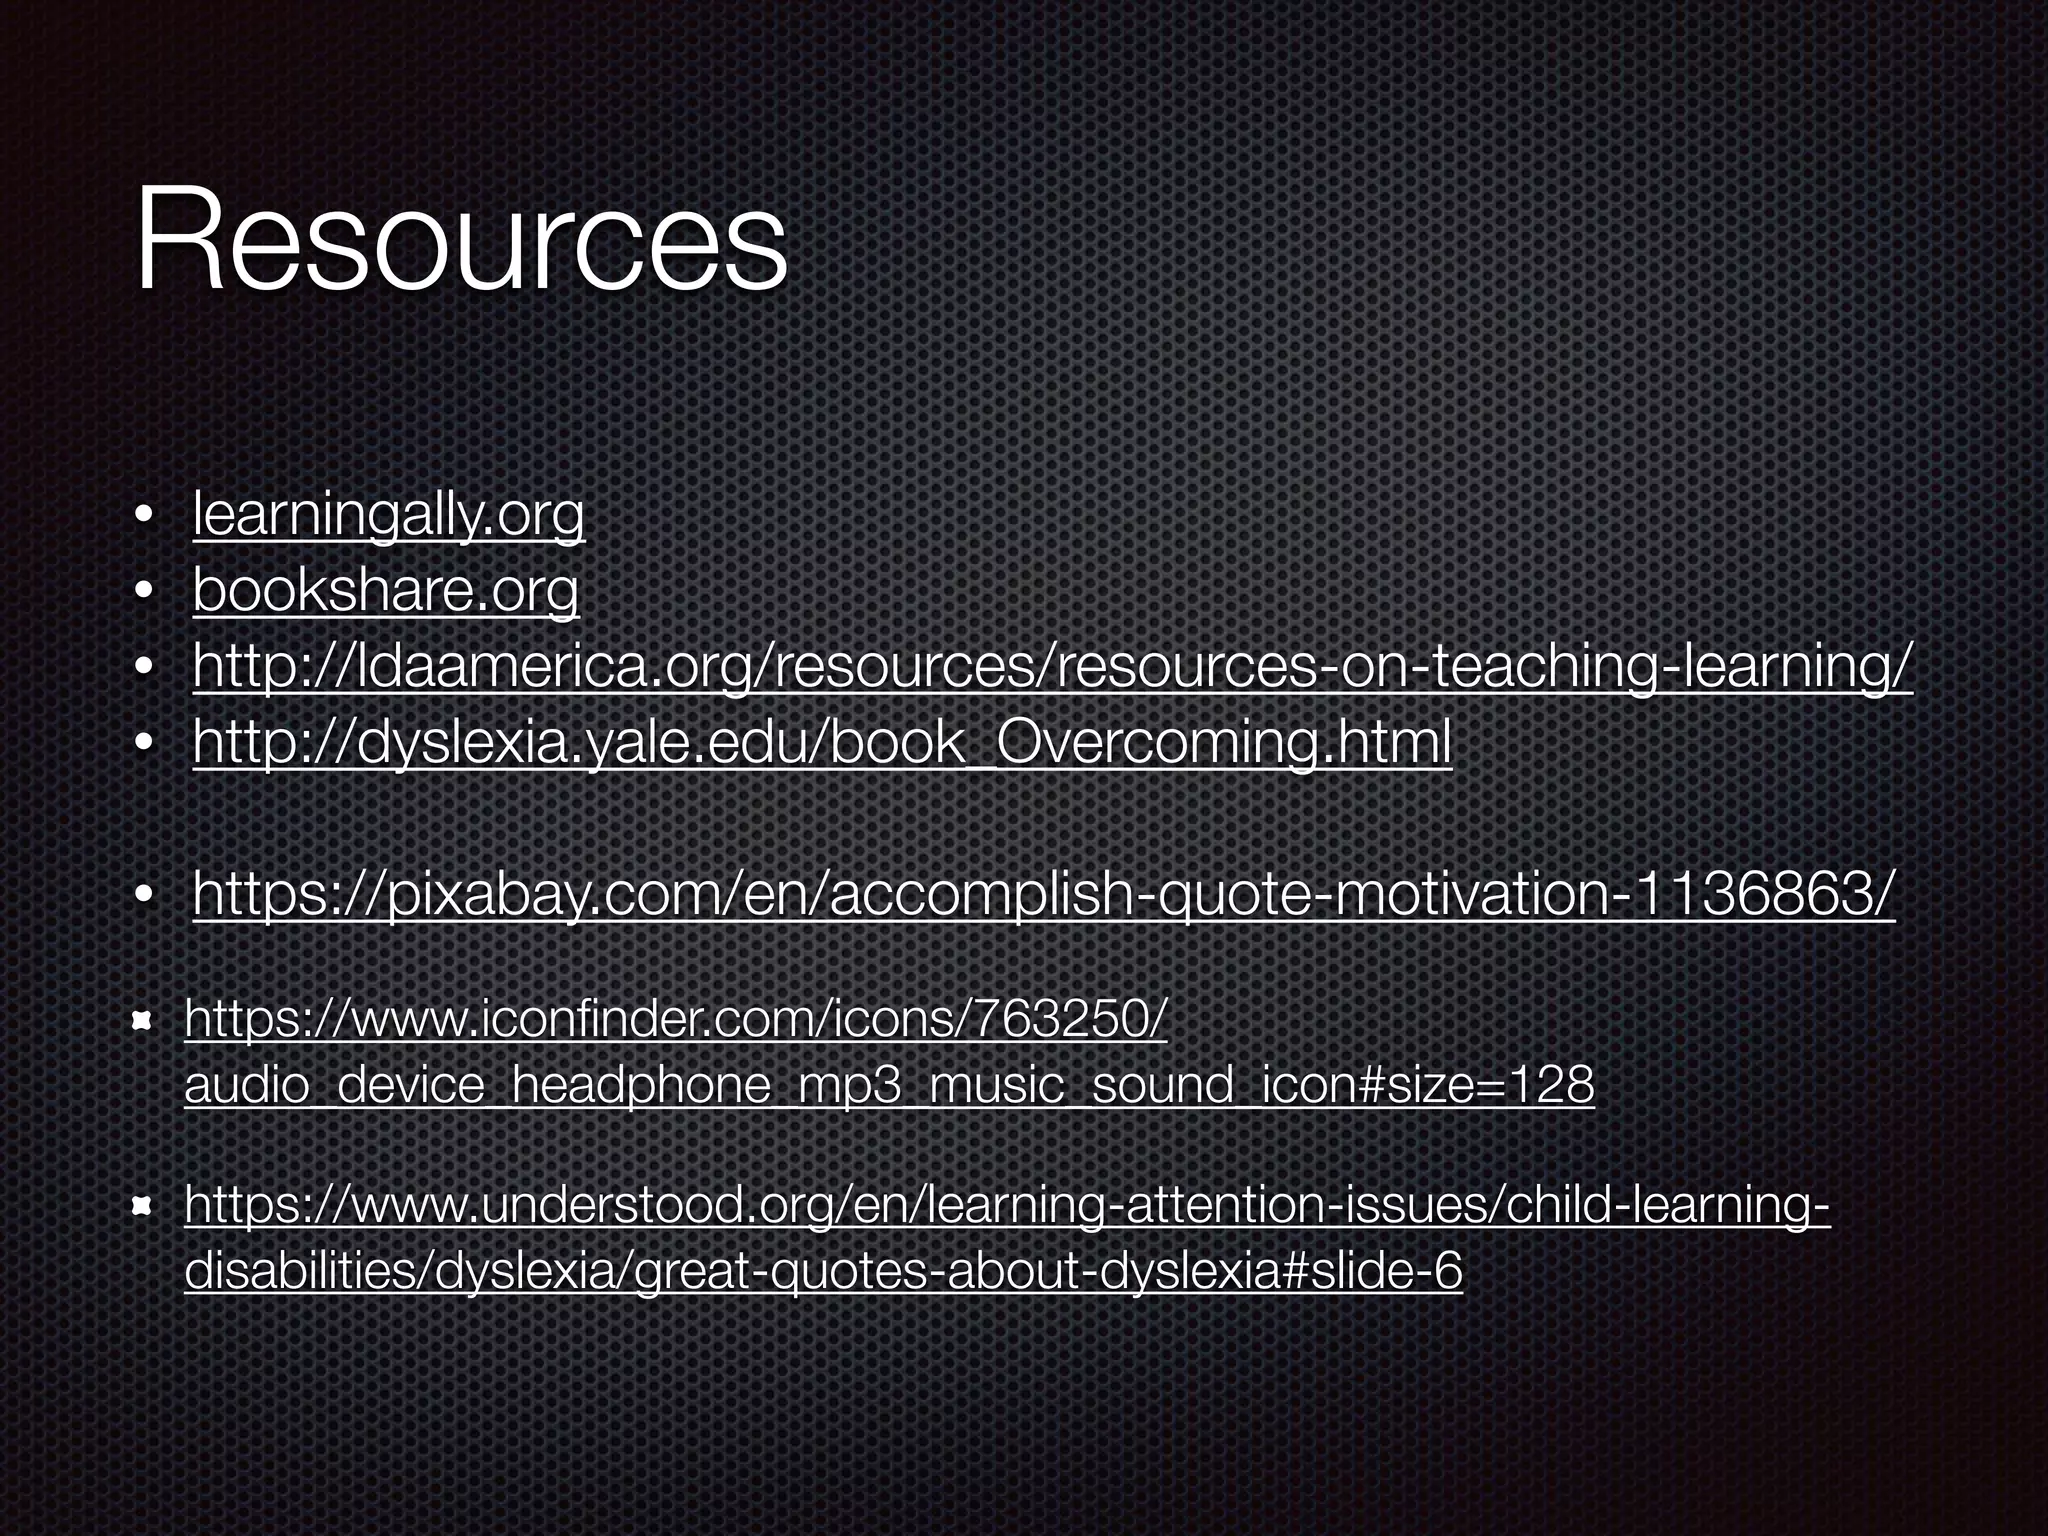
Print Disabilities…Be Gone
A story form a Teacher’s, and Parent’s,
Perspective
Goals for Today
Cody’s Story
Set up Devices
Apps
Share
Overcoming Dyslexia
by Sally Shaywitz, M.D.
All rights reserved by Random House, Inc.
Cody’s Story
Coming to
the iBooks
store soon!
2. Set Up Devices
Text To Speech
a. Steps
i. In the Menu Bar, choose the Apple Icon
ii. Select “System Preferences”
iii. Click on “ Dictation and Speech”
iv. At the top, select “Text to Speech”
v. Check the box that says “Speak selected
text when the key is pressed”
vi. Take note of the specific key to press
“Current key: Option+Esc”
1. You can change that key if you like
vii. Choose a “system voice”
viii. Decide how fast or slow you like the to be
1. Slide the slider faster or slower and press
“Play” (to the right of the
slider) to test the speed
b. To use Text to Speech, follow these steps:
i. Find a set of text and highlight the words
you would like read
ii. Then press Option and Esc at the same
time
iii. Now the computer can read to you!
iPad
Macbook/iMac
	 a.	 Steps:
	 i.	 Go to “Settings” and
choose “General” then
“Accessibility”
	 ii.	 “Speech”
	 iii. “Speak Selection”
	 iv.	 “Speaking Rate”
	 v.	 Turn on, “Highlight Content”
	 vi.	 We decide whether or not
to turn on, “Speak Auto-Text”
	 b.	 Then we practice “Speak
Selection”
	 i.	 We open a page with text
on it, we tap and hold on a word,
stretch the selection handles and
choose, “Speak”
Speech to Text
a. To set up Speech to Text, follow these steps:
i. In the Menu Bar, choose the Apple Icon
ii.Select “System Preferences”
iii.Click on “ Dictation and Speech”
iv.At the top, select “Dictation”
v.Tap the circle that turns “Dictation On”
vi. It may ask if you would like to “Enable
Enhanced Dictation” and that is fine
b. To use Speech to Text, follow these steps:
i. Open an application where you would like to
put text (Pages, Keynote, Numbers, etc.)
ii.Double Tap the “Fn” key (Bottom left corner
of Macbook/wirelss keyboards, above the
arrow keys on the keyboard with numerical
keypad)
iii.Speak to the computer (with or without a
headset) and the computer will write down
what you say
iv.Notes:
1. When using a microphone, please go to
the Apple Icon
2. Select “System Preferences”
3. Click on “Sound”
4. Change the Input to your microphone,
if you are using a headset
iPad
Macbook/iMac
Open Editing App
Use Microphone
Add to iTunes as Spoken Text
iPad Macbook/iMac
a. Steps:
i. First make sure whatever program you
are in that you click on the name of the
Application, “Services” and then choose
“Services Preferences…”
ii.Then under “Text” make sure the “Add
to iTunes as Spoken Text”
b. To use this feature, follow these steps:
i. Highlight Text that you would like to
convert to speech
ii.Click on the name of the Application,
and select “Services”
iii. Select Add to iTunes as a Spoken
Track
iv. Then, go get your file in iTunes, you
can rename it if you like and add it to a
playlist
Not an Option
Captions
iPad
Macbook/iMac
a. Steps:
i.In the Menu Bar, choose the
Apple Icon
ii. Select “System Preferences”
iii. Click on “Accessibility”
iv. Select “Captions”
1. There are three choices;
Default, Classic and Large
Text
v. It is a good idea to check the
box for “Closed Captions and
SDH” so it will switch
automatically whenever closed
captions are available
a. One way to help students learn
to read is to leave captions on during all
videos; particularly when children are
young
b. To set up Captions, follow these
steps:
	 i.	 Go to “Settings” and choose
“General” then “Accessibility”
	 ii.	 Tap on “Subtitles &
Captioning”
	 iii. Slide the slider for “Closed
Captions +SDH” to on (it will turn
green)
Increase Contrast
a. Steps:
i.In the Menu Bar, choose the Apple
Icon
ii. Select “System Preferences”
iii. Click on “Accessibility”
iv. Find “Display” on the left side
1. Here there are several
adjustments that might be
helpful
a. Invert colors
b. Use grayscale
c. Differentiate without color
d. Increase contrast
e. Reduce Transparency
2. You can also make the cursor
and mouse larger (to make it
easier to track) by adjusting the
“Cursor Size”
iPad
Macbook/iMac
	 a.	 Many Students need a higher
screen contrast to allow their eyes and
brains to read the words
	 b.	 To increase the contrast, follow
these steps:
	 i.	 Go to “Settings” and
choose “General” then
“Accessibility”
	 ii.	 Tap on “Increase Contrast”
	 iii.	 There are three settings to
adjust in there
	 iv.	 Go back one level and
decide if inverting colors is more
beneficial for the student
VoiceOver
a. To enable Voice Over for the
iMac or Macbook, follow these
steps:
i.In the Menu Bar, choose the
Apple Icon
ii.Select “System Preferences”
iii. Click on “Accessibility”
iv. Choose VoiceOver –
However, you may want to
select the “Open VoiceOver
Training” first before you start
VoiceOver
b. You can use “Command+F5” to
get out of VoiceOver Mode
iPad
Macbook/iMac
* Accessibility Shortcut
* Command+F5
	 a.	 VoiceOver can be an ultimate game changer for
students with extremely low vision or those who are blind
	 i.	 Go to “Settings” and choose “General” then
“Accessibility”
	 ii.	 Tap on “VoiceOver”
	 iii.	 Before you turn “VoiceOver” on, you need
to know how to turn off “VoiceOver”
	 1.	 Sometimes a triple click of the Home
button will turn off the “VoiceOver” (This is usually
preset in the settings.)
	 2.	 When VoiceOver is on, Single tap to hear
VoiceOver and then double tap to select “Settings”
and choose “General” then “Accessibility”
“VoiceOver” and toggle “VoiceOver” off
	 3.	 Sometimes you can even get Siri to help
you turn off the “VoiceOver”
	 iv. Now, there are plenty of options to adjust here, so
take some time to go through each option
	 v.	 Then, toggle the “VoiceOver” switch to on (it
will turn green)
Zoom
a. My students love this feature!
Whether they have a print disability
or not, they love to zoom in on
things, especially while creating in
Photoshop or making a screencast.
b. To set up Zoom, follow these steps:
i.In the Menu Bar, choose the
Apple Icon
ii.Select “System Preferences”
iii. Click on “Accessibility”
iv. Select “Zoom”
v.Check the box that says “Use
scroll gesture with modifier keys
to zoom:”
c. To use the Zoom feature:
i.iMac: Hold “Control” while using
the mouse’s scroll ball
ii.Macbook: Hold “Control” while
using two fingers on the trackpad
iPad
Macbook/iMac
	 a.	 For students with low
vision, they may benefit from
the iOS feature of Zoom
	 i.	 Go to “Settings” and
choose “General” then
“Accessibility”
	 ii.	 Tap on “Zoom”
	 iii.	 Adjust any other
desired settings and start
3. Add Content
a. Application Process:
i.Create an account
ii. Turn in the Print Disability verification form
iii. Account gets approved (or not approved)
iv. To check eligibility
b. Price:
i.U.S. schools and students – free
ii. Other Individuals: $50 annually + $25 setup
1. (There are some discounts for low income countries available)
c. Playback:
i.Books can be read on computers, tablets, smartphones, MP3
players and assistive technology devices
ii. iOS Apps
iii. Formats
1. DAISY, audio, text, brf
a. Pros:
i.Free for U.S.
students
ii. Large collection of
books
iii. Many textbooks
available
iv. Accessible for
download anytime
a.Cons:
i.Computer sounding
voices - Although,
depending on the
app, for example
Voice Dream Reader,
the voices are quite
good and will
continue to get even
better
bookshare.org
Apps to Use with
Bookshare:
1. Read2Go
2. Capti
3. Voice Dream Reader
For more ways to listen
a. Application Process:
i.Complete Application
ii. Pay the fee
iii. To check eligibility
b. Price:
i.$119 per year for individual membership. Institutional
memberships are also available for K-12 schools, colleges and
universities at various pricing levels.
ii.Those with financial need can apply for assistance
c. Playback:
i. Android and iOS devices
ii. PC, Mac and Chromebook computers
iii. DAISY (Digital Accessible Information System) devices
d. Formats
i. Audio
ii. VOICEText
a.Pros:
i. Human read text
ii. Large Collection of
books
iii. Accessible for
download anytime
a.Cons:
i.Very expensive annual fee
learningally.org
Apps to Use with
Learning Ally:
Learning Ally
Apps to Add For Reading
Other Book/Audiobook Apps
1. There are other Apps that have
books and audiobooks for various fee
structures like the following list:
i. iBooks Store
ii. Kindle
iii. Audible
iv. Audiobooks
v. Downpour
vi. Scribd
vii. Overdrive
viii. NeoBook
ix. Librivox
x. Books by NewWind Software
xi. Audiobook Pop!
Several are specifically designed for young
children like:
i.Dr. Seuss by Oceanhouse Media
ii.and our new favorite Epic!
Learning Ally
Capti
Voice Dream Reader (&
Writer) voicedream.com
Apps to Add for Writing
• Pages
• Keynote
• Numbers
• Notes
• Google Drive
• Google Docs
• Google Sheets
• Google Slides
• Ginger
• iWordQ Typ-O HD Writing is for
Everybody! Writing support for
Dyslexics regardless of spelling
Other Resources for Students
with Print Disabilities
Open Dyslexic Font
Parents Helping Parents
Yale Center for Dyslexia and Creativity
Children’s Dyslexia Centers
Share
Tell someone near you, one story
that included technology and
helped a struggling reader
—RickRiordan.com
Rick Riordan, author of the Percy Jackson series
“Dyslexic kids are creative, ‘outside-the-box’ thinkers.
They have to be, because they don’t see or solve
problems the same way other kids do. In school,
unfortunately, they are sometimes written off as lazy,
unmotivated, rude or even stupid. They aren’t. Making
Percy dyslexic was my way of honoring the potential of
all the kids I’ve known who have those conditions. It’s not
a bad thing to be different. Sometimes, it’s the mark of
being very, very talented.”
Resources
• learningally.org
• bookshare.org
• http://ldaamerica.org/resources/resources-on-teaching-learning/
• http://dyslexia.yale.edu/book_Overcoming.html
• https://pixabay.com/en/accomplish-quote-motivation-1136863/
https://www.iconfinder.com/icons/763250/
audio_device_headphone_mp3_music_sound_icon#size=128
https://www.understood.org/en/learning-attention-issues/child-learning-
disabilities/dyslexia/great-quotes-about-dyslexia#slide-6
Thanks for Listening Today
Please give feedback for this session
Go to kbteched.com/print-disabilities-be-gone/ for
more information, the slides from today, and I will post
a link to download my book there as soon as it is ready

Setting up Accessibility Features

  • 1.
    Print Disabilities…Be Gone Astory form a Teacher’s, and Parent’s, Perspective
  • 2.
    Goals for Today Cody’sStory Set up Devices Apps Share
  • 4.
    Overcoming Dyslexia by SallyShaywitz, M.D. All rights reserved by Random House, Inc.
  • 5.
  • 6.
  • 7.
    2. Set UpDevices
  • 8.
    Text To Speech a.Steps i. In the Menu Bar, choose the Apple Icon ii. Select “System Preferences” iii. Click on “ Dictation and Speech” iv. At the top, select “Text to Speech” v. Check the box that says “Speak selected text when the key is pressed” vi. Take note of the specific key to press “Current key: Option+Esc” 1. You can change that key if you like vii. Choose a “system voice” viii. Decide how fast or slow you like the to be 1. Slide the slider faster or slower and press “Play” (to the right of the slider) to test the speed b. To use Text to Speech, follow these steps: i. Find a set of text and highlight the words you would like read ii. Then press Option and Esc at the same time iii. Now the computer can read to you! iPad Macbook/iMac a. Steps: i. Go to “Settings” and choose “General” then “Accessibility” ii. “Speech” iii. “Speak Selection” iv. “Speaking Rate” v. Turn on, “Highlight Content” vi. We decide whether or not to turn on, “Speak Auto-Text” b. Then we practice “Speak Selection” i. We open a page with text on it, we tap and hold on a word, stretch the selection handles and choose, “Speak”
  • 9.
    Speech to Text a.To set up Speech to Text, follow these steps: i. In the Menu Bar, choose the Apple Icon ii.Select “System Preferences” iii.Click on “ Dictation and Speech” iv.At the top, select “Dictation” v.Tap the circle that turns “Dictation On” vi. It may ask if you would like to “Enable Enhanced Dictation” and that is fine b. To use Speech to Text, follow these steps: i. Open an application where you would like to put text (Pages, Keynote, Numbers, etc.) ii.Double Tap the “Fn” key (Bottom left corner of Macbook/wirelss keyboards, above the arrow keys on the keyboard with numerical keypad) iii.Speak to the computer (with or without a headset) and the computer will write down what you say iv.Notes: 1. When using a microphone, please go to the Apple Icon 2. Select “System Preferences” 3. Click on “Sound” 4. Change the Input to your microphone, if you are using a headset iPad Macbook/iMac Open Editing App Use Microphone
  • 10.
    Add to iTunesas Spoken Text iPad Macbook/iMac a. Steps: i. First make sure whatever program you are in that you click on the name of the Application, “Services” and then choose “Services Preferences…” ii.Then under “Text” make sure the “Add to iTunes as Spoken Text” b. To use this feature, follow these steps: i. Highlight Text that you would like to convert to speech ii.Click on the name of the Application, and select “Services” iii. Select Add to iTunes as a Spoken Track iv. Then, go get your file in iTunes, you can rename it if you like and add it to a playlist Not an Option
  • 11.
    Captions iPad Macbook/iMac a. Steps: i.In theMenu Bar, choose the Apple Icon ii. Select “System Preferences” iii. Click on “Accessibility” iv. Select “Captions” 1. There are three choices; Default, Classic and Large Text v. It is a good idea to check the box for “Closed Captions and SDH” so it will switch automatically whenever closed captions are available a. One way to help students learn to read is to leave captions on during all videos; particularly when children are young b. To set up Captions, follow these steps: i. Go to “Settings” and choose “General” then “Accessibility” ii. Tap on “Subtitles & Captioning” iii. Slide the slider for “Closed Captions +SDH” to on (it will turn green)
  • 12.
    Increase Contrast a. Steps: i.Inthe Menu Bar, choose the Apple Icon ii. Select “System Preferences” iii. Click on “Accessibility” iv. Find “Display” on the left side 1. Here there are several adjustments that might be helpful a. Invert colors b. Use grayscale c. Differentiate without color d. Increase contrast e. Reduce Transparency 2. You can also make the cursor and mouse larger (to make it easier to track) by adjusting the “Cursor Size” iPad Macbook/iMac a. Many Students need a higher screen contrast to allow their eyes and brains to read the words b. To increase the contrast, follow these steps: i. Go to “Settings” and choose “General” then “Accessibility” ii. Tap on “Increase Contrast” iii. There are three settings to adjust in there iv. Go back one level and decide if inverting colors is more beneficial for the student
  • 13.
    VoiceOver a. To enableVoice Over for the iMac or Macbook, follow these steps: i.In the Menu Bar, choose the Apple Icon ii.Select “System Preferences” iii. Click on “Accessibility” iv. Choose VoiceOver – However, you may want to select the “Open VoiceOver Training” first before you start VoiceOver b. You can use “Command+F5” to get out of VoiceOver Mode iPad Macbook/iMac * Accessibility Shortcut * Command+F5 a. VoiceOver can be an ultimate game changer for students with extremely low vision or those who are blind i. Go to “Settings” and choose “General” then “Accessibility” ii. Tap on “VoiceOver” iii. Before you turn “VoiceOver” on, you need to know how to turn off “VoiceOver” 1. Sometimes a triple click of the Home button will turn off the “VoiceOver” (This is usually preset in the settings.) 2. When VoiceOver is on, Single tap to hear VoiceOver and then double tap to select “Settings” and choose “General” then “Accessibility” “VoiceOver” and toggle “VoiceOver” off 3. Sometimes you can even get Siri to help you turn off the “VoiceOver” iv. Now, there are plenty of options to adjust here, so take some time to go through each option v. Then, toggle the “VoiceOver” switch to on (it will turn green)
  • 14.
    Zoom a. My studentslove this feature! Whether they have a print disability or not, they love to zoom in on things, especially while creating in Photoshop or making a screencast. b. To set up Zoom, follow these steps: i.In the Menu Bar, choose the Apple Icon ii.Select “System Preferences” iii. Click on “Accessibility” iv. Select “Zoom” v.Check the box that says “Use scroll gesture with modifier keys to zoom:” c. To use the Zoom feature: i.iMac: Hold “Control” while using the mouse’s scroll ball ii.Macbook: Hold “Control” while using two fingers on the trackpad iPad Macbook/iMac a. For students with low vision, they may benefit from the iOS feature of Zoom i. Go to “Settings” and choose “General” then “Accessibility” ii. Tap on “Zoom” iii. Adjust any other desired settings and start
  • 15.
  • 16.
    a. Application Process: i.Createan account ii. Turn in the Print Disability verification form iii. Account gets approved (or not approved) iv. To check eligibility b. Price: i.U.S. schools and students – free ii. Other Individuals: $50 annually + $25 setup 1. (There are some discounts for low income countries available) c. Playback: i.Books can be read on computers, tablets, smartphones, MP3 players and assistive technology devices ii. iOS Apps iii. Formats 1. DAISY, audio, text, brf
  • 17.
    a. Pros: i.Free forU.S. students ii. Large collection of books iii. Many textbooks available iv. Accessible for download anytime a.Cons: i.Computer sounding voices - Although, depending on the app, for example Voice Dream Reader, the voices are quite good and will continue to get even better bookshare.org
  • 18.
    Apps to Usewith Bookshare: 1. Read2Go 2. Capti 3. Voice Dream Reader For more ways to listen
  • 19.
    a. Application Process: i.CompleteApplication ii. Pay the fee iii. To check eligibility b. Price: i.$119 per year for individual membership. Institutional memberships are also available for K-12 schools, colleges and universities at various pricing levels. ii.Those with financial need can apply for assistance c. Playback: i. Android and iOS devices ii. PC, Mac and Chromebook computers iii. DAISY (Digital Accessible Information System) devices d. Formats i. Audio ii. VOICEText
  • 20.
    a.Pros: i. Human readtext ii. Large Collection of books iii. Accessible for download anytime a.Cons: i.Very expensive annual fee learningally.org
  • 21.
    Apps to Usewith Learning Ally: Learning Ally
  • 22.
    Apps to AddFor Reading Other Book/Audiobook Apps 1. There are other Apps that have books and audiobooks for various fee structures like the following list: i. iBooks Store ii. Kindle iii. Audible iv. Audiobooks v. Downpour vi. Scribd vii. Overdrive viii. NeoBook ix. Librivox x. Books by NewWind Software xi. Audiobook Pop! Several are specifically designed for young children like: i.Dr. Seuss by Oceanhouse Media ii.and our new favorite Epic! Learning Ally Capti Voice Dream Reader (& Writer) voicedream.com
  • 23.
    Apps to Addfor Writing • Pages • Keynote • Numbers • Notes • Google Drive • Google Docs • Google Sheets • Google Slides • Ginger • iWordQ Typ-O HD Writing is for Everybody! Writing support for Dyslexics regardless of spelling
  • 24.
    Other Resources forStudents with Print Disabilities Open Dyslexic Font Parents Helping Parents Yale Center for Dyslexia and Creativity Children’s Dyslexia Centers
  • 25.
    Share Tell someone nearyou, one story that included technology and helped a struggling reader
  • 26.
    —RickRiordan.com Rick Riordan, authorof the Percy Jackson series “Dyslexic kids are creative, ‘outside-the-box’ thinkers. They have to be, because they don’t see or solve problems the same way other kids do. In school, unfortunately, they are sometimes written off as lazy, unmotivated, rude or even stupid. They aren’t. Making Percy dyslexic was my way of honoring the potential of all the kids I’ve known who have those conditions. It’s not a bad thing to be different. Sometimes, it’s the mark of being very, very talented.”
  • 27.
    Resources • learningally.org • bookshare.org •http://ldaamerica.org/resources/resources-on-teaching-learning/ • http://dyslexia.yale.edu/book_Overcoming.html • https://pixabay.com/en/accomplish-quote-motivation-1136863/ https://www.iconfinder.com/icons/763250/ audio_device_headphone_mp3_music_sound_icon#size=128 https://www.understood.org/en/learning-attention-issues/child-learning- disabilities/dyslexia/great-quotes-about-dyslexia#slide-6
  • 28.
    Thanks for ListeningToday Please give feedback for this session Go to kbteched.com/print-disabilities-be-gone/ for more information, the slides from today, and I will post a link to download my book there as soon as it is ready