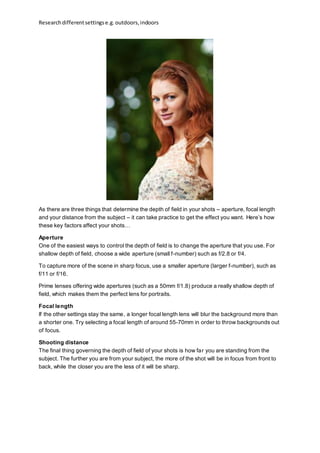
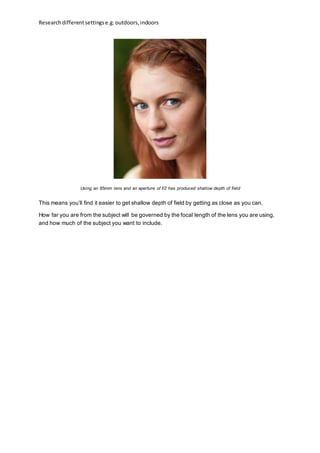
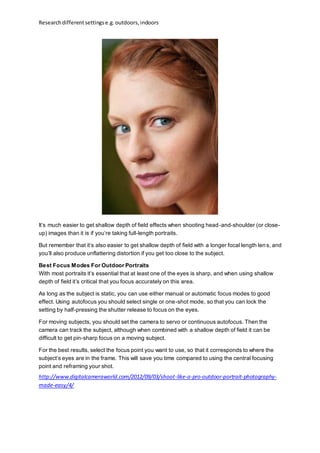
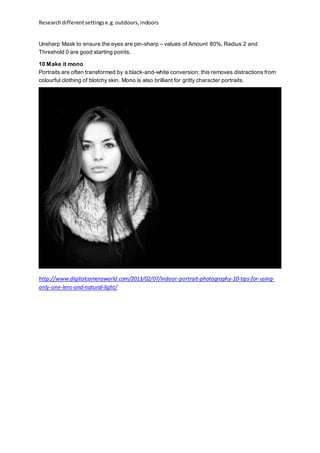
SlideShare a Scribd company logo
Researchdifferentsettingse.g.outdoors,indoors
OutdoorPortraitoutdoorsettings –
‘Blurring the background isthekey to classic portraitshots,to direct attention to the main subject.
Using a standard zoomlens,setthe focallength to between 50 and 100mm. Set yourcamera to
AperturePriority and select the largestapertureavailableon yourlens,such as f/4 or f/5.6.
While theapertureand the depthof field are important,you also need to watch the shutterspeed.
Makesure you’reusing a shutterspeed of at least 1/125sec to freezeany camera shakeor subject
movement.You also need to set the Autofocusmodeto singleorone shot,and select the focuspoint
so thatit’s overthe eye of the subject.’
Location
One of the great things about outdoor portrait photography is that you can shoot almost
anywhere, from your back garden to a glorious tropical beach. But it’s important to know how to
get the most out of any location you choose.
There are few hard and fast rules when it comes to working a location. If the location adds to
your portrait, you can include the background, but if the location isn’t particularly photogenic, try
using limited depth of field or tight framing to concentrate attention on your subject.
For the most striking portraits, it’s often best to keep things simple, so try to shoot against
uncluttered backgrounds such as the sky, a wall or foliage. This will help your subject stand out.
However, like most rules, there are times when it’s best to break them – particularly when you’re
shooting environmental portraits where you want to show the surroundings almost as much as
the subject itself.
Composition and framing
Try to position either your subject’s face (on a half or full-length portrait) or eyes (on a head-and-
shoulders or close-up shot) using the rule of thirds. This gives a much more balanced
composition than if they are in the centre of the frame.
When shooting closer than full length, you’ll need to think carefully about framing. A good rule of
thumb is to avoid cropping the portrait so that any joints such as knees or elbows come too close
to the edges of the frame.
http://www.digitalcameraworld.com/2012/09/03/shoot-like-a-pro-outdoor-portrait-photography-
made-easy/2/
01 Find yourself some shade
A simple solution is to position your model in a shady area. Don’t forget to watch the white
balance setting though. If the background is still in bright sunlight it can make your model’s skin
look too blue, because it will choose a daylight white balance, rather than shade.
Researchdifferentsettingse.g.outdoors,indoors
02 Wait for some cloud
If you can’t find any shade, and there are some clouds in the sky, you can try waiting for the sun
to disappear behind cloud for a natural diffused effect.
Shooting in changing light means that you’ll need to work quickly to get your shots though, and
you also need to watch the exposure.
Make sure that you set the exposure for the model, rather than a bright or dark background.
03 Diffuse the light
If there aren’t any clouds to diffuse harsh light, you can get a similar effect by holding a diffuser
between the subject and the sun. The diffuser can be as simple as a piece of translucent white
cloth or one made specifically for the purpose.
This works very well for head-and-shoulders portraits,but it can be impossible to find a big
enough diffuser to diffuse the lightfor a half- or full-length shot.
Even for head-and-shoulders shots you’ll find it much easier if you have a willing assistant to hold
the diffuser in position.
04 Shoot into the light
For a completely different look, try getting your model to face away from the sun, and shoot into
the light. You’ll need to avoid under-exposure, because the bright background will fool your
camera’s meter. Try using 
+1 or +2 stops of Exposure Compensation
http://www.digitalcameraworld.com/2012/09/03/shoot-like-a-pro-outdoor-portrait-photography-
made-easy/3/
Researchdifferentsettingse.g.outdoors,indoors
As there are three things that determine the depth of field in your shots – aperture, focal length
and your distance from the subject – it can take practice to get the effect you want. Here’s how
these key factors affect your shots…
Aperture
One of the easiest ways to control the depth of field is to change the aperture that you use. For
shallow depth of field, choose a wide aperture (small f-number) such as f/2.8 or f/4.
To capture more of the scene in sharp focus, use a smaller aperture (larger f-number), such as
f/11 or f/16.
Prime lenses offering wide apertures (such as a 50mm f/1.8) produce a really shallow depth of
field, which makes them the perfect lens for portraits.
Focal length
If the other settings stay the same, a longer focal length lens will blur the background more than
a shorter one. Try selecting a focal length of around 55-70mm in order to throw backgrounds out
of focus.
Shooting distance
The final thing governing the depth of field of your shots is how far you are standing from the
subject. The further you are from your subject, the more of the shot will be in focus from front to
back, while the closer you are the less of it will be sharp.
Researchdifferentsettingse.g.outdoors,indoors
Using an 85mm lens and an aperture of f/2 has produced shallow depth of field
This means you’ll find it easier to get shallow depth of field by getting as close as you can.
How far you are from the subject will be governed by the focal length of the lens you are using,
and how much of the subject you want to include.
Researchdifferentsettingse.g.outdoors,indoors
It’s much easier to get shallow depth of field effects when shooting head-and-shoulder (or close-
up) images than it is if you’re taking full-length portraits.
But remember that it’s also easier to get shallow depth of field with a longer focal length lens, and
you’ll also produce unflattering distortion if you get too close to the subject.
Best Focus Modes For Outdoor Portraits
With most portraits it’s essential that at least one of the eyes is sharp, and when using shallow
depth of field it’s critical that you focus accurately on this area.
As long as the subject is static, you can use either manual or automatic focus modes to good
effect. Using autofocus you should select single or one-shot mode, so that you can lock the
setting by half-pressing the shutter release to focus on the eyes.
For moving subjects, you should set the camera to servo or continuous autofocus. Then the
camera can track the subject, although when combined with a shallow depth of field it can be
difficult to get pin-sharp focus on a moving subject.
For the best results, select the focus point you want to use, so that it corresponds to where the
subject’s eyes are in the frame. This will save you time compared to using the central focusing
point and reframing your shot.
http://www.digitalcameraworld.com/2012/09/03/shoot-like-a-pro-outdoor-portrait-photography-
made-easy/4/
Researchdifferentsettingse.g.outdoors,indoors
IndoorPortraitSettings -
01 Use window light
Place your subject close to a window to make the most of any available natural light – this will
generally give more flattering results than flash-lit shots.
02 A little reflection
A reflector is invaluable for filling in shadows on faces. Position it on the opposite side of your
subject to the window, and slightly below them to reflect light back onto their features.
03 Go prime
A focal length of around 85mm is the classic choice for portraits; wide-angle lenses can contort
facial features when shooting up close, while telephoto lenses are impractical. If you’re using a
crop-sensor camera, then a using a prime lens like Canon’s budget EF 50mm f/1.8 lens will give
you an effective focal length of 80mm and has a wonderfully wide f/1.8 aperture.
04 Use a wide aperture
When shooting indoors, set Aperture Priority mode and select a wide aperture (such as f/2.8 or
greater). This will not only allow you to make the most of the lower light levels, but will also give
you a shallow depth of field that will help your subjects stand out from cluttered backgrounds.
05 Up the ISO
To avoid camera shake, you need to select a shutter speed of at least ‘one over’ the effective
focal length – so for 85mm you’d need 1/100 sec or faster. Shooting indoor portrait photography
in low light will mean you’re likely to need to shoot at ISO 800 or 1600 to obtain a good shutter
speed. While higher ISOs mean more image noise, this is very well controlled in most recent
DSLRs, and a little noise is far preferable to a shaky shot.
06 It’s all about the eyes
Getting your focus spot-on for portraits is critical – always focus on the eyes (or the nearest eye,
if your subject isn’t square-on to you). Switch to the single AF point mode and use one of the off-
centre AF points for sharp focusing and to help improve your compositions. If you use the central
AF point and focus and recompose, when shooting with a shallow DoF, you may end up with a
pin-sharp nose but out-of-focus eyes.
07 Find a model
It goes without saying the some people are more photogenic than others, so it may be worth
engaging the services of a model. Websites such as Model Mayhem are great places to find
willing subjects, and many models starting out will do it for free, in exchange for images for their
portfolio.
08 Keep up the rapport
You’ll get better portraits if you really engage with your subjects. Give them direction for their
poses and offer encouragement. Showyour subjects your shots on the LCD every so often 
so
they can see how good they look!
09 Make them pop
A simple Photoshop workflow will help make your portraits pop. Once you’ve processed theraw
format file, use a Levels adjustment layer to selectively brighten the eyes and teeth, and use the
Researchdifferentsettingse.g.outdoors,indoors
Unsharp Mask to ensure the eyes are pin-sharp – values of Amount 80%, Radius 2 and
Threshold 0 are good starting points.
10 Make it mono
Portraits are often transformed by a black-and-white conversion; this removes distractions from
colourful clothing of blotchy skin. Mono is also brilliant for gritty character portraits.
http://www.digitalcameraworld.com/2013/02/07/indoor-portrait-photography-10-tips-for-using-
only-one-lens-and-natural-light/
Researchdifferentsettingse.g.outdoors,indoors
Tips
http://www.digitalcameraworld.com/2014/07/2
5/24-of-our-most-popular-photography-cheat-
sheets/

More Related Content

What's hot

Lesson 8 • Focus & Lighting Introduction
Lesson 8 • Focus & Lighting IntroductionLesson 8 • Focus & Lighting Introduction
Lesson 8 • Focus & Lighting Introduction
Marcio Sargento
 
PhotographyTerminologyComplete
PhotographyTerminologyCompletePhotographyTerminologyComplete
PhotographyTerminologyCompleteChloeKyri
 
Lesson 1b Depth Of Field
Lesson 1b Depth Of FieldLesson 1b Depth Of Field
Lesson 1b Depth Of Field
hweeling
 
Basic photography depth of field
Basic photography   depth of fieldBasic photography   depth of field
Basic photography depth of fieldJimi Kayode
 
Close-up Photography
Close-up PhotographyClose-up Photography
Close-up Photographyjoelk
 
Understanding photography part 2
Understanding photography   part 2Understanding photography   part 2
Understanding photography part 2
Faisal Sohail
 
Art of Photography by Vivek Desai
Art of Photography by Vivek DesaiArt of Photography by Vivek Desai
Art of Photography by Vivek Desai
Anikait Chavan
 
Aperture
ApertureAperture
Aperture
Meredith Hudson
 
Depth of field
Depth of fieldDepth of field
Depth of field
Jessica Young
 
Basic Photography by Majid Pandit
Basic Photography by Majid PanditBasic Photography by Majid Pandit
Basic Photography by Majid Pandit
Majid Pandit
 
Wk 5 Camera techniques
Wk 5 Camera techniquesWk 5 Camera techniques
Wk 5 Camera techniquesClarke ECE
 
Lens Power Point Presentation.
Lens Power Point Presentation.Lens Power Point Presentation.
Lens Power Point Presentation.
John Munno
 
Photography course, class 1
Photography course, class 1Photography course, class 1
Photography course, class 1SeppoToikka
 
11 surefire landscape photography tips
11 surefire landscape photography tips11 surefire landscape photography tips
11 surefire landscape photography tipsLady Lee
 
Cool Photography Techniques
Cool Photography TechniquesCool Photography Techniques
Cool Photography Techniques
Abigail Sullivan
 
Landscape Focus Stacking for Photography
Landscape Focus Stacking for PhotographyLandscape Focus Stacking for Photography
Landscape Focus Stacking for Photography
Kurian Thayil
 
Digital Photography Basics with Jason Barnette
Digital Photography Basics with Jason BarnetteDigital Photography Basics with Jason Barnette
Digital Photography Basics with Jason BarnetteAAF SWVA
 
Fundamental of lens in photography
Fundamental of lens in photographyFundamental of lens in photography
Fundamental of lens in photography
Anindya Das
 

What's hot (20)

Lesson 8 • Focus & Lighting Introduction
Lesson 8 • Focus & Lighting IntroductionLesson 8 • Focus & Lighting Introduction
Lesson 8 • Focus & Lighting Introduction
 
Basic Photography
Basic PhotographyBasic Photography
Basic Photography
 
PhotographyTerminologyComplete
PhotographyTerminologyCompletePhotographyTerminologyComplete
PhotographyTerminologyComplete
 
Lesson 1b Depth Of Field
Lesson 1b Depth Of FieldLesson 1b Depth Of Field
Lesson 1b Depth Of Field
 
Basic photography depth of field
Basic photography   depth of fieldBasic photography   depth of field
Basic photography depth of field
 
Close-up Photography
Close-up PhotographyClose-up Photography
Close-up Photography
 
Understanding photography part 2
Understanding photography   part 2Understanding photography   part 2
Understanding photography part 2
 
Art of Photography by Vivek Desai
Art of Photography by Vivek DesaiArt of Photography by Vivek Desai
Art of Photography by Vivek Desai
 
Aperture
ApertureAperture
Aperture
 
Depth of field
Depth of fieldDepth of field
Depth of field
 
Basic Photography by Majid Pandit
Basic Photography by Majid PanditBasic Photography by Majid Pandit
Basic Photography by Majid Pandit
 
Wk 5 Camera techniques
Wk 5 Camera techniquesWk 5 Camera techniques
Wk 5 Camera techniques
 
Lens Power Point Presentation.
Lens Power Point Presentation.Lens Power Point Presentation.
Lens Power Point Presentation.
 
Photography course, class 1
Photography course, class 1Photography course, class 1
Photography course, class 1
 
11 surefire landscape photography tips
11 surefire landscape photography tips11 surefire landscape photography tips
11 surefire landscape photography tips
 
Cool Photography Techniques
Cool Photography TechniquesCool Photography Techniques
Cool Photography Techniques
 
Camera Lens
Camera LensCamera Lens
Camera Lens
 
Landscape Focus Stacking for Photography
Landscape Focus Stacking for PhotographyLandscape Focus Stacking for Photography
Landscape Focus Stacking for Photography
 
Digital Photography Basics with Jason Barnette
Digital Photography Basics with Jason BarnetteDigital Photography Basics with Jason Barnette
Digital Photography Basics with Jason Barnette
 
Fundamental of lens in photography
Fundamental of lens in photographyFundamental of lens in photography
Fundamental of lens in photography
 

Similar to Task 2 research different settings

10 Photography Tips That Makes You Professional
10 Photography Tips That Makes You Professional10 Photography Tips That Makes You Professional
10 Photography Tips That Makes You Professional
Ashik Pervez
 
A Beginners Guide to Portrait Photography: 6 Tips
A Beginners Guide to Portrait Photography: 6 TipsA Beginners Guide to Portrait Photography: 6 Tips
A Beginners Guide to Portrait Photography: 6 Tips
Tristan Taylor
 
Basic Photography Lesson
Basic Photography LessonBasic Photography Lesson
Basic Photography Lesson
hweeling
 
Masood Aini | Tips and Tricks For Professional Photography
Masood Aini | Tips and Tricks For Professional PhotographyMasood Aini | Tips and Tricks For Professional Photography
Masood Aini | Tips and Tricks For Professional Photography
Masoodaini1
 
Photography introduction
Photography introductionPhotography introduction
Photography introductionErin Hogshead
 
Creative lens-techniques
Creative lens-techniquesCreative lens-techniques
Creative lens-techniques
Lewis Simon
 
How to get the most sharp and focused photos: iPhone Photography Tips and Tricks
How to get the most sharp and focused photos: iPhone Photography Tips and TricksHow to get the most sharp and focused photos: iPhone Photography Tips and Tricks
How to get the most sharp and focused photos: iPhone Photography Tips and Tricks
Ram Chary Everi
 
02 25-16lecturephotocomposition-160225155509
02 25-16lecturephotocomposition-16022515550902 25-16lecturephotocomposition-160225155509
02 25-16lecturephotocomposition-160225155509
Sung Woo Yoo
 
02 25-16 lecture photo composition.
02 25-16 lecture photo composition.02 25-16 lecture photo composition.
02 25-16 lecture photo composition.
Sung Woo Yoo
 
Creative tips to help you capture stunning floral photography
Creative tips to help you capture stunning floral photographyCreative tips to help you capture stunning floral photography
Creative tips to help you capture stunning floral photography
Leo Erwin Garcia
 
Low light photography 40 pro tips for any situation
Low light photography 40 pro tips for any situationLow light photography 40 pro tips for any situation
Low light photography 40 pro tips for any situationStephanie Mizzi
 
Low light photography 40 pro tips for any situation
Low light photography 40 pro tips for any situationLow light photography 40 pro tips for any situation
Low light photography 40 pro tips for any situationStephanie Mizzi
 
Kodak easysharez981
Kodak easysharez981Kodak easysharez981
Kodak easysharez981easyshare45
 
Intro to photography
Intro to photographyIntro to photography
Intro to photographywhit1987ney
 
Night photography - AWCL Photography group
Night photography - AWCL Photography groupNight photography - AWCL Photography group
Night photography - AWCL Photography group
Heather Jones
 
Cat fotografia
Cat fotografiaCat fotografia
Cat fotografialucepa
 
How to take better photographs
How to take better photographsHow to take better photographs
How to take better photographs
Khada Nanda Acharya
 
Camera angles and photography
Camera angles and photographyCamera angles and photography
Camera angles and photography
CoombeMedia1
 
Best Macro photography Tips and Ideas
Best Macro photography Tips and IdeasBest Macro photography Tips and Ideas
Best Macro photography Tips and Ideas
DreamsDiary
 
Digital photography-tip
Digital photography-tipDigital photography-tip
Digital photography-tip
Yasir Khan
 

Similar to Task 2 research different settings (20)

10 Photography Tips That Makes You Professional
10 Photography Tips That Makes You Professional10 Photography Tips That Makes You Professional
10 Photography Tips That Makes You Professional
 
A Beginners Guide to Portrait Photography: 6 Tips
A Beginners Guide to Portrait Photography: 6 TipsA Beginners Guide to Portrait Photography: 6 Tips
A Beginners Guide to Portrait Photography: 6 Tips
 
Basic Photography Lesson
Basic Photography LessonBasic Photography Lesson
Basic Photography Lesson
 
Masood Aini | Tips and Tricks For Professional Photography
Masood Aini | Tips and Tricks For Professional PhotographyMasood Aini | Tips and Tricks For Professional Photography
Masood Aini | Tips and Tricks For Professional Photography
 
Photography introduction
Photography introductionPhotography introduction
Photography introduction
 
Creative lens-techniques
Creative lens-techniquesCreative lens-techniques
Creative lens-techniques
 
How to get the most sharp and focused photos: iPhone Photography Tips and Tricks
How to get the most sharp and focused photos: iPhone Photography Tips and TricksHow to get the most sharp and focused photos: iPhone Photography Tips and Tricks
How to get the most sharp and focused photos: iPhone Photography Tips and Tricks
 
02 25-16lecturephotocomposition-160225155509
02 25-16lecturephotocomposition-16022515550902 25-16lecturephotocomposition-160225155509
02 25-16lecturephotocomposition-160225155509
 
02 25-16 lecture photo composition.
02 25-16 lecture photo composition.02 25-16 lecture photo composition.
02 25-16 lecture photo composition.
 
Creative tips to help you capture stunning floral photography
Creative tips to help you capture stunning floral photographyCreative tips to help you capture stunning floral photography
Creative tips to help you capture stunning floral photography
 
Low light photography 40 pro tips for any situation
Low light photography 40 pro tips for any situationLow light photography 40 pro tips for any situation
Low light photography 40 pro tips for any situation
 
Low light photography 40 pro tips for any situation
Low light photography 40 pro tips for any situationLow light photography 40 pro tips for any situation
Low light photography 40 pro tips for any situation
 
Kodak easysharez981
Kodak easysharez981Kodak easysharez981
Kodak easysharez981
 
Intro to photography
Intro to photographyIntro to photography
Intro to photography
 
Night photography - AWCL Photography group
Night photography - AWCL Photography groupNight photography - AWCL Photography group
Night photography - AWCL Photography group
 
Cat fotografia
Cat fotografiaCat fotografia
Cat fotografia
 
How to take better photographs
How to take better photographsHow to take better photographs
How to take better photographs
 
Camera angles and photography
Camera angles and photographyCamera angles and photography
Camera angles and photography
 
Best Macro photography Tips and Ideas
Best Macro photography Tips and IdeasBest Macro photography Tips and Ideas
Best Macro photography Tips and Ideas
 
Digital photography-tip
Digital photography-tipDigital photography-tip
Digital photography-tip
 

More from wolllfie

Production comentary
Production comentaryProduction comentary
Production comentarywolllfie
 
Task 4 final images landscape
Task 4 final images landscapeTask 4 final images landscape
Task 4 final images landscapewolllfie
 
Pr9 – sourcing images
Pr9 – sourcing imagesPr9 – sourcing images
Pr9 – sourcing imageswolllfie
 
Task 4 final images landscape
Task 4 final images landscapeTask 4 final images landscape
Task 4 final images landscapewolllfie
 
Olivia singleton fmp diary main
Olivia singleton fmp diary mainOlivia singleton fmp diary main
Olivia singleton fmp diary mainwolllfie
 
Magazine research
Magazine researchMagazine research
Magazine researchwolllfie
 
Task 1 part 2
Task 1 part 2Task 1 part 2
Task 1 part 2wolllfie
 
Task 1 part 1
Task 1 part 1Task 1 part 1
Task 1 part 1wolllfie
 
Review on dan's work
Review on dan's workReview on dan's work
Review on dan's workwolllfie
 
New evaluation fmp completed
New evaluation fmp completedNew evaluation fmp completed
New evaluation fmp completedwolllfie
 
Task 7 previous work
Task 7 previous workTask 7 previous work
Task 7 previous workwolllfie
 
Task 6 research magazine covers
Task 6 research magazine coversTask 6 research magazine covers
Task 6 research magazine coverswolllfie
 
Task 5 research styles of makeup and hair
Task 5 research styles of makeup and hairTask 5 research styles of makeup and hair
Task 5 research styles of makeup and hairwolllfie
 
Task 4 photography theme ideas
Task 4 photography theme ideasTask 4 photography theme ideas
Task 4 photography theme ideaswolllfie
 
Task 3 mind map ideas
Task 3 mind map ideasTask 3 mind map ideas
Task 3 mind map ideaswolllfie
 
Task 1 research famous portrait photographers
Task 1 research famous portrait photographersTask 1 research famous portrait photographers
Task 1 research famous portrait photographerswolllfie
 
Unit 51 page layout & design task 2
Unit 51 page layout & design task 2Unit 51 page layout & design task 2
Unit 51 page layout & design task 2wolllfie
 

More from wolllfie (20)

Production comentary
Production comentaryProduction comentary
Production comentary
 
Task 4 final images landscape
Task 4 final images landscapeTask 4 final images landscape
Task 4 final images landscape
 
Pr10
Pr10Pr10
Pr10
 
Pr9 – sourcing images
Pr9 – sourcing imagesPr9 – sourcing images
Pr9 – sourcing images
 
Task 4 final images landscape
Task 4 final images landscapeTask 4 final images landscape
Task 4 final images landscape
 
Olivia singleton fmp diary main
Olivia singleton fmp diary mainOlivia singleton fmp diary main
Olivia singleton fmp diary main
 
Magazine research
Magazine researchMagazine research
Magazine research
 
Task 1 part 2
Task 1 part 2Task 1 part 2
Task 1 part 2
 
Task 1 part 1
Task 1 part 1Task 1 part 1
Task 1 part 1
 
Review on dan's work
Review on dan's workReview on dan's work
Review on dan's work
 
New evaluation fmp completed
New evaluation fmp completedNew evaluation fmp completed
New evaluation fmp completed
 
Task 7 previous work
Task 7 previous workTask 7 previous work
Task 7 previous work
 
Task 6 research magazine covers
Task 6 research magazine coversTask 6 research magazine covers
Task 6 research magazine covers
 
Task 5 research styles of makeup and hair
Task 5 research styles of makeup and hairTask 5 research styles of makeup and hair
Task 5 research styles of makeup and hair
 
Task 4 photography theme ideas
Task 4 photography theme ideasTask 4 photography theme ideas
Task 4 photography theme ideas
 
Task 3 mind map ideas
Task 3 mind map ideasTask 3 mind map ideas
Task 3 mind map ideas
 
Task 1 research famous portrait photographers
Task 1 research famous portrait photographersTask 1 research famous portrait photographers
Task 1 research famous portrait photographers
 
Unit 51 page layout & design task 2
Unit 51 page layout & design task 2Unit 51 page layout & design task 2
Unit 51 page layout & design task 2
 
Db17 new
Db17 newDb17 new
Db17 new
 
Db17
Db17Db17
Db17
 

Task 2 research different settings

  • 1. Researchdifferentsettingse.g.outdoors,indoors OutdoorPortraitoutdoorsettings – ‘Blurring the background isthekey to classic portraitshots,to direct attention to the main subject. Using a standard zoomlens,setthe focallength to between 50 and 100mm. Set yourcamera to AperturePriority and select the largestapertureavailableon yourlens,such as f/4 or f/5.6. While theapertureand the depthof field are important,you also need to watch the shutterspeed. Makesure you’reusing a shutterspeed of at least 1/125sec to freezeany camera shakeor subject movement.You also need to set the Autofocusmodeto singleorone shot,and select the focuspoint so thatit’s overthe eye of the subject.’ Location One of the great things about outdoor portrait photography is that you can shoot almost anywhere, from your back garden to a glorious tropical beach. But it’s important to know how to get the most out of any location you choose. There are few hard and fast rules when it comes to working a location. If the location adds to your portrait, you can include the background, but if the location isn’t particularly photogenic, try using limited depth of field or tight framing to concentrate attention on your subject. For the most striking portraits, it’s often best to keep things simple, so try to shoot against uncluttered backgrounds such as the sky, a wall or foliage. This will help your subject stand out. However, like most rules, there are times when it’s best to break them – particularly when you’re shooting environmental portraits where you want to show the surroundings almost as much as the subject itself. Composition and framing Try to position either your subject’s face (on a half or full-length portrait) or eyes (on a head-and- shoulders or close-up shot) using the rule of thirds. This gives a much more balanced composition than if they are in the centre of the frame. When shooting closer than full length, you’ll need to think carefully about framing. A good rule of thumb is to avoid cropping the portrait so that any joints such as knees or elbows come too close to the edges of the frame. http://www.digitalcameraworld.com/2012/09/03/shoot-like-a-pro-outdoor-portrait-photography- made-easy/2/ 01 Find yourself some shade A simple solution is to position your model in a shady area. Don’t forget to watch the white balance setting though. If the background is still in bright sunlight it can make your model’s skin look too blue, because it will choose a daylight white balance, rather than shade.
  • 2. Researchdifferentsettingse.g.outdoors,indoors 02 Wait for some cloud If you can’t find any shade, and there are some clouds in the sky, you can try waiting for the sun to disappear behind cloud for a natural diffused effect. Shooting in changing light means that you’ll need to work quickly to get your shots though, and you also need to watch the exposure. Make sure that you set the exposure for the model, rather than a bright or dark background. 03 Diffuse the light If there aren’t any clouds to diffuse harsh light, you can get a similar effect by holding a diffuser between the subject and the sun. The diffuser can be as simple as a piece of translucent white cloth or one made specifically for the purpose. This works very well for head-and-shoulders portraits,but it can be impossible to find a big enough diffuser to diffuse the lightfor a half- or full-length shot. Even for head-and-shoulders shots you’ll find it much easier if you have a willing assistant to hold the diffuser in position. 04 Shoot into the light For a completely different look, try getting your model to face away from the sun, and shoot into the light. You’ll need to avoid under-exposure, because the bright background will fool your camera’s meter. Try using 
+1 or +2 stops of Exposure Compensation http://www.digitalcameraworld.com/2012/09/03/shoot-like-a-pro-outdoor-portrait-photography- made-easy/3/
  • 3. Researchdifferentsettingse.g.outdoors,indoors As there are three things that determine the depth of field in your shots – aperture, focal length and your distance from the subject – it can take practice to get the effect you want. Here’s how these key factors affect your shots… Aperture One of the easiest ways to control the depth of field is to change the aperture that you use. For shallow depth of field, choose a wide aperture (small f-number) such as f/2.8 or f/4. To capture more of the scene in sharp focus, use a smaller aperture (larger f-number), such as f/11 or f/16. Prime lenses offering wide apertures (such as a 50mm f/1.8) produce a really shallow depth of field, which makes them the perfect lens for portraits. Focal length If the other settings stay the same, a longer focal length lens will blur the background more than a shorter one. Try selecting a focal length of around 55-70mm in order to throw backgrounds out of focus. Shooting distance The final thing governing the depth of field of your shots is how far you are standing from the subject. The further you are from your subject, the more of the shot will be in focus from front to back, while the closer you are the less of it will be sharp.
  • 4. Researchdifferentsettingse.g.outdoors,indoors Using an 85mm lens and an aperture of f/2 has produced shallow depth of field This means you’ll find it easier to get shallow depth of field by getting as close as you can. How far you are from the subject will be governed by the focal length of the lens you are using, and how much of the subject you want to include.
  • 5. Researchdifferentsettingse.g.outdoors,indoors It’s much easier to get shallow depth of field effects when shooting head-and-shoulder (or close- up) images than it is if you’re taking full-length portraits. But remember that it’s also easier to get shallow depth of field with a longer focal length lens, and you’ll also produce unflattering distortion if you get too close to the subject. Best Focus Modes For Outdoor Portraits With most portraits it’s essential that at least one of the eyes is sharp, and when using shallow depth of field it’s critical that you focus accurately on this area. As long as the subject is static, you can use either manual or automatic focus modes to good effect. Using autofocus you should select single or one-shot mode, so that you can lock the setting by half-pressing the shutter release to focus on the eyes. For moving subjects, you should set the camera to servo or continuous autofocus. Then the camera can track the subject, although when combined with a shallow depth of field it can be difficult to get pin-sharp focus on a moving subject. For the best results, select the focus point you want to use, so that it corresponds to where the subject’s eyes are in the frame. This will save you time compared to using the central focusing point and reframing your shot. http://www.digitalcameraworld.com/2012/09/03/shoot-like-a-pro-outdoor-portrait-photography- made-easy/4/
  • 6. Researchdifferentsettingse.g.outdoors,indoors IndoorPortraitSettings - 01 Use window light Place your subject close to a window to make the most of any available natural light – this will generally give more flattering results than flash-lit shots. 02 A little reflection A reflector is invaluable for filling in shadows on faces. Position it on the opposite side of your subject to the window, and slightly below them to reflect light back onto their features. 03 Go prime A focal length of around 85mm is the classic choice for portraits; wide-angle lenses can contort facial features when shooting up close, while telephoto lenses are impractical. If you’re using a crop-sensor camera, then a using a prime lens like Canon’s budget EF 50mm f/1.8 lens will give you an effective focal length of 80mm and has a wonderfully wide f/1.8 aperture. 04 Use a wide aperture When shooting indoors, set Aperture Priority mode and select a wide aperture (such as f/2.8 or greater). This will not only allow you to make the most of the lower light levels, but will also give you a shallow depth of field that will help your subjects stand out from cluttered backgrounds. 05 Up the ISO To avoid camera shake, you need to select a shutter speed of at least ‘one over’ the effective focal length – so for 85mm you’d need 1/100 sec or faster. Shooting indoor portrait photography in low light will mean you’re likely to need to shoot at ISO 800 or 1600 to obtain a good shutter speed. While higher ISOs mean more image noise, this is very well controlled in most recent DSLRs, and a little noise is far preferable to a shaky shot. 06 It’s all about the eyes Getting your focus spot-on for portraits is critical – always focus on the eyes (or the nearest eye, if your subject isn’t square-on to you). Switch to the single AF point mode and use one of the off- centre AF points for sharp focusing and to help improve your compositions. If you use the central AF point and focus and recompose, when shooting with a shallow DoF, you may end up with a pin-sharp nose but out-of-focus eyes. 07 Find a model It goes without saying the some people are more photogenic than others, so it may be worth engaging the services of a model. Websites such as Model Mayhem are great places to find willing subjects, and many models starting out will do it for free, in exchange for images for their portfolio. 08 Keep up the rapport You’ll get better portraits if you really engage with your subjects. Give them direction for their poses and offer encouragement. Showyour subjects your shots on the LCD every so often 
so they can see how good they look! 09 Make them pop A simple Photoshop workflow will help make your portraits pop. Once you’ve processed theraw format file, use a Levels adjustment layer to selectively brighten the eyes and teeth, and use the
  • 7. Researchdifferentsettingse.g.outdoors,indoors Unsharp Mask to ensure the eyes are pin-sharp – values of Amount 80%, Radius 2 and Threshold 0 are good starting points. 10 Make it mono Portraits are often transformed by a black-and-white conversion; this removes distractions from colourful clothing of blotchy skin. Mono is also brilliant for gritty character portraits. http://www.digitalcameraworld.com/2013/02/07/indoor-portrait-photography-10-tips-for-using- only-one-lens-and-natural-light/