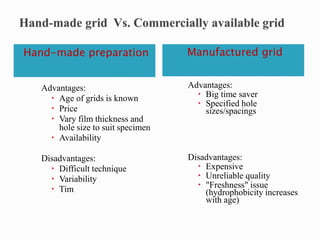
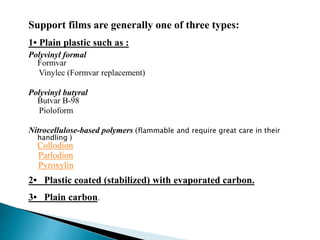
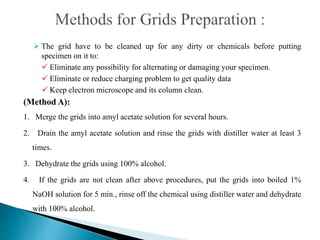
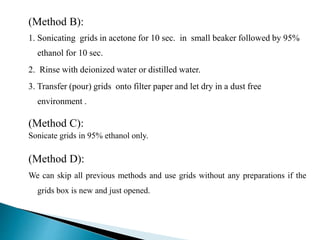
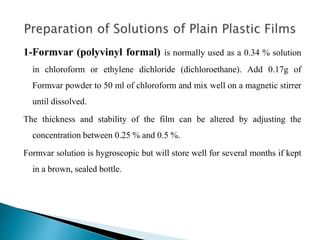
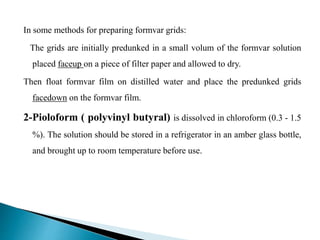
SlideShare a Scribd company logo
1 of 37
by
Dr. Fatma Kassem
Associate Researcher of Clinical Pathology and Electron Microscopy at TBRI
2015
 Some basic topics about EM grid.
 Methods for grids preparation
 Preparation of solutions of plain plastic films
 Chemical precautions
 Steps of film coating grids:
◦ Collodion support films
◦ Pioloform support films
◦ Formvar coating grids
◦ Formvar grids for frozen hydrated sample
 Summarize steps of formvar coating grids
What is EM grid?
The EM grid is a 3.05 mm diameter, thin mesh, and it can be made
from a number of different metals (copper, gold, nickel, molybdenum,
stainless steel, tungsten, aluminum, titanium etc.), and have various
spacing patterns.
Most EM grids are made of copper because it is non-ferromagnetic
and thus minimally distorts the magnetic field of the objective lens.
The copper mesh also rapidly removes heat away from the support
film and thus prevents thermal expansion and movement of the specimen
under electron irradiation.
 Copper grids are usually used because they are conductive, stable in the
beam and inexpensive. But when treating the sample on the grid with
some substances such as acids, bases, some salts, etc. more expensive non-
reactive grids such as gold or platinum may be necessary.
 As The diameter of grids is standard,3.05mm. The Thickness is variable
based on the materials of the grid. The thickness range is from 10um to
25um. The mesh of the grid is defined by the number of holes within 1
inch. For example, the 200 mesh grid has 20 holes along diameter
direction, 400 mesh grid has 40 holes in diameter. With each hole size less
than 200um in 100 mesh grid, 100um in 200 mesh grid, 75um in 300 mesh
grid and 50um in 400 mesh grid.
The EM grid is to the TEM what the glass slide is to the light microscope. It
provides a way for supporting the specimen and delivering the specimen
into the TEM column for observation and data collection.
Grids may be used bare or, more commonly, filmed depending on the nature
of the specimen being studied.
Thin sectioned specimens, for example, are sometimes examined on bare
grids, but for highest resolution work, the sections must be mounted on
filmed grids or, better yet, on net films.
These films should be extremely thin (20 nm or less) and made of suitable
electron-transparent substance, such as plastic or evaporated carbon,
without breaking when gently handled or when irradiated with the electron
beam.
If high resolution work is required, plain carbon
films are the best choice because these films are
generally tough and could withstand the
bombardment of electron beam. They can also
conduct electricity and heat easily from the specimen
to the grid bars and hence reduce specimen drift due
to both charge and thermal effects.
Hand-made preparation Manufactured grid
Advantages:
 Age of grids is known
 Price
 Vary film thickness and
hole size to suit specimen
 Availability
Disadvantages:
 Difficult technique
 Variability
 Tim
Advantages:
 Big time saver
 Specified hole
sizes/spacings
Disadvantages:
 Expensive
 Unreliable quality
 "Freshness" issue
(hydrophobicity increases
with age)
Support films are generally one of three types:
1• Plain plastic such as :
Polyvinyl formal
Formvar
Vinylec (Formvar replacement)
Polyvinyl butyral
Butvar B-98
Pioloform
Nitrocellulose-based polymers (flammable and require great care in their
handling )
Collodion
Parlodion
Pyroxylin
2• Plastic coated (stabilized) with evaporated carbon.
3• Plain carbon.
 The grid have to be cleaned up for any dirty or chemicals before putting
specimen on it to:
 Eliminate any possibility for alternating or damaging your specimen.
 Eliminate or reduce charging problem to get quality data
 Keep electron microscope and its column clean.
(Method A):
1. Merge the grids into amyl acetate solution for several hours.
2. Drain the amyl acetate solution and rinse the grids with distiller water at least 3
times.
3. Dehydrate the grids using 100% alcohol.
4. If the grids are not clean after above procedures, put the grids into boiled 1%
NaOH solution for 5 min., rinse off the chemical using distiller water and dehydrate
with 100% alcohol.
(Method B):
1. Sonicating grids in acetone for 10 sec. in small beaker followed by 95%
ethanol for 10 sec.
2. Rinse with deionized water or distilled water.
3. Transfer (pour) grids onto filter paper and let dry in a dust free
environment .
(Method C):
Sonicate grids in 95% ethanol only.
(Method D):
We can skip all previous methods and use grids without any preparations if the
grids box is new and just opened.
1-Formvar (polyvinyl formal) is normally used as a 0.34 % solution
in chloroform or ethylene dichloride (dichloroethane). Add 0.17g of
Formvar powder to 50 ml of chloroform and mix well on a magnetic stirrer
until dissolved.
The thickness and stability of the film can be altered by adjusting the
concentration between 0.25 % and 0.5 %.
Formvar solution is hygroscopic but will store well for several months if kept
in a brown, sealed bottle.
In some methods for preparing formvar grids:
The grids are initially predunked in a small volum of the formvar solution
placed faceup on a piece of filter paper and allowed to dry.
Then float formvar film on distilled water and place the predunked grids
facedown on the formvar film.
2-Pioloform ( polyvinyl butyral) is dissolved in chloroform (0.3 - 1.5
%). The solution should be stored in a refrigerator in an amber glass bottle,
and brought up to room temperature before use.
Formvar coated grids without a carbon layer are suitable for
TEM applications up to 100kV. The films are available on
grids made of copper, nickel or gold. Pioloform is sometimes
preferred to Formvar® because of its higher mechanical and
thermal stability, and lower bulk which can help reduce
electron scattering.
3- Butvar B98 (polyvinyl butyral) is a resin containing 20 %
polyvinyl alcohol, and is normally used as a 0.25 % solution in chloroform.
It is an alternative support film to Formvar. Films made from Butvar are
hydrophilic, and therefore suitable for negative staining methods, having
good mechanical stability, high electron-transparency and minimum
intrinsic structure. Butvar B98 can also be applied to grids as an adhesive.
4- Parlodion: Its manufactured by nitrating (with nitric acid)
and then sulfating (with sulfuric acid) prepared by 0.2%
solution in isoamyle-acetate (Also used as gun powder).
5- Collodion: prepared by 2% collodion in amyl acetate solution.
It has been reported that one should use only amyl acetate as the solvent for
Parlodion or its sister compounds. Ethyl ether/alcohol solutions are thought to
be dangerous because if ether peroxidation has occurred, the sample could
explode upon drying).
Ethylene dichloride and chloroform are carcinogenic and methanol is toxic. Care
should be taken to avoid contact with solvents or inhaling their vapors. Old
Formvar solutions should be disposed of as hazardous waste.
Preparation of solutions must be under hood ,wearing protective coat, mask,
gloves and goggles.
A. Collodion support film
1. Prepare a concentration of 2% collodion in amyl acetate solution.
2. Place a drop of the collodion solution on the surface of distiller water
and allow it to spread out and dry.
3. Use tweezers to pick up the film and discard it properly. This process
will remove any dust floating on the water surface. Repeat the process
twice or more if necessary.
4. In a vibration free environment, place a drop of the collodion solution
on the surface of distiller water and allow it to spread out and dry. This
leaves a thin layer of plastic on the water surface.
Note: If thicker film is desired, user could add one or two more drops of
collodion drops after the first drop is well spread and dried.
Note: This method tends to produce thicker and more uneven films compared to
the formvar film.
5. Check if the film is even. Remove the film if the film appears to be uneven.
Note: A good coating film should appear an even grey to dark grey color when
viewed
by reflected light. If it appears yellowish or uneven, it is too thick and unsuitable.
6. Lay the EM grids shiny-side up (dull side down) onto the plastic film.
7. Remove the grid with film from the water using a strip of hard filter paper.
User can also use Parafilm or a clean glass slide to pick up the grids.
8. Set the grids aside in a dust free place to dry before use.
B- Pioloform support film:
(Pioloform produces a stronger film than formvar)
1. Prepare a concentration of 1.2% (0.3-1.5%) in chloroform
(analytical quality), adjusted with extra chloroform until films
of the desired thickness are obtained.
Note: To avoid the formation of holes in the films if the
conditions are humid, allow to dry in a lidded container thus
retaining an atmosphere of chloroform.
2. Pour approx 80ml of the pioloform solution into a 100ml
container with a tap. The container should be wide enough to
put in a glass microscope slide
3. Remove dust from a glass microscope slide with tissue, and drop into the
pioloform solution. Cover the top of the container, open tap and drain
solution into the stock bottle for re-use.
4. Leave the slide to dry with the cover on, thus maintaining the chloroform
atmosphere within the container.
5. Score 2mm from the slide edge with razor, breathe on the film and lower
into a beaker of distilled water at an angle of 45°. The film should flow on
the water.
6. Place acetone-cleaned grids, matt side down onto the film, separating each
by 3mm.
7. Cut a piece of 'Yellow Pages' (with text printing on both sides to allow
even uptake of water) and leave until the whole paper is wet. Remove the
grids gently from the surface with forceps.
8. For slot grids, remove from the surface of the water when 3mm has been
wetted.
9. Set the grids aside in a dust free place to dry before use.
C- Formvar coating grids:.
1. Prepare grids as mentioned before.
2. Polish slide and blow off any lint with compressed air. Keep the slide in a dry,
dust- free environment until use (e.g. on filter paper under an upturned beaker). If
the plastic film adheres to the slide and cannot be floated off, several different
methods of cleaning the slide should be tried as cleaning a glass slide with water
and detergent:
a) To prevent contamination with oil from the skin do not touch the slides with
bare hands (use gloves).
b) Scrub the glass slide with lint-free paper, put them into the slide holder and
soak in 2% RBS for at least one day. (RBS: mixtures of anionic and non-
ionic surfactants.
c) Rinse the slides thoroughly by running de-ionized water over the slides.
d) Dry the slides by air drying but keep them dust free or dry them in an oven
at relatively low temperature. After drying the slides can be stored in a slides
box.
 Recent attempts have shown that slides taken from a box that has been open for
several weeks or slides that have been in a petri dish for several weeks are the best.
3. Submerge polished
slide 3/4 of height with
formvar solution.
4. Pour the solution into
a clean Coplin jar or
graduated cylinder.
5. Drain off the formvar solution and
immediately remove slide. Touch
the edge of the slide to filter paper
to wick off the excess fluid and let
the slide stand to dry in a dust free
environment.
 The film will be milky when wet
but it will clear somewhat as it
dries( 5-10 min.).
 The thickness of the films produced
is regulated by the speed with
which the funnel drains (the longer
the slide is within the solution ,the
thicker the support film will be) and
the concentration of the formvar.
6. Overfill a staining dish (or
stainless steel bowl) with distilled
water (or deionized or tap water)
and clean the surface by dragging
a kimwipe or plastic rod across the
surface to removeany floating
debris.
7. When the coated slide is dry, score
2mm from the slide edges with a
sharp, ethanol or aceton cleaned
razor blade

8. Frost the slide by exhaling heavily
onto the slide to get a layer of
water vapor on and under the film.
Immediately float the films onto the
water surface by touching the
bottom of the slide, held
perpendicular or at a ~15° angle ,
to the water surface. Slowly lower
the slide into the bath, teasing the
film off as necessary. Be sure your
forceps are cleaned with ethanol.
Note: All the actions should be
gentle and the hand should
not be shaking when
lowering the slide into the
water.
If the film is difficult to see, a bright desk lamp
can be used to reflect light off the surface of the water
and the film.
A good film should appear an even grey to dark
grey color when viewed by reflected light. If it
appears yellowish or uneven, it is too thick and
unsuitable.
9. Gently lay the grids,
shiny/bright surface
down, onto good
(uniform, gray color,
un-wrinkled, etc.)
areas of the film.
10. The films with grids
are picked up by:
A- Place a small piece of clean,
white office paper onto the
surface of the grids and film and
allow it to soak up water. The
grids will show up through the
paper when the paper is fully
soaked.
Pick up the paper, grids
and film with forceps
and place on dry filter
paper, grid side up, in a
covered Petri dish to
dry.
B- Covering them with parafilm as they float on the water
surface. Pick up the edge of the parafilm and the film
with grids should come with it. If they don't, try a
different corner. Don't let your fingers touch the water
surface, or you run the risk of leaving a film in the
water and on the formvar
C- Cover slide, hard filter paper or by the slide that we
used to obtain the film covered by one side sticky
office paper
11. Let the grids dry several hours
before using them. Depending on
your use, you may want to carbon
coat them to impart greater
stability to the films.
Holey films need the added
stability of thicker carbon. These
should be coated to a gray/black
color which takes about 400
milliseconds on the Emitech
carbon coater. For large particles
or complexes (>800 Å), it may be
beneficial to carbon coat very
heavily to increase the depth of
the holes.
12. At this point, the grids may be examined in a light microscope with phase
contrast illumination to determine the quality of the films.
13. Carbon-Formvar films can be easily converted into carbon-only films by
placing the white paper and grids onto a piece of filter paper saturated with
ethylene dichloride. The level of ethylene dichloride should be sufficient to
completely soak the backing paper without submersing the tops of the
grids. One half hour should be sufficient time to dissolve the Formvar film
and not damage the carbon support. Remove the paper and allow it and the
grids to dry.
Another method for preparing pure-carbon films is to evaporate a layer
of carbon directly onto the surface of a freshly-cleaved piece of mica. The
carbon is then floated off onto water and transferred to EM grids.
14. Tape the grids and paper to a glass slide with "Scotch" tape to prevent the
grids from being jostled. Place the slide in a covered petri dish. Care must
still be used when handling the grids to prevent them from being scattered.
The same steps of the previous method with
following modifications:
• Add about 50 drops of a 50% glycerol/water
solution to the surface of the Formvar solution.
Place the tip of a probe sonicator onto the surface
of the solution and sonicate until mixed.
Sonication intensity should be great enough to
cause the solution to bubble vigorously. Mixing
often requires no more than about 5 seconds. The
solution should appear cloudy or milky. This
should produce numerous holes that are 1-2 µm
in diameter and suitable for use with frozen-
hydrated samples. Sonicating for longer periods
of time produces smaller holes in the film;
shorter times produce larger holes.
 NB:
 Grids covered with large empty Epon
sections (sections without embeded
tissue) may be used in place of
formvar for whole-mount supports.
 Other whole-mount methods describe
shorter incubation or spread time of
1-2minutes without fixatoin.
1. Sonicate grids in 95% ethanol in
small beaker
2. Rinse with distilled water
3. Transfer grids onto filter paper and
let dry
4. Polish slide with lint-free cloth until
shiny/slippery, and wipe clean
5. Submerge polished slide 3/4 of
height with formvar solution(0.17 FV
powder to 50ml chloroform)
6. Drain off the formvar solution and
immediately remove slide. Let the
slide stand to dry (10 min)
7. Overfill a staining dish with distilled water
8. When the coated slide is dry, score the
edges with a sharp, ethanol-cleaned razor
blade
9. Frost the slide by exhaling heavily onto the
slide
10. Immediately float the films onto the water
surface by touching the bottom of the
slide, held perpendicular, to the water
surface. Slowly lower the slide into the
bath
11. Gently lay the grids, face down, on the
film in the regions that are of the proper
thickness and without wrinkles etc
13. The films with grids are picked up by
cover slide
14 Let the grids dry several hours before
using them. Depending on your use, you
may want to carbon coat them to impart
greater stability to the films.
• After picking up the formvar grids from DW:
1. let them completely dry.
2. place the paper with the film and grids onto a piece of filter paper that
is just saturated with methanol. The glycerol in the Formvar solution
often produces bubbles in the film not open holes. The methanol
treatment will break the thin film over these "pseudo-holes".
3. Soak in a covered petri dish for about 40-50 minutes.
4. Allow the film to dry before carbon coating.

More Related Content

What's hot

Tem or transmitted electron microscopy
Tem or transmitted electron microscopyTem or transmitted electron microscopy
Tem or transmitted electron microscopyvijayakumars66
 
Transmission Electron Microscope
Transmission Electron MicroscopeTransmission Electron Microscope
Transmission Electron MicroscopeManoranjan Ghosh
 
Electron microscope (TEM & SEM)
Electron microscope (TEM & SEM)Electron microscope (TEM & SEM)
Electron microscope (TEM & SEM)Subhankar Das
 
Transmission electron microscope (TEM)
Transmission electron microscope (TEM)Transmission electron microscope (TEM)
Transmission electron microscope (TEM)Nano Encryption
 
Transmission electron microscope
Transmission electron microscopeTransmission electron microscope
Transmission electron microscopeMonika Uma Shankar
 
Transmission electron microscope
Transmission electron microscopeTransmission electron microscope
Transmission electron microscopeRaj Mohan
 
Transmission Electron Microscope
Transmission Electron MicroscopeTransmission Electron Microscope
Transmission Electron Microscope20was
 
Transmission electron microscope
Transmission electron microscopeTransmission electron microscope
Transmission electron microscopeSenthil Arasan
 
Transmission Electron Microscopy
Transmission Electron MicroscopyTransmission Electron Microscopy
Transmission Electron MicroscopySejal9787
 
Transmission electron microscope
Transmission electron microscopeTransmission electron microscope
Transmission electron microscopeSuganyaPaulraj
 
Presentation on SEM (Scanning Electron Microscope)
Presentation on SEM (Scanning Electron Microscope) Presentation on SEM (Scanning Electron Microscope)
Presentation on SEM (Scanning Electron Microscope) Farshina Nazrul
 
Scanning electron microscopy
Scanning electron microscopyScanning electron microscopy
Scanning electron microscopyJessa Ariño
 
Electron microscope, principle and application
Electron microscope, principle and applicationElectron microscope, principle and application
Electron microscope, principle and applicationKAUSHAL SAHU
 
AFM (Atomic Force Microscopy)
AFM (Atomic Force Microscopy)AFM (Atomic Force Microscopy)
AFM (Atomic Force Microscopy)Chemist Sohaib
 
Scanning electron microscope
Scanning electron microscopeScanning electron microscope
Scanning electron microscopeSenthil Arasan
 
Principle & Applications of Transmission Electron Microscopy (TEM) & High Res...
Principle & Applications of Transmission Electron Microscopy (TEM) & High Res...Principle & Applications of Transmission Electron Microscopy (TEM) & High Res...
Principle & Applications of Transmission Electron Microscopy (TEM) & High Res...Gulfam Raza
 

What's hot (20)

Tem or transmitted electron microscopy
Tem or transmitted electron microscopyTem or transmitted electron microscopy
Tem or transmitted electron microscopy
 
Transmission Electron Microscope
Transmission Electron MicroscopeTransmission Electron Microscope
Transmission Electron Microscope
 
Electron microscope (TEM & SEM)
Electron microscope (TEM & SEM)Electron microscope (TEM & SEM)
Electron microscope (TEM & SEM)
 
Transmission electron microscope (TEM)
Transmission electron microscope (TEM)Transmission electron microscope (TEM)
Transmission electron microscope (TEM)
 
Transmission electron microscope
Transmission electron microscopeTransmission electron microscope
Transmission electron microscope
 
Transmission electron microscope
Transmission electron microscopeTransmission electron microscope
Transmission electron microscope
 
Scanning and Transmission Electron Microscope
Scanning and Transmission Electron MicroscopeScanning and Transmission Electron Microscope
Scanning and Transmission Electron Microscope
 
Tem ppt
Tem ppt Tem ppt
Tem ppt
 
Transmission Electron Microscope
Transmission Electron MicroscopeTransmission Electron Microscope
Transmission Electron Microscope
 
Transmission electron microscope
Transmission electron microscopeTransmission electron microscope
Transmission electron microscope
 
SEM- scanning electron microscope
SEM- scanning electron microscope SEM- scanning electron microscope
SEM- scanning electron microscope
 
Transmission Electron Microscopy
Transmission Electron MicroscopyTransmission Electron Microscopy
Transmission Electron Microscopy
 
Transmission electron microscope
Transmission electron microscopeTransmission electron microscope
Transmission electron microscope
 
Presentation on SEM (Scanning Electron Microscope)
Presentation on SEM (Scanning Electron Microscope) Presentation on SEM (Scanning Electron Microscope)
Presentation on SEM (Scanning Electron Microscope)
 
Scanning electron microscopy
Scanning electron microscopyScanning electron microscopy
Scanning electron microscopy
 
Electron microscope, principle and application
Electron microscope, principle and applicationElectron microscope, principle and application
Electron microscope, principle and application
 
AFM (Atomic Force Microscopy)
AFM (Atomic Force Microscopy)AFM (Atomic Force Microscopy)
AFM (Atomic Force Microscopy)
 
Scanning electron microscope
Scanning electron microscopeScanning electron microscope
Scanning electron microscope
 
Electron microscope
Electron microscopeElectron microscope
Electron microscope
 
Principle & Applications of Transmission Electron Microscopy (TEM) & High Res...
Principle & Applications of Transmission Electron Microscopy (TEM) & High Res...Principle & Applications of Transmission Electron Microscopy (TEM) & High Res...
Principle & Applications of Transmission Electron Microscopy (TEM) & High Res...
 

Similar to Support Films for Electron Microscopy Grids

Specimen Preperation for Electron Microscope .pptx
Specimen Preperation for Electron Microscope .pptxSpecimen Preperation for Electron Microscope .pptx
Specimen Preperation for Electron Microscope .pptxSreedevi694198
 
dark room processing / dental courses
dark room processing / dental coursesdark room processing / dental courses
dark room processing / dental coursesIndian dental academy
 
A6-Nylon_Film_Handling_Guide_v1
A6-Nylon_Film_Handling_Guide_v1A6-Nylon_Film_Handling_Guide_v1
A6-Nylon_Film_Handling_Guide_v1Ken Guhse
 
waterproofing Sealants & Silicone
waterproofing Sealants & Siliconewaterproofing Sealants & Silicone
waterproofing Sealants & Siliconebarbie811764
 
02.multi layer composite films
02.multi layer composite films02.multi layer composite films
02.multi layer composite filmsSHRIKANT ATHAVALE
 
Flame Treatment Technology for the Photovoltaic Industry
Flame Treatment Technology for the Photovoltaic IndustryFlame Treatment Technology for the Photovoltaic Industry
Flame Treatment Technology for the Photovoltaic IndustryStefano Mancinelli
 
Latent Image formation & Dark room Chemistry.pptx
Latent Image formation & Dark room Chemistry.pptxLatent Image formation & Dark room Chemistry.pptx
Latent Image formation & Dark room Chemistry.pptxssuser71d7b1
 
Principle of tissue processing
Principle of tissue processingPrinciple of tissue processing
Principle of tissue processingAtifa Ambreen
 
steps of processing of complete denture (2).pptx
steps of processing of complete denture (2).pptxsteps of processing of complete denture (2).pptx
steps of processing of complete denture (2).pptxmohamedalloush8
 
Technoseal dpm-product-guide-october
Technoseal dpm-product-guide-octoberTechnoseal dpm-product-guide-october
Technoseal dpm-product-guide-octoberSeamless Coatings Ltd
 
Plastination
PlastinationPlastination
PlastinationJ P
 
Dark room procedure/ oral surgery courses
Dark room procedure/ oral surgery courses  Dark room procedure/ oral surgery courses
Dark room procedure/ oral surgery courses Indian dental academy
 
Microencapsulation by Pravin Gore
Microencapsulation by Pravin GoreMicroencapsulation by Pravin Gore
Microencapsulation by Pravin Goregorepravin77
 

Similar to Support Films for Electron Microscopy Grids (20)

darkroom.pdf
darkroom.pdfdarkroom.pdf
darkroom.pdf
 
Specimen Preperation for Electron Microscope .pptx
Specimen Preperation for Electron Microscope .pptxSpecimen Preperation for Electron Microscope .pptx
Specimen Preperation for Electron Microscope .pptx
 
Electron microscope
Electron microscopeElectron microscope
Electron microscope
 
dark room processing / dental courses
dark room processing / dental coursesdark room processing / dental courses
dark room processing / dental courses
 
A6-Nylon_Film_Handling_Guide_v1
A6-Nylon_Film_Handling_Guide_v1A6-Nylon_Film_Handling_Guide_v1
A6-Nylon_Film_Handling_Guide_v1
 
waterproofing Sealants & Silicone
waterproofing Sealants & Siliconewaterproofing Sealants & Silicone
waterproofing Sealants & Silicone
 
Pod
PodPod
Pod
 
02.multi layer composite films
02.multi layer composite films02.multi layer composite films
02.multi layer composite films
 
Flame Treatment Technology for the Photovoltaic Industry
Flame Treatment Technology for the Photovoltaic IndustryFlame Treatment Technology for the Photovoltaic Industry
Flame Treatment Technology for the Photovoltaic Industry
 
Latent Image formation & Dark room Chemistry.pptx
Latent Image formation & Dark room Chemistry.pptxLatent Image formation & Dark room Chemistry.pptx
Latent Image formation & Dark room Chemistry.pptx
 
Principle of tissue processing
Principle of tissue processingPrinciple of tissue processing
Principle of tissue processing
 
steps of processing of complete denture (2).pptx
steps of processing of complete denture (2).pptxsteps of processing of complete denture (2).pptx
steps of processing of complete denture (2).pptx
 
Technoseal dpm-product-guide-october
Technoseal dpm-product-guide-octoberTechnoseal dpm-product-guide-october
Technoseal dpm-product-guide-october
 
Plastination
PlastinationPlastination
Plastination
 
Thin layer chromatography
Thin layer chromatographyThin layer chromatography
Thin layer chromatography
 
Unit v
Unit vUnit v
Unit v
 
Unit 5-MANUFACTURING OF PLASTIC COMPONENTS
Unit 5-MANUFACTURING OF PLASTIC COMPONENTSUnit 5-MANUFACTURING OF PLASTIC COMPONENTS
Unit 5-MANUFACTURING OF PLASTIC COMPONENTS
 
unit-v.pdf
unit-v.pdfunit-v.pdf
unit-v.pdf
 
Dark room procedure/ oral surgery courses
Dark room procedure/ oral surgery courses  Dark room procedure/ oral surgery courses
Dark room procedure/ oral surgery courses
 
Microencapsulation by Pravin Gore
Microencapsulation by Pravin GoreMicroencapsulation by Pravin Gore
Microencapsulation by Pravin Gore
 

Recently uploaded

BUMI DAN ANTARIKSA PROJEK IPAS SMK KELAS X.pdf
BUMI DAN ANTARIKSA PROJEK IPAS SMK KELAS X.pdfBUMI DAN ANTARIKSA PROJEK IPAS SMK KELAS X.pdf
BUMI DAN ANTARIKSA PROJEK IPAS SMK KELAS X.pdfWildaNurAmalia2
 
FREE NURSING BUNDLE FOR NURSES.PDF by na
FREE NURSING BUNDLE FOR NURSES.PDF by naFREE NURSING BUNDLE FOR NURSES.PDF by na
FREE NURSING BUNDLE FOR NURSES.PDF by naJASISJULIANOELYNV
 
Analytical Profile of Coleus Forskohlii | Forskolin .pptx
Analytical Profile of Coleus Forskohlii | Forskolin .pptxAnalytical Profile of Coleus Forskohlii | Forskolin .pptx
Analytical Profile of Coleus Forskohlii | Forskolin .pptxSwapnil Therkar
 
RESPIRATORY ADAPTATIONS TO HYPOXIA IN HUMNAS.pptx
RESPIRATORY ADAPTATIONS TO HYPOXIA IN HUMNAS.pptxRESPIRATORY ADAPTATIONS TO HYPOXIA IN HUMNAS.pptx
RESPIRATORY ADAPTATIONS TO HYPOXIA IN HUMNAS.pptxFarihaAbdulRasheed
 
Twin's paradox experiment is a meassurement of the extra dimensions.pptx
Twin's paradox experiment is a meassurement of the extra dimensions.pptxTwin's paradox experiment is a meassurement of the extra dimensions.pptx
Twin's paradox experiment is a meassurement of the extra dimensions.pptxEran Akiva Sinbar
 
BIOETHICS IN RECOMBINANT DNA TECHNOLOGY.
BIOETHICS IN RECOMBINANT DNA TECHNOLOGY.BIOETHICS IN RECOMBINANT DNA TECHNOLOGY.
BIOETHICS IN RECOMBINANT DNA TECHNOLOGY.PraveenaKalaiselvan1
 
Pests of castor_Binomics_Identification_Dr.UPR.pdf
Pests of castor_Binomics_Identification_Dr.UPR.pdfPests of castor_Binomics_Identification_Dr.UPR.pdf
Pests of castor_Binomics_Identification_Dr.UPR.pdfPirithiRaju
 
STOPPED FLOW METHOD & APPLICATION MURUGAVENI B.pptx
STOPPED FLOW METHOD & APPLICATION MURUGAVENI B.pptxSTOPPED FLOW METHOD & APPLICATION MURUGAVENI B.pptx
STOPPED FLOW METHOD & APPLICATION MURUGAVENI B.pptxMurugaveni B
 
THE ROLE OF PHARMACOGNOSY IN TRADITIONAL AND MODERN SYSTEM OF MEDICINE.pptx
THE ROLE OF PHARMACOGNOSY IN TRADITIONAL AND MODERN SYSTEM OF MEDICINE.pptxTHE ROLE OF PHARMACOGNOSY IN TRADITIONAL AND MODERN SYSTEM OF MEDICINE.pptx
THE ROLE OF PHARMACOGNOSY IN TRADITIONAL AND MODERN SYSTEM OF MEDICINE.pptxNandakishor Bhaurao Deshmukh
 
(9818099198) Call Girls In Noida Sector 14 (NOIDA ESCORTS)
(9818099198) Call Girls In Noida Sector 14 (NOIDA ESCORTS)(9818099198) Call Girls In Noida Sector 14 (NOIDA ESCORTS)
(9818099198) Call Girls In Noida Sector 14 (NOIDA ESCORTS)riyaescorts54
 
Speech, hearing, noise, intelligibility.pptx
Speech, hearing, noise, intelligibility.pptxSpeech, hearing, noise, intelligibility.pptx
Speech, hearing, noise, intelligibility.pptxpriyankatabhane
 
Pests of jatropha_Bionomics_identification_Dr.UPR.pdf
Pests of jatropha_Bionomics_identification_Dr.UPR.pdfPests of jatropha_Bionomics_identification_Dr.UPR.pdf
Pests of jatropha_Bionomics_identification_Dr.UPR.pdfPirithiRaju
 
Call Us ≽ 9953322196 ≼ Call Girls In Lajpat Nagar (Delhi) |
Call Us ≽ 9953322196 ≼ Call Girls In Lajpat Nagar (Delhi) |Call Us ≽ 9953322196 ≼ Call Girls In Lajpat Nagar (Delhi) |
Call Us ≽ 9953322196 ≼ Call Girls In Lajpat Nagar (Delhi) |aasikanpl
 
Evidences of Evolution General Biology 2
Evidences of Evolution General Biology 2Evidences of Evolution General Biology 2
Evidences of Evolution General Biology 2John Carlo Rollon
 
Solution chemistry, Moral and Normal solutions
Solution chemistry, Moral and Normal solutionsSolution chemistry, Moral and Normal solutions
Solution chemistry, Moral and Normal solutionsHajira Mahmood
 
Forest laws, Indian forest laws, why they are important
Forest laws, Indian forest laws, why they are importantForest laws, Indian forest laws, why they are important
Forest laws, Indian forest laws, why they are importantadityabhardwaj282
 
Is RISC-V ready for HPC workload? Maybe?
Is RISC-V ready for HPC workload? Maybe?Is RISC-V ready for HPC workload? Maybe?
Is RISC-V ready for HPC workload? Maybe?Patrick Diehl
 
Behavioral Disorder: Schizophrenia & it's Case Study.pdf
Behavioral Disorder: Schizophrenia & it's Case Study.pdfBehavioral Disorder: Schizophrenia & it's Case Study.pdf
Behavioral Disorder: Schizophrenia & it's Case Study.pdfSELF-EXPLANATORY
 
Neurodevelopmental disorders according to the dsm 5 tr
Neurodevelopmental disorders according to the dsm 5 trNeurodevelopmental disorders according to the dsm 5 tr
Neurodevelopmental disorders according to the dsm 5 trssuser06f238
 
Analytical Profile of Coleus Forskohlii | Forskolin .pdf
Analytical Profile of Coleus Forskohlii | Forskolin .pdfAnalytical Profile of Coleus Forskohlii | Forskolin .pdf
Analytical Profile of Coleus Forskohlii | Forskolin .pdfSwapnil Therkar
 

Recently uploaded (20)

BUMI DAN ANTARIKSA PROJEK IPAS SMK KELAS X.pdf
BUMI DAN ANTARIKSA PROJEK IPAS SMK KELAS X.pdfBUMI DAN ANTARIKSA PROJEK IPAS SMK KELAS X.pdf
BUMI DAN ANTARIKSA PROJEK IPAS SMK KELAS X.pdf
 
FREE NURSING BUNDLE FOR NURSES.PDF by na
FREE NURSING BUNDLE FOR NURSES.PDF by naFREE NURSING BUNDLE FOR NURSES.PDF by na
FREE NURSING BUNDLE FOR NURSES.PDF by na
 
Analytical Profile of Coleus Forskohlii | Forskolin .pptx
Analytical Profile of Coleus Forskohlii | Forskolin .pptxAnalytical Profile of Coleus Forskohlii | Forskolin .pptx
Analytical Profile of Coleus Forskohlii | Forskolin .pptx
 
RESPIRATORY ADAPTATIONS TO HYPOXIA IN HUMNAS.pptx
RESPIRATORY ADAPTATIONS TO HYPOXIA IN HUMNAS.pptxRESPIRATORY ADAPTATIONS TO HYPOXIA IN HUMNAS.pptx
RESPIRATORY ADAPTATIONS TO HYPOXIA IN HUMNAS.pptx
 
Twin's paradox experiment is a meassurement of the extra dimensions.pptx
Twin's paradox experiment is a meassurement of the extra dimensions.pptxTwin's paradox experiment is a meassurement of the extra dimensions.pptx
Twin's paradox experiment is a meassurement of the extra dimensions.pptx
 
BIOETHICS IN RECOMBINANT DNA TECHNOLOGY.
BIOETHICS IN RECOMBINANT DNA TECHNOLOGY.BIOETHICS IN RECOMBINANT DNA TECHNOLOGY.
BIOETHICS IN RECOMBINANT DNA TECHNOLOGY.
 
Pests of castor_Binomics_Identification_Dr.UPR.pdf
Pests of castor_Binomics_Identification_Dr.UPR.pdfPests of castor_Binomics_Identification_Dr.UPR.pdf
Pests of castor_Binomics_Identification_Dr.UPR.pdf
 
STOPPED FLOW METHOD & APPLICATION MURUGAVENI B.pptx
STOPPED FLOW METHOD & APPLICATION MURUGAVENI B.pptxSTOPPED FLOW METHOD & APPLICATION MURUGAVENI B.pptx
STOPPED FLOW METHOD & APPLICATION MURUGAVENI B.pptx
 
THE ROLE OF PHARMACOGNOSY IN TRADITIONAL AND MODERN SYSTEM OF MEDICINE.pptx
THE ROLE OF PHARMACOGNOSY IN TRADITIONAL AND MODERN SYSTEM OF MEDICINE.pptxTHE ROLE OF PHARMACOGNOSY IN TRADITIONAL AND MODERN SYSTEM OF MEDICINE.pptx
THE ROLE OF PHARMACOGNOSY IN TRADITIONAL AND MODERN SYSTEM OF MEDICINE.pptx
 
(9818099198) Call Girls In Noida Sector 14 (NOIDA ESCORTS)
(9818099198) Call Girls In Noida Sector 14 (NOIDA ESCORTS)(9818099198) Call Girls In Noida Sector 14 (NOIDA ESCORTS)
(9818099198) Call Girls In Noida Sector 14 (NOIDA ESCORTS)
 
Speech, hearing, noise, intelligibility.pptx
Speech, hearing, noise, intelligibility.pptxSpeech, hearing, noise, intelligibility.pptx
Speech, hearing, noise, intelligibility.pptx
 
Pests of jatropha_Bionomics_identification_Dr.UPR.pdf
Pests of jatropha_Bionomics_identification_Dr.UPR.pdfPests of jatropha_Bionomics_identification_Dr.UPR.pdf
Pests of jatropha_Bionomics_identification_Dr.UPR.pdf
 
Call Us ≽ 9953322196 ≼ Call Girls In Lajpat Nagar (Delhi) |
Call Us ≽ 9953322196 ≼ Call Girls In Lajpat Nagar (Delhi) |Call Us ≽ 9953322196 ≼ Call Girls In Lajpat Nagar (Delhi) |
Call Us ≽ 9953322196 ≼ Call Girls In Lajpat Nagar (Delhi) |
 
Evidences of Evolution General Biology 2
Evidences of Evolution General Biology 2Evidences of Evolution General Biology 2
Evidences of Evolution General Biology 2
 
Solution chemistry, Moral and Normal solutions
Solution chemistry, Moral and Normal solutionsSolution chemistry, Moral and Normal solutions
Solution chemistry, Moral and Normal solutions
 
Forest laws, Indian forest laws, why they are important
Forest laws, Indian forest laws, why they are importantForest laws, Indian forest laws, why they are important
Forest laws, Indian forest laws, why they are important
 
Is RISC-V ready for HPC workload? Maybe?
Is RISC-V ready for HPC workload? Maybe?Is RISC-V ready for HPC workload? Maybe?
Is RISC-V ready for HPC workload? Maybe?
 
Behavioral Disorder: Schizophrenia & it's Case Study.pdf
Behavioral Disorder: Schizophrenia & it's Case Study.pdfBehavioral Disorder: Schizophrenia & it's Case Study.pdf
Behavioral Disorder: Schizophrenia & it's Case Study.pdf
 
Neurodevelopmental disorders according to the dsm 5 tr
Neurodevelopmental disorders according to the dsm 5 trNeurodevelopmental disorders according to the dsm 5 tr
Neurodevelopmental disorders according to the dsm 5 tr
 
Analytical Profile of Coleus Forskohlii | Forskolin .pdf
Analytical Profile of Coleus Forskohlii | Forskolin .pdfAnalytical Profile of Coleus Forskohlii | Forskolin .pdf
Analytical Profile of Coleus Forskohlii | Forskolin .pdf
 

Support Films for Electron Microscopy Grids

  • 1. by Dr. Fatma Kassem Associate Researcher of Clinical Pathology and Electron Microscopy at TBRI 2015
  • 2.  Some basic topics about EM grid.  Methods for grids preparation  Preparation of solutions of plain plastic films  Chemical precautions  Steps of film coating grids: ◦ Collodion support films ◦ Pioloform support films ◦ Formvar coating grids ◦ Formvar grids for frozen hydrated sample  Summarize steps of formvar coating grids
  • 3. What is EM grid? The EM grid is a 3.05 mm diameter, thin mesh, and it can be made from a number of different metals (copper, gold, nickel, molybdenum, stainless steel, tungsten, aluminum, titanium etc.), and have various spacing patterns. Most EM grids are made of copper because it is non-ferromagnetic and thus minimally distorts the magnetic field of the objective lens. The copper mesh also rapidly removes heat away from the support film and thus prevents thermal expansion and movement of the specimen under electron irradiation.
  • 4.  Copper grids are usually used because they are conductive, stable in the beam and inexpensive. But when treating the sample on the grid with some substances such as acids, bases, some salts, etc. more expensive non- reactive grids such as gold or platinum may be necessary.  As The diameter of grids is standard,3.05mm. The Thickness is variable based on the materials of the grid. The thickness range is from 10um to 25um. The mesh of the grid is defined by the number of holes within 1 inch. For example, the 200 mesh grid has 20 holes along diameter direction, 400 mesh grid has 40 holes in diameter. With each hole size less than 200um in 100 mesh grid, 100um in 200 mesh grid, 75um in 300 mesh grid and 50um in 400 mesh grid.
  • 5. The EM grid is to the TEM what the glass slide is to the light microscope. It provides a way for supporting the specimen and delivering the specimen into the TEM column for observation and data collection. Grids may be used bare or, more commonly, filmed depending on the nature of the specimen being studied. Thin sectioned specimens, for example, are sometimes examined on bare grids, but for highest resolution work, the sections must be mounted on filmed grids or, better yet, on net films. These films should be extremely thin (20 nm or less) and made of suitable electron-transparent substance, such as plastic or evaporated carbon, without breaking when gently handled or when irradiated with the electron beam.
  • 6. If high resolution work is required, plain carbon films are the best choice because these films are generally tough and could withstand the bombardment of electron beam. They can also conduct electricity and heat easily from the specimen to the grid bars and hence reduce specimen drift due to both charge and thermal effects.
  • 7. Hand-made preparation Manufactured grid Advantages:  Age of grids is known  Price  Vary film thickness and hole size to suit specimen  Availability Disadvantages:  Difficult technique  Variability  Tim Advantages:  Big time saver  Specified hole sizes/spacings Disadvantages:  Expensive  Unreliable quality  "Freshness" issue (hydrophobicity increases with age)
  • 8. Support films are generally one of three types: 1• Plain plastic such as : Polyvinyl formal Formvar Vinylec (Formvar replacement) Polyvinyl butyral Butvar B-98 Pioloform Nitrocellulose-based polymers (flammable and require great care in their handling ) Collodion Parlodion Pyroxylin 2• Plastic coated (stabilized) with evaporated carbon. 3• Plain carbon.
  • 9.  The grid have to be cleaned up for any dirty or chemicals before putting specimen on it to:  Eliminate any possibility for alternating or damaging your specimen.  Eliminate or reduce charging problem to get quality data  Keep electron microscope and its column clean. (Method A): 1. Merge the grids into amyl acetate solution for several hours. 2. Drain the amyl acetate solution and rinse the grids with distiller water at least 3 times. 3. Dehydrate the grids using 100% alcohol. 4. If the grids are not clean after above procedures, put the grids into boiled 1% NaOH solution for 5 min., rinse off the chemical using distiller water and dehydrate with 100% alcohol.
  • 10. (Method B): 1. Sonicating grids in acetone for 10 sec. in small beaker followed by 95% ethanol for 10 sec. 2. Rinse with deionized water or distilled water. 3. Transfer (pour) grids onto filter paper and let dry in a dust free environment . (Method C): Sonicate grids in 95% ethanol only. (Method D): We can skip all previous methods and use grids without any preparations if the grids box is new and just opened.
  • 11. 1-Formvar (polyvinyl formal) is normally used as a 0.34 % solution in chloroform or ethylene dichloride (dichloroethane). Add 0.17g of Formvar powder to 50 ml of chloroform and mix well on a magnetic stirrer until dissolved. The thickness and stability of the film can be altered by adjusting the concentration between 0.25 % and 0.5 %. Formvar solution is hygroscopic but will store well for several months if kept in a brown, sealed bottle.
  • 12. In some methods for preparing formvar grids: The grids are initially predunked in a small volum of the formvar solution placed faceup on a piece of filter paper and allowed to dry. Then float formvar film on distilled water and place the predunked grids facedown on the formvar film. 2-Pioloform ( polyvinyl butyral) is dissolved in chloroform (0.3 - 1.5 %). The solution should be stored in a refrigerator in an amber glass bottle, and brought up to room temperature before use.
  • 13. Formvar coated grids without a carbon layer are suitable for TEM applications up to 100kV. The films are available on grids made of copper, nickel or gold. Pioloform is sometimes preferred to Formvar® because of its higher mechanical and thermal stability, and lower bulk which can help reduce electron scattering.
  • 14. 3- Butvar B98 (polyvinyl butyral) is a resin containing 20 % polyvinyl alcohol, and is normally used as a 0.25 % solution in chloroform. It is an alternative support film to Formvar. Films made from Butvar are hydrophilic, and therefore suitable for negative staining methods, having good mechanical stability, high electron-transparency and minimum intrinsic structure. Butvar B98 can also be applied to grids as an adhesive. 4- Parlodion: Its manufactured by nitrating (with nitric acid) and then sulfating (with sulfuric acid) prepared by 0.2% solution in isoamyle-acetate (Also used as gun powder). 5- Collodion: prepared by 2% collodion in amyl acetate solution.
  • 15. It has been reported that one should use only amyl acetate as the solvent for Parlodion or its sister compounds. Ethyl ether/alcohol solutions are thought to be dangerous because if ether peroxidation has occurred, the sample could explode upon drying). Ethylene dichloride and chloroform are carcinogenic and methanol is toxic. Care should be taken to avoid contact with solvents or inhaling their vapors. Old Formvar solutions should be disposed of as hazardous waste. Preparation of solutions must be under hood ,wearing protective coat, mask, gloves and goggles.
  • 16. A. Collodion support film 1. Prepare a concentration of 2% collodion in amyl acetate solution. 2. Place a drop of the collodion solution on the surface of distiller water and allow it to spread out and dry. 3. Use tweezers to pick up the film and discard it properly. This process will remove any dust floating on the water surface. Repeat the process twice or more if necessary. 4. In a vibration free environment, place a drop of the collodion solution on the surface of distiller water and allow it to spread out and dry. This leaves a thin layer of plastic on the water surface.
  • 17. Note: If thicker film is desired, user could add one or two more drops of collodion drops after the first drop is well spread and dried. Note: This method tends to produce thicker and more uneven films compared to the formvar film. 5. Check if the film is even. Remove the film if the film appears to be uneven. Note: A good coating film should appear an even grey to dark grey color when viewed by reflected light. If it appears yellowish or uneven, it is too thick and unsuitable. 6. Lay the EM grids shiny-side up (dull side down) onto the plastic film. 7. Remove the grid with film from the water using a strip of hard filter paper. User can also use Parafilm or a clean glass slide to pick up the grids. 8. Set the grids aside in a dust free place to dry before use.
  • 18. B- Pioloform support film: (Pioloform produces a stronger film than formvar) 1. Prepare a concentration of 1.2% (0.3-1.5%) in chloroform (analytical quality), adjusted with extra chloroform until films of the desired thickness are obtained. Note: To avoid the formation of holes in the films if the conditions are humid, allow to dry in a lidded container thus retaining an atmosphere of chloroform. 2. Pour approx 80ml of the pioloform solution into a 100ml container with a tap. The container should be wide enough to put in a glass microscope slide
  • 19. 3. Remove dust from a glass microscope slide with tissue, and drop into the pioloform solution. Cover the top of the container, open tap and drain solution into the stock bottle for re-use. 4. Leave the slide to dry with the cover on, thus maintaining the chloroform atmosphere within the container. 5. Score 2mm from the slide edge with razor, breathe on the film and lower into a beaker of distilled water at an angle of 45°. The film should flow on the water.
  • 20. 6. Place acetone-cleaned grids, matt side down onto the film, separating each by 3mm. 7. Cut a piece of 'Yellow Pages' (with text printing on both sides to allow even uptake of water) and leave until the whole paper is wet. Remove the grids gently from the surface with forceps. 8. For slot grids, remove from the surface of the water when 3mm has been wetted. 9. Set the grids aside in a dust free place to dry before use.
  • 21. C- Formvar coating grids:. 1. Prepare grids as mentioned before. 2. Polish slide and blow off any lint with compressed air. Keep the slide in a dry, dust- free environment until use (e.g. on filter paper under an upturned beaker). If the plastic film adheres to the slide and cannot be floated off, several different methods of cleaning the slide should be tried as cleaning a glass slide with water and detergent: a) To prevent contamination with oil from the skin do not touch the slides with bare hands (use gloves). b) Scrub the glass slide with lint-free paper, put them into the slide holder and soak in 2% RBS for at least one day. (RBS: mixtures of anionic and non- ionic surfactants. c) Rinse the slides thoroughly by running de-ionized water over the slides. d) Dry the slides by air drying but keep them dust free or dry them in an oven at relatively low temperature. After drying the slides can be stored in a slides box.  Recent attempts have shown that slides taken from a box that has been open for several weeks or slides that have been in a petri dish for several weeks are the best.
  • 22. 3. Submerge polished slide 3/4 of height with formvar solution. 4. Pour the solution into a clean Coplin jar or graduated cylinder.
  • 23. 5. Drain off the formvar solution and immediately remove slide. Touch the edge of the slide to filter paper to wick off the excess fluid and let the slide stand to dry in a dust free environment.  The film will be milky when wet but it will clear somewhat as it dries( 5-10 min.).  The thickness of the films produced is regulated by the speed with which the funnel drains (the longer the slide is within the solution ,the thicker the support film will be) and the concentration of the formvar.
  • 24. 6. Overfill a staining dish (or stainless steel bowl) with distilled water (or deionized or tap water) and clean the surface by dragging a kimwipe or plastic rod across the surface to removeany floating debris. 7. When the coated slide is dry, score 2mm from the slide edges with a sharp, ethanol or aceton cleaned razor blade 
  • 25. 8. Frost the slide by exhaling heavily onto the slide to get a layer of water vapor on and under the film. Immediately float the films onto the water surface by touching the bottom of the slide, held perpendicular or at a ~15° angle , to the water surface. Slowly lower the slide into the bath, teasing the film off as necessary. Be sure your forceps are cleaned with ethanol. Note: All the actions should be gentle and the hand should not be shaking when lowering the slide into the water.
  • 26. If the film is difficult to see, a bright desk lamp can be used to reflect light off the surface of the water and the film. A good film should appear an even grey to dark grey color when viewed by reflected light. If it appears yellowish or uneven, it is too thick and unsuitable.
  • 27. 9. Gently lay the grids, shiny/bright surface down, onto good (uniform, gray color, un-wrinkled, etc.) areas of the film.
  • 28. 10. The films with grids are picked up by: A- Place a small piece of clean, white office paper onto the surface of the grids and film and allow it to soak up water. The grids will show up through the paper when the paper is fully soaked.
  • 29. Pick up the paper, grids and film with forceps and place on dry filter paper, grid side up, in a covered Petri dish to dry.
  • 30. B- Covering them with parafilm as they float on the water surface. Pick up the edge of the parafilm and the film with grids should come with it. If they don't, try a different corner. Don't let your fingers touch the water surface, or you run the risk of leaving a film in the water and on the formvar C- Cover slide, hard filter paper or by the slide that we used to obtain the film covered by one side sticky office paper
  • 31. 11. Let the grids dry several hours before using them. Depending on your use, you may want to carbon coat them to impart greater stability to the films. Holey films need the added stability of thicker carbon. These should be coated to a gray/black color which takes about 400 milliseconds on the Emitech carbon coater. For large particles or complexes (>800 Å), it may be beneficial to carbon coat very heavily to increase the depth of the holes.
  • 32. 12. At this point, the grids may be examined in a light microscope with phase contrast illumination to determine the quality of the films. 13. Carbon-Formvar films can be easily converted into carbon-only films by placing the white paper and grids onto a piece of filter paper saturated with ethylene dichloride. The level of ethylene dichloride should be sufficient to completely soak the backing paper without submersing the tops of the grids. One half hour should be sufficient time to dissolve the Formvar film and not damage the carbon support. Remove the paper and allow it and the grids to dry.
  • 33. Another method for preparing pure-carbon films is to evaporate a layer of carbon directly onto the surface of a freshly-cleaved piece of mica. The carbon is then floated off onto water and transferred to EM grids. 14. Tape the grids and paper to a glass slide with "Scotch" tape to prevent the grids from being jostled. Place the slide in a covered petri dish. Care must still be used when handling the grids to prevent them from being scattered.
  • 34. The same steps of the previous method with following modifications: • Add about 50 drops of a 50% glycerol/water solution to the surface of the Formvar solution. Place the tip of a probe sonicator onto the surface of the solution and sonicate until mixed. Sonication intensity should be great enough to cause the solution to bubble vigorously. Mixing often requires no more than about 5 seconds. The solution should appear cloudy or milky. This should produce numerous holes that are 1-2 µm in diameter and suitable for use with frozen- hydrated samples. Sonicating for longer periods of time produces smaller holes in the film; shorter times produce larger holes.
  • 35.  NB:  Grids covered with large empty Epon sections (sections without embeded tissue) may be used in place of formvar for whole-mount supports.  Other whole-mount methods describe shorter incubation or spread time of 1-2minutes without fixatoin.
  • 36. 1. Sonicate grids in 95% ethanol in small beaker 2. Rinse with distilled water 3. Transfer grids onto filter paper and let dry 4. Polish slide with lint-free cloth until shiny/slippery, and wipe clean 5. Submerge polished slide 3/4 of height with formvar solution(0.17 FV powder to 50ml chloroform) 6. Drain off the formvar solution and immediately remove slide. Let the slide stand to dry (10 min) 7. Overfill a staining dish with distilled water 8. When the coated slide is dry, score the edges with a sharp, ethanol-cleaned razor blade 9. Frost the slide by exhaling heavily onto the slide 10. Immediately float the films onto the water surface by touching the bottom of the slide, held perpendicular, to the water surface. Slowly lower the slide into the bath 11. Gently lay the grids, face down, on the film in the regions that are of the proper thickness and without wrinkles etc 13. The films with grids are picked up by cover slide 14 Let the grids dry several hours before using them. Depending on your use, you may want to carbon coat them to impart greater stability to the films.
  • 37. • After picking up the formvar grids from DW: 1. let them completely dry. 2. place the paper with the film and grids onto a piece of filter paper that is just saturated with methanol. The glycerol in the Formvar solution often produces bubbles in the film not open holes. The methanol treatment will break the thin film over these "pseudo-holes". 3. Soak in a covered petri dish for about 40-50 minutes. 4. Allow the film to dry before carbon coating.

Editor's Notes

  1. Sonication: exposure to sound waves; disruption of bacteria by exposure to high-frequency sound waves
  2. Hygroscopic: absorb moisture from air
  3. اقتراحي الزق بارافيم علي سلايد والقط بيها
  4. Phase contrast microscopy is an optical microscopy technique that converts phase shifts in light passing through a transparent specimen to brightness changes in the image. Phase shifts themselves are invisible, but become visible when shown as brightness variations. Phase contrast microscopy is particularly important in biology. It reveals many cellularstructures that are not visible with a simpler bright field microscope. These structures were made visible to earlier microscopists by staining, but this required additional preparation and killed the cells. The phase contrast microscope made it possible for biologists to study living cells and how they proliferate through cell division