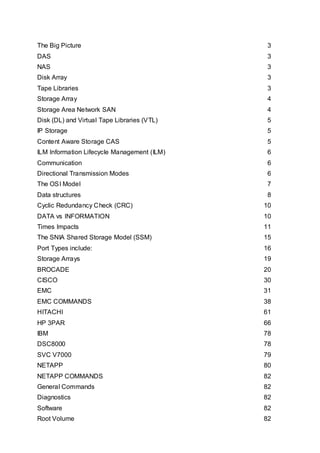
This document provides an overview of various storage technologies and concepts, including:
1) Disk array controllers that manage I/O to improve performance and protect against disk failures. Tape libraries evolved to provide common power and handling for multiple tape drives.
2) Network attached storage (NAS) allows file sharing across a network by making remote files appear local. Storage arrays combine disk arrays and provide common management of storage capacity.
3) Storage area networks (SANs) connect computer systems and storage using a switched network infrastructure, allowing storage access without direct physical connections. Disk and virtual tape libraries use disk arrays for backup and recovery.


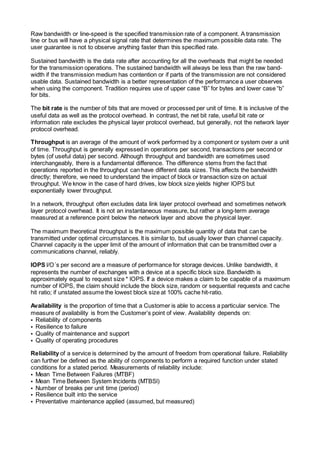


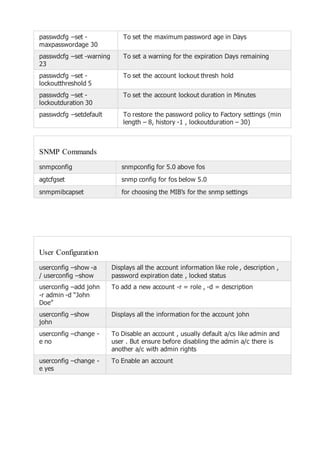
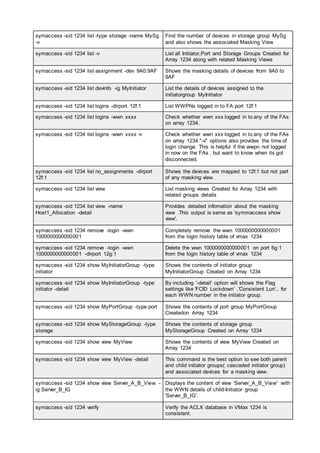
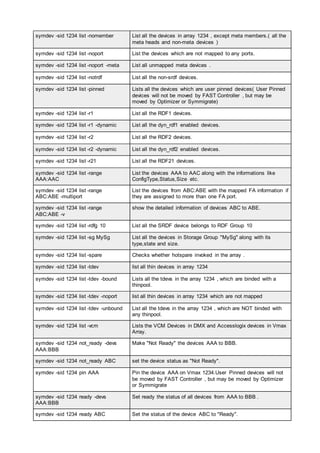
![switchuptime OR
uptime
Displays the uptime for the switch
firmwareshow Displays the firmware on the switch
version Displays the current firmware version on the switch
hashow Displays the status of local and remote CP’s. High availability ,
heartbeat and synchronization
Port Settings
portcfgshow Displays the port settings
portcfg rscnsupr
[slot/port] –enable
A registered state change registration is suppressed when a
state change occurs on the port
portcfg rscnsupr
[slot/port] –disable
A registered state change registration is sent when a state
change occurs on the port
portname To assign a name for a port
portdisable To disable a port or slot
portenable To enable a port or slot
portcfgpersistentdisa
ble
To disable a port , status would not change even after
rebooting the switch
portcfgpersistentena
ble
To enable a port , status would not change even after
rebooting the switch
portshow To show the port status
portcfgspeed , To set speed for a port#te – 0:auto negotiated 1,2,4 Gbit/sec
, 1 : 1Gbit/sec , 2 : 2 Gbit/sec , 4 : 4Gbit/sec
switchcfgspeed To set speed for all the ports on the switch Note – 0:auto
negotiated 1,2,4 Gbit/sec , 1 : 1Gbit/sec , 2 : 2 Gbit/sec , 4 :
4Gbit/sec
portcfgshow Displays the speed set for all ports on all slots and other
detailed port information
portcfgdefault To set the port settings to default
portcfglongdistance To set the long distance mode . Default is L0(Normal), as per
distance will display LE <=10 kms , L0.5 <=25kms , L1
<=50 kms, L2<=100kms , LD=auto , LS = Static
portcfgeport Used to disable a port from being a E port](https://image.slidesharecdn.com/1b86d326-7055-414f-9182-32169c6339a3-160523023920/85/Storage-23-320.jpg)

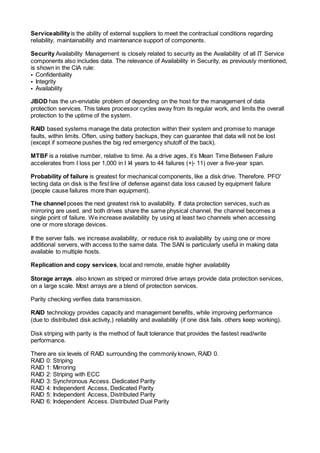
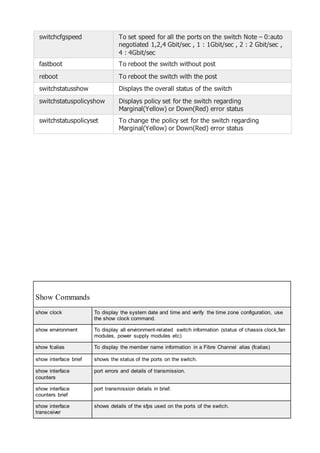
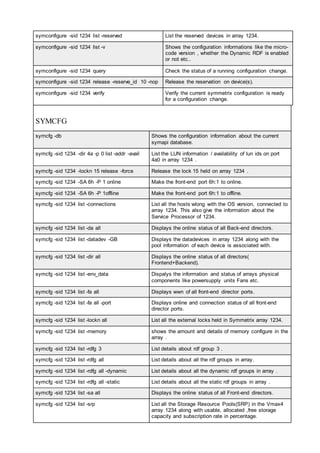
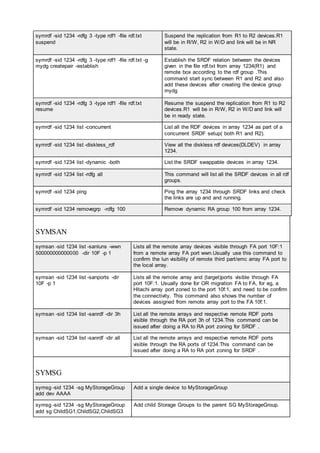
![Firmware commands
configupload Saves the switch config as an ASCII text
file to an FTP server
configdownload To restore a switch configuration from
ASCII text file Note – Need to disable the
switch before downloading the config file
configure => cfgload attributes : [y]
=> Ensure secure config upload /
download : [y]
Fabric OS v 4.4 & above provides Secure
File Copy Protocol (SCP) during upload or
download of configurations
firmwaredownload To download the firmware to be installed
on the switch
firmwareshow To be run after installing the firmware on
the switch
version Displays the current firmware version on
the switch
fastboot Needs to be run after installing the
firmware. This does not include the post.
reboot Needs to be run after installing the
firmware. This includes the post.
Miscellaneous commands
killtelnet To kill a particular session which is using telnet
configure To configure a switch
quietmode To switch off the quiet mode
quietmode 1 To suppress messages to the console
switchname Displays the switch name
switchname “EXAMPLE” To assign a switch name
bannerset To set the banner which will appear when logging in using
the CLI or web tools
timeout Displays the timeout time set for Telnet session on the
switch
timeout 10 To set a specific timeout time for the Telnet session
switchuptime or uptime Displays the uptime for the switch](https://image.slidesharecdn.com/1b86d326-7055-414f-9182-32169c6339a3-160523023920/85/Storage-26-320.jpg)
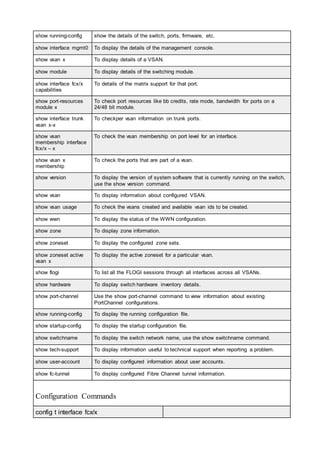


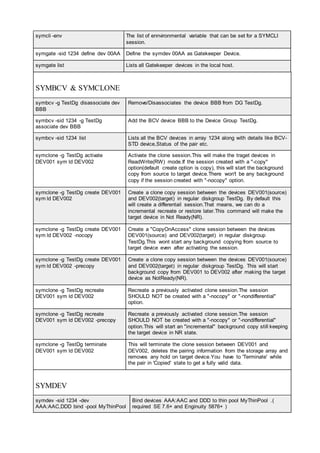


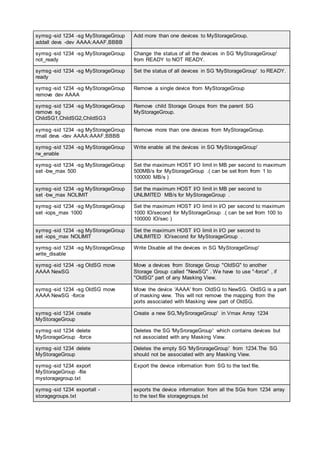


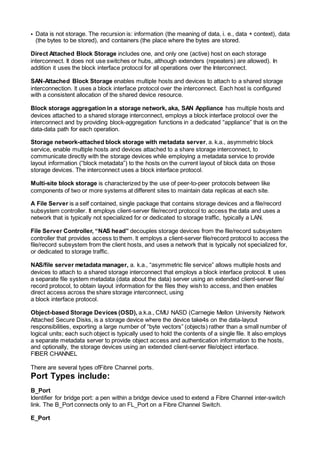
![pairresync Re-establishes a split pair volume and then restarts the update copy
operations to the secondary volume. The pairresync command can
resynchronize either a paired logical volume or a group of paired volumes.
pairsplit Splits and deletes volume pairs.
pairsyncwait Used to confirm data consistency between the TrueCopy Async/ Universal
Replicator P-VOL and S-VOL by confirming that required writing was
stored in the DFW area of RCU, and confirming whether the last writing
just before this command reached the RCUDFW area.
pairvolchk Checks the attributes and status of a pair volume. It acquires and reports
the attribute of a volume or group connected to the local host (issuing the
command) or remote host. The volume attribute is SMPL (simplex), P VOL
(primary volume), or S VOL (secondary volume).
raidar Displays the status and I/O activity information for the specified
port/TID(s)/LUN(s) at the specified time interval. The configuration
information is acquired directly from the storage system (not from the
configuration definition file).
raidqry Displays the configuration of the connected host and RAID storage
system.
raidscan Displays the status information for the specified port/TID(s)/
LUN(s)/MU#(s). The information is acquired directly from the storage
system (not the configuration definition file).
raidvchkdsp Displays the parameters for data validation of the specified volumes. Unit
of checking for the validation is based on the group of CCI configuration
definition file.
raidvchkscan Displays the fibre port of the storage system, target ID, LDEV mapped for
LUN#, and LDEV status, regardless of the configuration definition file.
raidvchkscan (for
UR/URz)
Supports the (-v jnl [t] [unit#]) option to find the journal volume list setting.
It also displays any information for the journal volume. The Universal
Replicator function is available on the USP V/VM and TagmaStore
USP/TagmaStore NSC storage systems.
raidvchkscan (for
Thin Image, Copy-
on-Write Snapshot,
or Dynamic
Provisioning pool)
Supports the option (-v pid[a] [unit#]) to find the Thin Image, Copy-on-
Write Snapshot, or Dynamic Provisioning pool settings, and displays
information for the Thin Image, Copy-on-Write Snapshot, or Dynamic
Provisioning pool.
raidvchkset You can set the parameters for data validation of the specified volumes.
You also can set to off all of the validation checking without specifying
[type]. Unit of checking for the validation is based on the group of CCI
configuration definition file.
HP 3PAR
The tightly-clustered HP 3PAR Architecture is the storage architecture for the next decade. This
design brings together next-generation hardware and unique software innovations that combine
the benefits of modular and monolithic architectures while eliminating price premiums and scaling
complexities. The revolutionary, zero-detection capable HP 3PAR ASIC uses Thin Built In](https://image.slidesharecdn.com/1b86d326-7055-414f-9182-32169c6339a3-160523023920/85/Storage-66-320.jpg)


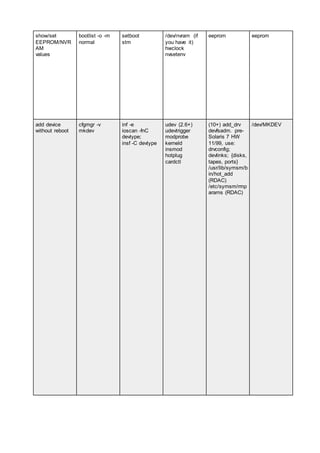
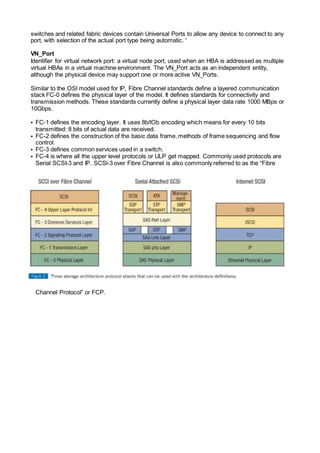
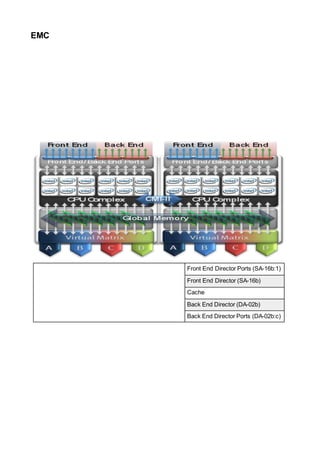
![remove device rmdev rmsf ? (10+) rem_drv
devfsadm
?
tape device /dev/rmt0 /dev/rmt/0m /dev/st0 /dev/rmt/0 /dev/rst0
stdin/ stdout/
stderr
? ? /dev/fd/[012] /dev/fd/[012] ?
X kvm config ? itemap xorgcfg
xorgconfig
Xorg -configure
system-config-
display
xf86config
XFree86 -
configure
redhat-config-
xfree86
/etc/X11/?dm
kdmconfig (x86)
fbconfig;
m64config;
(etc.)
?
TASK OS AIX HP-UX Linux Solaris SunOS 4](https://image.slidesharecdn.com/1b86d326-7055-414f-9182-32169c6339a3-160523023920/85/Storage-91-320.jpg)
![read a disk
label
lspv scsimgr
(11.31+)
diskinfo
pvdisplay
fdisk -l prtvtoc dkinfo
whole disk in
partition
hdisk[0,1,2,...] ? /dev/hda (e.g. if
/dev/hda1
is a partition)
2 c
label a disk mkvg pvcreate cfdisk
fdisk
gdisk
e2label
format
prtvtoc
(x86) fdisk
format
partition a disk mklv smh (11.31+)
lvcreate
sam
parted (if you
have it)
cfdisk
fdisk
gdisk
pdisk (on a
MAC)
(deb) mac-fdisk
(on a MAC)
(md) diskdrake
format
fmthard
format
TASK OS AIX HP-UX Linux Solaris SunOS 4](https://image.slidesharecdn.com/1b86d326-7055-414f-9182-32169c6339a3-160523023920/85/Storage-92-320.jpg)

![load module vxketadm
modname load
cfgmgr
mkdev -l
devname
kmadmin -L
kcmodule
module=loaded
(11.23+)
modprobe
insmod
modload ?
unload module rmdev -l
devname
kmadmin -U
kcmodule
module=unused
(11.23+)
rmmod
modprobe -r
modunload ?
make disk
bootable
bosboot -a mkboot (rh) mkbootdisk
(deb) fdisk -A
(and lilo to
manipulate
mbr)
installboot
/usr/platform/
`uname -i`
/lib/fs/ufs/bootbl
k
raw_device_file
/usr/kvm/mdec
installboot [-
hltv]
protobootblk
bootdevice
startup scripts /etc/rc*
/etc/inittab
/etc/rc* (9)
/etc/rc.config.d
(preferred)
/sbin/rc* (10+)
/sbin/init.d/
/etc/rc* (but
may vary)
/etc/init.d/
chkconfig
service
/etc/rc*
/etc/init.d/
(10+) svcadm
(10+) svcs
/etc/rc*
start/ stop/
config services
startsrc
stopsrc
lssrc
refresh
srcmstr
? (rh) service
(rh) chkconfig
(deb) sysv-rc-
conf
svcs (10+)
svcadm (10+)
?](https://image.slidesharecdn.com/1b86d326-7055-414f-9182-32169c6339a3-160523023920/85/Storage-94-320.jpg)


![firewall config genfilt
smitty ipsec4
wsm network
/etc/opt/ipf/ipf.c
onf
iptables
ipchains
ipfwadm
(rh) redhat-
config-
securitylevel
(10+) ipf, ipfs,
ipfstat
/etc/ipf/ipf.conf
(9+) /usr/aset/
(hardening tool)
(9) SunScreen
3.2
?
TASK OS AIX HP-UX Linux Solaris SunOS 4
show installed
software
lslpp -L rmfn, what (HP-
UX 9)
swlist (HP-UX
10+)
swm list
(11.31+)
(rh) rpm -a -i
(rh) rpm -qa
(rh) yum list
installed
(deb) dselect
(deb) aptitude
(deb) dpkg -l
(gen) ls
/var/db/pkg/*
(gen) eix -I
pkginfo
prodreg
admintool
/var/sadm/install
/contents
?
file is in which
package
lslpp -w file
rpm -qif file
which_fileset
swlist -l file |
grep file
(deb) dpkg --
search file
(deb) apt-file
update && apt-
file search file
(rh) rpm -qif file
(gen) equery b
file
(gen) qfile file
pkgchk -l -p
binaryToCheck
?
add software smitty install
rpm -ihv
installp -acgxYd
/sourcedir
[fileset|ALL]
swm install
(11.31+)
swinstall
(rh) rpm -hiv
(rh) yum install
pkg
(deb) dselect
(deb) apt-get
install pkg
(deb) dpkg -i
(md) urpmi
pkgadd ?](https://image.slidesharecdn.com/1b86d326-7055-414f-9182-32169c6339a3-160523023920/85/Storage-105-320.jpg)


![Server interview[1]](https://cdn.slidesharecdn.com/ss_thumbnails/serverinterview1-170120070259-thumbnail.jpg?width=640&height=640&fit=bounds)