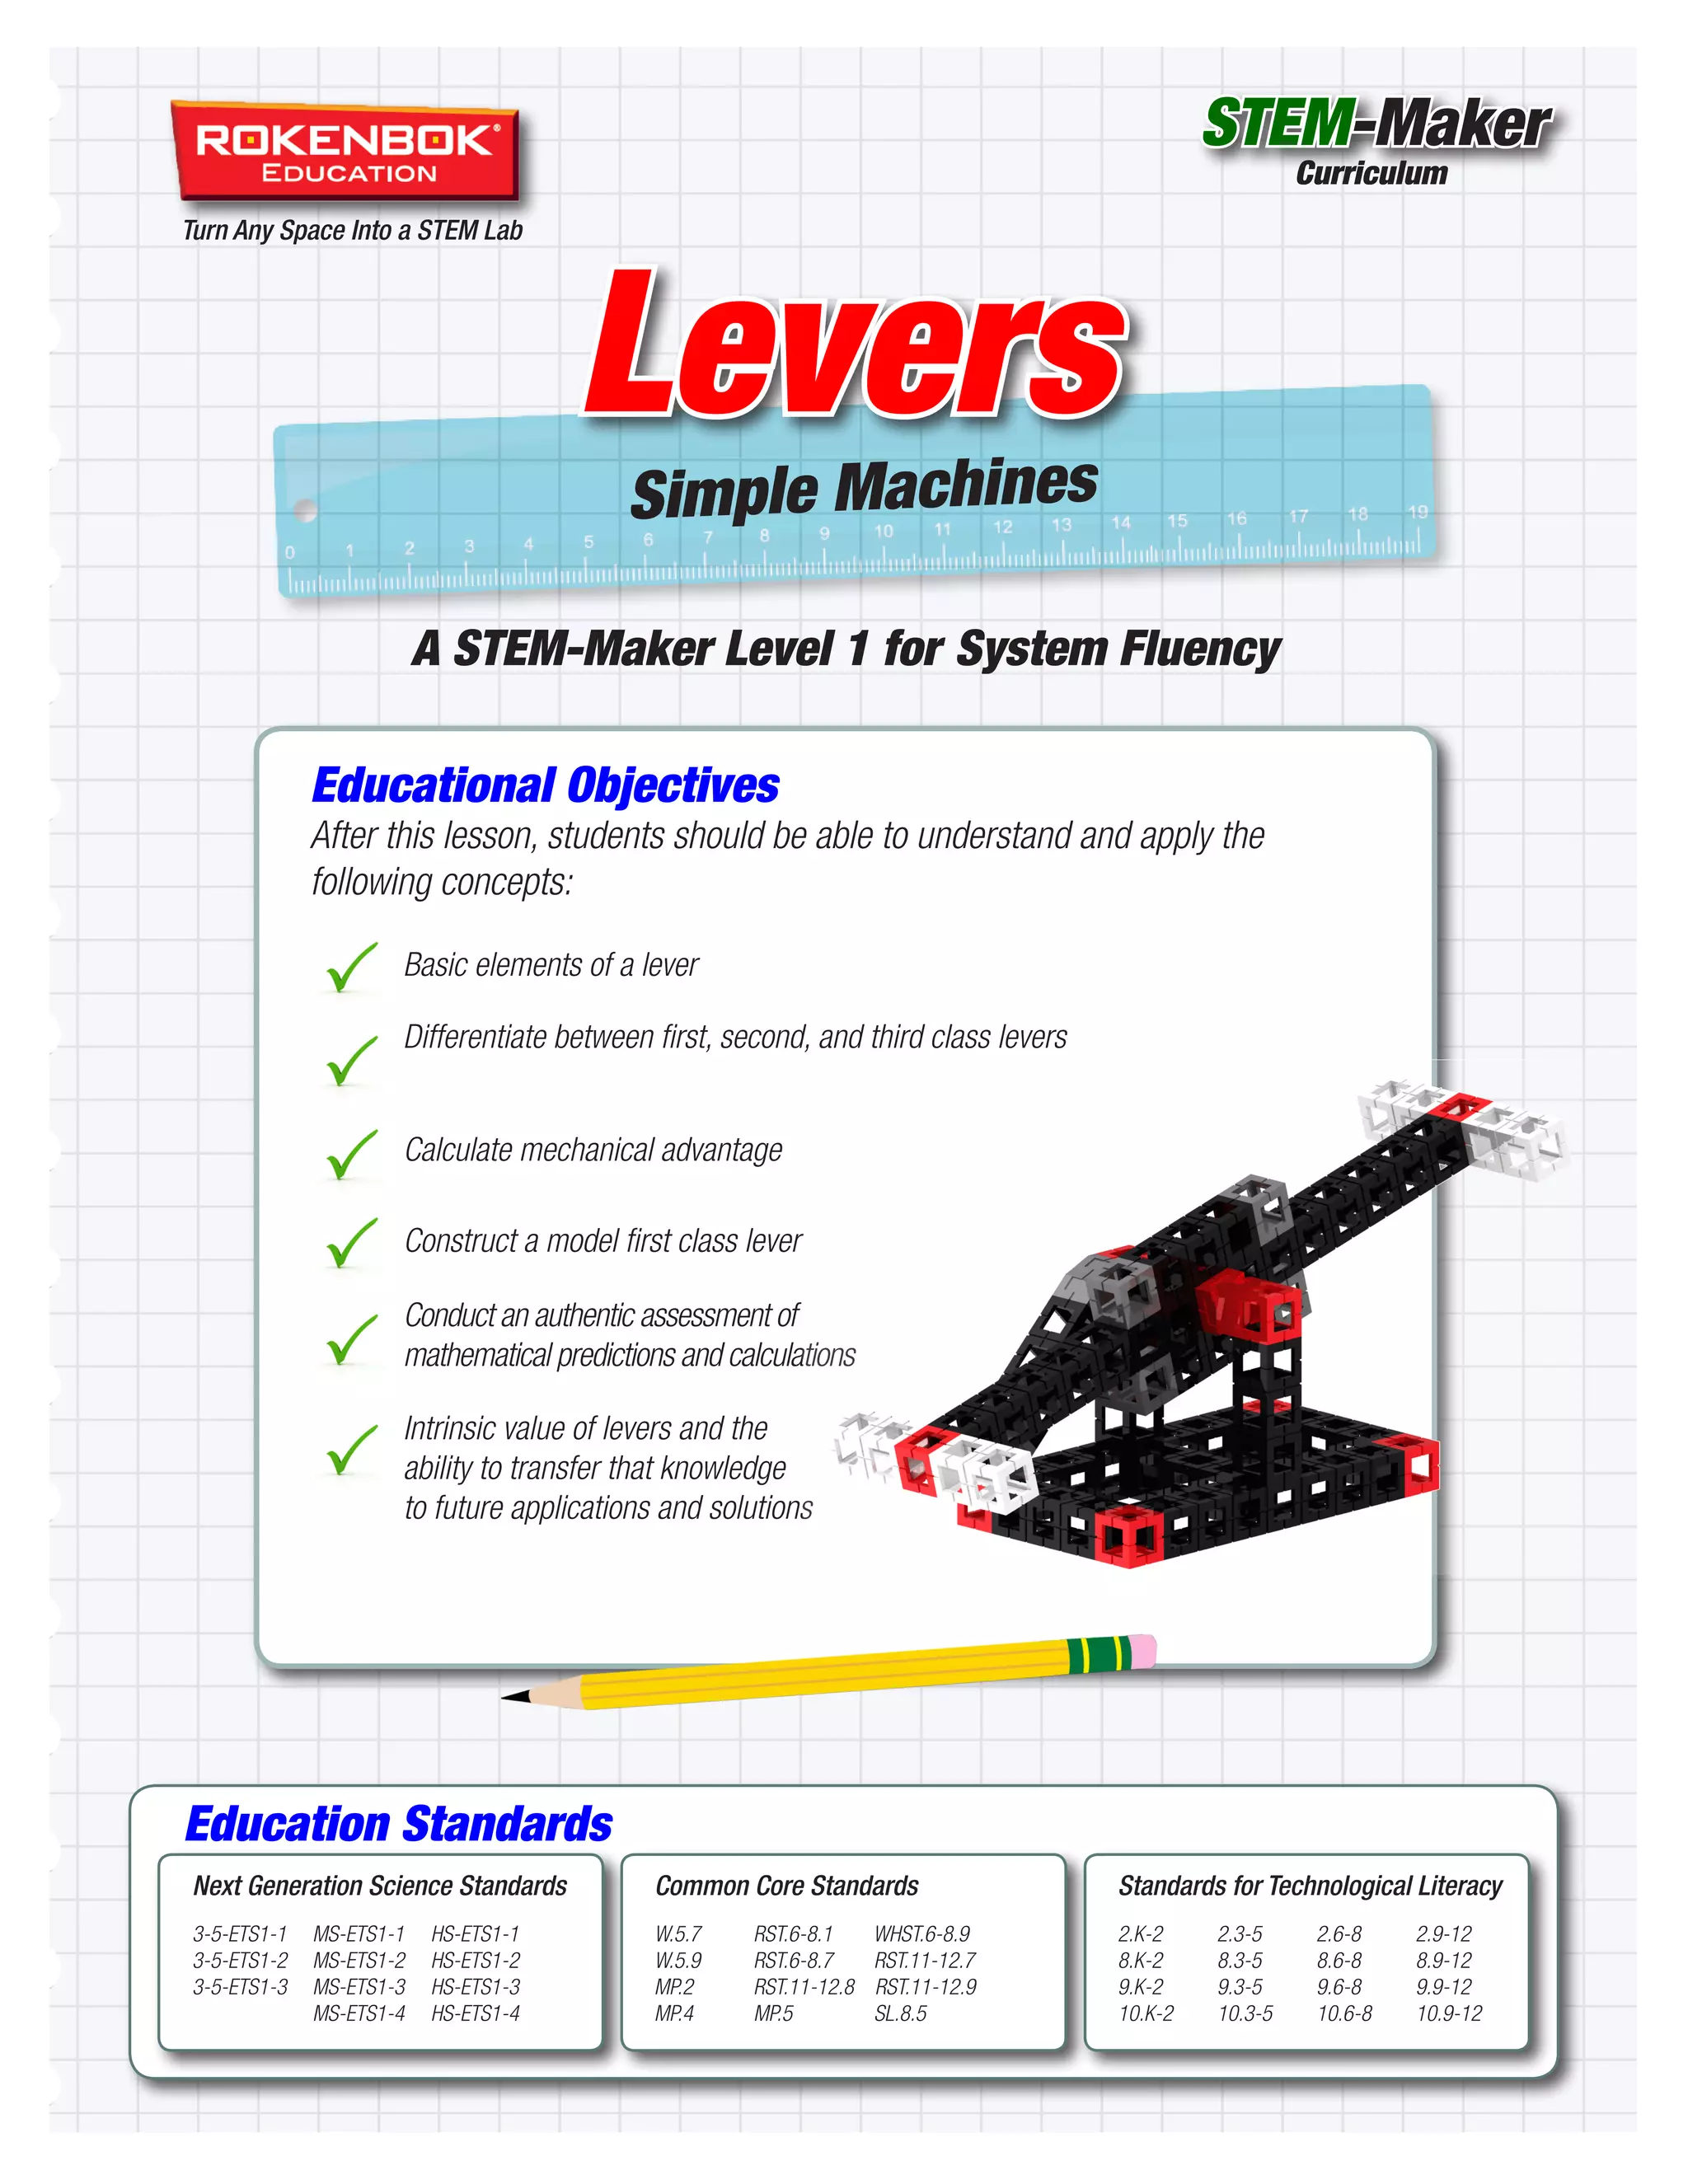
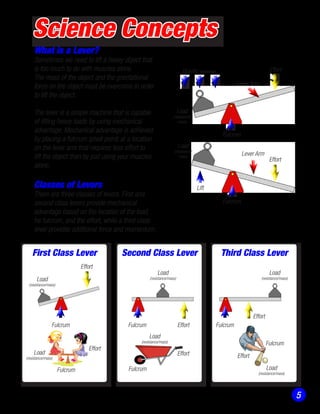
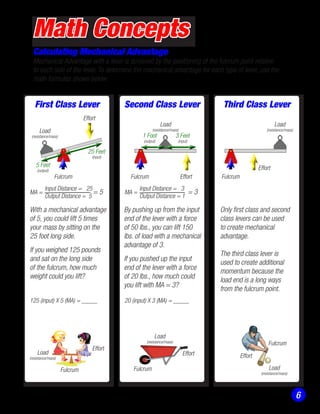
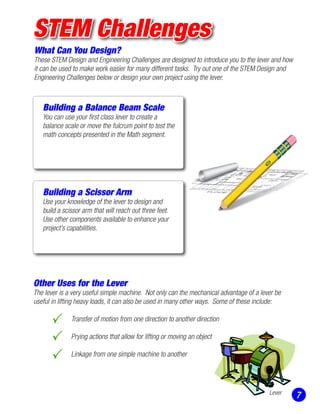
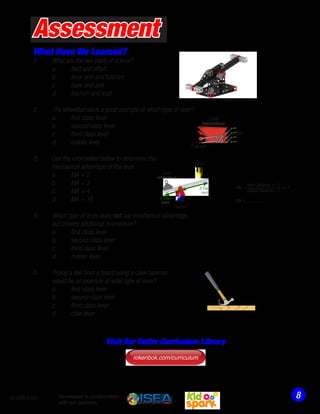
Levers
Simple Machines
A STEM-Maker Level 1 for System Fluency
Education Standards
STEM-Maker
Curriculum
Turn Any Space Into a STEM Lab
Standards for Technological Literacy
2.K-2	2.3-5	2.6-8	2.9-12	
8.K-2	 8.3-5 	 8.6-8	 8.9-12		
9.K-2	9.3-5	9.6-8	9.9-12
10.K-2	10.3-5	10.6-8	10.9-12
Next Generation Science Standards
3-5-ETS1-1	 MS-ETS1-1 HS-ETS1-1
3-5-ETS1-2	 MS-ETS1-2 HS-ETS1-2
3-5-ETS1-3	 MS-ETS1-3 HS-ETS1-3
	 MS-ETS1-4 HS-ETS1-4
Common Core Standards
W.5.7 	 RST.6-8.1	 WHST.6-8.9
W.5.9	 RST.6-8.7	 RST.11-12.7
MP.2	 RST.11-12.8 RST.11-12.9
MP.4	 MP.5	 SL.8.5
Educational Objectives
After this lesson, students should be able to understand and apply the
following concepts:
Basic elements of a lever
Differentiate between first, second, and third class levers
Calculate mechanical advantage
Construct a model first class lever
Conduct an authentic assessment of
mathematical predictions and calculations
Intrinsic value of levers and the
ability to transfer that knowledge
to future applications and solutions
Table of Contents
Introduction
	 Introduction ............................................................................................................................	 1
	 Key Terms ..............................................................................................................................	 1
	 Additional Resources ..............................................................................................................	 1
	 Building Basics with Rokenbok .................................................................................................	 2
Technology and Engineering
	 Bill of Materials .......................................................................................................................	 3
	 Building a Lever .....................................................................................................................	 3-4
Science Concepts
	 What is a Lever? ......................................................................................................................	 5
	 Classes of Levers ....................................................................................................................	 5
Math Concepts
	 Calculating Mechanical Advantage ...........................................................................................	 6
STEM Challenges
	 Building a Balance Beam Scale .. ..............................................................................................	 7
	 Building a Scissor Arm .............................................................................................................	 7
Assessment
Level 1 Simple Machines: The Lever
Welcome
From basic STEM literacies to 3D solid modeling, Rokenbok STEM-MAKER curriculum was created
to help you teach technology, engineering, and design in almost any setting. Rokenbok’s STEM-
Maker Curriculum guides fun and engaging hands-on project based challenges, and models the
progression of fluencies mastered by real designers and engineers. Lesson plans are categorized
in three progressive levels for grades 3-12 and align with NGSS and common core state standards.
Progression through these levels builds confidence, a sense of accomplishment setting the
groundwork for a love of learning, creating and making.
Step-by-step, single-solution
projects introduce Rokenbok
materials and how the
system works.
System Fluency Creative Fluency Engineering Fluency
Realistic design briefs
challenge the student to
solve a problem basedon the
skills learned in Level 1. Students
add their own design creativity
to solve a problem using the
Rokenbok system.
A more advanced design brief
challenges students to design
and build custom parts to
complete a project. Students
use the Rokenbok Open
Source Library and 3D solid
modeling software to adapt
and create their own parts
and tools.
Introduction
Introduction
This Level 1 project is designed to introduce your students to one of the six simple machines,
the lever. Students will learn how levers work by making their own lever system, applying the
mathematics behind a lever, as well as learning key terms related to the subject matter.
Key Terms
Lever: 	 A rigid bar resting on a pivot, used to help move a heavy or firmly 	
	 fixed load with one end when pressure is applied to the other.
Simple Machine: 	 A device that transmits or modifies force or motion.
Effort: 	 Force used to move an object over a distance.
Resistance/Mass: 	 Force to overcome, object to be moved, otherwise known as load.
Fulcrum: 	 The pivot point of a lever that helps create mechanical advantage.
Mechanical		
Advantage:	 The advantage gained by the use of a mechanism in
	 transmitting force.
Additional Resources
http://scienceforkids.kidipede.com/physics/machines/lever.htm
www.enchantedlearning.com/physics/machines/Levers.shtml
http://iqa.evergreenps.org/science/phy_science/ma.html
1
2
Building Basics with Rokenbok
You will be using the Rokenbok Education ROK Ed Rover or SnapStack module for
this project.
Snapping:
Rokenbok building components snap together for
a snug fit. It is easier to snap pieces together by
angling the beam into the block.
Bracing:
Use braces to strengthen any Rokenbok build.
Girders, 2-way braces, 3-way braces, and
corbels are all commonly used for this purpose.
Disassemble:
Always use the Rokenbok key tool when taking apart
pieces. Insert the tab on the key into the engineered
slot on each piece and twist slightly. This will protect
your fingers and minimize broken pieces.
Take Inventory:
It is recommended to take inventory of all components at the end of each build and
a complete check at the end of the school year. Replacement pieces can be found
online at Rokenbok.com/Education
Component Care:
All building components should be cleaned regularly with a mild detergent and water.
Snapping
Bracing
Disassemble
3
Technology & Engineering
Building a Lever
Follow the step-by-step instructions to build a lever.
2
Bill of Materials
9x 2x
4x
4x
Makes one lever.
4x
4x
1 Building the Base
8x
Building the Fulcrum
Technology & Engineering
Building a Lever
Follow the step-by-step instructions to build a first class lever.
3
4
Building Lever Beam
Final Lever Assembly
4
Science Concepts
What is a Lever?
Sometimes we need to lift a heavy object that
is too much to do with muscles alone.
The mass of the object and the gravitational
force on the object must be overcome in order
to lift the object.
The lever is a simple machine that is capable
of lifting heavy loads by using mechanical
advantage. Mechanical advantage is achieved
by placing a fulcrum (pivot point) at a location
on the lever arm that requires less effort to
lift the object than by just using your muscles
alone.
Classes of Levers
There are three classes of levers. First and
second class levers provide mechanical
advantage based on the location of the load,
he fulcrum, and the effort, while a third class
lever provides additional force and momentum.
Load
(resistance/
mass)
Gravity (resistance)
Lever Arm
Lift
Fulcrum
Effort
Effort
Lever Arm
Fulcrum
Load
(resistance/
mass)
First Class Lever
Fulcrum
Load
(resistance/mass)
Effort
Load
(resistance/mass)
Fulcrum
Effort
Second Class Lever
Fulcrum
Load
(resistance/mass)
Effort
Third Class Lever
Fulcrum
Load
(resistance/mass)
Effort
Load
(resistance/mass)
Fulcrum
Effort
Load
(resistance/mass)
Fulcrum
Effort
5
Math Concepts
Calculating Mechanical Advantage
Mechanical Advantage with a lever is achieved by the positioning of the fulcrum point relative
to each side of the lever. To determine the mechanical advantage for each type of lever, use the
math formulas shown below:
First Class Lever
Fulcrum
Load
(resistance/mass)
Effort
Load
(resistance/mass)
Fulcrum
Effort
Second Class Lever
Fulcrum
Load
(resistance/mass)
Effort
Third Class Lever
Fulcrum
Load
(resistance/mass)
Effort
Load
(resistance/mass)
Fulcrum
Effort
Load
(resistance/mass)
Fulcrum
Effort
5 Feet
(output)
25 Feet
(input)
MA =
Input Distance = 25
Output Distance = 5
= 5
With a mechanical advantage
of 5, you could lift 5 times
your mass by sitting on the
25 foot long side.
If you weighed 125 pounds
and sat on the long side
of the fulcrum, how much
weight could you lift?
MA =
Input Distance = 3
Output Distance = 1
= 3
3 Feet
(input)
1 Foot
(output)
By pushing up from the input
end of the lever with a force
of 50 lbs., you can lift 150
lbs. of load with a mechanical
advantage of 3.
If you pushed up the input
end of the lever with a force
of 20 lbs., how much could
you lift with MA = 3?
125 (input) X 5 (MA) = _____ 20 (input) X 3 (MA) = _____
Only first class and second
class levers can be used
to create mechanical
advantage.
The third class lever is
used to create additional
momentum because the
load end is a long ways
from the fulcrum point.
6
STEM Challenges
What Can You Design?
These STEM Design and Engineering Challenges are designed to introduce you to the lever and how
it can be used to make work easier for many different tasks. Try out one of the STEM Design and
Engineering Challenges below or design your own project using the lever.
Building a Balance Beam Scale
You can use your first class lever to create a
balance scale or move the fulcrum point to test the
math concepts presented in the Math segment.
Other Uses for the Lever
The lever is a very useful simple machine. Not only can the mechanical advantage of a lever be
useful in lifting heavy loads, it can also be used in many other ways. Some of these include:
		 Transfer of motion from one direction to another direction
		 Prying actions that allow for lifting or moving an object
		 Linkage from one simple machine to another
		
7
Building a Scissor Arm
Use your knowledge of the lever to design and
build a scissor arm that will reach out three feet.
Use other components available to enhance your
project’s capabilities.
Lever
What Have We Learned?
1.	 What are the two parts of a lever?
	 a.	 load and effort
	 b. 	 lever arm and fulcrum
	 c.	 base and axle
	 d.	 fulcrum and load
2.	 The wheelbarrow is a good example of which type of lever?
	 a.	 first class lever
	 b.	 second class lever
	 c.	 third class lever
	 d.	 mobile lever
3.	 Use the information below to determine the
	 mechanical advantage of the lever.
	 a.	 MA = 2
	 b.	 MA = 3
	 c.	 MA = 4
	 d.	 MA = 16
4.	 Which type of lever does not use mechanical advantage,
	 but creates additional momentum?
	 a.	 first class lever
	 b.	 second class lever
	 c.	 third class lever
	 d.	 motion lever
5.	 Prying a nail from a board using a claw hammer
	 would be an example of what type of lever?
	 a.	 first class lever
	 b.	 second class lever
	 c.	 third class lever
	 d.	 claw lever
Assessment
MA =
Input Distance = ?
Output Distance = ?
= ?
Fulcrum
Load
(resistance/mass)
Effort
2 Feet
(output)
8 Feet
(input)
MA = ______
Load
(resistance/mass)
Fulcrum
Effort
850-00974-001
rokenbok.com/curriculum
Visit Our Entire Curriculum Library
Developed in collaboration
with our partners:

Stem Education - Levers

  • 1.
    Levers Simple Machines A STEM-MakerLevel 1 for System Fluency Education Standards STEM-Maker Curriculum Turn Any Space Into a STEM Lab Standards for Technological Literacy 2.K-2 2.3-5 2.6-8 2.9-12 8.K-2 8.3-5 8.6-8 8.9-12 9.K-2 9.3-5 9.6-8 9.9-12 10.K-2 10.3-5 10.6-8 10.9-12 Next Generation Science Standards 3-5-ETS1-1 MS-ETS1-1 HS-ETS1-1 3-5-ETS1-2 MS-ETS1-2 HS-ETS1-2 3-5-ETS1-3 MS-ETS1-3 HS-ETS1-3 MS-ETS1-4 HS-ETS1-4 Common Core Standards W.5.7 RST.6-8.1 WHST.6-8.9 W.5.9 RST.6-8.7 RST.11-12.7 MP.2 RST.11-12.8 RST.11-12.9 MP.4 MP.5 SL.8.5 Educational Objectives After this lesson, students should be able to understand and apply the following concepts: Basic elements of a lever Differentiate between first, second, and third class levers Calculate mechanical advantage Construct a model first class lever Conduct an authentic assessment of mathematical predictions and calculations Intrinsic value of levers and the ability to transfer that knowledge to future applications and solutions
  • 2.
    Table of Contents Introduction Introduction ............................................................................................................................ 1 Key Terms .............................................................................................................................. 1 Additional Resources .............................................................................................................. 1 Building Basics with Rokenbok ................................................................................................. 2 Technology and Engineering Bill of Materials ....................................................................................................................... 3 Building a Lever ..................................................................................................................... 3-4 Science Concepts What is a Lever? ...................................................................................................................... 5 Classes of Levers .................................................................................................................... 5 Math Concepts Calculating Mechanical Advantage ........................................................................................... 6 STEM Challenges Building a Balance Beam Scale .. .............................................................................................. 7 Building a Scissor Arm ............................................................................................................. 7 Assessment Level 1 Simple Machines: The Lever Welcome From basic STEM literacies to 3D solid modeling, Rokenbok STEM-MAKER curriculum was created to help you teach technology, engineering, and design in almost any setting. Rokenbok’s STEM- Maker Curriculum guides fun and engaging hands-on project based challenges, and models the progression of fluencies mastered by real designers and engineers. Lesson plans are categorized in three progressive levels for grades 3-12 and align with NGSS and common core state standards. Progression through these levels builds confidence, a sense of accomplishment setting the groundwork for a love of learning, creating and making. Step-by-step, single-solution projects introduce Rokenbok materials and how the system works. System Fluency Creative Fluency Engineering Fluency Realistic design briefs challenge the student to solve a problem basedon the skills learned in Level 1. Students add their own design creativity to solve a problem using the Rokenbok system. A more advanced design brief challenges students to design and build custom parts to complete a project. Students use the Rokenbok Open Source Library and 3D solid modeling software to adapt and create their own parts and tools.
  • 3.
    Introduction Introduction This Level 1project is designed to introduce your students to one of the six simple machines, the lever. Students will learn how levers work by making their own lever system, applying the mathematics behind a lever, as well as learning key terms related to the subject matter. Key Terms Lever: A rigid bar resting on a pivot, used to help move a heavy or firmly fixed load with one end when pressure is applied to the other. Simple Machine: A device that transmits or modifies force or motion. Effort: Force used to move an object over a distance. Resistance/Mass: Force to overcome, object to be moved, otherwise known as load. Fulcrum: The pivot point of a lever that helps create mechanical advantage. Mechanical Advantage: The advantage gained by the use of a mechanism in transmitting force. Additional Resources http://scienceforkids.kidipede.com/physics/machines/lever.htm www.enchantedlearning.com/physics/machines/Levers.shtml http://iqa.evergreenps.org/science/phy_science/ma.html 1
  • 4.
    2 Building Basics withRokenbok You will be using the Rokenbok Education ROK Ed Rover or SnapStack module for this project. Snapping: Rokenbok building components snap together for a snug fit. It is easier to snap pieces together by angling the beam into the block. Bracing: Use braces to strengthen any Rokenbok build. Girders, 2-way braces, 3-way braces, and corbels are all commonly used for this purpose. Disassemble: Always use the Rokenbok key tool when taking apart pieces. Insert the tab on the key into the engineered slot on each piece and twist slightly. This will protect your fingers and minimize broken pieces. Take Inventory: It is recommended to take inventory of all components at the end of each build and a complete check at the end of the school year. Replacement pieces can be found online at Rokenbok.com/Education Component Care: All building components should be cleaned regularly with a mild detergent and water. Snapping Bracing Disassemble
  • 5.
    3 Technology & Engineering Buildinga Lever Follow the step-by-step instructions to build a lever. 2 Bill of Materials 9x 2x 4x 4x Makes one lever. 4x 4x 1 Building the Base 8x Building the Fulcrum
  • 6.
    Technology & Engineering Buildinga Lever Follow the step-by-step instructions to build a first class lever. 3 4 Building Lever Beam Final Lever Assembly 4
  • 7.
    Science Concepts What isa Lever? Sometimes we need to lift a heavy object that is too much to do with muscles alone. The mass of the object and the gravitational force on the object must be overcome in order to lift the object. The lever is a simple machine that is capable of lifting heavy loads by using mechanical advantage. Mechanical advantage is achieved by placing a fulcrum (pivot point) at a location on the lever arm that requires less effort to lift the object than by just using your muscles alone. Classes of Levers There are three classes of levers. First and second class levers provide mechanical advantage based on the location of the load, he fulcrum, and the effort, while a third class lever provides additional force and momentum. Load (resistance/ mass) Gravity (resistance) Lever Arm Lift Fulcrum Effort Effort Lever Arm Fulcrum Load (resistance/ mass) First Class Lever Fulcrum Load (resistance/mass) Effort Load (resistance/mass) Fulcrum Effort Second Class Lever Fulcrum Load (resistance/mass) Effort Third Class Lever Fulcrum Load (resistance/mass) Effort Load (resistance/mass) Fulcrum Effort Load (resistance/mass) Fulcrum Effort 5
  • 8.
    Math Concepts Calculating MechanicalAdvantage Mechanical Advantage with a lever is achieved by the positioning of the fulcrum point relative to each side of the lever. To determine the mechanical advantage for each type of lever, use the math formulas shown below: First Class Lever Fulcrum Load (resistance/mass) Effort Load (resistance/mass) Fulcrum Effort Second Class Lever Fulcrum Load (resistance/mass) Effort Third Class Lever Fulcrum Load (resistance/mass) Effort Load (resistance/mass) Fulcrum Effort Load (resistance/mass) Fulcrum Effort 5 Feet (output) 25 Feet (input) MA = Input Distance = 25 Output Distance = 5 = 5 With a mechanical advantage of 5, you could lift 5 times your mass by sitting on the 25 foot long side. If you weighed 125 pounds and sat on the long side of the fulcrum, how much weight could you lift? MA = Input Distance = 3 Output Distance = 1 = 3 3 Feet (input) 1 Foot (output) By pushing up from the input end of the lever with a force of 50 lbs., you can lift 150 lbs. of load with a mechanical advantage of 3. If you pushed up the input end of the lever with a force of 20 lbs., how much could you lift with MA = 3? 125 (input) X 5 (MA) = _____ 20 (input) X 3 (MA) = _____ Only first class and second class levers can be used to create mechanical advantage. The third class lever is used to create additional momentum because the load end is a long ways from the fulcrum point. 6
  • 9.
    STEM Challenges What CanYou Design? These STEM Design and Engineering Challenges are designed to introduce you to the lever and how it can be used to make work easier for many different tasks. Try out one of the STEM Design and Engineering Challenges below or design your own project using the lever. Building a Balance Beam Scale You can use your first class lever to create a balance scale or move the fulcrum point to test the math concepts presented in the Math segment. Other Uses for the Lever The lever is a very useful simple machine. Not only can the mechanical advantage of a lever be useful in lifting heavy loads, it can also be used in many other ways. Some of these include: Transfer of motion from one direction to another direction Prying actions that allow for lifting or moving an object Linkage from one simple machine to another 7 Building a Scissor Arm Use your knowledge of the lever to design and build a scissor arm that will reach out three feet. Use other components available to enhance your project’s capabilities. Lever
  • 10.
    What Have WeLearned? 1. What are the two parts of a lever? a. load and effort b. lever arm and fulcrum c. base and axle d. fulcrum and load 2. The wheelbarrow is a good example of which type of lever? a. first class lever b. second class lever c. third class lever d. mobile lever 3. Use the information below to determine the mechanical advantage of the lever. a. MA = 2 b. MA = 3 c. MA = 4 d. MA = 16 4. Which type of lever does not use mechanical advantage, but creates additional momentum? a. first class lever b. second class lever c. third class lever d. motion lever 5. Prying a nail from a board using a claw hammer would be an example of what type of lever? a. first class lever b. second class lever c. third class lever d. claw lever Assessment MA = Input Distance = ? Output Distance = ? = ? Fulcrum Load (resistance/mass) Effort 2 Feet (output) 8 Feet (input) MA = ______ Load (resistance/mass) Fulcrum Effort 850-00974-001 rokenbok.com/curriculum Visit Our Entire Curriculum Library Developed in collaboration with our partners: