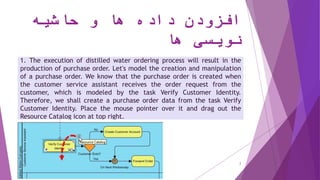
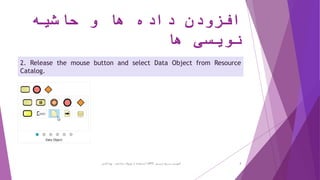
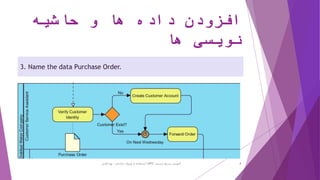
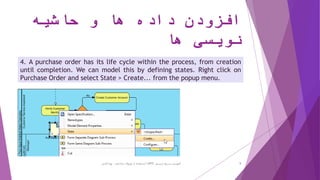
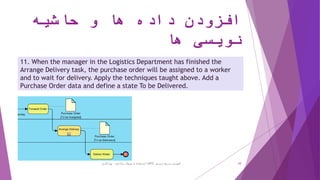
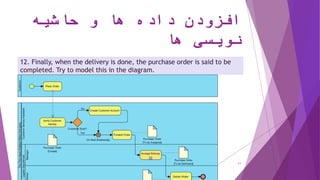
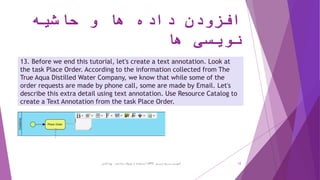
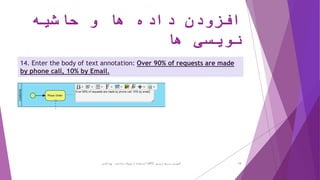
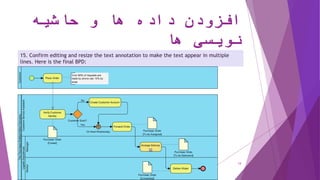
‫بخش‬‫هفتم‬–‫مطالعه‬
‫موردی‬(‫ادامه‬)
‫ترسیم‬ ‫سریع‬ ‫آموزش‬BPD‫پارادایم‬ ‫ویژوال‬ ‫از‬ ‫استفاده‬ ‫با‬-‫فانی‬ ‫پویا‬ 1
‫حاشیه‬ ‫و‬ ‫ها‬ ‫داده‬ ‫افزودن‬
‫ها‬ ‫نویسی‬
1. The execution of distilled water ordering process will result in the
production of purchase order. Let's model the creation and manipulation
of a purchase order. We know that the purchase order is created when
the customer service assistant receives the order request from the
customer, which is modeled by the task Verify Customer Identity.
Therefore, we shall create a purchase order data from the task Verify
Customer Identity. Place the mouse pointer over it and drag out the
Resource Catalog icon at top right.
‫ترسیم‬ ‫سریع‬ ‫آموزش‬BPD ‫پارادایم‬ ‫ویژوال‬ ‫از‬ ‫استفاده‬ ‫با‬-‫فانی‬ ‫پویا‬ 2
‫حاشیه‬ ‫و‬ ‫ها‬ ‫داده‬ ‫افزودن‬
‫ها‬ ‫نویسی‬
2. Release the mouse button and select Data Object from Resource
Catalog.
‫ترسیم‬ ‫سریع‬ ‫آموزش‬BPD‫پارادایم‬ ‫ویژوال‬ ‫از‬ ‫استفاده‬ ‫با‬-‫فانی‬ ‫پویا‬ 3
‫حاشیه‬ ‫و‬ ‫ها‬ ‫داده‬ ‫افزودن‬
‫ها‬ ‫نویسی‬
3. Name the data Purchase Order.
‫ترسیم‬ ‫سریع‬ ‫آموزش‬BPD‫پارادایم‬ ‫ویژوال‬ ‫از‬ ‫استفاده‬ ‫با‬-‫فانی‬ ‫پویا‬ 4
‫حاشیه‬ ‫و‬ ‫ها‬ ‫داده‬ ‫افزودن‬
‫ها‬ ‫نویسی‬
4. A purchase order has its life cycle within the process, from creation
until completion. We can model this by defining states. Right click on
Purchase Order and select State > Create... from the popup menu.
‫ترسیم‬ ‫سریع‬ ‫آموزش‬BPD‫پارادایم‬ ‫ویژوال‬ ‫از‬ ‫استفاده‬ ‫با‬-‫فانی‬ ‫پویا‬ 5
‫حاشیه‬ ‫و‬ ‫ها‬ ‫داده‬ ‫افزودن‬
‫ها‬ ‫نویسی‬
5. In the input window, enter Create as name of state and click OK.
6. The Create tag is added to the name of Purchase Order. As I said a purchase
order has its life cycle. When the customer service assistant has finished the
task Forward Order, the purchase order will wait for the Logistics Department's
assignment. We can model this by re-using the same piece of data with a change
of state. From the task Forward Order, press and drag out the Resource
Catalog icon.
‫ترسیم‬ ‫سریع‬ ‫آموزش‬BPD ‫پارادایم‬ ‫ویژوال‬ ‫از‬ ‫استفاده‬ ‫با‬-‫فانی‬ ‫پویا‬ 6
‫حاشیه‬ ‫و‬ ‫ها‬ ‫داده‬ ‫افزودن‬
‫ها‬ ‫نویسی‬
7. Release the mouse button and select Data Object from Resource
Catalog.
8. Enter Purchase Order as the name of data. Pay attention to this step.
You must enter Purchase Order as name in order to re-use the Purchase
Order data object created before. When you confirm editing, you will be
prompted if you want the data object to reference to the existing data
one. Choose Yes.
‫ترسیم‬ ‫سریع‬ ‫آموزش‬BPD‫پارادایم‬ ‫ویژوال‬ ‫از‬ ‫استفاده‬ ‫با‬-‫فانی‬ ‫پویا‬ 7
‫حاشیه‬ ‫و‬ ‫ها‬ ‫داده‬ ‫افزودن‬
‫ها‬ ‫نویسی‬
9. Right click on the Purchase Order data associated with Forward Order
and select State > Create... from the popup menu.
‫ترسیم‬ ‫سریع‬ ‫آموزش‬BPD‫پارادایم‬ ‫ویژوال‬ ‫از‬ ‫استفاده‬ ‫با‬-‫فانی‬ ‫پویا‬ 8
‫حاشیه‬ ‫و‬ ‫ها‬ ‫داده‬ ‫افزودن‬
‫ها‬ ‫نویسی‬
10. Enter To be Assigned as name of state and confirm. Up to now, the
same Purchase Order data is shown twice in the process flow, with two
different states.
‫ترسیم‬ ‫سریع‬ ‫آموزش‬BPD‫پارادایم‬ ‫ویژوال‬ ‫از‬ ‫استفاده‬ ‫با‬-‫فانی‬ ‫پویا‬ 9
‫حاشیه‬ ‫و‬ ‫ها‬ ‫داده‬ ‫افزودن‬
‫ها‬ ‫نویسی‬
11. When the manager in the Logistics Department has finished the
Arrange Delivery task, the purchase order will be assigned to a worker
and to wait for delivery. Apply the techniques taught above. Add a
Purchase Order data and define a state To be Delivered.
‫ترسیم‬ ‫سریع‬ ‫آموزش‬BPD‫پارادایم‬ ‫ویژوال‬ ‫از‬ ‫استفاده‬ ‫با‬-‫فانی‬ ‫پویا‬ 10
‫حاشیه‬ ‫و‬ ‫ها‬ ‫داده‬ ‫افزودن‬
‫ها‬ ‫نویسی‬
12. Finally, when the delivery is done, the purchase order is said to be
completed. Try to model this in the diagram.
‫ترسیم‬ ‫سریع‬ ‫آموزش‬BPD ‫پارادایم‬ ‫ویژوال‬ ‫از‬ ‫استفاده‬ ‫با‬-‫فانی‬ ‫پویا‬ 11
‫حاشیه‬ ‫و‬ ‫ها‬ ‫داده‬ ‫افزودن‬
‫ها‬ ‫نویسی‬
13. Before we end this tutorial, let's create a text annotation. Look at
the task Place Order. According to the information collected from The
True Aqua Distilled Water Company, we know that while some of the
order requests are made by phone call, some are made by Email. Let's
describe this extra detail using text annotation. Use Resource Catalog to
create a Text Annotation from the task Place Order.
‫ترسیم‬ ‫سریع‬ ‫آموزش‬BPD‫پارادایم‬ ‫ویژوال‬ ‫از‬ ‫استفاده‬ ‫با‬-‫فانی‬ ‫پویا‬ 12
‫حاشیه‬ ‫و‬ ‫ها‬ ‫داده‬ ‫افزودن‬
‫ها‬ ‫نویسی‬
14. Enter the body of text annotation: Over 90% of requests are made
by phone call, 10% by Email.
‫ترسیم‬ ‫سریع‬ ‫آموزش‬BPD‫پارادایم‬ ‫ویژوال‬ ‫از‬ ‫استفاده‬ ‫با‬-‫فانی‬ ‫پویا‬ 13
‫حاشیه‬ ‫و‬ ‫ها‬ ‫داده‬ ‫افزودن‬
‫ها‬ ‫نویسی‬
15. Confirm editing and resize the text annotation to make the text appear in multiple
lines. Here is the final BPD:
‫ترسیم‬ ‫سریع‬ ‫آموزش‬BPD ‫پارادایم‬ ‫ویژوال‬ ‫از‬ ‫استفاده‬ ‫با‬-‫فانی‬ ‫پویا‬ 14
‫ترسیم‬ ‫سریع‬ ‫آموزش‬BPD ‫پارادایم‬ ‫ویژوال‬ ‫از‬ ‫استفاده‬ ‫با‬-‫فانی‬ ‫پویا‬ 15

آموزش سریع ترسیم نمودار فرایند کسب و کار با استفاده از ویژوال پارادایم - بخش هفتم و آخر

  • 1.
  • 2.
    ‫حاشیه‬ ‫و‬ ‫ها‬‫داده‬ ‫افزودن‬ ‫ها‬ ‫نویسی‬ 1. The execution of distilled water ordering process will result in the production of purchase order. Let's model the creation and manipulation of a purchase order. We know that the purchase order is created when the customer service assistant receives the order request from the customer, which is modeled by the task Verify Customer Identity. Therefore, we shall create a purchase order data from the task Verify Customer Identity. Place the mouse pointer over it and drag out the Resource Catalog icon at top right. ‫ترسیم‬ ‫سریع‬ ‫آموزش‬BPD ‫پارادایم‬ ‫ویژوال‬ ‫از‬ ‫استفاده‬ ‫با‬-‫فانی‬ ‫پویا‬ 2
  • 3.
    ‫حاشیه‬ ‫و‬ ‫ها‬‫داده‬ ‫افزودن‬ ‫ها‬ ‫نویسی‬ 2. Release the mouse button and select Data Object from Resource Catalog. ‫ترسیم‬ ‫سریع‬ ‫آموزش‬BPD‫پارادایم‬ ‫ویژوال‬ ‫از‬ ‫استفاده‬ ‫با‬-‫فانی‬ ‫پویا‬ 3
  • 4.
    ‫حاشیه‬ ‫و‬ ‫ها‬‫داده‬ ‫افزودن‬ ‫ها‬ ‫نویسی‬ 3. Name the data Purchase Order. ‫ترسیم‬ ‫سریع‬ ‫آموزش‬BPD‫پارادایم‬ ‫ویژوال‬ ‫از‬ ‫استفاده‬ ‫با‬-‫فانی‬ ‫پویا‬ 4
  • 5.
    ‫حاشیه‬ ‫و‬ ‫ها‬‫داده‬ ‫افزودن‬ ‫ها‬ ‫نویسی‬ 4. A purchase order has its life cycle within the process, from creation until completion. We can model this by defining states. Right click on Purchase Order and select State > Create... from the popup menu. ‫ترسیم‬ ‫سریع‬ ‫آموزش‬BPD‫پارادایم‬ ‫ویژوال‬ ‫از‬ ‫استفاده‬ ‫با‬-‫فانی‬ ‫پویا‬ 5
  • 6.
    ‫حاشیه‬ ‫و‬ ‫ها‬‫داده‬ ‫افزودن‬ ‫ها‬ ‫نویسی‬ 5. In the input window, enter Create as name of state and click OK. 6. The Create tag is added to the name of Purchase Order. As I said a purchase order has its life cycle. When the customer service assistant has finished the task Forward Order, the purchase order will wait for the Logistics Department's assignment. We can model this by re-using the same piece of data with a change of state. From the task Forward Order, press and drag out the Resource Catalog icon. ‫ترسیم‬ ‫سریع‬ ‫آموزش‬BPD ‫پارادایم‬ ‫ویژوال‬ ‫از‬ ‫استفاده‬ ‫با‬-‫فانی‬ ‫پویا‬ 6
  • 7.
    ‫حاشیه‬ ‫و‬ ‫ها‬‫داده‬ ‫افزودن‬ ‫ها‬ ‫نویسی‬ 7. Release the mouse button and select Data Object from Resource Catalog. 8. Enter Purchase Order as the name of data. Pay attention to this step. You must enter Purchase Order as name in order to re-use the Purchase Order data object created before. When you confirm editing, you will be prompted if you want the data object to reference to the existing data one. Choose Yes. ‫ترسیم‬ ‫سریع‬ ‫آموزش‬BPD‫پارادایم‬ ‫ویژوال‬ ‫از‬ ‫استفاده‬ ‫با‬-‫فانی‬ ‫پویا‬ 7
  • 8.
    ‫حاشیه‬ ‫و‬ ‫ها‬‫داده‬ ‫افزودن‬ ‫ها‬ ‫نویسی‬ 9. Right click on the Purchase Order data associated with Forward Order and select State > Create... from the popup menu. ‫ترسیم‬ ‫سریع‬ ‫آموزش‬BPD‫پارادایم‬ ‫ویژوال‬ ‫از‬ ‫استفاده‬ ‫با‬-‫فانی‬ ‫پویا‬ 8
  • 9.
    ‫حاشیه‬ ‫و‬ ‫ها‬‫داده‬ ‫افزودن‬ ‫ها‬ ‫نویسی‬ 10. Enter To be Assigned as name of state and confirm. Up to now, the same Purchase Order data is shown twice in the process flow, with two different states. ‫ترسیم‬ ‫سریع‬ ‫آموزش‬BPD‫پارادایم‬ ‫ویژوال‬ ‫از‬ ‫استفاده‬ ‫با‬-‫فانی‬ ‫پویا‬ 9
  • 10.
    ‫حاشیه‬ ‫و‬ ‫ها‬‫داده‬ ‫افزودن‬ ‫ها‬ ‫نویسی‬ 11. When the manager in the Logistics Department has finished the Arrange Delivery task, the purchase order will be assigned to a worker and to wait for delivery. Apply the techniques taught above. Add a Purchase Order data and define a state To be Delivered. ‫ترسیم‬ ‫سریع‬ ‫آموزش‬BPD‫پارادایم‬ ‫ویژوال‬ ‫از‬ ‫استفاده‬ ‫با‬-‫فانی‬ ‫پویا‬ 10
  • 11.
    ‫حاشیه‬ ‫و‬ ‫ها‬‫داده‬ ‫افزودن‬ ‫ها‬ ‫نویسی‬ 12. Finally, when the delivery is done, the purchase order is said to be completed. Try to model this in the diagram. ‫ترسیم‬ ‫سریع‬ ‫آموزش‬BPD ‫پارادایم‬ ‫ویژوال‬ ‫از‬ ‫استفاده‬ ‫با‬-‫فانی‬ ‫پویا‬ 11
  • 12.
    ‫حاشیه‬ ‫و‬ ‫ها‬‫داده‬ ‫افزودن‬ ‫ها‬ ‫نویسی‬ 13. Before we end this tutorial, let's create a text annotation. Look at the task Place Order. According to the information collected from The True Aqua Distilled Water Company, we know that while some of the order requests are made by phone call, some are made by Email. Let's describe this extra detail using text annotation. Use Resource Catalog to create a Text Annotation from the task Place Order. ‫ترسیم‬ ‫سریع‬ ‫آموزش‬BPD‫پارادایم‬ ‫ویژوال‬ ‫از‬ ‫استفاده‬ ‫با‬-‫فانی‬ ‫پویا‬ 12
  • 13.
    ‫حاشیه‬ ‫و‬ ‫ها‬‫داده‬ ‫افزودن‬ ‫ها‬ ‫نویسی‬ 14. Enter the body of text annotation: Over 90% of requests are made by phone call, 10% by Email. ‫ترسیم‬ ‫سریع‬ ‫آموزش‬BPD‫پارادایم‬ ‫ویژوال‬ ‫از‬ ‫استفاده‬ ‫با‬-‫فانی‬ ‫پویا‬ 13
  • 14.
    ‫حاشیه‬ ‫و‬ ‫ها‬‫داده‬ ‫افزودن‬ ‫ها‬ ‫نویسی‬ 15. Confirm editing and resize the text annotation to make the text appear in multiple lines. Here is the final BPD: ‫ترسیم‬ ‫سریع‬ ‫آموزش‬BPD ‫پارادایم‬ ‫ویژوال‬ ‫از‬ ‫استفاده‬ ‫با‬-‫فانی‬ ‫پویا‬ 14
  • 15.
    ‫ترسیم‬ ‫سریع‬ ‫آموزش‬BPD‫پارادایم‬ ‫ویژوال‬ ‫از‬ ‫استفاده‬ ‫با‬-‫فانی‬ ‫پویا‬ 15