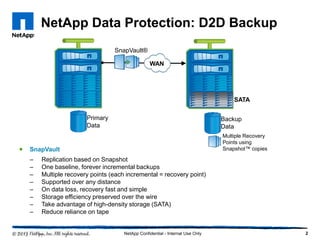
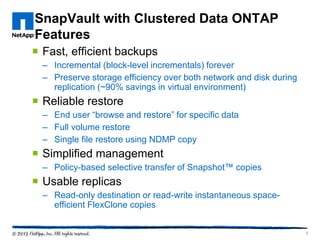
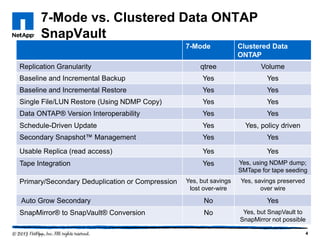
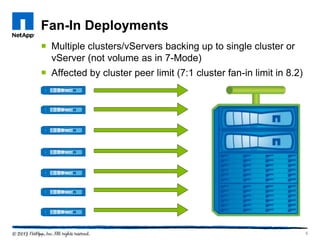
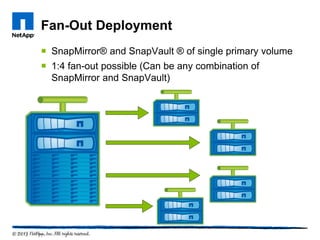
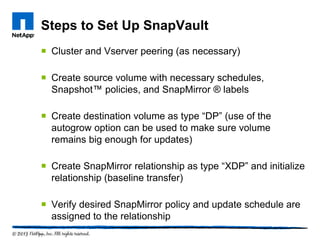
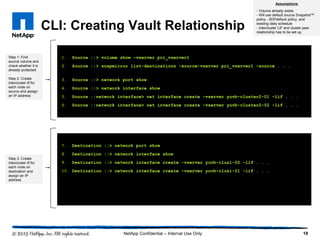
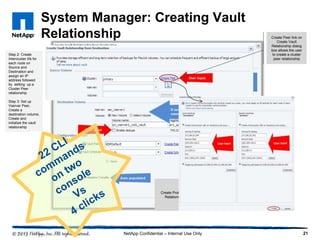
Robbie Rikard
Technical Marketing Engineer
March 2013
SnapVault in Clustered
Data ONTAP 8.2
NetApp Data Protection: D2D Backup
2NetApp Confidential - Internal Use Only
 SnapVault
– Replication based on Snapshot
– One baseline, forever incremental backups
– Multiple recovery points (each incremental = recovery point)
– Supported over any distance
– On data loss, recovery fast and simple
– Storage efficiency preserved over the wire
– Take advantage of high-density storage (SATA)
– Reduce reliance on tape
Backup
Data
SnapVault®
Primary
Data
WAN
Multiple Recovery
Points using
Snapshot™ copies
SATA
SnapVault with Clustered Data ONTAP
Features
 Fast, efficient backups
– Incremental (block-level incrementals) forever
– Preserve storage efficiency over both network and disk during
replication (~90% savings in virtual environment)
 Reliable restore
– End user “browse and restore” for specific data
– Full volume restore
– Single file restore using NDMP copy
 Simplified management
– Policy-based selective transfer of Snapshot™ copies
 Usable replicas
– Read-only destination or read-write instantaneous space-
efficient FlexClone copies
3
7-Mode vs. Clustered Data ONTAP
SnapVault
4
7-Mode Clustered Data
ONTAP
Replication Granularity qtree Volume
Baseline and Incremental Backup Yes Yes
Baseline and Incremental Restore Yes Yes
Single File/LUN Restore (Using NDMP Copy) Yes Yes
Data ONTAP® Version Interoperability Yes Yes
Schedule-Driven Update Yes Yes, policy driven
Secondary Snapshot™ Management Yes Yes
Usable Replica (read access) Yes Yes
Tape Integration Yes Yes, using NDMP dump;
SMTape for tape seeding
Primary/Secondary Deduplication or Compression Yes, but savings
lost over-wire
Yes, savings preserved
over wire
Auto Grow Secondary No Yes
SnapMirror® to SnapVault® Conversion No Yes, but SnapVault to
SnapMirror not possible
B CA
Data Warehouse
X Y Z
Receiver
Engine Architecture
- Space savings on network
- Space savings at destination
- Flexibility at destination
– for example, addition dedupe
Foo
X
Y Z
Bar
Sender
BarFoo
X Y Z
Data Stream
Foo : [X, Y, Z]
Bar : [X, Y, Z’]
Metadata Stream
Z’
Z’
Z’
C’
5
Fan-In Deployments
 Multiple clusters/vServers backing up to single cluster or
vServer (not volume as in 7-Mode)
 Affected by cluster peer limit (7:1 cluster fan-in limit in 8.2)
6
Fan-Out Deployment
 SnapMirror® and SnapVault ® of single primary volume
 1:4 fan-out possible (Can be any combination of
SnapMirror and SnapVault)
SnapMirror and SnapVault Cascades
 SnapMirror ®  SnapVault ®, SnapVault  SnapMirror
 SnapMirror  SnapVault cascade will only transfer
SnapMirror base Snapshot™ copy to SnapVault
destination
Caveats
 Support for 64-bit aggregates only
 Only system-level fan-in, not volume level (like in 7-
Mode SnapVault ®)
 SnapVault relationships between a 7-Mode and
clustered Data ONTAP ® system are not possible
9
Storage Efficiency Configurations
 In general, when data on the primary system is deduplicated
and/or compressed, those savings will result in less data being
transmitted over the network and the savings being preserved on
the SnapVault ® secondary
 Deduplication and compression can be enabled to run on the
SnapVault secondary after SnapVault updates complete to gain
additional savings on the secondary data
 If compression is run on a SnapVault secondary volume then
SnapVault updates will no longer preserve the savings over the
network or on the secondary volume, this can not be reversed
without a rebaseline
Steps to Set Up SnapVault
 Cluster and Vserver peering (as necessary)
 Create source volume with necessary schedules,
Snapshot™ policies, and SnapMirror ® labels
 Create destination volume as type “DP” (use of the
autogrow option can be used to make sure volume
remains big enough for updates)
 Create SnapMirror relationship as type “XDP” and initialize
relationship (baseline transfer)
 Verify desired SnapMirror policy and update schedule are
assigned to the relationship
Cron Schedules
Snapshot Policies
Schedules
SnapMirror Policies
Transitioning from 7-Mode
 Primary data must be copied to clustered Data ONTAP ® system
and new relationship created with a SnapVault ® secondary that
is also running clustered Data ONTAP (this will require a
baseline transfer)
 When transitioning to clustered Data ONTAP, keep in mind that
SnapVault relationships are based on volumes in clustered Data
ONTAP, not qtrees as in 7-Mode
 Backups made using 7-Mode SnapVault may either be retained
on a 7-Mode system until no longer needed or copied to a new
volume on a clustered Data ONTAP system and held until no
longer needed (restores could be done using single file restore
or protocol copy)
Management Options in 8.2
16
System Manager 3.0 Unified Manager 6.0
Create SnapVault® Relationships Yes Yes (only Partners*)
Manage SnapVault Relationships
• Schedules
• Policies
Yes Yes (only Partners*)
Restore options
• Full volume restore
Yes Yes
Restore options
• Incremental volume restore
Yes Yes
Monitoring Yes Yes
Alerting No Yes
Discovery Yes Yes
Backup Partner Support No Yes
* Backup Integration Partners such as SnapProtect® and Replication Director
17NetApp Confidential - Internal Use Only
SnapVault Creation in
System Manager 3.0
CLI: Creating Vault Relationship
18NetApp Confidential – Internal Use Only
1. Source ::> volume show -vserver pri_vserver1
2. Source ::> snapmirror list-destinations -source-vserver pri_vserver1 –source . . .
3. Source ::> network port show
4. Source ::> network interface show
5. Source ::network interface> net interface create -vserver yuvb-cluster2-01 –lif . . .
6. Source ::network interface> net interface create -vserver yuvb-cluster2-02 -lif . . .
7. Destination ::> network port show
8. Destination ::> network interface show
9. Destination ::> network interface create -vserver yuvb-clus1-02 –lif . . .
10. Destination ::> network interface create -vserver yuvb-clus1-01 -lif . . .
Step 1: Find
source volume and
check whether it is
already protected
Step 2: Create
intercluster lif for
each node on
source and assign
an IP address
Assumptions
- Volume already exists
- Will use default source Snapshot™
policy , XDPdefault policy, and
existing daily schedule
- Intercluster LIF and cluster peer
relationship has to be set up
Step 3: Create
intercluster lif for
each node on
destination and
assign an IP
address
CLI: Creating Vault Relationship
19NetApp Confidential – Internal Use Only
11. Source:: cluster peer create -peer-addrs 10.238.20.244,10.238.20.248 -username admin
12. Source:: cluster peer show
13. Source:: vserver peer create -vserver pri_vserver1 -peer-vserver sec_vserver1 . . .
14. Source:: vserver peer show
15. Destination:: vserver peer show
16. Destination:: vserver peer accept -vserver sec_vserver1 -peer-vserver pri_vserver1
17. Destination:: volume show -vserver sec_vserver1
18. Destination:: storage aggregate show
19. Destination::vserver> volume create -vserver sec_vserver1 -type DP -volume . . .
20. Destination:: snapmirror create -source-path primary://pri_vserver1/vol1 - . . .
21. Destination:: snapmirror initialize -destination-path . . .
22. Destination::snapmirror> show
Step 4: Set up
Cluster Peer and
Vserver Peer
Assumptions
- Volume already exists
- Will use default source Snapshot™
policy , XDPdefault policy, and
existing daily schedule
- Intercluster LIF and Cluster Peer
relationship has to be set up
Step 5: Set up
Cluster Peer and
Vserver Peer
Step 6: Create a
destination volume
Step 7: Create and
initialize the vault
relationship
System Manager: Creating Vault
Relationship
20NetApp Confidential – Internal Use Only
Step 1: Find
source volume and
check whether it is
already protected
Data Protection tab
on a volume lets a
user know whether
the volume has been
protected.
Set up Data
Protection
System Manager: Creating Vault
Relationship
21NetApp Confidential – Internal Use Only
Step 2: Create
Intercluster lifs for
each node on
Source and
Destination and
assign an IP
address followed
by setting up a
Cluster Peer
relationship
Step 3: Set up
Vserver Peer,
Create a
destination volume,
Create and
initialize the vault
relationship
Create Protection
Relationship
Create Peer link on
Create Vault
Relationship dialog
box allows the user
to create a cluster
peer relationship
22NetApp Confidential - Internal Use Only
© 2013 NetApp, Inc. All rights reserved. No portions of this document may be reproduced without prior written consent of NetApp, Inc.
Specifications are subject to change without notice. NetApp, the NetApp logo, Go further, faster, Data ONTAP, FlexClone, SnapMirror,
SnapProtect, Snapshot, and SnapVault are trademarks or registered trademarks of NetApp, Inc. in the United States and/or other countries. All
other brands or products are trademarks or registered trademarks of their respective holders and should be treated as such.

SnapVault SE presentation

  • 1.
    Robbie Rikard Technical MarketingEngineer March 2013 SnapVault in Clustered Data ONTAP 8.2
  • 2.
    NetApp Data Protection:D2D Backup 2NetApp Confidential - Internal Use Only  SnapVault – Replication based on Snapshot – One baseline, forever incremental backups – Multiple recovery points (each incremental = recovery point) – Supported over any distance – On data loss, recovery fast and simple – Storage efficiency preserved over the wire – Take advantage of high-density storage (SATA) – Reduce reliance on tape Backup Data SnapVault® Primary Data WAN Multiple Recovery Points using Snapshot™ copies SATA
  • 3.
    SnapVault with ClusteredData ONTAP Features  Fast, efficient backups – Incremental (block-level incrementals) forever – Preserve storage efficiency over both network and disk during replication (~90% savings in virtual environment)  Reliable restore – End user “browse and restore” for specific data – Full volume restore – Single file restore using NDMP copy  Simplified management – Policy-based selective transfer of Snapshot™ copies  Usable replicas – Read-only destination or read-write instantaneous space- efficient FlexClone copies 3
  • 4.
    7-Mode vs. ClusteredData ONTAP SnapVault 4 7-Mode Clustered Data ONTAP Replication Granularity qtree Volume Baseline and Incremental Backup Yes Yes Baseline and Incremental Restore Yes Yes Single File/LUN Restore (Using NDMP Copy) Yes Yes Data ONTAP® Version Interoperability Yes Yes Schedule-Driven Update Yes Yes, policy driven Secondary Snapshot™ Management Yes Yes Usable Replica (read access) Yes Yes Tape Integration Yes Yes, using NDMP dump; SMTape for tape seeding Primary/Secondary Deduplication or Compression Yes, but savings lost over-wire Yes, savings preserved over wire Auto Grow Secondary No Yes SnapMirror® to SnapVault® Conversion No Yes, but SnapVault to SnapMirror not possible
  • 5.
    B CA Data Warehouse XY Z Receiver Engine Architecture - Space savings on network - Space savings at destination - Flexibility at destination – for example, addition dedupe Foo X Y Z Bar Sender BarFoo X Y Z Data Stream Foo : [X, Y, Z] Bar : [X, Y, Z’] Metadata Stream Z’ Z’ Z’ C’ 5
  • 6.
    Fan-In Deployments  Multipleclusters/vServers backing up to single cluster or vServer (not volume as in 7-Mode)  Affected by cluster peer limit (7:1 cluster fan-in limit in 8.2) 6
  • 7.
    Fan-Out Deployment  SnapMirror®and SnapVault ® of single primary volume  1:4 fan-out possible (Can be any combination of SnapMirror and SnapVault)
  • 8.
    SnapMirror and SnapVaultCascades  SnapMirror ®  SnapVault ®, SnapVault  SnapMirror  SnapMirror  SnapVault cascade will only transfer SnapMirror base Snapshot™ copy to SnapVault destination
  • 9.
    Caveats  Support for64-bit aggregates only  Only system-level fan-in, not volume level (like in 7- Mode SnapVault ®)  SnapVault relationships between a 7-Mode and clustered Data ONTAP ® system are not possible 9
  • 10.
    Storage Efficiency Configurations In general, when data on the primary system is deduplicated and/or compressed, those savings will result in less data being transmitted over the network and the savings being preserved on the SnapVault ® secondary  Deduplication and compression can be enabled to run on the SnapVault secondary after SnapVault updates complete to gain additional savings on the secondary data  If compression is run on a SnapVault secondary volume then SnapVault updates will no longer preserve the savings over the network or on the secondary volume, this can not be reversed without a rebaseline
  • 11.
    Steps to SetUp SnapVault  Cluster and Vserver peering (as necessary)  Create source volume with necessary schedules, Snapshot™ policies, and SnapMirror ® labels  Create destination volume as type “DP” (use of the autogrow option can be used to make sure volume remains big enough for updates)  Create SnapMirror relationship as type “XDP” and initialize relationship (baseline transfer)  Verify desired SnapMirror policy and update schedule are assigned to the relationship
  • 12.
  • 13.
  • 14.
  • 15.
    Transitioning from 7-Mode Primary data must be copied to clustered Data ONTAP ® system and new relationship created with a SnapVault ® secondary that is also running clustered Data ONTAP (this will require a baseline transfer)  When transitioning to clustered Data ONTAP, keep in mind that SnapVault relationships are based on volumes in clustered Data ONTAP, not qtrees as in 7-Mode  Backups made using 7-Mode SnapVault may either be retained on a 7-Mode system until no longer needed or copied to a new volume on a clustered Data ONTAP system and held until no longer needed (restores could be done using single file restore or protocol copy)
  • 16.
    Management Options in8.2 16 System Manager 3.0 Unified Manager 6.0 Create SnapVault® Relationships Yes Yes (only Partners*) Manage SnapVault Relationships • Schedules • Policies Yes Yes (only Partners*) Restore options • Full volume restore Yes Yes Restore options • Incremental volume restore Yes Yes Monitoring Yes Yes Alerting No Yes Discovery Yes Yes Backup Partner Support No Yes * Backup Integration Partners such as SnapProtect® and Replication Director
  • 17.
    17NetApp Confidential -Internal Use Only SnapVault Creation in System Manager 3.0
  • 18.
    CLI: Creating VaultRelationship 18NetApp Confidential – Internal Use Only 1. Source ::> volume show -vserver pri_vserver1 2. Source ::> snapmirror list-destinations -source-vserver pri_vserver1 –source . . . 3. Source ::> network port show 4. Source ::> network interface show 5. Source ::network interface> net interface create -vserver yuvb-cluster2-01 –lif . . . 6. Source ::network interface> net interface create -vserver yuvb-cluster2-02 -lif . . . 7. Destination ::> network port show 8. Destination ::> network interface show 9. Destination ::> network interface create -vserver yuvb-clus1-02 –lif . . . 10. Destination ::> network interface create -vserver yuvb-clus1-01 -lif . . . Step 1: Find source volume and check whether it is already protected Step 2: Create intercluster lif for each node on source and assign an IP address Assumptions - Volume already exists - Will use default source Snapshot™ policy , XDPdefault policy, and existing daily schedule - Intercluster LIF and cluster peer relationship has to be set up Step 3: Create intercluster lif for each node on destination and assign an IP address
  • 19.
    CLI: Creating VaultRelationship 19NetApp Confidential – Internal Use Only 11. Source:: cluster peer create -peer-addrs 10.238.20.244,10.238.20.248 -username admin 12. Source:: cluster peer show 13. Source:: vserver peer create -vserver pri_vserver1 -peer-vserver sec_vserver1 . . . 14. Source:: vserver peer show 15. Destination:: vserver peer show 16. Destination:: vserver peer accept -vserver sec_vserver1 -peer-vserver pri_vserver1 17. Destination:: volume show -vserver sec_vserver1 18. Destination:: storage aggregate show 19. Destination::vserver> volume create -vserver sec_vserver1 -type DP -volume . . . 20. Destination:: snapmirror create -source-path primary://pri_vserver1/vol1 - . . . 21. Destination:: snapmirror initialize -destination-path . . . 22. Destination::snapmirror> show Step 4: Set up Cluster Peer and Vserver Peer Assumptions - Volume already exists - Will use default source Snapshot™ policy , XDPdefault policy, and existing daily schedule - Intercluster LIF and Cluster Peer relationship has to be set up Step 5: Set up Cluster Peer and Vserver Peer Step 6: Create a destination volume Step 7: Create and initialize the vault relationship
  • 20.
    System Manager: CreatingVault Relationship 20NetApp Confidential – Internal Use Only Step 1: Find source volume and check whether it is already protected Data Protection tab on a volume lets a user know whether the volume has been protected. Set up Data Protection
  • 21.
    System Manager: CreatingVault Relationship 21NetApp Confidential – Internal Use Only Step 2: Create Intercluster lifs for each node on Source and Destination and assign an IP address followed by setting up a Cluster Peer relationship Step 3: Set up Vserver Peer, Create a destination volume, Create and initialize the vault relationship Create Protection Relationship Create Peer link on Create Vault Relationship dialog box allows the user to create a cluster peer relationship
  • 22.
    22NetApp Confidential -Internal Use Only © 2013 NetApp, Inc. All rights reserved. No portions of this document may be reproduced without prior written consent of NetApp, Inc. Specifications are subject to change without notice. NetApp, the NetApp logo, Go further, faster, Data ONTAP, FlexClone, SnapMirror, SnapProtect, Snapshot, and SnapVault are trademarks or registered trademarks of NetApp, Inc. in the United States and/or other countries. All other brands or products are trademarks or registered trademarks of their respective holders and should be treated as such.

Editor's Notes

  • #3 Use this as an overview of SnapVault value propositions. Notice that all the points are the same from 7-Mode SnapVault except for storage efficiency preserved over the wire, which is new for clustered Data ONTAP.
  • #4 Features are similar to 7-Mode. Storage efficiency preservation is a new feature for clustered Data ONTAP SnapVault. End user browse and restore is referring to the ability to use NFS and CIFS to allow end users to mount their backups and copy and paste their backed up files to their system. Simplified management refers to the new transfer and scheduling mechanisms that will be discussed later and the ability to use System Manager to create and manage relationships. Notice that SnapVault has a read-only destination. This is different from 7-Mode where the destination could be converted to RW using SnapMirror, this is not possible in clustered Data ONTAP. You can create a FlexClone copy of a SnapVault backup.
  • #5 -SMTape (SnapMirror to Tape) available only for Tape Seeding via the CLI. No NDMP interface, thus backup applications cannot use SMTape. -Because SnapVault relationships are now at the volume level of granularity, Fan-In will be system level. Meaning, several source systems can Fan-In into a single destination system. -Policy Driven schedules allow for better categorization of Snapshot copies on the secondary . -SnapVault secondary cannot be made r/w for data serving (unlike 7-Mode qtree SnapMirror, where this was possible).
  • #6 This illustration shows how storage efficiencies are preserved across the network and on the destination during SnapVault transfers in clustered Data ONTAP. It also show that if the primary data hasn’t been completely deduplication on the source before transferring it to the secondary, additional deduplication savings can be gained by running deduplication again on the secondary after the SnapVault transfer completes.
  • #7 Fan in is system level fan-in with clustered Data ONTAP. Since replication is now done at the volume level, you cannon have multiple source volumes backing up to the same destination volume similar to the way you could have multiple source qtrees backing up to one volume with 7-Mode SnapVault. You can have volumes from different vservers backing up to volumes on the same vserver. Note that in 8.2 the number of cluster peers is limited to 8, so volumes from a maximum of 8 clusters can back up to a single cluster. The current limit in Data ONTAP is 8 cluster peers. This means that volumes from a maximum of 7 different clusters can back up to a single destination cluster.
  • #8 The fan out limit of 1:4 applies to the combined number of SnapMirror and SnapVault relationships. One volume can have a maximum of 4 relationships of any combination of SnapMirror and SnapVault.
  • #9 SnapVault to SnapVault cascades are not supported. In the case of a SnapMirror to SnapVault cascade, only the SnapMirror base Snapshot copy can be transferred to the SnapVault secondary. The SnapMirror policy assigned to the SnapVault relationship should use the special SnapMirror label “sm_created” to specify how many of the Snapshot copies to keep. Any other SnapMirror labels in the SnapMirror policy assigned to a SnapVault relationship that uses a SnapMirror destination as the SnapVault source will be ignored.
  • #13 Snapshot policies are applied to the primary volume in a SnapVault relationship. The Snapshot policy specifies when Snapshot copies will be created, what they will be called and how many of each to keep. Notice the last column shows SnapMirror labels. The SnapVault secondary will look for Snapshot copies with the specified SnapMirror labels to know which Snapshot copies to transfer to the secondary.
  • #14 These schedules are configured at the system level and are used in both the Snapshot policies and used to specify the SnapVault transfer schedule on the secondary. These schedules can be modified with the “cron modify” command or new ones created with the “cron create” command. Schedules can also be modified and created with System Manager 3.0.
  • #15 A SnapMirror policy is applied to SnapVault relationships to specify what Snapshot copies to transfer from the primary (by specifying SnapMirror labels) and to set how many of the Snapshot copies to keep. SnapMirror policies can be created and modified using System Manager 3.0 or by using “snapmirror policy” CLI commands.
  • #19 Source ::> volume show -vserver pri_vserver1 Source ::> snapmirror list-destinations -source-vserver pri_vserver1 -source-volume vol1 Source ::> network port show Source ::> network interface show Source ::network interface> net interface create -vserver yuvb-cluster2-01 -lif yuvb-cluster2-01-lif1 -role intercluster -home-node yuvb-cluster2-01 -home-port e0c -address 10.238.20.250 -netmask 255.255.192.0 Source ::network interface> net interface create -vserver yuvb-cluster2-02 -lif yuvb-cluster2-02-lif1 -role intercluster -home-node yuvb-cluster2-02 -home-port e0c -address 10.238.20.242 -netmask 255.255.192.0 Destination ::> network port show Destination ::> network interface show Destination ::> network interface create -vserver yuvb-clus1-02 -lif yuvb-clus1-02-lif1 -role intercluster -home-node yuvb-clus1-02 -home-port e0c -address 10.238.20.248 -netmask 255.255.192.0 Destination ::> network interface create -vserver yuvb-clus1-01 -lif yuvb-clus1-01-lif1 -role intercluster -home-node yuvb-clus1-01 -home-port e0c -address 10.238.20.244 -netmask 255.255.192.0
  • #20 Source:: cluster peer create -peer-addrs 10.238.20.244,10.238.20.248 -username admin   Source:: cluster peer show   Source::vserver peer create -vserver pri_vserver1 -peer-vserver sec_vserver1 -peer-cluster Destination -applications snapmirror   Source::vserver peer show