SharePoint Re-branding The VisualStudio Way Part One SandBox Solution
•
0 likes•834 views

SharePoint re-branding is an inevitable area for all SharePoint developers and designers. In this article I have taken time to show you how you can re-brand your SharePoint. with this knowledge and added creativity you can do more.

Recommended
More Related Content
What's hot
What's hot (20)
Viewers also liked
Viewers also liked (6)
Similar to SharePoint Re-branding The VisualStudio Way Part One SandBox Solution
Similar to SharePoint Re-branding The VisualStudio Way Part One SandBox Solution (20)
Recently uploaded
Recently uploaded (20)
SharePoint Re-branding The VisualStudio Way Part One SandBox Solution
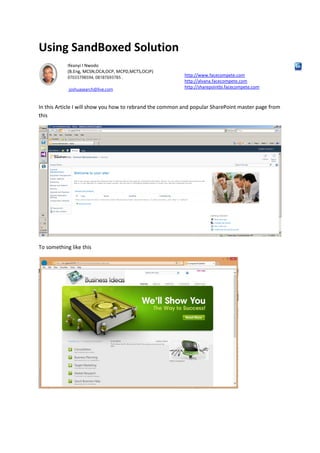
- 1. Using SandBoxed Solution Ifeanyi I Nwodo (B.Eng, MCSN,OCA,OCP, MCPD,MCTS,OCJP) 07033798594, 08187693785 . joshuasearch@live.com http://www.facecompete.com http://alvana.facecompete.com http://sharepointbi.facecompete.com In this Article I will show you how to rebrand the common and popular SharePoint master page from this To something like this
- 2. With what you learn you will obviously be able to rebrand a new masterpage or create a new one. This article assumes you understand the use of visual studio 2010 or 2012. I will actually be using 2012 version, I also assume you have have a good knowledge of HTML, CSS, Javascript, ASP.Net and C#. To get started we will need to design a typical Html website which will form the sample for the customisation. It will serve as the model we want to rebrand our sharepoint masterpage into. Having this will make your rebranding a lot easier. In my case and for this article I will be using a html website template I downloaded from free website template, you can also download same or any other template or better build the design of your choice from scratch I have uploaded the template am using you can download it here. Note our focus: Rebrand the outofbox sharepoint site to meet organisational need and suit the public viewing aspiration(that is be adaptable for anonymous viewing ). Sharepoint boast of v4.master, nightandday.master and minimal.master masterpage files. With the 2010 + versions the v4.master is set as the default master page. The v4.Master will be our target file for customisation, we will need to make a copy of its content for onward customisation within visual. Getting Started: To get started we need to create a site enabled with anonymous access level in order to allow the public to view part of our site as an internet websites and the order part available for view by authenticated users. The following shows you how to create a site in sharepoint with anonymous access. I will recommend in practice you apply this to a subsite and not the mainsite. Start sharepoint Central Administration and login using Administrative Credentials
- 3. Click application management from the Central Administration menu on the welcome page Click on manage web application Click New from the ribbon
- 4. Fill the Create new web application dialog box. Note I choose the Name BusinessIdea allowed the provided port and choose yes for allow anonymous in order for the web application to provide such support
- 5. Appart from enabling this support at root level we are also required to do it at the site level in this case which eversite withing the root we want to grant anonymous access to or make public viewable like internet websites. Click ok With our web application now created lets go back to Application management and create site collection for our new web Application, to do this click Application Management from the Central Administration menu. Click create site collections On thesite collection page change the web application to the one you created. Fill the remaining detail for your site such as Title, Description(optional) and choose a template for this article I choose Team Site.
- 6. Chose the site Administrators and click ok. With your site now created we can now enable anonymous access at the site level, click on the link to the new site. On our new site click site actions and on the drop down menu select site settings On the users and permissions category click site permission
- 7. Click Anonymous access On the anonymous access dialog box we choose what we want to grant anonymous access to in our case we choose entire website. With that we are done with the first part you can now try to access the website anonymously. This is what I get
- 8. Recap: We have archeived Web Application creation. Site creation Anonymouse site enabling Next Phase: In this Phase we are going to rebrand the masterpage and ensure that only authenticated users have access to the SharePoint ribbon and the site makes use of a new design one from the template I mentioned earlier if you have not downloaded it please do that now it will be required for our further practice. I will be creating a site wide feature that can be started and stoped though after development it will be set to automatic activation. For this part I will be creating a sharepoint project in 2012 its similar with 2010. Start visual studio Point to new and Click Project On the new projects dialog box choose share point project depending on the version you have in our case it is sharepoint 2010
- 9. Specify a name for the new project example CustomSharePointRebranding and click ok. On the Sharepoint Customisation wizard specify the url for the new web application and site we have created (remember the BusinessIdea Web Application and site url we created earlier) Select Deploy as Sandboxed Solution (ensuring our application runs within a secure environment plus we can always switch to farm if there is the need. Click Finish(our project window is seen below).
- 10. Click feature from the solution explorer and ensure it has a site wide application(see below). Rename the feature to something more appropriate Example Main, MainFeature, MainSite, RebrandFeature. We are going to add a module to our sandbox solution to serve as a location for our masterpage, right click on the pro ject point to Add and click on New Item
- 11. On the New Item Dialog click on modules, specify a name and click ok. I named my MasterPageGallery. Now we have a module with element.xml and sample.txt within. The Element xml file automatically populates itself with whatever content entered within the module, hence mapping them appropriately for access within the site. We are not going to be creating Application pages since they are not supported under sandbox solution. We will simply rename the sample.txt to the Appropriate name we wish to use for our master page. Rename the Sample.txt, for example CustomRebranding.master.
- 12. You can checkout the modules Element xml file and see how our new masterpage have been mapped appropriately. <?xml version="1.0" encoding="utf-8"?> <Elements xmlns="http://schemas.microsoft.com/sharepoint/"> <Module Name="MasterPageGallery" Path="MasterPageGallery" Url="_catalogs/masterpage"> <File Path=" MasterPageGalleryCustomRebranding.master" Url=" MasterPageGallery/CustomRebranding.master" /> </Module> </Elements> Below is a modified content of the v4.master master page file. I have merged it with the HTML content of the BusinessIdea Template downloaded earlier. I have also briefly specified areas of modification and merger on the file using comments. And have replaced the content of our newly created masterpage file which in my case is CustomRebranding.master with the new content . With more time and with your knowledge of Html and Asp.net you can do more modification to the file’s content. <%@Master language="C#"%> <%@ Register Tagprefix="SharePoint" Namespace="Microsoft.SharePoint.WebControls" Assembly="Microsoft.SharePoint, Version=14.0.0.0, Culture=neutral, PublicKeyToken=71e9bce111e9429c" %> <%@ Register Tagprefix="Utilities" Namespace="Microsoft.SharePoint.Utilities" Assembly="Microsoft.SharePoint, Version=14.0.0.0, Culture=neutral, PublicKeyToken=71e9bce111e9429c" %> <%@ Import Namespace="Microsoft.SharePoint" %> <%@ Assembly Name="Microsoft.Web.CommandUI, Version=14.0.0.0, Culture=neutral, PublicKeyToken=71e9bce111e9429c" %> <%@ Import Namespace="Microsoft.SharePoint.ApplicationPages" %> <%@ Register Tagprefix="WebPartPages" Namespace="Microsoft.SharePoint.WebPartPages" Assembly="Microsoft.SharePoint, Version=14.0.0.0, Culture=neutral, PublicKeyToken=71e9bce111e9429c" %> <%@ Register TagPrefix="wssuc" TagName="Welcome" src="~/_controltemplates/Welcome.ascx" %> <%@ Register TagPrefix="wssuc" TagName="MUISelector" src="~/_controltemplates/MUISelector.ascx" %> <%@ Register TagPrefix="wssuc" TagName="DesignModeConsole" src="~/_controltemplates/DesignModeConsole.ascx" %> <!DOCTYPE html PUBLIC "-//W3C//DTD XHTML 1.0 Strict//EN" "http://www.w3.org/TR/xhtml1/DTD/xhtml1-strict.dtd"> <html lang="<%$Resources:wss,language_value%>" dir="<%$Resources:wss,multipages_direction_dir_value%>" runat="server" xmlns:o="urn:schemas-microsoft-com:office:office"> <head runat="server"> <meta http-equiv="X-UA-Compatible" content="IE=8"/> <meta name="GENERATOR" content="Microsoft SharePoint"/> <meta name="progid" content="SharePoint.WebPartPage.Document"/> <meta http-equiv="Content-Type" content="text/html; charset=utf-8"/> <meta http-equiv="Expires" content="0"/> <SharePoint:RobotsMetaTag runat="server"/> <title id="onetidTitle"><asp:ContentPlaceHolder id="PlaceHolderPageTitle" runat="server"/></title> <SharePoint:CssLink runat="server" Version="4"/> <SharePoint:Theme runat="server"/> <SharePoint:ULSClientConfig runat="server"/> <script type="text/javascript"> var _fV4UI = true; </script> <SharePoint:ScriptLink language="javascript" name="core.js" OnDemand="true" runat="server" /> <SharePoint:CustomJSUrl runat="server" />
- 13. <SharePoint:SoapDiscoveryLink runat="server" /> <asp:ContentPlaceHolder id="PlaceHolderAdditionalPageHead" runat="server"/> <SharePoint:DelegateControl runat="server" ControlId="AdditionalPageHead" AllowMultipleControls="true"/> <SharePoint:SPShortcutIcon runat="server" IconUrl="/_layouts/images/favicon.ico" /> <asp:ContentPlaceHolder id="PlaceHolderBodyAreaClass" runat="server"/> <asp:ContentPlaceHolder id="PlaceHolderTitleAreaClass" runat="server"/> <SharePoint:SPPageManager runat="server" /> <SharePoint:SPHelpPageComponent Visible="false" runat="server" /> <!-- Added Head content to define static location of style, image and javascript files. to archeieve this the way i did simply rename the folders css,imagess and js to customcss, customimages and customjs, then copy the folders to the location C:Program FilesCommon FilesMicrosoft SharedWeb Server Extensions15TEMPLATELAYOUTS for sharepoint 2010 or C:Program FilesCommon FilesMicrosoft SharedWeb Server Extensions14TEMPLATELAYOUTS for sharepoint 2013. The LAYOUT directory in this location corresponds to _layouts on the URL --> <link href="/_layouts/SharePointRebrandingFarm/css/style.css" rel="stylesheet" type="text/css" /> <script src="/_layouts/SharePointRebrandingFarm/js/jquery-1.4.2.min.js" type="text/javascript"></script> <script src="/_layouts/SharePointRebrandingFarm/js/cufon-yui.js" type="text/javascript"></script> <script src="/_layouts/SharePointRebrandingFarm/js/cufon-replace.js" type="text/javascript"></script> <script src="/_layouts/SharePointRebrandingFarm/js/AvantGarde_Bk_BT_400.font.js" type="text/javascript"></script> <script src="/_layouts/SharePointRebrandingFarm/js/Myriad_Pro_300.font.js" type="text/javascript"></script> <script src="/_layouts/SharePointRebrandingFarm/js/jcarousellite.js" type="text/javascript"></script> <script type="text/javascript"> $(document).ready(function () { $(".carousel").jCarouselLite({ btnNext: ".next", btnPrev: ".prev" }); }); </script> <!--End of Added Content--> </head> <!--Body Modification : by adding "overflow:auto; background:none to the body style inline and removing scroll="no". Scrolling is restored to the page --> <body onload="if (typeof(_spBodyOnLoadWrapper) != 'undefined') _spBodyOnLoadWrapper();" class="v4master" style="overflow:auto; background:none"> <form runat="server" onsubmit="if (typeof(_spFormOnSubmitWrapper) != 'undefined') {return _spFormOnSubmitWrapper();} else {return true;}"> <asp:ScriptManager id="ScriptManager" runat="server" EnablePageMethods="false" EnablePartialRendering="true" EnableScriptGlobalization="false" EnableScriptLocalization="true" /> <WebPartPages:SPWebPartManager id="m" runat="Server" /> <SharePoint:SPNoScript runat="server"/> <div id="TurnOnAccessibility" style="display:none" class="s4-notdlg noindex">
- 14. <a id="linkTurnOnAcc" href="#" class="ms-TurnOnAcc" onclick="SetIsAccessibilityFeatureEnabled(true);UpdateAccessibilityUI();document.g etElementById('linkTurnOffAcc').focus();return false;"><SharePoint:EncodedLiteral runat="server" text="<%$Resources:wss,master_turnonaccessibility%>" EncodeMethod="HtmlEncode"/></a> </div> <div id="TurnOffAccessibility" style="display:none" class="s4-notdlg noindex"> <a id="linkTurnOffAcc" href="#" class="ms-TurnOffAcc" onclick="SetIsAccessibilityFeatureEnabled(false);UpdateAccessibilityUI();document. getElementById('linkTurnOnAcc').focus();return false;"><SharePoint:EncodedLiteral runat="server" text="<%$Resources:wss,master_turnoffaccessibility%>" EncodeMethod="HtmlEncode"/></a> </div> <div class="s4-notdlg s4-skipribbonshortcut noindex"> <a href="javascript:;" onclick="javascript:this.href='#startNavigation';" class="ms-SkiptoNavigation" accesskey="<%$Resources:wss,skipribbon_accesskey%>" runat="server"><SharePoint:EncodedLiteral runat="server" text="<%$Resources:wss,skipRibbonCommandsLink%>" EncodeMethod="HtmlEncode"/></a> </div> <div class="s4-notdlg noindex"> <a href="javascript:;" onclick="javascript:this.href='#mainContent';" class="ms-SkiptoMainContent" accesskey="<%$Resources:wss,maincontent_accesskey%>" runat="server"><SharePoint:EncodedLiteral runat="server" text="<%$Resources:wss,mainContentLink%>" EncodeMethod="HtmlEncode"/></a> </div> <a id="HiddenAnchor" href="javascript:;" style="display:none;"></a> <SharePoint:DelegateControl runat="server" ControlId="GlobalNavigation" /> <!-- This section is added to turn off legacy issue message for all users. This are messages that inform the user of the compartibility issues of thier browser with the viewing page, this is usually the case with older browsers like IE6 which is not compatible with SharePoint 2010 Master Page. --> <script type="text/javascript"> function ProcessImn(){} function ProcessImnMarkers(){} </script> <!--End of legacy message turn off--> <!-- Enabling Free scrolling: The Body section of the Master page. the Div ensures that contents are resisable, commenting it ensures that the Banner section where you have the ribbon is no longer freezed, providing for free flowing of the page as with regular pages. --> <!--<div id="s4-workspace" class="s4-nosetwidth">--> <!-- End of Enabling free scrolling--> <div id="s4-bodyContainer"> <!-- content from our business Idea web template(1) div Openning header,row-1--> <div id="header" > <div class="row-1"> <!--Customisation Hide-Reveal (1): to hide reveal features based on authentication here I ensure that anonymous users see a login link, no ribbon,banner and features i have chosen for a anonymous users this is archeived using the ASP.Net LoginView Control objected and utilising its AnonymousTemplate and LoggedInTemplate effectively -->
- 15. <asp:LoginView id="LoginView" runat="server"> <AnonymousTemplate> <div class="fright" style="padding:2px 50px 0 0; font-weight:bold; color:green"> <a href="/_layouts/authenticate.aspx" style="text-decoration:none">User Login</a> </div> <style type="text/css"> body #s4-ribbonrow { display: none; } #header { height:552px; background:url(/_layouts/SharePointRebrandingFarm/images/header-bg.jpg) no- repeat left bottom; position:relative; } </style> </style> <style type="text/css"> #s4-leftpanel { display: none; } #customcontent { display: none; } .s4-ca { margin-left:0px; } </style> </AnonymousTemplate> <LoggedInTemplate> <style type="text/css"> body #s4-ribbonrow { /*display:*/ } #header { width:95%; height:352px; background:none; position:relative; } #content .row-1 { width:100%; } #content .row-1 .inside { left:0px; padding: 0 0 40px 40px; width:100%; position:relative; }
- 16. #content .content { width:100%; } .fright { width:40%; } </style> </LoggedInTemplate> </asp:LoginView> <!-- End of Customisation Hide-Reveal (1)--> <!--content from our business Idea web template(2) div fright--> <div class="fright" style="padding:10px 50px 0 0;"> <!--Modification of search bar on masterpage, relocating it to appear at the top by the left along side the Sign In ink--> <div id="s4-searcharea" class="s4-search s4-rp"> <asp:ContentPlaceHolder id="PlaceHolderSearchArea" runat="server"> <SharePoint:DelegateControl ID="DelegateControl1" runat="server" ControlId="SmallSearchInputBox" Version="4" /> </asp:ContentPlaceHolder> <span class="s4-help"> <span style="height:17px;width:17px;position:relative;display:inline- block;overflow:hidden;" class="s4-clust"><a href="#" style="height:17px;width:17px;display:inline-block;" onclick="TopHelpButtonClick('HelpHome');return false" accesskey="<%$Resources:wss,multipages_helplink_accesskey%>" id="TopHelpLink" title="<%$Resources:wss,multipages_helplinkalt_text%>" runat="server"><img id="Img1" src="/_layouts/images/fgimg.png" alt="<%$Resources:wss,multipages_helplinkalt_text%>" style="left:-0px !important;top:-309px !important;position:absolute;" align="absmiddle" border="0" runat="server" /></a></span> </span> </div> <!--End of Modification of search bar--> </div> <!--Closing content from our business Idea web template(2) div fright--> <!--content from our business Idea web template(3) div fleft for logo and fright for menue--> <div class="fleft"><a href="#"><img src="/_layouts/SharePointRebrandingFarm/images/logo.gif" alt="Logo" /></a></div> <div class="fright" style="padding:46px 50px 0 0;"> <ul> <li><a href="#" class="active">home</a></li> <li><a href="#">about</a></li> <li><a href="#">articles</a></li> <li><a href="#">contacts</a></li> <li><a href="#">sitemap</a></li> </ul> </div> <!--Closing content from our business Idea web template(3) div fright--> </div> <!--Closing content from our business Idea web template(1) div row-1-->
- 17. <!--Customisation Hide-Reveal (2): to hide reveal features based on authentication here I ensure that anonymous users see the banner while authenticated users see the ribbon. This is archeived using the ASP.Net LoginView Control objected and utilising its AnonymousTemplate effectively --> <asp:LoginView id="LoginView1" runat="server"> <AnonymousTemplate> <div class="row-2"><span><b><img src="/_layouts/SharePointRebrandingFarm/images/slogan.gif" alt="" /></b> <a href="#"><img src="/_layouts/SharePointRebrandingFarm/images/button.gif" alt="" /></a></span></div> </AnonymousTemplate> </asp:LoginView> <!-- End of Customisation Hide-Reveal (2)--> <!-- The Ribbon div from the master page and its contents--> <div id="s4-ribbonrow" class="s4-pr s4-ribbonrowhidetitle" > <div id="s4-ribboncont"> <SharePoint:SPRibbon ID="SPRibbon1" runat="server" PlaceholderElementId="RibbonContainer" CssFile=""> <SharePoint:SPRibbonPeripheralContent ID="SPRibbonPeripheralContent1" runat="server" Location="TabRowLeft" CssClass="ms-siteactionscontainer s4-notdlg"> <span class="ms-siteactionsmenu" id="siteactiontd"> <SharePoint:SiteActions runat="server" accesskey="<%$Resources:wss,tb_SiteActions_AK%>" id="SiteActionsMenuMain" PrefixHtml="" SuffixHtml="" MenuNotVisibleHtml="&nbsp;" > <CustomTemplate> <SharePoint:FeatureMenuTemplate ID="FeatureMenuTemplate1" runat="server" FeatureScope="Site" Location="Microsoft.SharePoint.StandardMenu" GroupId="SiteActions" UseShortId="true" > <SharePoint:MenuItemTemplate runat="server" id="MenuItem_EditPage" Text="<%$Resources:wss,siteactions_editpage%>" Description="<%$Resources:wss,siteactions_editpagedescriptionv4%>" ImageUrl="/_layouts/images/ActionsEditPage.png" MenuGroupId="100" Sequence="110" ClientOnClickNavigateUrl="javascript:ChangeLayoutMode(false);" />
- 18. <SharePoint:MenuItemTemplate runat="server" id="MenuItem_TakeOffline" Text="<%$Resources:wss,siteactions_takeoffline%>" Description="<%$Resources:wss,siteactions_takeofflinedescription%>" ImageUrl="/_layouts/images/connecttospworkspace32.png" MenuGroupId="100" Sequence="120" /> <SharePoint:MenuItemTemplate runat="server" id="MenuItem_CreatePage" Text="<%$Resources:wss,siteactions_createpage%>" Description="<%$Resources:wss,siteactions_createpagedesc%>" ImageUrl="/_layouts/images/NewContentPageHH.png" MenuGroupId="200" Sequence="210" UseShortId="true" ClientOnClickScriptContainingPrefixedUrl="if (LaunchCreateHandler('Page')) { OpenCreateWebPageDialog('~site/_layouts/createwebpage.aspx') }" PermissionsString="AddListItems, EditListItems" PermissionMode="All" /> <SharePoint:MenuItemTemplate runat="server" id="MenuItem_CreateDocLib" Text="<%$Resources:wss,siteactions_createdoclib%>" Description="<%$Resources:wss,siteactions_createdoclibdesc%>" ImageUrl="/_layouts/images/NewDocLibHH.png" MenuGroupId="200" Sequence="220" UseShortId="true" ClientOnClickScriptContainingPrefixedUrl="if (LaunchCreateHandler('DocLib')) { GoToPage('~site/_layouts/new.aspx?FeatureId={00bfea71-e717-4e80-aa17- d0c71b360101}&ListTemplate=101') }" PermissionsString="ManageLists" PermissionMode="Any" VisibilityFeatureId="00BFEA71- E717-4E80-AA17-D0C71B360101" /> <SharePoint:MenuItemTemplate runat="server" id="MenuItem_CreateSite" Text="<%$Resources:wss,siteactions_createsite%>" Description="<%$Resources:wss,siteactions_createsitedesc%>" ImageUrl="/_layouts/images/newweb32.png" MenuGroupId="200" Sequence="230" UseShortId="true" ClientOnClickScriptContainingPrefixedUrl="if (LaunchCreateHandler('Site')) { STSNavigate('~site/_layouts/newsbweb.aspx') }"
- 19. PermissionsString="ManageSubwebs,ViewFormPages" PermissionMode="All" /> <SharePoint:MenuItemTemplate runat="server" id="MenuItem_Create" Text="<%$Resources:wss,siteactions_create%>" Description="<%$Resources:wss,siteactions_createdesc%>" MenuGroupId="200" Sequence="240" UseShortId="true" ClientOnClickScriptContainingPrefixedUrl="if (LaunchCreateHandler('All')) { STSNavigate('~site/_layouts/create.aspx') }" PermissionsString="ManageLists, ManageSubwebs" PermissionMode="Any" /> <SharePoint:MenuItemTemplate runat="server" id="MenuItem_ViewAllSiteContents" Text="<%$Resources:wss,quiklnch_allcontent%>" Description="<%$Resources:wss,siteactions_allcontentdescription%>" ImageUrl="/_layouts/images/allcontent32.png" MenuGroupId="300" Sequence="302" UseShortId="true" ClientOnClickNavigateUrl="~site/_layouts/viewlsts.aspx" PermissionsString="ViewFormPages" PermissionMode="Any" /> <SharePoint:MenuItemTemplate runat="server" id="MenuItem_EditSite" Text="<%$Resources:wss,siteactions_editsite%>" Description="<%$Resources:wss,siteactions_editsitedescription%>" ImageUrl="/_layouts/images/SharePointDesigner32.png" MenuGroupId="300" Sequence="304" UseShortId="true" ClientOnClickScriptContainingPrefixedUrl="EditInSPD('~site/',true);" PermissionsString="AddAndCustomizePages" PermissionMode="Any" /> <SharePoint:MenuItemTemplate runat="server" id="MenuItem_SitePermissions" Text="<%$Resources:wss,people_sitepermissions%>" Description="<%$Resources:wss,siteactions_sitepermissiondescriptionv4%>" ImageUrl="/_layouts/images/Permissions32.png" MenuGroupId="300" Sequence="310" UseShortId="true"
- 20. ClientOnClickNavigateUrl="~site/_layouts/user.aspx" PermissionsString="EnumeratePermissions" PermissionMode="Any" /> <SharePoint:MenuItemTemplate runat="server" id="MenuItem_Settings" Text="<%$Resources:wss,settings_pagetitle%>" Description="<%$Resources:wss,siteactions_sitesettingsdescriptionv4%>" ImageUrl="/_layouts/images/settingsIcon.png" MenuGroupId="300" Sequence="320" UseShortId="true" ClientOnClickNavigateUrl="~site/_layouts/settings.aspx" PermissionsString="EnumeratePermissions,ManageWeb,ManageSubwebs,AddAndCustomize Pages,ApplyThemeAndBorder,ManageAlerts,ManageLists,ViewUsageData" PermissionMode="Any" /> <SharePoint:MenuItemTemplate runat="server" id="MenuItem_CommitNewUI" Text="<%$Resources:wss,siteactions_commitnewui%>" Description="<%$Resources:wss,siteactions_commitnewuidescription%>" ImageUrl="/_layouts/images/visualupgradehh.png" MenuGroupId="300" Sequence="330" UseShortId="true" ClientOnClickScriptContainingPrefixedUrl="GoToPage('~site/_layouts/prjsetng.asp x')" PermissionsString="ManageWeb" PermissionMode="Any" ShowOnlyIfUIVersionConfigurationEnabled="true" /> </SharePoint:FeatureMenuTemplate> </CustomTemplate> </SharePoint:SiteActions></span> <asp:ContentPlaceHolder id="PlaceHolderGlobalNavigation" runat="server"> <SharePoint:PopoutMenu runat="server" ID="GlobalBreadCrumbNavPopout" IconUrl="/_layouts/images/fgimg.png" IconAlt="<%$Resources:wss,master_breadcrumbIconAlt%>" IconOffsetX=0 IconOffsetY=112 IconWidth=16 IconHeight=16 AnchorCss="s4-breadcrumb-anchor" AnchorOpenCss="s4-breadcrumb-anchor- open" MenuCss="s4-breadcrumb-menu"> <div class="s4-breadcrumb-top">
- 21. <asp:Label ID="Label1" runat="server" CssClass="s4-breadcrumb-header" Text="<%$Resources:wss,master_breadcrumbHeader%>" /> </div> <asp:ContentPlaceHolder id="PlaceHolderTitleBreadcrumb" runat="server"> <SharePoint:ListSiteMapPath ID="ListSiteMapPath1" runat="server" SiteMapProviders="SPSiteMapProvider,SPContentMapProvider" RenderCurrentNodeAsLink="false" PathSeparator="" CssClass="s4-breadcrumb" NodeStyle-CssClass="s4- breadcrumbNode" CurrentNodeStyle- CssClass="s4-breadcrumbCurrentNode" RootNodeStyle- CssClass="s4-breadcrumbRootNode" NodeImageOffsetX=0 NodeImageOffsetY=353 NodeImageWidth=16 NodeImageHeight=16 NodeImageUrl="/_layouts/images/fgimg.png" RTLNodeImageOffsetX=0 RTLNodeImageOffsetY=376 RTLNodeImageWidth=16 RTLNodeImageHeight=16 RTLNodeImageUrl="/_layouts/images/fgimg.png" HideInteriorRootNodes="true" SkipLinkText="" /> </asp:ContentPlaceHolder> </SharePoint:PopoutMenu> <div class="s4-die"> <asp:ContentPlaceHolder id="PlaceHolderGlobalNavigationSiteMap" runat="server" Visible="false"> </asp:ContentPlaceHolder> </div> </asp:ContentPlaceHolder> <SharePoint:PageStateActionButton id="PageStateActionButton" runat="server" Visible="false" /> </SharePoint:SPRibbonPeripheralContent> <SharePoint:SPRibbonPeripheralContent runat="server" Location="TabRowRight" ID="RibbonTabRowRight" CssClass="s4-trc-container s4-notdlg"> <SharePoint:DelegateControl runat="server" ID="GlobalDelegate0" ControlId="GlobalSiteLink0" /> <a href="#" tabindex="-1" style="display:none"></a><a href="#" tabindex="-1" style="display:none"></a> <div class="s4-trc-container-menu"> <div> <wssuc:Welcome id="IdWelcome" runat="server" EnableViewState="false"> </wssuc:Welcome>
- 22. <wssuc:MUISelector ID="IdMuiSelector" runat="server"/> </div> </div> <SharePoint:DelegateControl ControlId="GlobalSiteLink2" ID="GlobalDelegate2" Scope="Farm" runat="server" /> <span> <span class="s4-devdashboard"> <Sharepoint:DeveloperDashboardLauncher ID="DeveloperDashboardLauncher" NavigateUrl="javascript:ToggleDeveloperDashboard()" runat="server" ImageUrl="/_layouts/images/fgimg.png" Text="<%$Resources:wss,multipages_launchdevdashalt_text%>" OffsetX=0 OffsetY=222 Height=16 Width=16 /> </span> </span> </SharePoint:SPRibbonPeripheralContent> </SharePoint:SPRibbon> </div> <div id="notificationArea" class="s4-noti"> </div> <asp:ContentPlaceHolder ID="SPNavigation" runat="server"> <SharePoint:DelegateControl runat="server" ControlId="PublishingConsole" Id="PublishingConsoleDelegate"> </SharePoint:DelegateControl> </asp:ContentPlaceHolder> <div id="WebPartAdderUpdatePanelContainer"> <asp:UpdatePanel ID="WebPartAdderUpdatePanel" UpdateMode="Conditional" ChildrenAsTriggers="false" runat="server"> <ContentTemplate> <WebPartPages:WebPartAdder ID="WebPartAdder" runat="server" /> </ContentTemplate> <Triggers> <asp:PostBackTrigger ControlID="WebPartAdder" /> </Triggers> </asp:UpdatePanel> </div> </div> <!-- End of the Ribbon div from the master page and its contents--> </div> <!--Closing content from our business Idea web template(1) div header--> <!--content from our business Idea web template(3) div content, row-1, inside, container,aside--> <div id="content" > <div class="row-1">
- 23. <div class="inside"> <div class="container"> <div class="aside" style="margin-right:0px;"> <h3> <!--Modification of hearichy navigation link below the ribbon--> <div class="s4-titletext" style="font-size:16px;"> <span name="onetidProjectPropertyTitle1"> <asp:ContentPlaceHolder id="PlaceHolderSiteName" runat="server"> <SharePoint:SPLinkButton runat="server" NavigateUrl="~site/" id="onetidProjectPropertyTitle"><SharePoint:ProjectProperty ID="ProjectProperty1" Property="Title" runat="server" /></SharePoint:SPLinkButton> </asp:ContentPlaceHolder> <SharePoint:ClusteredDirectionalSeparatorArrow ID="ClusteredDirectionalSeparatorArrow1" runat="server" /> <asp:ContentPlaceHolder id="PlaceHolderPageTitleInTitleArea" runat="server" /> </span> <div class="s4- pagedescription" tabindex="0" > <asp:ContentPlaceHolder id="PlaceHolderPageDescription" runat="server"/> </div> </div> <!--End of Modification of hearichy navigation link--> <!--continued content from our business Idea web template--> </h3> <ul> <li> <img src="/_layouts/SharePointRebrandingFarm/images/pic1.gif" alt="" /> <div class="extra-wrap"><span>Consultation</span>Sed ut perspiciatis unde<a href="#">...</a></div> </li> <li> <img src="/_layouts/SharePointRebrandingFarm/images/pic2.gif" alt="" /> <div class="extra-wrap"><span>Business Planning</span>Iste natus error sit voluptatem<a href="#">...</a></div> </li> <li> <img src="/_layouts/SharePointRebrandingFarm/images/pic3.gif" alt="" /> <div class="extra-wrap"><span>Target Marketing</span>Accusantium dolmque ldan<a href="#">...</a></div> </li> <li> <img src="/_layouts/SharePointRebrandingFarm/images/pic4.gif" alt="" /> <div class="extra-wrap"><span>Market Research</span>Tium totam rem aperiam eaque<a href="#">...</a></div> </li> <li> <img src="/_layouts/SharePointRebrandingFarm/images/pic5.gif" alt="" /> <div class="extra-wrap"><span>Quick Business Help</span>Ipsa quae ab illo inventore<a href="#">...</a></div> </li> </ul>
- 24. <div class="wrapper"><a href="#" class="link1"><em><b>Learn More</b></em></a></div> </div> <div class="content" style="padding:0 0 0px 0px; width:70%; background:none"> <!-- Removal of the old logo and title content and search bar from the master page--> <!-- <div id="s4-titlerow" class="s4-pr s4-notdlg s4- titlerowhidetitle" > <div class="s4-title s4-lp" style="background:none"> <div class="s4-title-inner" style="background:none"> <table class="s4-titletable" cellspacing="0"> <tbody> <tr> <td class="s4- titlelogo"> <!-- <SharePoint:SPLinkButton runat="server" NavigateUrl="~site/" id="onetidProjectPropertyTitleGraphic" > <SharePoint:SiteLogoImage name="onetidHeadbnnr0" id="onetidHeadbnnr2" LogoImageUrl="/_layouts/images/siteIcon.png" runat="server"/> </SharePoint:SPLinkButton>--> <!--</td> <td td>--> <!--<td class="s4- socialdata-notif"> <SharePoint:DelegateControl ID="DelegateControl2" ControlId="GlobalSiteLink3" Scope="Farm" runat="server" /> </td> </tr> </tbody> </table> </div> </div>--> <!--<div id="s4-topheader2" class="s4-pr s4-notdlg" style="background:none"> <a name="startNavigation"></a> <div class="s4-rp s4-app"> </div>--> <!--End of Removal of the old logo and title content and search bar from the master page <div class="s4-lp s4-toplinks"> <asp:ContentPlaceHolder id="PlaceHolderTopNavBar" runat="server"> <asp:ContentPlaceHolder id="PlaceHolderHorizontalNav" runat="server">--> <!-- Removal of the horizontal menu from the masterpage. I do not need this since I have a static menu above courtesy of the web template am using. --> <!--<SharePoint:AspMenu ID="TopNavigationMenuV4" Runat="server" EnableViewState="false" DataSourceID="topSiteMap"
- 25. AccessKey="<%$Resources:wss,navigation_accesskey%>" UseSimpleRendering="true" UseSeparateCss="false" Orientation="Horizontal" StaticDisplayLevels="2" MaximumDynamicDisplayLevels="1" SkipLinkText="" CssClass="s4-tn" /> <SharePoint:DelegateControl runat="server" ControlId="TopNavigationDataSource" Id="topNavigationDelegate"> <Template_Controls> <asp:SiteMapDataSource ShowStartingNode="False" SiteMapProvider="SPNavigationProvider" id="topSiteMap" runat="server" StartingNodeUrl="sid:1002"/> </Template_Controls> </SharePoint:DelegateControl>--> <!--End of Removal of the horizontal menu from the masterpage. </asp:ContentPlaceHolder> </asp:ContentPlaceHolder> </div> </div> </div>--> <!--End of Removal of Logo, Title Content and horizontal Menu from master page--> <!--continued content from our Master Page --> <div id="s4-statusbarcontainer"> <div id="pageStatusBar" class="s4-status-s1"> </div> </div> <SharePoint:VisualUpgradePreviewStatus ID="VisualUpgradePreviewStatus1" runat="server" /> <div style="padding:0 0 0px 0px; width:100%"> <div id="s4-mainarea" class="s4-pr s4-widecontentarea"> <div id="s4-leftpanel" class="s4-notdlg"> <div id="s4-leftpanel-content"> <asp:ContentPlaceHolder id="PlaceHolderLeftNavBarDataSource" runat="server" /> <asp:ContentPlaceHolder id="PlaceHolderCalendarNavigator" runat="server" /> <asp:ContentPlaceHolder id="PlaceHolderLeftActions" runat="server"></asp:ContentPlaceHolder> <asp:ContentPlaceHolder id="PlaceHolderLeftNavBarTop" runat="server"/> <asp:ContentPlaceHolder id="PlaceHolderLeftNavBar" runat="server"> <div class="ms-quicklaunchouter"> <div class="ms-quickLaunch"> <asp:ContentPlaceHolder id="PlaceHolderQuickLaunchTop" runat="server"> <SharePoint:UIVersionedContent ID="UIVersionedContent1" UIVersion="3" runat="server"> <ContentTemplate>
- 26. <h3 class="ms-standardheader"><label class="ms-hidden"><SharePoint:EncodedLiteral ID="EncodedLiteral1" runat="server" text="<%$Resources:wss,quiklnch_pagetitle%>" EncodeMethod="HtmlEncode"/></label> <Sharepoint:SPSecurityTrimmedControl ID="SPSecurityTrimmedControl1" runat="server" PermissionsString="ViewFormPages"> <div class="ms- quicklaunchheader"><SharePoint:SPLinkButton id="idNavLinkViewAll" runat="server" NavigateUrl="~site/_layouts/viewlsts.aspx" Text="<%$Resources:wss,quiklnch_allcontent%>" accesskey="<%$Resources:wss,quiklnch_allcontent_AK%>"/></div> </SharePoint:SPSecurityTrimmedControl> </h3> </ContentTemplate> </SharePoint:UIVersionedContent> </asp:ContentPlaceHolder> <Sharepoint:SPNavigationManager id="QuickLaunchNavigationManager" runat="server" QuickLaunchControlId="QuickLaunchMenu" ContainedControl="QuickLaunch" EnableViewState="false" CssClass="ms-quicklaunch-navmgr" > <div> <SharePoint:DelegateControl ID="DelegateControl3" runat="server" ControlId="QuickLaunchDataSource"> <Template_Controls> <asp:SiteMapDataSource SiteMapProvider="SPNavigationProvider" ShowStartingNode="False" id="QuickLaunchSiteMap" StartingNodeUrl="sid:1025" runat="server" /> </Template_Controls> </SharePoint:DelegateControl> <SharePoint:UIVersionedContent ID="UIVersionedContent2" UIVersion="3" runat="server"> <ContentTemplate> <SharePoint:AspMenu id="QuickLaunchMenu" runat="server" DataSourceId="QuickLaunchSiteMap" Orientation="Vertical" StaticDisplayLevels="2" ItemWrap="true" MaximumDynamicDisplayLevels="0" StaticSubMenuIndent="0" SkipLinkText="" CssClass="s4-die" > <LevelMenuItemStyles> <asp:MenuItemStyle CssClass="ms- navheader"/> <asp:MenuItemStyle CssClass="ms- navitem"/> </LevelMenuItemStyles> <LevelSubMenuStyles> <asp:SubMenuStyle CssClass="ms- navSubMenu1"/>
- 27. <asp:SubMenuStyle CssClass="ms- navSubMenu2"/> </LevelSubMenuStyles> <LevelSelectedStyles> <asp:MenuItemStyle CssClass="ms- selectednavheader"/> <asp:MenuItemStyle CssClass="ms- selectednav"/> </LevelSelectedStyles> </SharePoint:AspMenu> </ContentTemplate> </SharePoint:UIVersionedContent> <SharePoint:UIVersionedContent ID="UIVersionedContent3" UIVersion="4" runat="server"> <ContentTemplate> <SharePoint:AspMenu id="V4QuickLaunchMenu" runat="server" EnableViewState="false" DataSourceId="QuickLaunchSiteMap" UseSimpleRendering="true" UseSeparateCss="false" Orientation="Vertical" StaticDisplayLevels="2" MaximumDynamicDisplayLevels="0" SkipLinkText="" CssClass="s4-ql" /> </ContentTemplate> </SharePoint:UIVersionedContent> </div> </Sharepoint:SPNavigationManager> <Sharepoint:UIVersionedContent ID="UIVersionedContent4" runat="server" UIVersion="3"> <ContentTemplate> <Sharepoint:SPNavigationManager id="TreeViewNavigationManager" runat="server" ContainedControl="TreeView" > <table class="ms-navSubMenu1" cellpadding="0" cellspacing="0" border="0"> <tr> <td> <table class="ms-navheader" width="100%" cellpadding="0" cellspacing="0" border="0"> <tr> <td nowrap="nowrap" id="idSiteHierarchy"> <SharePoint:SPLinkButton runat="server" NavigateUrl="~site/_layouts/viewlsts.aspx" id="idNavLinkSiteHierarchy" Text="<%$Resources:wss,treeview_header%>" accesskey="<%$Resources:wss,quiklnch_allcontent_AK%>"/> </td> </tr> </table> </td> </tr> </table> <div class="ms-treeviewouter"> <SharePoint:DelegateControl ID="DelegateControl4" runat="server" ControlId="TreeViewAndDataSource"> <Template_Controls>
- 28. <SharePoint:SPHierarchyDataSourceControl runat="server" id="TreeViewDataSource" RootContextObject="Web" IncludeDiscussionFolders="true" /> <SharePoint:SPRememberScroll runat="server" id="TreeViewRememberScroll" onscroll="javascript:_spRecordScrollPositions(this);" style="overflow: auto;height: 400px;width: 150px; "> <Sharepoint:SPTreeView id="WebTreeView" runat="server" ShowLines="false" DataSourceId="TreeViewDataSource" ExpandDepth="0" SelectedNodeStyle-CssClass="ms- tvselected" NodeStyle-CssClass="ms-navitem" NodeStyle-HorizontalPadding="2" SkipLinkText="" NodeIndent="12" ExpandImageUrl="/_layouts/images/tvplus.gif" CollapseImageUrl="/_layouts/images/tvminus.gif" NoExpandImageUrl="/_layouts/images/tvblank.gif" > </Sharepoint:SPTreeView> </Sharepoint:SPRememberScroll> </Template_Controls> </SharePoint:DelegateControl> </div> </Sharepoint:SPNavigationManager> </ContentTemplate> </SharePoint:UIVersionedContent> <Sharepoint:UIVersionedContent ID="UIVersionedContent5" runat="server" UIVersion="4"> <ContentTemplate> <Sharepoint:SPNavigationManager id="TreeViewNavigationManagerV4" runat="server" ContainedControl="TreeView" CssClass="s4-treeView" > <!--navigation --> <SharePoint:SPLinkButton runat="server" NavigateUrl="~site/_layouts/viewlsts.aspx" id="idNavLinkSiteHierarchyV4" Text="<%$Resources:wss,treeview_header%>" accesskey="<%$Resources:wss,quiklnch_allcontent_AK%>" CssClass="s4-qlheader" /> <div class="ms-treeviewouter"> <SharePoint:DelegateControl ID="DelegateControl5" runat="server" ControlId="TreeViewAndDataSource"> <Template_Controls> <SharePoint:SPHierarchyDataSourceControl runat="server" id="TreeViewDataSourceV4" RootContextObject="Web"
- 29. IncludeDiscussionFolders="true" /> <SharePoint:SPRememberScroll runat="server" id="TreeViewRememberScrollV4" onscroll="javascript:_spRecordScrollPositions(this);" style="overflow: auto;height: 400px;width: 155px; "> <Sharepoint:SPTreeView id="WebTreeViewV4" runat="server" ShowLines="false" DataSourceId="TreeViewDataSourceV4" ExpandDepth="0" SelectedNodeStyle- CssClass="ms-tvselected" NodeStyle-CssClass="ms- navitem" SkipLinkText="" NodeIndent="12" ExpandImageUrl="/_layouts/images/tvclosed.png" ExpandImageUrlRtl="/_layouts/images/tvclosedrtl.png" CollapseImageUrl="/_layouts/images/tvopen.png" CollapseImageUrlRtl="/_layouts/images/tvopenrtl.png" NoExpandImageUrl="/_layouts/images/tvblank.gif" > </Sharepoint:SPTreeView> </Sharepoint:SPRememberScroll> </Template_Controls> </SharePoint:DelegateControl> </div> </Sharepoint:SPNavigationManager> </ContentTemplate> </SharePoint:UIVersionedContent> <asp:ContentPlaceHolder id="PlaceHolderQuickLaunchBottom" runat="server"> <SharePoint:UIVersionedContent UIVersion="3" runat="server" id="PlaceHolderQuickLaunchBottomV3"> <ContentTemplate> <table width="100%" cellpadding="0" cellspacing="0" border="0" class="s4-die"> <tr><td> <table class="ms-recyclebin" width="100%" cellpadding="0" cellspacing="0" border="0"> <tr><td nowrap="nowrap"> <SharePoint:SPLinkButton runat="server" NavigateUrl="~site/_layouts/recyclebin.aspx" id="v3idNavLinkRecycleBin" ImageUrl="/_layouts/images/recycbin.gif" Text="<%$Resources:wss,StsDefault_RecycleBin%>" PermissionsString="DeleteListItems" /> </td></tr> </table> </td></tr> </table> </ContentTemplate> </SharePoint:UIVersionedContent>
- 30. <SharePoint:UIVersionedContent UIVersion="4" runat="server" id="PlaceHolderQuickLaunchBottomV4"> <ContentTemplate> <ul class="s4-specialNavLinkList"> <li> <SharePoint:ClusteredSPLinkButton runat="server" NavigateUrl="~site/_layouts/recyclebin.aspx" ImageClass="s4- specialNavIcon" ImageUrl="/_layouts/images/fgimg.png" ImageWidth=16 ImageHeight=16 OffsetX=0 OffsetY=428 id="idNavLinkRecycleBin" Text="<%$Resources:wss,StsDefault_RecycleBin%>" CssClass="s4-rcycl" PermissionsString="DeleteListItems" /> </li> <li> <SharePoint:ClusteredSPLinkButton id="idNavLinkViewAllV4" runat="server" PermissionsString="ViewFormPages" NavigateUrl="~site/_layouts/viewlsts.aspx" ImageClass="s4- specialNavIcon" ImageUrl="/_layouts/images/fgimg.png" ImageWidth=16 ImageHeight=16 OffsetX=0 OffsetY=0 Text="<%$Resources:wss,quiklnch_allcontent_short%>" accesskey="<%$Resources:wss,quiklnch_allcontent_AK%>"/> </li> </ul> </ContentTemplate> </SharePoint:UIVersionedContent> </asp:ContentPlaceHolder> </div> </div> </asp:ContentPlaceHolder> </div> </div> <!--content body here--> <div class="s4-ca s4-ca-dlgNoRibbon" id="MSO_ContentTable" style="background:none"> <div class="s4-die" style="background:none">
- 31. <asp:ContentPlaceHolder id="PlaceHolderPageImage" runat="server" Visible="false"/> <asp:ContentPlaceHolder id="PlaceHolderTitleLeftBorder" runat="server" Visible="false"> </asp:ContentPlaceHolder> <div id="onetidPageTitleAreaFrame" class='ms-pagetitleareaframe s4-pagetitle'></div> <asp:ContentPlaceHolder id="PlaceHolderMiniConsole" runat="server" Visible="false"/> <span class="s4-die" style="background:none"> <asp:ContentPlaceHolder id="PlaceHolderTitleRightMargin" runat="server" Visible="false"/> </span> <asp:ContentPlaceHolder id="PlaceHolderTitleAreaSeparator" runat="server" Visible="false"/> <asp:ContentPlaceHolder id="PlaceHolderNavSpacer" runat="server" Visible="false"><!--<img src="/_layouts/images/blank.gif" width='138' height='1' alt="" />-- ></asp:ContentPlaceholder> <asp:ContentPlaceHolder id="PlaceHolderLeftNavBarBorder" runat="server" Visible="false"></asp:ContentPlaceHolder> <asp:ContentPlaceHolder id="PlaceHolderBodyLeftBorder" runat="server" Visible="false"> </asp:ContentPlaceHolder> </div> <SharePoint:VersionedPlaceHolder UIVersion="3" ID="DesignModeConsoleV3" runat="server"> <asp:ContentPlaceHolder id="WSSDesignConsole" runat="server"> <!--<wssuc:DesignModeConsole id="IdDesignModeConsole" runat="server" />--> </asp:ContentPlaceHolder> </SharePoint:VersionedPlaceHolder> <!--inner body conntent here--> <div class='s4-ba'><div class='ms-bodyareacell' > <!-- modification of the content body to accomodate a maximum allocated width and no background--> <div id="MSO_ContentDiv" runat="server" style="width:100%;background:none; "> <!-- End of modification of the content body to accomodate a maximum allocated width and no background--> <a name="mainContent"></a> <asp:ContentPlaceHolder id="PlaceHolderMain" runat="server"> </asp:ContentPlaceHolder> </div> </div></div> <!--inner body content ends here--> <div class="s4-die"> <asp:ContentPlaceHolder id="PlaceHolderBodyRightMargin" runat="server"> </asp:ContentPlaceHolder> </div> </div> <!--content body ends here--> </div> </div> <SharePoint:DeveloperDashboard ID="DeveloperDashboard1" runat="server" />
- 32. </div> <div id="customcontent" class="clear"><asp:ContentPlaceHolder id="customcontentPlaceholder" runat="server"> </asp:ContentPlaceHolder></div> </div> </div> <!-- content from our business Idea web template(4) with modification from the footer --> <div class="tail-middle"> <div class="row-2"> <div class="inside"> <h3>Recent Articles</h3> <div class="carousel-box"> <div class="prev"><a href="#"><img src="/_layouts/SharePointRebrandingFarm/images/prev.png" alt="" /></a></div> <div class="next"><a href="#"><img src="/_layouts/SharePointRebrandingFarm/images/next.png" alt="" /></a></div> <div class="carousel"> <ul> <li> <div class="box"> <div class="border-top"> <div class="border-bot"> <div class="left-top-corner"> <div class="right-top-corner"> <div class="right-bot-corner"> <div class="left-bot-corner"> <div class="img-box2"><img src="/_layouts/SharePointRebrandingFarm/images/slide-img1.jpg" alt="" /> <div class="inner"> <h4>Business Plans</h4> <p>Here you will find free samples of business plans that will help you to run your own business. </p> </div> </div> </div> </div> </div> </div> </div> </div> </div> </li> <li> <div class="box"> <div class="border-top"> <div class="border-bot"> <div class="left-top-corner"> <div class="right-top-corner"> <div class="right-bot-corner"> <div class="left-bot-corner"> <div class="inner"> <div class="img-box2"><img src="/_layouts/SharePointRebrandingFarm/images/slide-img2.jpg" alt="" /> <div class="inner"> <h4>About Template</h4> <p class="extra">Aeneanid justo a lobortor a et et in eros porta curabitur. Rhoncuscondissim nam sed nulla id ac dui id temportis orci ligula. Pretrainterdum intesque.</p> </div>
- 33. </div> </div> </div> </div> </div> </div> </div> </div> </div> </li> <li> <div class="box"> <div class="border-top"> <div class="border-bot"> <div class="left-top-corner"> <div class="right-top-corner"> <div class="right-bot-corner"> <div class="left-bot-corner"> <div class="inner"> <div class="img-box2"><img src="/_layouts/SharePointRebrandingFarm/images/slide-img3.jpg" alt="" /> <div class="inner"> <h4>Useful Information</h4> <p>Read this sample article and learn more about the strategic business planning.</p> </div> </div> </div> </div> </div> </div> </div> </div> </div> </div> </li> </ul> </div> </div> </div> </div> </div> </div> <div id="footer"> <div class="footerlink"> <p class="lf">Copyright © 2014 <a href="#">Business Idea</a> - All Rights Reserved</p> <p class="rf">MasterPage template by Joshus Silver(Ifeanyi I Nwodo) <br /> HTML Template from template monster.</p> <div style="clear:both;"></div> </div> </div> <!-- Closing content from our business Idea web template(4) --> <!-- concluding part of the master page--> </div> <asp:ContentPlaceHolder id="PlaceHolderFormDigest" runat="server"> <SharePoint:FormDigest runat="server"/> </asp:ContentPlaceHolder>
- 34. <input type="text" name="__spText1" title="text" style="display:none;" /> <input type="text" name="__spText2" title="text" style="display:none;" /> </form> <asp:ContentPlaceHolder id="PlaceHolderUtilityContent" runat="server"/> <SharePoint:WarnOnUnsupportedBrowsers runat="server"/> <!--This tag is responsible for legacy browser check message that pops up with old browsers such as IE6, we have done something about this above using javascript--> <!--end of concluding part of the master page--> </body> </html> Now we have the masterpage is time to get the other contents of the Business Idea and apply same on the (including the js folder containing javascript files, css folder containing style file and images folder containing images used on the sight). To bring in these folders, map to the Layout folder on SharePoint. By right clicking on the project, point to Add and click SharePoint “Layouts” mapped folder. See below: Now is time to apply our new master page file and its corresponding css file on the site on starting this feature and reverting the master page and its corresponding css file to the default which is v4.master on stopping this feature. To archeive this we need to add the Event Receiver to the feature if we have not yet done so. If you have not done so right click on the feature and click Event Receiver
- 35. Populate the FeatureActivated and FeatureDeactivating methods Now uncomment both methods and override as follows : In both methods, I locate the sites root url and add “/” to it if there is none on it, before attaching the url of the master page and CSS while defining the sites masterpage and css. public override void FeatureActivated(SPFeatureReceiverProperties properties) { SPSite siteCollection = properties.Feature.Parent as SPSite; if (siteCollection != null) { SPWeb wSite = siteCollection.RootWeb; string siteRelativeURL = wSite.ServerRelativeUrl; if (!siteRelativeURL.EndsWith("/")) { siteRelativeURL += "/"; } foreach (SPWeb site in siteCollection.AllWebs) { site.MasterUrl = siteRelativeURL + "_catalogs/masterpage/CustomRebranding.master"; site.CustomMasterUrl = siteRelativeURL + "_catalogs/masterpage/CustomRebranding.master"; site.AlternateCssUrl = siteRelativeURL + "Style%20Library/sharepontrebranding/css/style.css"; //site.SiteLogoUrl = ""; // site.SiteLogoUrl = siteRelativeURL + "Style%20Library/sharepontrebranding/images/logo.gif"; site.Update(); } } }
- 36. public override void FeatureDeactivating(SPFeatureReceiverProperties properties) { SPSite siteCollection = properties.Feature.Parent as SPSite; if (siteCollection != null) { SPWeb wSite = siteCollection.RootWeb; string siteRealtiveUrl = wSite.ServerRelativeUrl; if(!siteRealtiveUrl.EndsWith("/")) { siteRealtiveUrl +="/"; } foreach(SPWeb site in siteCollection.AllWebs) { site.MasterUrl = siteRealtiveUrl + "_catalogs/masterpage/v4.master"; site.CustomMasterUrl = siteRealtiveUrl + "_catalogs/masterpage/v4.master"; site.AlternateCssUrl = ""; site.SiteLogoUrl = ""; site.Update(); } } } For the contents of the images and js folders I have statically specified them in the masterpage file and the css file, you can check the masterpage file to confirm this From master page file <link href="/_layouts/SharePointRebrandingFarm/css/style.css" rel="stylesheet" type="text/css" /> <script src="/_layouts/SharePointRebrandingFarm/js/jquery-1.4.2.min.js" type="text/javascript"></script> <script src="/_layouts/SharePointRebrandingFarm/js/cufon-yui.js" type="text/javascript"></script> <script src="/_layouts/SharePointRebrandingFarm/js/cufon-replace.js" type="text/javascript"></script> <script src="/_layouts/SharePointRebrandingFarm/js/AvantGarde_Bk_BT_400.font.js" type="text/javascript"></script> <script src="/_layouts/SharePointRebrandingFarm/js/Myriad_Pro_300.font.js" type="text/javascript"></script> <script src="/_layouts/SharePointRebrandingFarm/js/jcarousellite.js" type="text/javascript"></script> <img src="/_layouts/sharepontrebranding/images/logo.gif" alt="Logo" /> From CSS file background:url("/_layouts/sharepontrebranding/images/tail-top-left.gif) repeat-x left top;
- 37. Right click on the project and click deploy. That’s all you can now navigate the site you will get something similar to See our new feature running below
- 38. Untill we meet a gain from me to you its Nkoma…….. Download complete sandboxed project here.