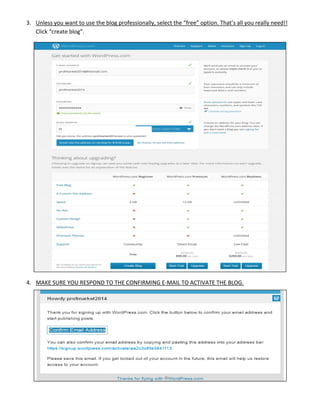
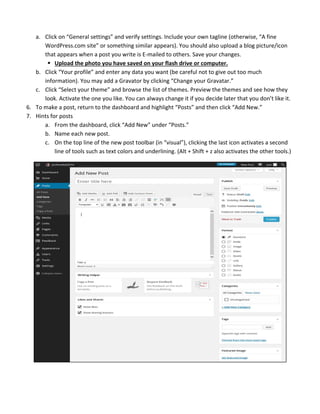
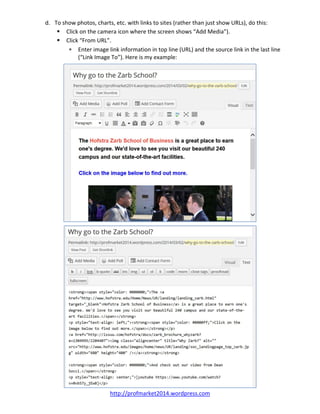
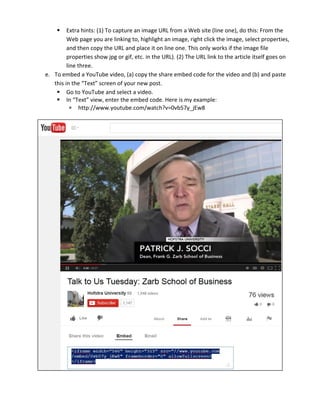
Tips for Setting Up a WordPress.com Blog (A Beginner’s Brief Guide) 
by Joel R. Evans, Zarb School of Business, Hofstra University (March 2014) 
www.evansonmarketing.com 
Overview 
1. Go to http://www.wordpress.com/ and click “Get Started” or “Create your WordPress.com blog 
now!” 
 
2. Follow the instructions and choose your E‐mail address, user name, password, and blog address. 
3. Unless you want to use the blog professionally, select the “free” option. That’s all you really need!! 
Click “create blog”. 
 
4. MAKE SURE YOU RESPOND TO THE CONFIRMING E‐MAIL TO ACTIVATE THE BLOG. 
 
5. After you confirm the E‐mail and login, your WordPress Dashboard will appear. DO NOT WRITE A 
POST until you set up your blog: 


a. Click on “General settings” and verify settings. Include your own tagline (otherwise, “A fine 
WordPress.com site” or something similar appears). You should also upload a blog picture/icon 
that appears when a post you write is E‐mailed to others. Save your changes. 
 Upload the photo you have saved on your flash drive or computer. 
b. Click “Your profile” and enter any data you want (be careful not to give out too much 
information). You may add a Gravator by clicking “Change your Gravatar.” 
c. Click “Select your theme” and browse the list of themes. Preview the themes and see how they 
look. Activate the one you like. You can always change it if you decide later that you don’t like it. 
6. To make a post, return to the dashboard and highlight “Posts” and then click “Add New.”  
7. Hints for posts 
a. From the dashboard, click “Add New” under “Posts.” 
b. Name each new post. 
c. On the top line of the new post toolbar (in “visual”), clicking the last icon activates a second 
line of tools such as text colors and underlining. (Alt + Shift + z also activates the other tools.) 
 
   
d. To show photos, charts, etc. with links to sites (rather than just show URLs), do this: 
 Click on the camera icon where the screen shows “Add Media”). 
 Click “From URL”. 
 Enter image link information in top line (URL) and the source link in the last line 
(“Link Image To”). Here is my example: 


http://profmarket2014.wordpress.com   
 
 Extra hints: (1) To capture an image URL from a Web site (line one), do this: From the 
Web page you are linking to, highlight an image, right click the image, select properties, 
and then copy the URL and place it on line one. This only works if the image file 
properties show jpg or gif, etc. in the URL). (2) The URL link to the article itself goes on 
line three. 
e. To embed a YouTube video, (a) copy the share embed code for the video and (b) and paste 
this in the “Text” screen of your new post. 
 Go to YouTube and select a video. 
 In “Text” view, enter the embed code. Here is my example: 
 http://www.youtube.com/watch?v=0vb57y_jEw8 


8. REMEMBER, be careful and credit and link to the source. 
 
Special Topics 
1. Gaining followers: 
a. Signups : Go to your dashboard and scroll down to “Appearance.” Click on “Widgets”. Scroll 
down to “Follow Blog” and then drag and drop this icon to your sidebar. 
b. Social media: Activate posts from social media links. 
2. Using pages 
a. To create top‐of‐the‐page items such as “About,” WordPress requires the use of pages. 
b. Return to the dashboard and highlight “Pages” on the left toolbar. Then click “Add New.” 
c. Enter a title and then some text. Your blog should at least have an “About” section that says 
something about you and the purpose of your blog. Copy and paste your material from your PC. 
3. Setting up categories for posts 
a. To make life simpler for your blog followers, you may want to categorize your posts. 
b. Return to the dashboard and highlight “Posts.” Click on “Categories.” Add as many as you want. 
c. After you set up your categories, you MUST indicate in each of your posts which category in 
which to place the post by clicking one or more category boxes under the new post box. 
4. Comments 
a. YOU control whether or not individual comments appear on your blog. 
b. No comments appear without your approval. 
c. From the dashboard, click on “Comments.” If any are listed there, you have the option of 
approving or rejecting them. 
5. More 
a. WordPress has a lot of other free features, it’s up to you if you want to use them. 
  NOTES:  


Setting Up a WordPress Blog