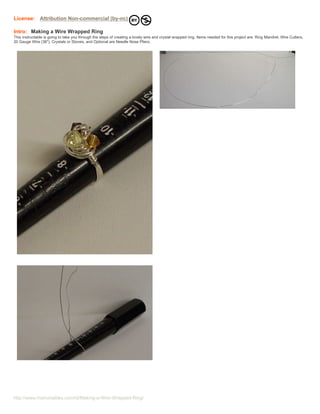
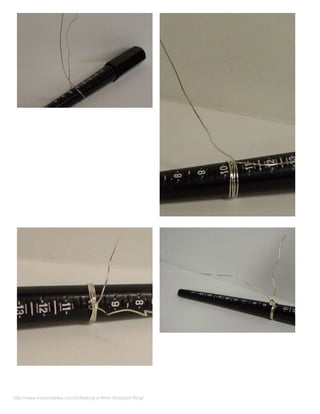
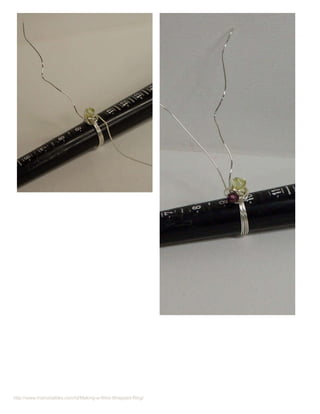
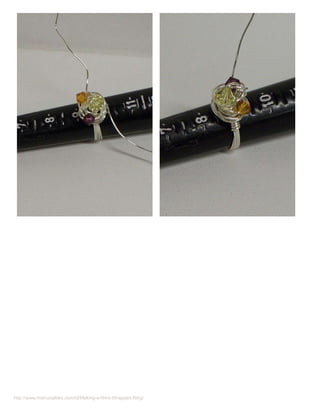
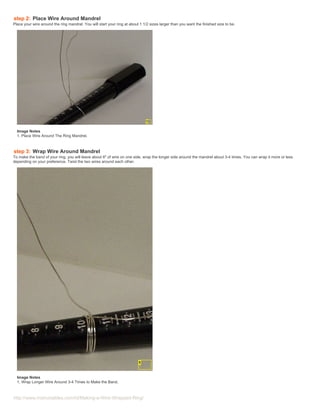
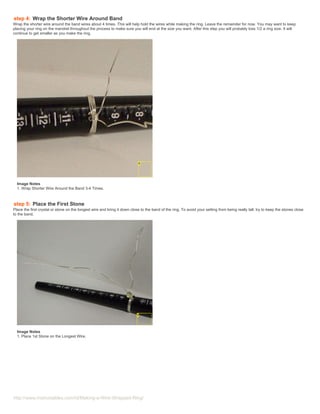
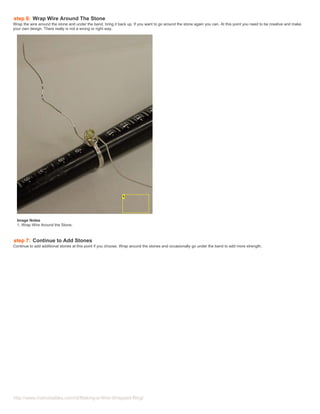
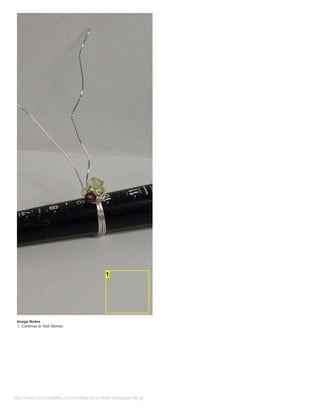
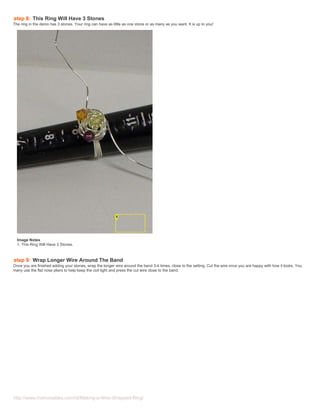
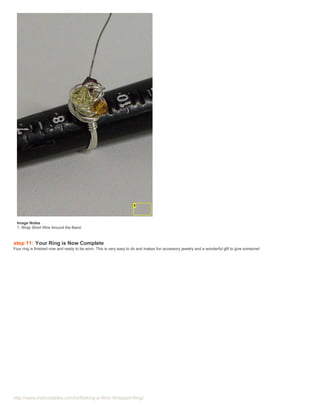
Home Sign Up! Browse Community Submit
 All      Art       Craft        Food          Games           Green          Home           Kids        Life       Music          Offbeat          Outdoors             Pets        Photo         Ride         Science           Tech
Making a Wire Wrapped Ring
by aressa on May 12, 2009
Table of Contents

License: Attribution Non-commercial (by-nc) . . . . . . . . . . . . . . . . . . . . . . . . . . . . . . . . . . . . . . . . . . . . . . . . . . . . . . . . . . . . . . . . . . . . . . . . . . . . . . . . . . . . . . . . .                  2

Intro: Making a Wire Wrapped Ring . . . . . . . . . . . . . . . . . . . . . . . . . . . . . . . . . . . . . . . . . . . . . . . . . . . . . . . . . . . . . . . . . . . . . . . . . . . . . . . . . . . . . . . . . . . . . . .                2

step 1: Cut Wire . . . . . . . . . . . . . . . . . . . . . . . . . . . . . . . . . . . . . . . . . . . . . . . . . . . . . . . . . . . . . . . . . . . . . . . . . . . . . . . . . . . . . . . . . . . . . . . . . . . . . . . . . . . . . .   6

step 2: Place Wire Around Mandrel . . . . . . . . . . . . . . . . . . . . . . . . . . . . . . . . . . . . . . . . . . . . . . . . . . . . . . . . . . . . . . . . . . . . . . . . . . . . . . . . . . . . . . . . . . . . . . .                7

step 3: Wrap Wire Around Mandrel . . . . . . . . . . . . . . . . . . . . . . . . . . . . . . . . . . . . . . . . . . . . . . . . . . . . . . . . . . . . . . . . . . . . . . . . . . . . . . . . . . . . . . . . . . . . . . . .               7

step 4: Wrap the Shorter Wire Around Band . . . . . . . . . . . . . . . . . . . . . . . . . . . . . . . . . . . . . . . . . . . . . . . . . . . . . . . . . . . . . . . . . . . . . . . . . . . . . . . . . . . . . . . . .                    8

step 5: Place the First Stone . . . . . . . . . . . . . . . . . . . . . . . . . . . . . . . . . . . . . . . . . . . . . . . . . . . . . . . . . . . . . . . . . . . . . . . . . . . . . . . . . . . . . . . . . . . . . . . . . . . .          8

step 6: Wrap Wire Around The Stone . . . . . . . . . . . . . . . . . . . . . . . . . . . . . . . . . . . . . . . . . . . . . . . . . . . . . . . . . . . . . . . . . . . . . . . . . . . . . . . . . . . . . . . . . . . . . .                 9

step 7: Continue to Add Stones . . . . . . . . . . . . . . . . . . . . . . . . . . . . . . . . . . . . . . . . . . . . . . . . . . . . . . . . . . . . . . . . . . . . . . . . . . . . . . . . . . . . . . . . . . . . . . . . . .             9

step 8: This Ring Will Have 3 Stones . . . . . . . . . . . . . . . . . . . . . . . . . . . . . . . . . . . . . . . . . . . . . . . . . . . . . . . . . . . . . . . . . . . . . . . . . . . . . . . . . . . . . . . . . . . . . . 11

step 9: Wrap Longer Wire Around The Band . . . . . . . . . . . . . . . . . . . . . . . . . . . . . . . . . . . . . . . . . . . . . . . . . . . . . . . . . . . . . . . . . . . . . . . . . . . . . . . . . . . . . . . . 11

step 10: Wrap Shorter Wire Around The Band . . . . . . . . . . . . . . . . . . . . . . . . . . . . . . . . . . . . . . . . . . . . . . . . . . . . . . . . . . . . . . . . . . . . . . . . . . . . . . . . . . . . . . . 12

step 11: Your Ring is Now Complete . . . . . . . . . . . . . . . . . . . . . . . . . . . . . . . . . . . . . . . . . . . . . . . . . . . . . . . . . . . . . . . . . . . . . . . . . . . . . . . . . . . . . . . . . . . . . . 13

Related Instructables . . . . . . . . . . . . . . . . . . . . . . . . . . . . . . . . . . . . . . . . . . . . . . . . . . . . . . . . . . . . . . . . . . . . . . . . . . . . . . . . . . . . . . . . . . . . . . . . . . . . . . . . . . . 14

Advertisements . . . . . . . . . . . . . . . . . . . . . . . . . . . . . . . . . . . . . . . . . . . . . . . . . . . . . . . . . . . . . . . . . . . . . . . . . . . . . . . . . . . . . . . . . . . . . . . . . . . . . . . . . . . . . . . 14

Comments . . . . . . . . . . . . . . . . . . . . . . . . . . . . . . . . . . . . . . . . . . . . . . . . . . . . . . . . . . . . . . . . . . . . . . . . . . . . . . . . . . . . . . . . . . . . . . . . . . . . . . . . . . . . . . . . . . . 14


http://www.instructables.com/id/Making-a-Wire-Wrapped-Ring/
License: Attribution Non-commercial (by-nc)

Intro: Making a Wire Wrapped Ring
This instructable is going to take you through the steps of creating a lovely wire and crystal wrapped ring. Items needed for this project are: Ring Mandrel, Wire Cutters,
20 Gauge Wire (36"), Crystals or Stones, and Optional are Needle Nose Pliers.


http://www.instructables.com/id/Making-a-Wire-Wrapped-Ring/
Image Notes
  1. This ring will be completed in this project.


step 1: Cut Wire
Use wire cutters and cut off approximately 36" of wire for this project.'


  Image Notes
  1. Cut 36" of Wire.


http://www.instructables.com/id/Making-a-Wire-Wrapped-Ring/
step 2: Place Wire Around Mandrel
Place your wire around the ring mandrel. You will start your ring at about 1 1/2 sizes larger than you want the finished size to be.


  Image Notes
  1. Place Wire Around The Ring Mandrel.


step 3: Wrap Wire Around Mandrel
To make the band of your ring, you will leave about 6" of wire on one side, wrap the longer side around the mandrel about 3-4 times. You can wrap it more or less
depending on your preference. Twist the two wires around each other.


  Image Notes
  1. Wrap Longer Wire Around 3-4 Times to Make the Band.


http://www.instructables.com/id/Making-a-Wire-Wrapped-Ring/
step 4: Wrap the Shorter Wire Around Band
Wrap the shorter wire around the band wires about 4 times. This will help hold the wires while making the ring. Leave the remainder for now. You may want to keep
placing your ring on the mandrel throughout the process to make sure you will end at the size you want. After this step you will probably loss 1/2 a ring size. It will
continue to get smaller as you make the ring.


  Image Notes
  1. Wrap Shorter Wire Around the Band 3-4 Times.


step 5: Place the First Stone
Place the first crystal or stone on the longest wire and bring it down close to the band of the ring. To avoid your setting from being really tall, try to keep the stones close
to the band.


  Image Notes
  1. Place 1st Stone on the Longest Wire.


http://www.instructables.com/id/Making-a-Wire-Wrapped-Ring/
step 6: Wrap Wire Around The Stone
Wrap the wire around the stone and under the band, bring it back up. If you want to go around the stone again you can. At this point you need to be creative and make
your own design. There really is not a wrong or right way.


  Image Notes
  1. Wrap Wire Around the Stone.


step 7: Continue to Add Stones
Continue to add additional stones at this point if you choose. Wrap around the stones and occasionally go under the band to add more strength.


http://www.instructables.com/id/Making-a-Wire-Wrapped-Ring/
Image Notes
 1. Continue to Add Stones.


http://www.instructables.com/id/Making-a-Wire-Wrapped-Ring/
step 8: This Ring Will Have 3 Stones
The ring in the demo has 3 stones. Your ring can have as little as one stone or as many as you want. It is up to you!


  Image Notes
  1. This Ring Will Have 3 Stones.


step 9: Wrap Longer Wire Around The Band
Once you are finished adding your stones, wrap the longer wire around the band 3-4 times, close to the setting. Cut the wire once you are happy with how it looks. You
many use the flat nose pliers to help keep the coil tight and press the cut wire close to the band.


http://www.instructables.com/id/Making-a-Wire-Wrapped-Ring/
Image Notes
  1. Wrap Longer Wire Around Band.


step 10: Wrap Shorter Wire Around The Band
Move now to the shorter wire and repeat the previous step, making both sides match if possible.


http://www.instructables.com/id/Making-a-Wire-Wrapped-Ring/
Image Notes
  1. Wrap Short Wire Around the Band.


step 11: Your Ring is Now Complete
Your ring is finished now and ready to be worn. This is very easy to do and makes fun accessory jewelry and a wonderful gift to give someone!


http://www.instructables.com/id/Making-a-Wire-Wrapped-Ring/
Image Notes
 1. Your Ring is now Complete!


Related Instructables


                                          Byzantine
                                          Chainmail(le)
A Simple Wire      Volume 6 - How         Speed-weaving         Ye Olde Chain     Earrings made      Make an Iron
Ring by totemic    to Weave Full                                Maille Rings by   from floppy disk   Man Arc
                                          by ryzellon
                   Persian by                                   mat_the_w         parts! by zoxx     Reactor by
                   jbb3141                                                                           Honus


Advertisements
Comments
 9 comments        Add Comment


          vlslpn says:                                                                                                                  May 21, 2009. 5:54 PM REPLY
          I have a ring like this! I purchased it at a craft show. I love it!


          griesegal says:                                                                                                                    May 21, 2009. 3:18 PM REPLY
          I love the versatility of wire and this is a cool, free-form ring. I have a more structured style wire ring with mine and my husbands birthstones that I always
          wear.

          Mandrels are available lots of places, but one of my favorite supply houses is Fire Mountain Gems and Beads.
          http://www.firemountaingems.com/shopping.asp?skw=KWTOOLMANDREL


http://www.instructables.com/id/Making-a-Wire-Wrapped-Ring/
cjdold says:                                                                                                                May 21, 2009. 2:24 PM REPLY
        You can get mandrels on ebay, but a pool cue is a reasonable substitute. don't use a nice new one though. You can also get long taper punches, from
        hardware shops, that are stronger.


        Crucio says:                                                                                                          May 21, 2009. 12:29 PM REPLY
        Hi Amy, Nice job! Where can one obtain a ring mandrel?


        pennysartroom says:                                                                                                     May 21, 2009. 5:27 AM REPLY
        What a great idea, looks like a lot of fun, can't wait to try it! Thanks, Penny


           aressa says:                                                                                                         May 21, 2009. 7:29 AM REPLY
            Thanks! They are a lot of fun to make. Once you get started you won't want to stop!! (lol)


        xwx says:                                                                                                               May 12, 2009. 6:42 PM REPLY
        This rocks I love it I'll have to try it some time :D


           aressa says:                                                                                                         May 21, 2009. 7:26 AM REPLY
            Thanks! I hope you have fun making them. I love to make them. They are fast and easy to do!


           aressa says:                                                                                                            May 13, 2009. 9:27 AM REPLY
            Thanks! It is funny and once you get started you want to keep making them. They are fun to wear and make great gifts. Amy


http://www.instructables.com/id/Making-a-Wire-Wrapped-Ring/

Making a-wire-wrapped-ring

  • 1.
    Home Sign Up!Browse Community Submit All Art Craft Food Games Green Home Kids Life Music Offbeat Outdoors Pets Photo Ride Science Tech Making a Wire Wrapped Ring by aressa on May 12, 2009 Table of Contents License: Attribution Non-commercial (by-nc) . . . . . . . . . . . . . . . . . . . . . . . . . . . . . . . . . . . . . . . . . . . . . . . . . . . . . . . . . . . . . . . . . . . . . . . . . . . . . . . . . . . . . . . . . 2 Intro: Making a Wire Wrapped Ring . . . . . . . . . . . . . . . . . . . . . . . . . . . . . . . . . . . . . . . . . . . . . . . . . . . . . . . . . . . . . . . . . . . . . . . . . . . . . . . . . . . . . . . . . . . . . . . 2 step 1: Cut Wire . . . . . . . . . . . . . . . . . . . . . . . . . . . . . . . . . . . . . . . . . . . . . . . . . . . . . . . . . . . . . . . . . . . . . . . . . . . . . . . . . . . . . . . . . . . . . . . . . . . . . . . . . . . . . . 6 step 2: Place Wire Around Mandrel . . . . . . . . . . . . . . . . . . . . . . . . . . . . . . . . . . . . . . . . . . . . . . . . . . . . . . . . . . . . . . . . . . . . . . . . . . . . . . . . . . . . . . . . . . . . . . . 7 step 3: Wrap Wire Around Mandrel . . . . . . . . . . . . . . . . . . . . . . . . . . . . . . . . . . . . . . . . . . . . . . . . . . . . . . . . . . . . . . . . . . . . . . . . . . . . . . . . . . . . . . . . . . . . . . . . 7 step 4: Wrap the Shorter Wire Around Band . . . . . . . . . . . . . . . . . . . . . . . . . . . . . . . . . . . . . . . . . . . . . . . . . . . . . . . . . . . . . . . . . . . . . . . . . . . . . . . . . . . . . . . . . 8 step 5: Place the First Stone . . . . . . . . . . . . . . . . . . . . . . . . . . . . . . . . . . . . . . . . . . . . . . . . . . . . . . . . . . . . . . . . . . . . . . . . . . . . . . . . . . . . . . . . . . . . . . . . . . . . 8 step 6: Wrap Wire Around The Stone . . . . . . . . . . . . . . . . . . . . . . . . . . . . . . . . . . . . . . . . . . . . . . . . . . . . . . . . . . . . . . . . . . . . . . . . . . . . . . . . . . . . . . . . . . . . . . 9 step 7: Continue to Add Stones . . . . . . . . . . . . . . . . . . . . . . . . . . . . . . . . . . . . . . . . . . . . . . . . . . . . . . . . . . . . . . . . . . . . . . . . . . . . . . . . . . . . . . . . . . . . . . . . . . 9 step 8: This Ring Will Have 3 Stones . . . . . . . . . . . . . . . . . . . . . . . . . . . . . . . . . . . . . . . . . . . . . . . . . . . . . . . . . . . . . . . . . . . . . . . . . . . . . . . . . . . . . . . . . . . . . . 11 step 9: Wrap Longer Wire Around The Band . . . . . . . . . . . . . . . . . . . . . . . . . . . . . . . . . . . . . . . . . . . . . . . . . . . . . . . . . . . . . . . . . . . . . . . . . . . . . . . . . . . . . . . . 11 step 10: Wrap Shorter Wire Around The Band . . . . . . . . . . . . . . . . . . . . . . . . . . . . . . . . . . . . . . . . . . . . . . . . . . . . . . . . . . . . . . . . . . . . . . . . . . . . . . . . . . . . . . . 12 step 11: Your Ring is Now Complete . . . . . . . . . . . . . . . . . . . . . . . . . . . . . . . . . . . . . . . . . . . . . . . . . . . . . . . . . . . . . . . . . . . . . . . . . . . . . . . . . . . . . . . . . . . . . . 13 Related Instructables . . . . . . . . . . . . . . . . . . . . . . . . . . . . . . . . . . . . . . . . . . . . . . . . . . . . . . . . . . . . . . . . . . . . . . . . . . . . . . . . . . . . . . . . . . . . . . . . . . . . . . . . . . . 14 Advertisements . . . . . . . . . . . . . . . . . . . . . . . . . . . . . . . . . . . . . . . . . . . . . . . . . . . . . . . . . . . . . . . . . . . . . . . . . . . . . . . . . . . . . . . . . . . . . . . . . . . . . . . . . . . . . . . 14 Comments . . . . . . . . . . . . . . . . . . . . . . . . . . . . . . . . . . . . . . . . . . . . . . . . . . . . . . . . . . . . . . . . . . . . . . . . . . . . . . . . . . . . . . . . . . . . . . . . . . . . . . . . . . . . . . . . . . . 14 http://www.instructables.com/id/Making-a-Wire-Wrapped-Ring/
  • 2.
    License: Attribution Non-commercial(by-nc) Intro: Making a Wire Wrapped Ring This instructable is going to take you through the steps of creating a lovely wire and crystal wrapped ring. Items needed for this project are: Ring Mandrel, Wire Cutters, 20 Gauge Wire (36"), Crystals or Stones, and Optional are Needle Nose Pliers. http://www.instructables.com/id/Making-a-Wire-Wrapped-Ring/
  • 3.
  • 4.
  • 5.
  • 6.
    Image Notes 1. This ring will be completed in this project. step 1: Cut Wire Use wire cutters and cut off approximately 36" of wire for this project.' Image Notes 1. Cut 36" of Wire. http://www.instructables.com/id/Making-a-Wire-Wrapped-Ring/
  • 7.
    step 2: PlaceWire Around Mandrel Place your wire around the ring mandrel. You will start your ring at about 1 1/2 sizes larger than you want the finished size to be. Image Notes 1. Place Wire Around The Ring Mandrel. step 3: Wrap Wire Around Mandrel To make the band of your ring, you will leave about 6" of wire on one side, wrap the longer side around the mandrel about 3-4 times. You can wrap it more or less depending on your preference. Twist the two wires around each other. Image Notes 1. Wrap Longer Wire Around 3-4 Times to Make the Band. http://www.instructables.com/id/Making-a-Wire-Wrapped-Ring/
  • 8.
    step 4: Wrapthe Shorter Wire Around Band Wrap the shorter wire around the band wires about 4 times. This will help hold the wires while making the ring. Leave the remainder for now. You may want to keep placing your ring on the mandrel throughout the process to make sure you will end at the size you want. After this step you will probably loss 1/2 a ring size. It will continue to get smaller as you make the ring. Image Notes 1. Wrap Shorter Wire Around the Band 3-4 Times. step 5: Place the First Stone Place the first crystal or stone on the longest wire and bring it down close to the band of the ring. To avoid your setting from being really tall, try to keep the stones close to the band. Image Notes 1. Place 1st Stone on the Longest Wire. http://www.instructables.com/id/Making-a-Wire-Wrapped-Ring/
  • 9.
    step 6: WrapWire Around The Stone Wrap the wire around the stone and under the band, bring it back up. If you want to go around the stone again you can. At this point you need to be creative and make your own design. There really is not a wrong or right way. Image Notes 1. Wrap Wire Around the Stone. step 7: Continue to Add Stones Continue to add additional stones at this point if you choose. Wrap around the stones and occasionally go under the band to add more strength. http://www.instructables.com/id/Making-a-Wire-Wrapped-Ring/
  • 10.
    Image Notes 1.Continue to Add Stones. http://www.instructables.com/id/Making-a-Wire-Wrapped-Ring/
  • 11.
    step 8: ThisRing Will Have 3 Stones The ring in the demo has 3 stones. Your ring can have as little as one stone or as many as you want. It is up to you! Image Notes 1. This Ring Will Have 3 Stones. step 9: Wrap Longer Wire Around The Band Once you are finished adding your stones, wrap the longer wire around the band 3-4 times, close to the setting. Cut the wire once you are happy with how it looks. You many use the flat nose pliers to help keep the coil tight and press the cut wire close to the band. http://www.instructables.com/id/Making-a-Wire-Wrapped-Ring/
  • 12.
    Image Notes 1. Wrap Longer Wire Around Band. step 10: Wrap Shorter Wire Around The Band Move now to the shorter wire and repeat the previous step, making both sides match if possible. http://www.instructables.com/id/Making-a-Wire-Wrapped-Ring/
  • 13.
    Image Notes 1. Wrap Short Wire Around the Band. step 11: Your Ring is Now Complete Your ring is finished now and ready to be worn. This is very easy to do and makes fun accessory jewelry and a wonderful gift to give someone! http://www.instructables.com/id/Making-a-Wire-Wrapped-Ring/
  • 14.
    Image Notes 1.Your Ring is now Complete! Related Instructables Byzantine Chainmail(le) A Simple Wire Volume 6 - How Speed-weaving Ye Olde Chain Earrings made Make an Iron Ring by totemic to Weave Full Maille Rings by from floppy disk Man Arc by ryzellon Persian by mat_the_w parts! by zoxx Reactor by jbb3141 Honus Advertisements Comments 9 comments Add Comment vlslpn says: May 21, 2009. 5:54 PM REPLY I have a ring like this! I purchased it at a craft show. I love it! griesegal says: May 21, 2009. 3:18 PM REPLY I love the versatility of wire and this is a cool, free-form ring. I have a more structured style wire ring with mine and my husbands birthstones that I always wear. Mandrels are available lots of places, but one of my favorite supply houses is Fire Mountain Gems and Beads. http://www.firemountaingems.com/shopping.asp?skw=KWTOOLMANDREL http://www.instructables.com/id/Making-a-Wire-Wrapped-Ring/
  • 15.
    cjdold says: May 21, 2009. 2:24 PM REPLY You can get mandrels on ebay, but a pool cue is a reasonable substitute. don't use a nice new one though. You can also get long taper punches, from hardware shops, that are stronger. Crucio says: May 21, 2009. 12:29 PM REPLY Hi Amy, Nice job! Where can one obtain a ring mandrel? pennysartroom says: May 21, 2009. 5:27 AM REPLY What a great idea, looks like a lot of fun, can't wait to try it! Thanks, Penny aressa says: May 21, 2009. 7:29 AM REPLY Thanks! They are a lot of fun to make. Once you get started you won't want to stop!! (lol) xwx says: May 12, 2009. 6:42 PM REPLY This rocks I love it I'll have to try it some time :D aressa says: May 21, 2009. 7:26 AM REPLY Thanks! I hope you have fun making them. I love to make them. They are fast and easy to do! aressa says: May 13, 2009. 9:27 AM REPLY Thanks! It is funny and once you get started you want to keep making them. They are fun to wear and make great gifts. Amy http://www.instructables.com/id/Making-a-Wire-Wrapped-Ring/