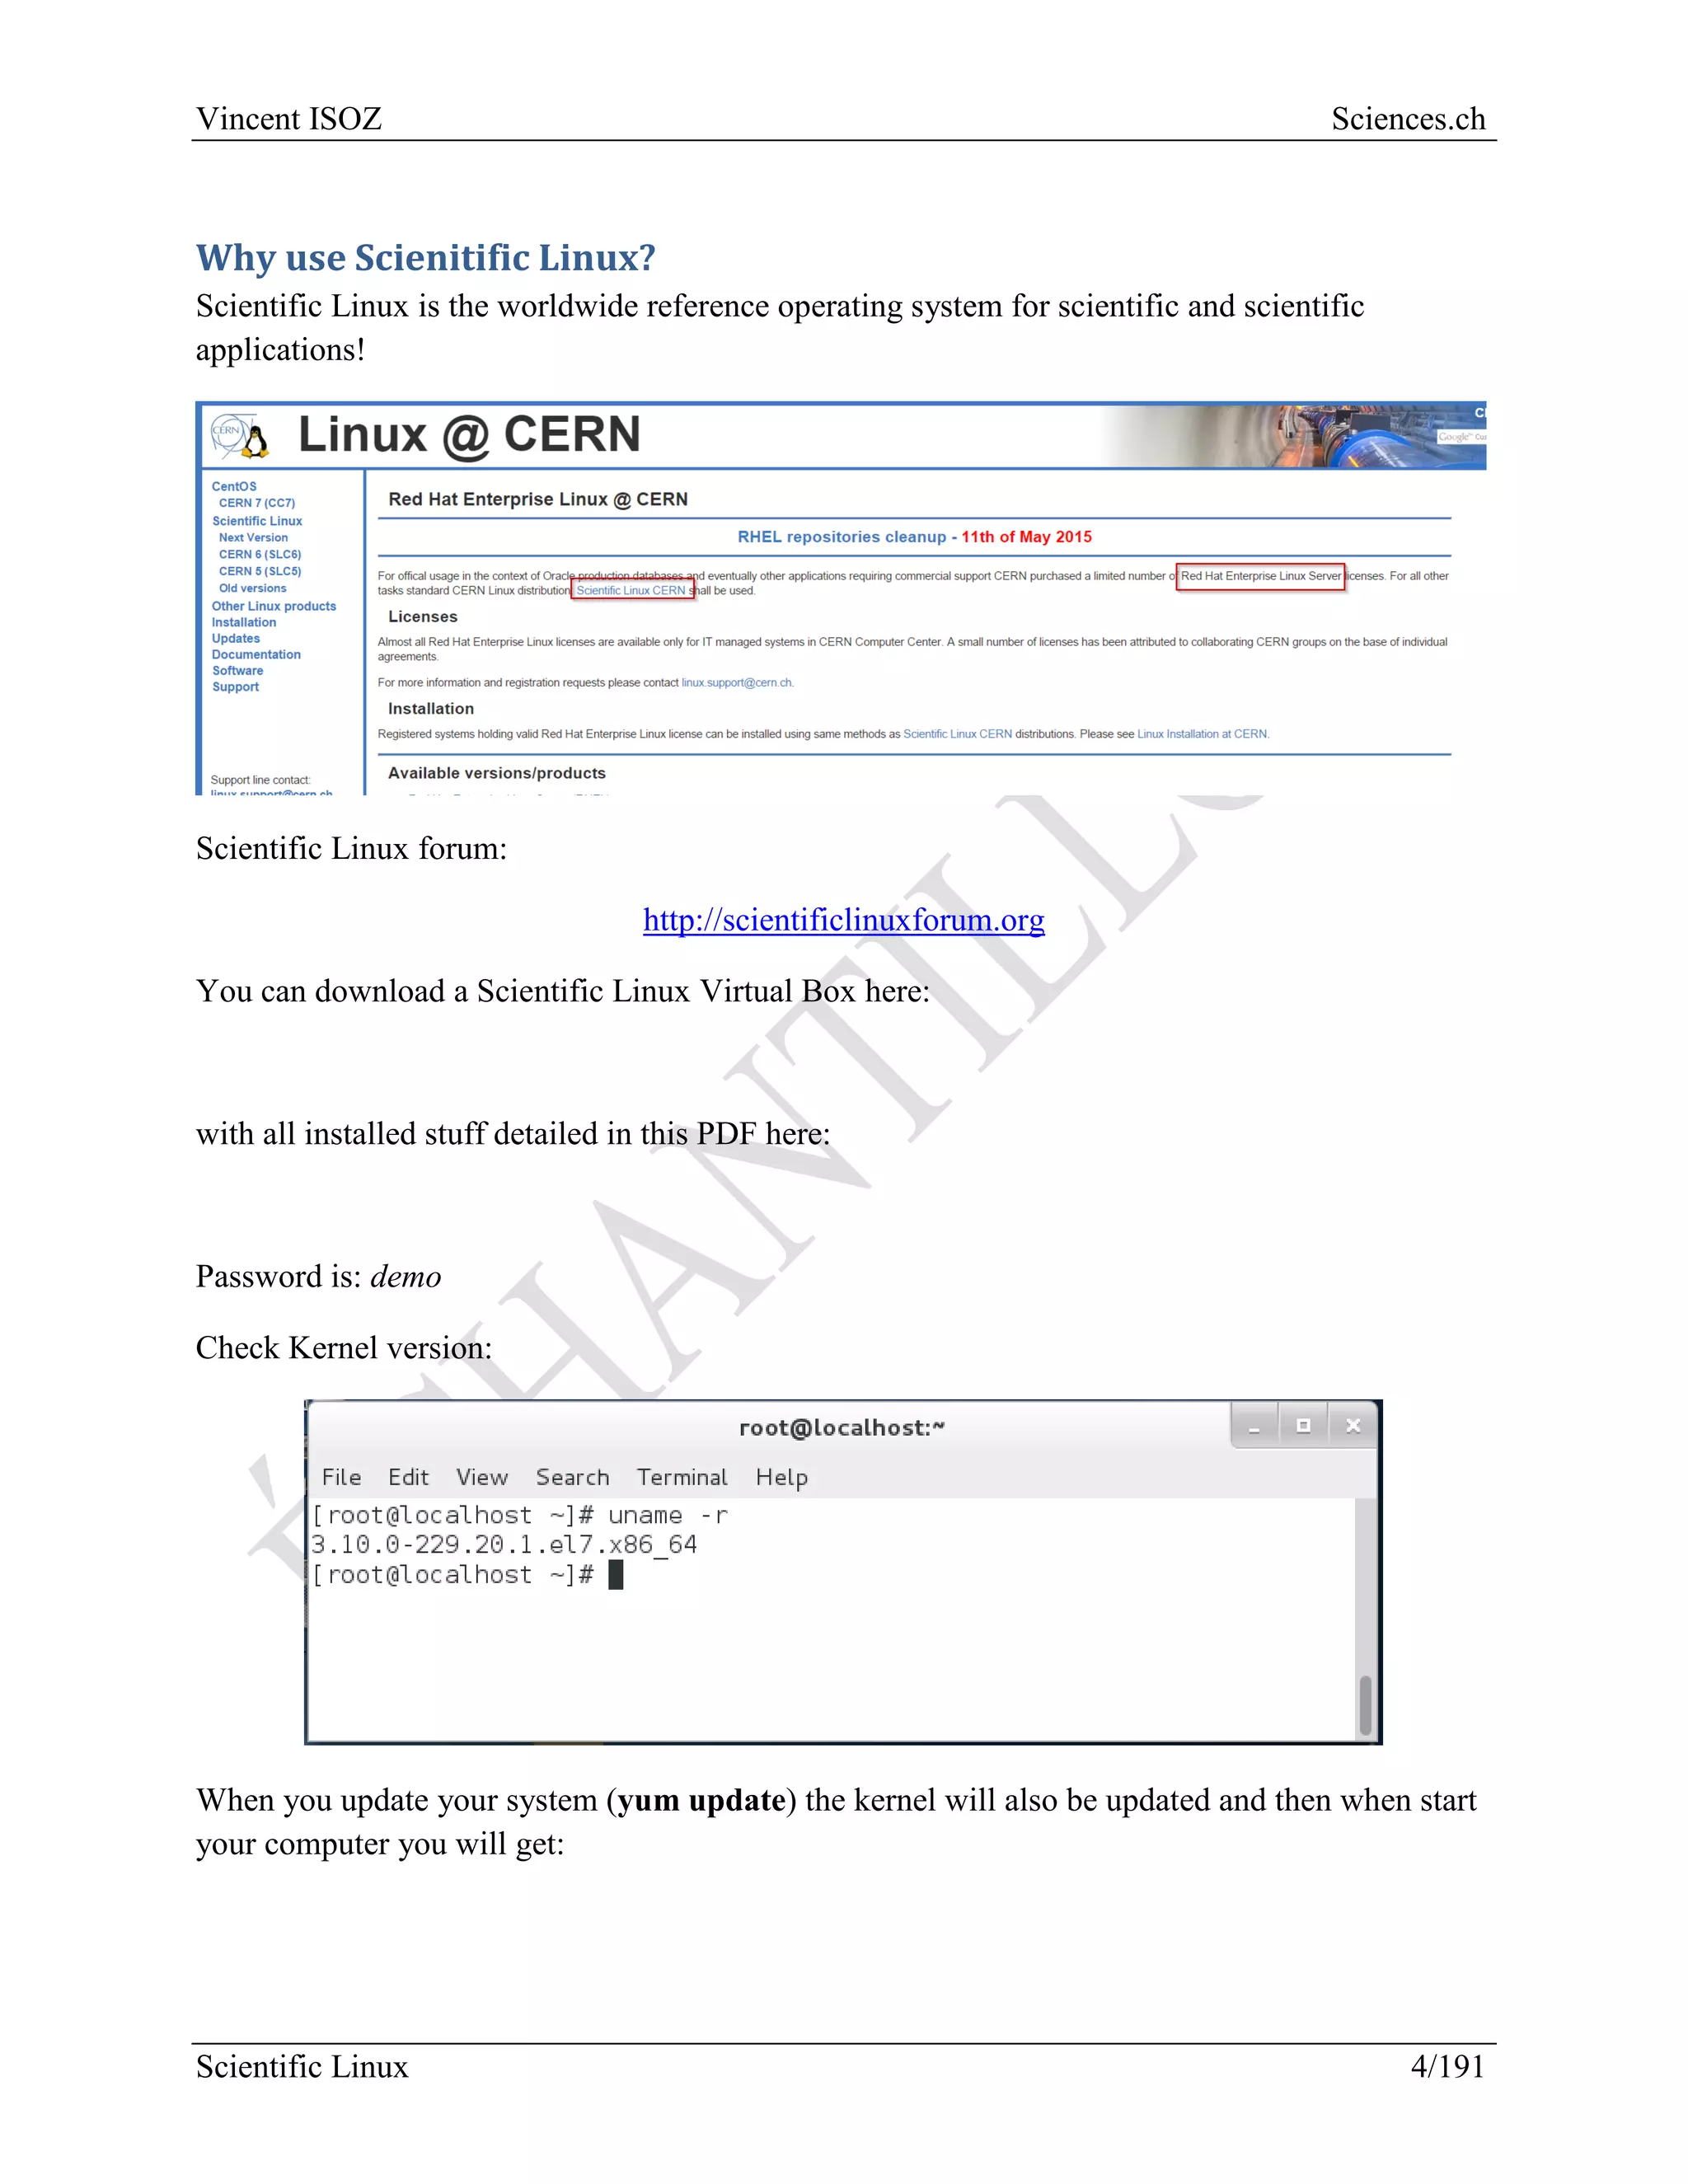
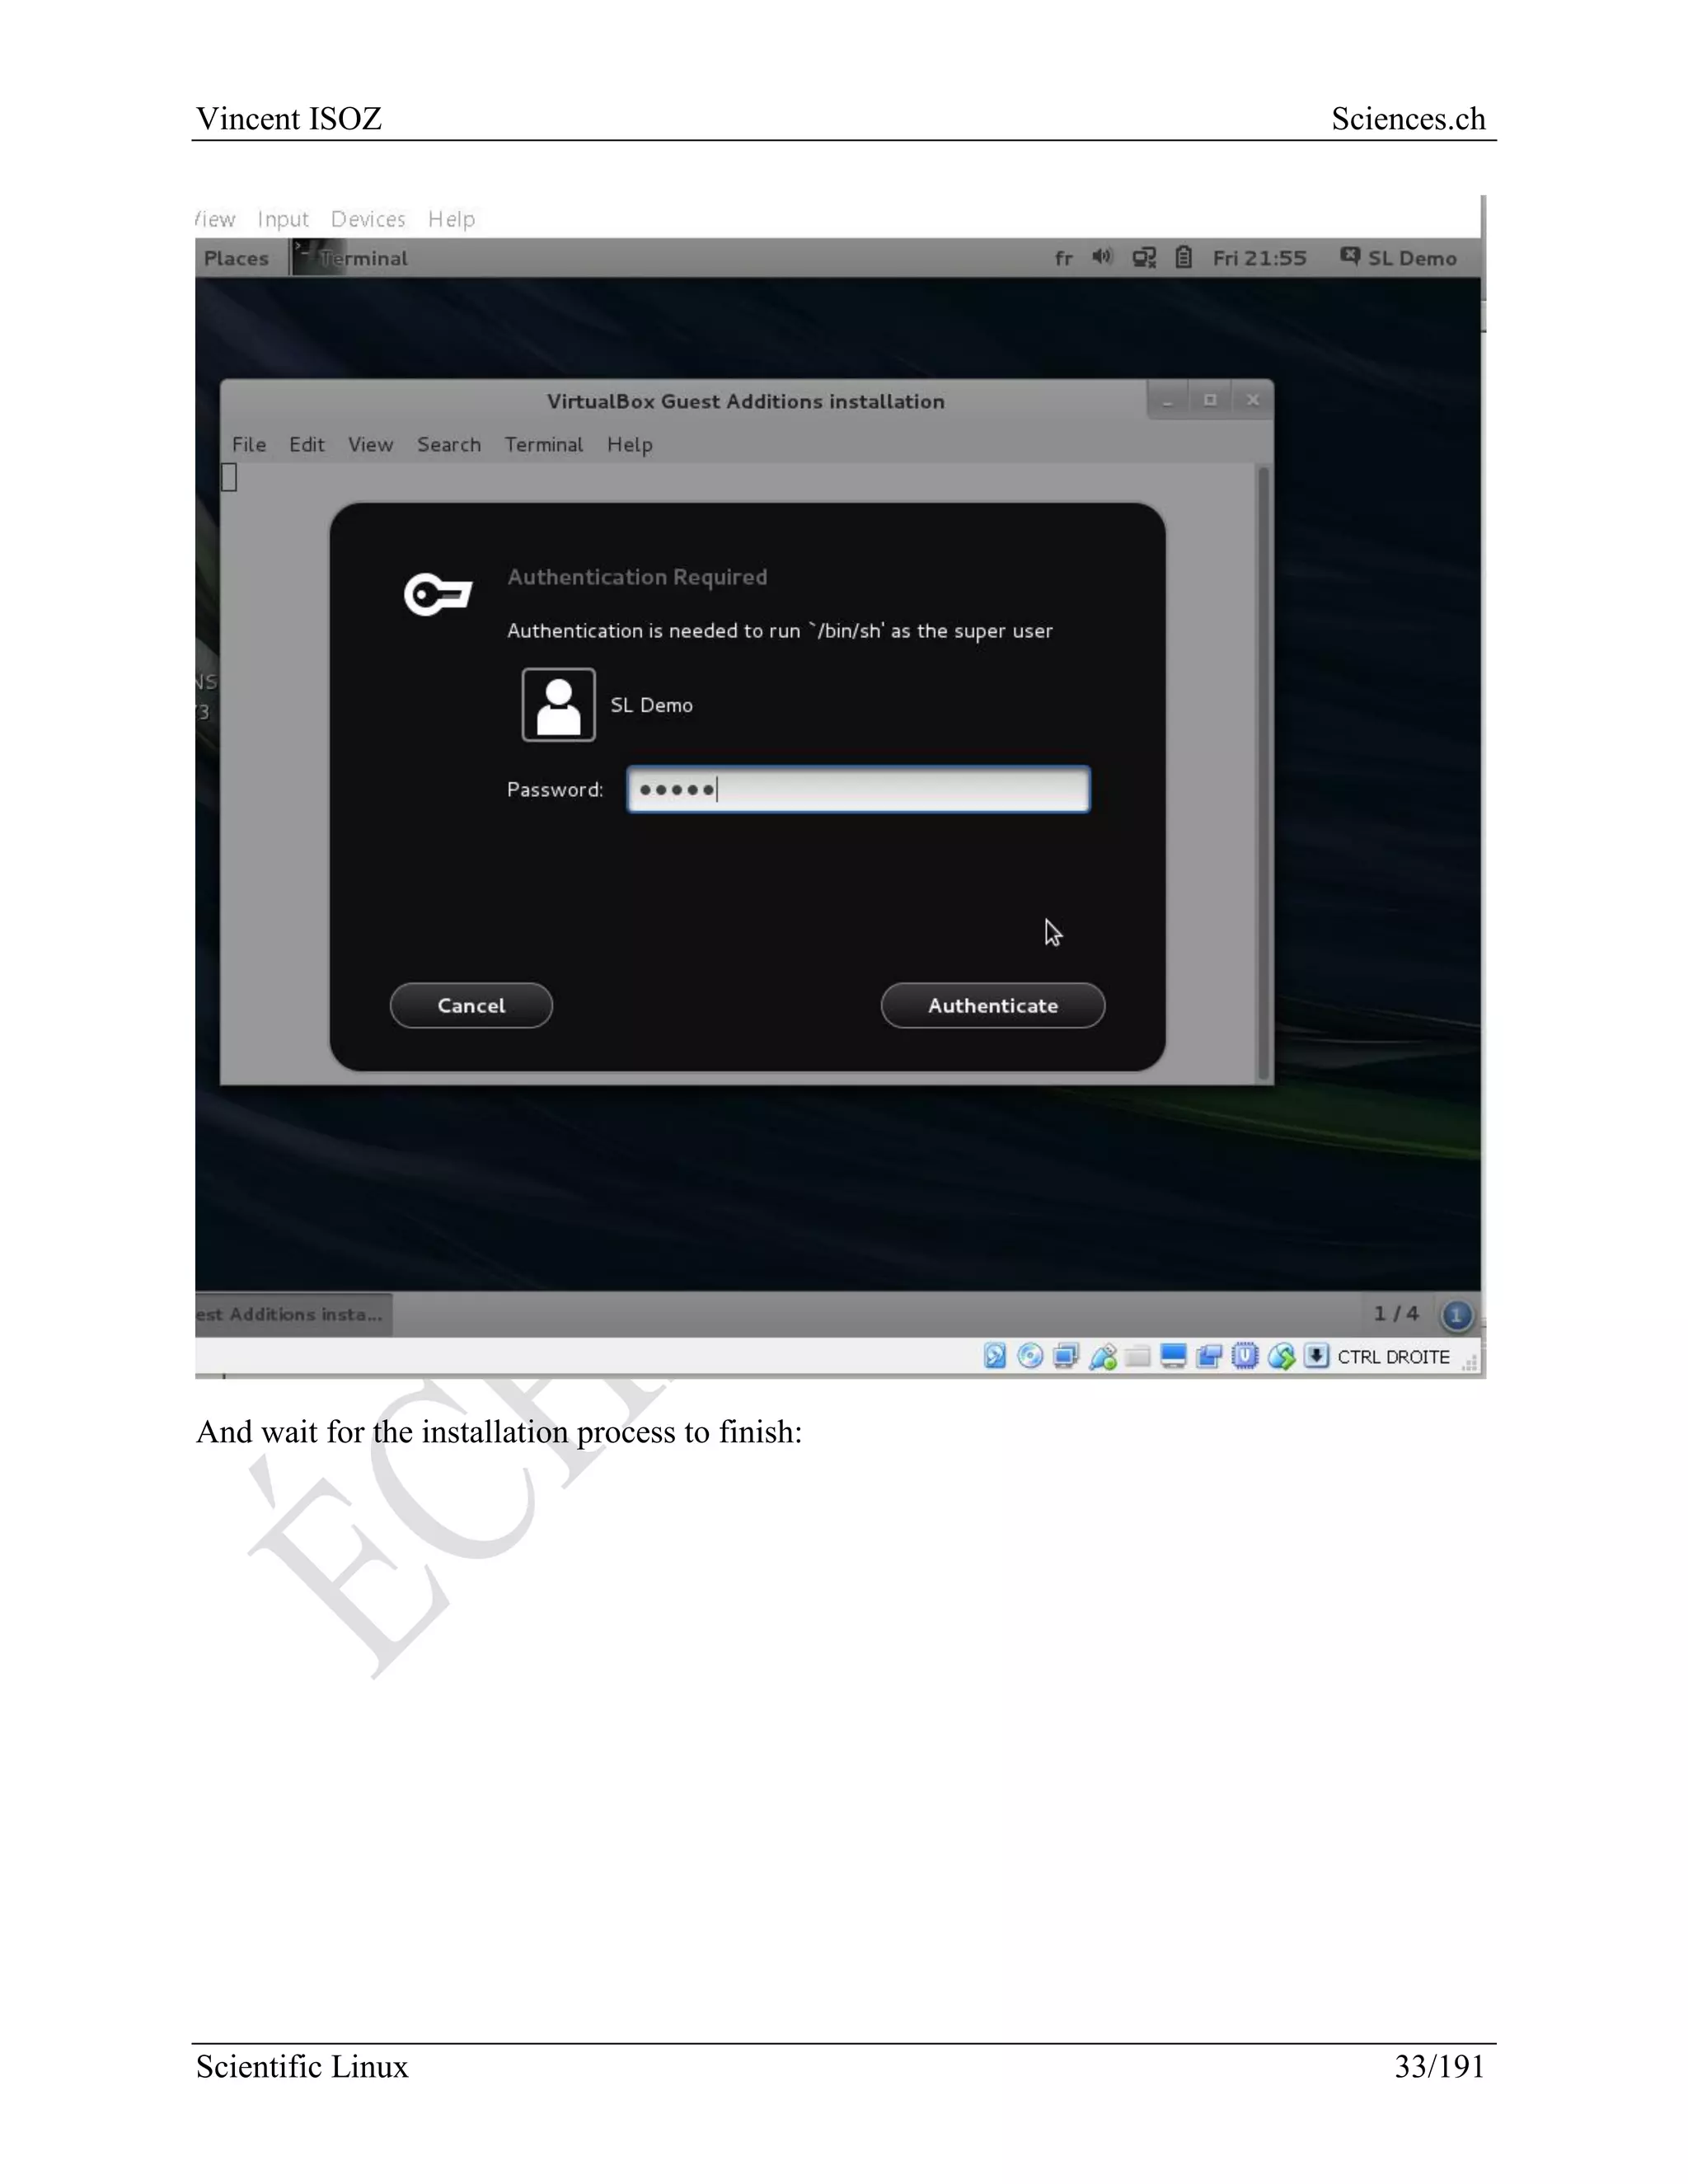
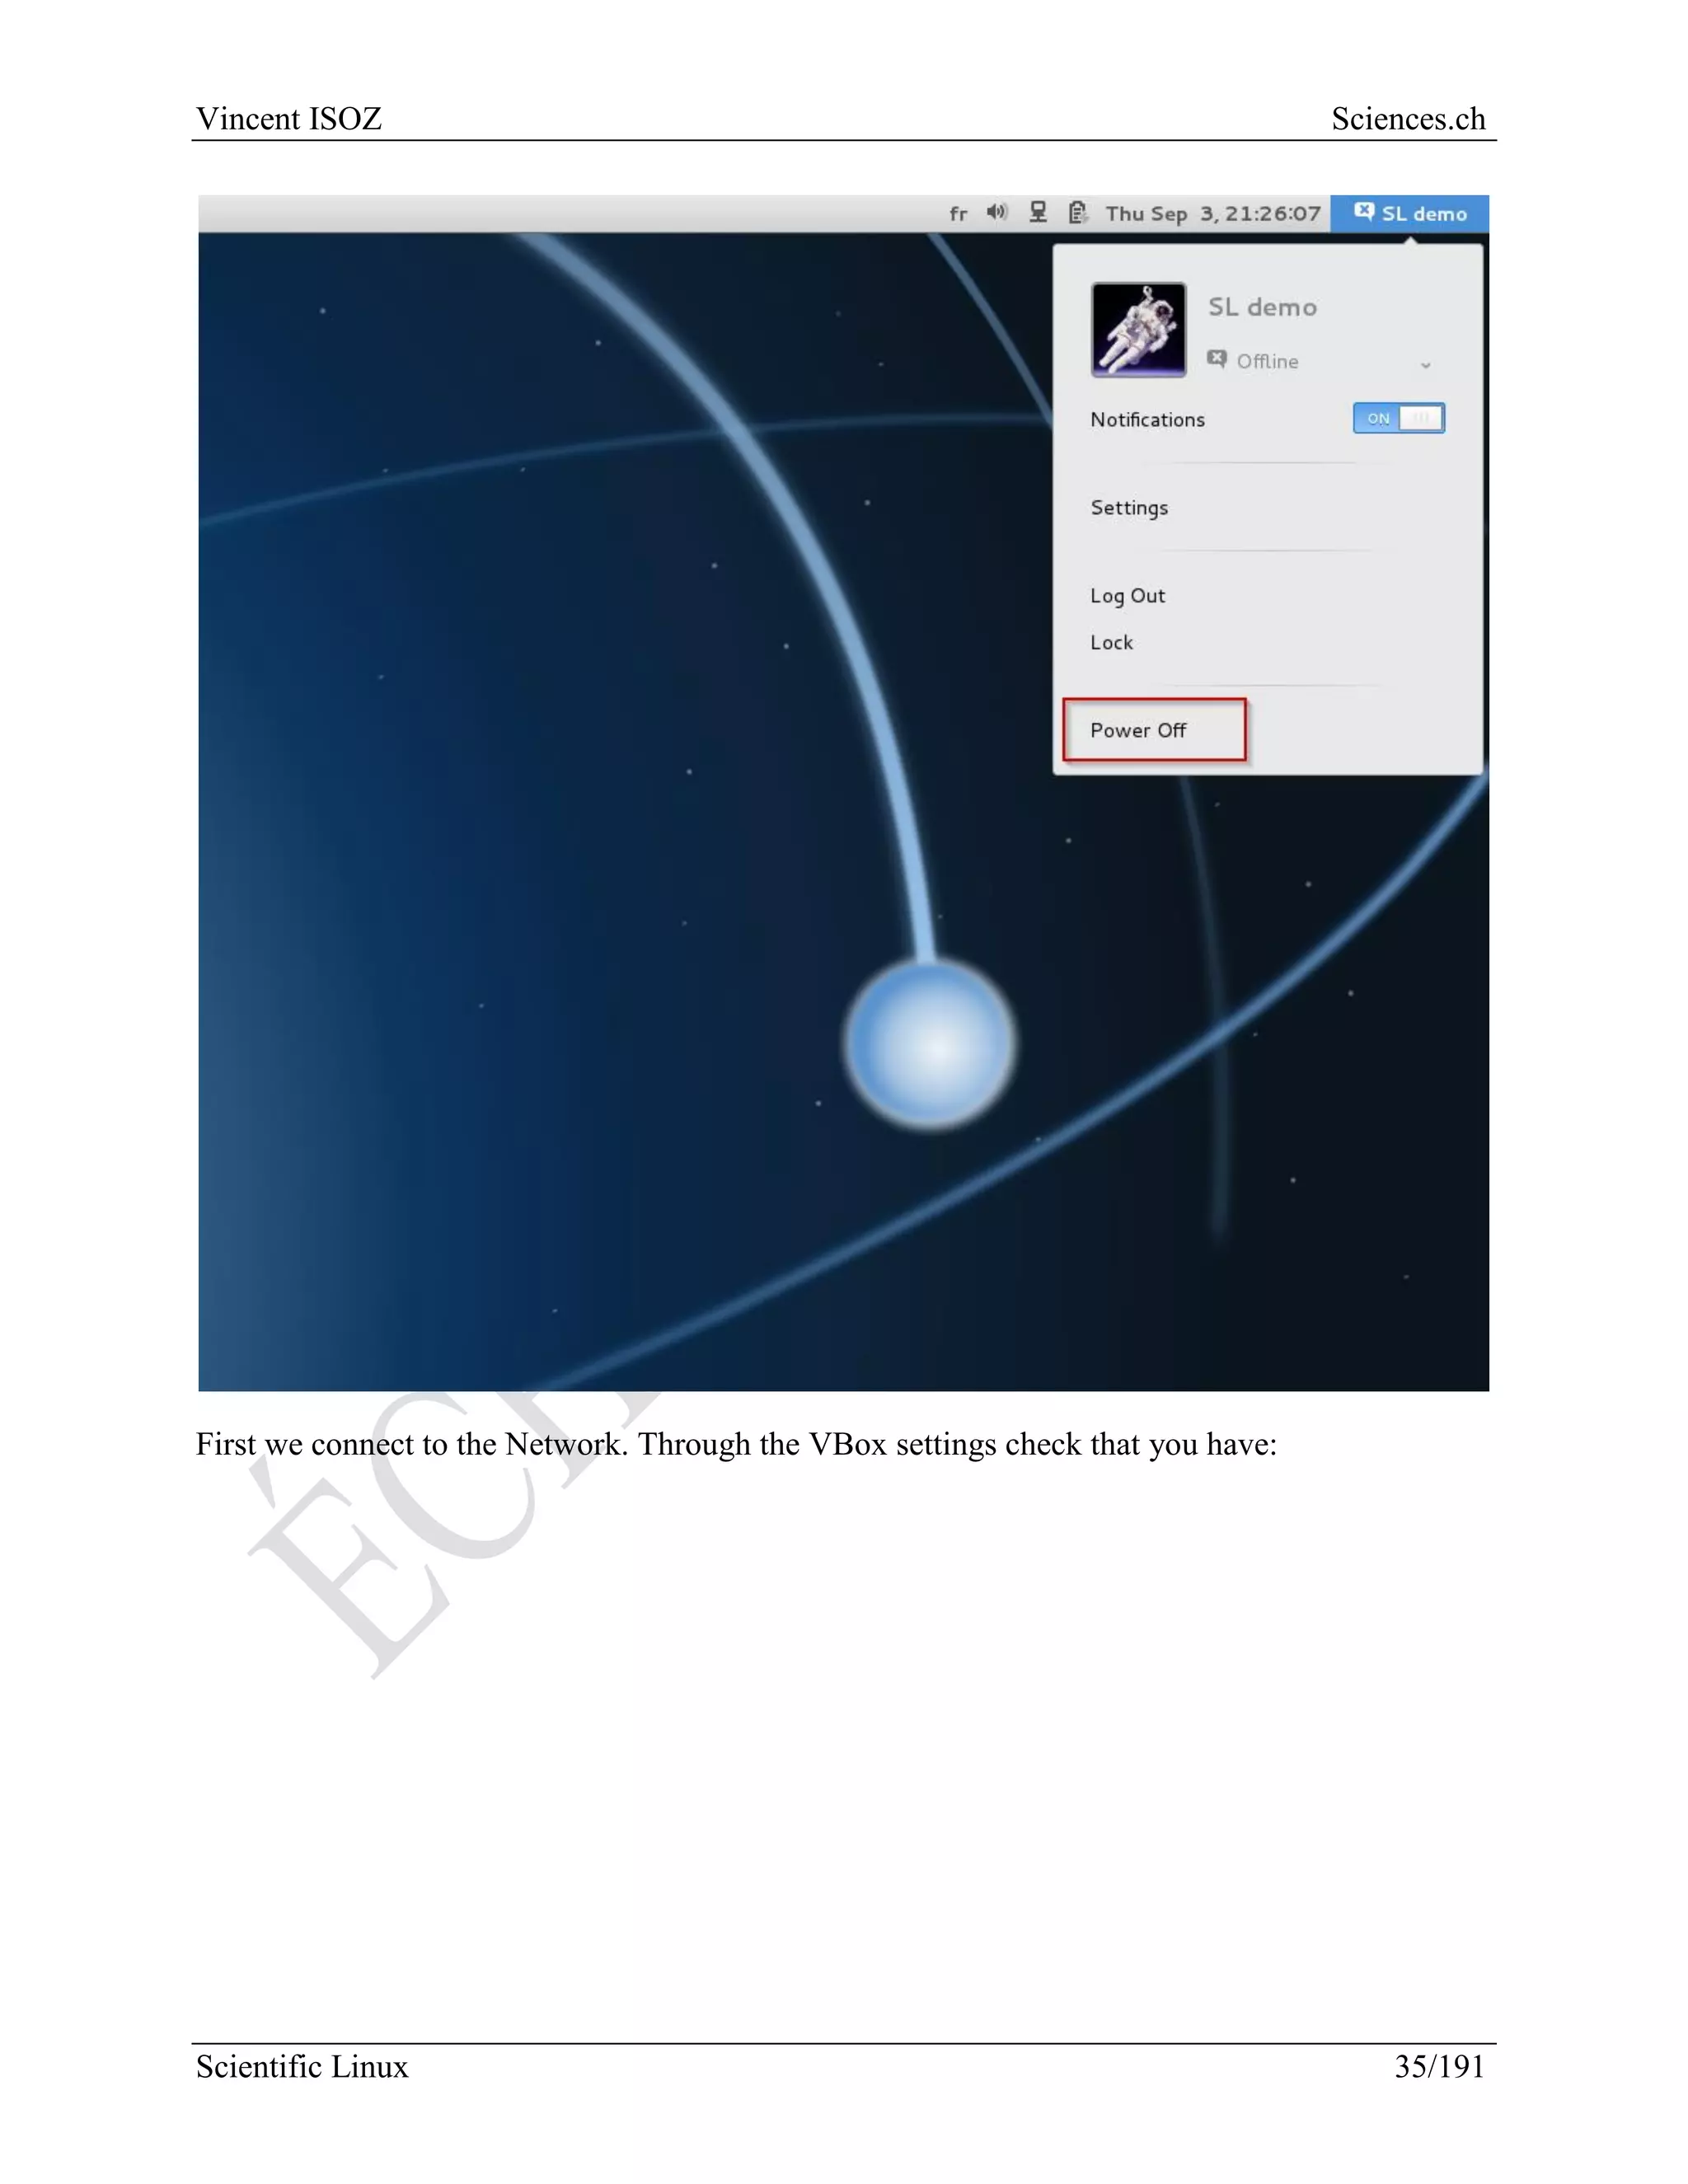
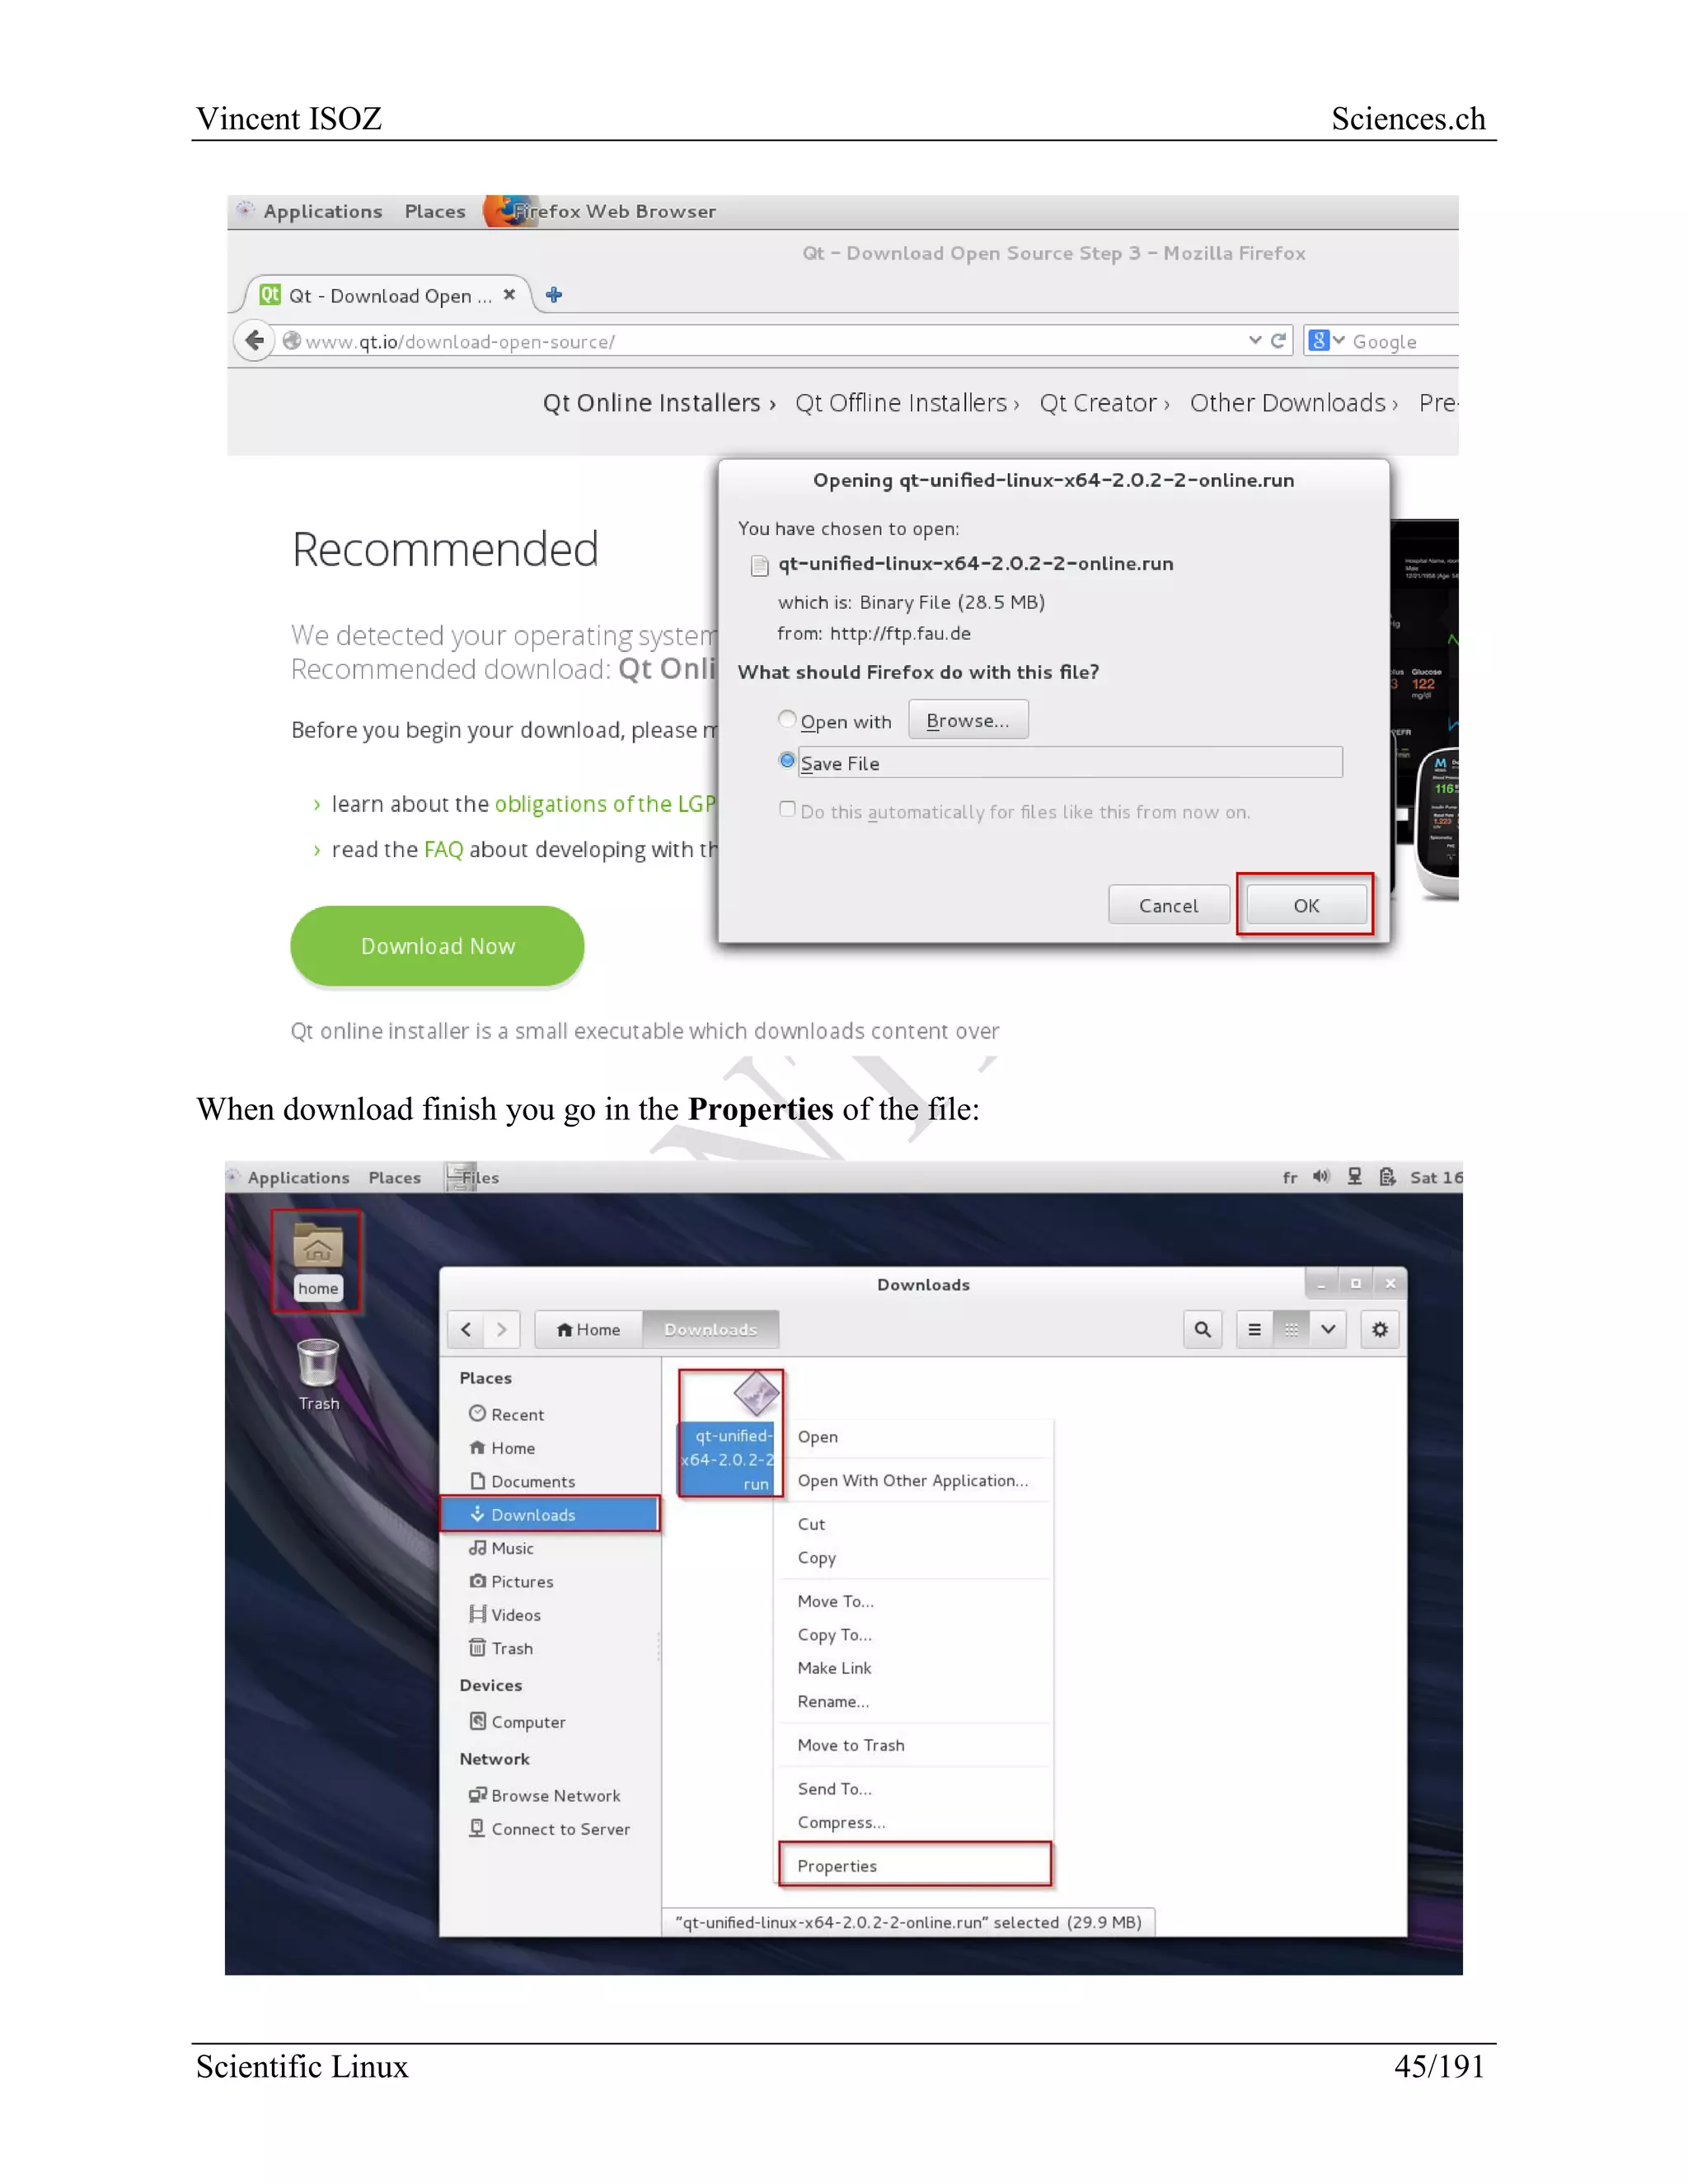
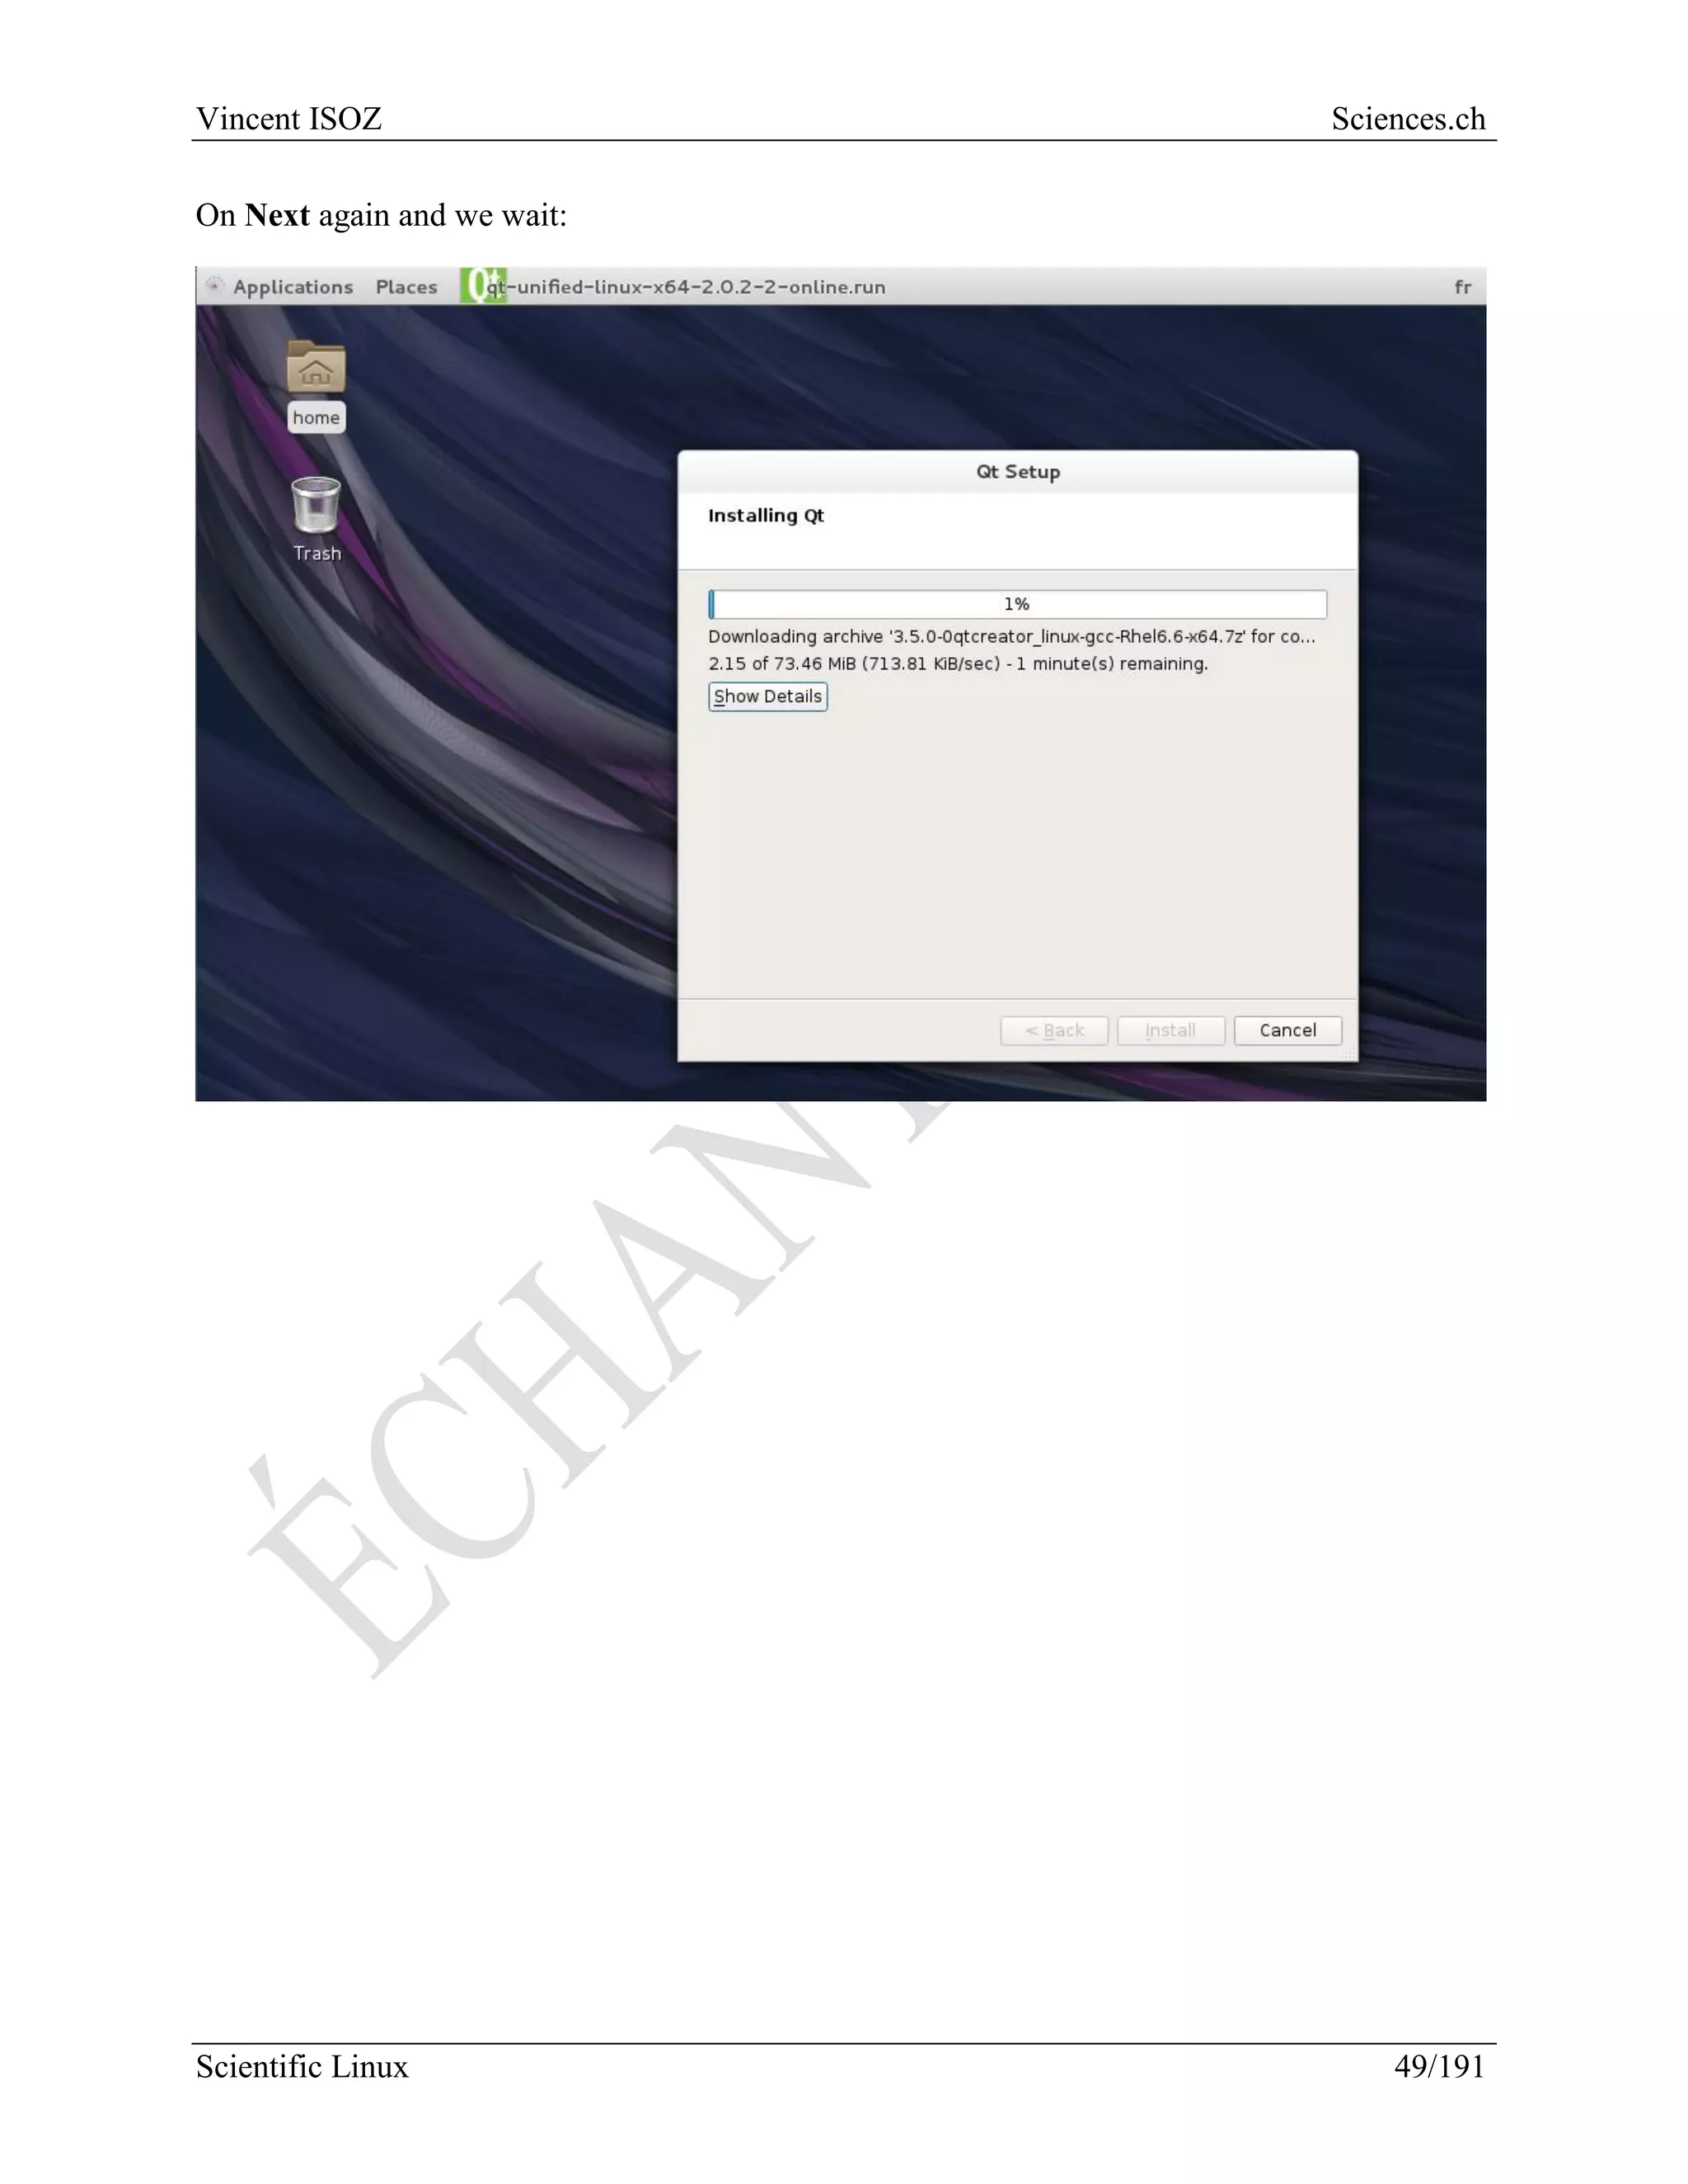
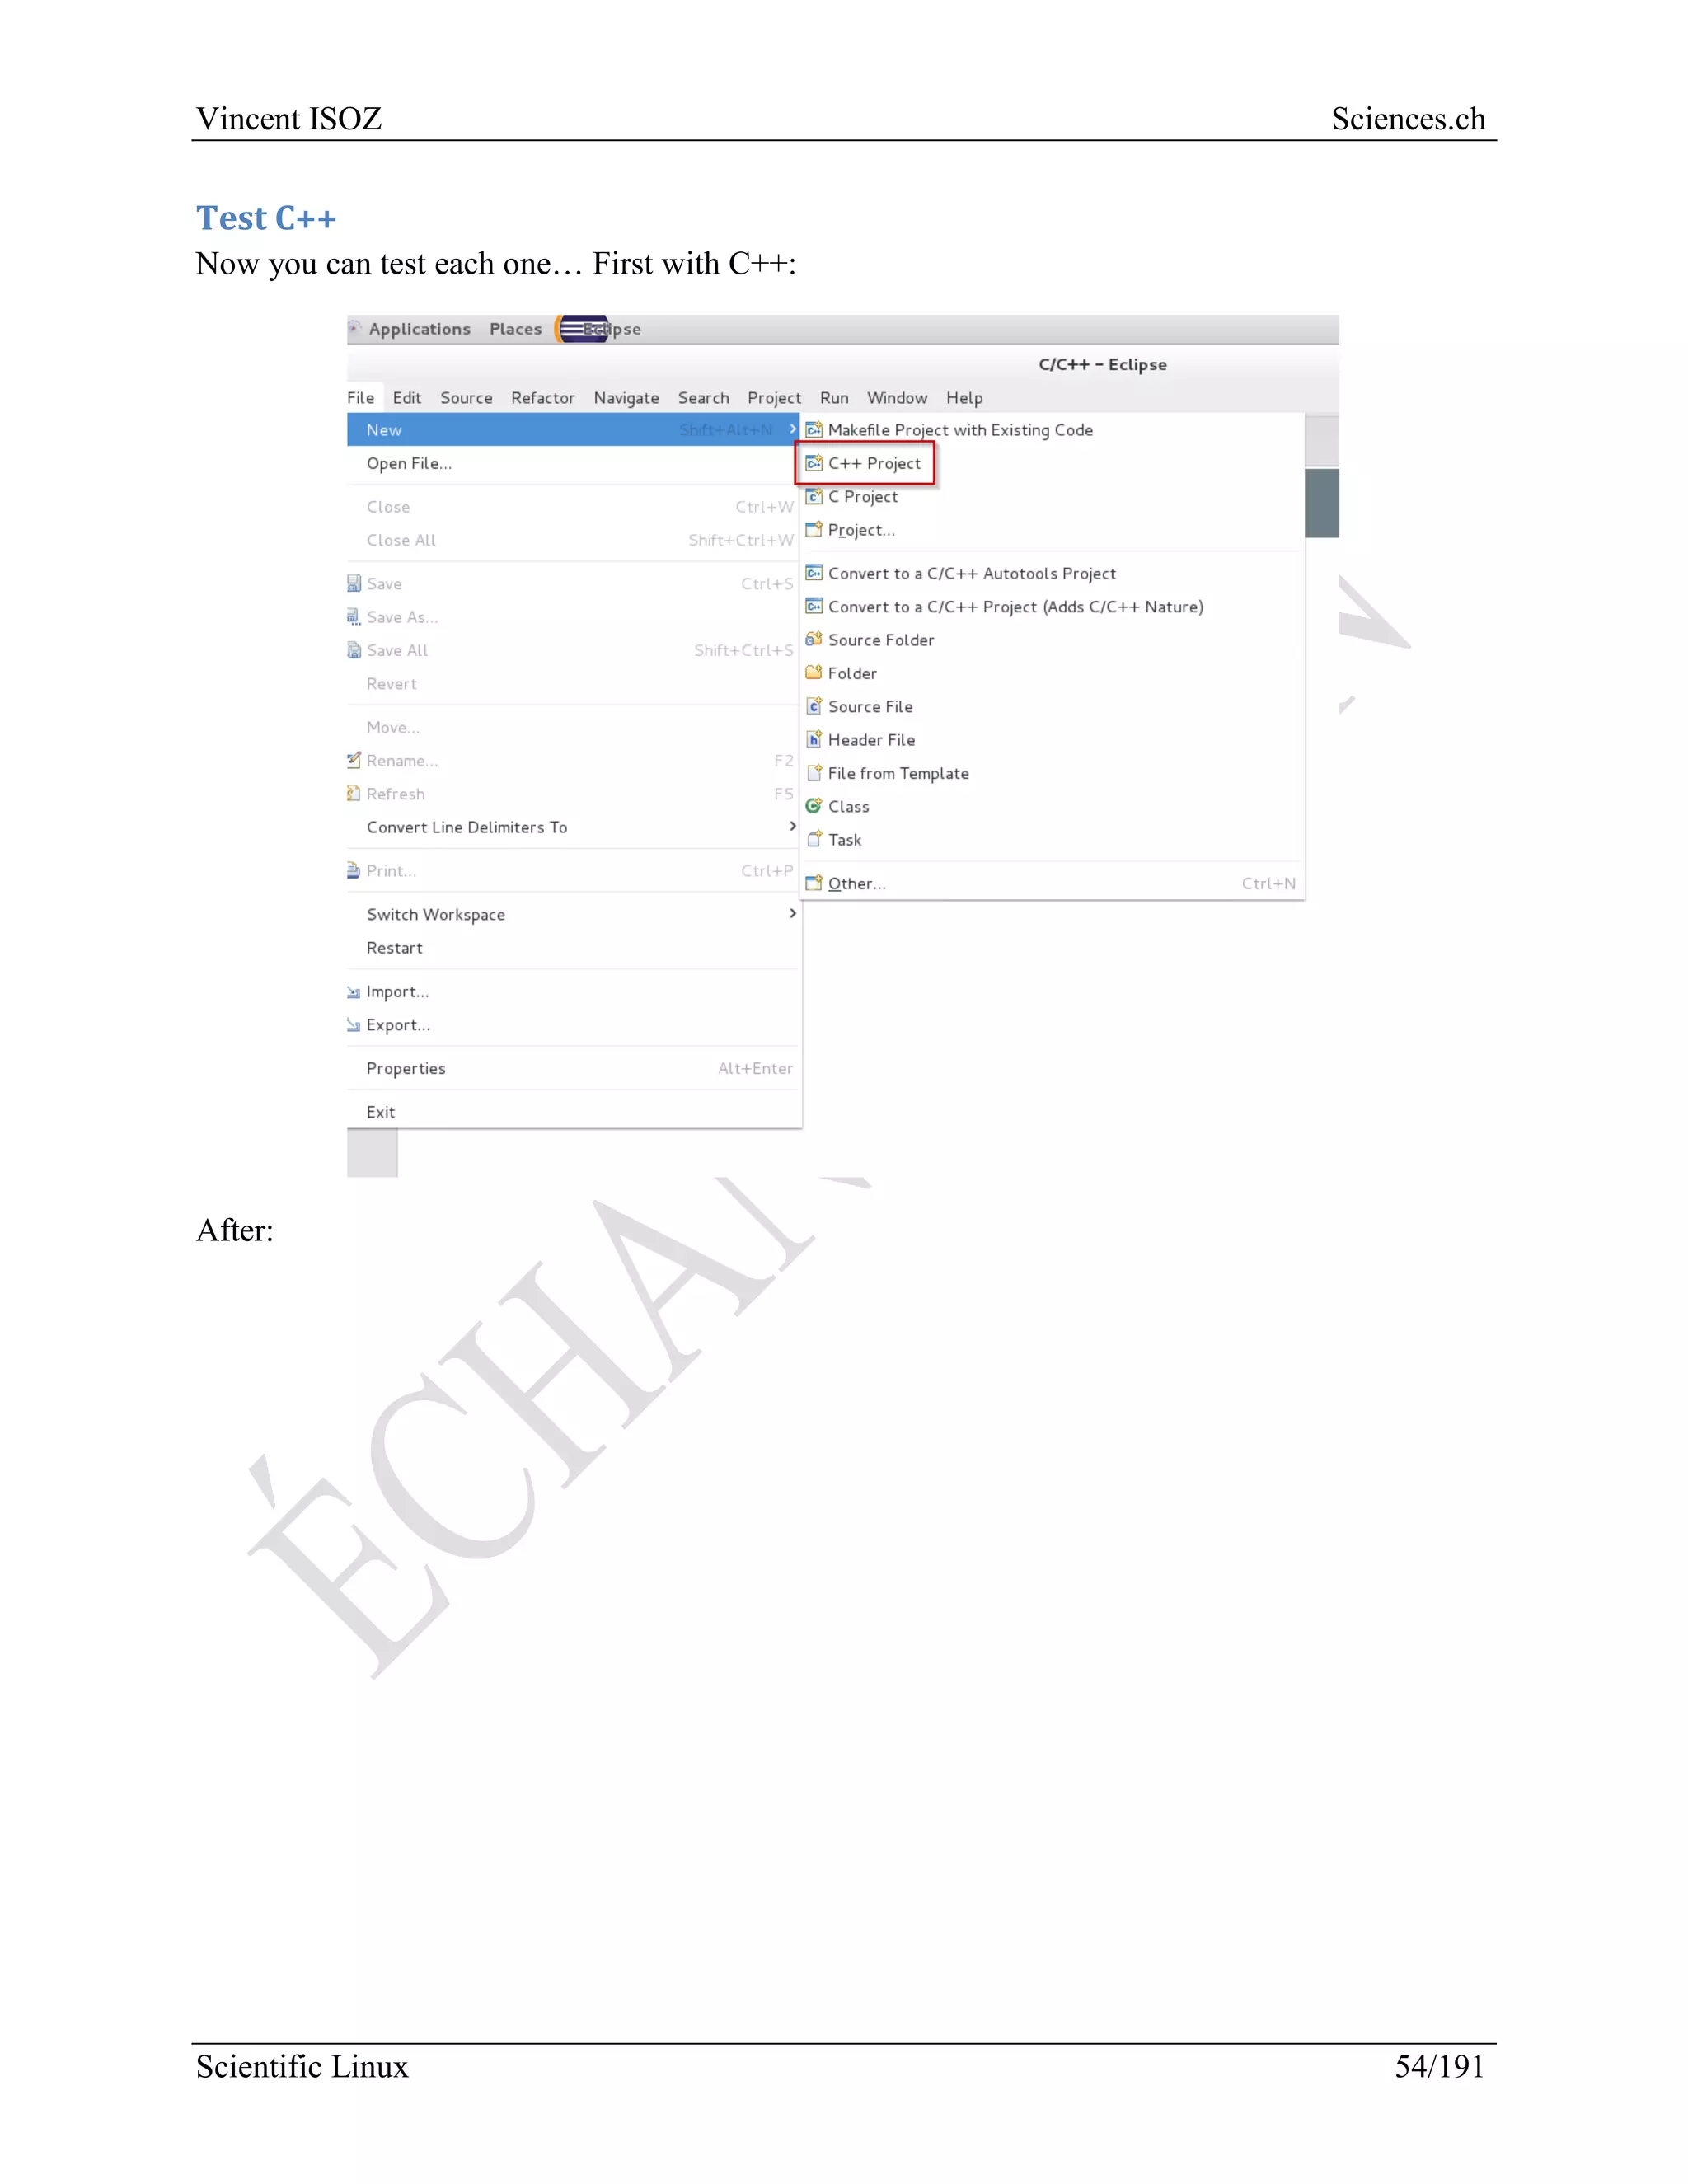
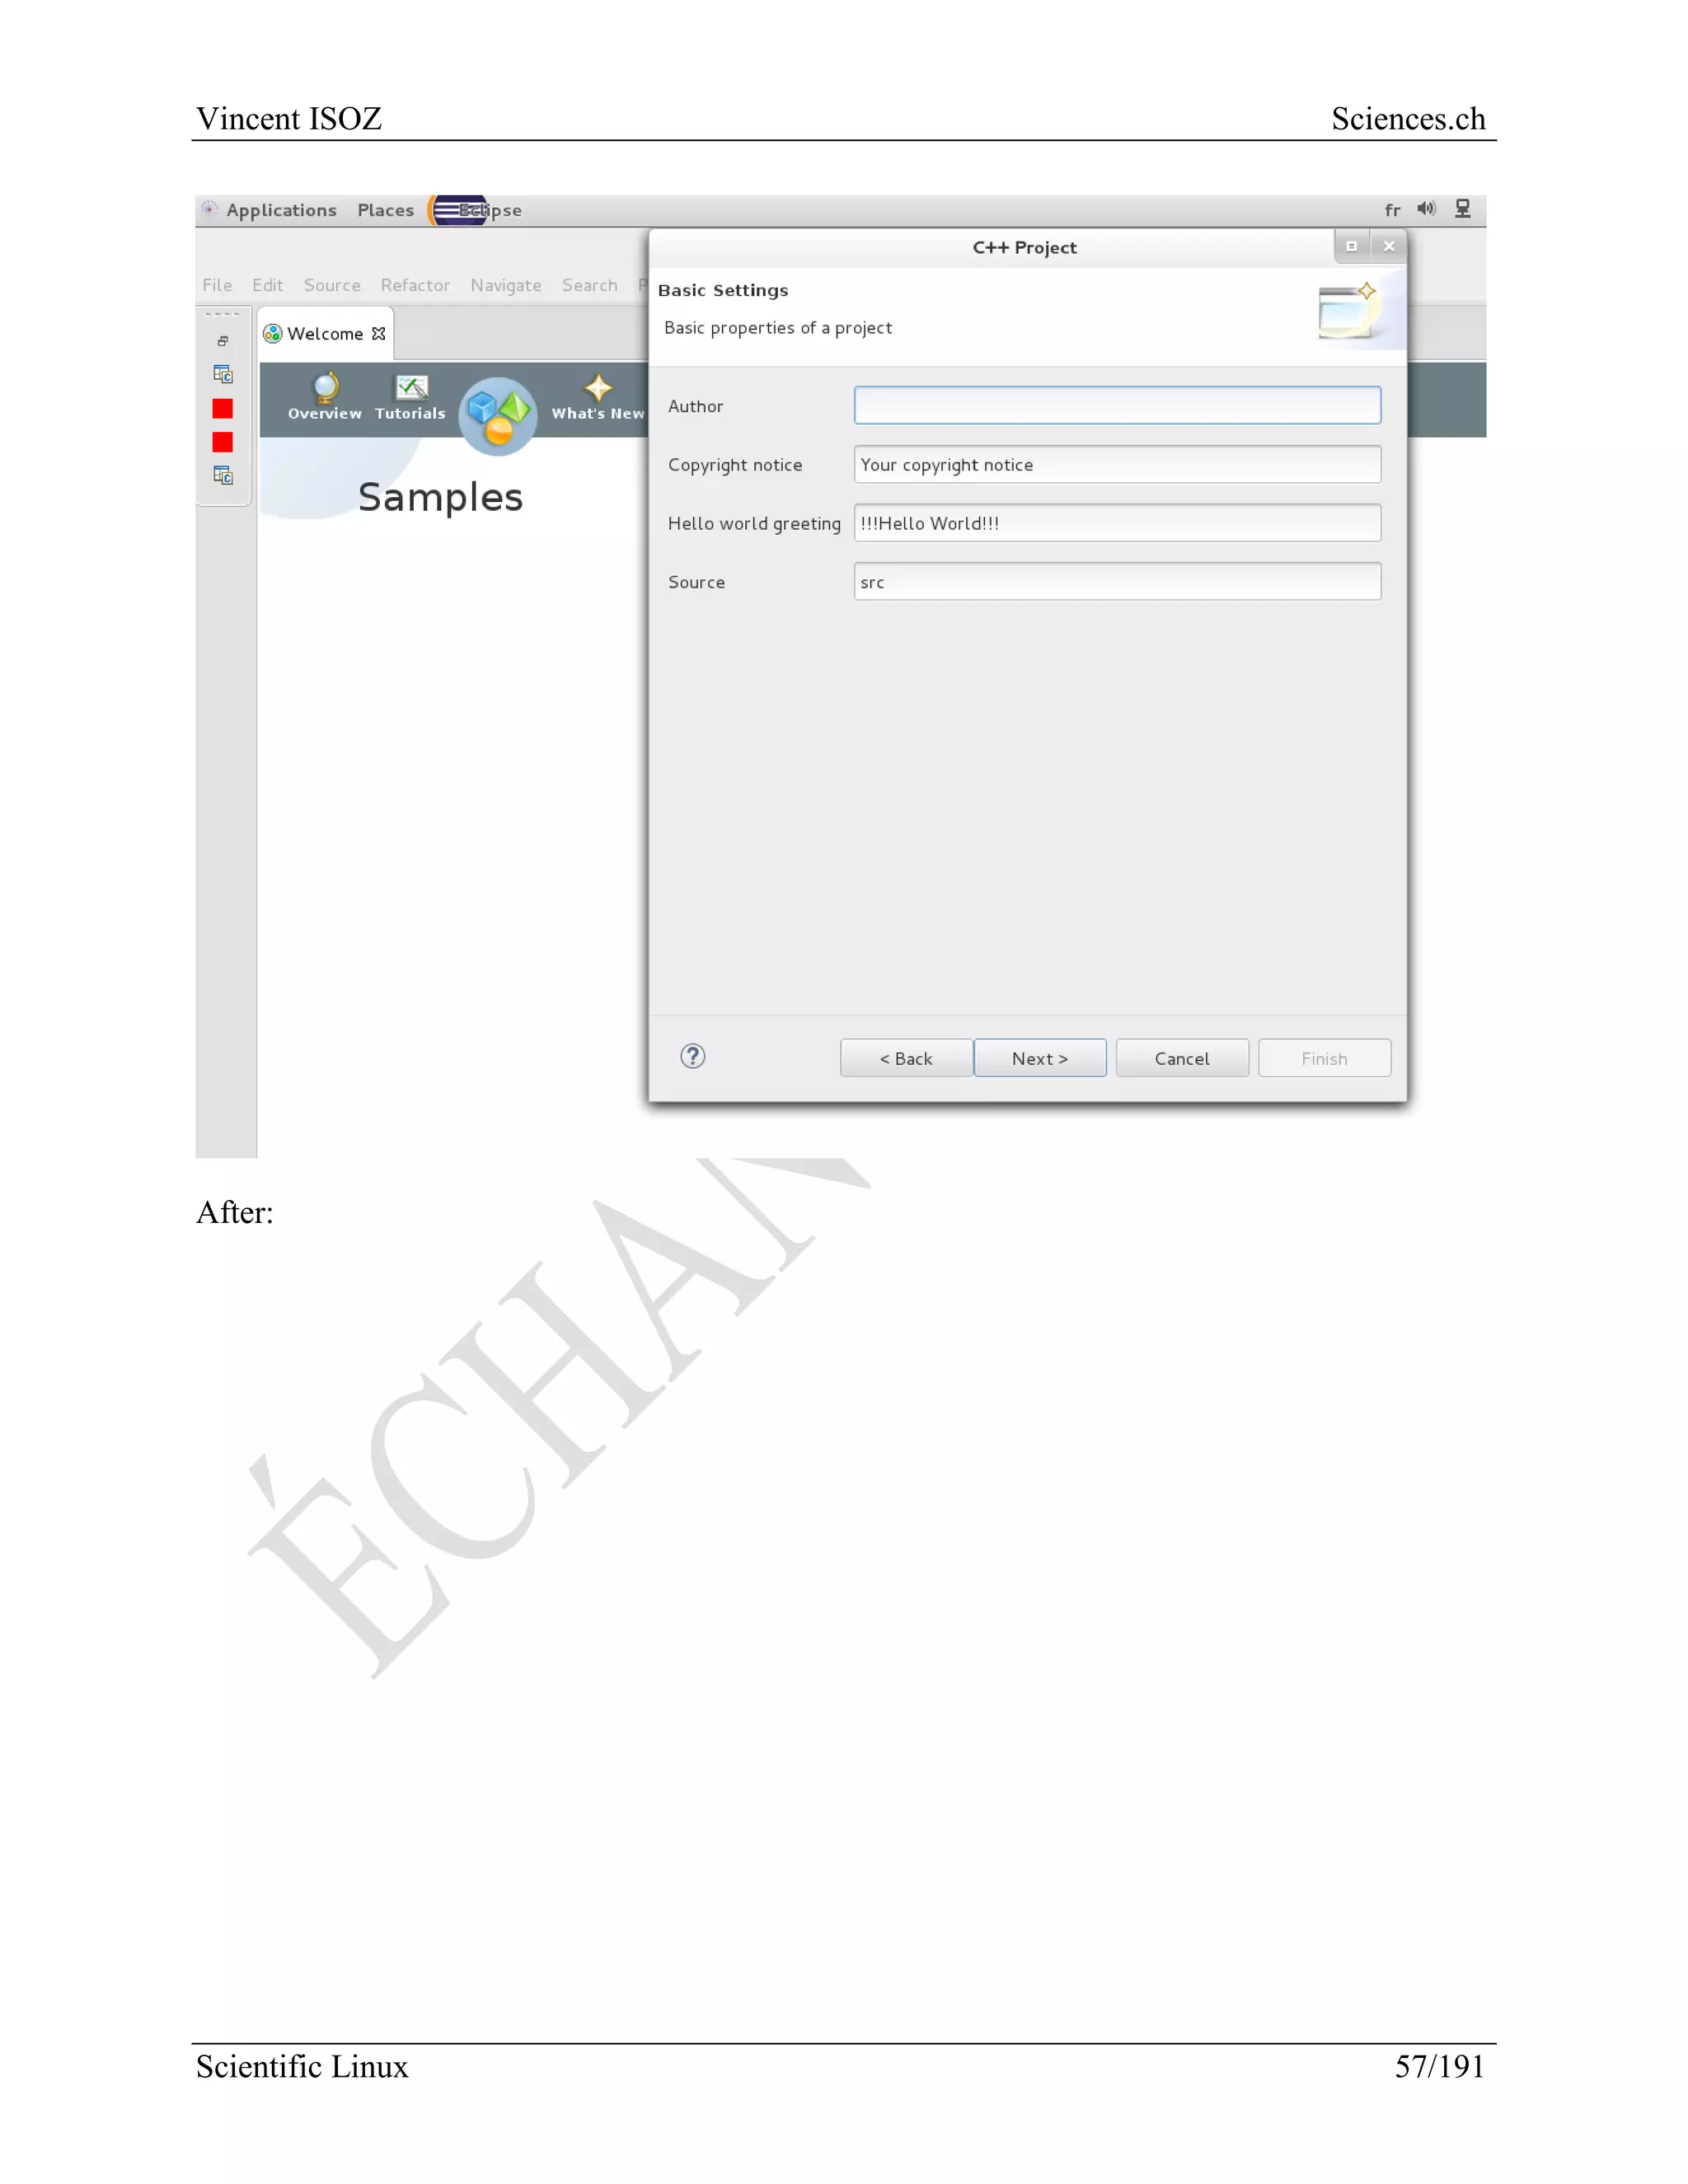
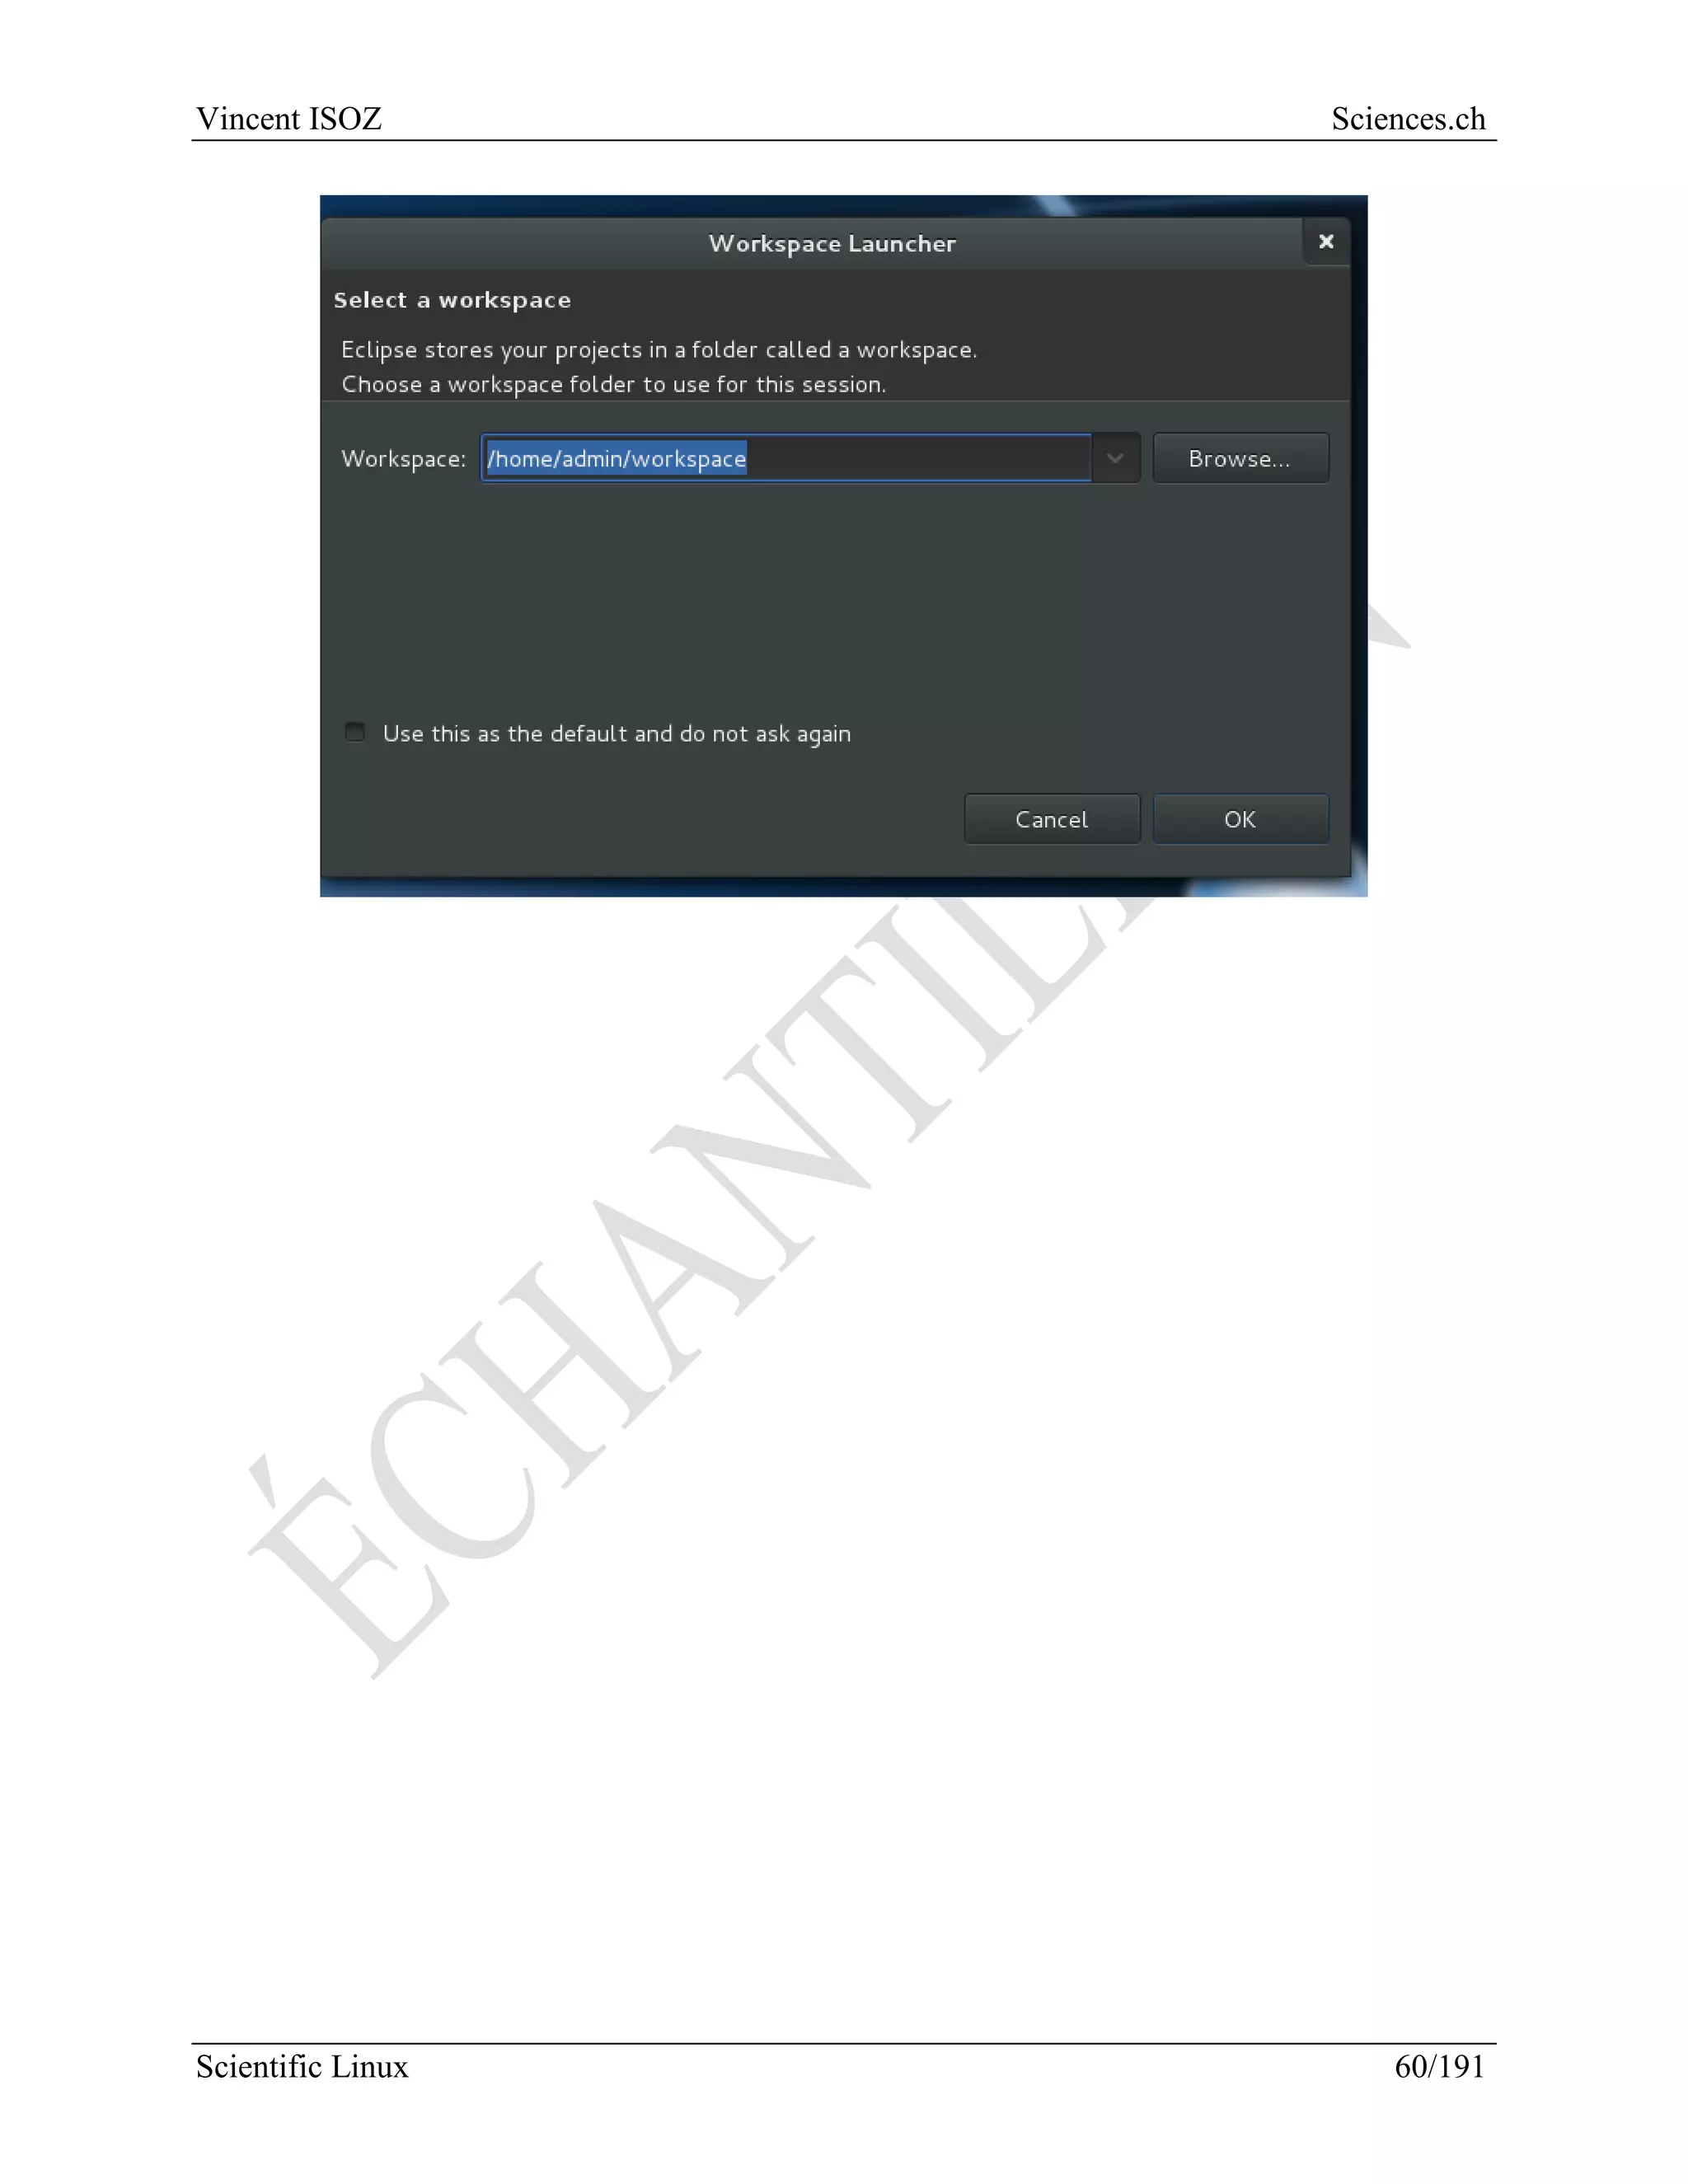
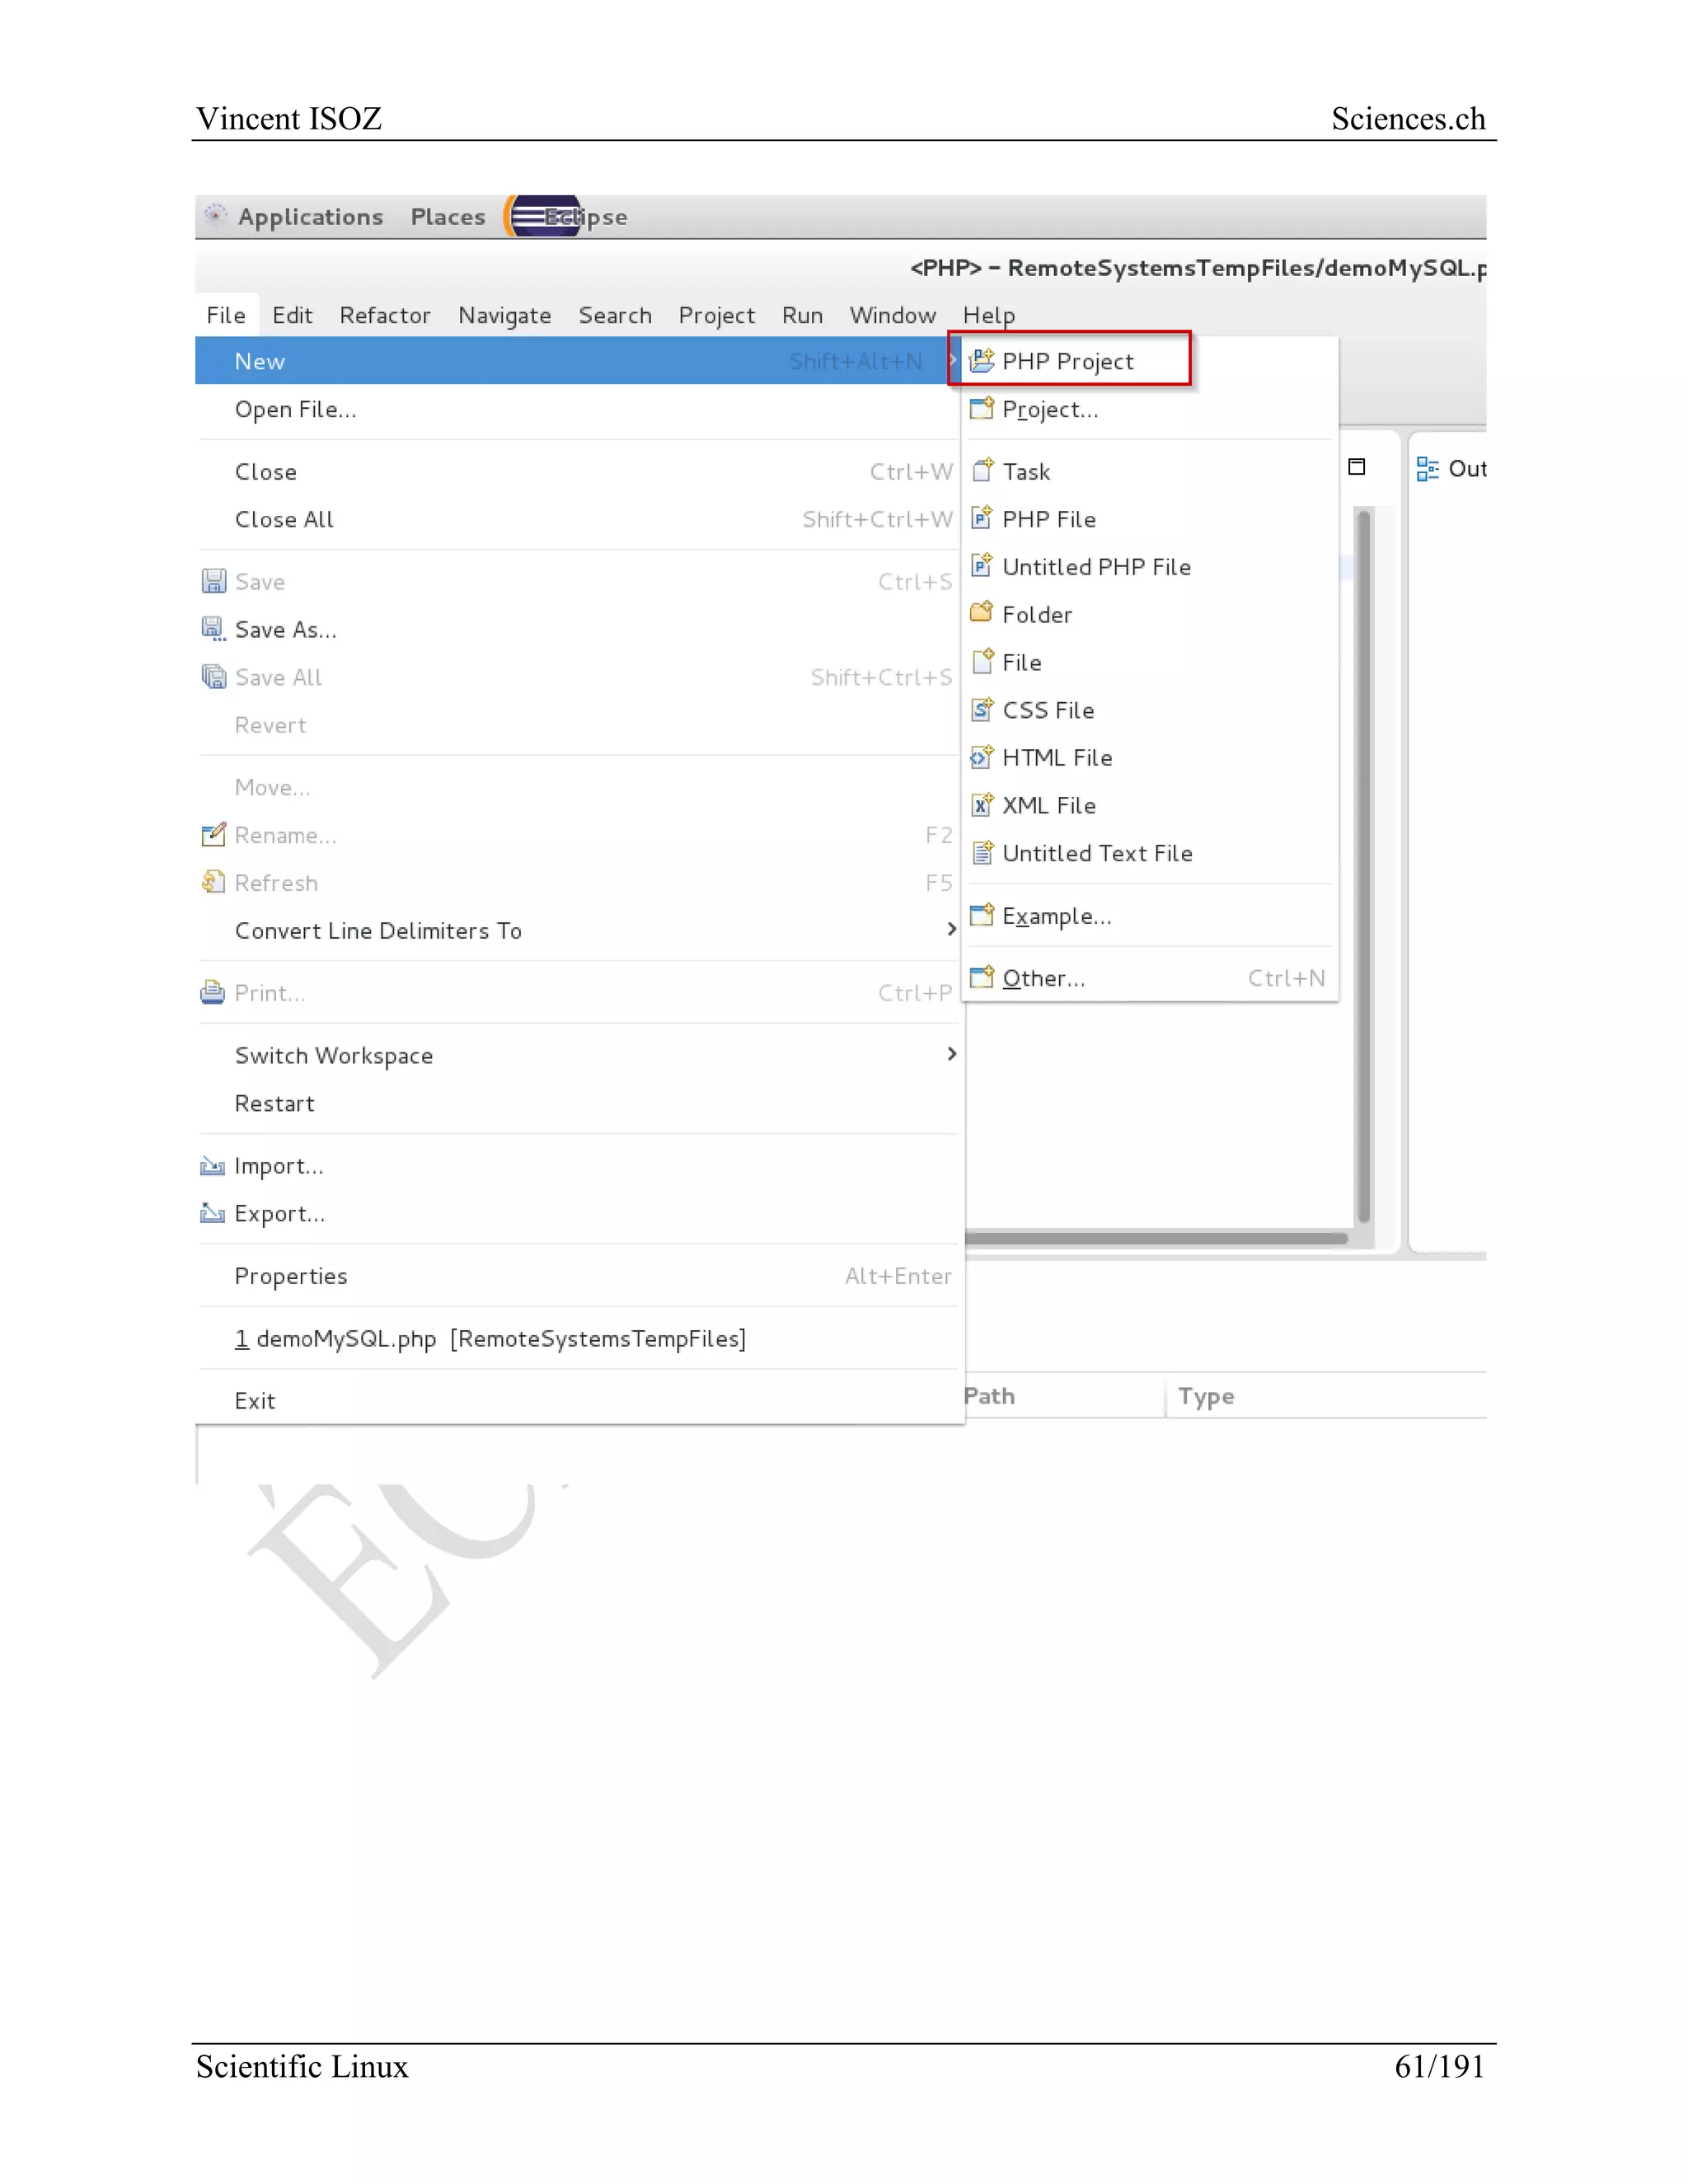
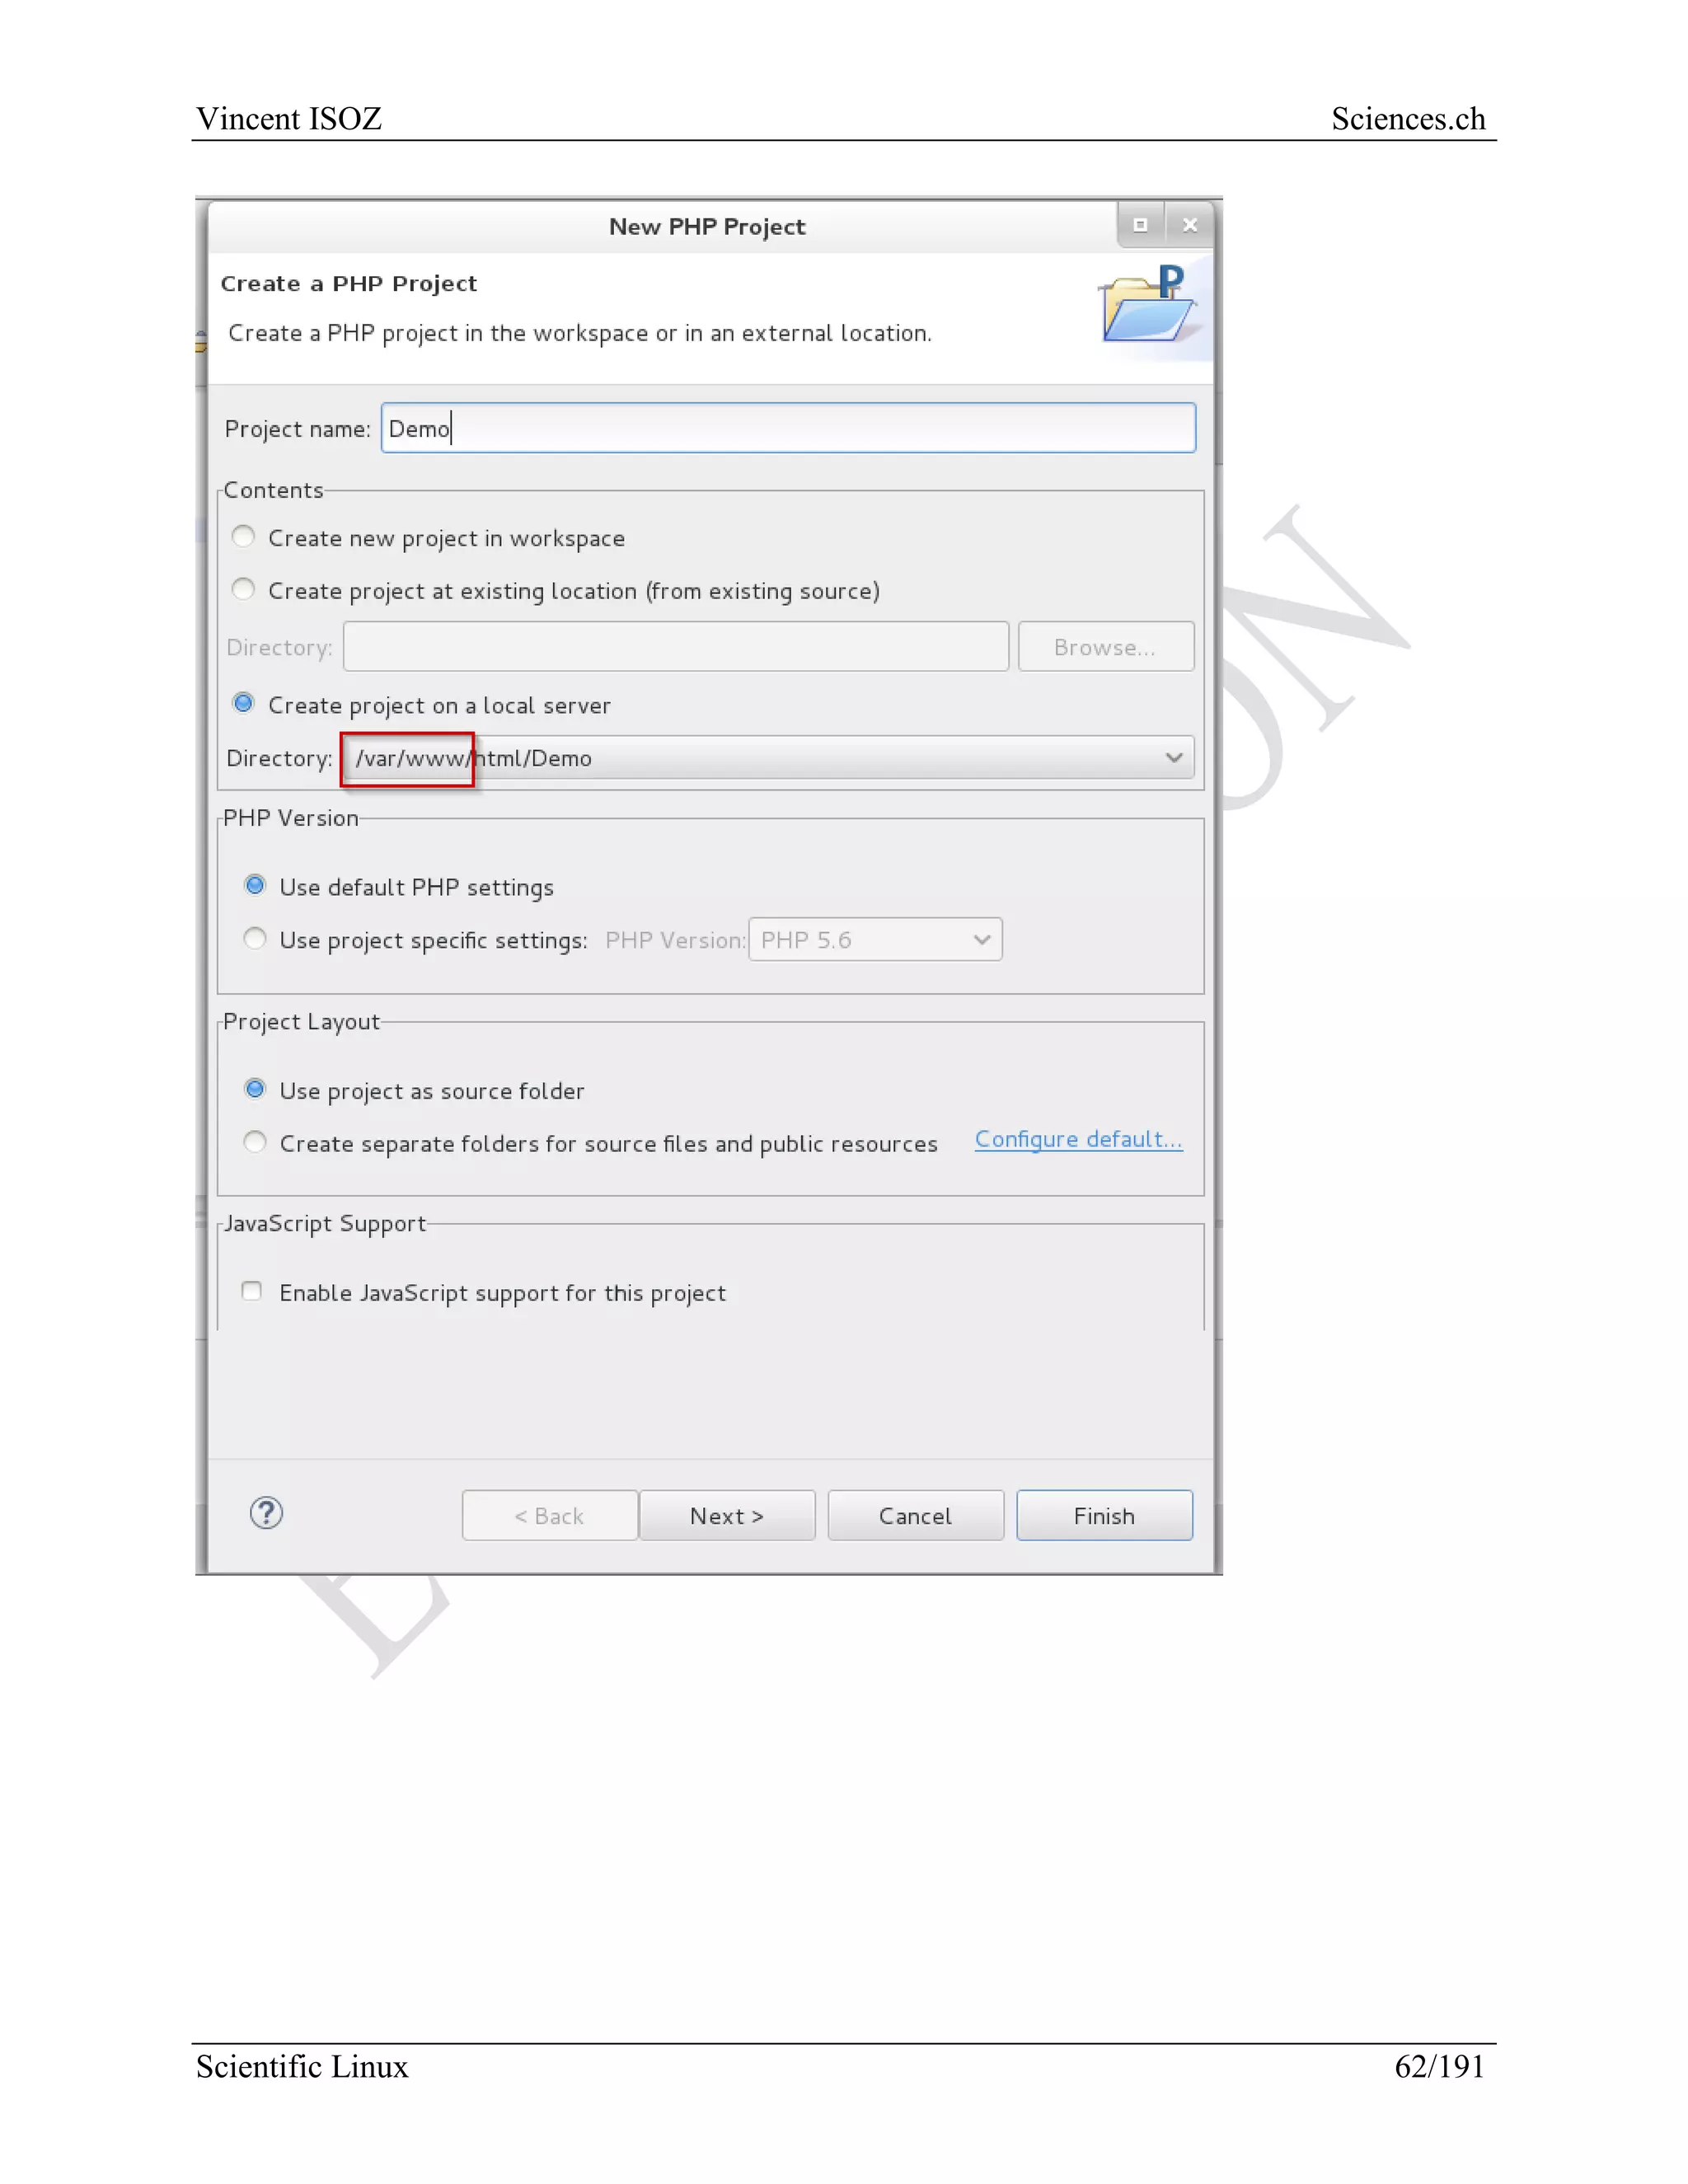
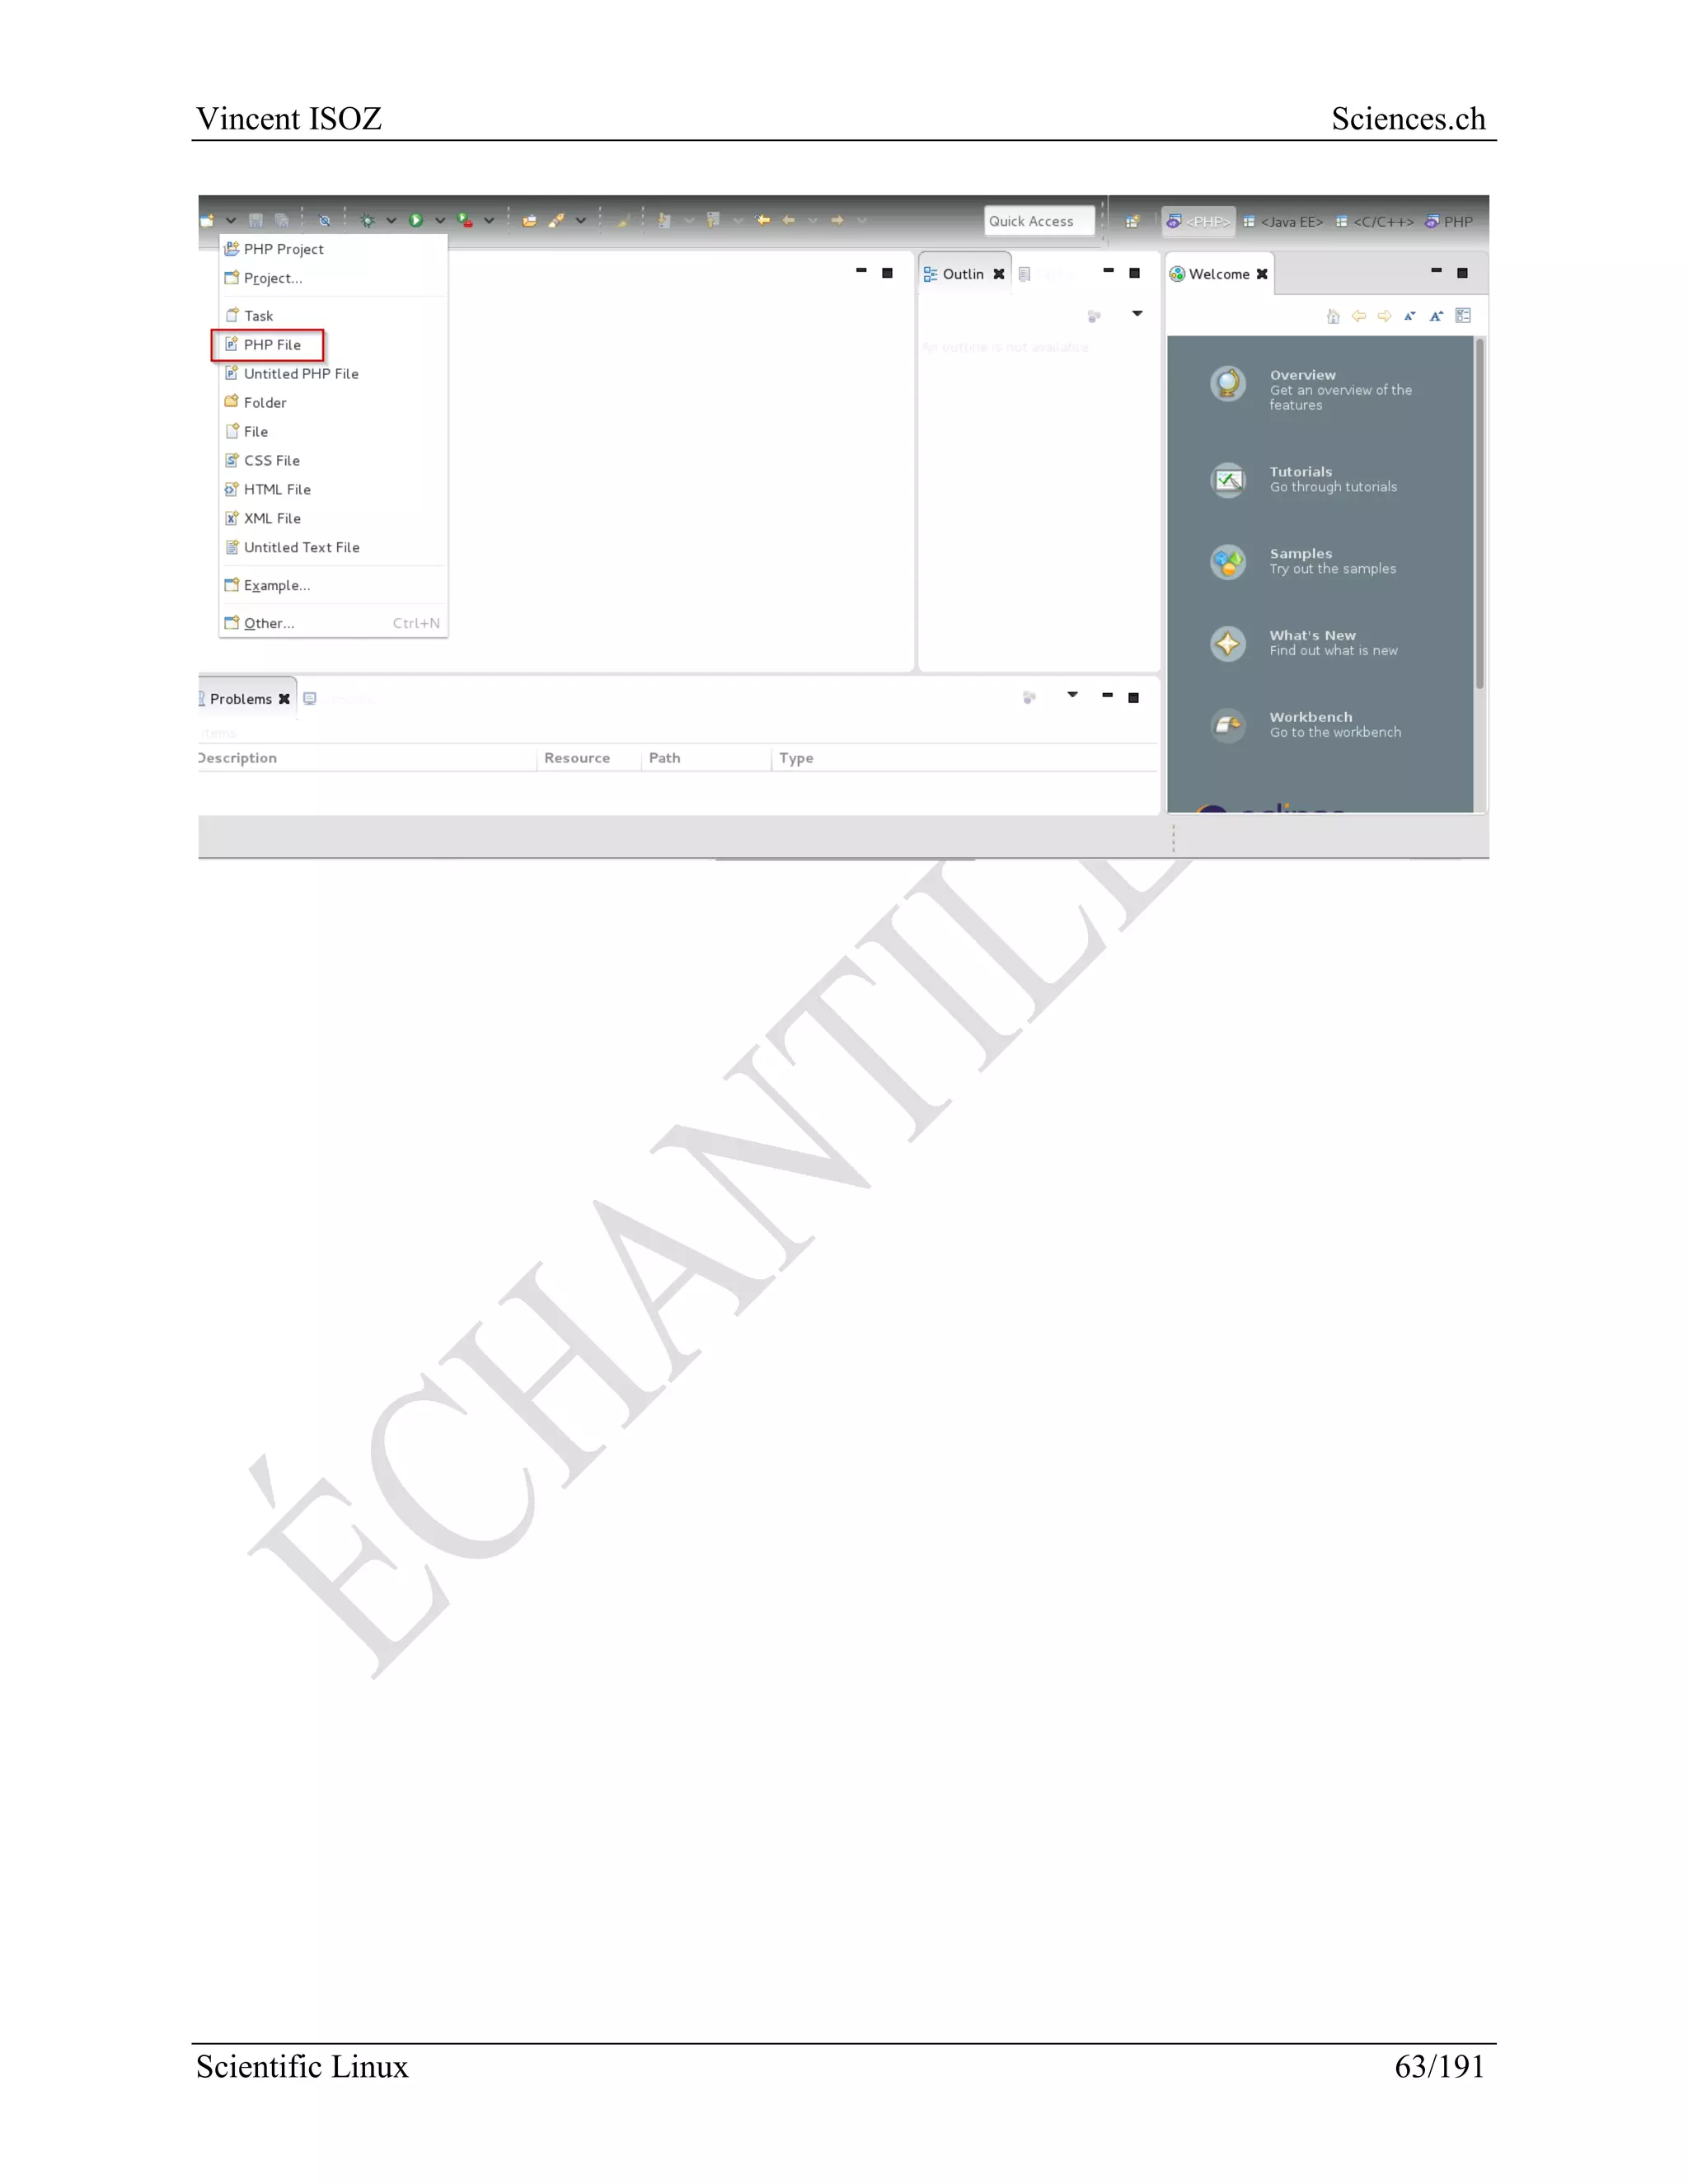
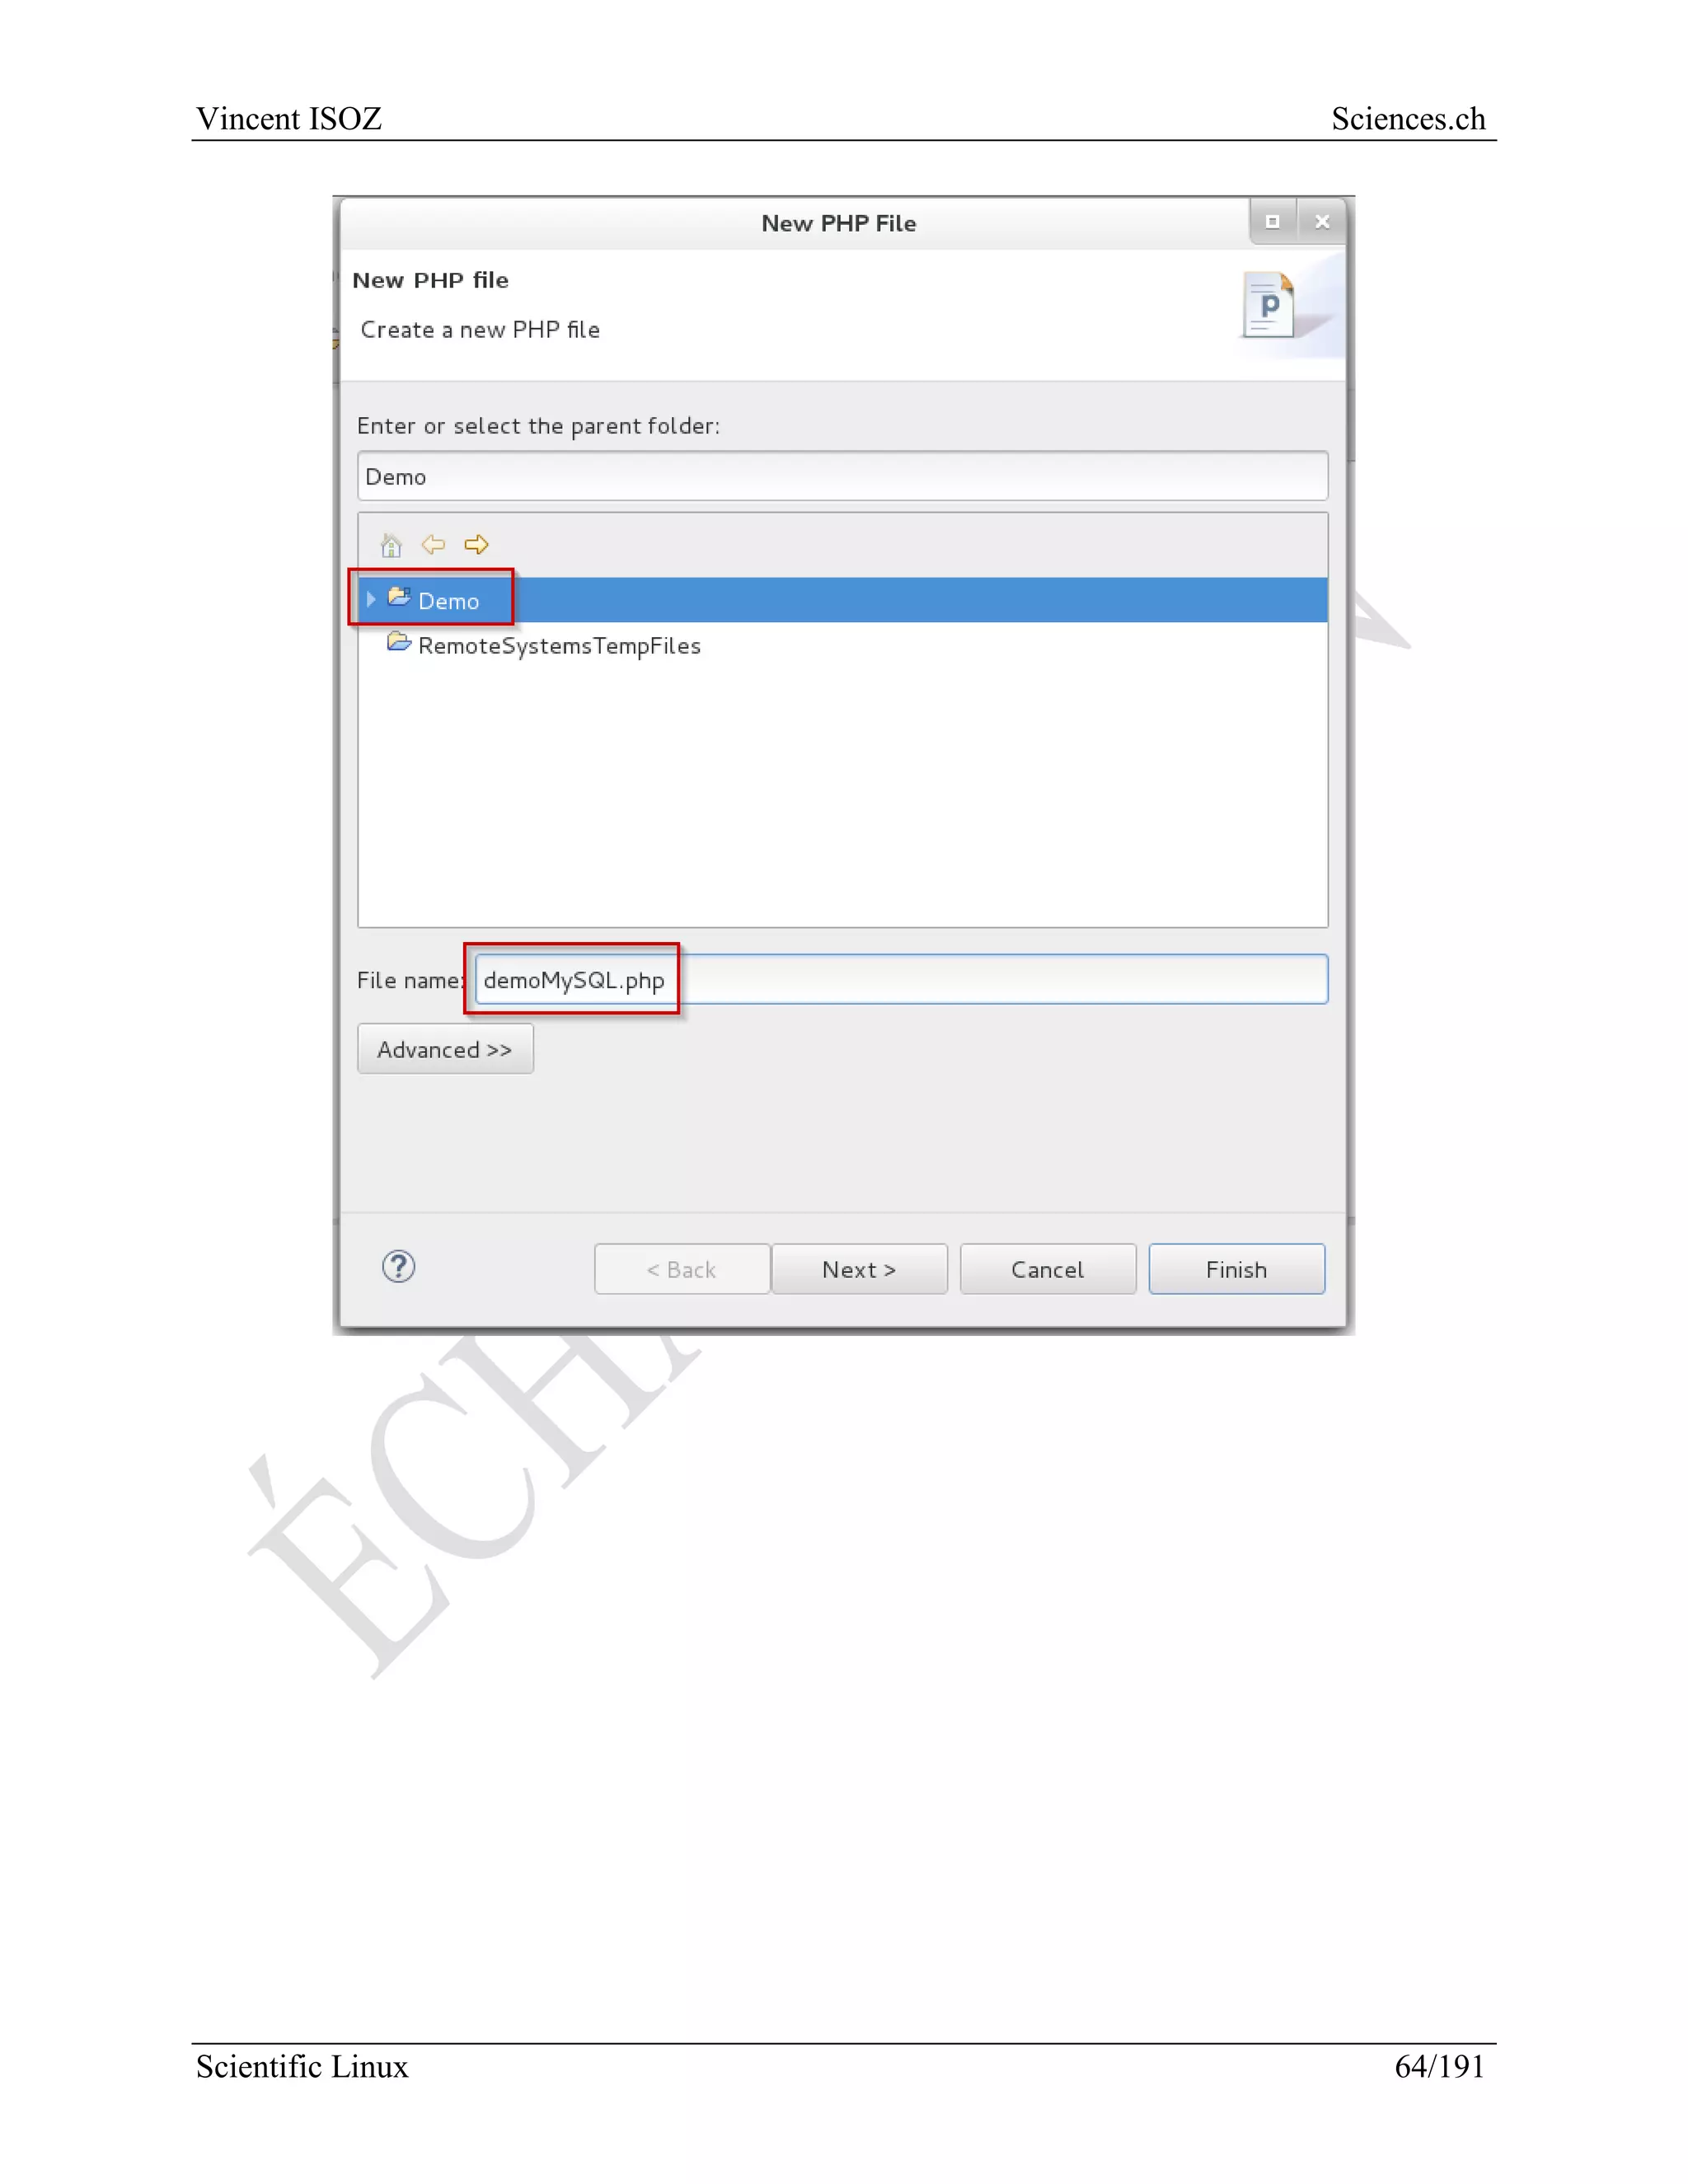
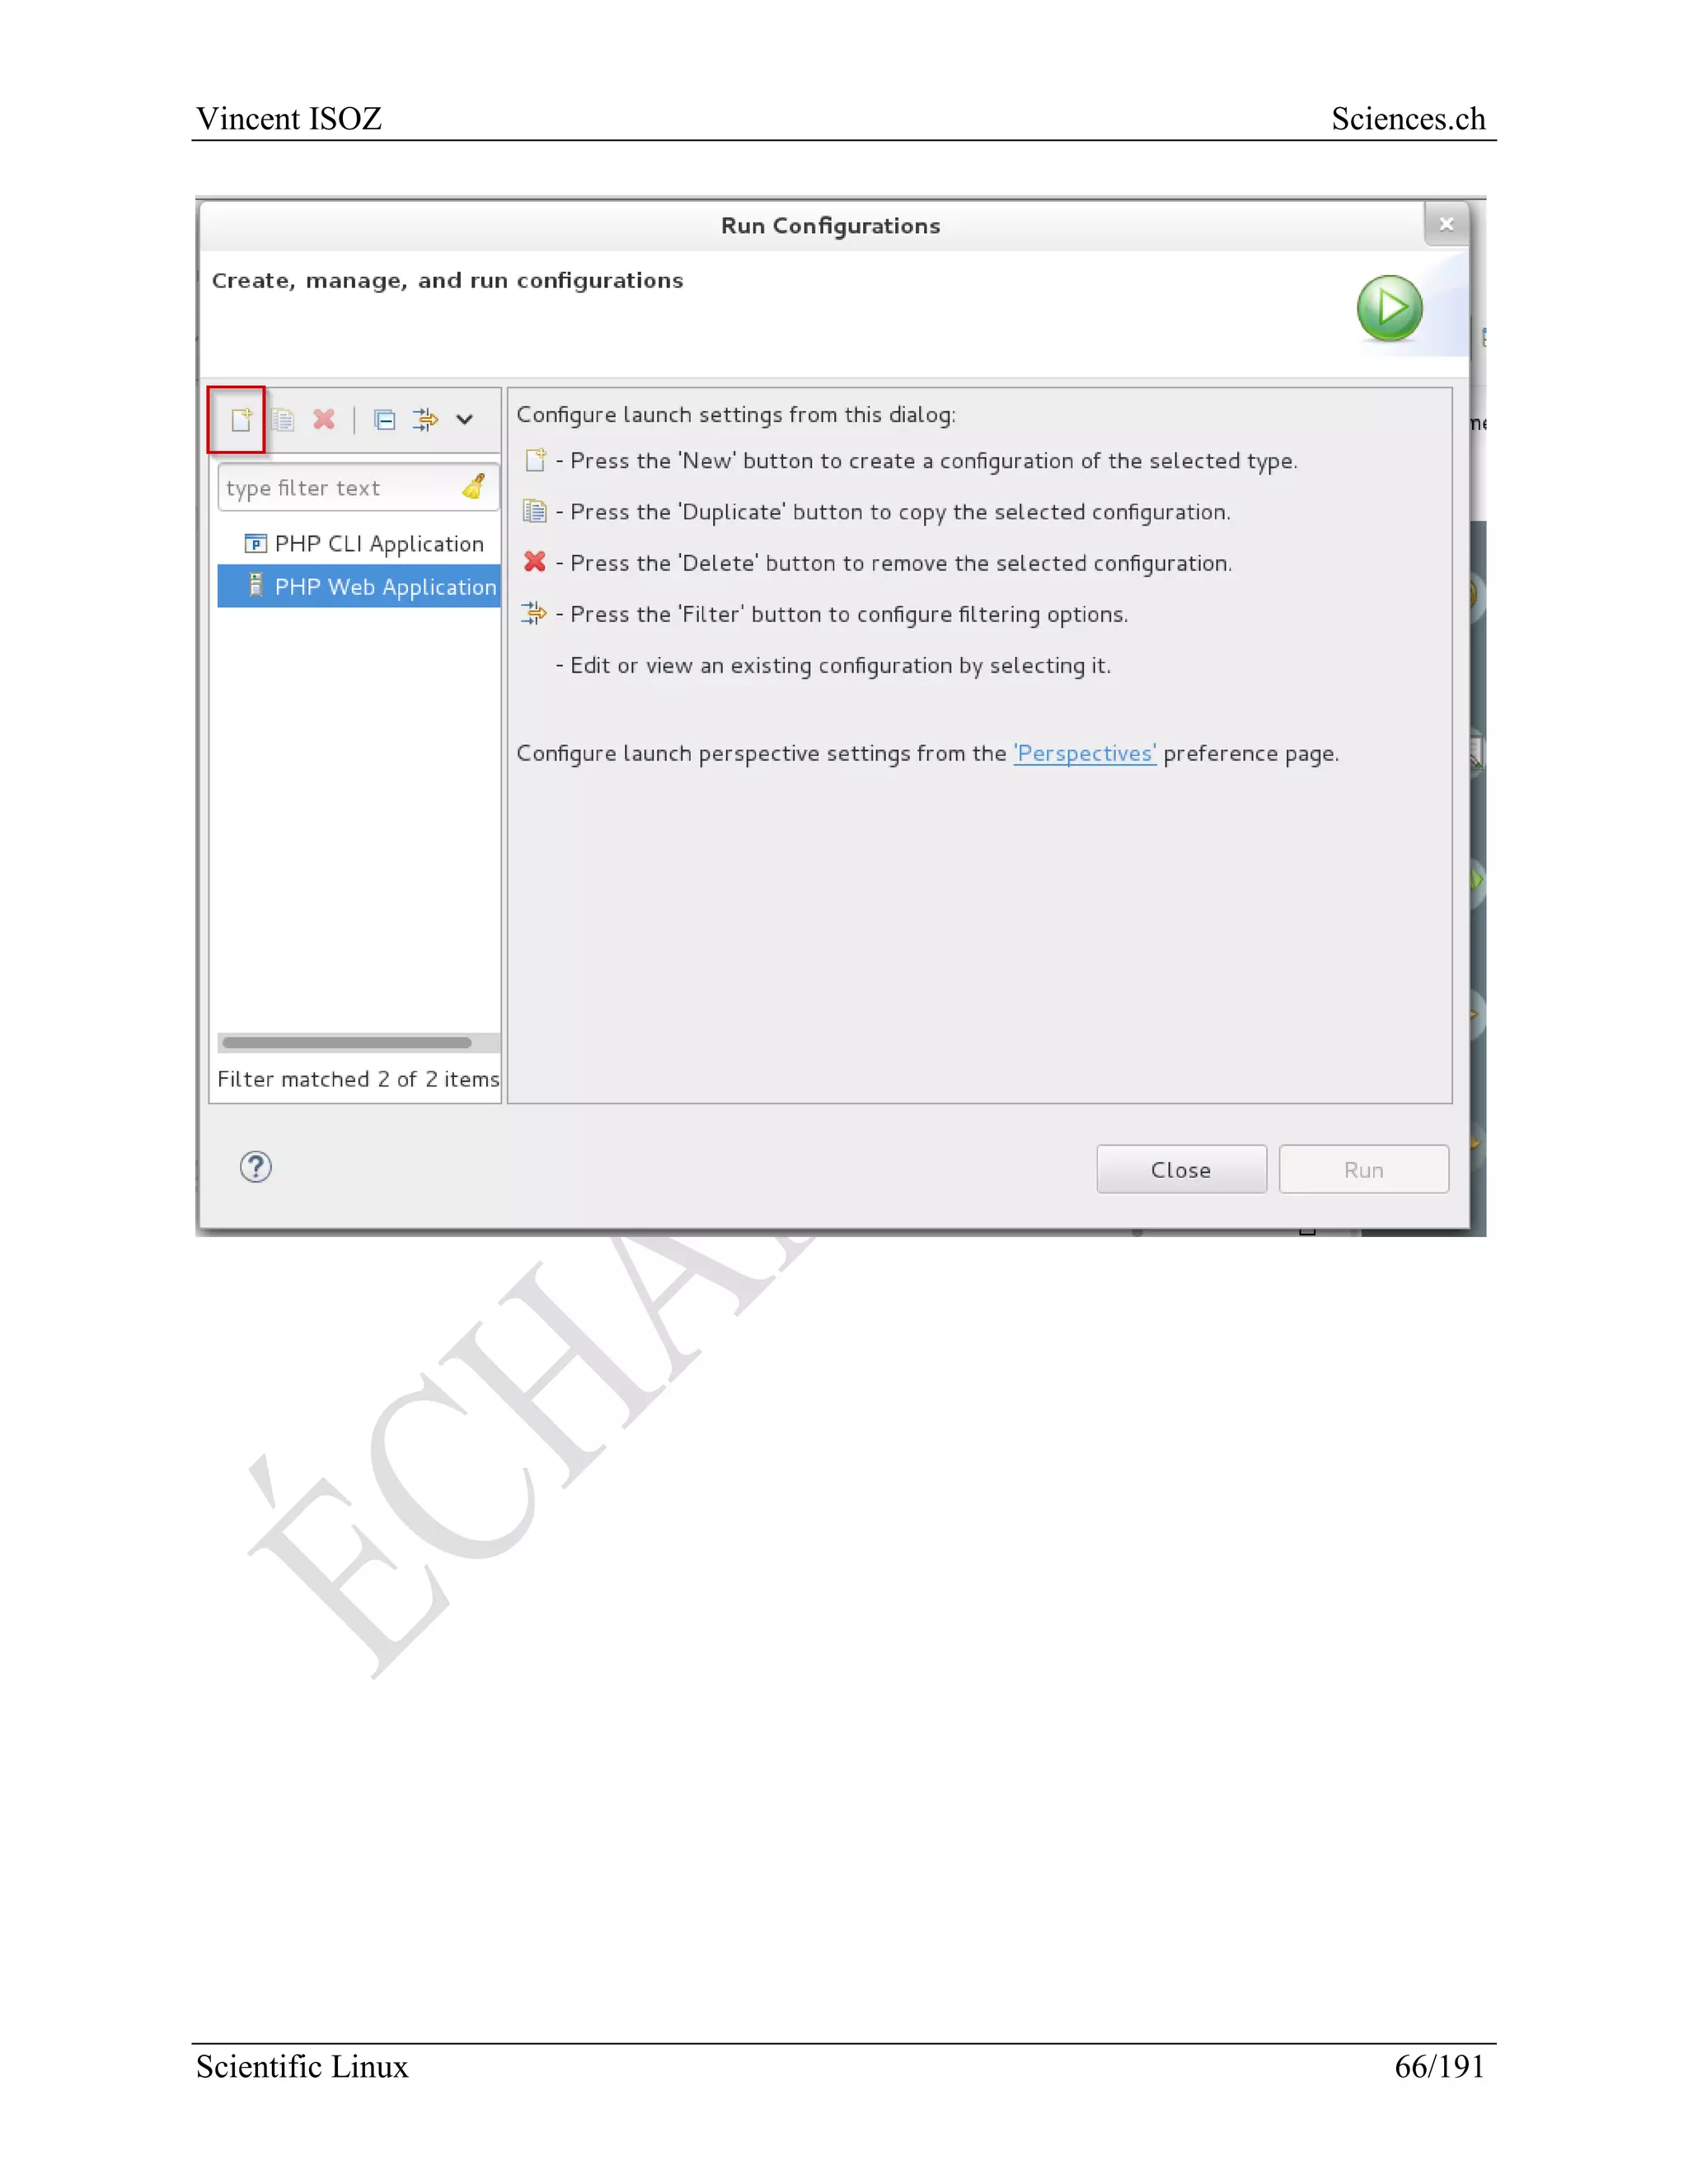
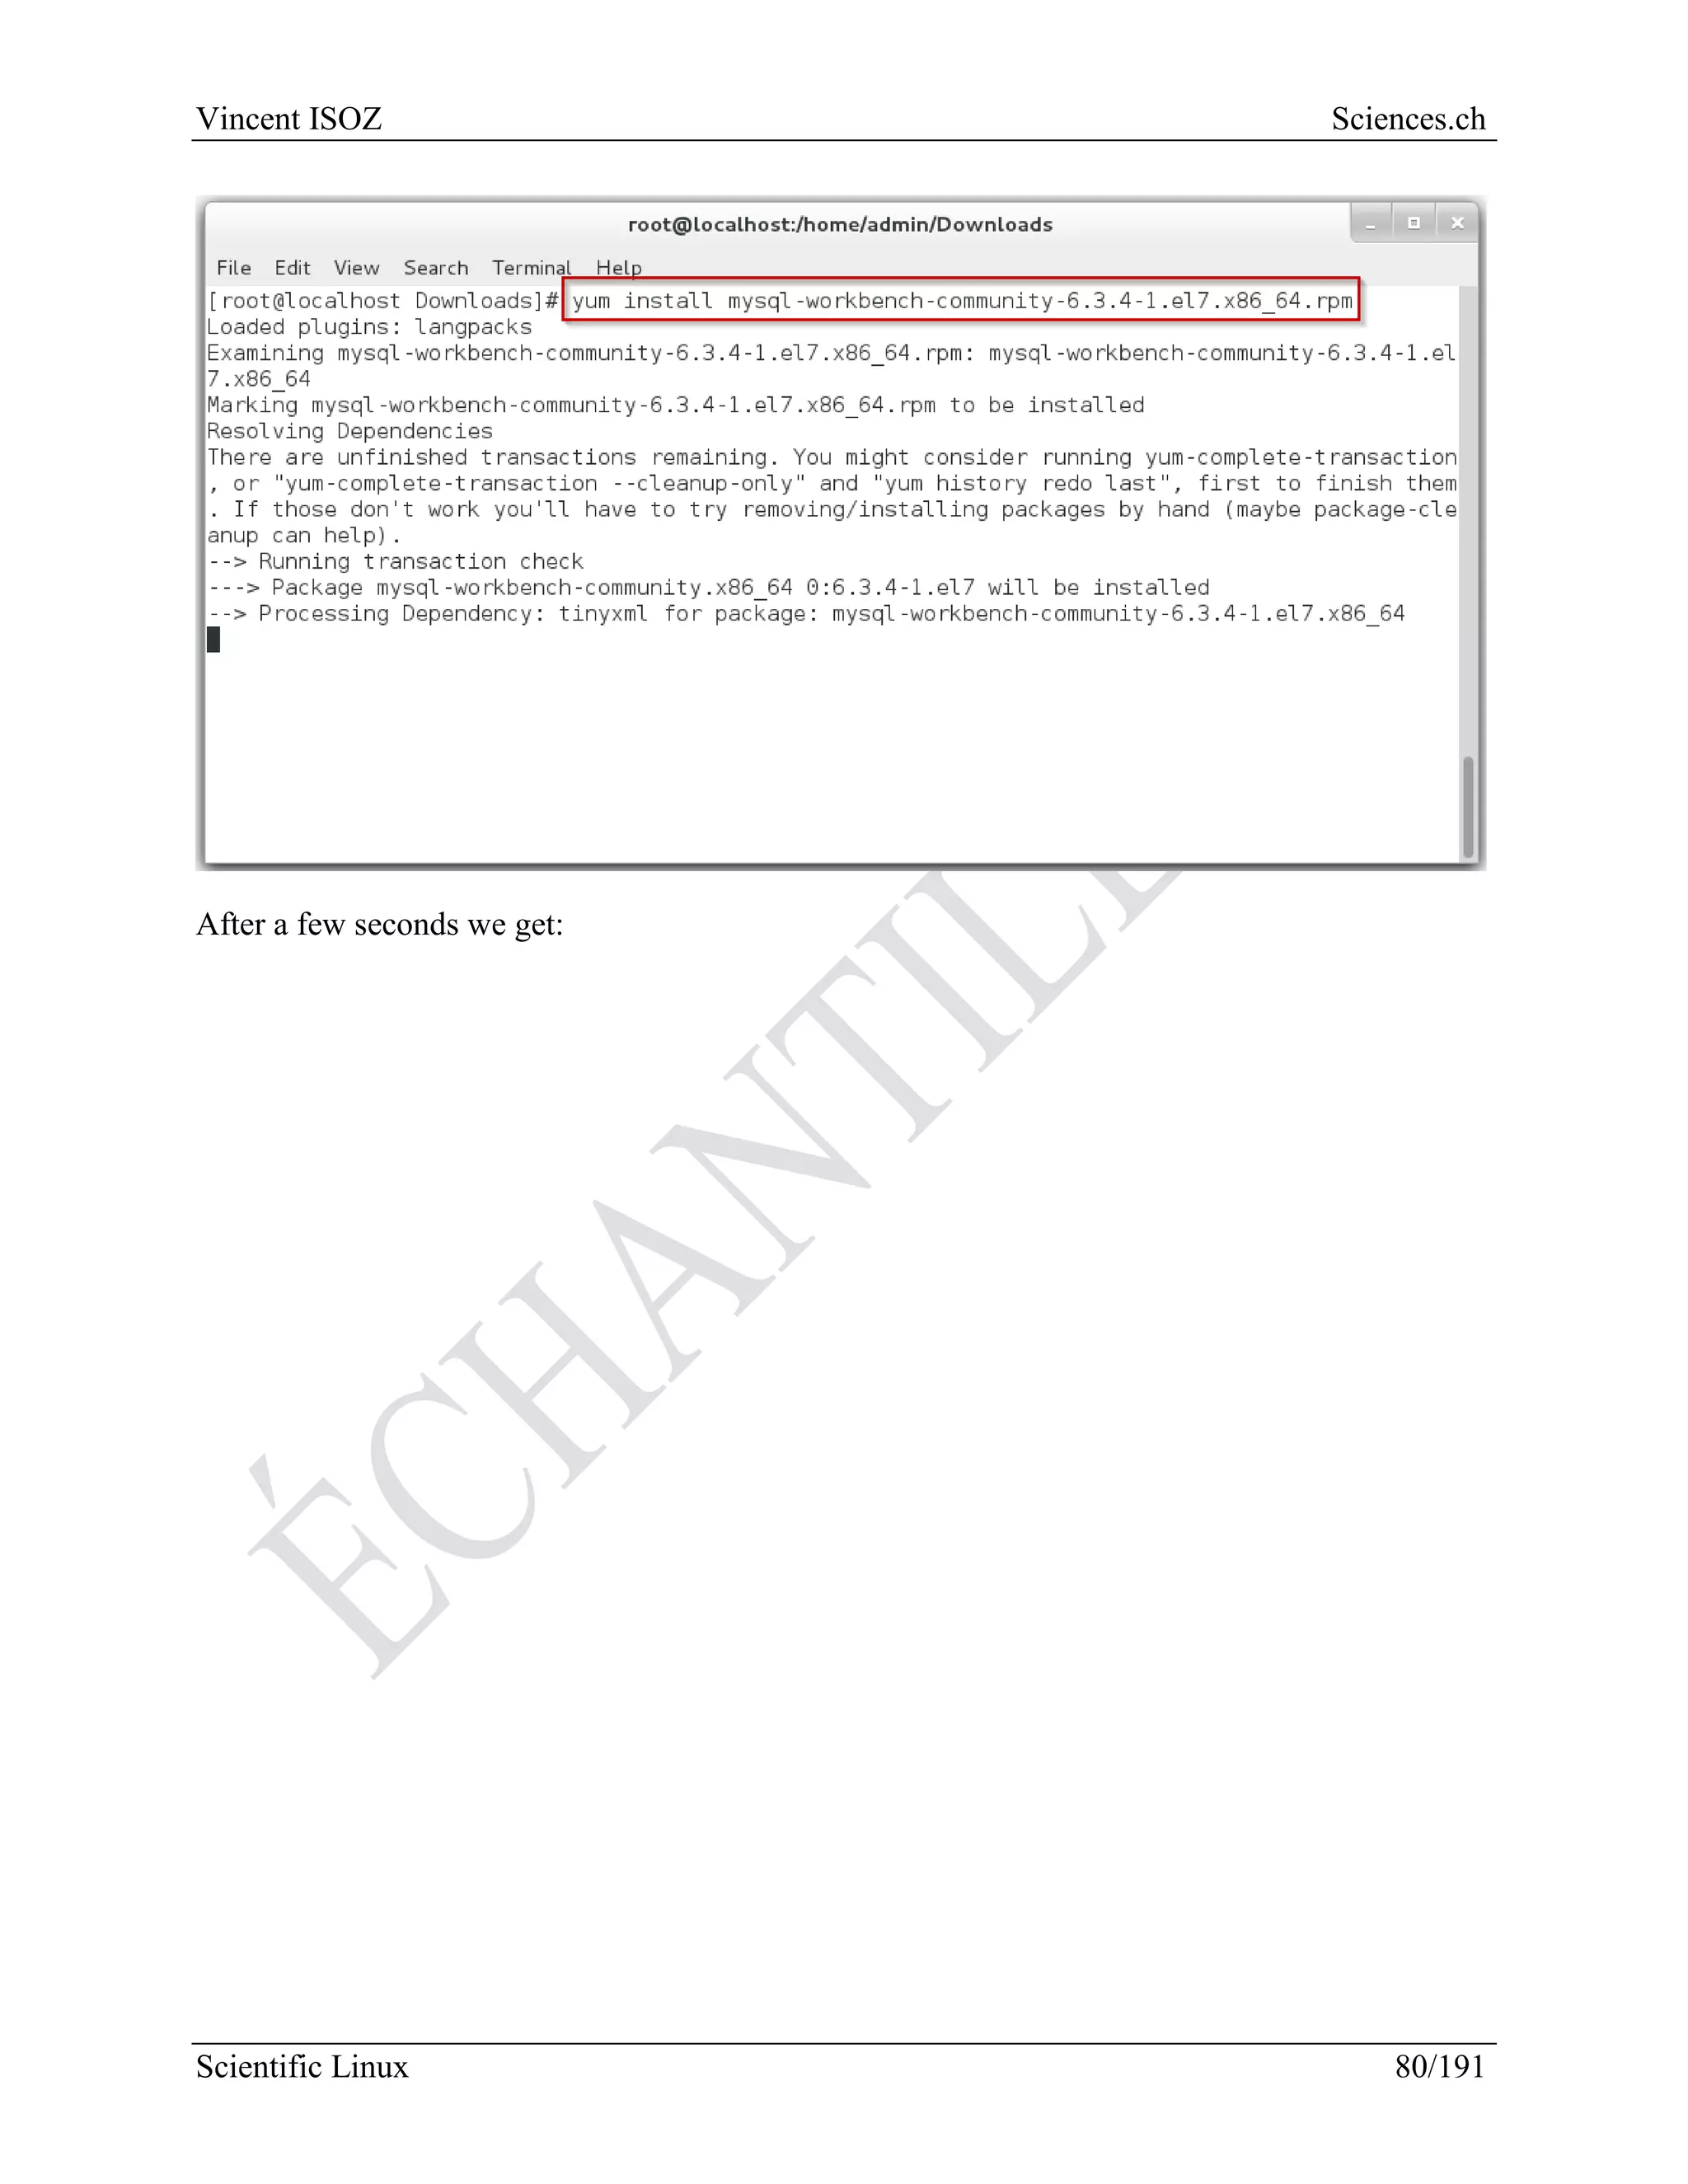
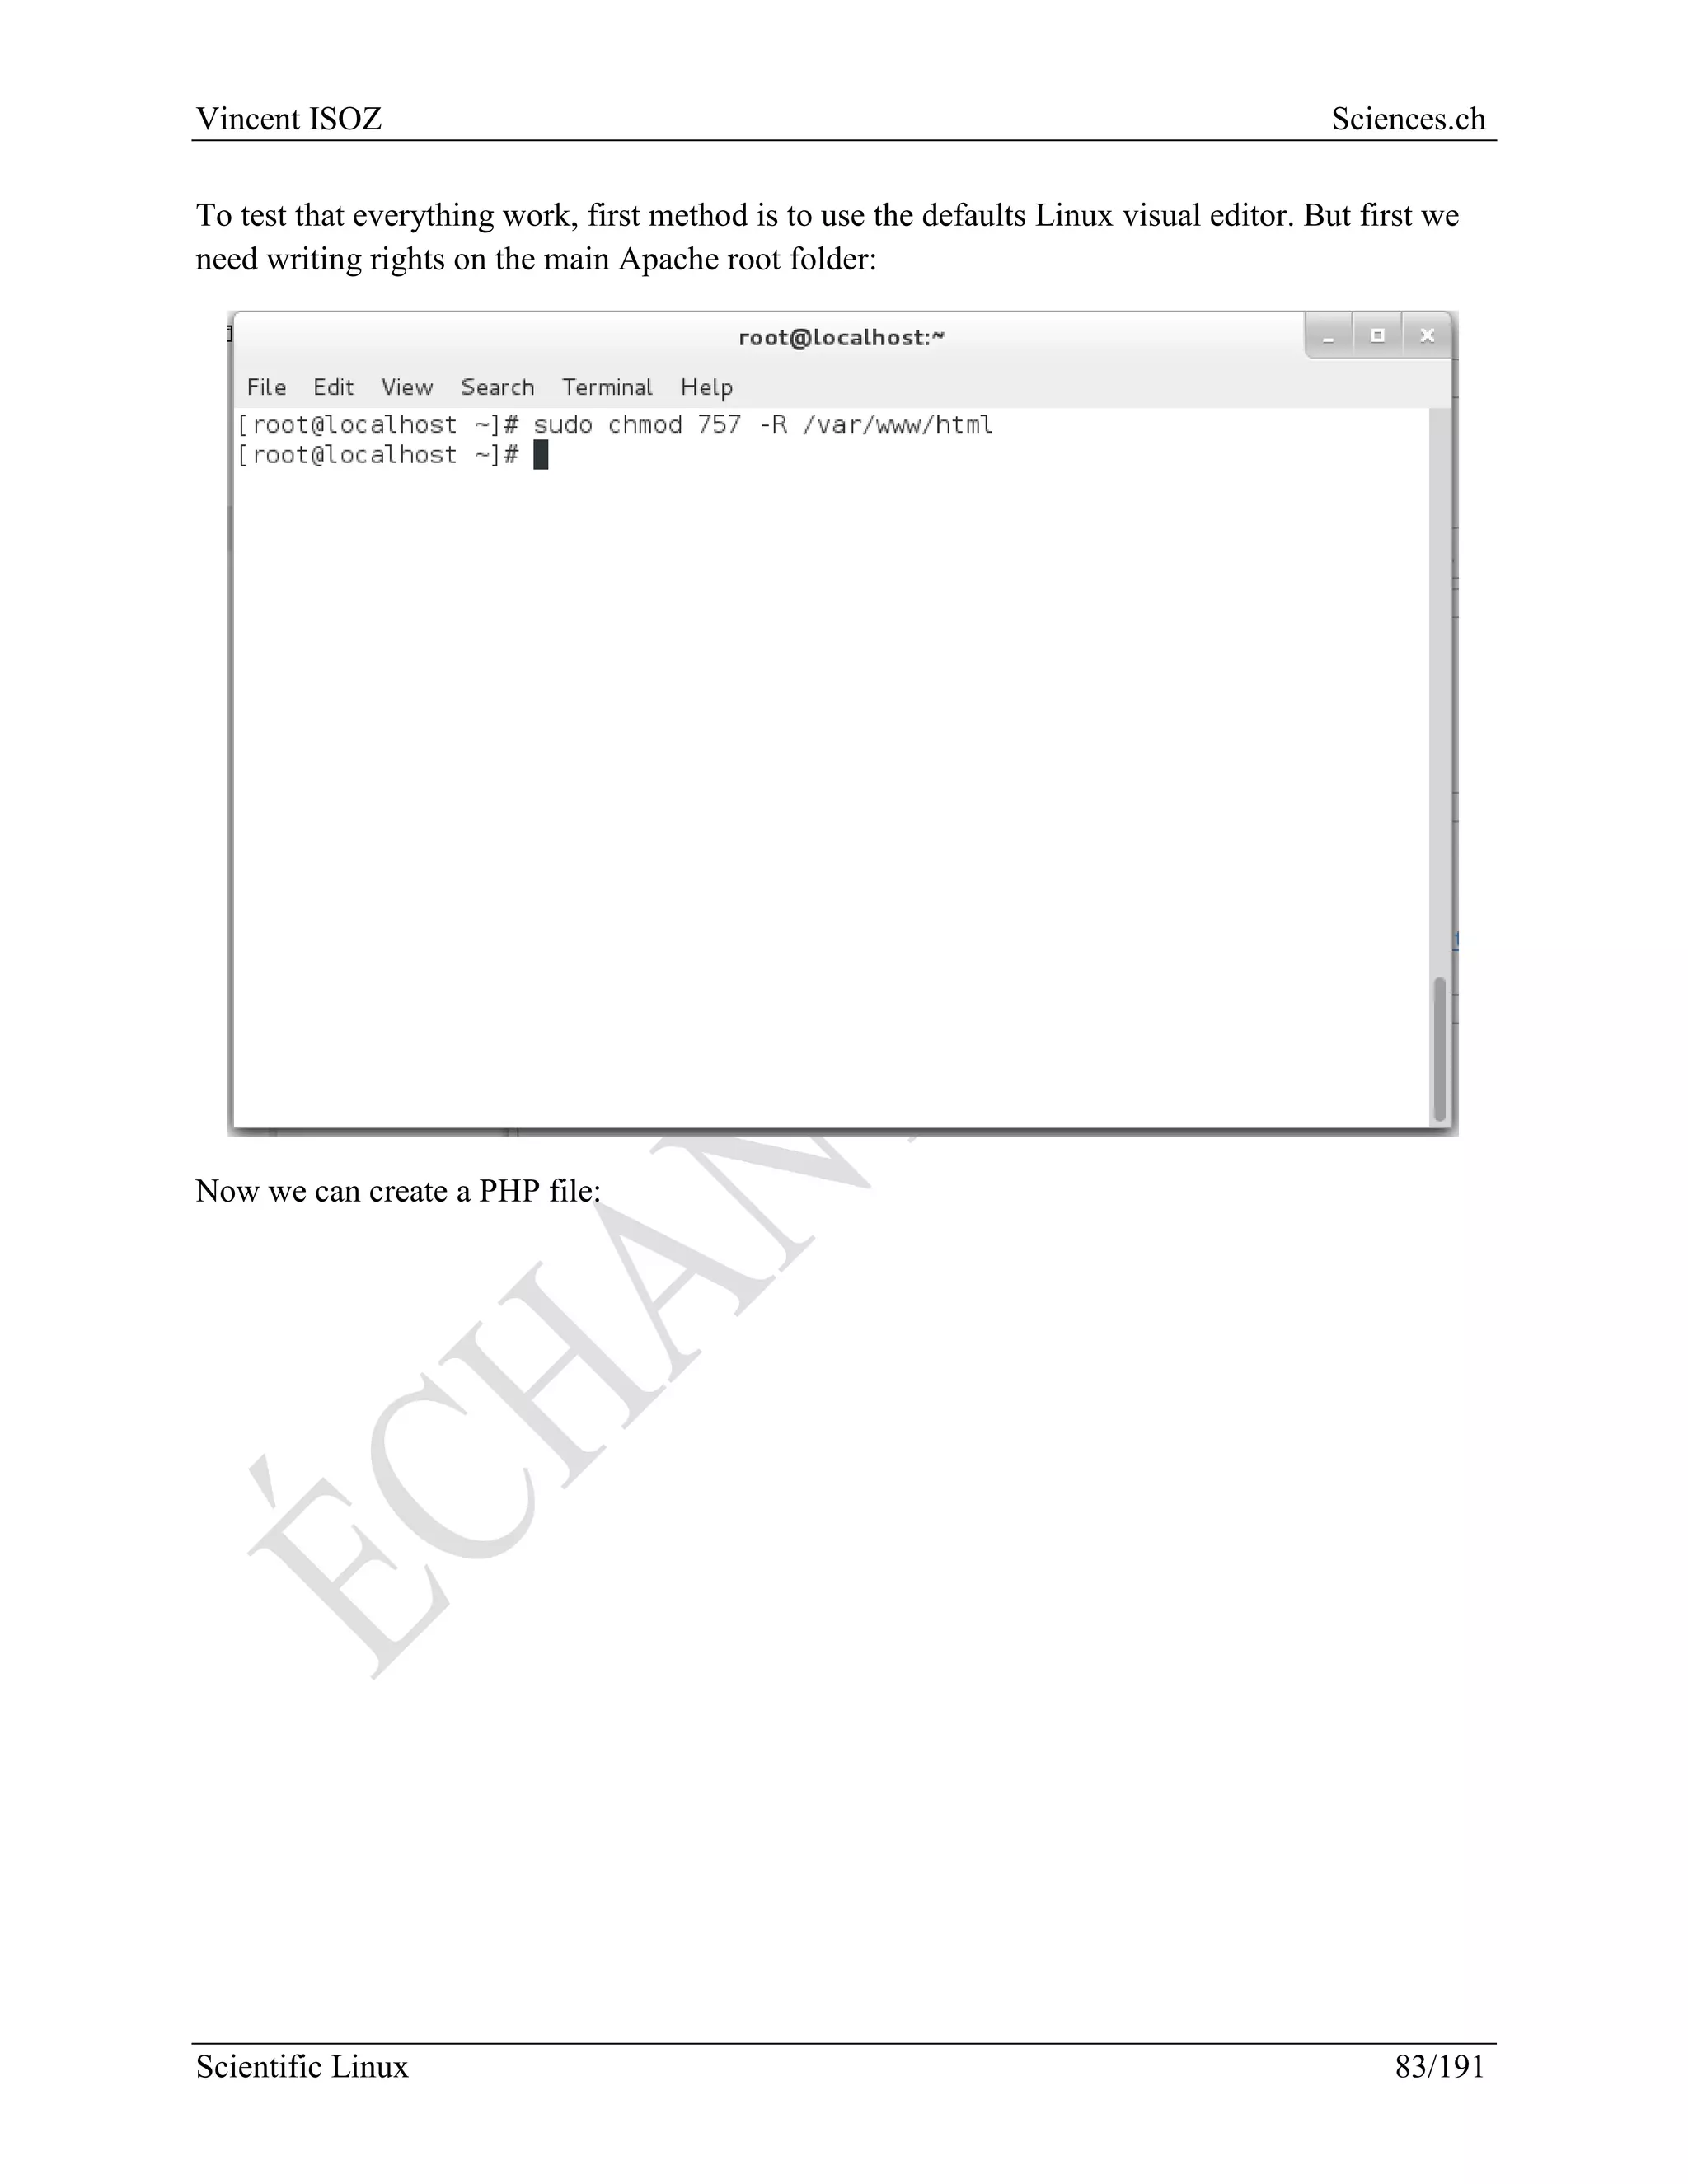
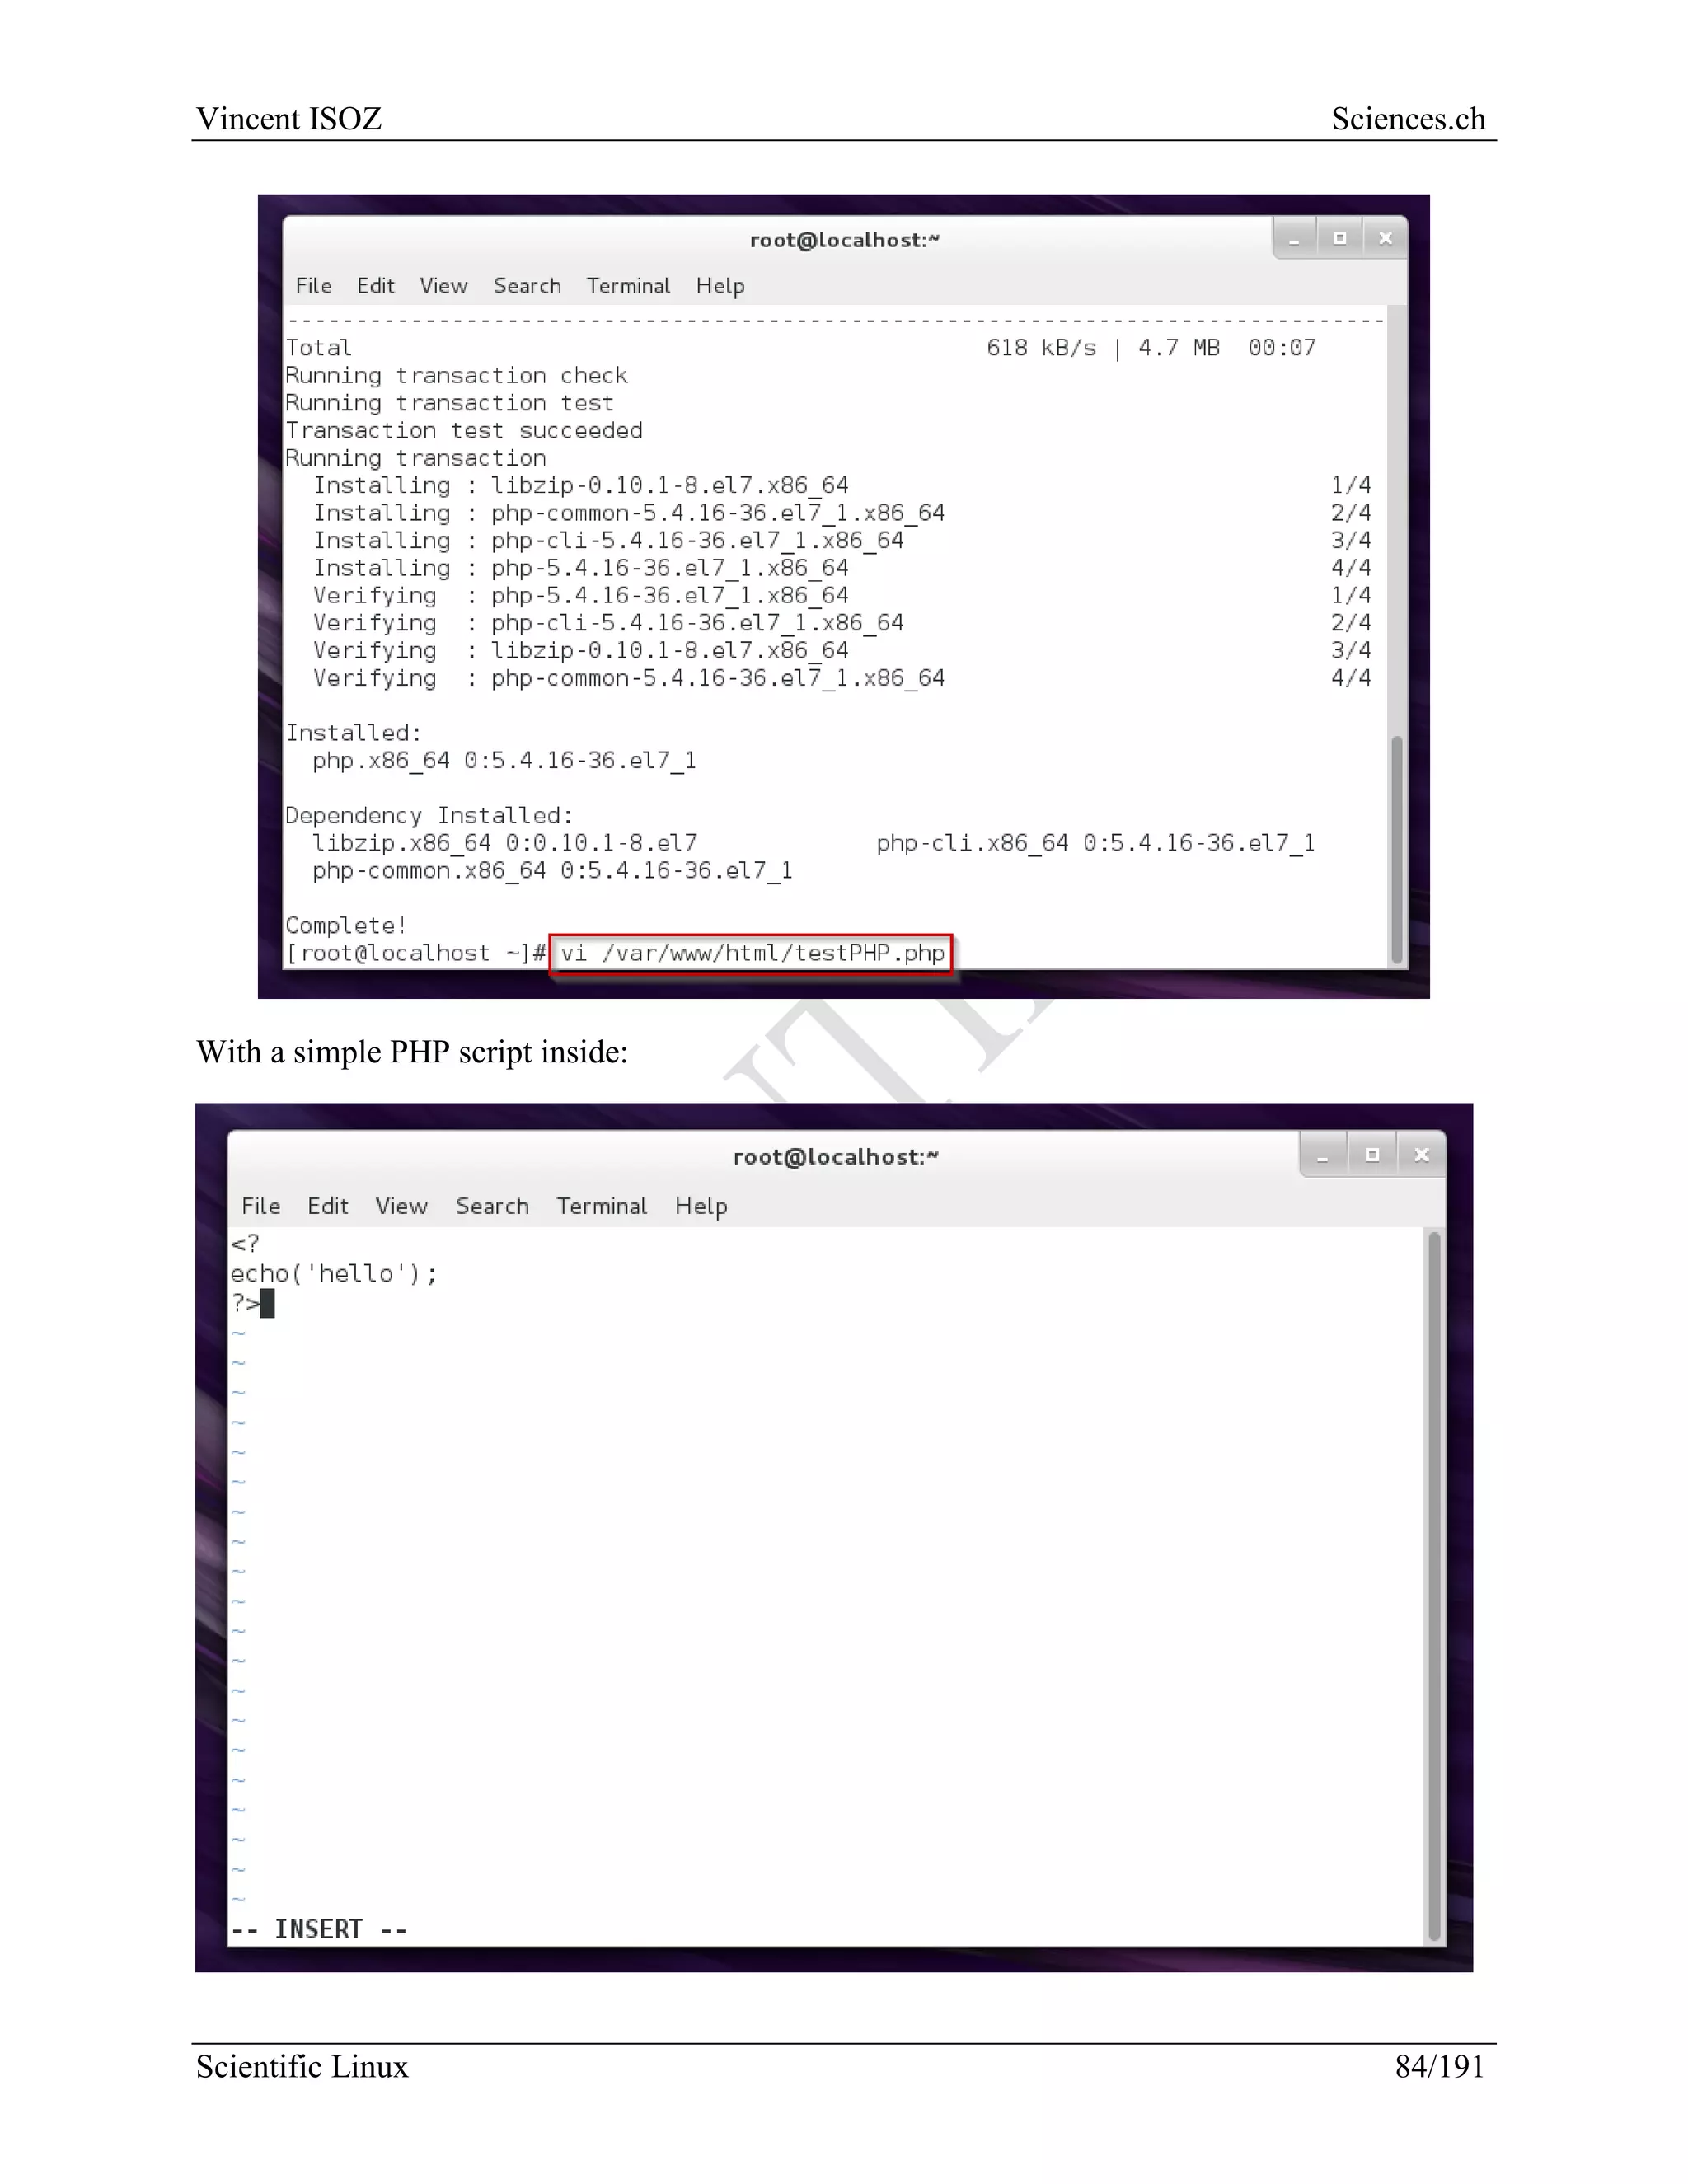
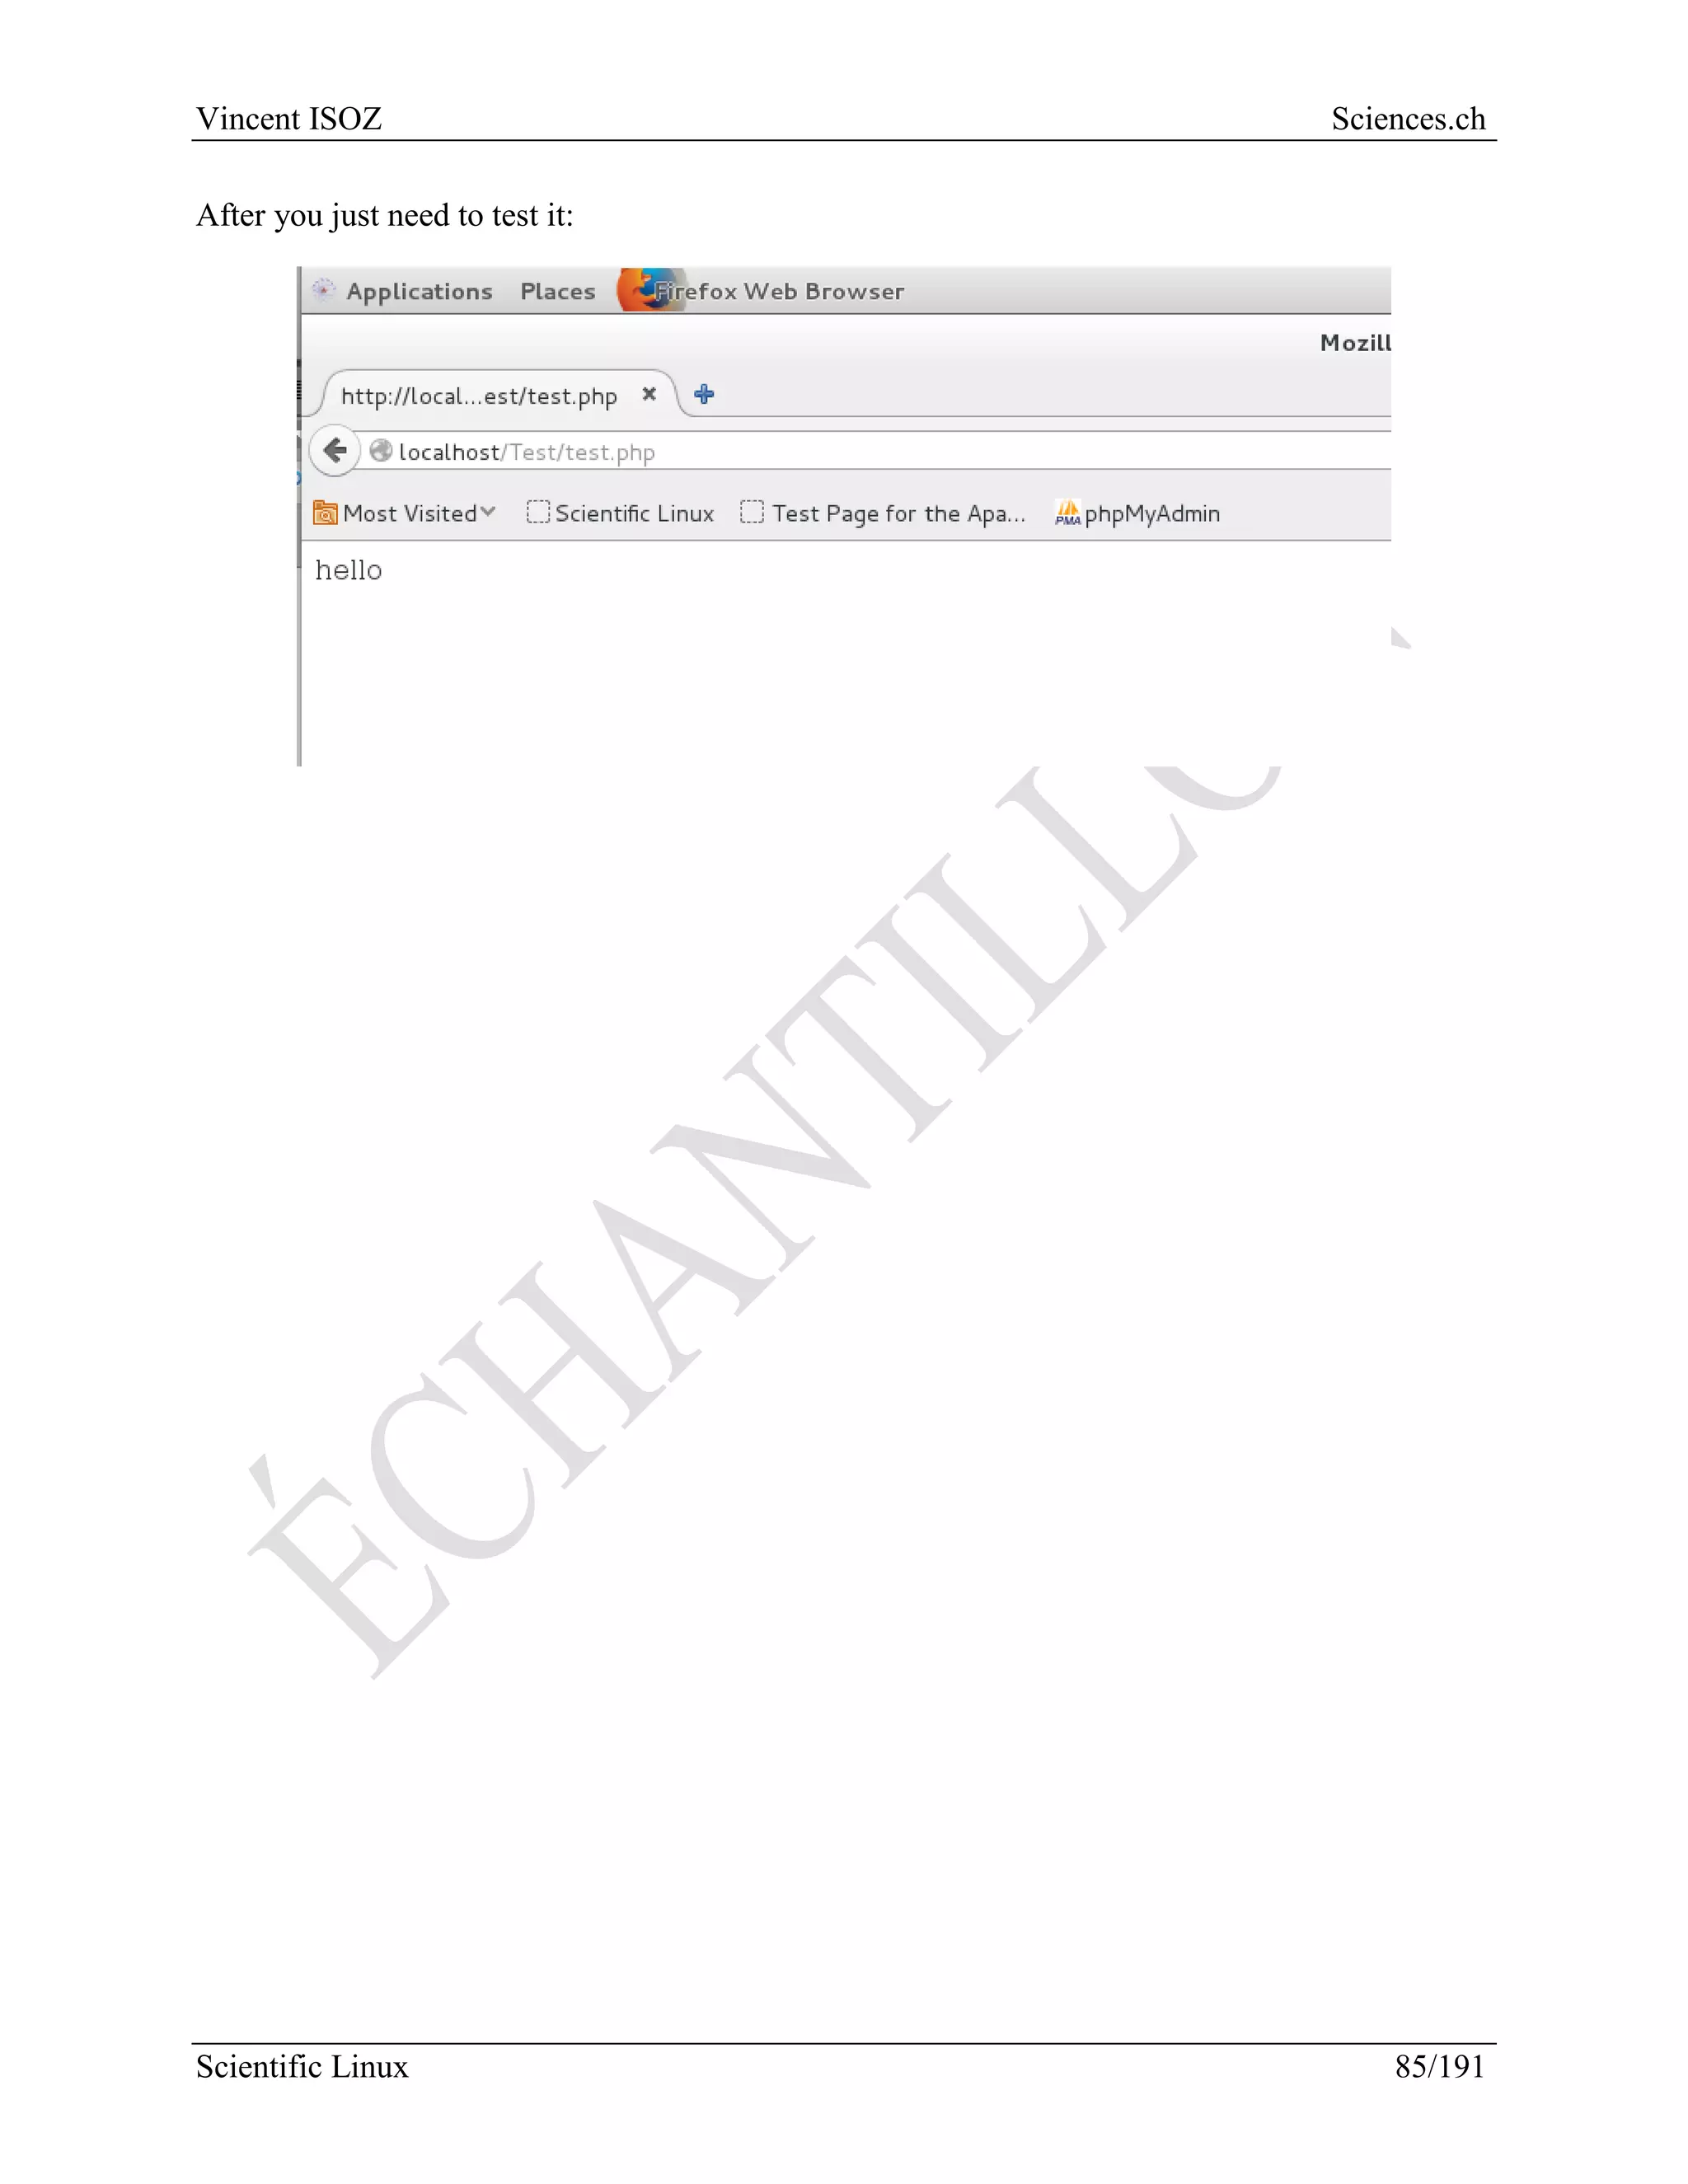
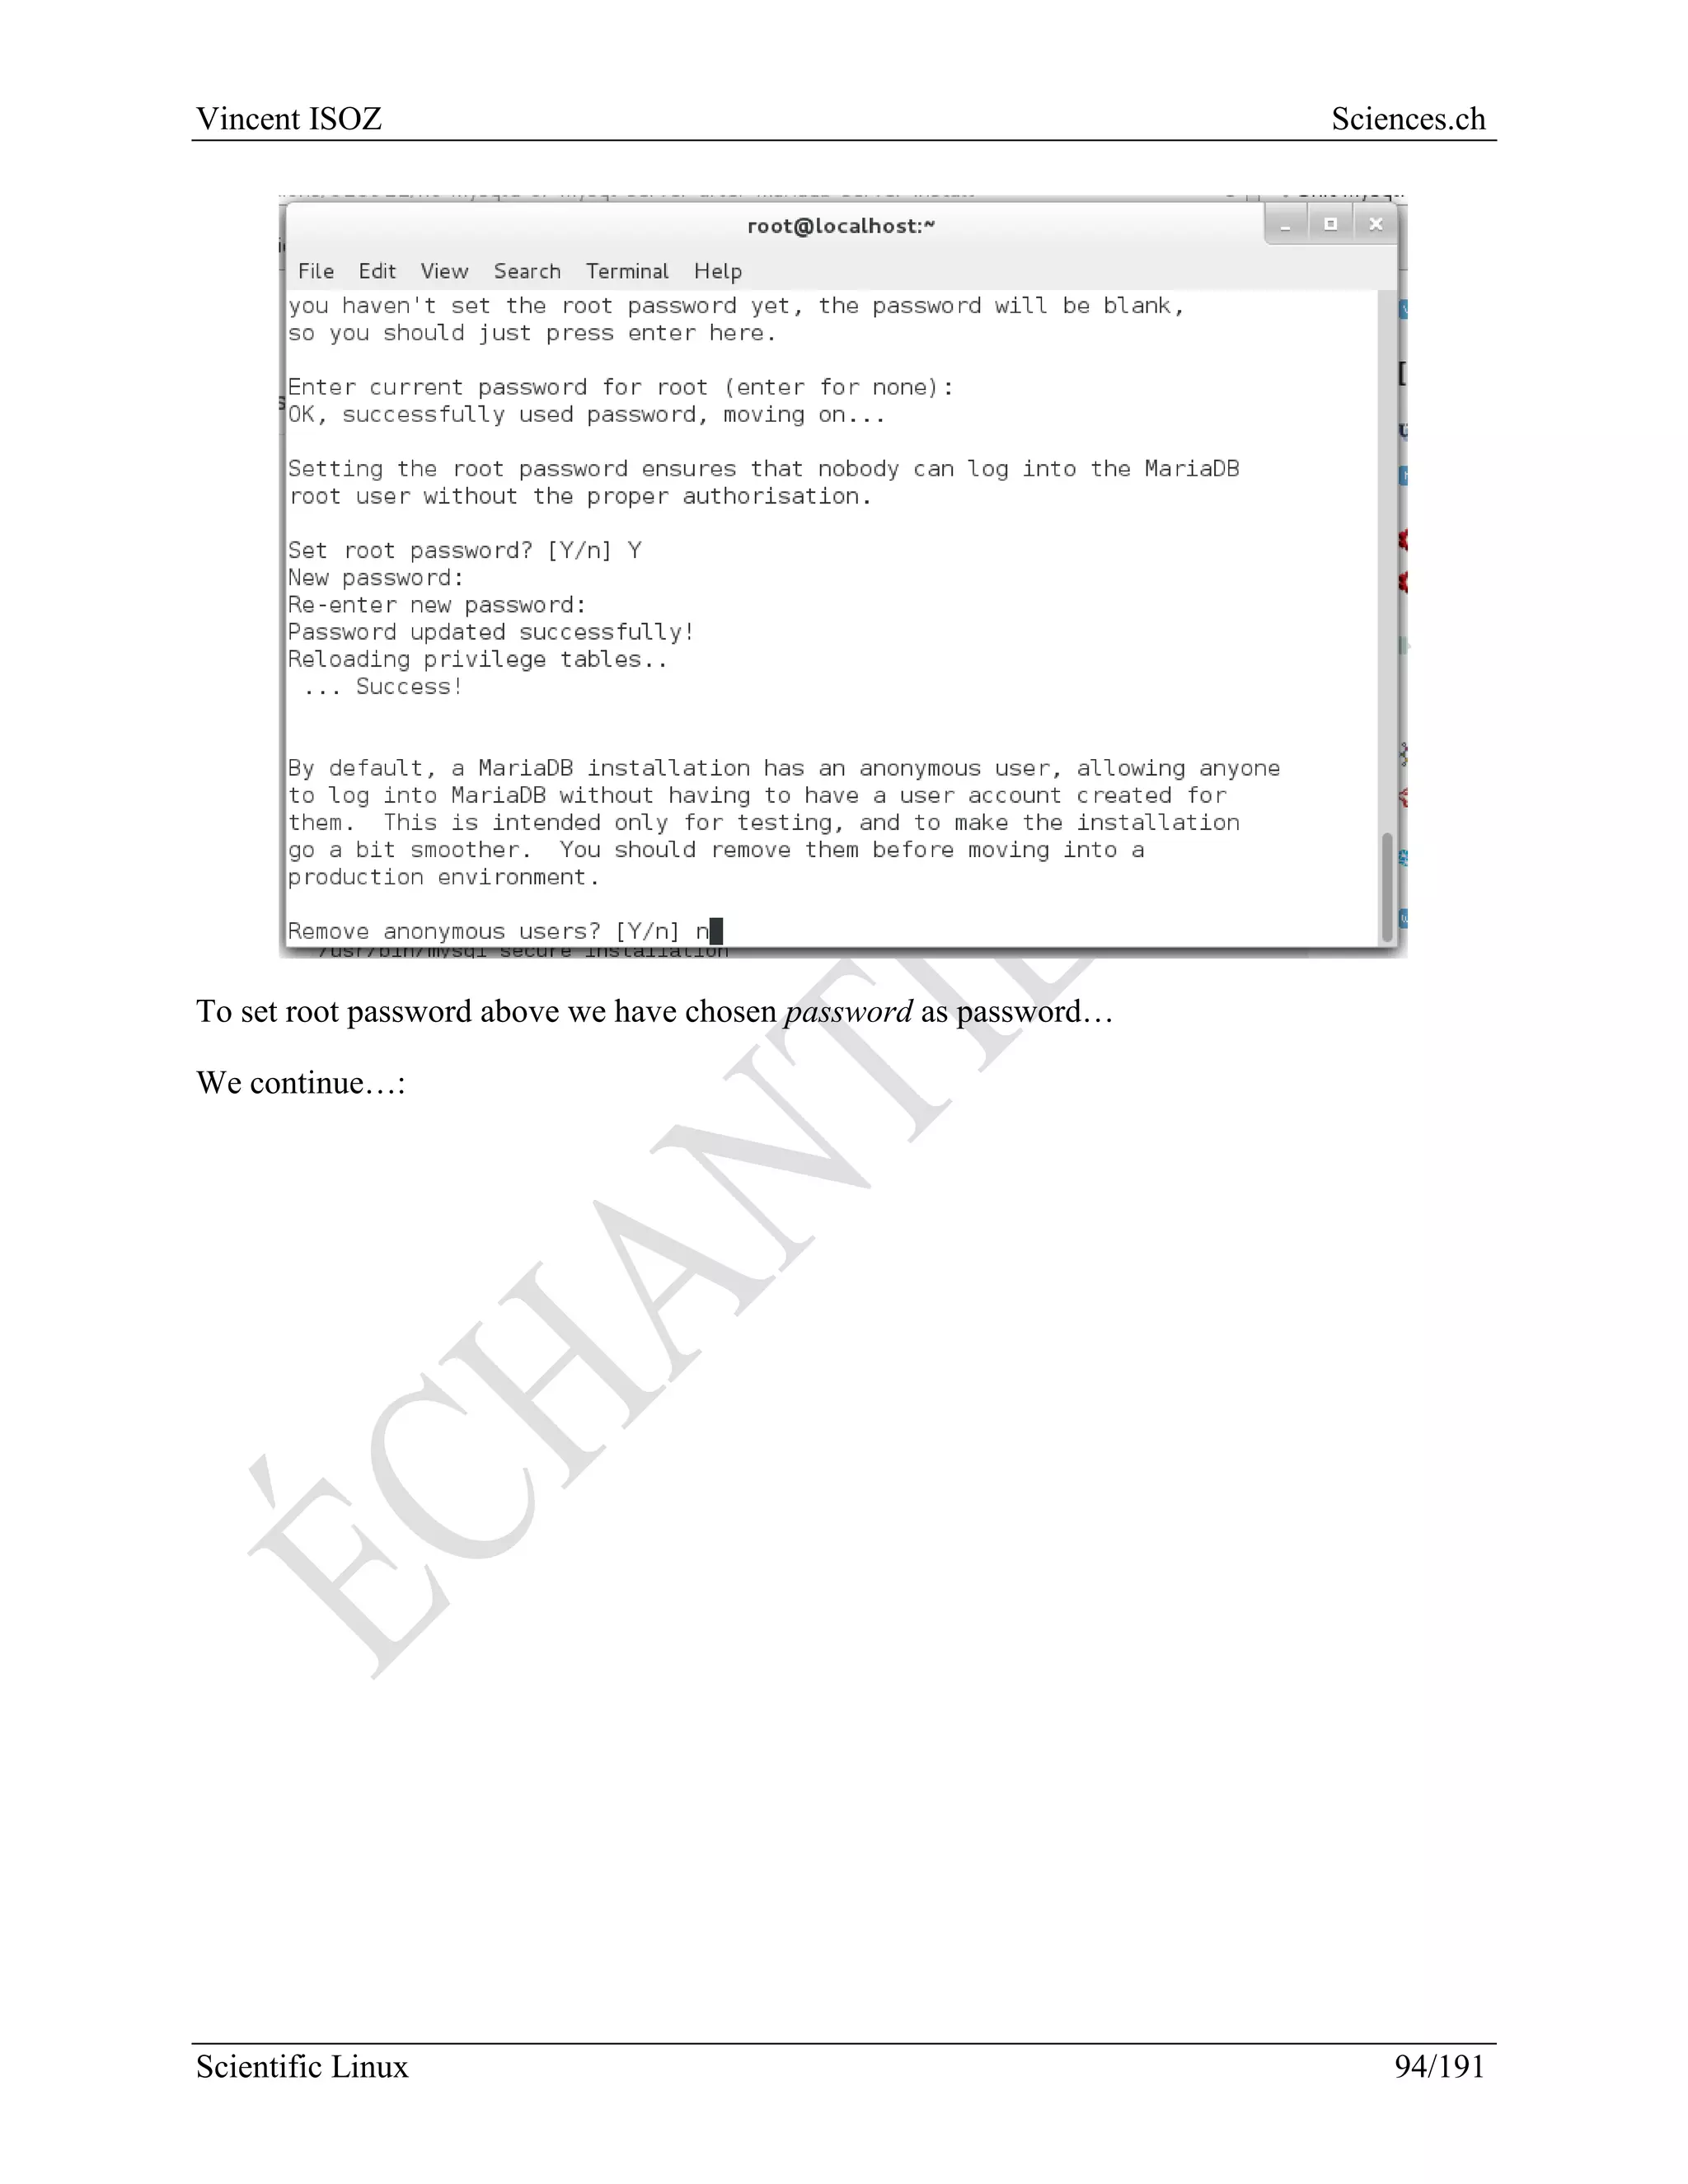
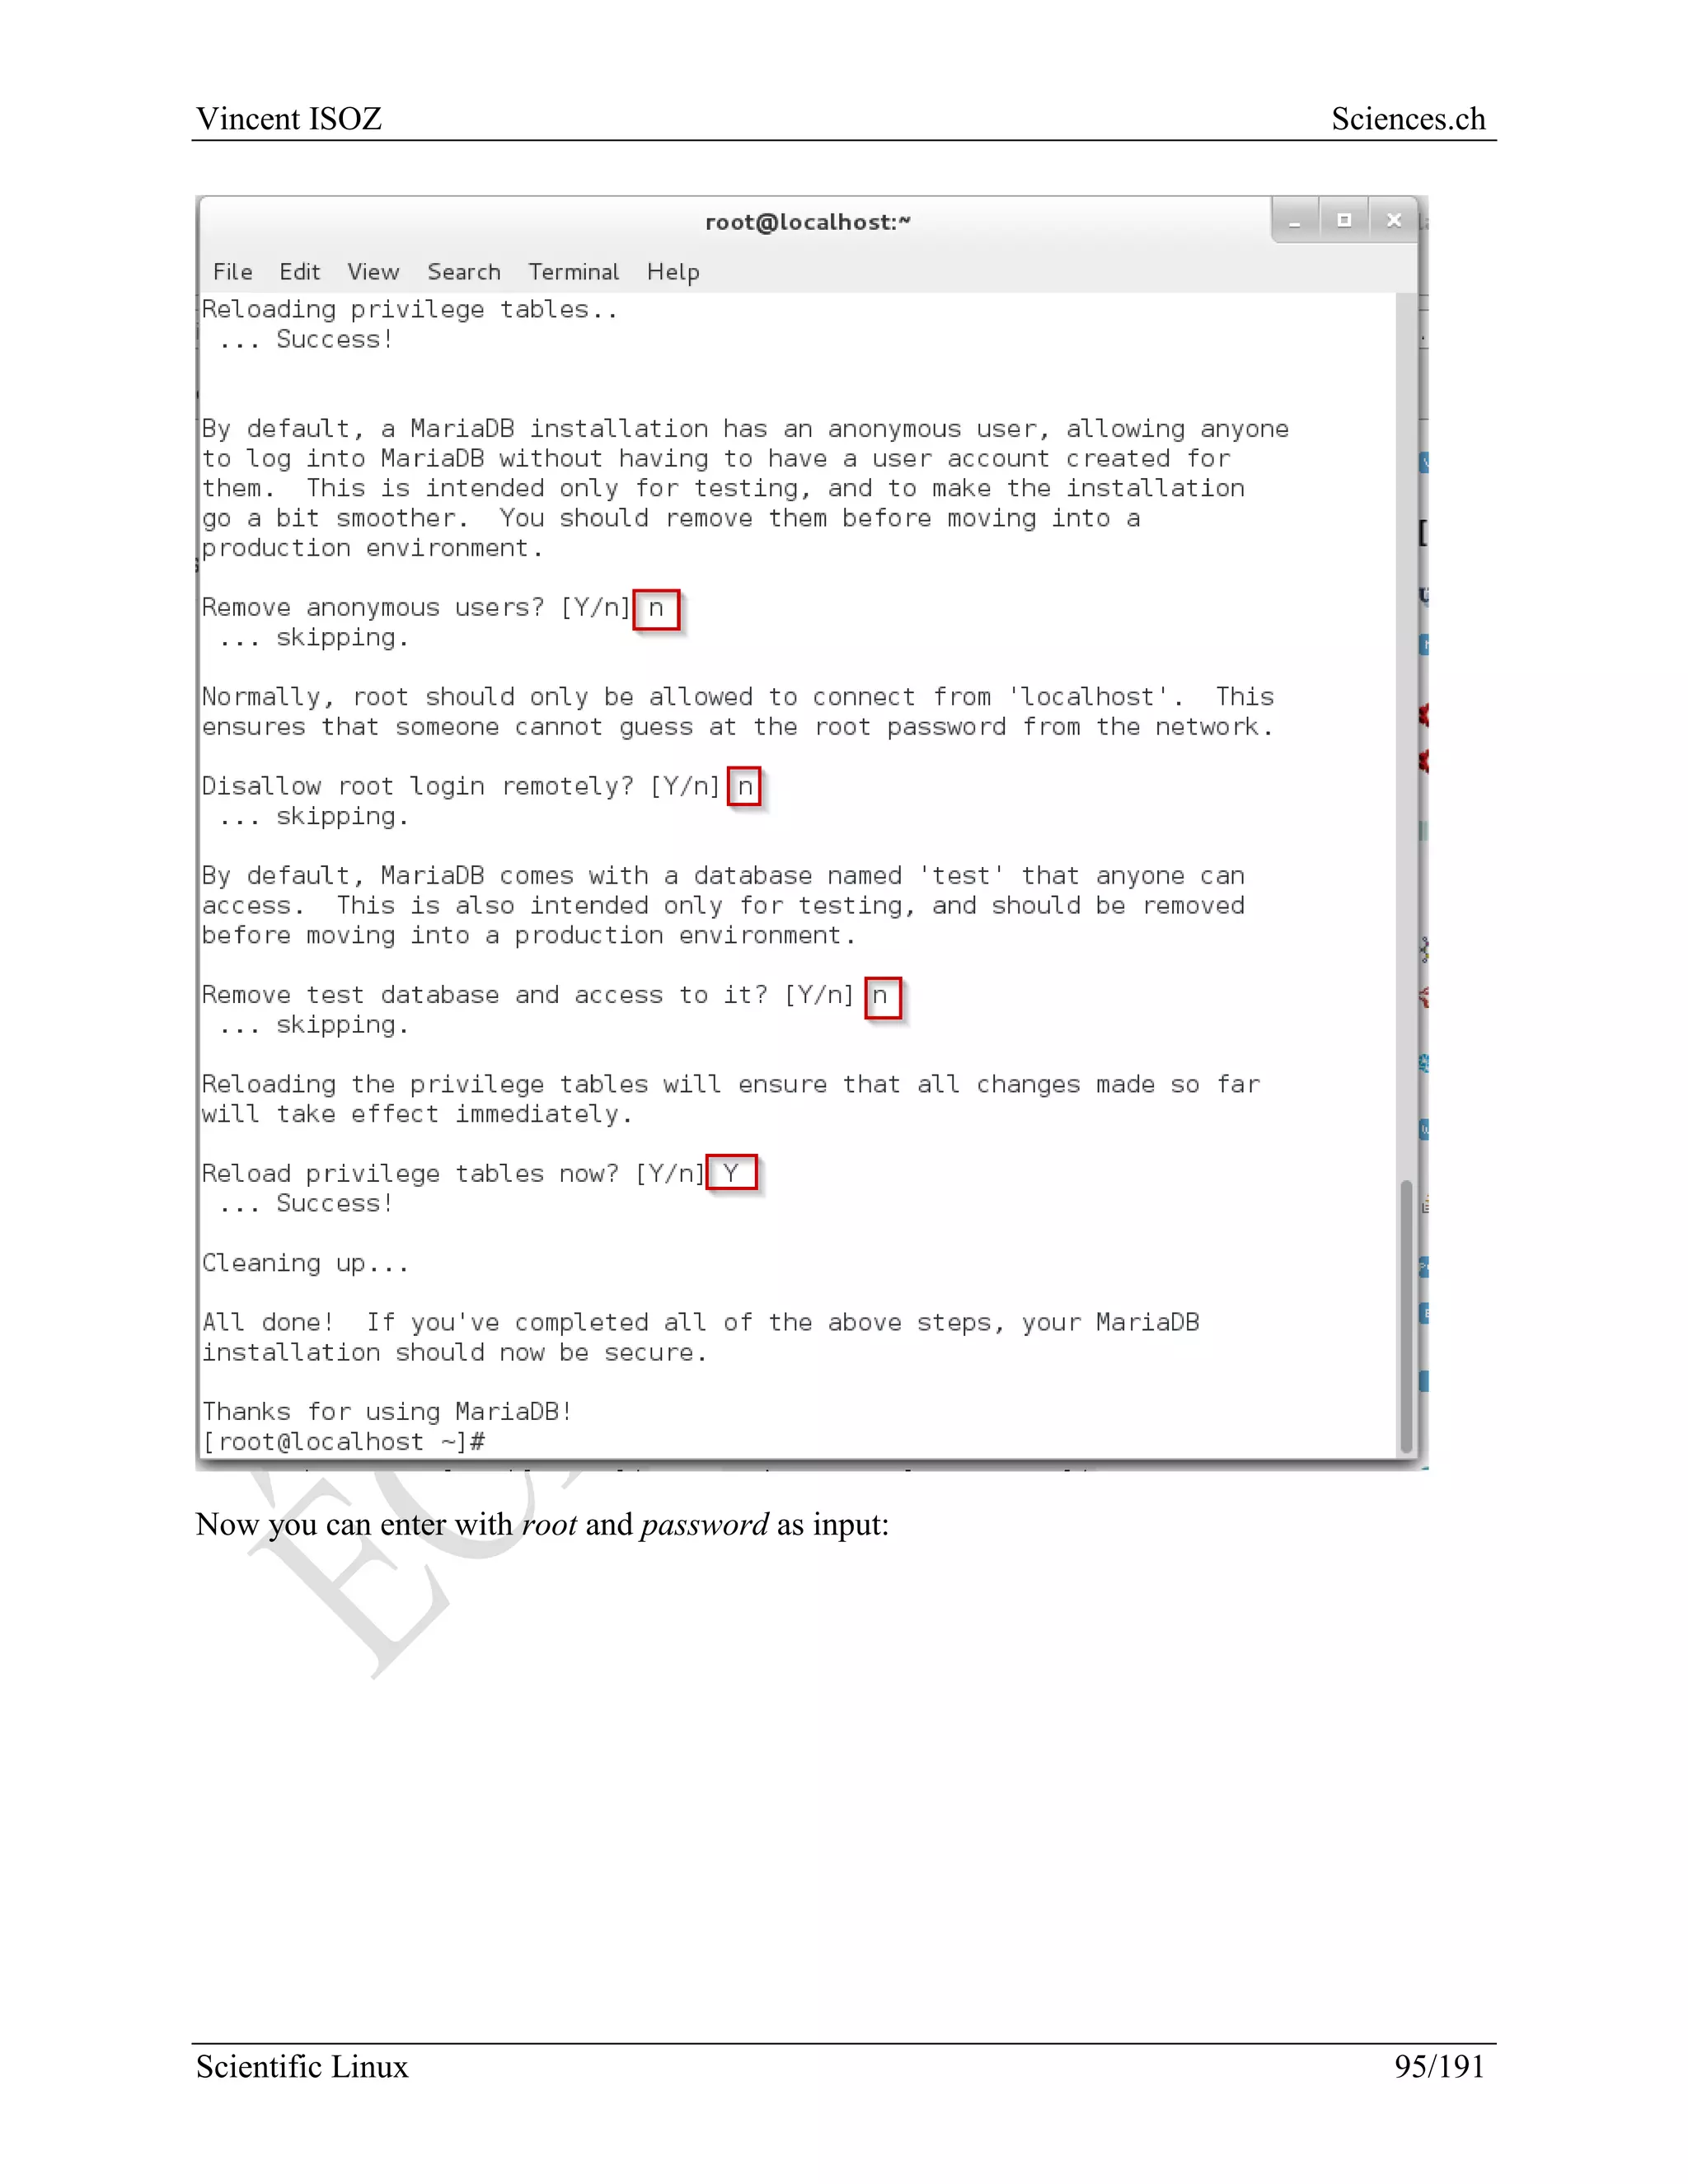
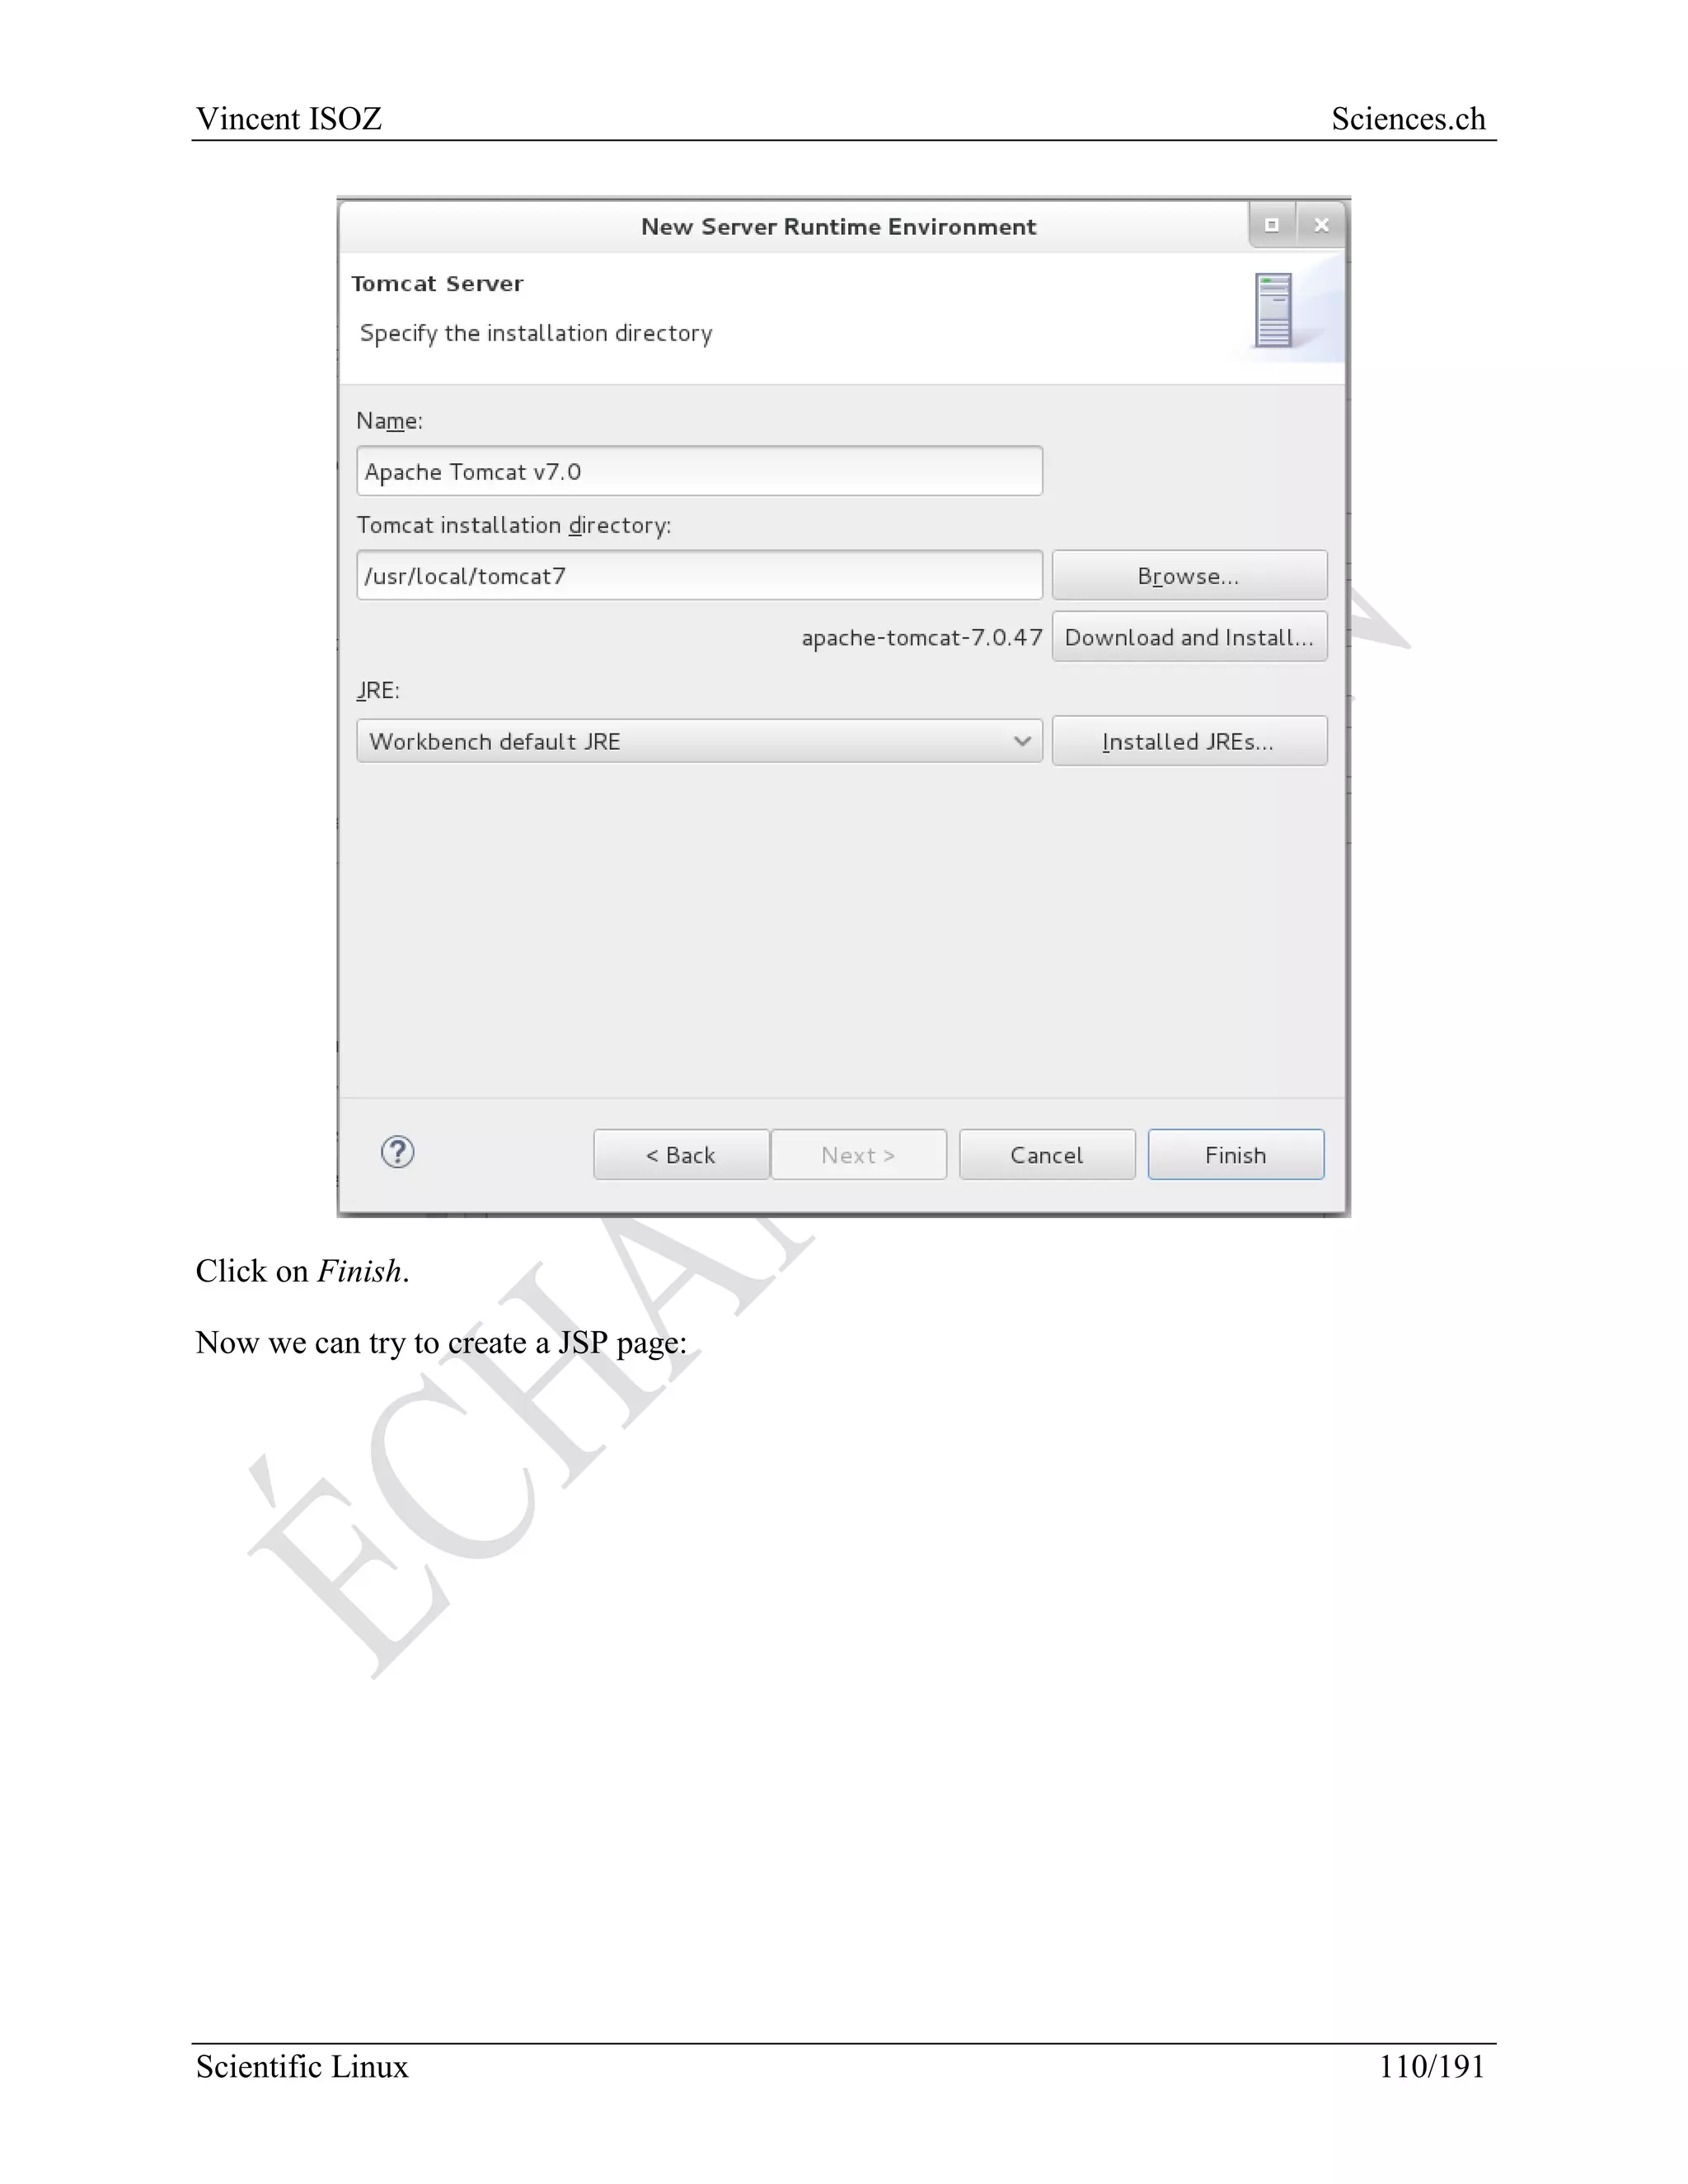
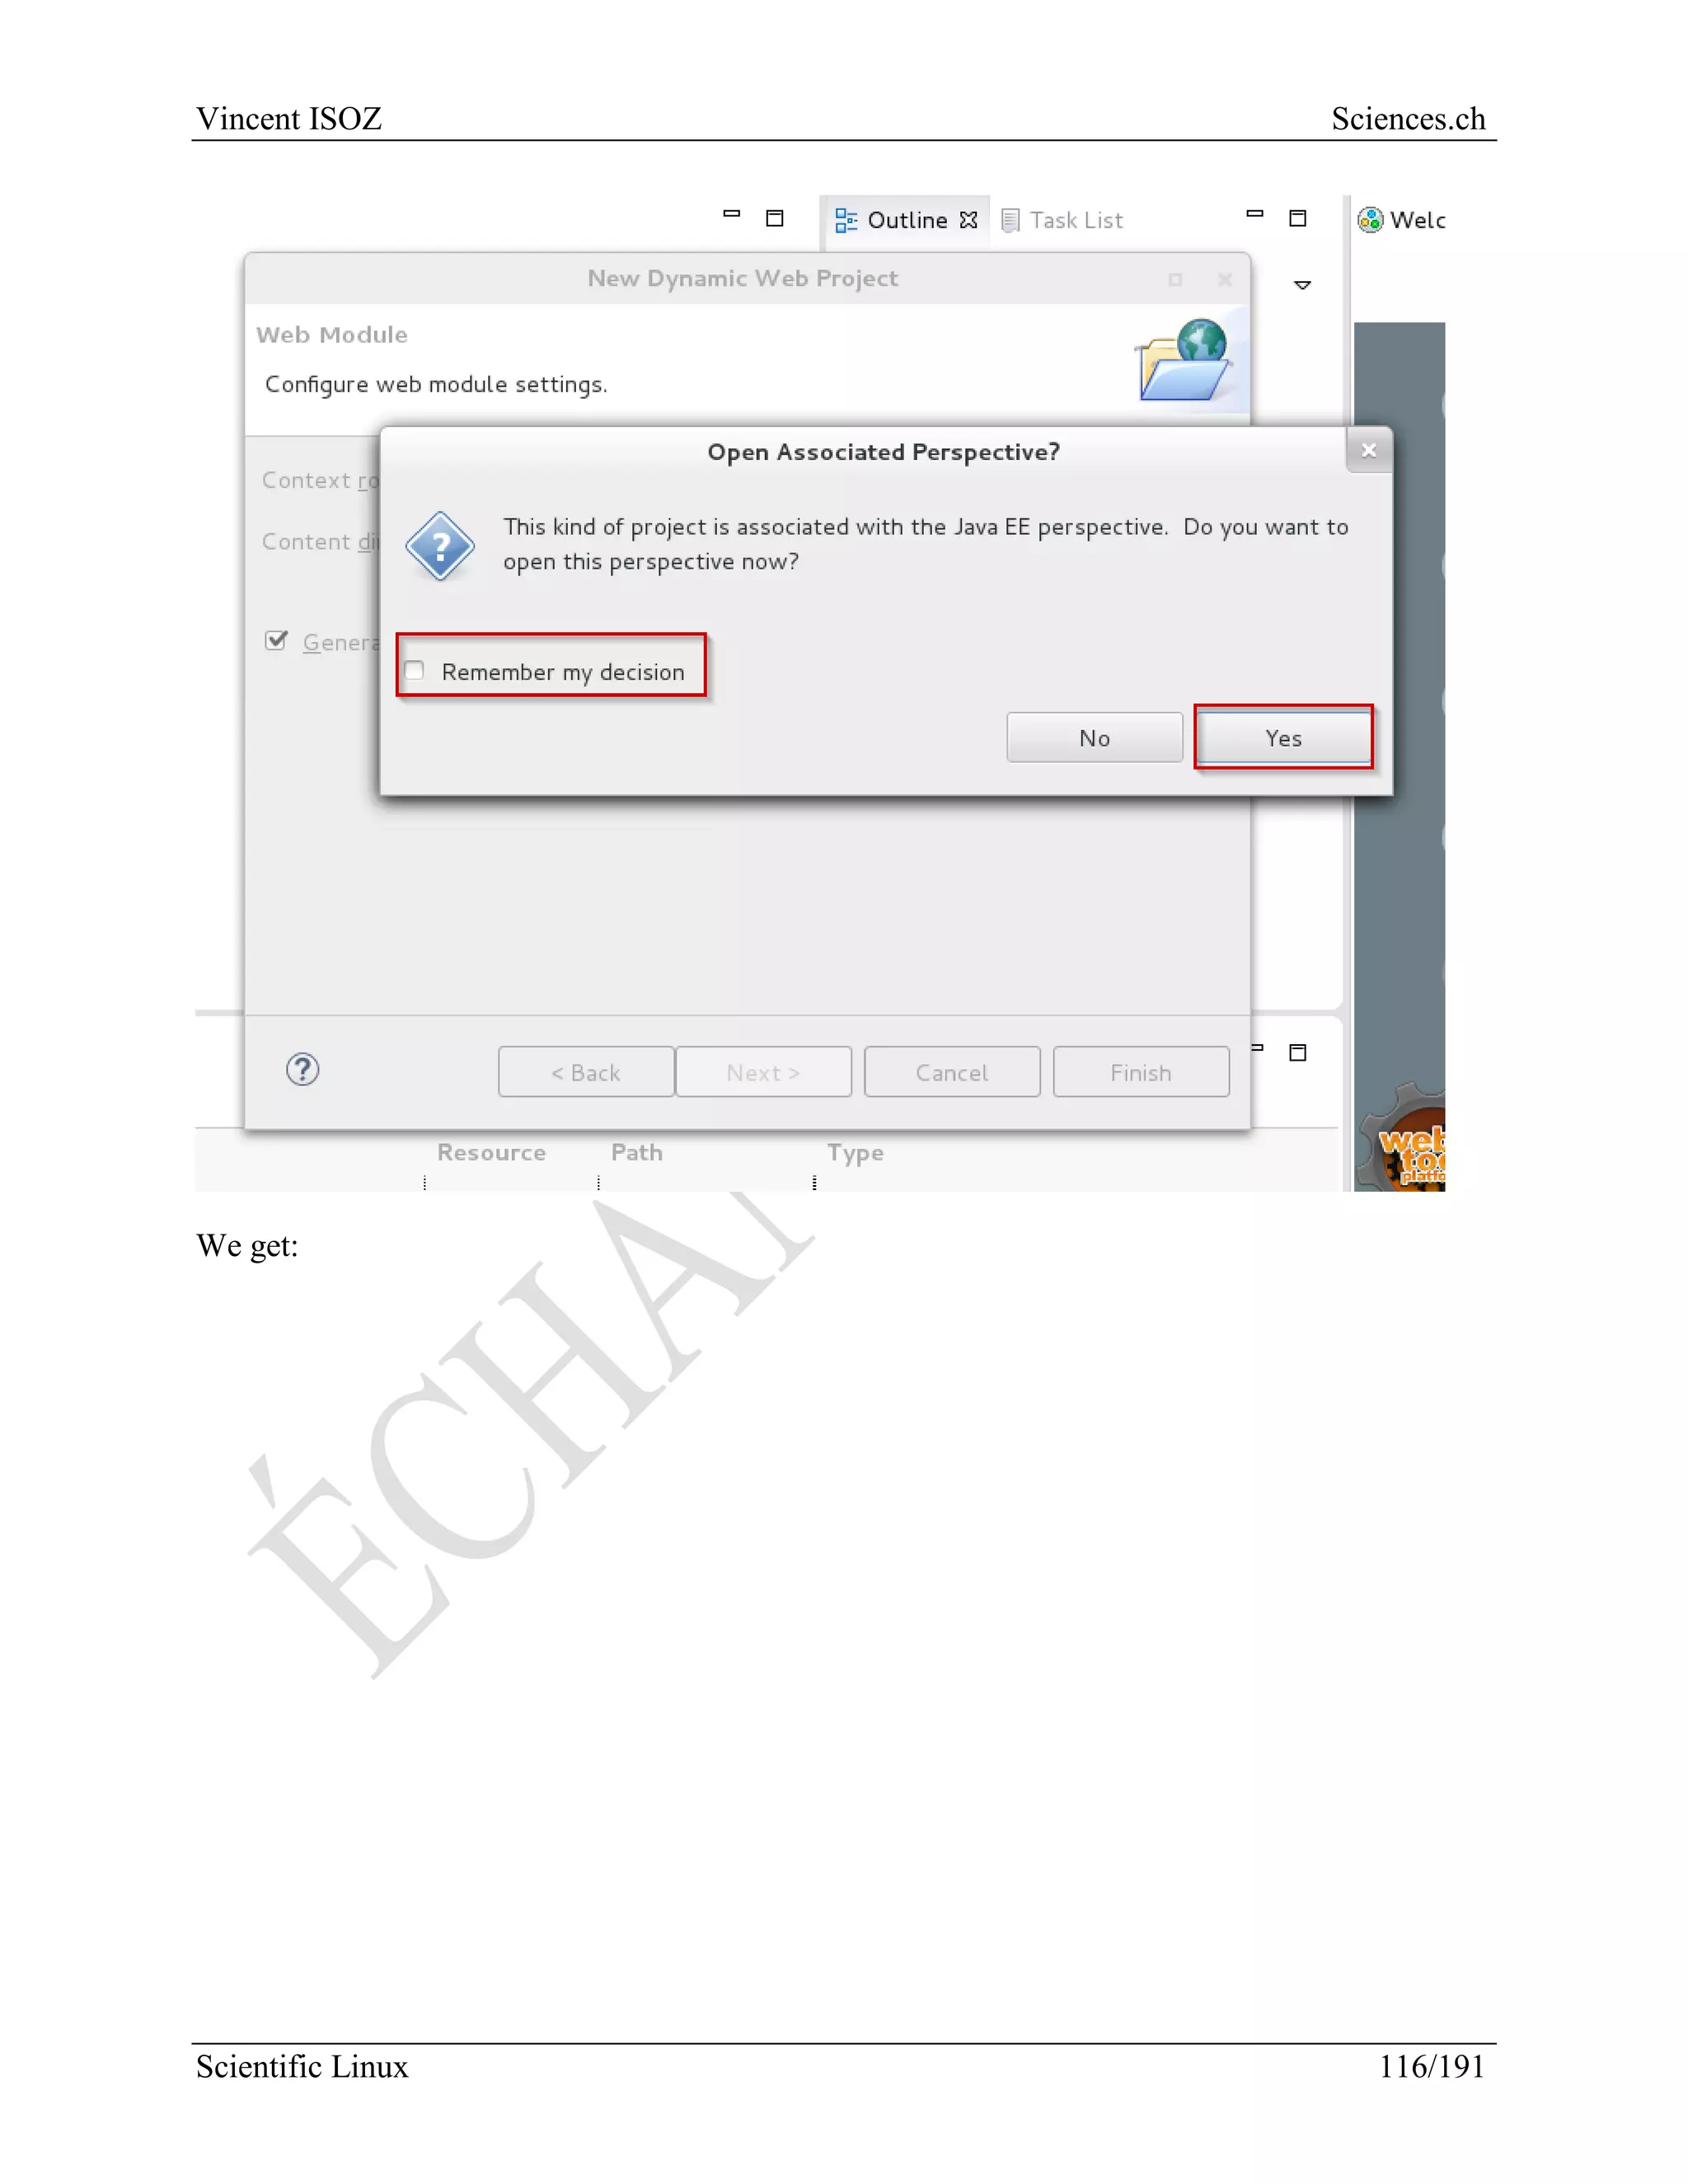
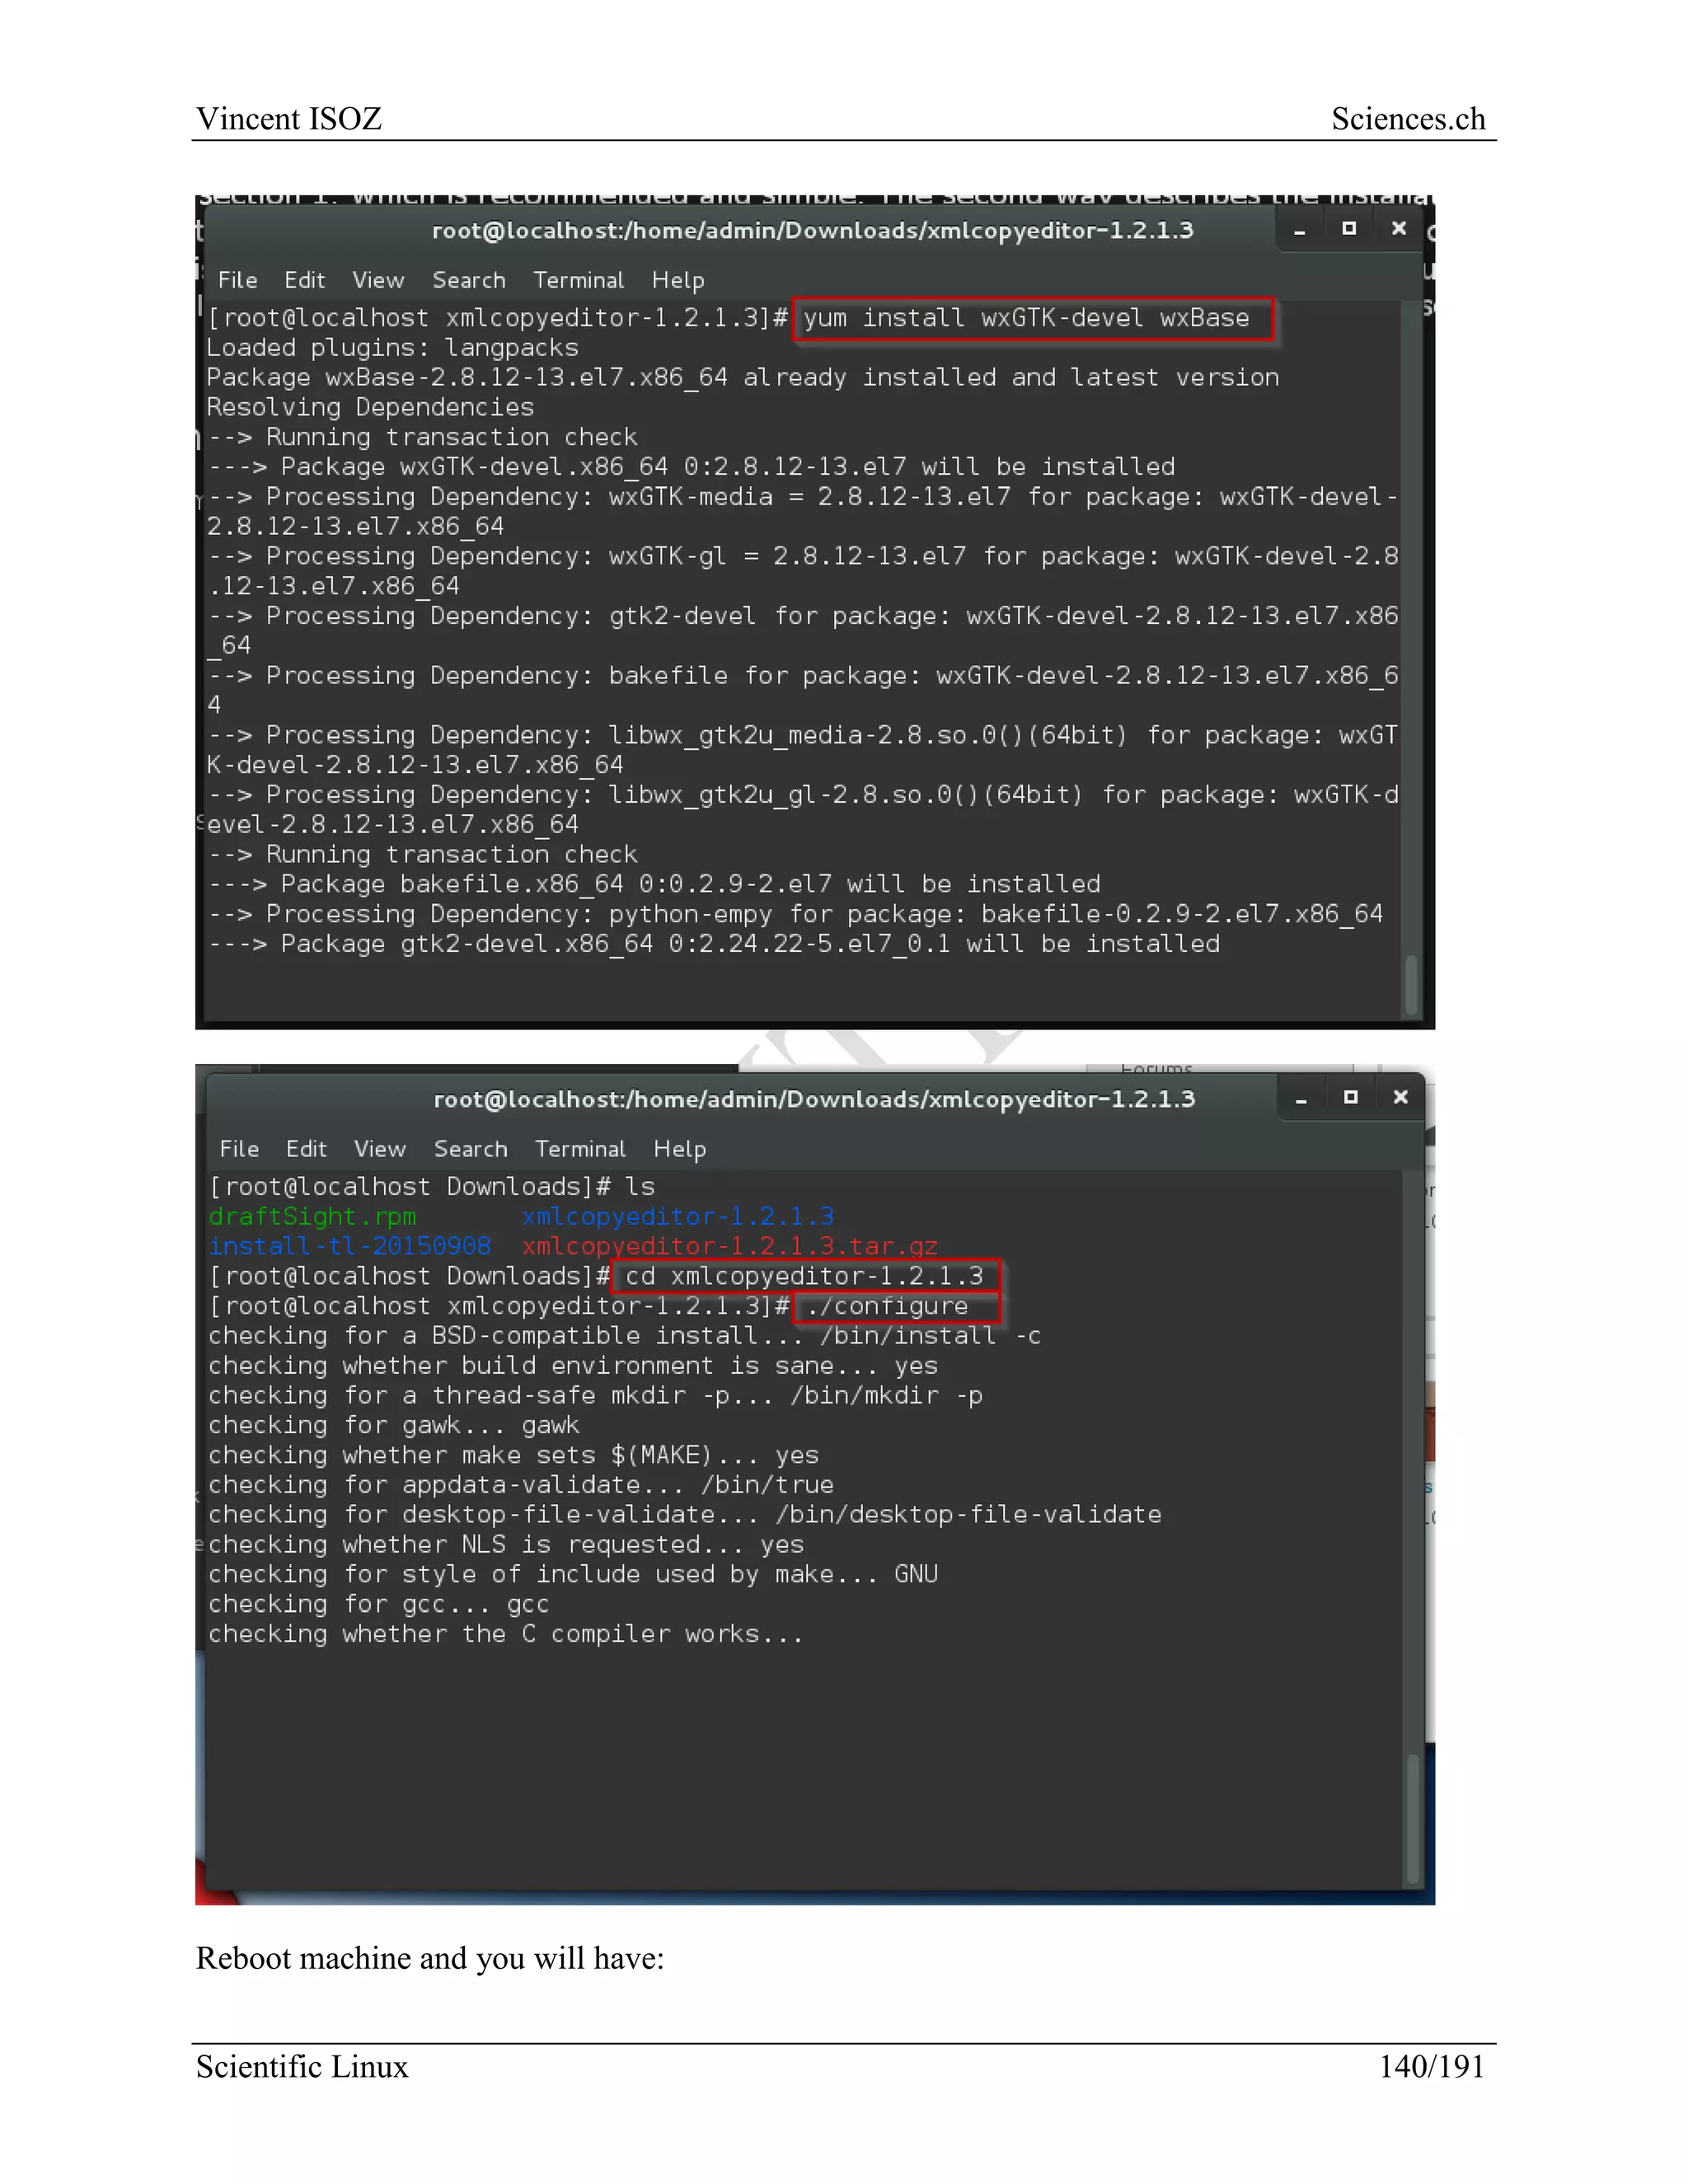
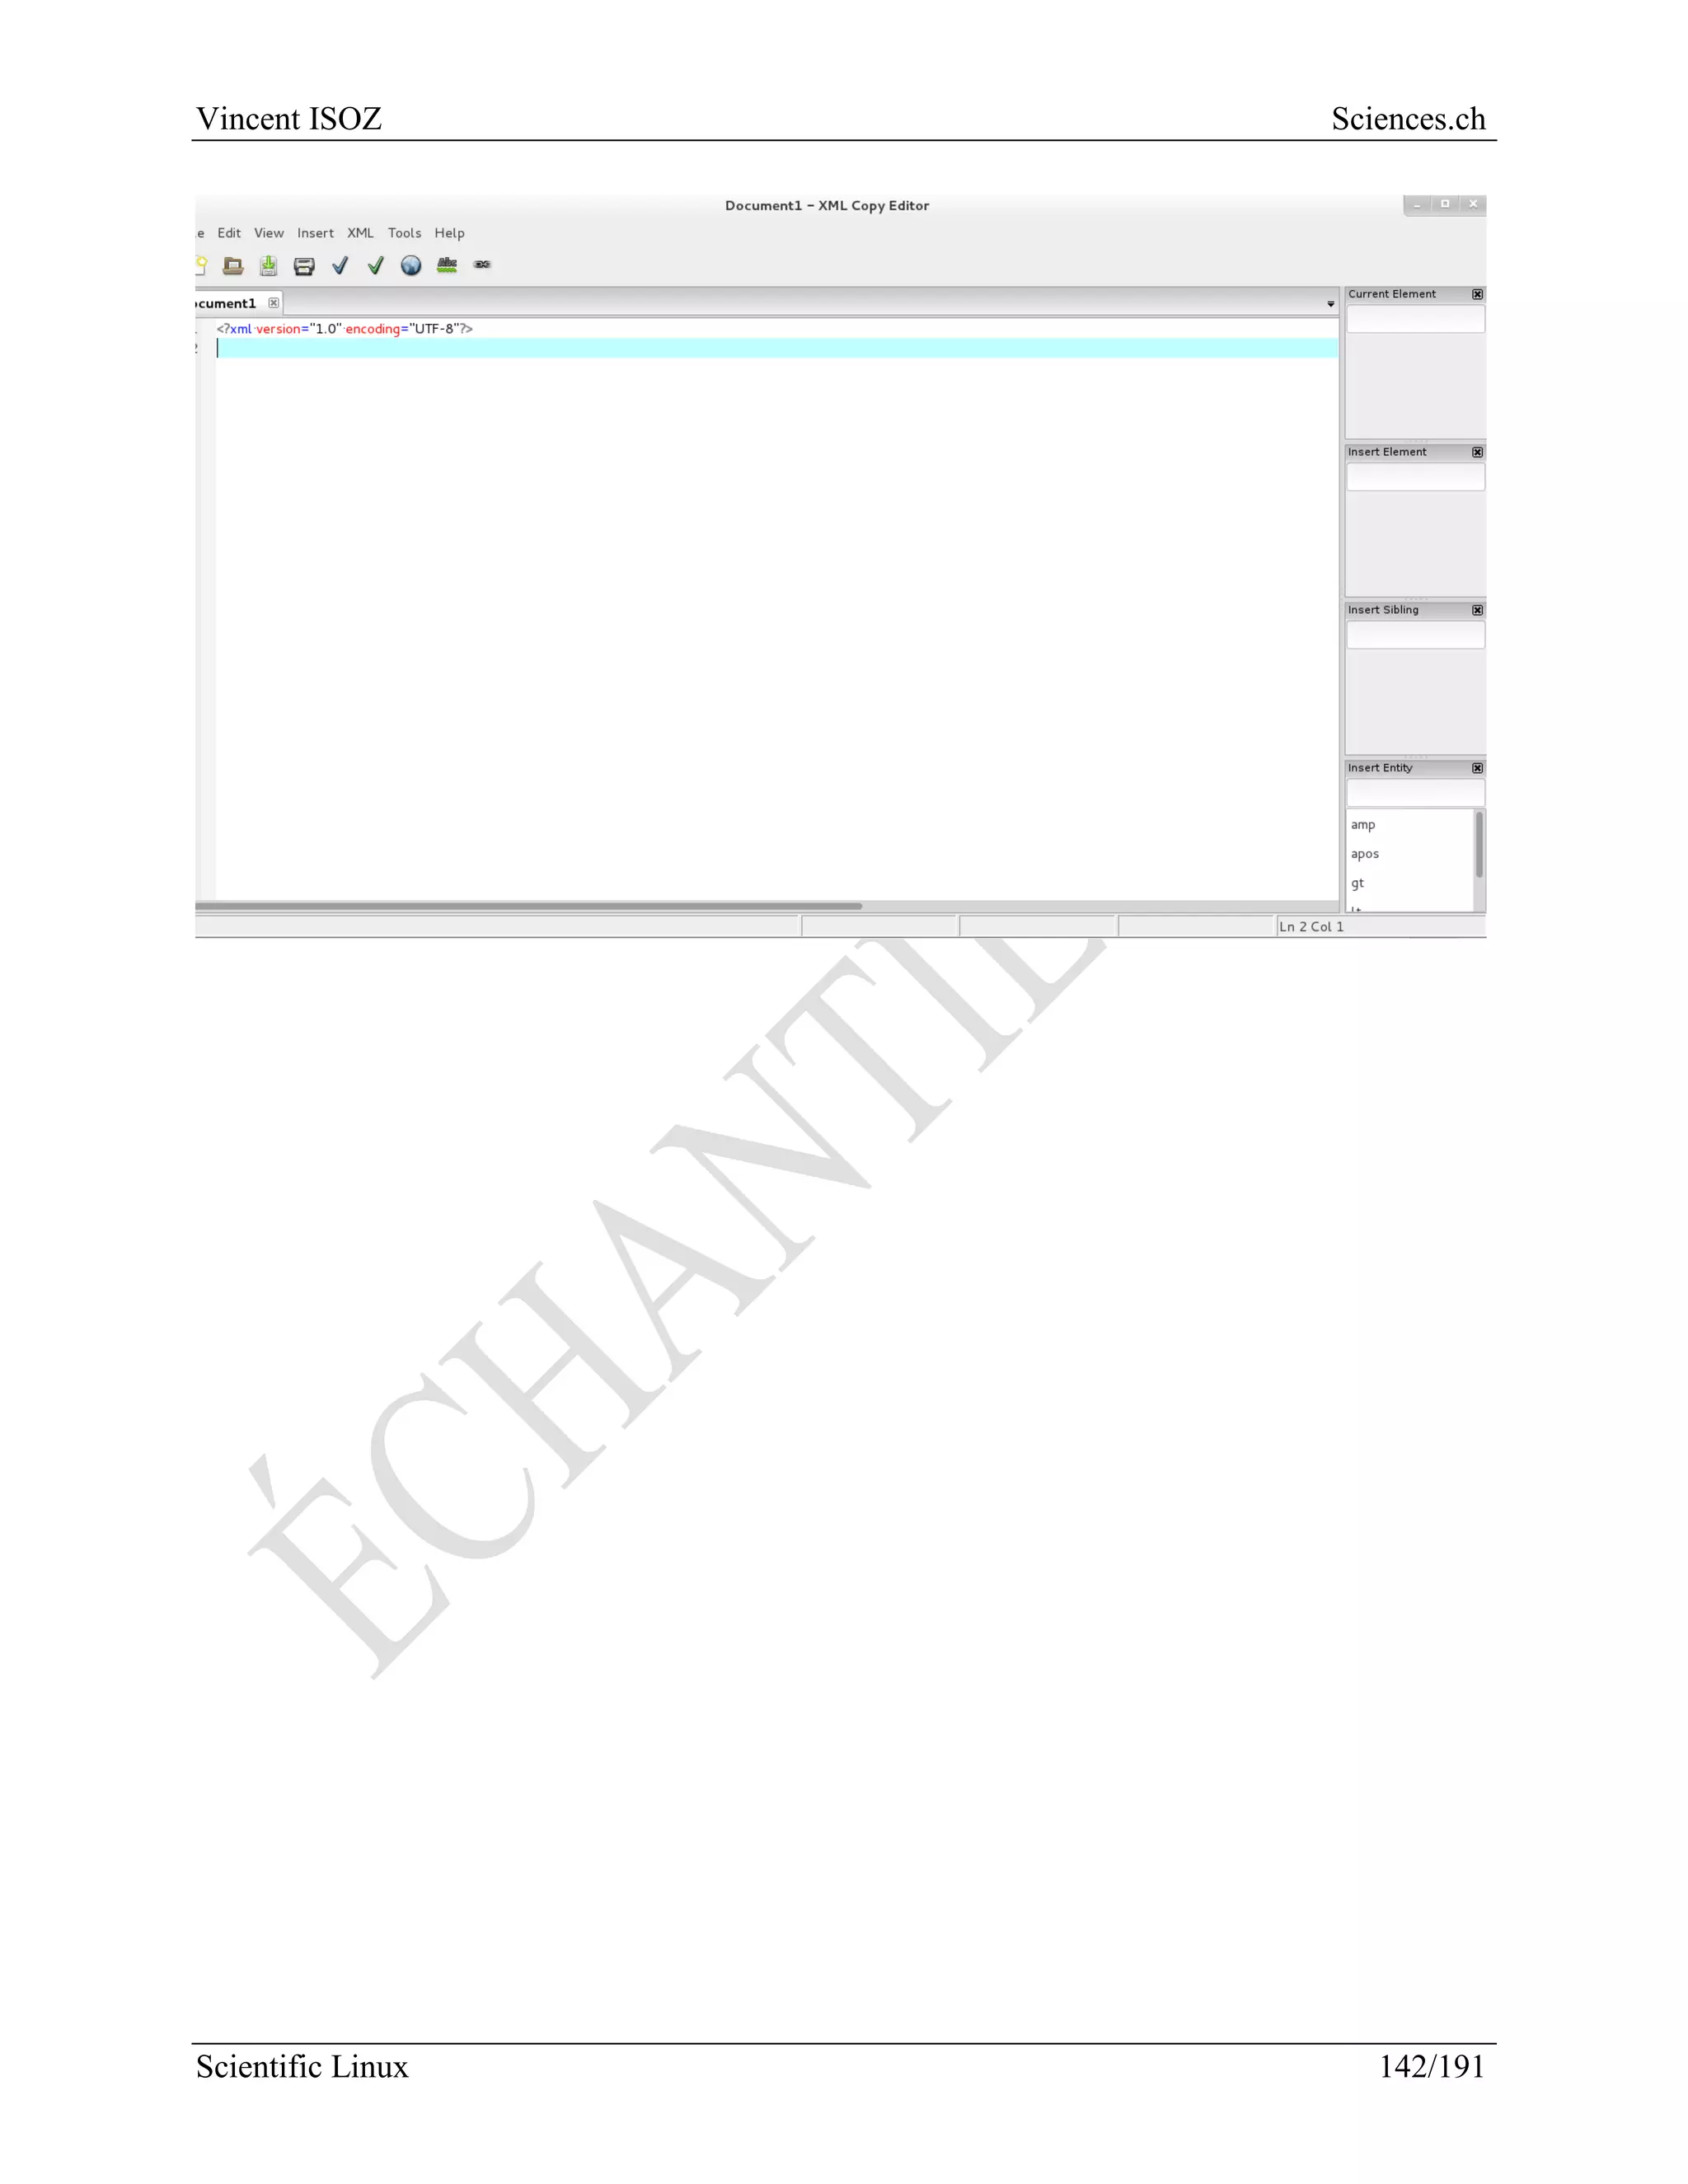
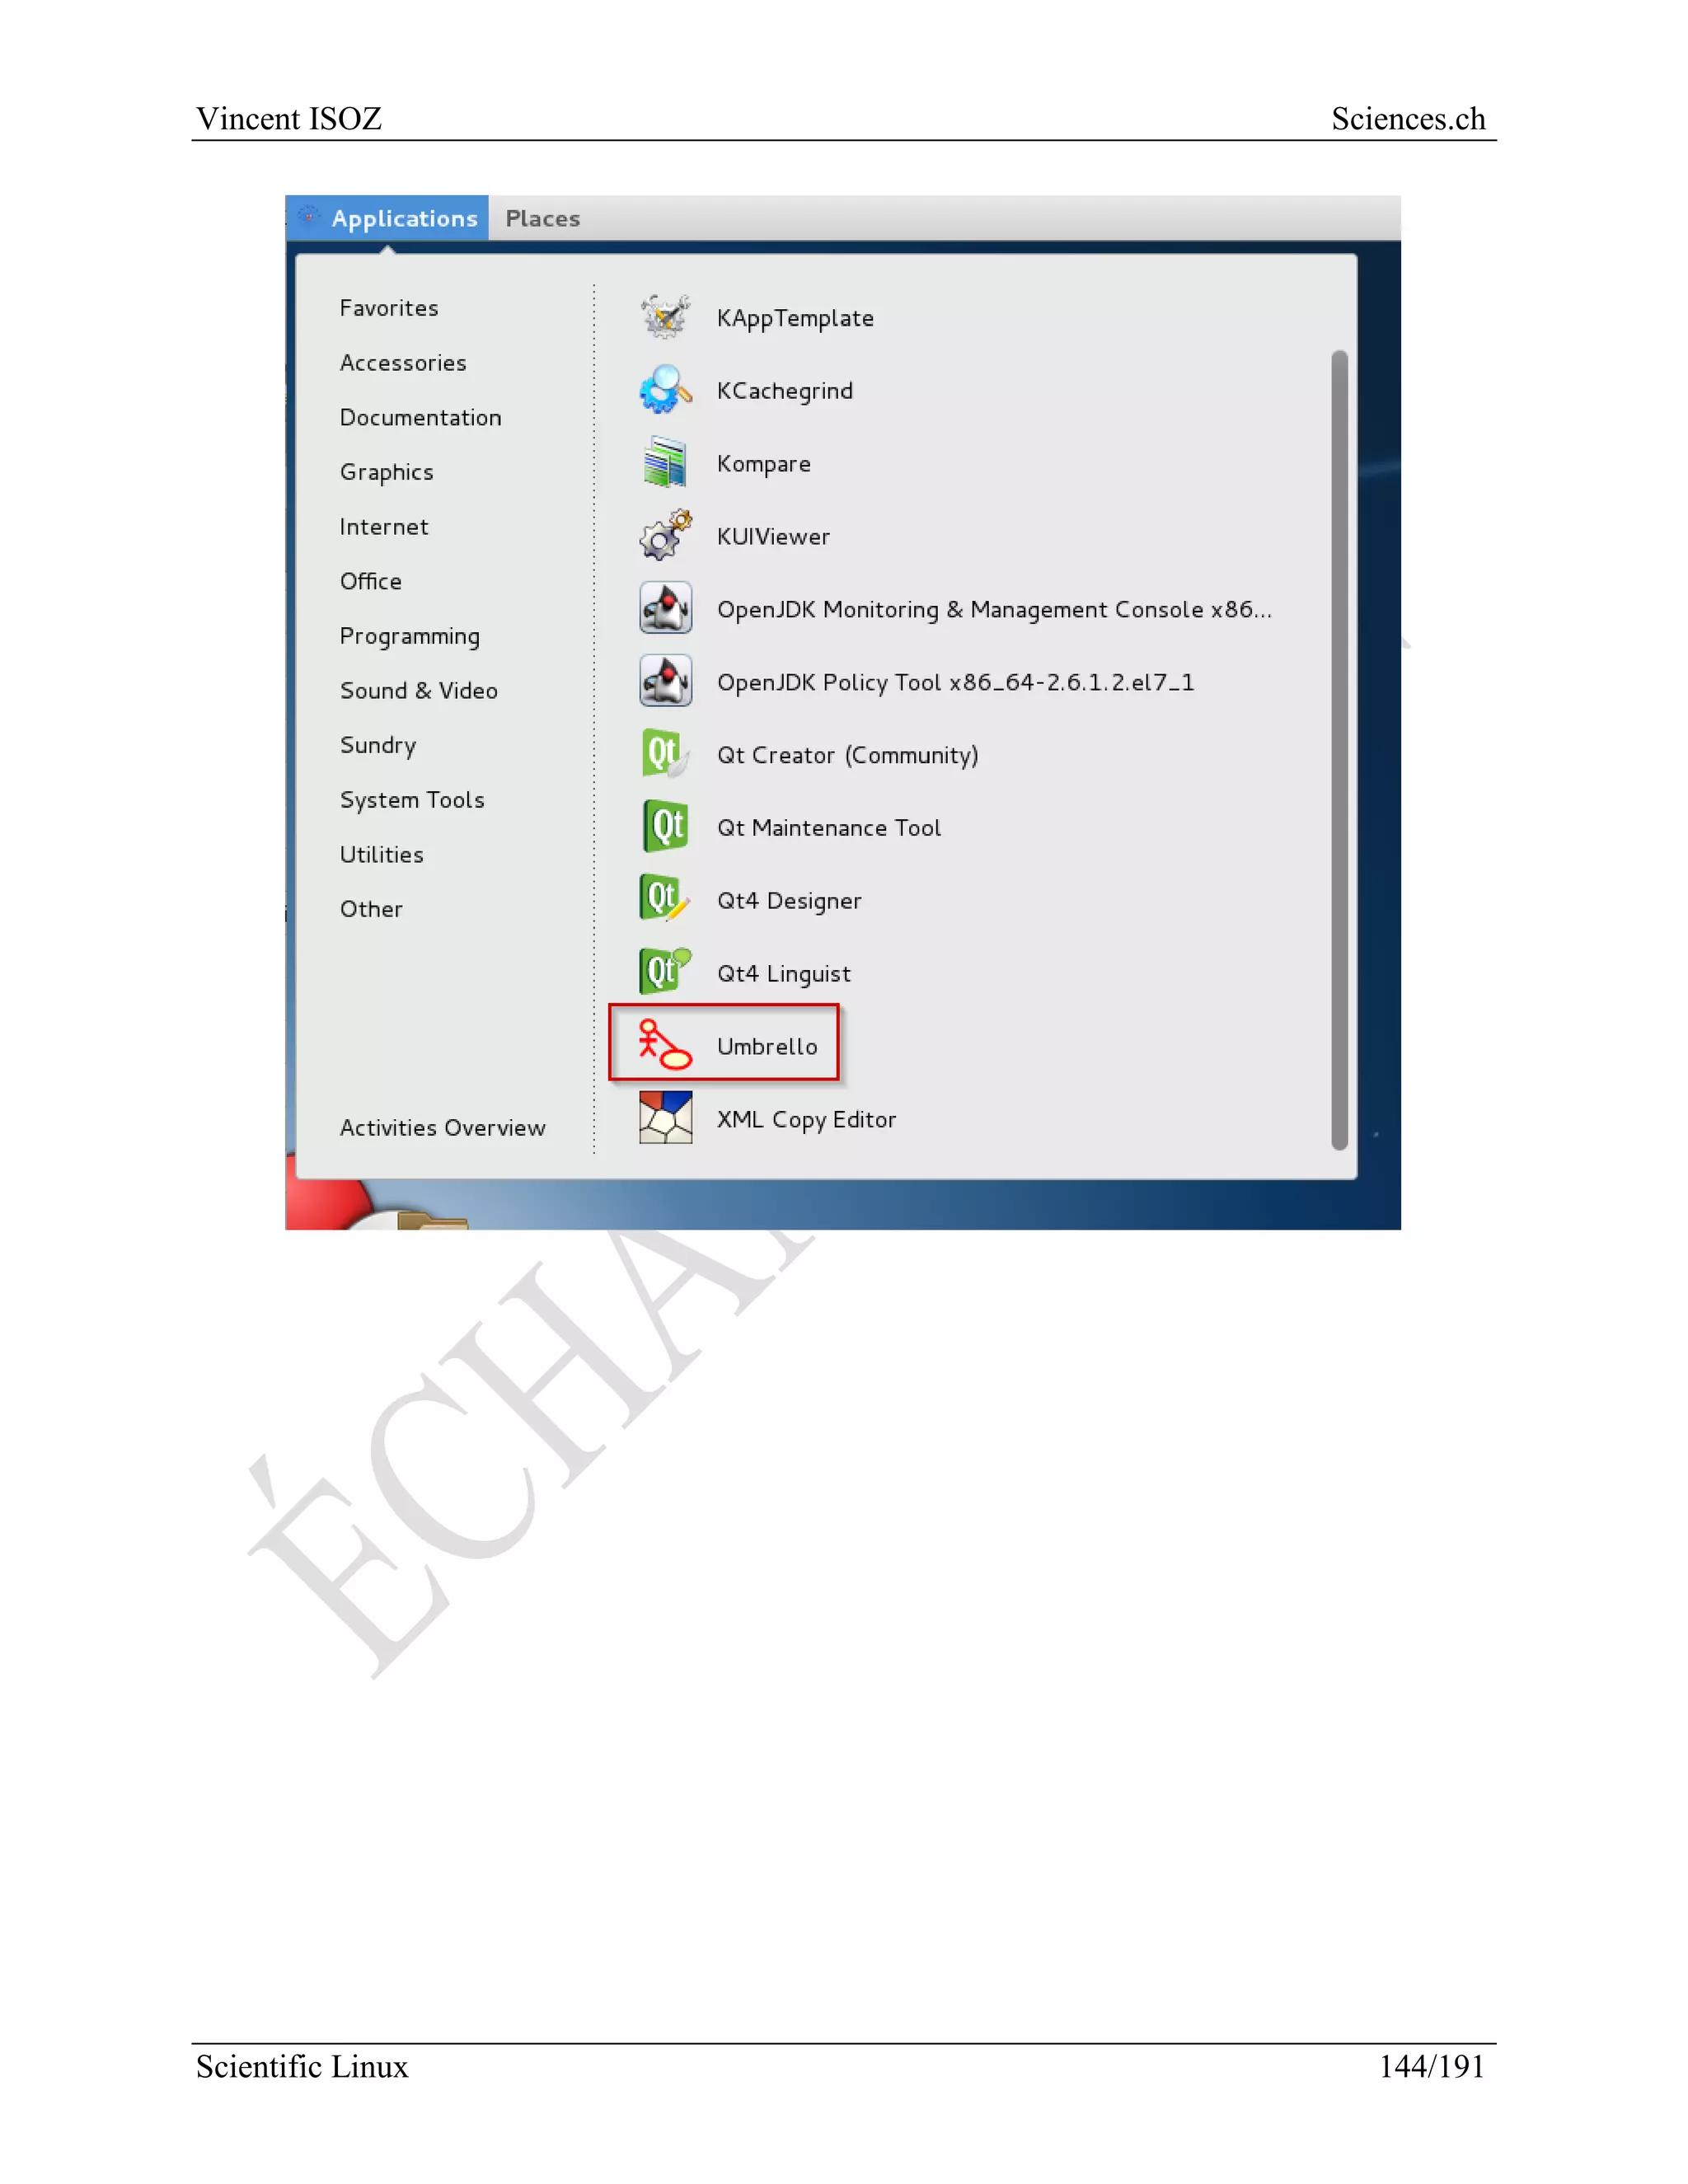
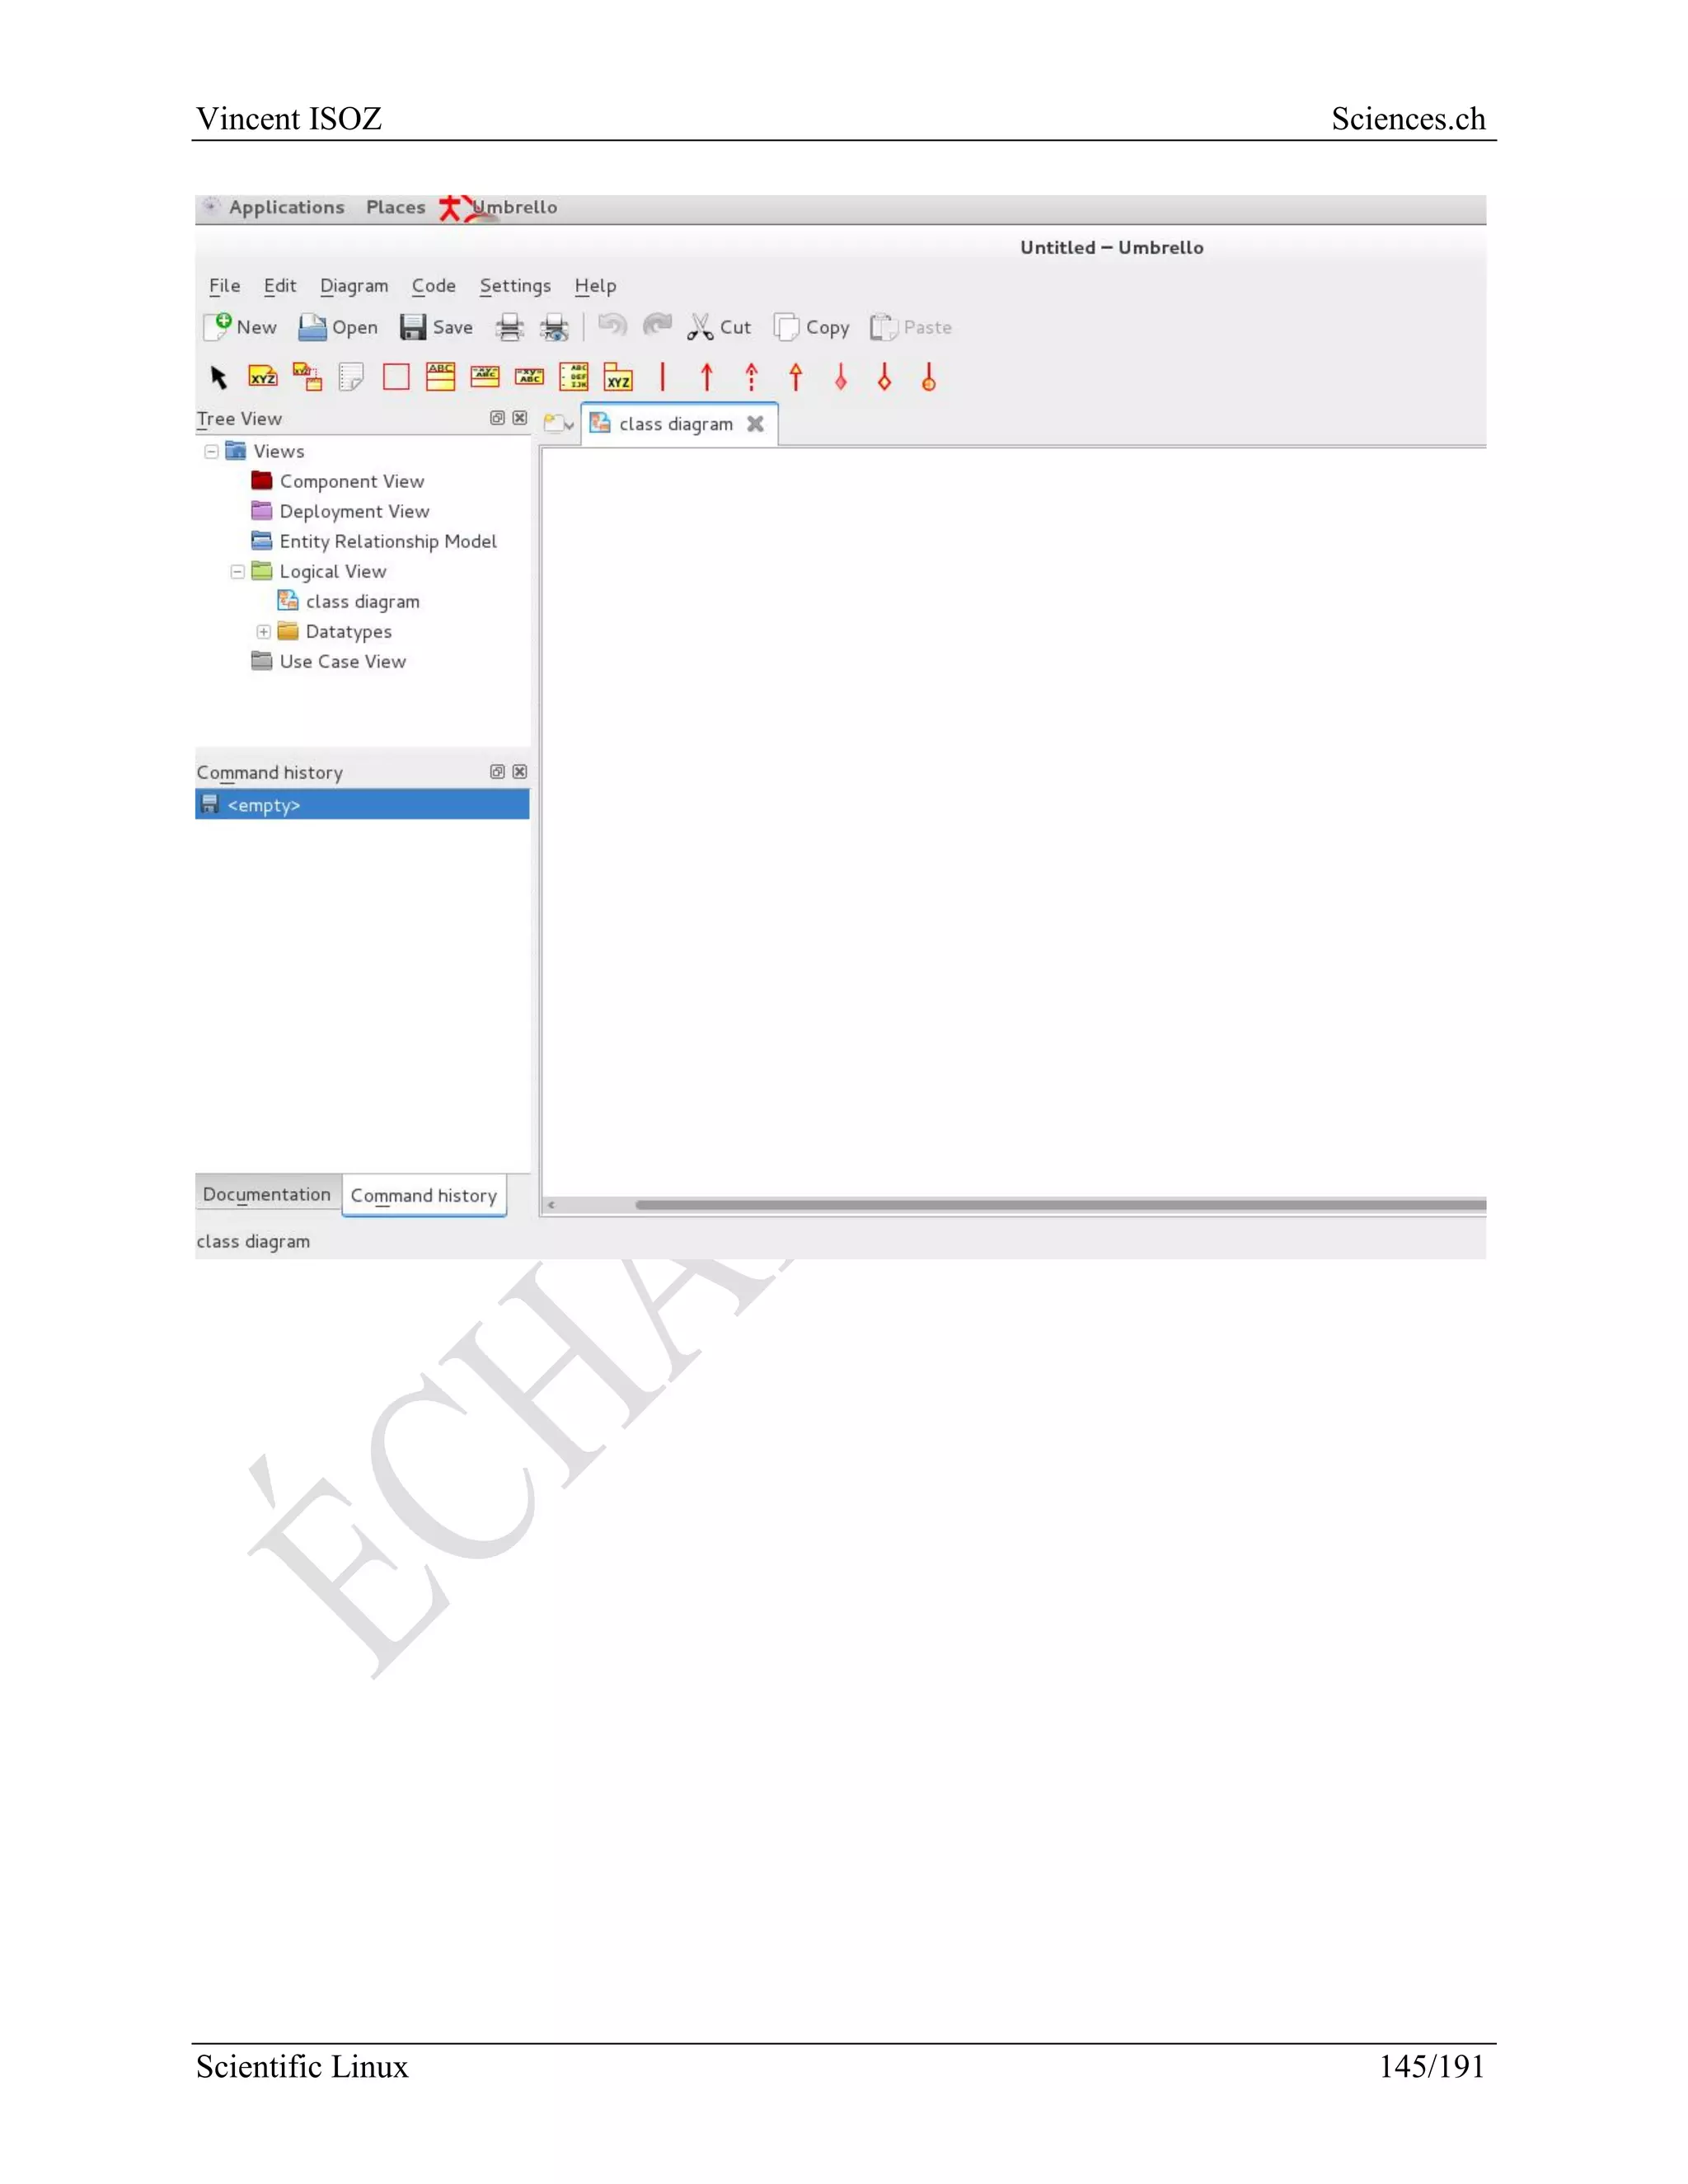
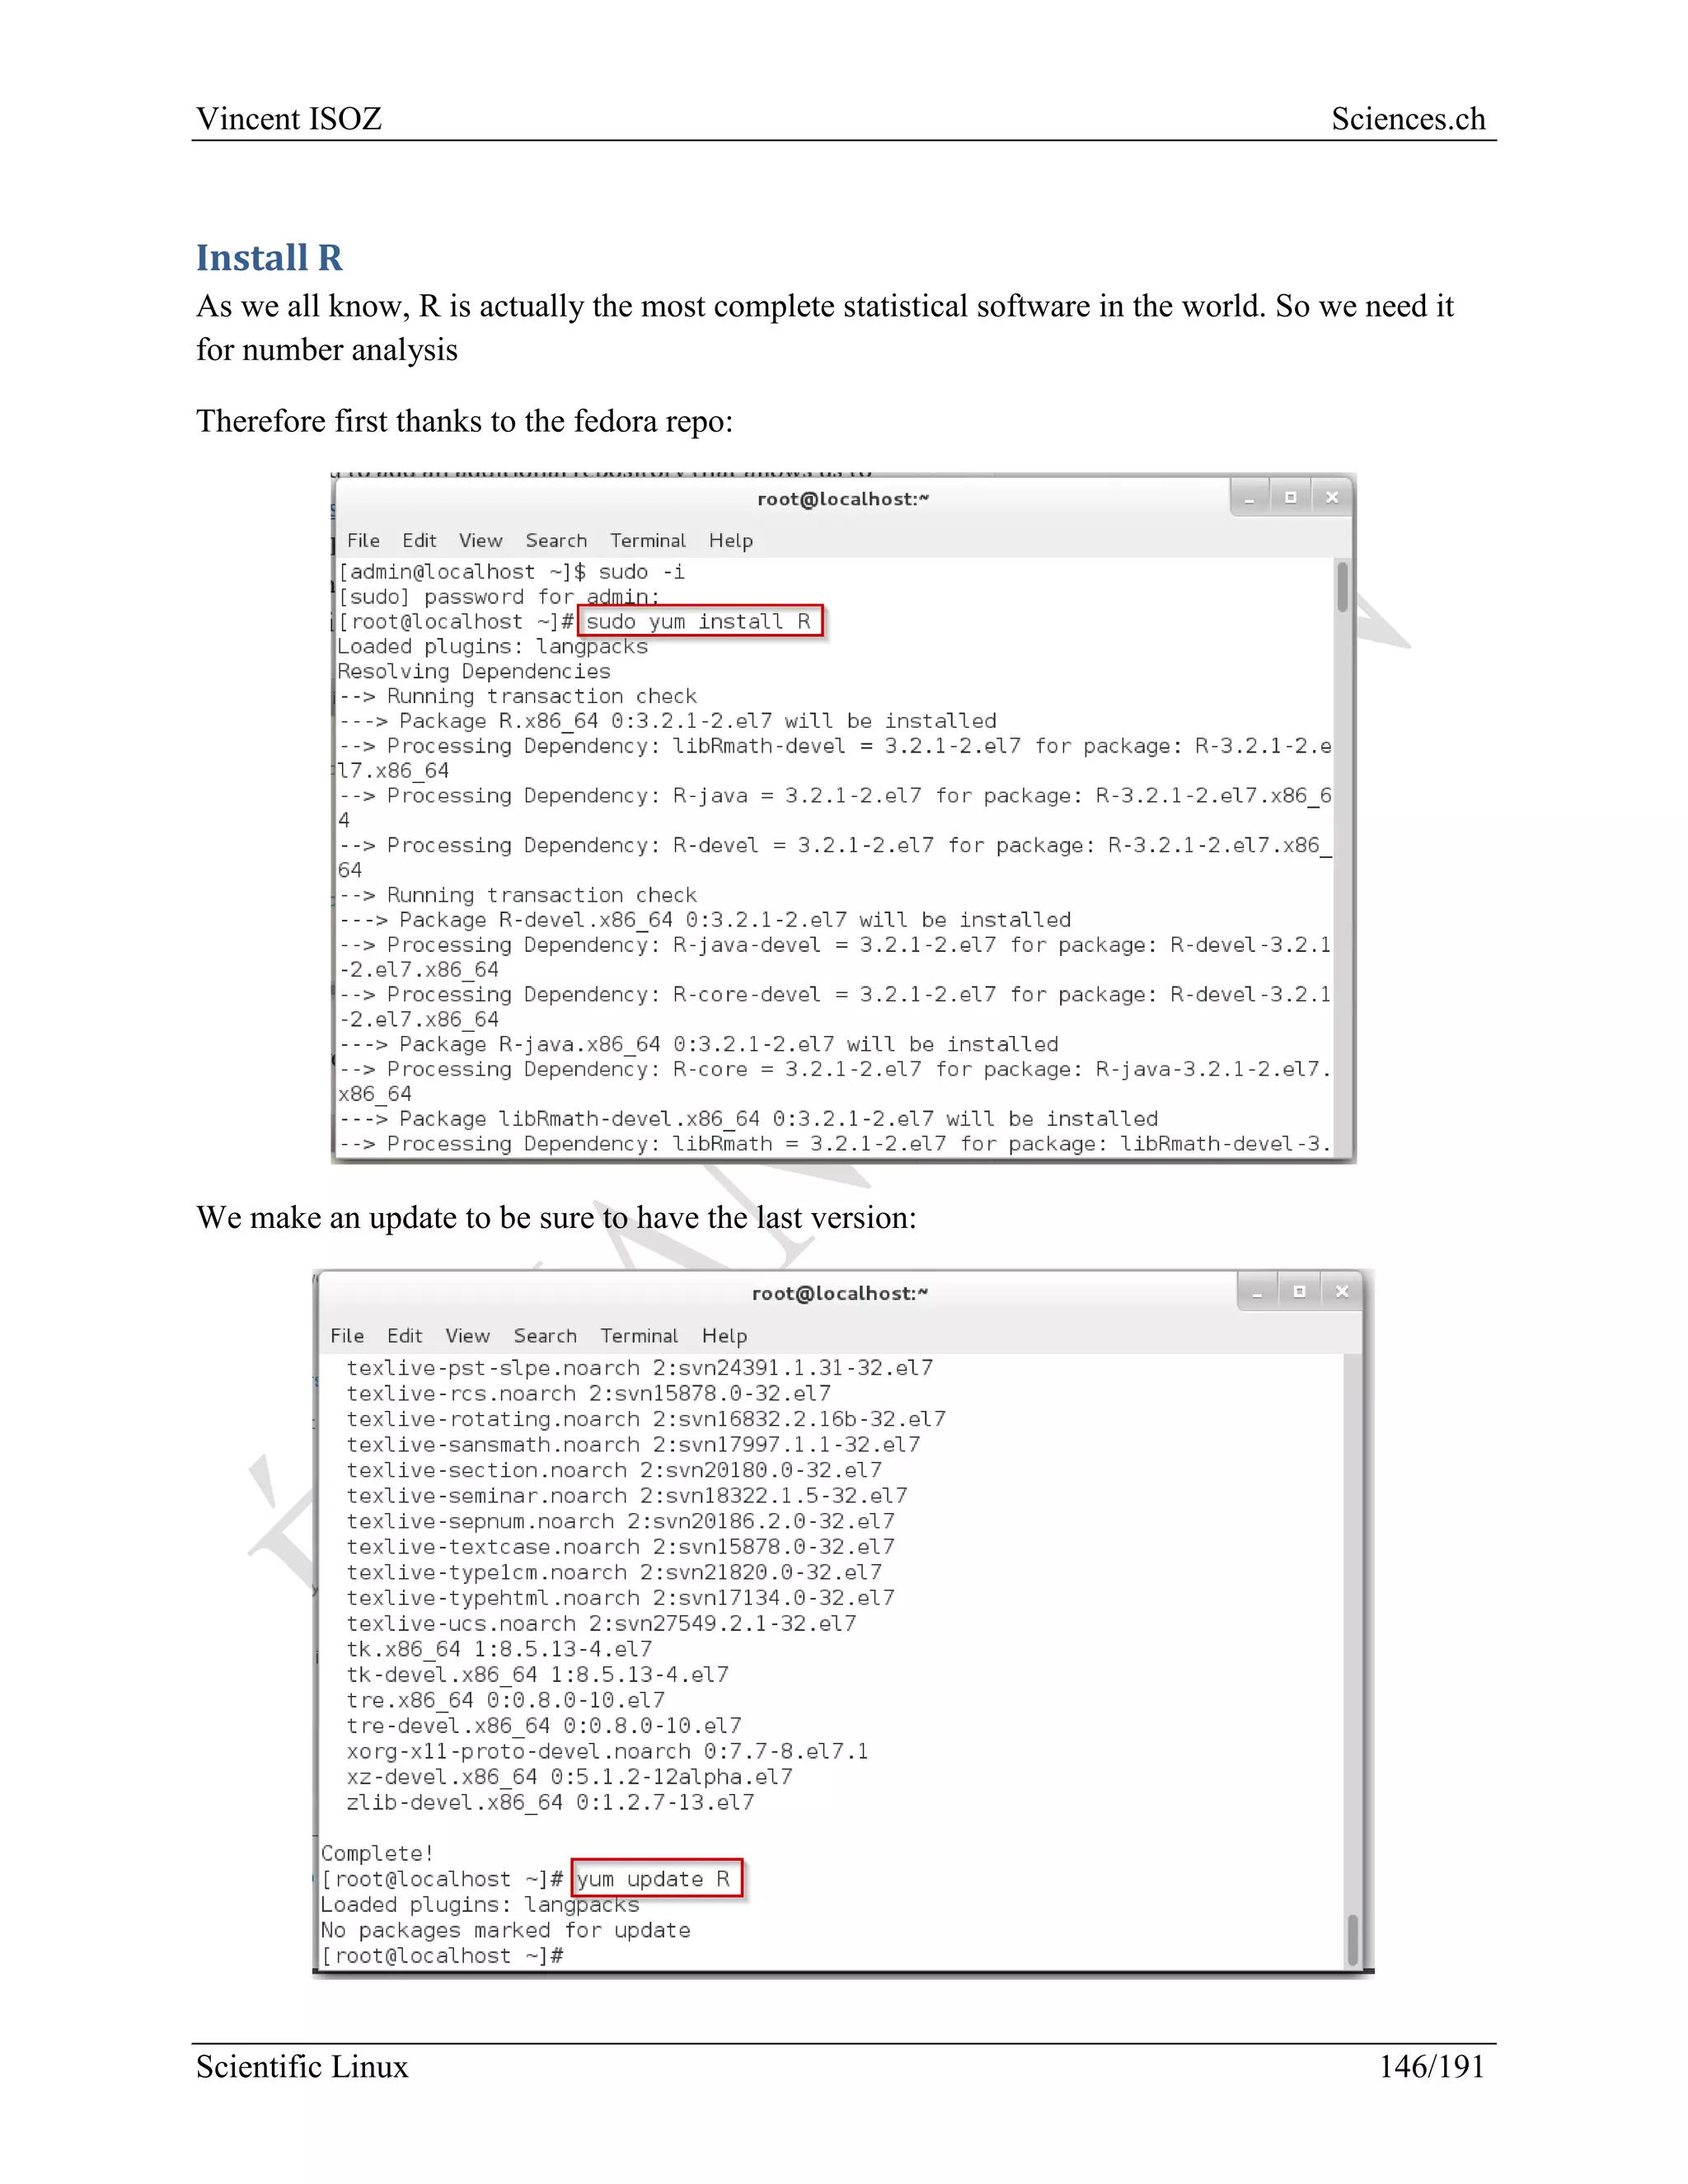
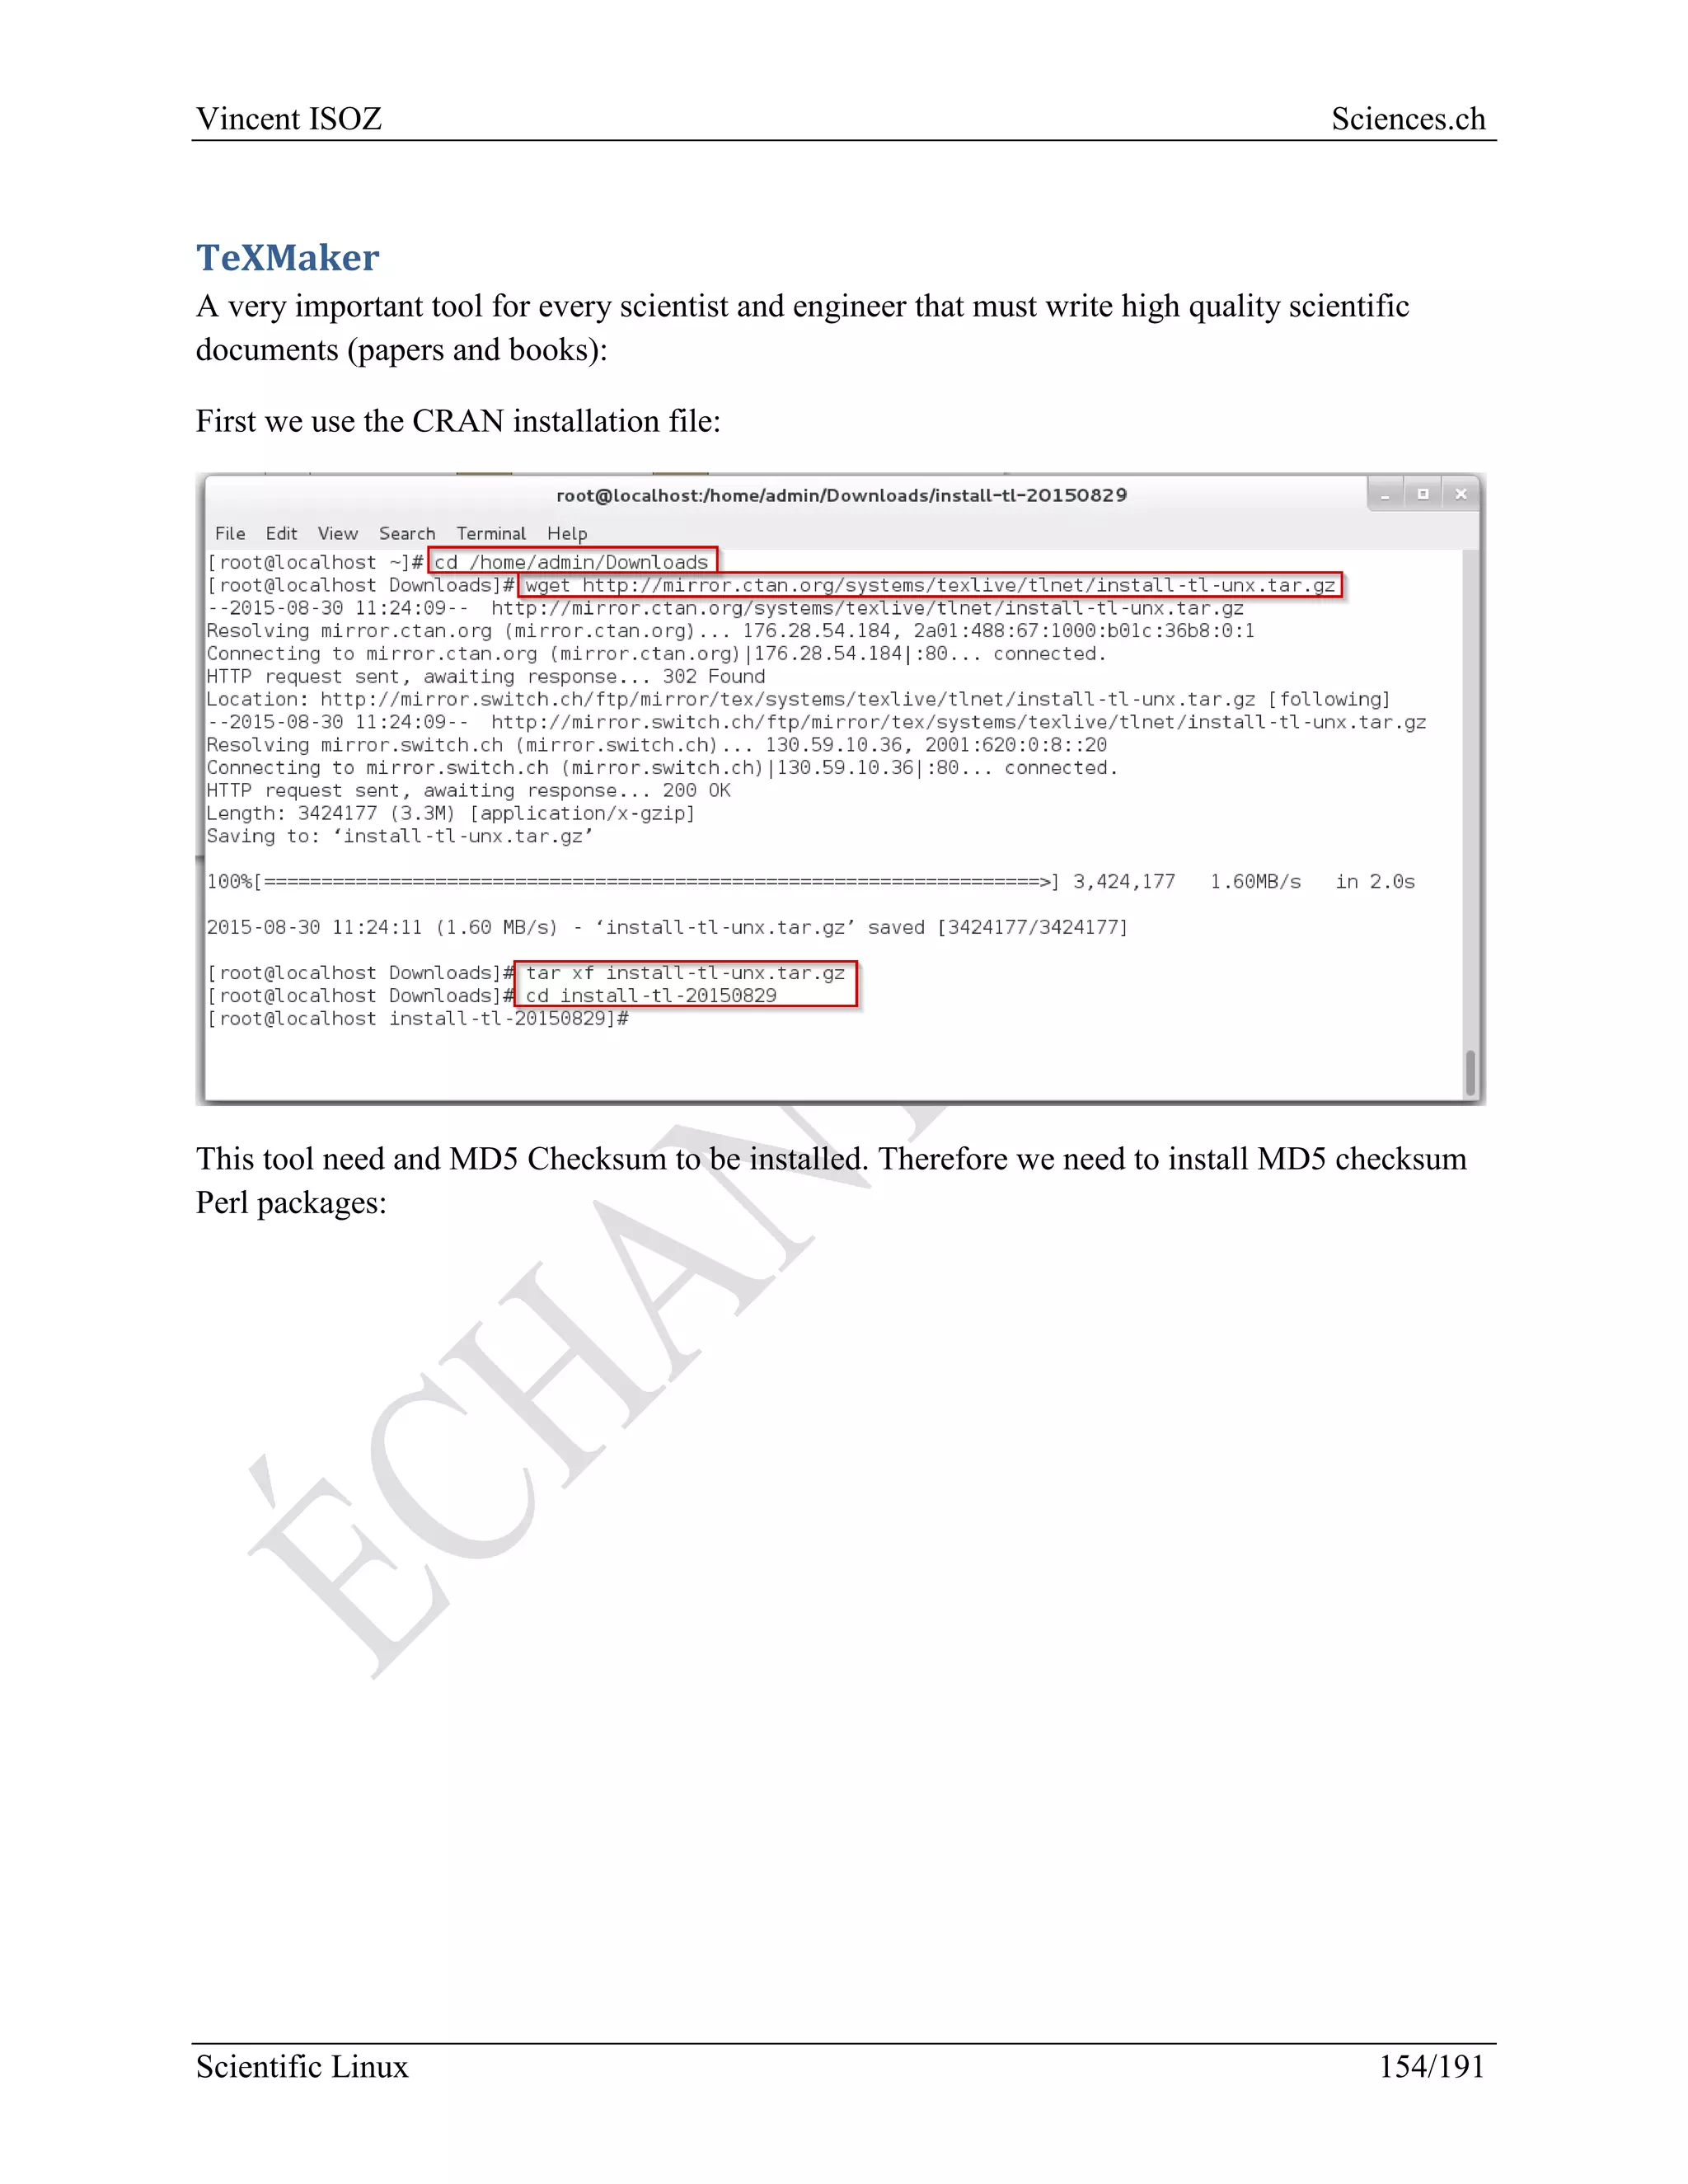
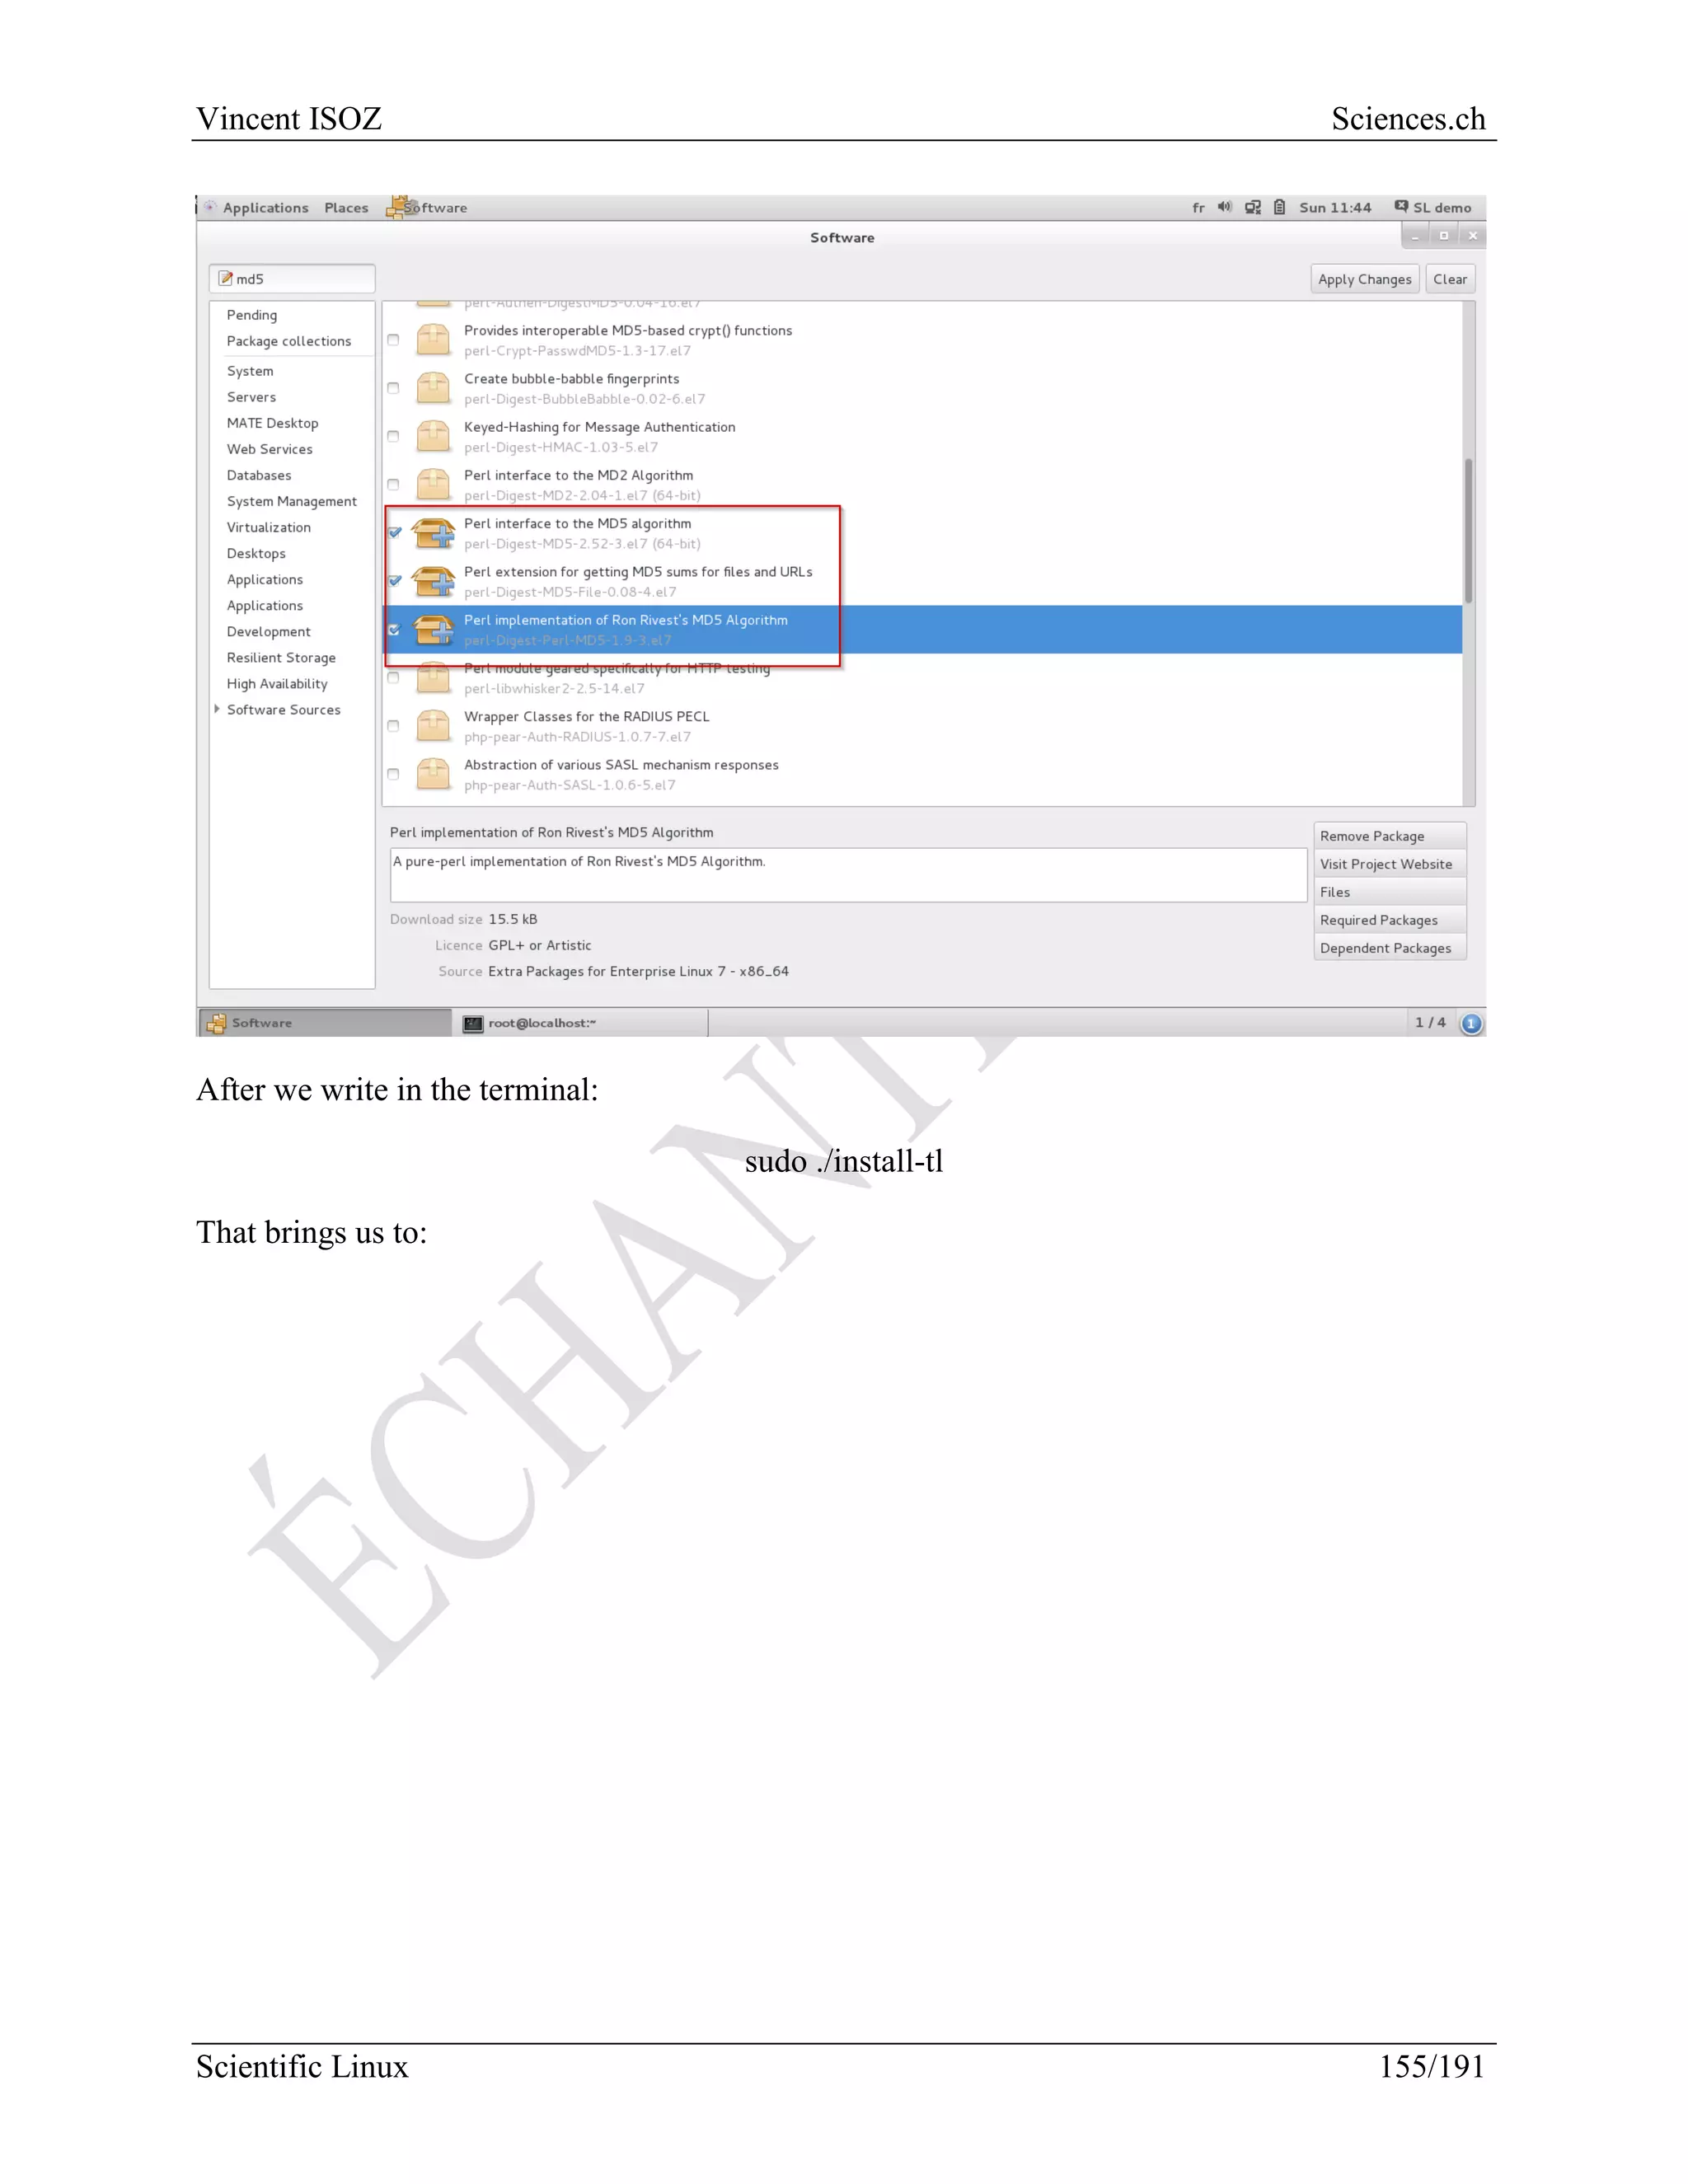
Scientific Linux Installation Guide
1/216
g
Scientific Linux
v4.3 (2017-07-31)
Scientific Linux Installation Guide
2/216
Scientific Linux 7.1 Installation
1 Contents
2 Why use Scientific Linux?.......................................................................................................4
2.1 Updates..............................................................................................................................5
3 BIOS activate Virtualization....................................................................................................7
4 Install Scientific Linux 7.1.......................................................................................................7
4.1 Change to Wired Internet by default ...............................................................................40
4.2 Auto log-on......................................................................................................................42
5 Programming/Development ...................................................................................................45
5.1 Qt C++.............................................................................................................................45
5.2 Eclipse Java, C/C++ and PHP .........................................................................................51
5.2.1 Test C++...................................................................................................................56
5.3 Aptana..............................................................................................................................61
5.4 XML/DTD/Xpath Copy Editor .......................................................................................64
5.5 UML Umbrello................................................................................................................72
5.6 PHP MySQL....................................................................................................................75
5.6.1 Apache......................................................................................................................75
5.6.2 MySQL.....................................................................................................................80
5.6.3 PHP & PHP-mySQL................................................................................................84
5.6.4 MariaDB & phpMyAdmin.......................................................................................90
5.7 Tomcat...........................................................................................................................102
5.8 Python............................................................................................................................124
5.9 Code::Blocks and Fortran..............................................................................................127
5.10 Oracle Express...............................................................................................................130
5.11 PostgreSQL....................................................................................................................137
6 Content Management Server................................................................................................138
6.1 Drupal ............................................................................................................................138
6.2 Typo 3............................................................................................................................140
7 Science .................................................................................................................................143
7.1 R.....................................................................................................................................143
7.1.1 R Studio..................................................................................................................145
7.1.2 Test PHP.................................................................................................................146
7.2 TeXMaker......................................................................................................................160
7.2.1 TeXLive .................................................................................................................168
7.2.2 LaTeXDraw............................................................................................................169
7.2.3 Tex2Html ...............................................................................................................175
7.3 Octave............................................................................................................................175
7.4 Scilab .............................................................................................................................177
Scientific Linux Installation Guide
3/216
7.5 FreeCAD........................................................................................................................181
7.6 Salome ...........................................................................................................................183
7.7 Maxima..........................................................................................................................187
7.8 KiCAD...........................................................................................................................188
8 Office....................................................................................................................................190
8.1 Qalculate........................................................................................................................190
8.2 OpenProj........................................................................................................................191
8.3 DropBox ........................................................................................................................196
8.4 Skype .............................................................................................................................198
8.5 Zim.................................................................................................................................201
8.6 VYM (View Your Mind/Mind Mapping) .....................................................................203
8.7 Vokoscreen (screen recorder)........................................................................................204
8.8 Dia .................................................................................................................................206
9 Others ...................................................................................................................................208
10 ToDo.....................................................................................................................................209
10.1 XMinder.........................................................................................................................209
10.2 DraftSight ......................................................................................................................210
Scientific Linux Installation Guide
4/216
2 Why use Scientific Linux?
Scientific Linux is the worldwide reference operating system for scientists and scientific
applications at this beginning of the 21st
century and created in 2004!
among a lot of other distributions:
Scientific Linux forum:
http://scientificlinuxforum.org
You can download the complete 31 Gigabytes Scientific Linux Virtual Box (vdi file) here1
:
https://www.dropbox.com/s/g1p1rymql4x45o4/ScientificLinux7.vdi?dl=0
with all installed stuff detailed in this PDF here:
1
The password of the Virtual Machin account is: password
Scientific Linux Installation Guide
5/216
https://fr.scribd.com/document/278466634/Scientific-Linux-Virtual-Box
If necessary you can check the kernel version with the following command:
2.1 Updates
When you update the applications of your system (yum update) the kernel will also be updated
and then when start your computer you will get:
To see the list of installed Kernel:
Scientific Linux Installation Guide
6/216
To remove an old Kernel just type:
Upgrades between major versions (from SL 5 to SL 6, or SL 6 to SL 7) are not supported!!!
Scientific Linux Installation Guide
7/216
3 BIOS activate Virtualization
Some computers have BIOS virtualization deactivated. For this purpose you need to change this:
4 Install Scientific Linux 7.1
Open Virtual Box:
Scientific Linux Installation Guide
8/216
Click on New:
Click Next and choose memory size (2GB recommended):
Scientific Linux Installation Guide
9/216
Click Next and choose:
Scientific Linux Installation Guide
10/216
Click Next and choose:
Click Next and choose (recommended 20 GB-30 GB):
Scientific Linux Installation Guide
11/216
Click Create.
Download Scientific Linux *.iso from here:
Scientific Linux Installation Guide
12/216
Now go in the Settings… of the VBox:
Scientific Linux Installation Guide
13/216
And choose:
Scientific Linux Installation Guide
14/216
Select the *.iso file you selected before:
Once selected, you can Start the Virtual Machine and you will get:
Scientific Linux Installation Guide
15/216
Click on the VBox screen and type Tab+Enter. After a few seconds you get:
Scientific Linux Installation Guide
16/216
Choose English (United States) and click on Continue:
Scientific Linux Installation Guide
17/216
Choose the GNOME Desktop with the visible package on the right:
You must select a partition to be able to continue the installation:
Scientific Linux Installation Guide
18/216
The following window appears:
Scientific Linux Installation Guide
19/216
Just click on Done in the upper left corner. Once you have also selected the right keyboard and
Date & Time Timezone click on Begin Installation:
Scientific Linux Installation Guide
20/216
While the installation is in process, click on Root Password:
Scientific Linux Installation Guide
21/216
And type a password (never forget it!):
Scientific Linux Installation Guide
22/216
Validate with Done and wait for the installation to finish:
Scientific Linux Installation Guide
23/216
When installation is finish click on Reboot:
Scientific Linux Installation Guide
24/216
When Reboot is finish, click on Finish Configuration:
Scientific Linux Installation Guide
25/216
Wait a few minutes to get:
Scientific Linux Installation Guide
26/216
Click Next:
Scientific Linux Installation Guide
27/216
Choose above your language and click Next:
Scientific Linux Installation Guide
28/216
Create a user and click Next to choose the user Timezone:
Scientific Linux Installation Guide
29/216
And… it's obvious… not need to comment:
Scientific Linux Installation Guide
30/216
You will get:
Scientific Linux Installation Guide
31/216
In VirtualBox go in:
Scientific Linux Installation Guide
32/216
Click on Run:
Scientific Linux Installation Guide
33/216
Type your password to continue the installation:
Scientific Linux Installation Guide
34/216
And wait for the installation process to finish:
Scientific Linux Installation Guide
35/216
When finish, restart the VBox:
Scientific Linux Installation Guide
36/216
First we connect to the Network. Through the VBox settings check that you have:
Scientific Linux Installation Guide
37/216
And after in you SL (Scientific Linuy acronym) do:
Once this done go in:
Scientific Linux Installation Guide
38/216
You will get almost 200 updates:
Scientific Linux Installation Guide
39/216
Click on Install Updates and when finished, reboot!
Scientific Linux Installation Guide
40/216
4.1 Change to Wired Internet by default
Each time you restart the VBox you will have to reconnect (wired) the VBox to the Internet. This
is boring. Do the following in the terminal:
You will get and click on Edit:
Scientific Linux Installation Guide
41/216
And activate:
Scientific Linux Installation Guide
42/216
4.2 Auto log-on
It is boring to always log-on a virtual test machine. Therefore:
Scientific Linux Installation Guide
43/216
Scientific Linux Installation Guide
44/216
Something that may be important to know in Linux is how to open the file explorer with
administrative rights:
Scientific Linux Installation Guide
45/216
5 Programming/Development
5.1 Qt C++
As some people now I like how C++ rocks. Only one language to rule them all! Develop once for
almost everything with fastest time execution as compared to Java, C#, Python and many others.
First you go on Qt website to download:
Scientific Linux Installation Guide
46/216
You save the file locally:
Scientific Linux Installation Guide
47/216
When download finish you go in the Properties of the file:
In Permissions we change activate Allow executing file as a program:
Scientific Linux Installation Guide
48/216
Note: Process is the same to install Google Earth!
Once done, you double click on the file and the installation starts:
Scientific Linux Installation Guide
49/216
You click on Next:
Scientific Linux Installation Guide
50/216
On Next:
On Next again:
Scientific Linux Installation Guide
51/216
On Next again and we wait:
5.2 Eclipse Java, C/C++ and PHP
We now download and install Eclipse for JEE, C/C++ and PHP.
For this purpose you go on the following page:
Scientific Linux Installation Guide
52/216
You click on the 64 bit link of each of the three distribution and you save the file:
Scientific Linux Installation Guide
53/216
Once the download done we extract each file (rename immediately the resulting folder with
something like eclipseJava or eclipseCpp etc. otherwise each tar.gz file we erase the previous
created folder!):
For each distribution you in the corresponding folder and double click on the eclipse icon to
check that it opens without issues:
Scientific Linux Installation Guide
54/216
You will get for JEE:
Caution!!! Sometimes menu are not visible but in fact they are here but just not visible!
And for C/C++:
Scientific Linux Installation Guide
55/216
Scientific Linux Installation Guide
56/216
5.2.1 Test C++
Now you can test each one… First with C++:
After:
Scientific Linux Installation Guide
57/216
And:
Scientific Linux Installation Guide
58/216
After:
Scientific Linux Installation Guide
59/216
After:
Scientific Linux Installation Guide
60/216
After:
Scientific Linux Installation Guide
61/216
After:
5.3 Aptana
Just download first:
Scientific Linux Installation Guide
62/216
It's a zip file:
Once downloaded just unzip and double click:
Scientific Linux Installation Guide
63/216
You will get:
Scientific Linux Installation Guide
64/216
If you get an error message about Chromium. Just reboot computer.
5.4 XML/DTD/Xpath Copy Editor
To install XML Copy Editor. First download:
Scientific Linux Installation Guide
65/216
Scientific Linux Installation Guide
66/216
Scientific Linux Installation Guide
67/216
Scientific Linux Installation Guide
68/216
Scientific Linux Installation Guide
69/216
Scientific Linux Installation Guide
70/216
Reboot machine and you will have:
Scientific Linux Installation Guide
71/216
Scientific Linux Installation Guide
72/216
5.5 UML Umbrello
To install UML Umbrello Editor the process is quite easy:
Scientific Linux Installation Guide
73/216
Scientific Linux Installation Guide
74/216
Scientific Linux Installation Guide
75/216
5.6 PHP MySQL
The purpose here is to have a LAMP with SL…
5.6.1 Apache
First we must be connected as root user:
Scientific Linux Installation Guide
76/216
We install Apache:
Scientific Linux Installation Guide
77/216
We start the server on we change to configuration to make it start automatically at every boot:
Now to make the whole LAMP works correctly we must configure an iptable. We create and
iptables file:
Scientific Linux Installation Guide
78/216
And in the editor press Insert key to begin to write:
When finish, write ESC + : wq and Enter to save and return to the terminal.
Scientific Linux Installation Guide
79/216
After we must install a package that can read and use the previous file:
Once installation done, you will have troubles with the existing firewall. We need to stop it and
deactivate it for each boot:
Now go in your favorite Internet Browser and type http://localhost:
Scientific Linux Installation Guide
80/216
5.6.2 MySQL
The purpose now is to install MySQL RDBMS:
Scientific Linux Installation Guide
81/216
5.6.2.1 Install MySQL Workbench
First you go on the following website:
Double click:
Scientific Linux Installation Guide
82/216
After a few seconds we get:
Scientific Linux Installation Guide
83/216
And when we open:
Scientific Linux Installation Guide
84/216
5.6.3 PHP & PHP-mySQL
The purpose now is to install PHP engine with the PHP-mySQL connector:
Scientific Linux Installation Guide
85/216
To test that everything work, first method is to use the defaults Linux visual editor. But first we
need writing rights on the main Apache root folder:
Now we can create a PHP file:
Scientific Linux Installation Guide
86/216
With a simple PHP script inside:
Scientific Linux Installation Guide
87/216
After you just need to test it:
Scientific Linux Installation Guide
88/216
We can do the same with Eclipse PHP. We create a project:
We create a simple script:
Scientific Linux Installation Guide
89/216
And when you click on Run you get:
Now to use mySQL with PHP we need:
Scientific Linux Installation Guide
90/216
5.6.4 MariaDB & phpMyAdmin
Now we want to install phpMyAdmin to manage more easily MySQL tables. First we need to
install a fedora repo:
And after:
Scientific Linux Installation Guide
91/216
To be sure that everything will work we do and update of all packages:
Now we can install phpMyAdmin:
Remarque: With this you can also install thunderbird (yum install thunderbird)
Scientific Linux Installation Guide
92/216
Once this done, you restart Apache:
And now you can check if it works through your browser:
Scientific Linux Installation Guide
93/216
But you will not be able to access to the admin console. For this we need to install MariaDB
packages (Oracle is devil…):
Scientific Linux Installation Guide
94/216
Or if the above method doesn't work well:
Scientific Linux Installation Guide
95/216
Now we start MariaDB services and we launch mysql secure installation wizard:
Now we can finally secure our mysql-phpMyAdmin installation:
!!! Just type ENTER for current root password. And follow the below answers:
Scientific Linux Installation Guide
96/216
To set root password above we have chosen password as password…
We continue…:
Scientific Linux Installation Guide
97/216
Now you can enter with root and password as input:
Scientific Linux Installation Guide
98/216
When you click on Go we get:
Scientific Linux Installation Guide
99/216
Now we configure MariaDB to start automatically on each reboot:
Scientific Linux Installation Guide
100/216
If and only if you can't still access to phpMyAdmin do the following:
Scientific Linux Installation Guide
101/216
So we can change the following file:
And you change:
Scientific Linux Installation Guide
102/216
And also:
We need to change back the access rules to read only:
Restart computer.
5.7 Tomcat
To create Java server pages we need to install the tomcat server: for this purpose:
Scientific Linux Installation Guide
103/216
After:
Once done this has created a tomcat7 folder where we need to change the default port 8080 to
something else otherwise we will be in conflict with our apache server:
Scientific Linux Installation Guide
104/216
To change this file we do:
And in the file we search:
Scientific Linux Installation Guide
105/216
We change to:
We start the Tomcat server a first time:
Scientific Linux Installation Guide
106/216
we wait one minute… stop it:
and start it again:
Scientific Linux Installation Guide
107/216
And we get:
Now we can test it. First open Java Eclipse and go into:
Scientific Linux Installation Guide
108/216
After we go:
Scientific Linux Installation Guide
109/216
We take:
Scientific Linux Installation Guide
110/216
We click on Next to get:
Scientific Linux Installation Guide
111/216
We go in our Tomcat installation folder:
Scientific Linux Installation Guide
112/216
We get:
Scientific Linux Installation Guide
113/216
Click on Finish.
Now we can try to create a JSP page:
Scientific Linux Installation Guide
114/216
Search after for Dynamic web project:
Scientific Linux Installation Guide
115/216
After we have:
Scientific Linux Installation Guide
116/216
We click on Next:
Scientific Linux Installation Guide
117/216
And Next again:
Scientific Linux Installation Guide
118/216
And Finish:
Scientific Linux Installation Guide
119/216
We get:
Scientific Linux Installation Guide
120/216
Scientific Linux Installation Guide
121/216
Scientific Linux Installation Guide
122/216
Scientific Linux Installation Guide
123/216
Scientific Linux Installation Guide
124/216
5.8 Python
To install Python you run the following command:
Scientific Linux Installation Guide
125/216
How do I start IDLE under Linux?
Scientific Linux Installation Guide
126/216
numpy and scipy come pre-compiled with CentOS, just type:
Scientific Linux Installation Guide
127/216
5.9 Code::Blocks and Fortran
Scientific Linux Installation Guide
128/216
Scientific Linux Installation Guide
129/216
Scientific Linux Installation Guide
130/216
5.10 Oracle Express
Major tool to learn PL/SQL!
First download Oracle Database Express Edition for Linux x64:
Scientific Linux Installation Guide
131/216
Once file download extract it on place:
Open the terminal in folder Disk1 of the resulting extraction and after type:
Scientific Linux Installation Guide
132/216
Scientific Linux Installation Guide
133/216
Scientific Linux Installation Guide
134/216
Password: password
Scientific Linux Installation Guide
135/216
Scientific Linux Installation Guide
136/216
Scientific Linux Installation Guide
137/216
5.11 PostgreSQL
Other details will follow…
Scientific Linux Installation Guide
138/216
6 Content Management Server
6.1 Drupal
Install WordPress and Joomla is very very easy stuff in SE Linux once the above steps all done.
But for Drupal it is a little bit more difficult. Once the zip file unpacked in the
var/www/html/drupal do the following:
And create the following folder:
Scientific Linux Installation Guide
139/216
And do:
So when you got before the following error message:
By clicking on proceed with the installation you get:
Scientific Linux Installation Guide
140/216
And now just continue as for WordPress and Joomla!
6.2 Typo 3
For Typo3 take care!!! The message:
Scientific Linux Installation Guide
141/216
Scientific Linux Installation Guide
142/216
For the database step choose socket:
Scientific Linux Installation Guide
143/216
7 Science
7.1 R
As we all know, R is actually the most complete statistical software in the world. So we need it
for number analysis
Therefore first thanks to the fedora repo:
Scientific Linux Installation Guide
144/216
We make an update to be sure to have the last version:
Now we launch R by typing just… R… (not userfriendly but terribly efficient access):
Scientific Linux Installation Guide
145/216
It may be useful also to know how to uninstall R as sometimes it can be corrupted. Then run the
following commands:
yum uninstall R
yum uninstall R-core
yum uninstall R-devel
yum uninstall R-core-devel
If you get an error when running R for the first time saying that a file is missing in a given folder.
Just go in this folder and copy paste in an existing file in that same folder having a similar name
and just rename it as expected by the R error message!
After you just have to read my R 1'700 pages book on R ;-)
7.1.1 R Studio
To install R Studio just run the following command:
Scientific Linux Installation Guide
146/216
7.1.2 Test PHP
Scientific Linux Installation Guide
147/216
Scientific Linux Installation Guide
148/216
Scientific Linux Installation Guide
149/216
Scientific Linux Installation Guide
150/216
Scientific Linux Installation Guide
151/216
Scientific Linux Installation Guide
152/216
Scientific Linux Installation Guide
153/216
Scientific Linux Installation Guide
154/216
Scientific Linux Installation Guide
155/216
Scientific Linux Installation Guide
156/216
Scientific Linux Installation Guide
157/216
Scientific Linux Installation Guide
158/216
Scientific Linux Installation Guide
159/216
Scientific Linux Installation Guide
160/216
If necessary:
7.2 TeXMaker
A very important tool for every scientist and engineer that must write high quality scientific
documents (papers and books):
First we use the CRAN installation file:
Scientific Linux Installation Guide
161/216
This tool need and MD5 Checksum to be installed. Therefore we need to install MD5 checksum
Perl packages:
After we write in the terminal:
sudo ./install-tl
Scientific Linux Installation Guide
162/216
That brings us to:
Wait… almost 3000 modules (LaTeX packages/*.sty) to install…
Scientific Linux Installation Guide
163/216
To install TeXMaker on SL 7.1 we will need to recompile TeXMaker code source. Then before
we install QT4 compiler!:
yum install pkg-config qt-devel qt-webkit-devel poppler-qt4-devel gcc-c++ make rpmdevtools
zlib1g-dev
Scientific Linux Installation Guide
164/216
And we download TeXMaker code source:
Once the download done we extract the package:
Scientific Linux Installation Guide
165/216
And by security we install the following packages:
Now we compile the sources:
After a few minutes you can finally write:
Scientific Linux Installation Guide
166/216
Scientific Linux Installation Guide
167/216
Now to be able to install and update packages write each time the two following lines:
Scientific Linux Installation Guide
168/216
7.2.1 TeXLive
To install a basic package for LaTeX type the following:
and to install a specific package:
Scientific Linux Installation Guide
169/216
7.2.2 LaTeXDraw
To install LaTeXDraw first download:
Scientific Linux Installation Guide
170/216
Unzip:
Scientific Linux Installation Guide
171/216
In the shell go into the folder:
Scientific Linux Installation Guide
172/216
And a wizard appears on the screen:
Scientific Linux Installation Guide
173/216
Once finished:
Scientific Linux Installation Guide
174/216
Finally:
Scientific Linux Installation Guide
175/216
7.2.3 Tex2Html
7.3 Octave
Octave is a Maple/Matlab like scientific software. To install it:
Scientific Linux Installation Guide
176/216
You get:
Finally:
Scientific Linux Installation Guide
177/216
7.4 Scilab
To install Scilab, the official way is first to download the package:
Scientific Linux Installation Guide
178/216
after to extract:
Scientific Linux Installation Guide
179/216
After in the shell we write:
Scientific Linux Installation Guide
180/216
And Scilab opens:
Scientific Linux Installation Guide
181/216
7.5 FreeCAD
Scientific Linux Installation Guide
182/216
Scientific Linux Installation Guide
183/216
7.6 Salome
To install SALOME we go first on their webpage to select the option highlighted below:
Scientific Linux Installation Guide
184/216
Once the download finish we extract the files:
Then we enter the corresponding folder:
Afterward we go in the shell, browse in the corresponding folder and launch the corresponding
bash file:
Scientific Linux Installation Guide
185/216
Then we get:
And after by creating a new file and inserting objects you can create your project:
Scientific Linux Installation Guide
186/216
Scientific Linux Installation Guide
187/216
7.7 Maxima
Scientific Linux Installation Guide
188/216
7.8 KiCAD
A Cross Platform and Open Source Electronics Design Automation Suite:
Scientific Linux Installation Guide
189/216
Scientific Linux Installation Guide
190/216
8 Office
8.1 Qalculate
A "small" calculator is always useful. Let us see how to install one that is considered as a
reference in the Linux World:
Scientific Linux Installation Guide
191/216
8.2 OpenProj
We all know that project management has become increasingly normative these last decades.
Having a project management software is a minimum nowadays.
So let's run with OpenProj.
First we download:
Scientific Linux Installation Guide
192/216
And we need to install the downloaded file:
After OpenProj will be in the menu:
Scientific Linux Installation Guide
193/216
But you will not be able to start it:
Scientific Linux Installation Guide
194/216
Therefore you need first to install JRE:
If the Java Platform does not appear it means (most of time) that its already installed.
After we edit the following file:
Scientific Linux Installation Guide
195/216
And we change this part:
Now we can open… OpenProj:
Scientific Linux Installation Guide
196/216
8.3 DropBox
First:
And finally:
Scientific Linux Installation Guide
197/216
Scientific Linux Installation Guide
198/216
8.4 Skype
Until today it is still not easy to install Skype on SL x64. Here are the different steps:
We start with:
And after:
yum install alsa-lib.i686 fontconfig.i686 freetype.i686 glib2.i686 libSM.i686 libXScrnSaver.i686
libXi.i686 libXrandr.i686 libXrender.i686 libXv.i686 libstdc++.i686 pulseaudio-libs.i686 qt.i686
qt-x11.i686 zlib.i686 qtwebkit.i686
We install some additional modules:
Now we download Skype:
Scientific Linux Installation Guide
199/216
Now we unpack:
Now we create launcher:
We create now a file with a special content:
Scientific Linux Installation Guide
200/216
Finally:
And Skype starts:
Scientific Linux Installation Guide
201/216
8.5 Zim
You like OneNote/EverNote and don't want use the web version? Here is the way to do it:
Once installed you get:
Scientific Linux Installation Guide
202/216
Finally:
Scientific Linux Installation Guide
203/216
8.6 VYM (View Your Mind/Mind Mapping)
To have in an easy way a Mind Mapping tool, type:
Then we get:
Scientific Linux Installation Guide
204/216
Ce qui donne:
8.7 Vokoscreen (screen recorder)
To have as screen recorder we type first:
After what we get:
Scientific Linux Installation Guide
205/216
This gives:
Scientific Linux Installation Guide
206/216
8.8 Dia
Scientific Linux Installation Guide
207/216
Scientific Linux Installation Guide
208/216
9 Others
After from the Software installer wizard you can install easily also:
 VLC media player
 Audacity
Scientific Linux Installation Guide
209/216
10 ToDo
Write procedure for DraftSight, Google Earth, XMinder, Aptana
10.1 XMinder
Scientific Linux Installation Guide
210/216
10.2 DraftSight
Scientific Linux Installation Guide
211/216
XMinder:
Scientific Linux Installation Guide
212/216
Google Earth:
Scientific Linux Installation Guide
213/216
Answer Y to all questions.
Reboot and install:
Scientific Linux Installation Guide
214/216
Answer Y to all questions. After:
Scientific Linux Installation Guide
215/216
Scientific Linux Installation Guide
216/216

Scientific Linux

  • 1.
    Scientific Linux InstallationGuide 1/216 g Scientific Linux v4.3 (2017-07-31)
  • 2.
    Scientific Linux InstallationGuide 2/216 Scientific Linux 7.1 Installation 1 Contents 2 Why use Scientific Linux?.......................................................................................................4 2.1 Updates..............................................................................................................................5 3 BIOS activate Virtualization....................................................................................................7 4 Install Scientific Linux 7.1.......................................................................................................7 4.1 Change to Wired Internet by default ...............................................................................40 4.2 Auto log-on......................................................................................................................42 5 Programming/Development ...................................................................................................45 5.1 Qt C++.............................................................................................................................45 5.2 Eclipse Java, C/C++ and PHP .........................................................................................51 5.2.1 Test C++...................................................................................................................56 5.3 Aptana..............................................................................................................................61 5.4 XML/DTD/Xpath Copy Editor .......................................................................................64 5.5 UML Umbrello................................................................................................................72 5.6 PHP MySQL....................................................................................................................75 5.6.1 Apache......................................................................................................................75 5.6.2 MySQL.....................................................................................................................80 5.6.3 PHP & PHP-mySQL................................................................................................84 5.6.4 MariaDB & phpMyAdmin.......................................................................................90 5.7 Tomcat...........................................................................................................................102 5.8 Python............................................................................................................................124 5.9 Code::Blocks and Fortran..............................................................................................127 5.10 Oracle Express...............................................................................................................130 5.11 PostgreSQL....................................................................................................................137 6 Content Management Server................................................................................................138 6.1 Drupal ............................................................................................................................138 6.2 Typo 3............................................................................................................................140 7 Science .................................................................................................................................143 7.1 R.....................................................................................................................................143 7.1.1 R Studio..................................................................................................................145 7.1.2 Test PHP.................................................................................................................146 7.2 TeXMaker......................................................................................................................160 7.2.1 TeXLive .................................................................................................................168 7.2.2 LaTeXDraw............................................................................................................169 7.2.3 Tex2Html ...............................................................................................................175 7.3 Octave............................................................................................................................175 7.4 Scilab .............................................................................................................................177
  • 3.
    Scientific Linux InstallationGuide 3/216 7.5 FreeCAD........................................................................................................................181 7.6 Salome ...........................................................................................................................183 7.7 Maxima..........................................................................................................................187 7.8 KiCAD...........................................................................................................................188 8 Office....................................................................................................................................190 8.1 Qalculate........................................................................................................................190 8.2 OpenProj........................................................................................................................191 8.3 DropBox ........................................................................................................................196 8.4 Skype .............................................................................................................................198 8.5 Zim.................................................................................................................................201 8.6 VYM (View Your Mind/Mind Mapping) .....................................................................203 8.7 Vokoscreen (screen recorder)........................................................................................204 8.8 Dia .................................................................................................................................206 9 Others ...................................................................................................................................208 10 ToDo.....................................................................................................................................209 10.1 XMinder.........................................................................................................................209 10.2 DraftSight ......................................................................................................................210
  • 4.
    Scientific Linux InstallationGuide 4/216 2 Why use Scientific Linux? Scientific Linux is the worldwide reference operating system for scientists and scientific applications at this beginning of the 21st century and created in 2004! among a lot of other distributions: Scientific Linux forum: http://scientificlinuxforum.org You can download the complete 31 Gigabytes Scientific Linux Virtual Box (vdi file) here1 : https://www.dropbox.com/s/g1p1rymql4x45o4/ScientificLinux7.vdi?dl=0 with all installed stuff detailed in this PDF here: 1 The password of the Virtual Machin account is: password
  • 5.
    Scientific Linux InstallationGuide 5/216 https://fr.scribd.com/document/278466634/Scientific-Linux-Virtual-Box If necessary you can check the kernel version with the following command: 2.1 Updates When you update the applications of your system (yum update) the kernel will also be updated and then when start your computer you will get: To see the list of installed Kernel:
  • 6.
    Scientific Linux InstallationGuide 6/216 To remove an old Kernel just type: Upgrades between major versions (from SL 5 to SL 6, or SL 6 to SL 7) are not supported!!!
  • 7.
    Scientific Linux InstallationGuide 7/216 3 BIOS activate Virtualization Some computers have BIOS virtualization deactivated. For this purpose you need to change this: 4 Install Scientific Linux 7.1 Open Virtual Box:
  • 8.
    Scientific Linux InstallationGuide 8/216 Click on New: Click Next and choose memory size (2GB recommended):
  • 9.
    Scientific Linux InstallationGuide 9/216 Click Next and choose: Click Next and choose:
  • 10.
    Scientific Linux InstallationGuide 10/216 Click Next and choose: Click Next and choose (recommended 20 GB-30 GB):
  • 11.
    Scientific Linux InstallationGuide 11/216 Click Create. Download Scientific Linux *.iso from here:
  • 12.
    Scientific Linux InstallationGuide 12/216 Now go in the Settings… of the VBox:
  • 13.
    Scientific Linux InstallationGuide 13/216 And choose:
  • 14.
    Scientific Linux InstallationGuide 14/216 Select the *.iso file you selected before: Once selected, you can Start the Virtual Machine and you will get:
  • 15.
    Scientific Linux InstallationGuide 15/216 Click on the VBox screen and type Tab+Enter. After a few seconds you get:
  • 16.
    Scientific Linux InstallationGuide 16/216 Choose English (United States) and click on Continue:
  • 17.
    Scientific Linux InstallationGuide 17/216 Choose the GNOME Desktop with the visible package on the right: You must select a partition to be able to continue the installation:
  • 18.
    Scientific Linux InstallationGuide 18/216 The following window appears:
  • 19.
    Scientific Linux InstallationGuide 19/216 Just click on Done in the upper left corner. Once you have also selected the right keyboard and Date & Time Timezone click on Begin Installation:
  • 20.
    Scientific Linux InstallationGuide 20/216 While the installation is in process, click on Root Password:
  • 21.
    Scientific Linux InstallationGuide 21/216 And type a password (never forget it!):
  • 22.
    Scientific Linux InstallationGuide 22/216 Validate with Done and wait for the installation to finish:
  • 23.
    Scientific Linux InstallationGuide 23/216 When installation is finish click on Reboot:
  • 24.
    Scientific Linux InstallationGuide 24/216 When Reboot is finish, click on Finish Configuration:
  • 25.
    Scientific Linux InstallationGuide 25/216 Wait a few minutes to get:
  • 26.
    Scientific Linux InstallationGuide 26/216 Click Next:
  • 27.
    Scientific Linux InstallationGuide 27/216 Choose above your language and click Next:
  • 28.
    Scientific Linux InstallationGuide 28/216 Create a user and click Next to choose the user Timezone:
  • 29.
    Scientific Linux InstallationGuide 29/216 And… it's obvious… not need to comment:
  • 30.
    Scientific Linux InstallationGuide 30/216 You will get:
  • 31.
    Scientific Linux InstallationGuide 31/216 In VirtualBox go in:
  • 32.
    Scientific Linux InstallationGuide 32/216 Click on Run:
  • 33.
    Scientific Linux InstallationGuide 33/216 Type your password to continue the installation:
  • 34.
    Scientific Linux InstallationGuide 34/216 And wait for the installation process to finish:
  • 35.
    Scientific Linux InstallationGuide 35/216 When finish, restart the VBox:
  • 36.
    Scientific Linux InstallationGuide 36/216 First we connect to the Network. Through the VBox settings check that you have:
  • 37.
    Scientific Linux InstallationGuide 37/216 And after in you SL (Scientific Linuy acronym) do: Once this done go in:
  • 38.
    Scientific Linux InstallationGuide 38/216 You will get almost 200 updates:
  • 39.
    Scientific Linux InstallationGuide 39/216 Click on Install Updates and when finished, reboot!
  • 40.
    Scientific Linux InstallationGuide 40/216 4.1 Change to Wired Internet by default Each time you restart the VBox you will have to reconnect (wired) the VBox to the Internet. This is boring. Do the following in the terminal: You will get and click on Edit:
  • 41.
    Scientific Linux InstallationGuide 41/216 And activate:
  • 42.
    Scientific Linux InstallationGuide 42/216 4.2 Auto log-on It is boring to always log-on a virtual test machine. Therefore:
  • 43.
  • 44.
    Scientific Linux InstallationGuide 44/216 Something that may be important to know in Linux is how to open the file explorer with administrative rights:
  • 45.
    Scientific Linux InstallationGuide 45/216 5 Programming/Development 5.1 Qt C++ As some people now I like how C++ rocks. Only one language to rule them all! Develop once for almost everything with fastest time execution as compared to Java, C#, Python and many others. First you go on Qt website to download:
  • 46.
    Scientific Linux InstallationGuide 46/216 You save the file locally:
  • 47.
    Scientific Linux InstallationGuide 47/216 When download finish you go in the Properties of the file: In Permissions we change activate Allow executing file as a program:
  • 48.
    Scientific Linux InstallationGuide 48/216 Note: Process is the same to install Google Earth! Once done, you double click on the file and the installation starts:
  • 49.
    Scientific Linux InstallationGuide 49/216 You click on Next:
  • 50.
    Scientific Linux InstallationGuide 50/216 On Next: On Next again:
  • 51.
    Scientific Linux InstallationGuide 51/216 On Next again and we wait: 5.2 Eclipse Java, C/C++ and PHP We now download and install Eclipse for JEE, C/C++ and PHP. For this purpose you go on the following page:
  • 52.
    Scientific Linux InstallationGuide 52/216 You click on the 64 bit link of each of the three distribution and you save the file:
  • 53.
    Scientific Linux InstallationGuide 53/216 Once the download done we extract each file (rename immediately the resulting folder with something like eclipseJava or eclipseCpp etc. otherwise each tar.gz file we erase the previous created folder!): For each distribution you in the corresponding folder and double click on the eclipse icon to check that it opens without issues:
  • 54.
    Scientific Linux InstallationGuide 54/216 You will get for JEE: Caution!!! Sometimes menu are not visible but in fact they are here but just not visible! And for C/C++:
  • 55.
  • 56.
    Scientific Linux InstallationGuide 56/216 5.2.1 Test C++ Now you can test each one… First with C++: After:
  • 57.
  • 58.
    Scientific Linux InstallationGuide 58/216 After:
  • 59.
    Scientific Linux InstallationGuide 59/216 After:
  • 60.
    Scientific Linux InstallationGuide 60/216 After:
  • 61.
    Scientific Linux InstallationGuide 61/216 After: 5.3 Aptana Just download first:
  • 62.
    Scientific Linux InstallationGuide 62/216 It's a zip file: Once downloaded just unzip and double click:
  • 63.
    Scientific Linux InstallationGuide 63/216 You will get:
  • 64.
    Scientific Linux InstallationGuide 64/216 If you get an error message about Chromium. Just reboot computer. 5.4 XML/DTD/Xpath Copy Editor To install XML Copy Editor. First download:
  • 65.
  • 66.
  • 67.
  • 68.
  • 69.
  • 70.
    Scientific Linux InstallationGuide 70/216 Reboot machine and you will have:
  • 71.
  • 72.
    Scientific Linux InstallationGuide 72/216 5.5 UML Umbrello To install UML Umbrello Editor the process is quite easy:
  • 73.
  • 74.
  • 75.
    Scientific Linux InstallationGuide 75/216 5.6 PHP MySQL The purpose here is to have a LAMP with SL… 5.6.1 Apache First we must be connected as root user:
  • 76.
    Scientific Linux InstallationGuide 76/216 We install Apache:
  • 77.
    Scientific Linux InstallationGuide 77/216 We start the server on we change to configuration to make it start automatically at every boot: Now to make the whole LAMP works correctly we must configure an iptable. We create and iptables file:
  • 78.
    Scientific Linux InstallationGuide 78/216 And in the editor press Insert key to begin to write: When finish, write ESC + : wq and Enter to save and return to the terminal.
  • 79.
    Scientific Linux InstallationGuide 79/216 After we must install a package that can read and use the previous file: Once installation done, you will have troubles with the existing firewall. We need to stop it and deactivate it for each boot: Now go in your favorite Internet Browser and type http://localhost:
  • 80.
    Scientific Linux InstallationGuide 80/216 5.6.2 MySQL The purpose now is to install MySQL RDBMS:
  • 81.
    Scientific Linux InstallationGuide 81/216 5.6.2.1 Install MySQL Workbench First you go on the following website: Double click:
  • 82.
    Scientific Linux InstallationGuide 82/216 After a few seconds we get:
  • 83.
    Scientific Linux InstallationGuide 83/216 And when we open:
  • 84.
    Scientific Linux InstallationGuide 84/216 5.6.3 PHP & PHP-mySQL The purpose now is to install PHP engine with the PHP-mySQL connector:
  • 85.
    Scientific Linux InstallationGuide 85/216 To test that everything work, first method is to use the defaults Linux visual editor. But first we need writing rights on the main Apache root folder: Now we can create a PHP file:
  • 86.
    Scientific Linux InstallationGuide 86/216 With a simple PHP script inside:
  • 87.
    Scientific Linux InstallationGuide 87/216 After you just need to test it:
  • 88.
    Scientific Linux InstallationGuide 88/216 We can do the same with Eclipse PHP. We create a project: We create a simple script:
  • 89.
    Scientific Linux InstallationGuide 89/216 And when you click on Run you get: Now to use mySQL with PHP we need:
  • 90.
    Scientific Linux InstallationGuide 90/216 5.6.4 MariaDB & phpMyAdmin Now we want to install phpMyAdmin to manage more easily MySQL tables. First we need to install a fedora repo: And after:
  • 91.
    Scientific Linux InstallationGuide 91/216 To be sure that everything will work we do and update of all packages: Now we can install phpMyAdmin: Remarque: With this you can also install thunderbird (yum install thunderbird)
  • 92.
    Scientific Linux InstallationGuide 92/216 Once this done, you restart Apache: And now you can check if it works through your browser:
  • 93.
    Scientific Linux InstallationGuide 93/216 But you will not be able to access to the admin console. For this we need to install MariaDB packages (Oracle is devil…):
  • 94.
    Scientific Linux InstallationGuide 94/216 Or if the above method doesn't work well:
  • 95.
    Scientific Linux InstallationGuide 95/216 Now we start MariaDB services and we launch mysql secure installation wizard: Now we can finally secure our mysql-phpMyAdmin installation: !!! Just type ENTER for current root password. And follow the below answers:
  • 96.
    Scientific Linux InstallationGuide 96/216 To set root password above we have chosen password as password… We continue…:
  • 97.
    Scientific Linux InstallationGuide 97/216 Now you can enter with root and password as input:
  • 98.
    Scientific Linux InstallationGuide 98/216 When you click on Go we get:
  • 99.
    Scientific Linux InstallationGuide 99/216 Now we configure MariaDB to start automatically on each reboot:
  • 100.
    Scientific Linux InstallationGuide 100/216 If and only if you can't still access to phpMyAdmin do the following:
  • 101.
    Scientific Linux InstallationGuide 101/216 So we can change the following file: And you change:
  • 102.
    Scientific Linux InstallationGuide 102/216 And also: We need to change back the access rules to read only: Restart computer. 5.7 Tomcat To create Java server pages we need to install the tomcat server: for this purpose:
  • 103.
    Scientific Linux InstallationGuide 103/216 After: Once done this has created a tomcat7 folder where we need to change the default port 8080 to something else otherwise we will be in conflict with our apache server:
  • 104.
    Scientific Linux InstallationGuide 104/216 To change this file we do: And in the file we search:
  • 105.
    Scientific Linux InstallationGuide 105/216 We change to: We start the Tomcat server a first time:
  • 106.
    Scientific Linux InstallationGuide 106/216 we wait one minute… stop it: and start it again:
  • 107.
    Scientific Linux InstallationGuide 107/216 And we get: Now we can test it. First open Java Eclipse and go into:
  • 108.
    Scientific Linux InstallationGuide 108/216 After we go:
  • 109.
    Scientific Linux InstallationGuide 109/216 We take:
  • 110.
    Scientific Linux InstallationGuide 110/216 We click on Next to get:
  • 111.
    Scientific Linux InstallationGuide 111/216 We go in our Tomcat installation folder:
  • 112.
    Scientific Linux InstallationGuide 112/216 We get:
  • 113.
    Scientific Linux InstallationGuide 113/216 Click on Finish. Now we can try to create a JSP page:
  • 114.
    Scientific Linux InstallationGuide 114/216 Search after for Dynamic web project:
  • 115.
    Scientific Linux InstallationGuide 115/216 After we have:
  • 116.
    Scientific Linux InstallationGuide 116/216 We click on Next:
  • 117.
    Scientific Linux InstallationGuide 117/216 And Next again:
  • 118.
    Scientific Linux InstallationGuide 118/216 And Finish:
  • 119.
    Scientific Linux InstallationGuide 119/216 We get:
  • 120.
  • 121.
  • 122.
  • 123.
  • 124.
    Scientific Linux InstallationGuide 124/216 5.8 Python To install Python you run the following command:
  • 125.
    Scientific Linux InstallationGuide 125/216 How do I start IDLE under Linux?
  • 126.
    Scientific Linux InstallationGuide 126/216 numpy and scipy come pre-compiled with CentOS, just type:
  • 127.
    Scientific Linux InstallationGuide 127/216 5.9 Code::Blocks and Fortran
  • 128.
  • 129.
  • 130.
    Scientific Linux InstallationGuide 130/216 5.10 Oracle Express Major tool to learn PL/SQL! First download Oracle Database Express Edition for Linux x64:
  • 131.
    Scientific Linux InstallationGuide 131/216 Once file download extract it on place: Open the terminal in folder Disk1 of the resulting extraction and after type:
  • 132.
  • 133.
  • 134.
    Scientific Linux InstallationGuide 134/216 Password: password
  • 135.
  • 136.
  • 137.
    Scientific Linux InstallationGuide 137/216 5.11 PostgreSQL Other details will follow…
  • 138.
    Scientific Linux InstallationGuide 138/216 6 Content Management Server 6.1 Drupal Install WordPress and Joomla is very very easy stuff in SE Linux once the above steps all done. But for Drupal it is a little bit more difficult. Once the zip file unpacked in the var/www/html/drupal do the following: And create the following folder:
  • 139.
    Scientific Linux InstallationGuide 139/216 And do: So when you got before the following error message: By clicking on proceed with the installation you get:
  • 140.
    Scientific Linux InstallationGuide 140/216 And now just continue as for WordPress and Joomla! 6.2 Typo 3 For Typo3 take care!!! The message:
  • 141.
  • 142.
    Scientific Linux InstallationGuide 142/216 For the database step choose socket:
  • 143.
    Scientific Linux InstallationGuide 143/216 7 Science 7.1 R As we all know, R is actually the most complete statistical software in the world. So we need it for number analysis Therefore first thanks to the fedora repo:
  • 144.
    Scientific Linux InstallationGuide 144/216 We make an update to be sure to have the last version: Now we launch R by typing just… R… (not userfriendly but terribly efficient access):
  • 145.
    Scientific Linux InstallationGuide 145/216 It may be useful also to know how to uninstall R as sometimes it can be corrupted. Then run the following commands: yum uninstall R yum uninstall R-core yum uninstall R-devel yum uninstall R-core-devel If you get an error when running R for the first time saying that a file is missing in a given folder. Just go in this folder and copy paste in an existing file in that same folder having a similar name and just rename it as expected by the R error message! After you just have to read my R 1'700 pages book on R ;-) 7.1.1 R Studio To install R Studio just run the following command:
  • 146.
    Scientific Linux InstallationGuide 146/216 7.1.2 Test PHP
  • 147.
  • 148.
  • 149.
  • 150.
  • 151.
  • 152.
  • 153.
  • 154.
  • 155.
  • 156.
  • 157.
  • 158.
  • 159.
  • 160.
    Scientific Linux InstallationGuide 160/216 If necessary: 7.2 TeXMaker A very important tool for every scientist and engineer that must write high quality scientific documents (papers and books): First we use the CRAN installation file:
  • 161.
    Scientific Linux InstallationGuide 161/216 This tool need and MD5 Checksum to be installed. Therefore we need to install MD5 checksum Perl packages: After we write in the terminal: sudo ./install-tl
  • 162.
    Scientific Linux InstallationGuide 162/216 That brings us to: Wait… almost 3000 modules (LaTeX packages/*.sty) to install…
  • 163.
    Scientific Linux InstallationGuide 163/216 To install TeXMaker on SL 7.1 we will need to recompile TeXMaker code source. Then before we install QT4 compiler!: yum install pkg-config qt-devel qt-webkit-devel poppler-qt4-devel gcc-c++ make rpmdevtools zlib1g-dev
  • 164.
    Scientific Linux InstallationGuide 164/216 And we download TeXMaker code source: Once the download done we extract the package:
  • 165.
    Scientific Linux InstallationGuide 165/216 And by security we install the following packages: Now we compile the sources: After a few minutes you can finally write:
  • 166.
  • 167.
    Scientific Linux InstallationGuide 167/216 Now to be able to install and update packages write each time the two following lines:
  • 168.
    Scientific Linux InstallationGuide 168/216 7.2.1 TeXLive To install a basic package for LaTeX type the following: and to install a specific package:
  • 169.
    Scientific Linux InstallationGuide 169/216 7.2.2 LaTeXDraw To install LaTeXDraw first download:
  • 170.
    Scientific Linux InstallationGuide 170/216 Unzip:
  • 171.
    Scientific Linux InstallationGuide 171/216 In the shell go into the folder:
  • 172.
    Scientific Linux InstallationGuide 172/216 And a wizard appears on the screen:
  • 173.
    Scientific Linux InstallationGuide 173/216 Once finished:
  • 174.
    Scientific Linux InstallationGuide 174/216 Finally:
  • 175.
    Scientific Linux InstallationGuide 175/216 7.2.3 Tex2Html 7.3 Octave Octave is a Maple/Matlab like scientific software. To install it:
  • 176.
    Scientific Linux InstallationGuide 176/216 You get: Finally:
  • 177.
    Scientific Linux InstallationGuide 177/216 7.4 Scilab To install Scilab, the official way is first to download the package:
  • 178.
    Scientific Linux InstallationGuide 178/216 after to extract:
  • 179.
    Scientific Linux InstallationGuide 179/216 After in the shell we write:
  • 180.
    Scientific Linux InstallationGuide 180/216 And Scilab opens:
  • 181.
    Scientific Linux InstallationGuide 181/216 7.5 FreeCAD
  • 182.
  • 183.
    Scientific Linux InstallationGuide 183/216 7.6 Salome To install SALOME we go first on their webpage to select the option highlighted below:
  • 184.
    Scientific Linux InstallationGuide 184/216 Once the download finish we extract the files: Then we enter the corresponding folder: Afterward we go in the shell, browse in the corresponding folder and launch the corresponding bash file:
  • 185.
    Scientific Linux InstallationGuide 185/216 Then we get: And after by creating a new file and inserting objects you can create your project:
  • 186.
  • 187.
    Scientific Linux InstallationGuide 187/216 7.7 Maxima
  • 188.
    Scientific Linux InstallationGuide 188/216 7.8 KiCAD A Cross Platform and Open Source Electronics Design Automation Suite:
  • 189.
  • 190.
    Scientific Linux InstallationGuide 190/216 8 Office 8.1 Qalculate A "small" calculator is always useful. Let us see how to install one that is considered as a reference in the Linux World:
  • 191.
    Scientific Linux InstallationGuide 191/216 8.2 OpenProj We all know that project management has become increasingly normative these last decades. Having a project management software is a minimum nowadays. So let's run with OpenProj. First we download:
  • 192.
    Scientific Linux InstallationGuide 192/216 And we need to install the downloaded file: After OpenProj will be in the menu:
  • 193.
    Scientific Linux InstallationGuide 193/216 But you will not be able to start it:
  • 194.
    Scientific Linux InstallationGuide 194/216 Therefore you need first to install JRE: If the Java Platform does not appear it means (most of time) that its already installed. After we edit the following file:
  • 195.
    Scientific Linux InstallationGuide 195/216 And we change this part: Now we can open… OpenProj:
  • 196.
    Scientific Linux InstallationGuide 196/216 8.3 DropBox First: And finally:
  • 197.
  • 198.
    Scientific Linux InstallationGuide 198/216 8.4 Skype Until today it is still not easy to install Skype on SL x64. Here are the different steps: We start with: And after: yum install alsa-lib.i686 fontconfig.i686 freetype.i686 glib2.i686 libSM.i686 libXScrnSaver.i686 libXi.i686 libXrandr.i686 libXrender.i686 libXv.i686 libstdc++.i686 pulseaudio-libs.i686 qt.i686 qt-x11.i686 zlib.i686 qtwebkit.i686 We install some additional modules: Now we download Skype:
  • 199.
    Scientific Linux InstallationGuide 199/216 Now we unpack: Now we create launcher: We create now a file with a special content:
  • 200.
    Scientific Linux InstallationGuide 200/216 Finally: And Skype starts:
  • 201.
    Scientific Linux InstallationGuide 201/216 8.5 Zim You like OneNote/EverNote and don't want use the web version? Here is the way to do it: Once installed you get:
  • 202.
    Scientific Linux InstallationGuide 202/216 Finally:
  • 203.
    Scientific Linux InstallationGuide 203/216 8.6 VYM (View Your Mind/Mind Mapping) To have in an easy way a Mind Mapping tool, type: Then we get:
  • 204.
    Scientific Linux InstallationGuide 204/216 Ce qui donne: 8.7 Vokoscreen (screen recorder) To have as screen recorder we type first: After what we get:
  • 205.
    Scientific Linux InstallationGuide 205/216 This gives:
  • 206.
    Scientific Linux InstallationGuide 206/216 8.8 Dia
  • 207.
  • 208.
    Scientific Linux InstallationGuide 208/216 9 Others After from the Software installer wizard you can install easily also:  VLC media player  Audacity
  • 209.
    Scientific Linux InstallationGuide 209/216 10 ToDo Write procedure for DraftSight, Google Earth, XMinder, Aptana 10.1 XMinder
  • 210.
    Scientific Linux InstallationGuide 210/216 10.2 DraftSight
  • 211.
    Scientific Linux InstallationGuide 211/216 XMinder:
  • 212.
    Scientific Linux InstallationGuide 212/216 Google Earth:
  • 213.
    Scientific Linux InstallationGuide 213/216 Answer Y to all questions. Reboot and install:
  • 214.
    Scientific Linux InstallationGuide 214/216 Answer Y to all questions. After:
  • 215.
  • 216.